OpenCart’s multi-store feature allows you to run multiple storefronts from a single installation and manage everything through one admin panel. Instead of setting up several separate OpenCart stores, you can share the same core files and database while customizing each storefront with its own domain, branding, products, languages, and currencies.
The setup process may sound technical at first, but it becomes much easier once you understand how OpenCart multi-store works behind the scenes. In the following sections, we will guide you through the complete setup process:
1. Configure your server & domain
Before you create a multi-store setup in OpenCart, your new domain or subdomain must point to the same OpenCart installation as your default store. This is one of the most important parts of the setup because all stores in an OpenCart multi-store environment share the same core files and admin panel.
Step 1: Log in to the hosting control panel for your current OpenCart store. From there, create a new addon domain or subdomain for the additional storefront.
For example, if your main store is installed on public_html/opencart, and you want to create a second store called: opencart2.yourdomain.com. You should create the new subdomain and connect it to the exact same installation directory.
Step 2: While creating the addon domain or subdomain, you should pay close attention to the Document Root setting. This path must point to the same folder where your existing OpenCart store is installed.
For example:
public_html/opencart
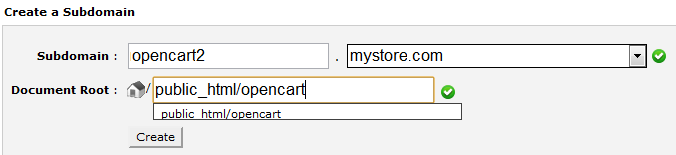
This setup allows multiple storefronts to share the same OpenCart system while displaying different products, themes, or configurations.
Step 3: Once the domain configuration is completed, you can repeat the same process for additional stores if needed.
2. Create a new store
The next step is configuring the new storefront inside the OpenCart admin dashboard. This is where OpenCart recognizes the new domain as a separate store within your multi-store system.
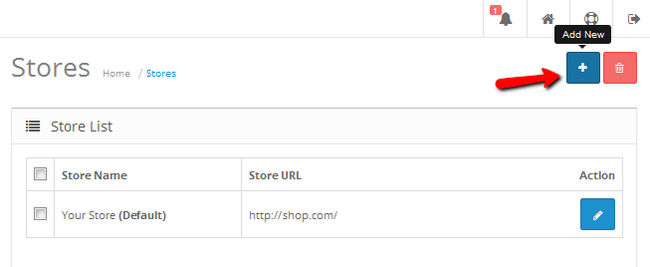
Step 1: Log in to your OpenCart Administration panel and navigate to System > Settings

Step 2: On the Settings page, click the Add New (or +) button in the top-right corner to create another storefront.
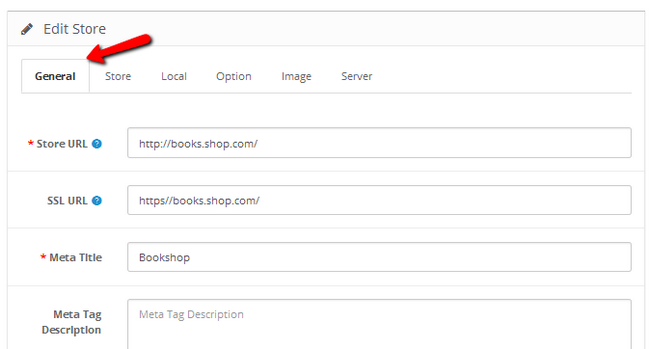
Step 3: Inside the configuration page, you can now fill in the settings for your new store:
- General: Add the Store URL and SSL URL for your new storefront.
- Store: Configure the store name and business contact details.
- Local: Choose the default language, country, and currency settings.
- Image: Set up a separate logo and favicon for the storefront.
Step 4: Once everything looks correct, click Save to create the new store.
3. Assign products & categories
After creating your multi-store setup in OpenCart, you need to decide which products and categories should appear on each storefront. This step helps you manage multiple stores from one admin panel while still displaying different product collections for different stores, regions, or customer groups.
- For categories: Go to Catalog > Categories, edit a category, open the Data tab, and select the storefronts where you want the category to appear.
- For products: Go to Catalog > Products, edit a product, navigate to the Links tab, and choose the storefronts where the product should be available.
In case you have any other questions, please reach out to us via:
- Ticket system (highly recommended)
- Email us at [email protected]
