GoDaddy to WordPress Migration
The GoDaddy to WordPress migration process involves transferring crucial data, such as products, categories, customers, and orders, to your new WordPress website. If you’re a non-technical person unsure where to get data or how to test it after migration but still want to convert GoDaddy website to WordPress, our all-in-one migration service is perfect for you.
The GoDaddy to WordPress migration process is guaranteed to be 100% safe, secure, and accurate. One key advantage is that your existing GoDaddy site remains fully functional during the migration, so you can continue accepting orders and gathering customer information without interruptions, ensuring smooth business operations. Let’s explore now!
For more GoDaddy to WordPress Migration information, please click Here.
GoDaddy to WordPress Migration: Key takeaways
- Explore the benefits of WordPress and why transitioning your GoDaddy store to WordPress could be the right move.
- Dive into LitExtension’s seamless GoDaddy-to-WordPress migration process.
- For tech-savvy individuals, uncover a step-by-step guide to manually migrating your store from GoDaddy to WordPress.
- Learn what sets LitExtension’s GoDaddy-to-WordPress migration service apart.
- Find answers to common questions about the migration process and make an informed decision.
Why should you move GoDaddy to WordPress?
WordPress has greater customization than GoDaddy
WordPress opens up a world of unlimited customization through its rich ecosystem of 59,000+ plugins and 11,000+ themes. Unlike GoDaddy’s limited 100+ basic templates and integrations, WordPress empowers you to fine-tune every aspect of your website – from appearance and layout to specialized features. You can craft a distinctive website that truly reflects your brand identity and business requirements. With access to thousands of themes and plugins, you’re not confined to pre-made templates but can build a unique digital presence that stands out in your industry. While GoDaddy restricts you to basic customization options, WordPress lets you modify everything from color schemes to custom CSS and PHP code.
WordPress has more SEO features than GoDaddy
WordPress comes equipped with powerful built-in SEO tools and can be further enhanced through specialized plugins. You can easily customize meta titles, descriptions, create SEO-friendly URLs, optimize images, and manage many other SEO elements – areas where GoDaddy falls short. For instance, WordPress allows you to implement structured data markup, create custom XML sitemaps, and optimize page loading speed – crucial factors that can significantly improve your search engine rankings and visibility. With WordPress’s average page load time of 1.7-2.4 seconds compared to GoDaddy’s 2.5-3.5 seconds, your site will perform better in search rankings.
WordPress has larger community and support than GoDaddy
One of WordPress’s standout strengths is its massive community of 1.5 million+ active developers and users across 50,000+ WordPress-specific forums. When challenges arise, you can easily tap into this vast knowledge base through forums, tutorials, and expert advice, with an average response time of 1-24 hours. In contrast, GoDaddy’s support is limited to customer service with response times of 24-48 hours and a small community forum of fewer than 10,000 users. The WordPress community is known for its collaborative spirit, with developers constantly creating new solutions and sharing insights across 500+ annual WordCamps in 65 countries and 2,000+ worldwide meetup groups. This means you’re never alone in your website journey – there’s always someone who has faced similar challenges and can offer guidance.
WordPress has more advanced features than GoDaddy
WordPress’s plugin architecture makes it incredibly versatile. Whether you need to add an e-commerce platform, membership system, learning management system, or complex booking features, there’s likely a plugin that can help among the 59,000+ available options. The platform’s flexibility allows you to start small and progressively add sophisticated functionality as your business grows, without needing to switch platforms or rebuild your site from scratch. Unlike GoDaddy’s fixed server configurations, WordPress offers unlimited bandwidth potential and storage capabilities.
WordPress is more scalable than GoDaddy
As your business expands, WordPress grows with you. The platform can handle substantial traffic increases and complex functionality requirements that might overwhelm GoDaddy’s basic plans. Whether you’re scaling from hundreds to millions of visitors, or from a simple blog to a complex e-commerce site, WordPress provides the infrastructure and flexibility to support your growth. This is evidenced by WordPress powering 43.2% of all websites on the internet, compared to GoDaddy’s less than 1% market share.
Learning curve
Though WordPress might initially appear more complex than GoDaddy’s user-friendly interface, modern WordPress page builders have significantly simplified the website creation process. With a bit of time invested in learning the basics, you’ll gain access to far more powerful tools and capabilities that can take your website to the next level. The investment in learning WordPress is justified by its comprehensive features, including 100% customizable SEO elements, advanced plugin options, full control over robots.txt, custom XML sitemaps, and robust schema markup support – features that GoDaddy’s basic platform simply cannot match.
What Data Can Be Migrated from GoDaddy to WordPress
-
Products
- SKU
- Full Description
- Status.
- Price
- Special Price
- Quantity
- Manage Stock.
- Meta Title, Meta Description.
- Weight, Width, Height, Length.
- Variants
- Thumbnail Image
- Additional Images.
Product Categories
- Description
- Meta Title, Meta Description.
-
- First Name, Last Name, Email.
- Billing Address
-
- Order ID.
- Order Date.
- Order Status.
- Order Items (Name, SKU, Option), Product Price, Quantity.
- Sub Price, Discount Price, Tax Price, Shipping Price, Total Price.
- Customer Name, Email.
- Billing Address (First Name, Last Name, Company, Address 1, Address 2, Country, State, City, Zip Code, Telephone).
- Shipping Address (First Name , Last Name, Company, Address 1, Address 2, Country, State, City, Zip Code, Telephone)
(*) Please note that if you want to import store data other than CMS/Blogs, plugins may need to be installed before migration.
Additional Options
Clear Sample Data On WordPress Before Migration
You can delete the sample data on WordPress in accordance with selected entities for migration… More Details →
Preserve Order IDs on WordPress Store
This option helps keep your order ID the same during your store migration… More Details →
Create 301 Redirects on WordPress Store
Automatically redirect your old store’s URLs to the new ones during the migration… More Details →
Migrate Images from Products, Categories, Blog Descriptions
This option helps you to migrate images in descriptions of products, categories, and blog posts… More Details →
Strip HTML Tags from Category and Product Names
Strip HTML tags from category and product names automatically when migrating your store … More Details →
How to Migrate GoDaddy to WordPress with LitExtension?
With our All-in-One migration package, you can transfer most of the data, such as products, customers, etc., from GoDaddy to WordPress instead of just transferring some contents through manual migration.
Here is how our experts migrate GoDaddy to WordPress:
#Step 1: Schedule a meeting with LitExtension
#Step 2: Receive a tailored technical consultant
#Step 4: Run a free demo migration
#Step 5: Perform full GoDaddy to WordPress migration
Step 1: You schedule a meeting with LitExtension
To begin with, fill out the form to schedule a free one-on-one meeting with us over Google Meet. For more convenience, please schedule your meeting at least two hours in advance and email us your issues beforehand.
Step 2: You receive a tailored technical consultant
During the virtual meeting, our migration experts will first listen to your specific expectations and requests. Then, we will provide you with technical consultation regarding the size and complexity of your GoDaddy website’s database.
Once we have a clear understanding of your migration needs, our specialist will present a proposal outlining the necessary steps, cost estimates, and other relevant details.
Step 3: LitExtension configures migration
Then, based on our mutual agreement from the meeting, our migration experts will proceed with configuring your migration from GoDaddy to WordPress.
If you have any further customizations or special requirements, don’t hesitate to let us know in the Customization Requirements box, and our sales specialist will contact you for a price estimate.
Step 4: Our migration experts run a free demo migration
In the next stage, LitExtension experts will perform a free demo migration with a small set of data, including product, customer, and order information. This will provide you with a clearer grasp of the migration process and its effectiveness.
*Please note that if your total entities are under 2000, the demo migration will be skipped unless you request us to perform one.
Once the demo migration is finished, we will inform you so that you can assess its results. If you have any comments regarding the demo migration results, feel free to discuss them with our migration specialists. Otherwise, we will proceed to the full migration.
Step 5: We perform full GoDaddy to WordPress migration
Then, we will perform the complete WordPress migration process. At this stage, the migration will run smoothly and securely on our servers without requiring your PC to stay on. Your existing GoDaddy website will continue to operate normally during the migration, ensuring no disruption to your business.
While the migration is in progress, our Smart Controller tool will continuously monitor it. This tool will alert us to any issues, allowing us to fix them as soon as possible.
Step 6: We check full GoDaddy to WordPress migration results
After the migration is complete, your Personal Assistant (PA) will inspect both the front and back ends of your WordPress website to confirm everything has been transferred without any error.
Once finished, our PA will inform you of the migration results. Please check it thoroughly, and feel free to ask your PA if you have any questions or concerns.
Step 7: You receive post-migration support
With our All-In-One package, you will get free post-migration services. This includes:
- Recent Data Migration: We will transfer all your new orders and customers to your WordPress website.
- Re-Migration: If the first migration does not meet your expectations, you can request our specialist to do a re-migration.
- Smart Update: We will simultaneously import your latest and previously changed data into your WordPress site.
The most awesome part is that these post-migration services are free as long as the number of migration entities is less than 10% of the first migration. Additionally, you can access these services at your fingertips for 6 months after the Full Migration.
If the amount of data is more than 10%, you will have to pay an additional fee. The cost for these services varies depending on the entities you have.
-
Table of Contents
Want to switch from WooCommerce to Shopify effortlessly? Trust LitExtension to deliver a smooth, reliable migration experience. We’ll transfer all your store data while ensuring it remains fully functional and operational.
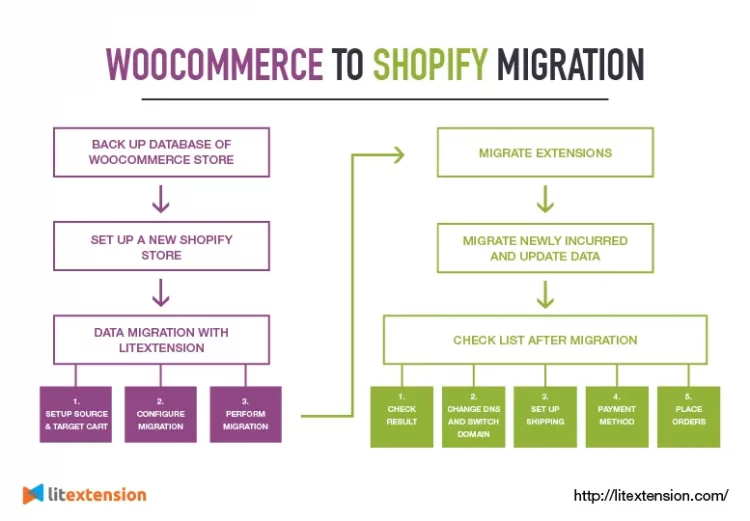
The step-by-step WooCommerce to Shopify migration process includes the following:
- Stage 1: Prepare for WooCommerce to Shopify Migration
- Stage 2: Perform full migration from WooCommerce to Shopify
- Stage 3: Follow a go-live checklist after data migration
Migrate from WooCommerce to Shopify: Preparation
We’ve created a comprehensive flow chart outlining each step of the migration process to make your transition smooth and efficient.
1. Backup database of WooCommerce store
When transferring your data with LitExtension, you don’t have to worry about data distortions because we will not alter anything on your WordPress WooCommerce Source Store. Thus, it is unnecessary to back up your WooCommerce source store data before migration.
In case you still want to backup your data, here is how to do it:
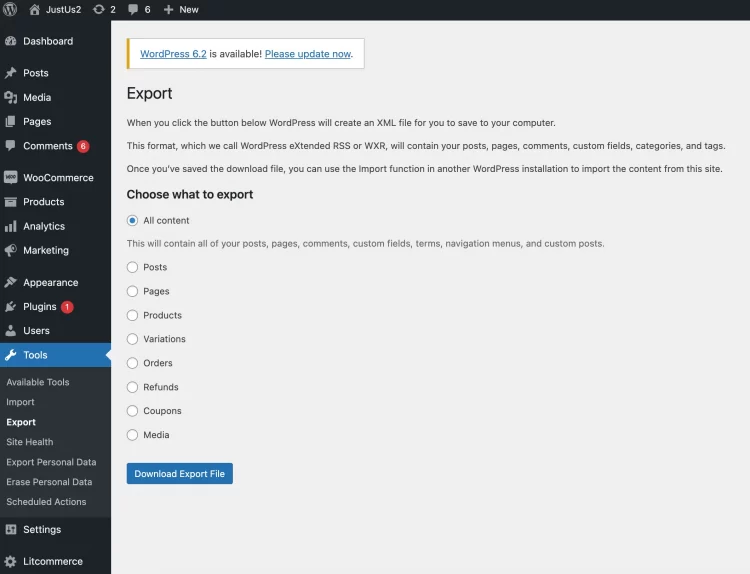
- Go to your WooCommerce store back-end, and navigate to Tools > Export.
- From there, you can export your site content, such as your posts, pages, comments, custom fields, etc. to XML files. If you, on the other hand, don’t want to export all of your content, you can just choose the specific fields you want to export.
- Hit “Download Export File” to get XML files.
This default function will compress your data to XML files. If you want to do more, for example, exporting products with images, some WooCommerce plugins (free and paid versions) will help you deal with that.
2. Set up a new Shopify store
After successfully backing up your files, it’s time to create a new Shopify home and begin your migration!
- The first step is to sign up a Shopify account at this address.
- After that, Shopify may ask you for information about your new store, or you can skip all the questions and start your journey on Shopify.
- Now, you’re on the Shopify dashboard and can get down to migrating from WooCommerce to Shopify.
The migration process involves only 3 simple steps, and no technical skill is required.
To better understand our service, you can check out our WooCommerce migration to Shopify tutorial video.
Now, let me walk you through a step-by-step guide to migrating from WooCommerce to Shopify with LitExtension.
Step 1: Register an LitExtension account
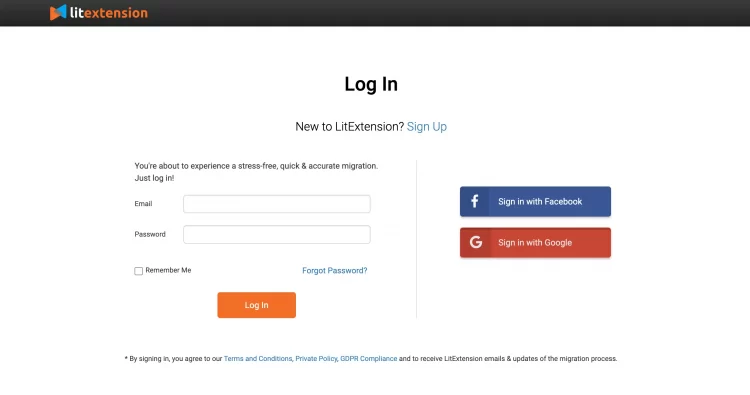
You can register an account on the LitExtension if you haven’t had one. You may quickly log in using your Facebook or Google account.
Step 2: Set up WooCommerce as Source Cart and Shopify as Target Cart
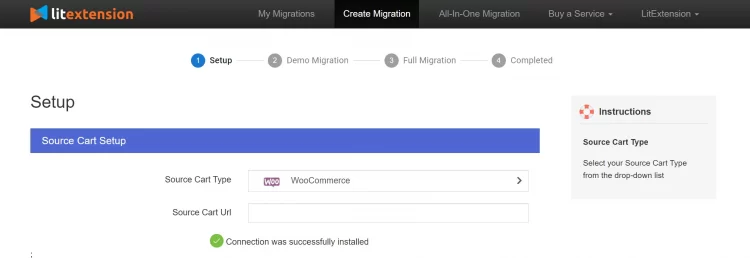
Once logged in to the LitExtension site, click “Create new migration” to move from WooCommerce to Shopify. Then, you can enter your Source’s and Target Cart’s information.
First, choose WooCommerce as your Source Cart from the drop-down menu. Then enter your store URL.
- Download & set up the “le_connector” file. This connector has only one function, which is to create a bridge between your WooCommerce database with LitExtension.
- Then, you can extract the LitExtension zip file and upload the Connector folder to the root folder of WooCommerce.
- Once finished, a notification will appear on your screen “Connection was successfully installed“.
Next, moving on to Target Cart setup.
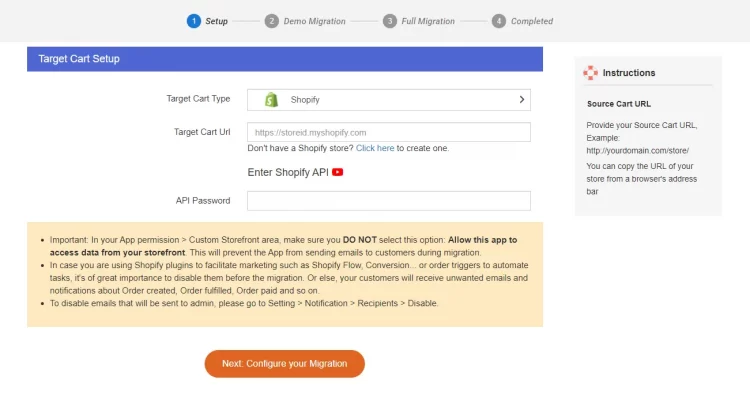
- After you have chosen Shopify as your Target Cart from the menu, enter your store URL and the API password into the blank space.
- Regarding Shopify API, LitExtension will migrate your data using API. If you’re using LitExtension on Shopify App Store, the Shopify API is automatically connected.
After finishing the cart setup, click “Next” to the following stage of the migration.
If you’re not getting the idea of how to get an API password from your Shopify store, please refer to the below video.
Step 3: Select entities to migrate from WooCommerce to Shopify
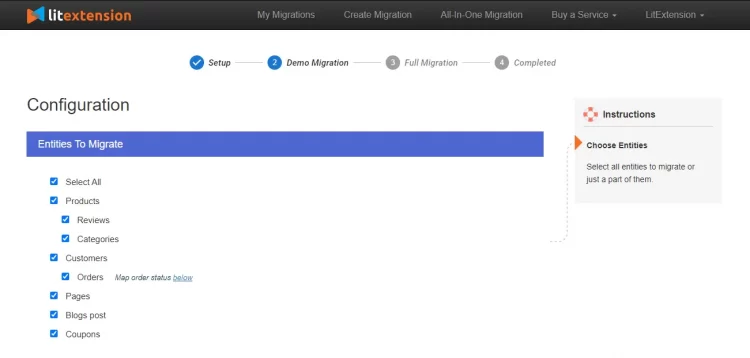
Now, you choose the entities to migrate WooCommerce to Shopify.
In this case, we support migrating products, customers, pages, blog posts, and coupons. You can choose to migrate only a few, for example, only import products from WooCommerce to Shopify or click “Select all” to migrate all of them.
To help you extend your WooCommerce to Shopify migration possibilities, we also offer some Additional Options, such as:
1. Clear current data on Target Store before Migration
If you choose this option, all data on your Target Store before the migration process (if any) will be deleted. Therefore, the data duplication risk when moving from WooCommerce to Shopify can be avoided.
2. Create the 301 redirects on your Target Store after migration
301 redirect is a procedure of pointing URLs from one site to another. In other words, when your customers click on your old WooCommerce website links, they will be redirected immediately to the corresponding page on your new Shopify store.
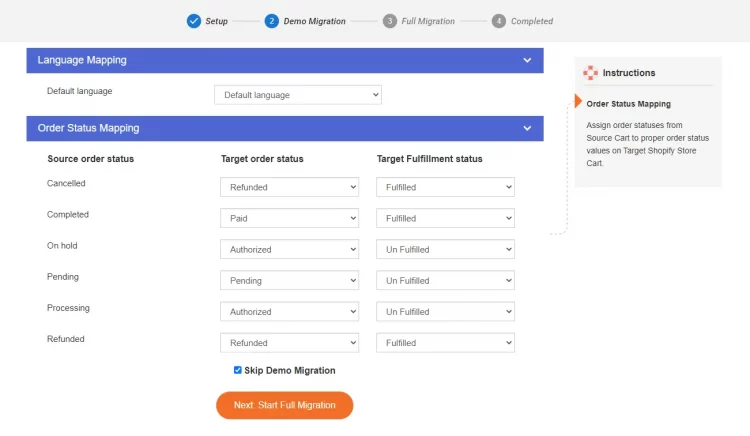
Don’t forget to map your order status and language so that your data can appear appropriately on your Shopify source store.
Step 4: Perform full migration from WooCommerce to Shopify
Now you are switching from WooCommerce to Shopify. We highly recommend you run the demo migration first to see how LitExtension will carry out the migration process (learn more about LitExtension demo migration).
Or, you can skip the Demo migration and run the full migration!
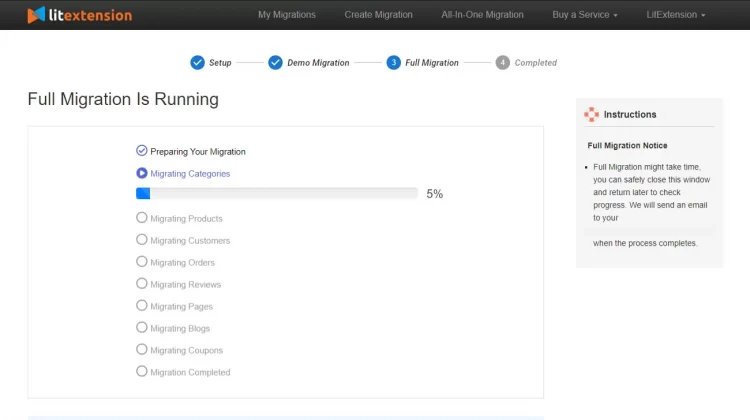
Once the migration begins, it will proceed smoothly on the server. As a result, you don’t have to keep your PC running while the data is transferred. It is entirely safe to turn it off!
You will be notified through email when the WooCommerce to Shopify migration process is complete.
You may have some extensions installed on your WooCommerce site to support your business, and you don’t want to lose these extended functionalities. To do this, look for and install Shopify apps with purposes that are related to those of your WooCommerce store (you can refer to our list of best Shopify apps).
Due to the peculiarity of Shopify apps and WooCommerce plugins, LitExtension will examine whether we can assist you in migrating your data to the new apps you choose. If feasible, we will facilitate the migration of data from your WooCommerce plugins to the corresponding apps in Shopify. It’s important to note that this additional service may incur extra costs.
During the whole migration process, LitExtension still keeps your old WooCommerce store running normally. Accordingly, you will still receive new orders and customers as usual while decorating your new Shopify store.
That is how our further migration services come in handy!
Recent Data Migration allows you to import all newly appearing entities to Shopify.
Smart Update updates changes you have made to data in the old store, along with all the newly appearing entities.
Re-migration service enables you to migrate your data all over again.
All these three options are FREE if you have performed full migration with LitExtension within 3 months before and the total number of additional entities is less than 10% of the total entities in the first migration.
WooCommerce to Shopify Migration: Post Migration
After the migration, you might want to take some extra steps to set up your new Shopify store. Here is a list of some post-migration activities that we recommend.
- Check migration result
- Change DNS and switch domain
- Set up your shipping
- Choose the payment method
- Try placing some orders
How LitExtension Troubleshoot WooCommerce to Shopify Migration
Potential issues may arise during the migration process, and here are LitExtension solutions to these.
1. Data mapping and compatibility
- Problem: Data from WooCommerce may not have a direct equivalent in Shopify
- Solution: You will have a consultation with LitExtension support team if you encounter any compatibility issues before migration to minimize all the upcoming issues.
2. Custom functionality and plugins
- Problem: WooCommerce may have custom functionality or plugins that don’t have direct equivalents in Shopify.
- Solution: We can assist in identifying the custom functionality or plugins in WooCommerce and explore Shopify’s app store for alternatives.
3. Design and theme migration
- Problem: WooCommerce themes may not be compatible or transferrable to Shopify.
- Solution: LitExtension experts can select and recommend a new Shopify theme for you. If you want to customize a new theme that fits the look and feel of your old store, we can assist you with our Shopify Development Services.
4. Product variants and attributes
- Problem: WooCommerce and Shopify may have different ways of managing product variants and attributes, leading to potential discrepancies.
- Solution: With LitExtension Additional Option, you may “Migrate Source Store categories into Shopify Smart Collections”. You can find out more here.
5. SEO and URL redirection
- Problem: Changing platforms may result in different URL structures, potentially impacting SEO and causing broken links.
- Solution: LitExtension Additional Option can support you with proper URL redirection from old WooCommerce URLs to corresponding Shopify URLs. Please refer to this document for more insights.
6. Downtime and impact on live store
- Problem: The migration process may require temporary downtime, impacting your live store’s availability.
- Solution: LitExtension ensures that your store will run smoothly during the migration and receive new orders. There will be downtime when transferring the domain, but it will not take long.
With LitExtension, you can minimize and simplify the migration process!
Migration Pricing
Migration Pricing
Total Entities:
- Products;
- Orders;
- Customers;
- Blog Posts
Automated Migration (Self-service)
OR
All-in-One Migration Service
Choose Your Migration Plan
Compare features and support levels to find the migration service that fits your timeline, budget, and needs.
Automated Migration$0 |
All-in-One Migration Service$0 |
|
|---|---|---|
| FREE Demo Migration | Unlimited FREE Demo Migration | Unlimited FREE Demo Migration |
| Migration Process | 3-step migration tool with easy-to-follow wizard guide | Expert-managed migration with Personal Assistant & QA testing |
| Additional Options |
FREE up to 6 Additional Options |
FREE all Additional Options |
| Migration Testing | Done by yourself | Done by LitExtension experts |
| Technical Support | 60-day technical support after Full Migration | 30-day technical support after migration is completed |
| Post-migration Support | ||
| Receive Support Request | 24/7 | 24/7 |
| Support Channels | Ticket | Ticket, Email |
| Money-back guarantee | 30-day money-back guarantee | 30-day money-back guarantee |
| Response Time Commitment | 24 hours | 24 hours |
Choose Your Migration Plan
All-in-One Migration Service$0 |
|
|---|---|
| FREE Demo Migration | Unlimited FREE Demo Migration |
| Migration Process | Expert-managed migration with Personal Assistant & QA testing |
| Additional Options | FREE all Additional Options |
| Migration Testing |
Done by LitExtension experts |
| Technical Support | 30-day technical support after migration is completed |
| Post-migration Support | |
| Support Response Time | 24/7 |
| Support Channels | Ticket, Email |
| Money-back guarantee | 30-day money-back guarantee |
| Response Time Commitment | 24 hours |
Popular Questions About GoDaddy to WordPress Migration
Not seeing your question listed here? Contact Us for the quickest answer.
How do I point my GoDaddy domain to my WordPress site?
You can easily do that by replacing the current nameserver with the nameserver of your new hosting service.
How Much is GoDaddy to WordPress Migration?
Pricing will change according to the number of entities and the type of source cart. Click here to estimate the cost of GoDaddy to WordPress migration.
Why should I use WooCommerce when migrating GoDaddy stores to WordPress?
Using WooCommerce, your WordPress site can function as a complete e-commerce store. Although WordPress supports sales, it lacks the features and customization options that WooCommerce offers. To move your store from GoDaddy to WordPress, start by downloading and installing the WooCommerce plugin. Other plugins like WP eStore or WP eCommerce can also be used for migrating from GoDaddy to WordPress.
Can I migrate categories and subcategories of products during GoDaddy to WordPress migration?
Yes, during the GoDaddy to WordPress Migration, you can transfer categories and their subcategories with ease.
How long does GoDaddy to WordPress migration take?
The duration of GoDaddy to WordPress migration is largely determined by the amount of content you plan to move. More entities will extend the migration.
How can I back up my GoDaddy website contents?
There are 3 ways you can back up your GoDaddy website data. Firstly, you can copy and paste content and images into files if you only have less data. Secondly, you can save your pages as files on your PC. Finally, you can use a free tool on Chrome called HTTrack to automatically extract your website.
Will my customer passwords be migrated from GoDaddy to WordPress?
Switching from GoDaddy to WordPress means your old passwords won’t work anymore due to different encoding rules. To use your old password on WordPress, you should use the Customer Password Plugin.
Can I use my GoDaddy domain for my new WordPress website?
Yes, you can use the old GoDaddy domain for your new WordPress site without having to buy a new one.
Can I continue to take orders during the GoDaddy to WordPress Migration?
During the GoDaddy to WordPress Migration with LitExtension, you can still take orders on your existing store. It will function as usual, allowing you to prepare your WooCommerce store for launch.
Will my website’s SEO be affected by migrating from GoDaddy to WordPress?
If you transfer GoDaddy to WordPress using LitExtension, your website’s SEO won’t be compromised.
Can create URLs Redirects when migrating from GoDaddy to WordPress?
When migrating GoDaddy to WordPress, you can set up URL redirects so that your old store URLs remain functional post-migration.
What are other popular WordPress Migration at LitExtension?
Besides GoDaddy to WordPress Migration, here are other popular WordPress Migration Services at LitExtension:
Leave The Work For The Experts
If you’re non-tech, let our GoDaddy to WordPress migration experts handle your migration from A to Z.
Save your time for more important tasks.

How Your Data Is Secured During Migration?

Server Security

Data Security

Data Access Restriction

GDPR Compliance

NDA

Payment Security
Why choose GoDaddy to WordPress Migration Services

Zero Effort Required
From start to finish, our expert team will do all the work, providing a worry-free, successful transition from GoDaddy to WordPress Migration.

Inclusive Migration Options
With all migration options included – like 301 Redirects and Product ID Preservation – you can enhance your WordPress migration experience at no extra costs.

Personalized Migration Experience
Each step of your GoDaddy to WordPress migration is tailored to meet your business requirements for a fully customized process.

Enhanced Data Quality Assurance
Our two-phase testing approach, with manual and complimentary autotesting, ensures the highest standard of data accuracy for your migration.

Dedicated Personal Assistant
Your dedicated assistant will guide you from start to finish, answering all questions and resolving issues along the way.

Comprehensive Post-Migration Support
For 30 days after migration completion, our team provides unlimited Re-migrations, Recent Migrations, and Smart Updates, ensuring ongoing flexibility and precision.
Your Success, Our Motivation
Who We Truly Are? Let Our Customer Define!
I am in the process of moving my existing website over to Shopify. As this is my 4th iteration of my website, I knew I didn’t want to do the migration part myself again! Using this service meant that I could concentrate on running my business for a couple of days while the migration was being done for me.
Lotus was phenomenal! She is detailed-oriented and works extremely fast! She helped with the migration from Wix to Shopify in no time. Thank you so much Lotus and everyone at LitExtension!
It was great service from those guys! Verry complex case with very old Woocommerce to new Woocommerce store!
I built our new Shopify site myself but with no developer experience. I really struggled migrating products, customers and order history. It was a bit overwhelming until I found Lit. They helped me set it up and did the contract. Emailed me at every stage and listened to my feedback. I found them on Thursday and by Monday the work was completed.
Took most of the work off our hands. The team were great and went out of their way to get the migration from J2store to Shopify completed. The time zone differences were slightly difficult but that didn’t stop the work from being completed.
Try Free Demo
All-in-One Migration
How to Perform GoDaddy to WordPress Migration Manually?
If you don’t want to hire an expert for any reason, you can still manually migrate GoDaddy to WordPress.
Step 1: Back up your GoDaddy website
1. Back up your content
Before starting to move GoDaddy website builder site to WordPress, you should back up all content on your website first. There are several methods for you to back up your GoDaddy site content.
Firstly, if you only have some pages of content and images, you can back up your content simply by copying the text into Word files and saving your images to your computer as well. To organize your files better, you should create separate files for each website page.
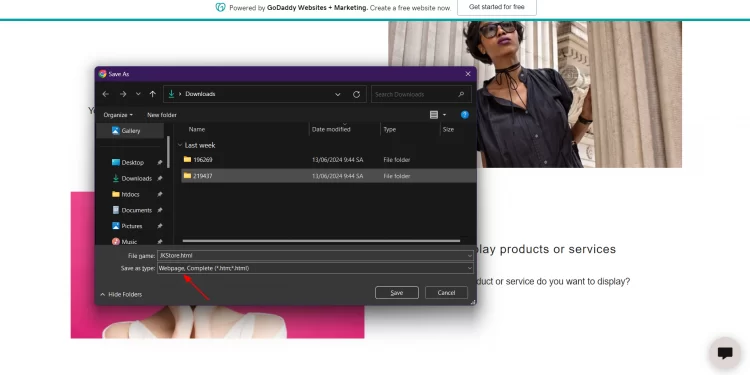
Secondly, you can quickly back up your content by visiting each page on your website and saving each one as a file. Press “CTRL+S” (or “Command+S” for Mac) to open the save dialog box. Next, choose “Webpage, Complete” in the Save as type field.
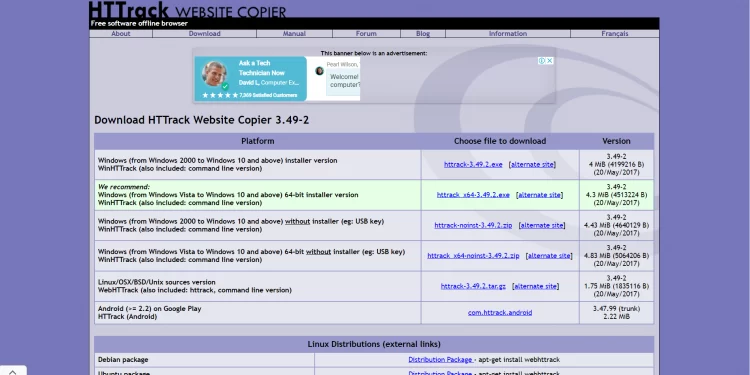
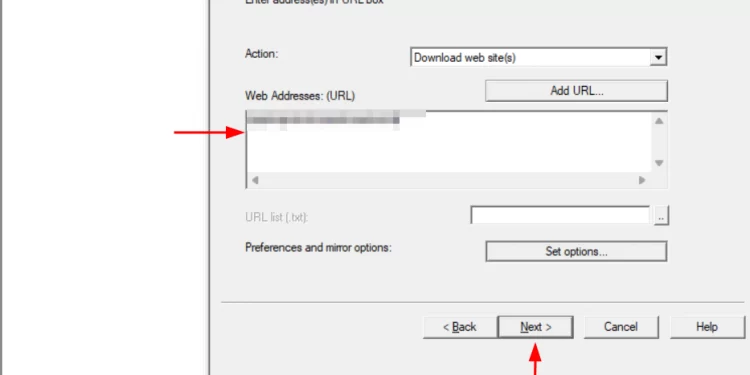
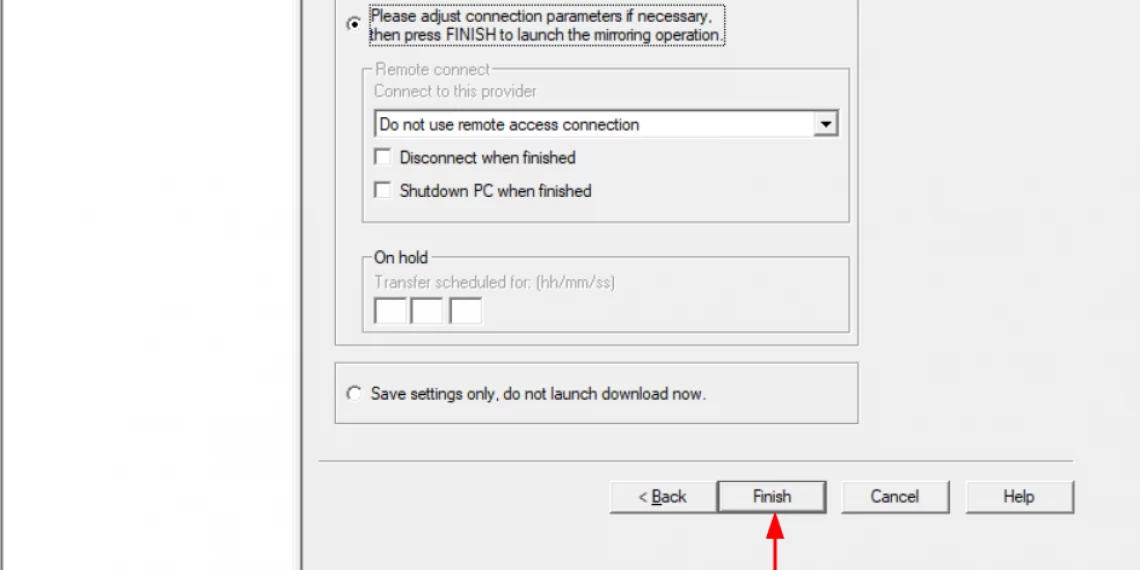
Another option is to use a free tool called HTTrack to save all pages of your GoDaddy website to your computer.
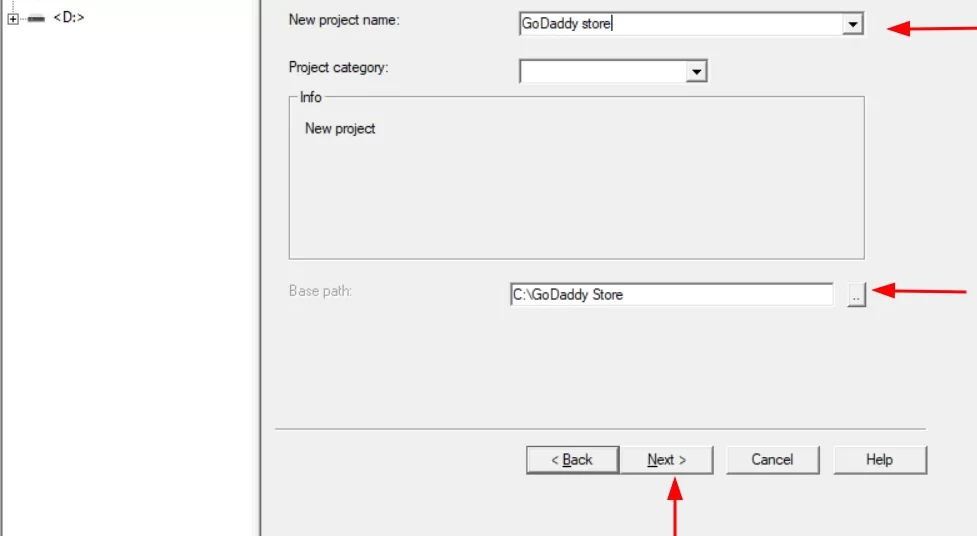
Once you have installed this tool, open it, fill in the required information, and click “Next.”
Next, fill in your website’s URL and click the button “Next.”
Although this tool is useful, there is one drawback that you should be aware of. Since the GoDaddy website and its themes store their database on different CDN servers, there might be some errors during the process of saving your images.
So, remember to double-check all your data after the saving progress is completed to ensure that there is no issue.
2. Back up your link structure
The next important step is backing up your link structure. If you don’t save your URLs, your customers will not be able to find your website with the old links, and this will badly affect your webpage. Backing up your old URLs will help you redirect your customers to your new WordPress site.
You will need to save all of the URLs on your website into a list in order to back up your link structure. If the number of your website URLs is few, you can simply copy and paste them into a file on your computer.
Or, you can use a free online tool on the Chrome store, such as Klipper, to extract all URLs of your website.
Once you have added it to your Chrome extension, open it on your website homepage and follow the instructions.
Step 2: Set up a new WordPress site
After backing up all data and URLs from your GoDaddy website, let’s create a WordPress website.
1. Install WordPress
You can go to WordPress.org to download and use WordPress for free. If you need more detailed instruction, please read here.
2. Choosing a Hosting service
Then, you have to choose a hosting service for your website since WordPress is a self-hosted website builder.
If you have already registered for hosting with GoDaddy’s hosting service, you can use it for your new WordPress website. (Remember to deactivate your GoDaddy website builder service before connecting your new WordPress store to GoDaddy’s hosting service.)
Step 3: Point your domain name to new WordPress hosting service
This step is for users who registered a domain name with GoDaddy and want to use it with a new WordPress hosting service. If you don’t register a domain name with GoDaddy, you can skip this step.
You can point your domain to a new hosting service simply by changing its nameservers to those of the hosting company you registered with before. If you need more detailed information, please follow the instructions here.
Step 4: Import all your GoDaddy website content into WordPress
Now, it’s time to import all content from your GoDaddy website into your new WordPress site.
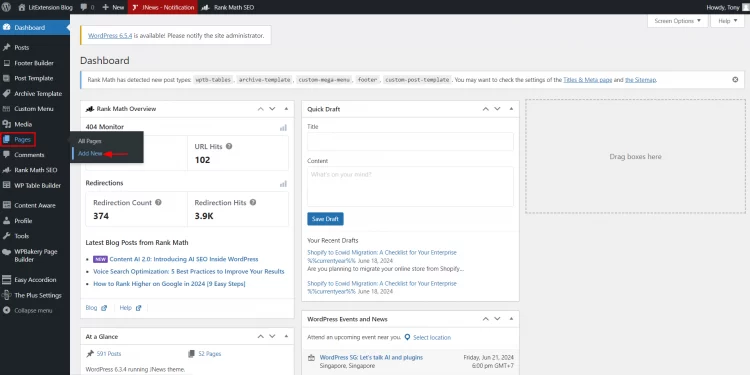
In the WordPress dashboard, move to the “Pages” section and choose “Add new” to import your pages to your new website.
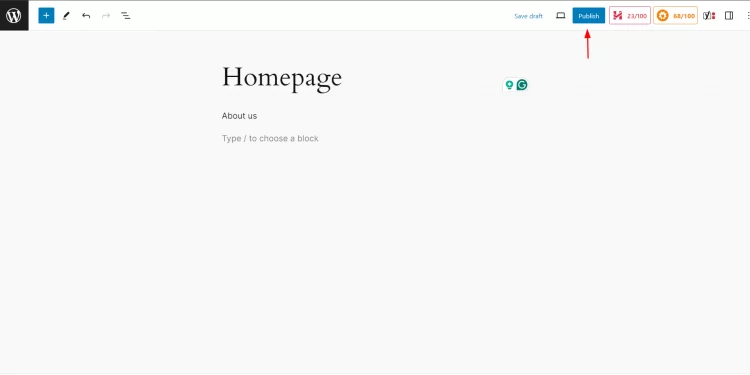
After uploading your content completely, double-check it and click the “Publish” button to make your page live on the website.
To import your blog posts, move to the “Posts” section and do the uploading pages.
Step 5: Setup redirects
Then, you can start setting up redirects. By doing so, search engines will guide your customers to your new website when they use the old URLs to search for your pages.
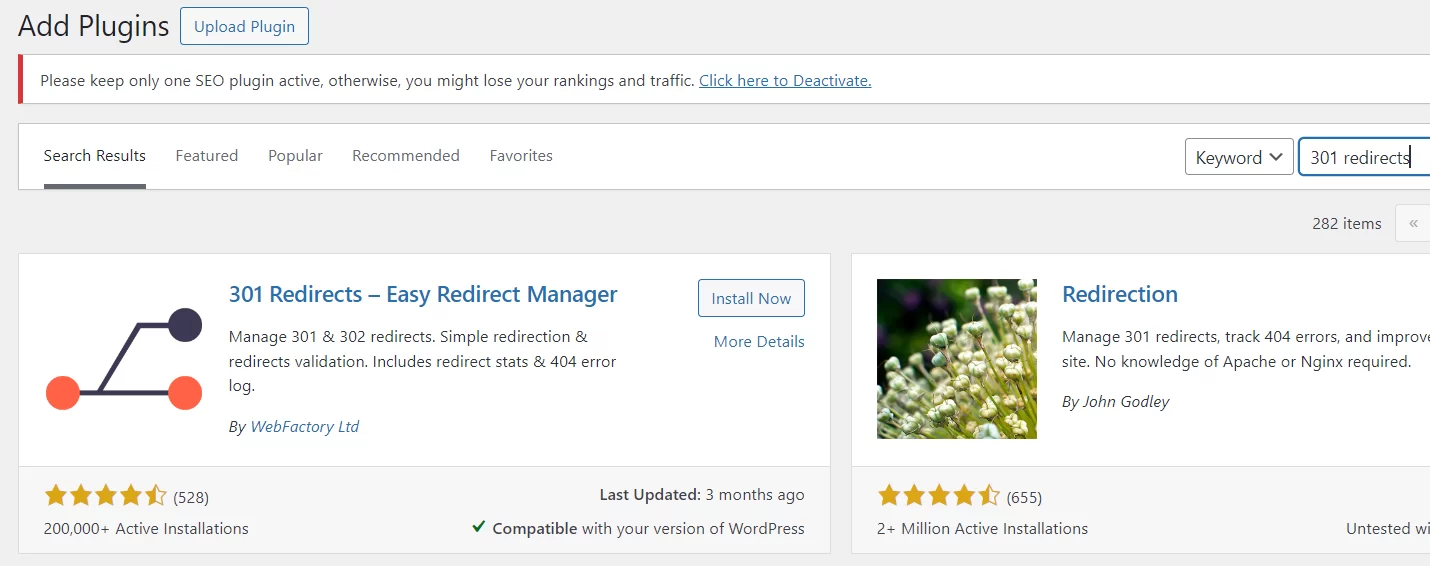
You can easily do this by installing redirect plugins to your WordPress website.
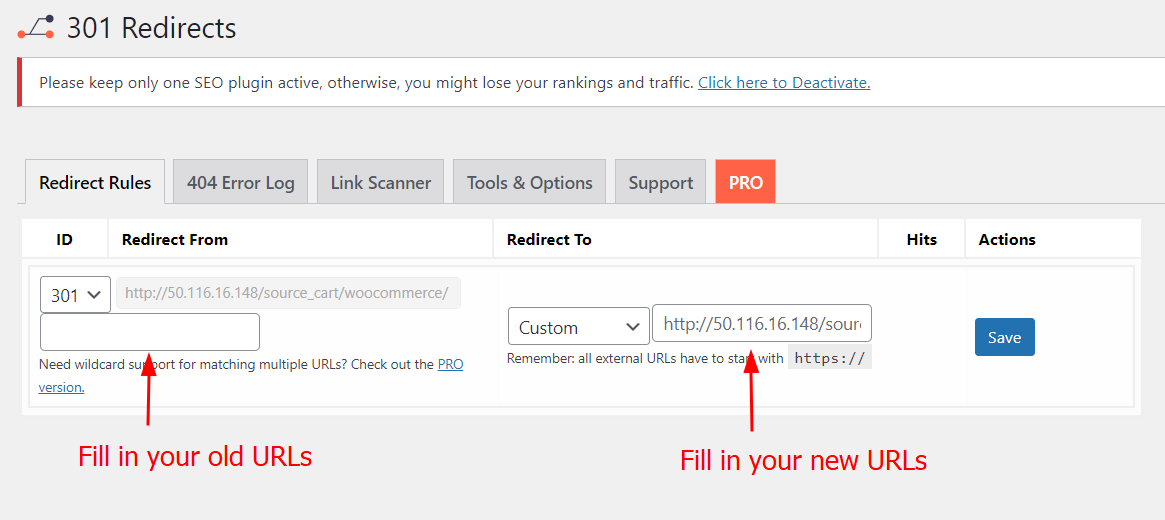
These plugins are easy to use. You just need to fill in your old URLs and the new URLs you want to redirect.
For example, we use 301 Redirects – Easy Redirect Manager by Webfactory LTD:
Click the button “Save” to save the redirect.
Step 6: Check the result, customize, and go live with your WordPress website
After moving GoDaddy to WordPress completely, you should thoroughly recheck all the content on your new website.
Once the initial setup is complete, you can personalize your WordPress site. You can choose a new theme from a vast array of themes that suit your brand’s aesthetic and functionality needs.
Additionally, you can enhance your site’s capabilities by installing various plugins, which can add features like SEO optimization, social media integration, e-commerce functionality, contact forms, and more.
After customizing your website to your satisfaction, you can make it live, allowing your customers to access and interact with your content seamlessly.


