How to Upgrade PrestaShop 1.7 to 8 [2024 Method]
PrestaShop Upgrade Services provided by LitExtension helps to transfer your important data including products, customers, orders,… from PrestaShop 1.7 to PrestaShop 8. Our experts guarantee a flawless PrestaShop Upgrade to the latest version with zero downtime, ensuring uninterrupted service for your valued customers.
Click HERE for more information!
Key Takeaways:
- PrestaShop 8 introduces significant enhancements including better performance, stronger security, PHP 8 compatibility, and a modernized admin interface—making it a more stable and scalable platform for your online store.
- LitExtension is the best solutions to upgrade PrestaShop 1.7 to 8.
- LitExtension offers the most efficient upgrade solution, ensuring a fast, 100% accurate data migration.
What’s New in The Latest Version of PrestaShop?
The introduction of PrestaShop 8, the first major update since PrestaShop 1.7.0 in 2016, marks a significant turning point for the platform.

PrestaShop version 8
Several internal components have been updated, tweaked, or eliminated as part of a large-scale cleaning of the codebase. Additionally, PrestaShop 8 is the first company-neutral edition of the project, which means no proprietary add-ons will be used during the update process.
1. Enhanced security page
There are three major improvements to PrestaShop’s security settings in the latest version:
-
- Password policy
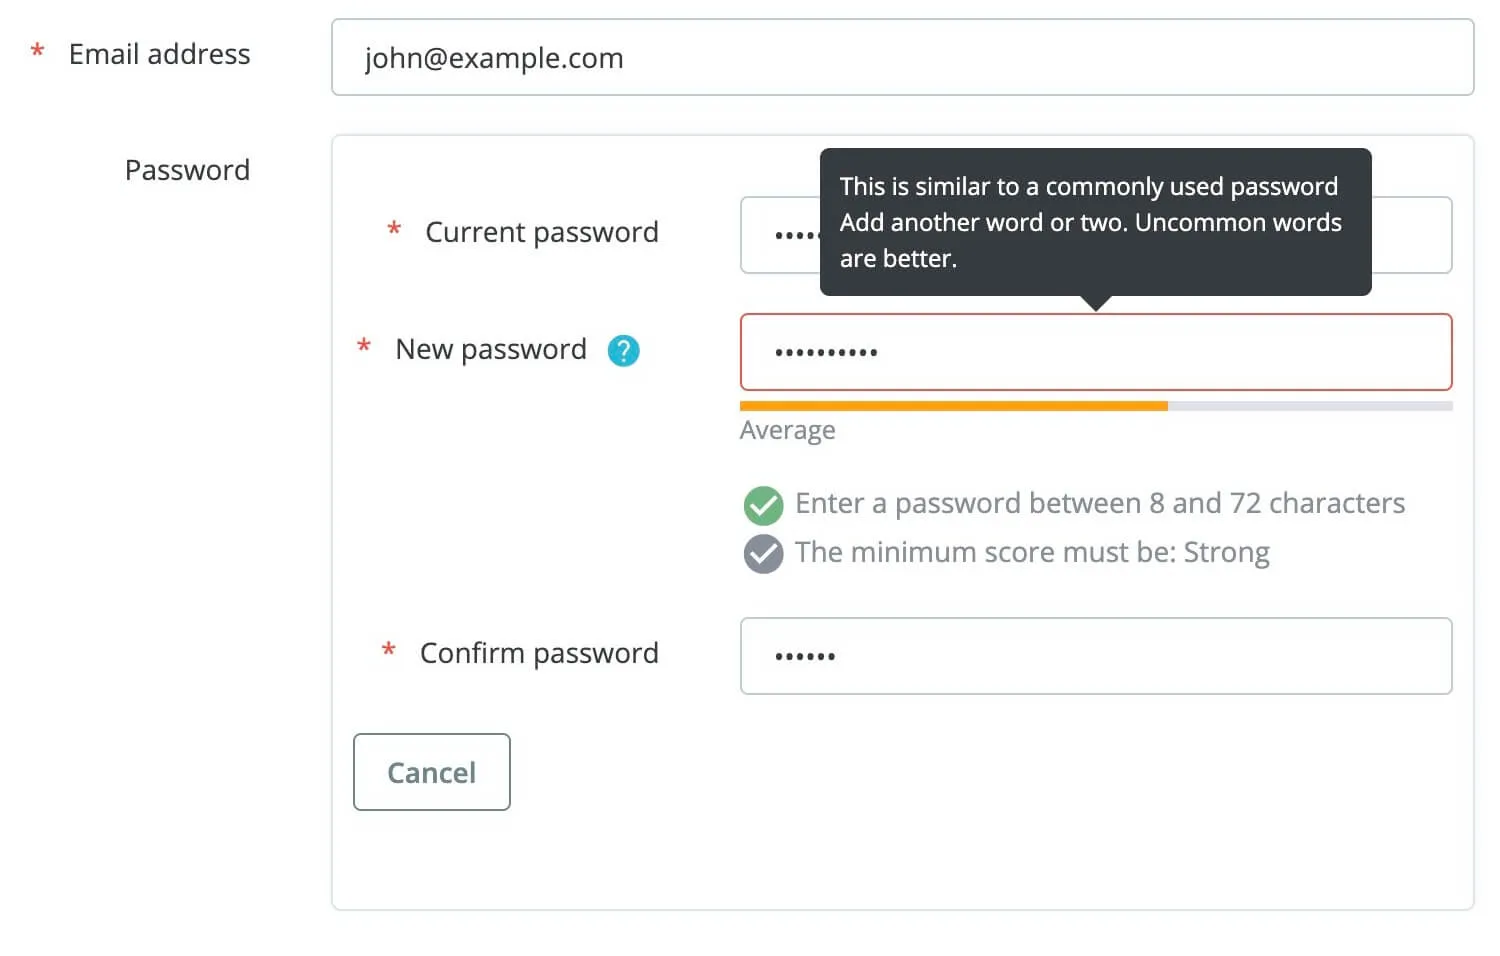
Online merchants are able to set up a password policy. Visitors will now get a color-coded indication during password setup to see whether or not their password meets the store’s minimum requirements. Thus, ensuring a more secure system for customers.
-
- Customer session control
In addition, you can gain control of anyone accessing your customer and employee session. Store managers may now see a customer’s session log and terminate their session remotely. The history of abandoned sessions may be rapidly cleared to make room for new ones.
-
- SQL injection
One of the most prevalent ways hackers undermine the security of online businesses is via SQL injection attacks, which have been hardened in PrestaShop 8. While analyzing PrestaShop 1.7 vs PrestaShop 8, we found that this is not included in the 1.7 version.
2. More image formats
PrestaShop version 8 also supports the new WebP format for your images. This allows store owners to maintain the same picture quality compared to JPEG or PNG while guaranteeing quicker loading speed for the website.
In addition to traditional bitmap graphics, you may utilize SVG files for your store’s logo. To configure the format settings, navigate to Design > Image Settings > Image generation options.
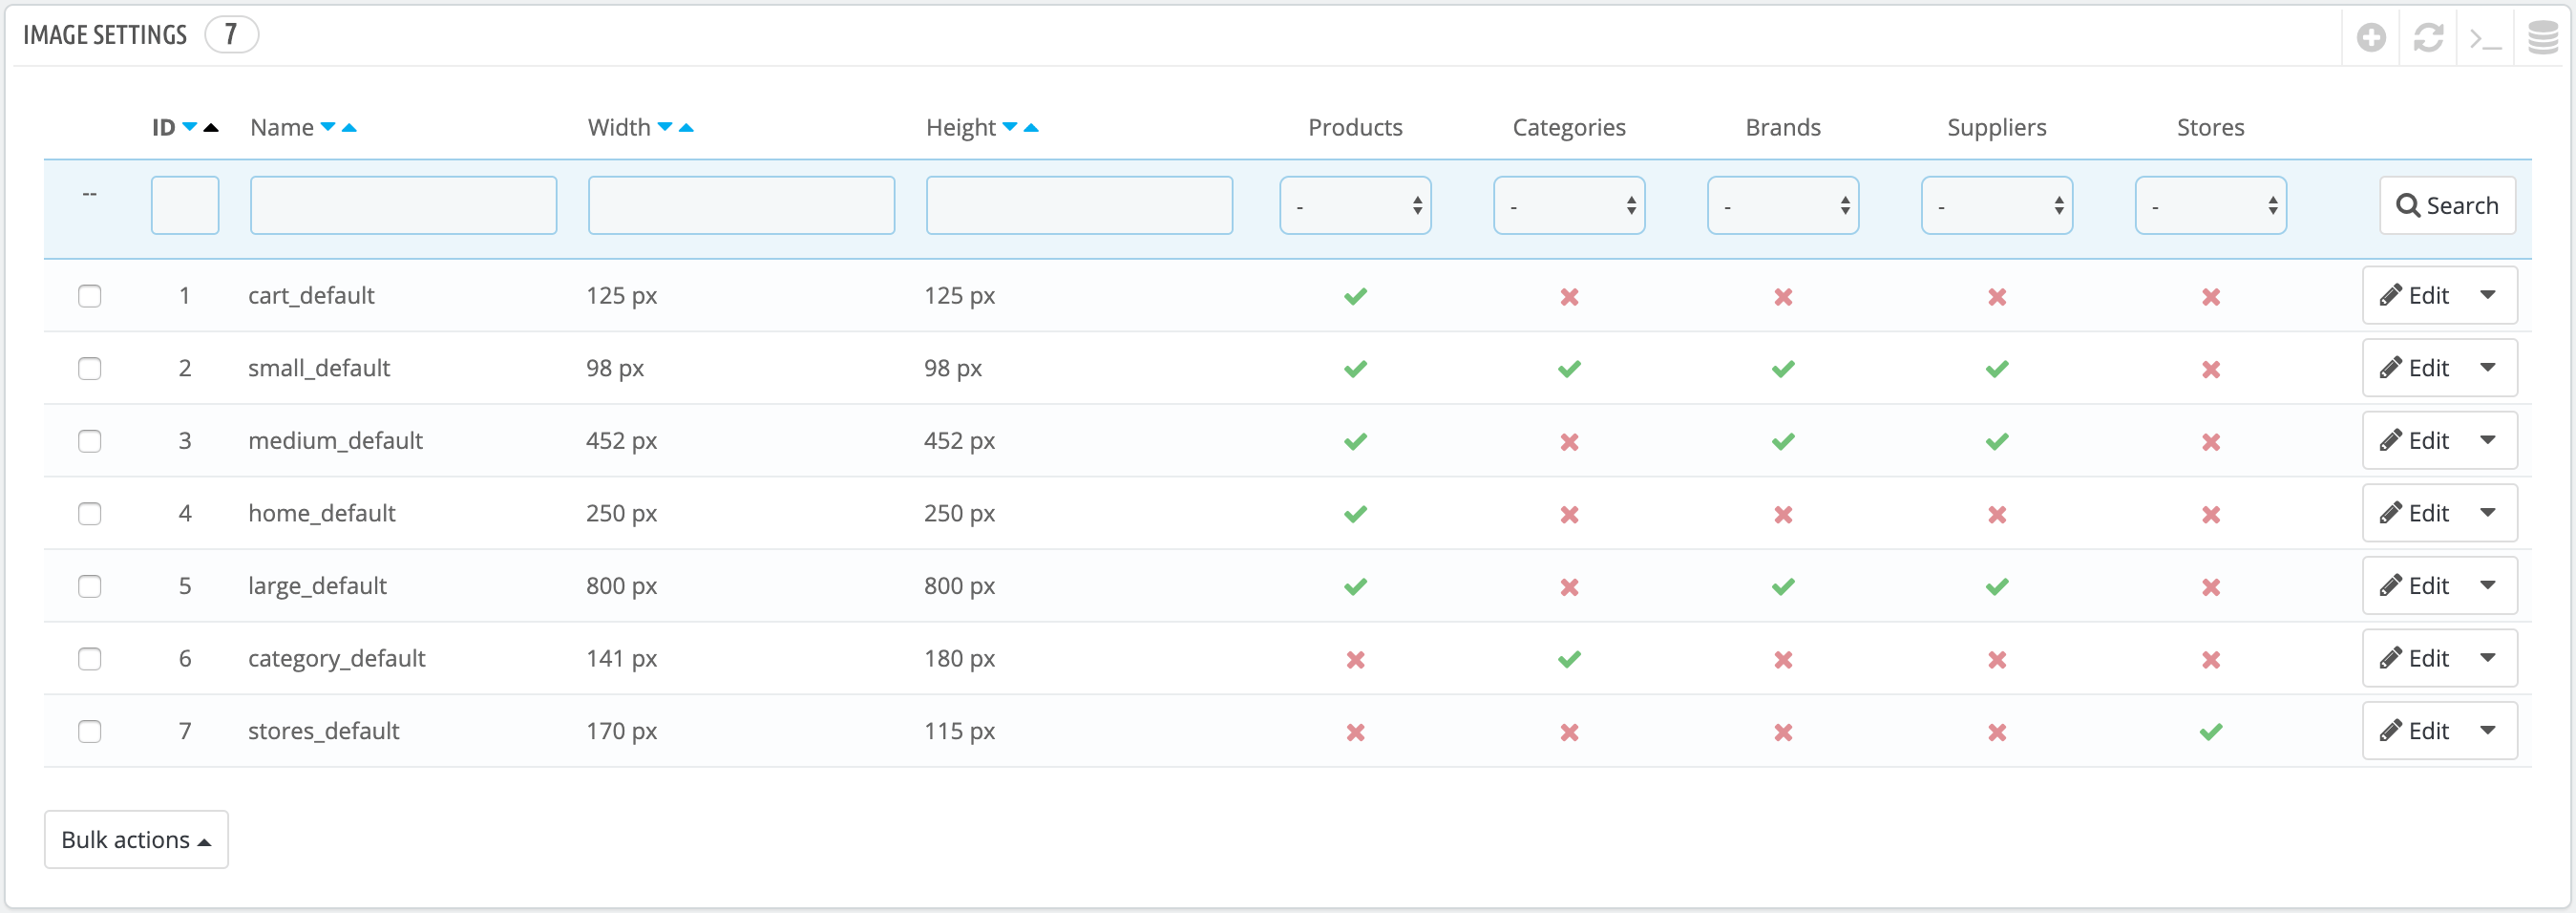
PrestaShop image settings
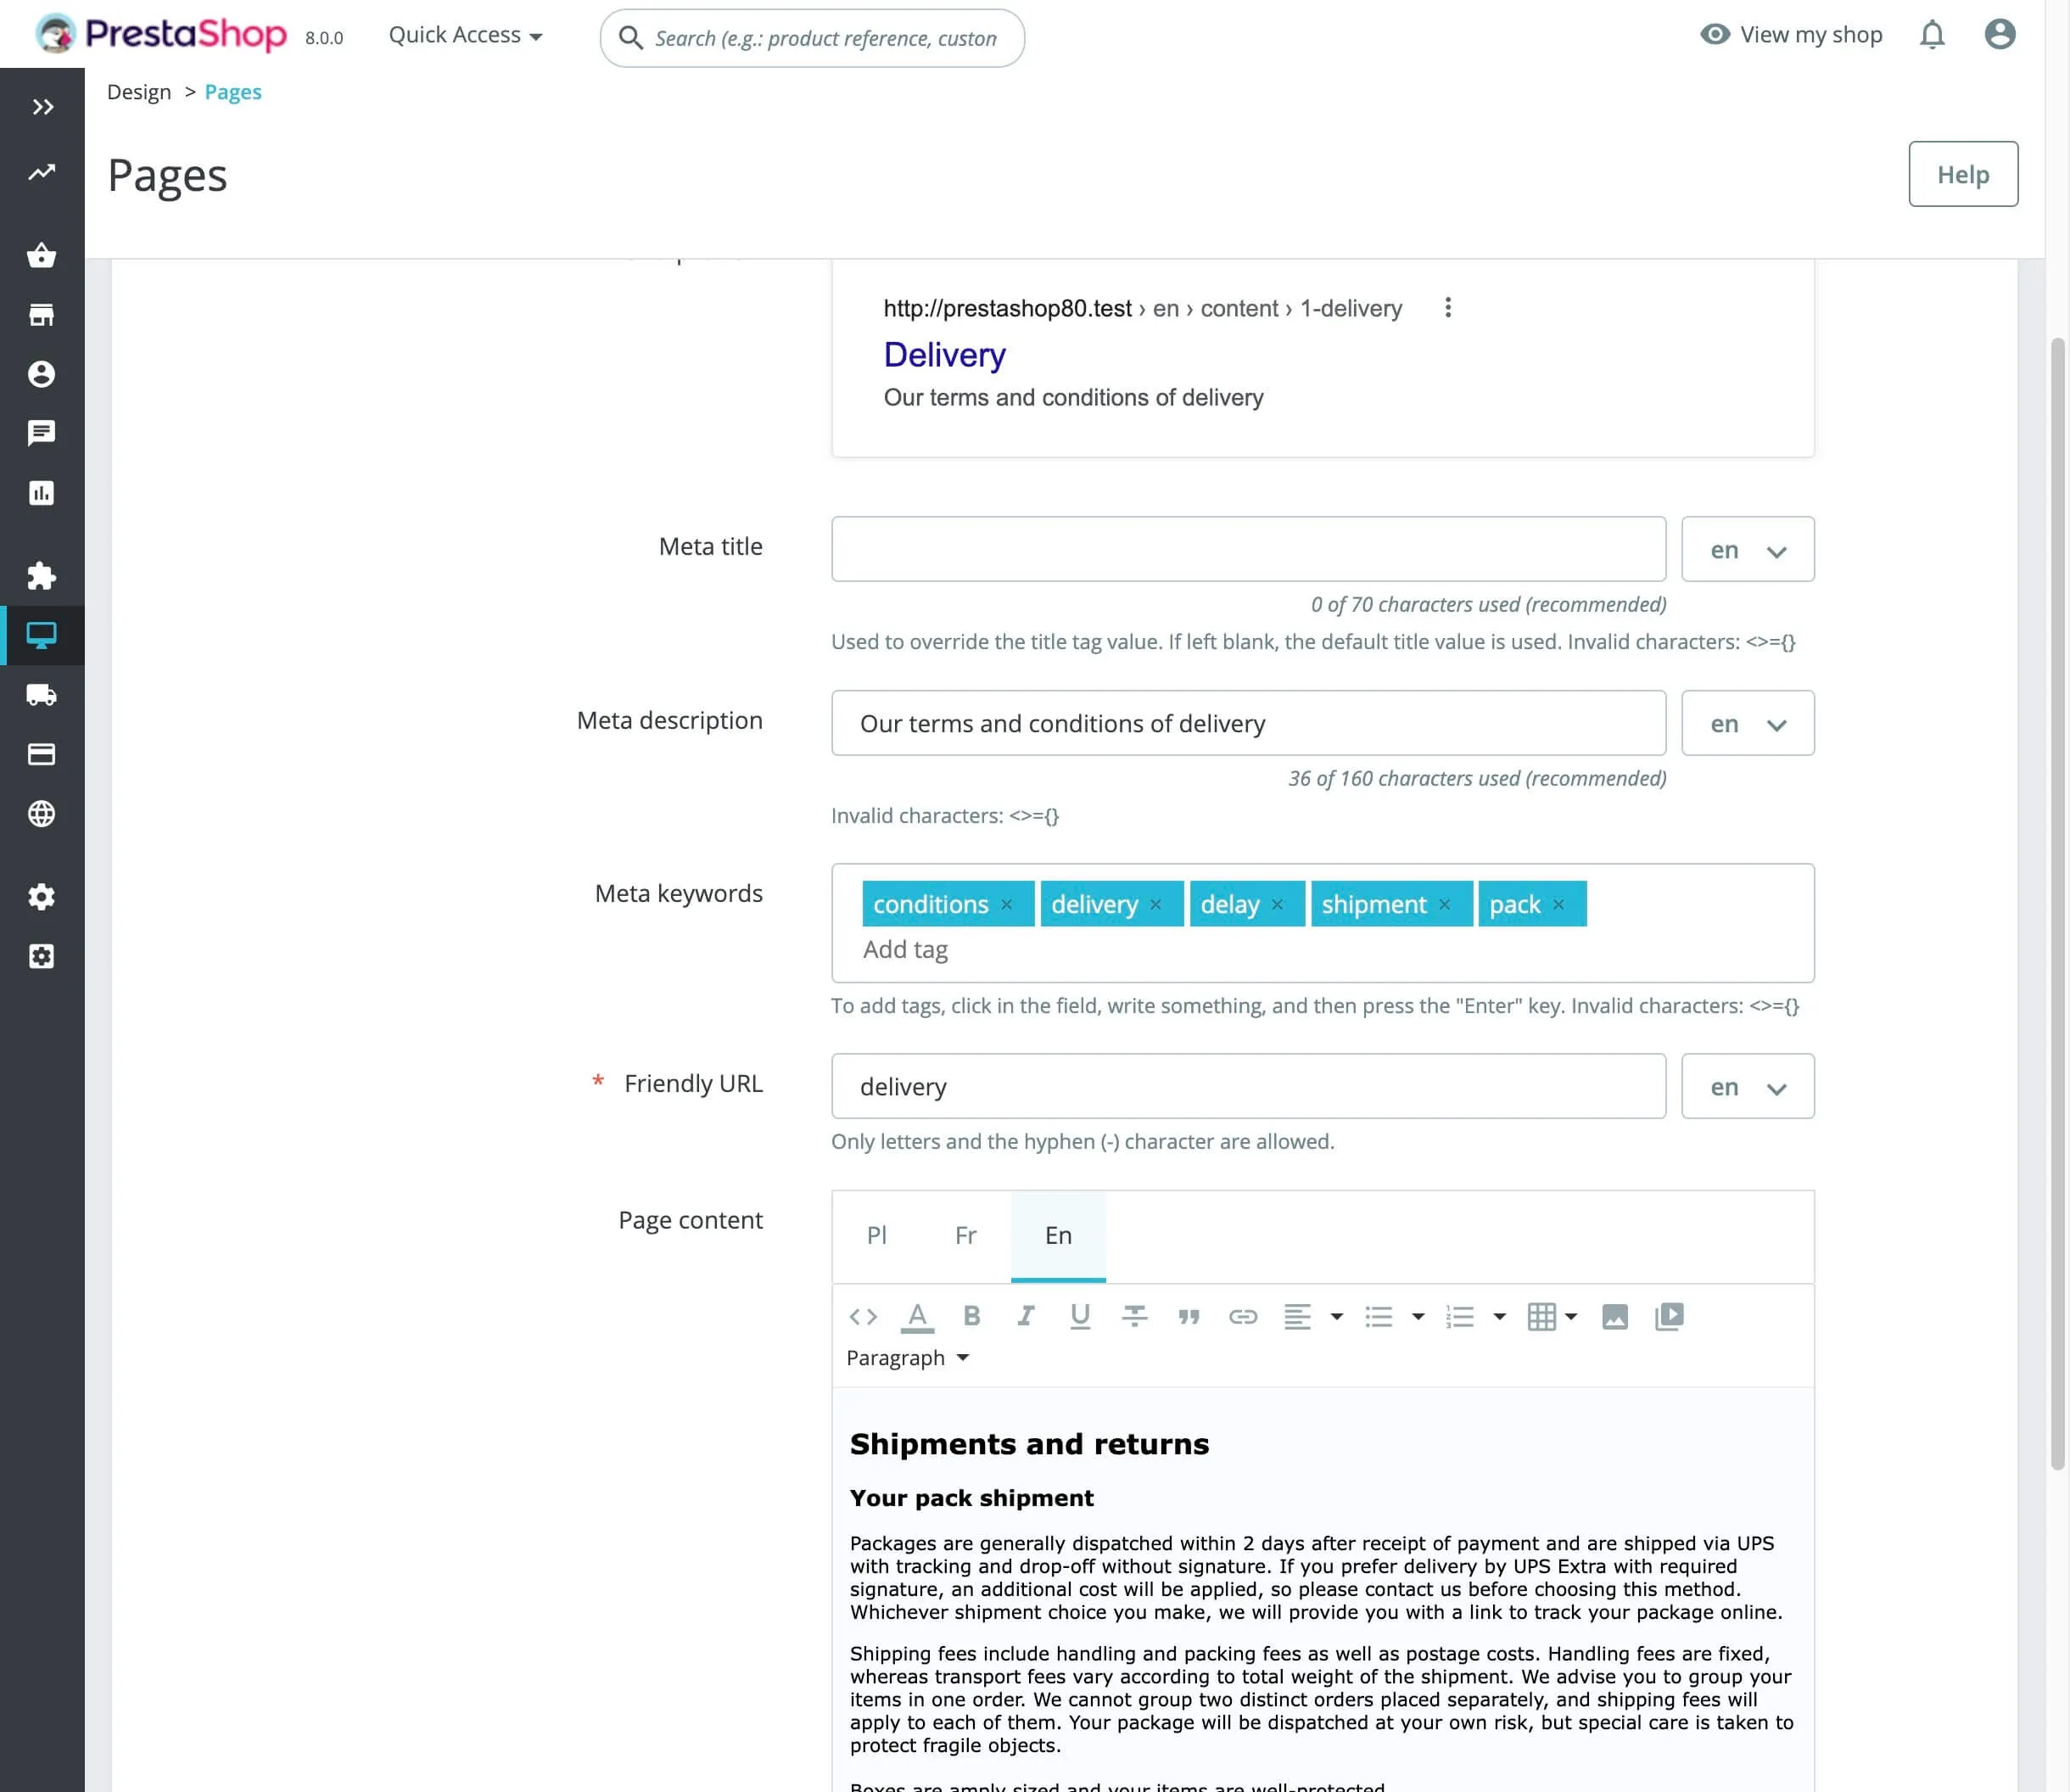
3. Optimized SEO features
As we all know, SEO features help the website rank higher in SERPs, leading to increased customers. Understanding the needs, PrestaShop decided to add more optimized SEO features to the new PrestaShop 8.0 version. These include:
-
- Category description: you can add a short description at the bottom of the page to elevate the category ranking.
-
- Page number included in meta title tags: On pages like new products, best sales, prices drop, etc., you can have the page number so that search engines can gain a better understanding of them.
-
- Suggested content length: Online retailers may now benefit from real-time character counts in certain text fields inside SEO, traffic, and CMS areas.
-
- Crawlers prevention: If you want to keep your discontinued items out of search engine results, use the “410 – Gone” response code instead of the more common “404 – Not Found“.
4. DKIM email signature
Using DKIM signatures, you may lessen the possibility of your store’s emails being flagged as spam. Advanced Settings > Email is where you’ll find this option for tweaking.
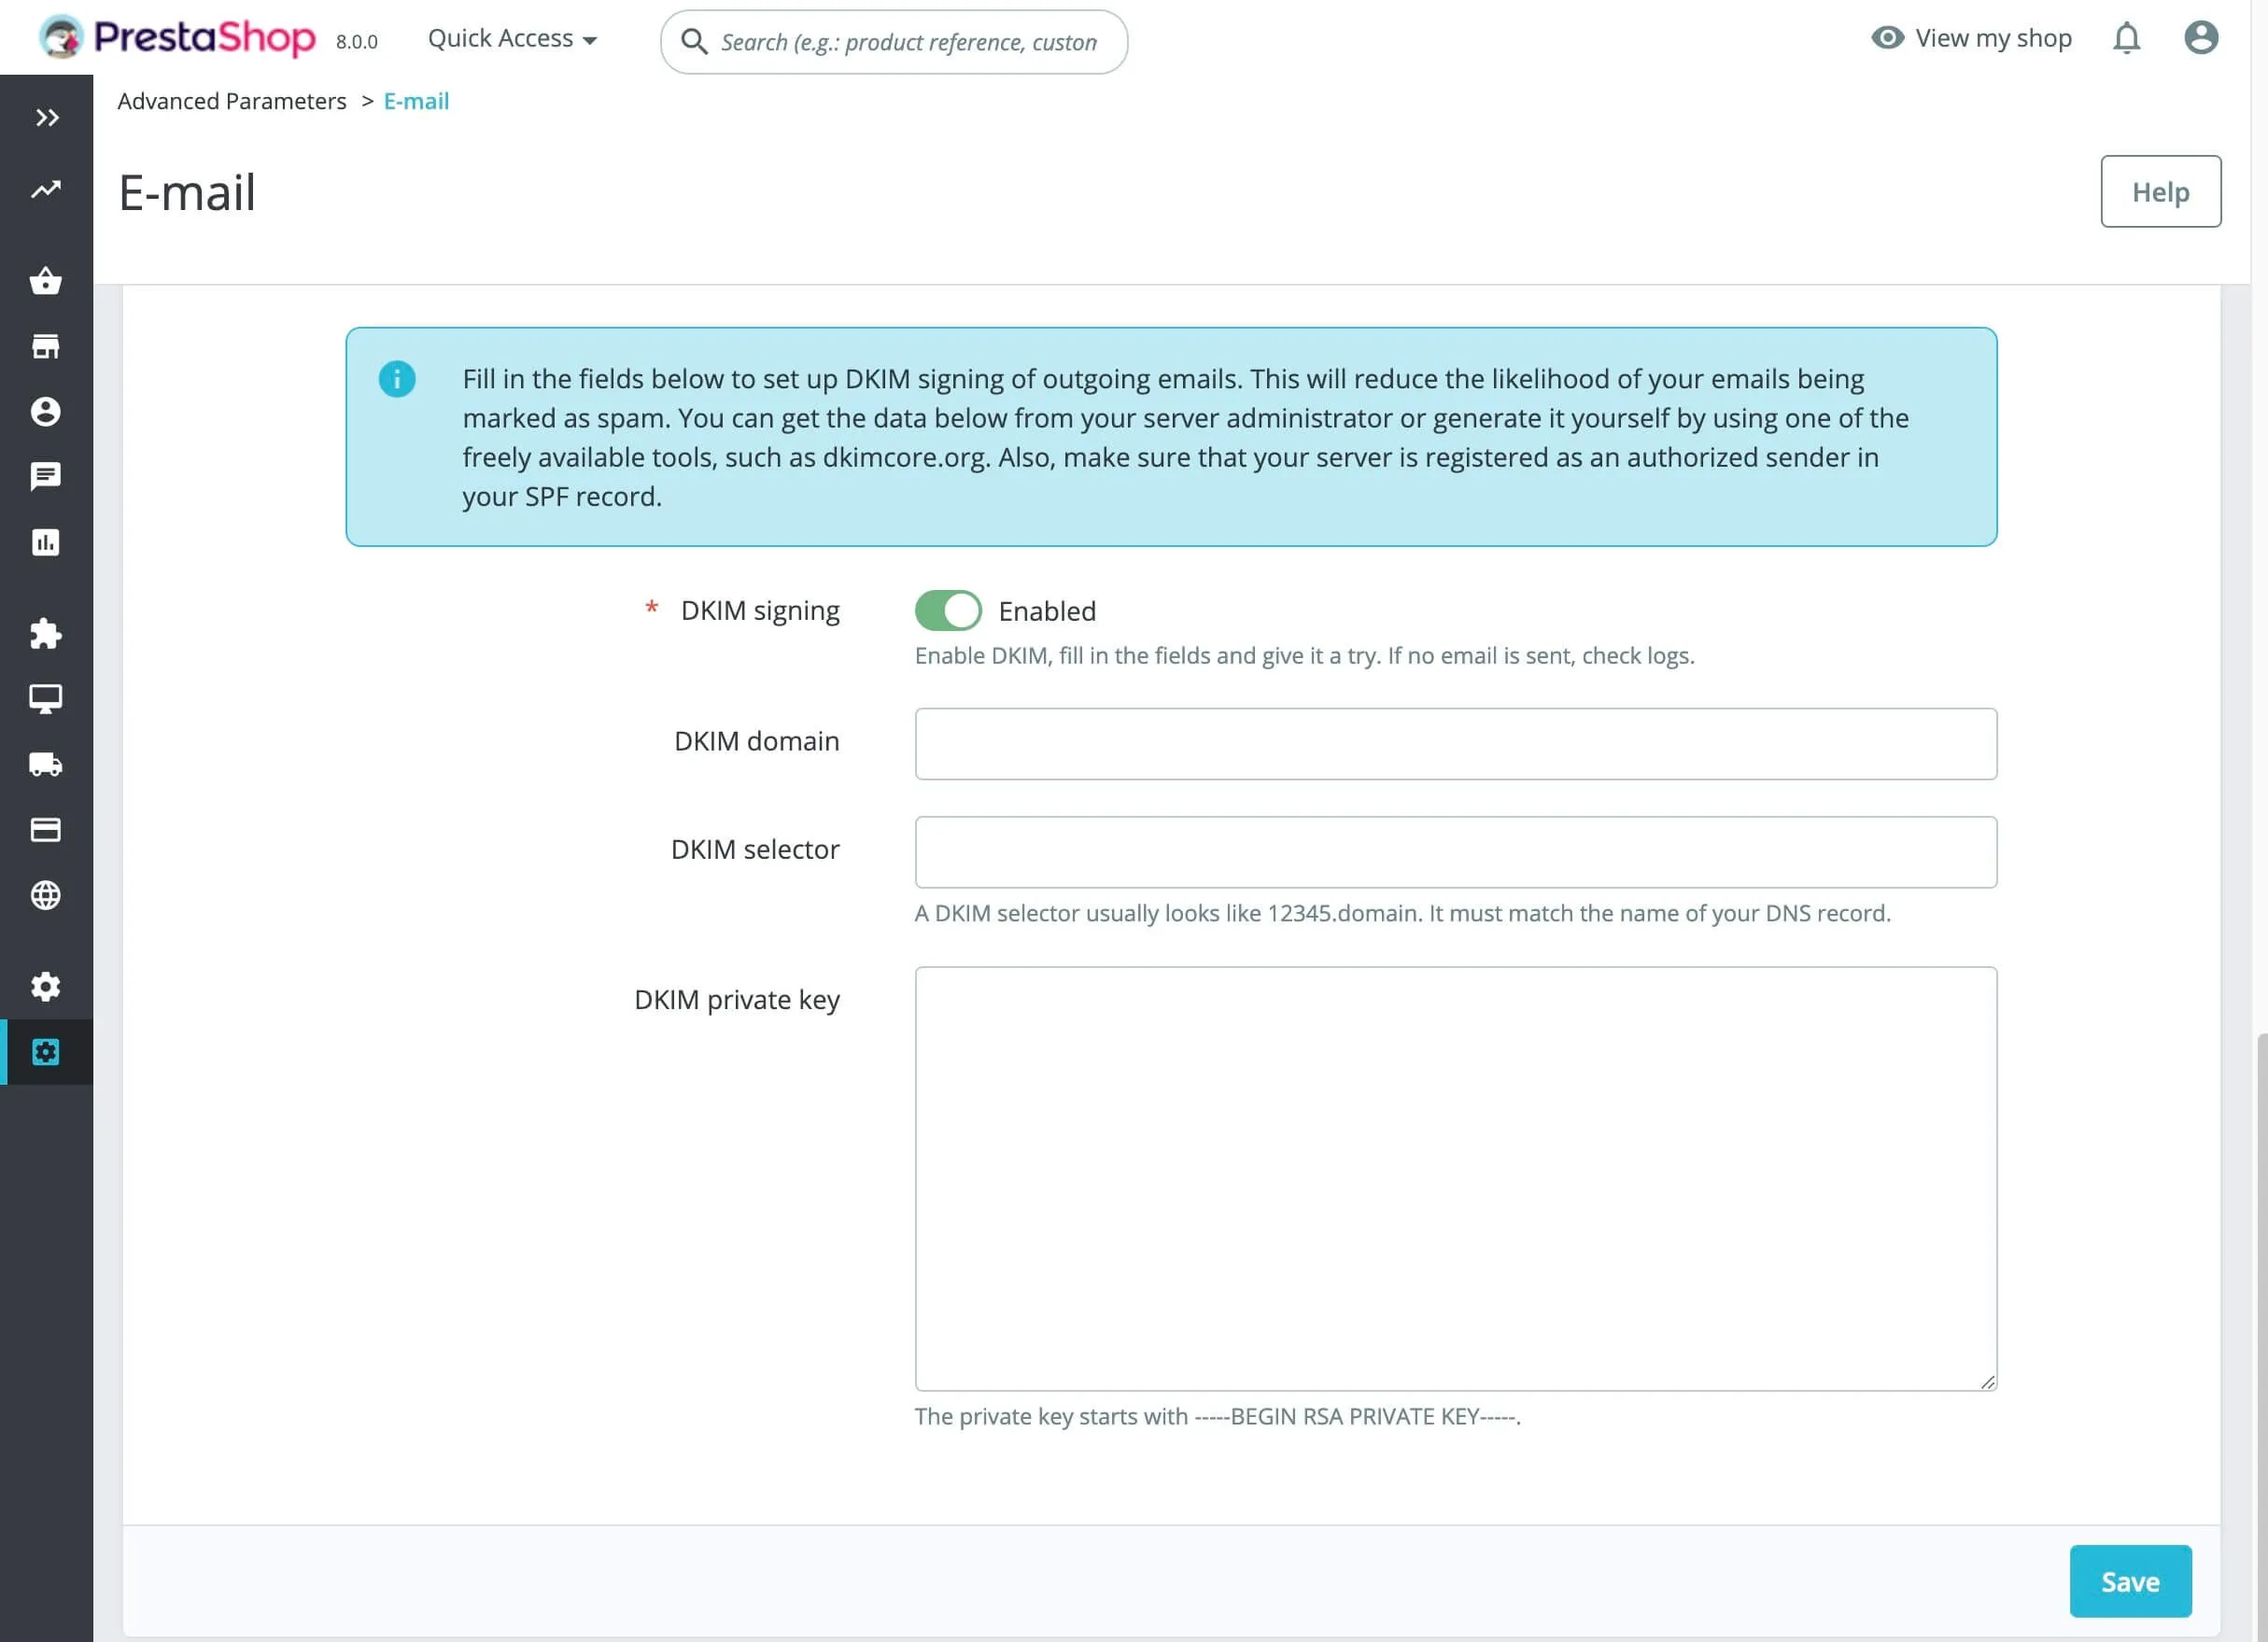
DKIM email signature
5. Simplified checkout process
The updated checkout procedure in Version 8 makes it simpler for your clients to buy from your store. You can now provide your consumers more flexibility by accepting new payment methods like Apple Pay and Google Pay.
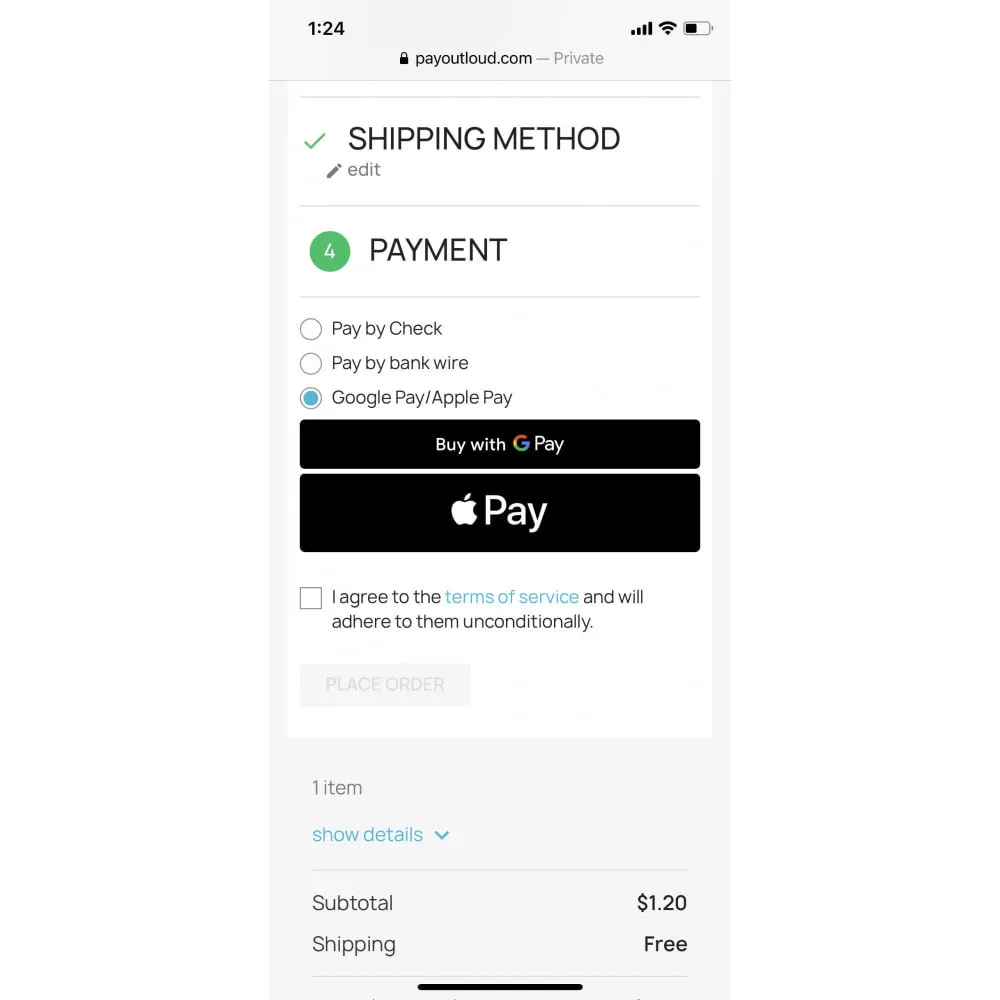
PrestaShop Google Pay
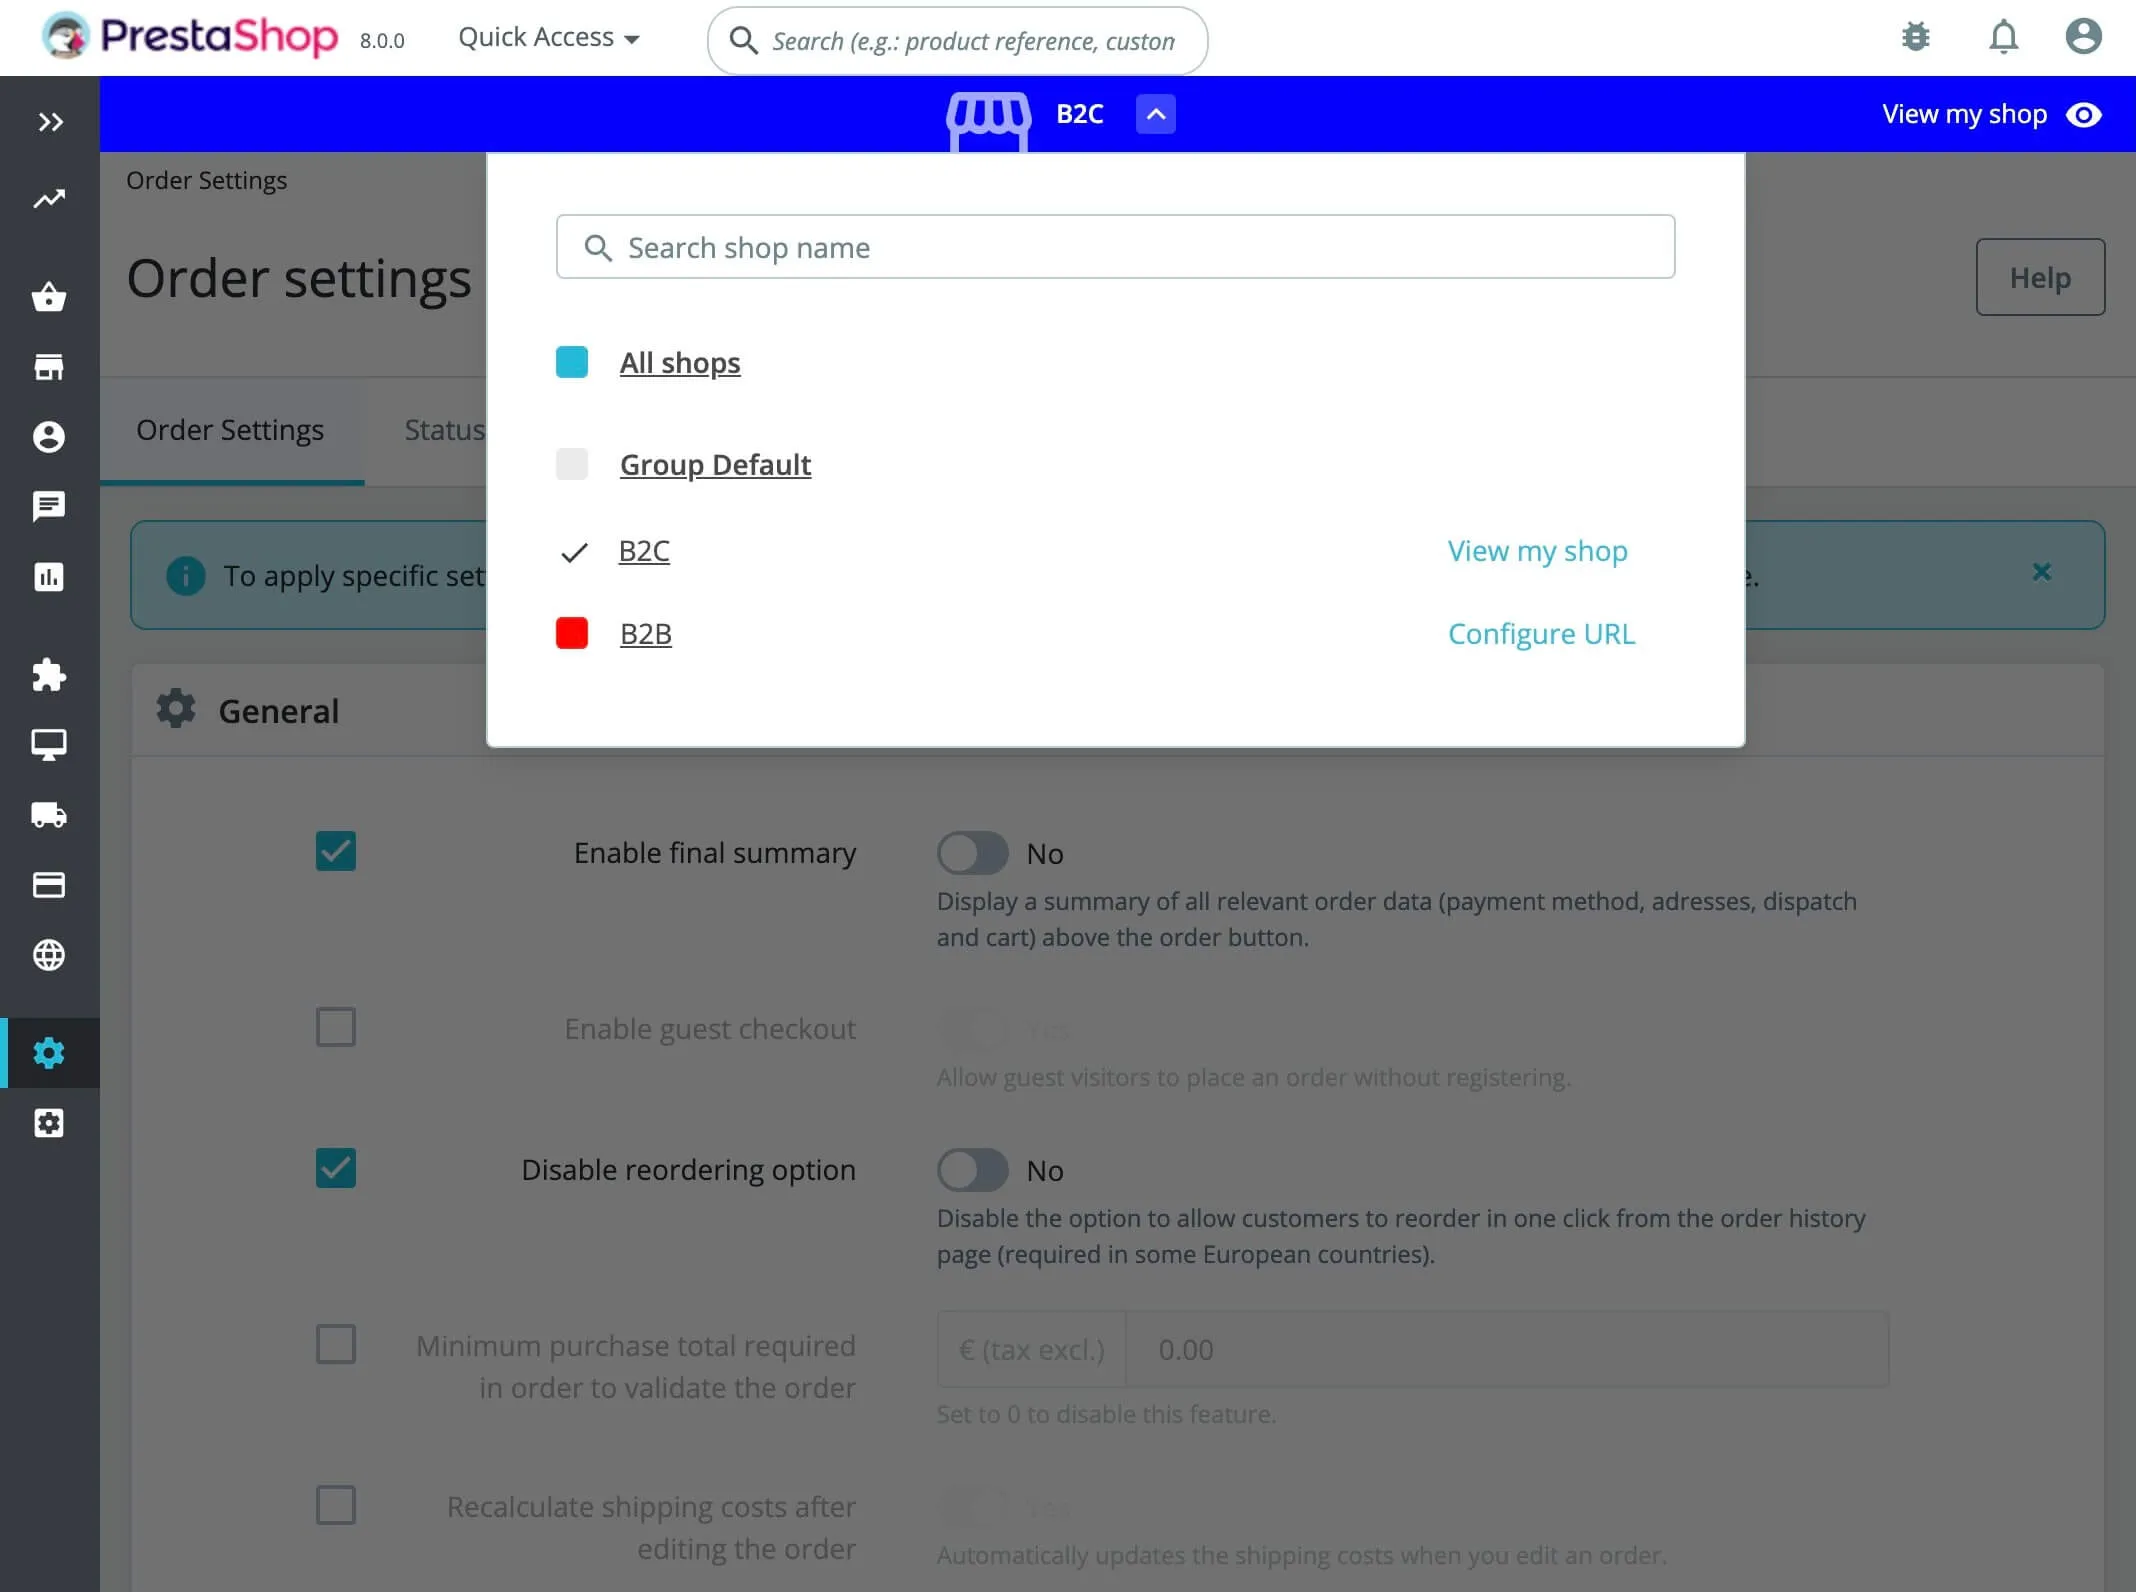
6. Compatible multistore dashboard
With the new multistore functionality, merchants may choose which data to update depending on whether they are in the shop or group context.
7. Robust installer
The update installation can be quite complicated for some users, especially beginners. For this reason, PrestaShop has improved its built-in installer system for the best experience:
-
- Reduce confusion by customizing the installation of your store’s PrestaShop modules and themes.
-
- Adjust the distribution to your needs. This enables developers to construct unique versions of PrestaShop that include (or exclude) the modules and themes you specify.
-
- When an error occurs during setup, the exact stack trace will be shown if debug mode is enabled. This will significantly aid developers in identifying the problem’s origin.
-
- The addition of the callback post-install() to modules allows developers to modify the source code after the installation of the store has been completed.
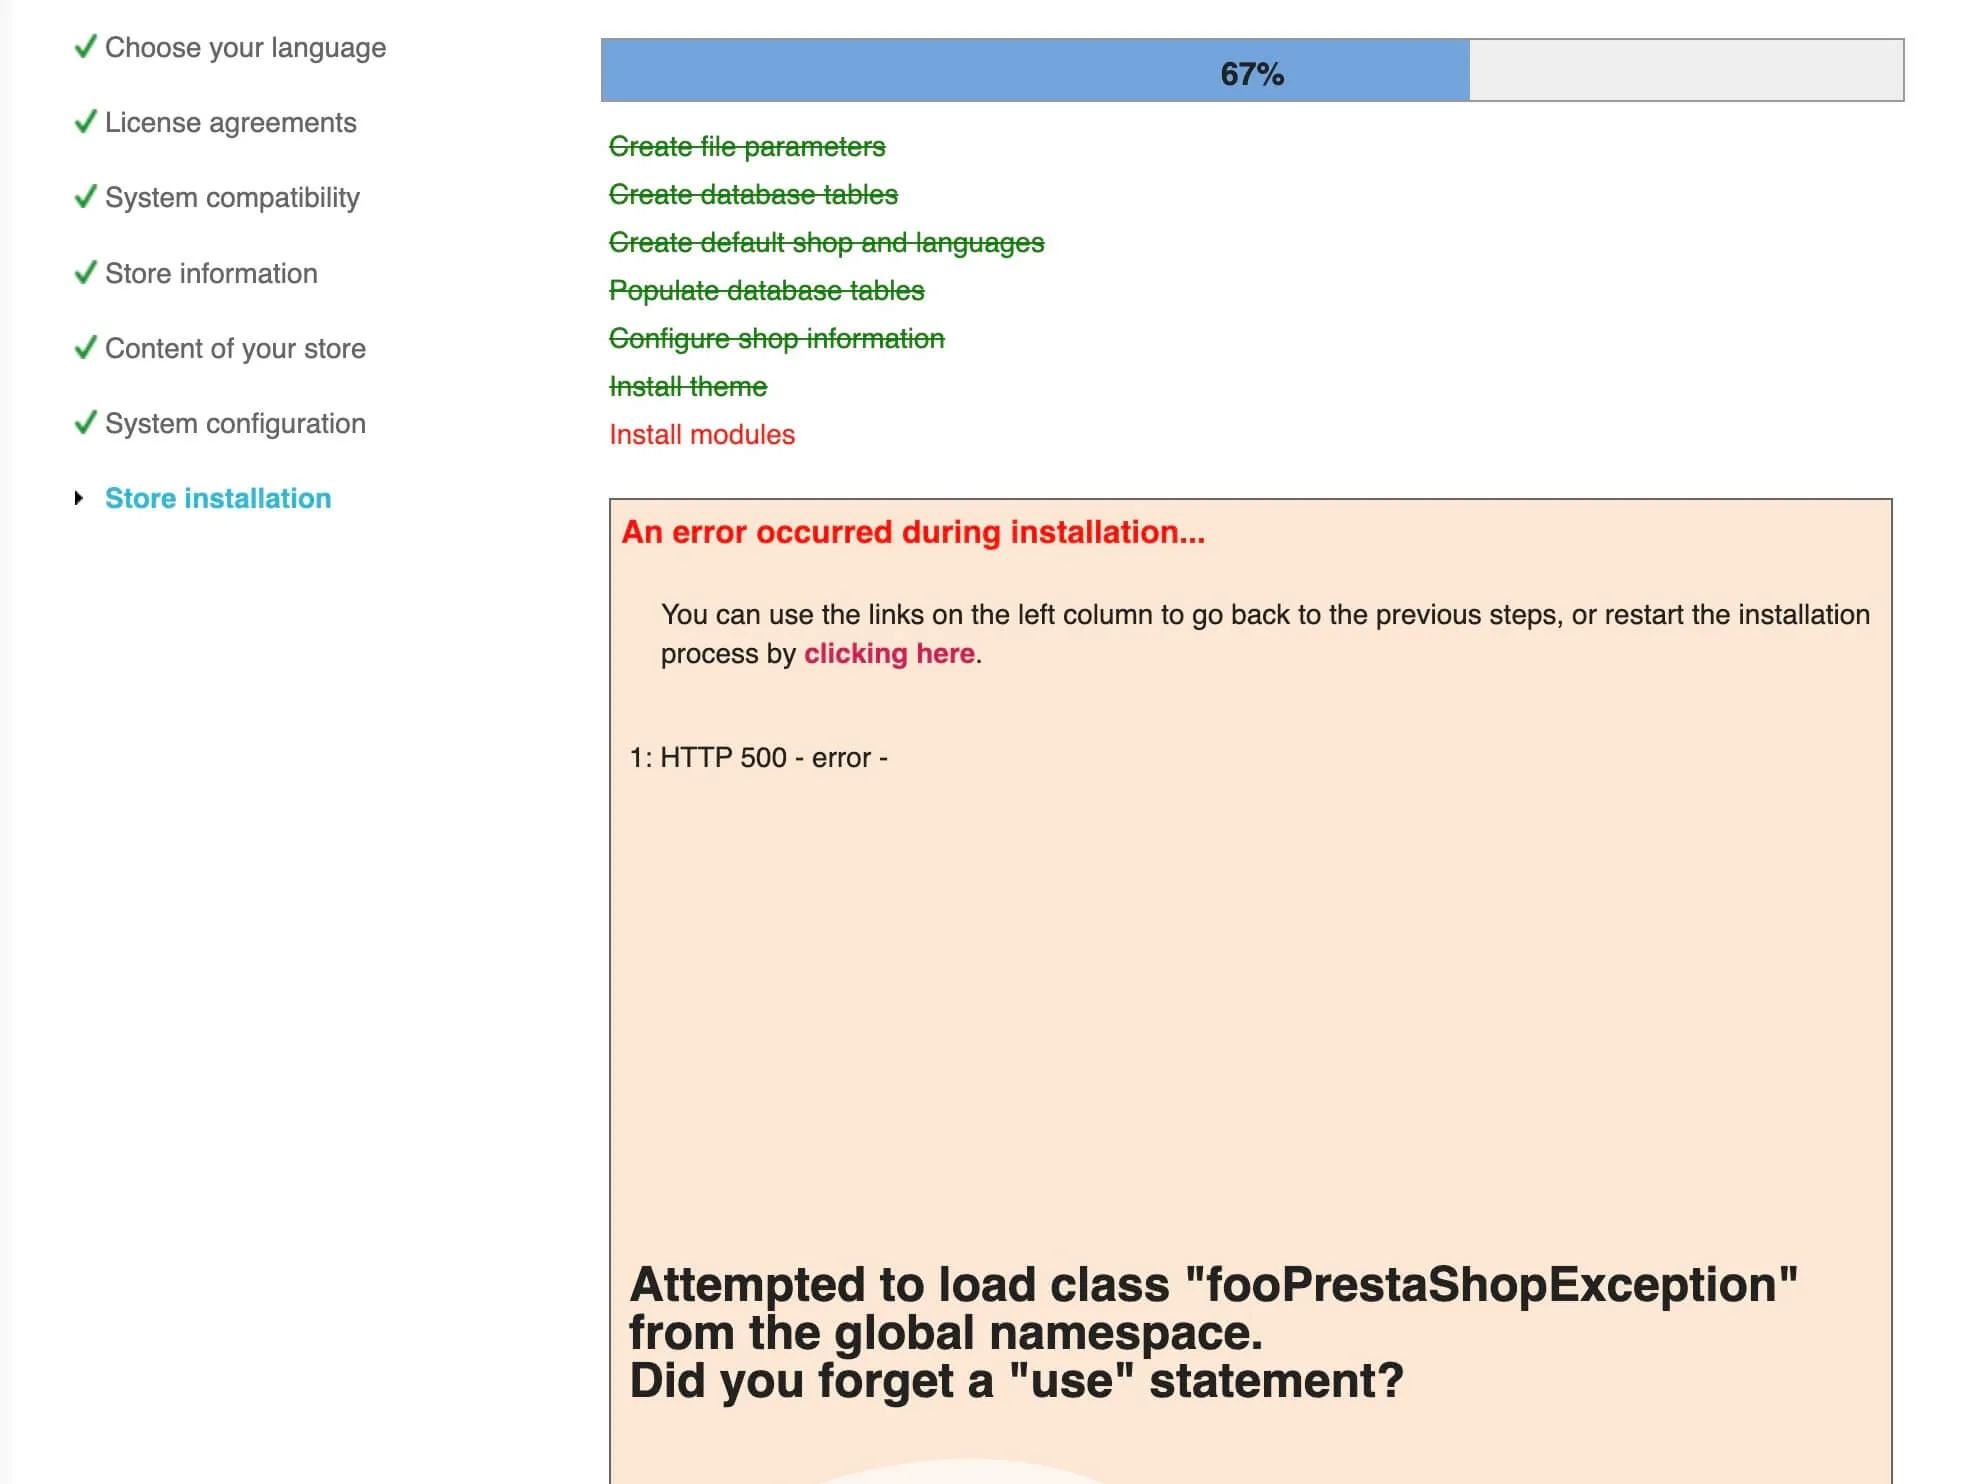
Identifying errors during installation
8. Faster loading speed
When compared to its predecessor – PrestaShop 1.7, PrestaShop 8 has undergone major architectural and performance enhancements. Using Symfony 4.4, the new version has inherited the speed and security enhancements of the framework’s latest version. Moreover, PrestaShop 8 is noticeably quicker thanks to its new caching engine.
What Data Can Be Migrated From PrestaShop 1.7 to PrestaShop 8
-
Products
- Name, Short Description, Full Description, Status.
- Manufacturer.
- SKU.
- Features.
- Price, Special Price, Special Price From-To Date.
- Meta Title, Meta Keywords, Meta Description.
- Weight, Width, Height, Length.
- Related Products, Product Tags.
- Barcode.
- Combinations (Weight, Attributes, Quantity, Images, Price, Name).
- Additional Images.
- Stock Availability.
Products Categories
- Name, Description.
- Thumbnail Image.
- Meta Title, Meta Description.
-
- ID, First Name, Last Name, Email, Date of Birth, Passwords, Created Date, Telephone.
- Customer Group.
- Newsletter.
- Address (Zip Code, City, State, Country, First Name, Last Name)
-
- Order ID, Order Number.
- Order Date.
- Order Status.
- Order Items (Name, SKU, Option), Product Price, Quantity.
- Sub Price, Discount Price, Tax Price, Shipping Price, Total Price.
- Custom Order Status, Shipping Price Order Status, History.
- Customer Name, Email.
- Billing Address (First Name, Last Name, Company, Address 1, Address 2, Country, State, City, Zip Code, Telephone).
- Shipping Address (First Name, Last NameCompany, Address 1, Address 2, Country, State, City, Zip Code, Telephone).
-
- Name, Description.
- Meta Title, Meta Description, Meta Keywords.
- Image.
-
- Tax Class (Name).
- Tax rate (Country, Rate).
-
- Description.
- Coupon Code, Coupon Expire Date.
- Discount Amount, Type Discount.
- Uses Per Customer, Minimum Spent.
-
- Title, User Name.
- Created Date.
- Product.
- Status, Rate.
- Comment.
-
- Title, Description.
- Meta Title, Meta Description, Meta Keyword.
- Created Date.
- URL Key.
-
- Products (Name, Short Description, Description, Meta Title, Meta Description, Attributes)
- Categories (Name, Description, Meta Title, Meta Description)
- CMS Page (Name, Description, Meta Title, Meta Description)
(*) Please note that the data listed above may vary depending on your Source Store.
Additional Options
Clear Data On PrestaShop Before Migration
You can delete the data on PrestaShop in accordance with selected entities for migration… More Details →
Preserve Product, Order, Customer IDs on PrestaShop Store
This option helps keep your product ID, customer ID or order ID the same during your store migration… More Details →
Create 301 Redirects on PrestaShop Store
Automatically redirect your old store’s URLs to the new ones during the migration… More Details →
Migrate Images from Products, Categories, Blog Descriptions
This option helps you to migrate images in descriptions of products, categories, and blog posts… More Details →
Strip HTML Tags from Category and Product Names
Strip HTML tags from category and product names automatically when migrating your store … More Details →
How to Upgrade PrestaShop 1.7 to PrestaShop 8

#1: Set-up PrestaShop Stores
Select PrestaShop as “Source Cart” and PrestaShop as “Target Cart” from the dropdown list. Afterward, enter store URL and follow brief instructions to set up the PrestaShop Upgrade process.

#2: Select Data You Want To Upgrade
Choose the entities you want within PrestaShop upgrade such as products, categories, orders, customers, SEO URLs, and even more.

#3: Perform Full PrestaShop Upgrade
Let’s start the PrestaShop Upgrade. Once the migration process is kicked off, it will constantly run even when you turn off your browser.
Step 1: Backup the database
It’s important to consider potential risks before making any changes to your store. To avoid data loss during the upgrade, it is recommended to have your PrestaShop backup. This entails backing up both your files and database.File Backup
The files on the web server are the first to back up after deploying PrestaShop. In the PrestaShop folder, you may find everything necessary to operate your store, including the source code, modules, themes, images, and other media files. Even if it’s easy to duplicate your data in another folder on the server, keeping a copy of your files on your device is still a good idea. You may download the files after connecting to the server through FTP, SSH, or RDP (depending on your server and hosting provider). Remember that the time it takes to perform the process may vary depending on the file quantity and internet connection speed. If you have command-line access to your server, you may save time by zipping up all the folders before the PrestaShop update.Database Backup
Backup your PrestaShop’s database as well. The dump is complete when you have a SQL file with both the table structure and data. In today’s article, we will introduce you to the two most commonly used methods:- Using mySQLdump
- Via PHPMyAdmin
- LOCK TABLES statement must be used.
- Insert a statement using DROP TABLE, VIEW, PROCEDURE, FUNCTION, EVENT, or TRIGGER.
Step 2: Set up Source and Target Cart
To perform PrestaShop upgrade, go to LitExtension website and register yourself a new account or sign in to the website (if you already have one). After that, open the “Create new migration” tab, where you will be able to set up Source and Target Cart for the PrestaShop upgrade. For both setup sections, select PrestaShop from the dropdown menu. Then, download the LitExtension connector file to your folder. By doing this, you may link your PrestaShop database to the LitExtension plugin. When the message “Connection was successfully installed” appears on the screen for both sections, click on “Next: Configure your Migration” to move on to the next step.Step 3: Select migration entities
To proceed with the PrestaShop upgrade to higher version, select the entities you would like to maintain. Our service offers PrestaShop upgrades for products, customers, orders, etc, or simply all of them. If that’s what you’re going for, click “Select All”. In addition to the standard selection, LitExtension also provides Additional Options to let you expand your upgrade scope. One of our client’s favorites is Customers Password Migration, which enables your customers to sign in to the new version without having to create new credentials. Don’t forget to map the language, order status, and customer group between PrestaShop versions 1.7 and 8 before running the upgrade!Step 4: Perform the PrestaShop upgrade
In case you want to test the water beforehand, try our free demo migration. We support up to 200 entities (for each data type, including Products, Orders, and Customers) when upgrading PrestaShop 1.7 to 8 or any version for your reference. Otherwise, you can skip the demo migration and jump upgrade to version 8 immediately by hovering over the “Start the full migration” button. Due to the nature of the cloud-based processing, you may now safely exit your browser or turn off your computer. Finally, we will email you to let you know that we have successfully performed the PrestaShop upgrade. Now, you may open your dashboard and double-check all the data. Since your website continues to function during the PrestaShop upgrade process, it is no surprise that you will see new orders and customer information. Henceforth, utilize our post-migration services:Recent data migration helps you move any freshly created entities. Smart update will update all changes you’ve made to data, along with all the newly appearing entities.Choose Your Migration Plan
Compare features and support levels to find the migration service that fits your timeline, budget, and needs.
Automated Migration$0 |
All-in-One Migration Service$0 |
|
|---|---|---|
| FREE Demo Migration | Unlimited FREE Demo Migration | Unlimited FREE Demo Migration |
| Migration Process | 3-step migration tool with easy-to-follow wizard guide | Expert-managed migration with Personal Assistant & QA testing |
| Additional Options |
FREE up to 6 Additional Options |
FREE all Additional Options |
| Migration Testing | Done by yourself | Done by LitExtension experts |
| Technical Support | 60-day technical support after Full Migration | 30-day technical support after migration is completed |
| Post-migration Support | ||
| Receive Support Request | 24/7 | 24/7 |
| Support Channels | Ticket | Ticket, Email |
| Money-back guarantee | 30-day money-back guarantee | 30-day money-back guarantee |
| Response Time Commitment | 24 hours | 24 hours |
Choose Your Migration Plan
All-in-One Migration Service$0 |
|
|---|---|
| FREE Demo Migration | Unlimited FREE Demo Migration |
| Migration Process | Expert-managed migration with Personal Assistant & QA testing |
| Additional Options | FREE all Additional Options |
| Migration Testing |
Done by LitExtension experts |
| Technical Support | 30-day technical support after migration is completed |
| Post-migration Support | |
| Support Response Time | 24/7 |
| Support Channels | Ticket, Email |
| Money-back guarantee | 30-day money-back guarantee |
| Response Time Commitment | 24 hours |
Migration Pricing
Popular Questions About PrestaShop Upgrade Process
Not seeing your question listed here? Contact Us for the quickest answer.
Why order totals are changed after PrestaShop Upgrade?
If you upgrade your PrestaShop store and transfer data to a different version, you may notice variations in order totals. This happens because LitExtension doesn’t transfer order totals tables, and the accounting systems for these totals can differ across versions.
Can I migrate taxes in PrestaShop upgrade?
Yes, taxes can be migrated between PrestaShop stores. If it fails, the feature might be disabled in the back-end. To enable it, go to the Admin panel, click Localization -> Taxes, and set the Enable Tax option to Yes.
Can I migrate review when upgrading PrestaShop?
Currently, LitExtension provides Review Migration for PrestaShop 1.7 and 8, for both source and target stores. Get in touch with us promptly!
Cannot find any products under categories menu from administrative panel of PrestaShop?
PrestaShop configurations restrict viewing products assigned to a particular category from the category menu. However, accessing the Products menu and filtering by category will fix this.
Can I migrate product attributes from PrestaShop to Prestashop?
Yes, you can. LitExtension facilitates the PrestaShop to PrestaShop migration of various types of product data, including variants such as weight, attributes, quantity, images, price, and name, when upgrading PrestaShop.
Leave The Work For The Experts
If you’re non-tech, let our PrestaShop migration experts handle your migration from A to Z.
Save your time for more important tasks.

How Your Data Is Secured During Migration?

Server Security

Data Security

Data Access Restriction

GDPR Compliance

NDA

Payment Security
Why Choose Automated Migration for PrestaShop Upgrade

3-Step Process
Achieve a seamless PrestaShop upgrade in just 3 easy steps with our automated tool—no coding skills required!

24/7 Expert Support
Access around-the-clock expert support – whenever you need help, we’re here, even on holidays.

Selling While Upgrading
Keep your sales uninterrupted throughout the upgrade process with our zero downtime commitment.

Data Quality Assurance
Enjoy data accuracy and quality assurance through meticulous manual testing in every upgrade.

FREE 60-Day Updates
Enjoy free Re-migrations, Recent Migrations, and Smart Updates for 60 days from your start date, keeping your data synchronized after migration.

Risk-Free Experience
Try our service with confidence, backed by a 30-day money-back guarantee – your satisfaction is our top priority.
Migrated From PrestaShop To Other Platforms
Your Success, Our Motivation
Who We Truly Are? Let Our Customer Define!
I recently upgraded my PrestaShop store using LitExtension’s service, and I couldn’t be happier. The migration process was seamless, and their team ensured that all my data was safely transferred. No downtime, no errors – just smooth sailing from start to finish. Their customer support was also top-notch, providing real-time updates and answering every question I had.
LitExtension helped us upgrade our PrestaShop to the latest version, and it was one of the best decisions we’ve made. We were concerned about potential data loss or compatibility issues, but their team handled everything with great care. They ensured all products, customers, and orders were intact, and the entire process was completed ahead of schedule.
Upgrading our PrestaShop store was a daunting task, but LitExtension made it stress-free. The migration team worked closely with us, keeping us informed every step of the way. They took care of every detail, from the smallest settings to large data transfers, ensuring nothing was lost. I appreciated how quickly they responded to any concerns, making the entire experience smooth.
