Customers, orders, and product data are among the cornerstones of a revenue-generating store. Therefore, “how to import customers and orders to Shopify” is one of the most common concerns that you might have when transferring your data to Shopify.
In this article, LitExtension will show you the simplest ways to perform Shopify import orders and customers:
- Step 1: Export data from the source store;
- Step 2: Set up Source Cart and Target Cart;
- Step 3: Select entities to migrate;
- Step 4: Run data migration to import customers and orders to Shopify.
Export Customers & Orders from the Source Store
First, you must export the customers and orders lists in CSV files from the source store. Bear in mind that each source cart has different ways to export data via CSV files, and you should refer to the corresponding document to learn more about this process.
For example, a Shopify CSV for customers' information should include the following fields.
Headers | Information |
First Name | The first name of the customer. |
Last Name | The last name of the customer. |
The email address of the customer. | |
Company | The name of the company that customer uses (if applicable) |
Address1 | The first line of the customer's address. |
Address2 | The second line of the customer's address(if necessary) |
City | The city where the customer lives. |
Province | The province or state where the customer lives. You must also enter the Province Code |
Province Code | The province or state ISO code. Shopify uses ISO alpha 2 codes. |
Country | The country where the customer lives. |
Country Code | The country ISO code. Shopify uses ISO alpha 2 codes. |
Zip | The postal or zip code for the customer's address. |
Phone | The customer's phone number. |
Accepts Marketing | Indicating whether the customer agrees to subscribe to email marketing, such as a newsletter. Valid entries are yes or no. |
Total Spent | The customer's total amount spent. Valid entries must not include a currency symbol. This field will not be imported with customer details. |
Total Orders | The customer's total number of orders. This field will not be imported with customer details. |
Tags | A comma-separated list of tags used to tag the customer (for example, tag1,tag2,tag3). |
Note | Additional information about the customer. |
Tax-Exempt | Indicates if the customer is tax-exempt. |
⚠️ Please note that it is unable to export existing customers' passwords since they are encrypted outside of Shopify. If you do want your customers to lose their accounts after the Shopify migration, please consider our “Customers Password Migration” service.
There are also specific requirements for Order CSV files. Orders with multiple line items are displayed on separate lines. To indicate that multiple items were purchased in the same order, many of the fields are left blank.
If you want to import customers and orders to Shopify, you must export your CSV files in UTF-8 format. Fortunately, most spreadsheet applications are capable of saving CSV files in UTF-8 format using the “Save As” or “Export” command. If you need any further explanation and support, please get in touch with our support team to ease the process.
After your data is in the correct CSV format, you can import customers and orders to Shopify.
Import Customers and Orders to Shopify with LitExtension App
If you want to save time, let's import customers and orders to Shopify with LitExtension.
By using our Shopify migration service, you can automatically and securely transfer customers and orders to Shopify in only 3 steps without having to configure your data manually. But why LitExtension? Here comes a comparison between the LitExtension data migration solution and other methods:
- We import customers and orders to Shopify via API.
- If you import with LitExtension, product links to the category & order will be preserved.
- LitExtension SEO URL migration protects your SEO efforts.
Yet, please note that due to the platform's limitation, we cannot migrate customers and orders to Shopify if you are using the Basic plan. In this case, you'll need to upgrade to a higher pricing tier or use our CSV File Migration Service to transfer.
Now, let's see how quickly and easily our solution can help you!
First, go to LitExtension homepage and log in/ create a new account, then follow our steps below to import customers and orders to Shopify.
Step 1: Set up the Source and Target Store
First, you will see a page where you can enter the information of your Source and Target Cart as below. There are various shopping cart options you can choose from.
Choose your Source Cart from the drop-down menu and insert the store URL. The setup requirements will depend on the Source Cart type. For example, with WooCommerce, you will have to download the “LitExtension Connector” to your computer – a bridge that connects your cart database with the LitExtension App.
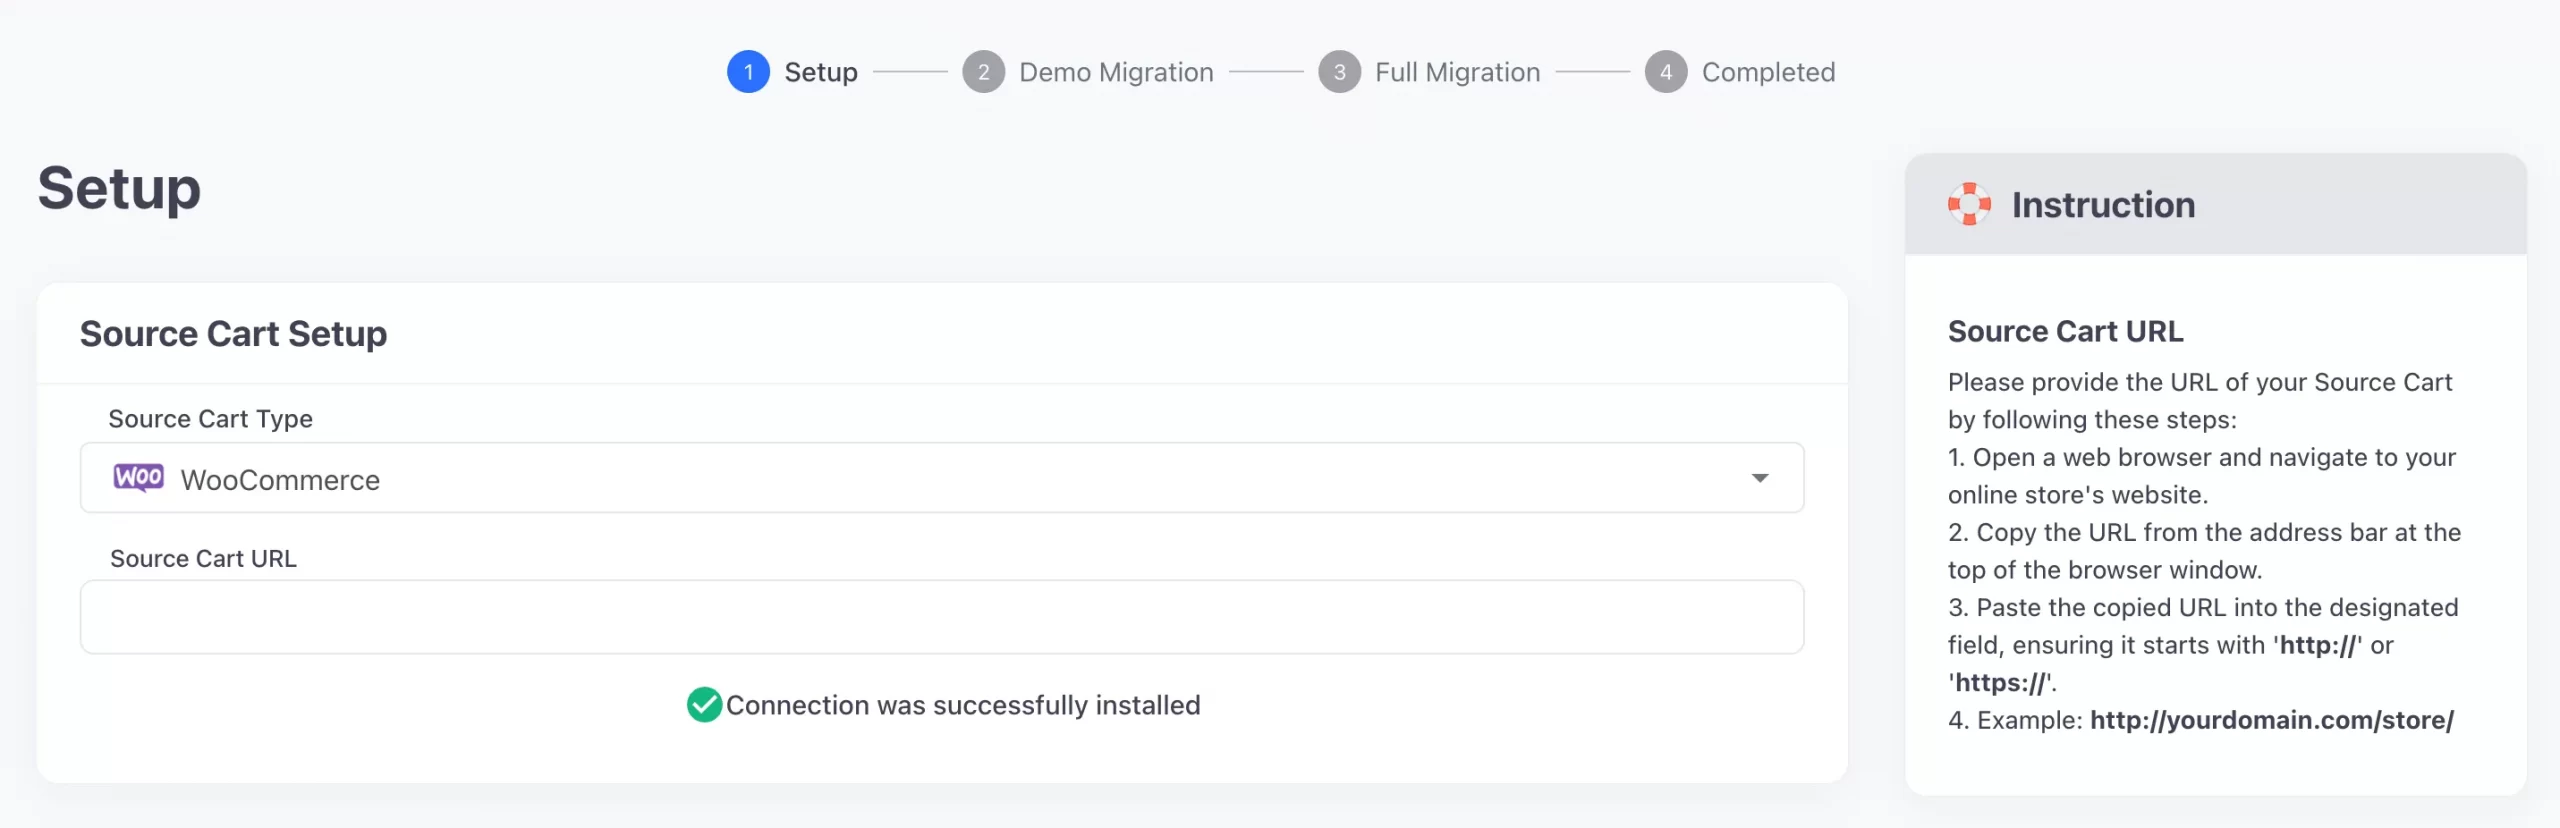
Once you are done, a notification will appear on the screen – “Connection was successfully installed”.
Then, coming to the target cart. Since we're importing customers and orders to Shopify, let's select Shopify as the target cart type. Now, you need to fill in the store URL and the API password (here's the guide to have it).
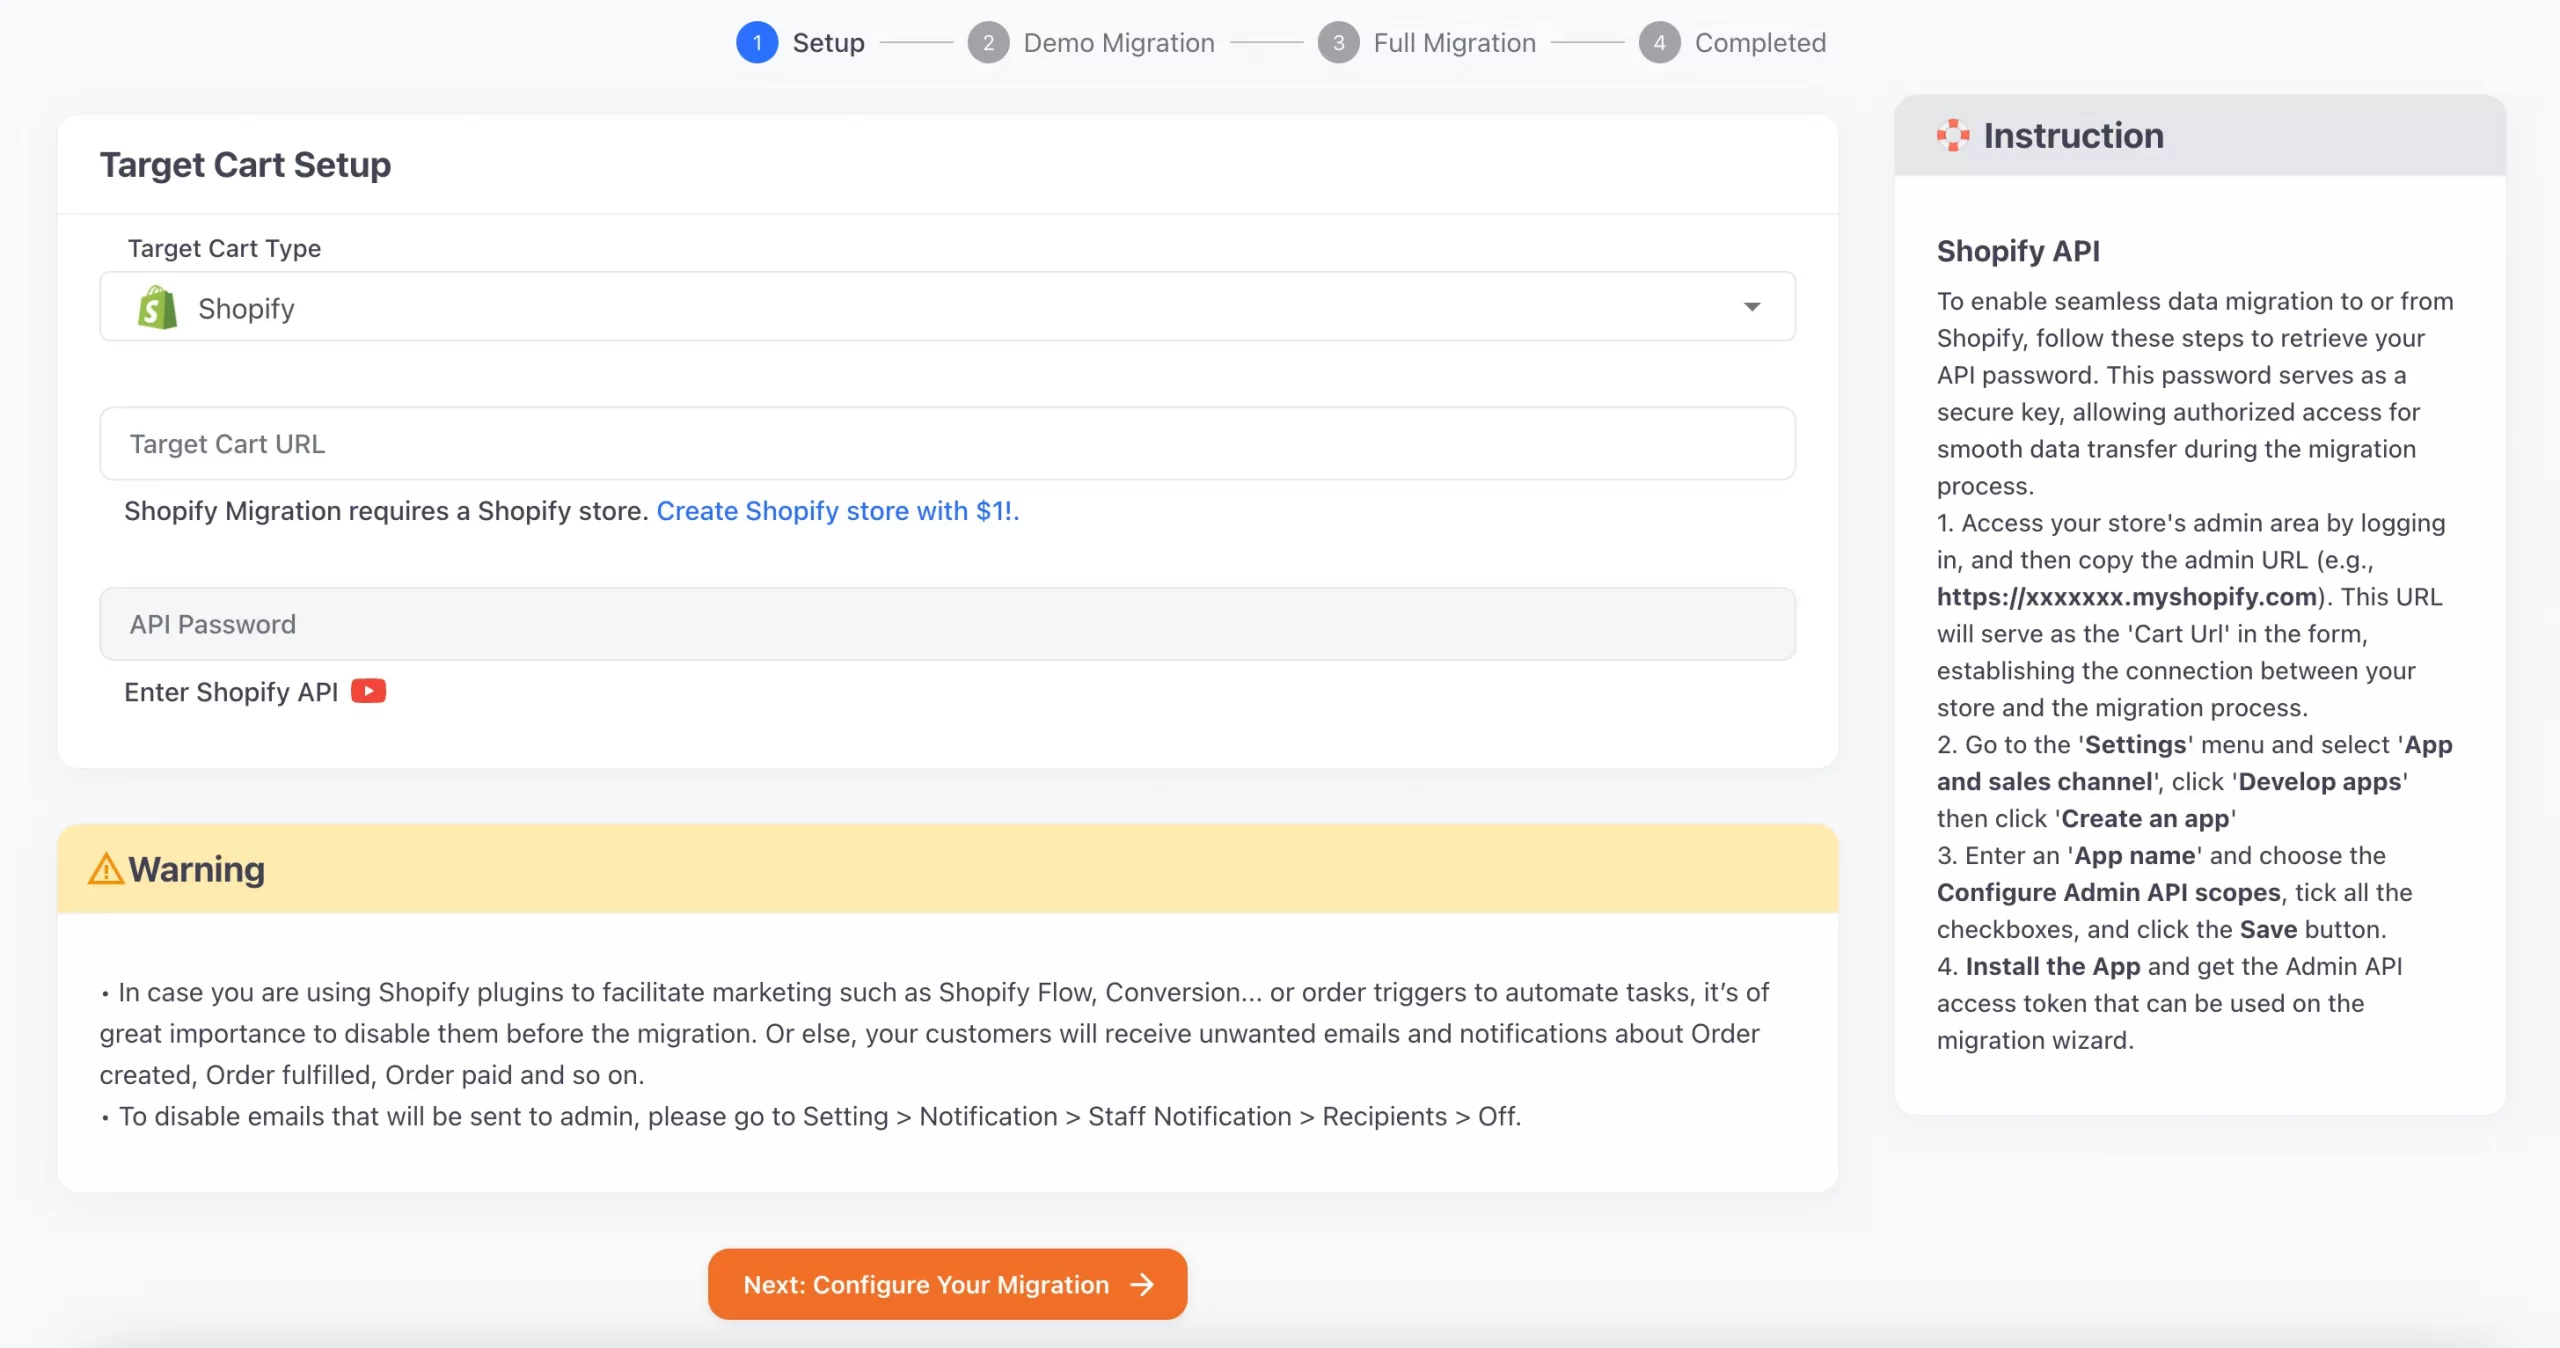
Once done, click “Next: Configure Your Migration” to kick off the import process.
Tips: If you're migrating via our app directly from Shopify, you won't need to fill in your Shopify store information since they are automatically filled. You can proceed straight to the migration process without having to manually connect to Shopify.
Step 2: Select Entities to Migrate to Shopify
In this stage, you can choose the entities that you want to migrate to Shopify. LitExtension supports various types of data: products, pages, blogs post, coupons, etc. Make sure to tick on Customers, Orders, and other data types as you require.
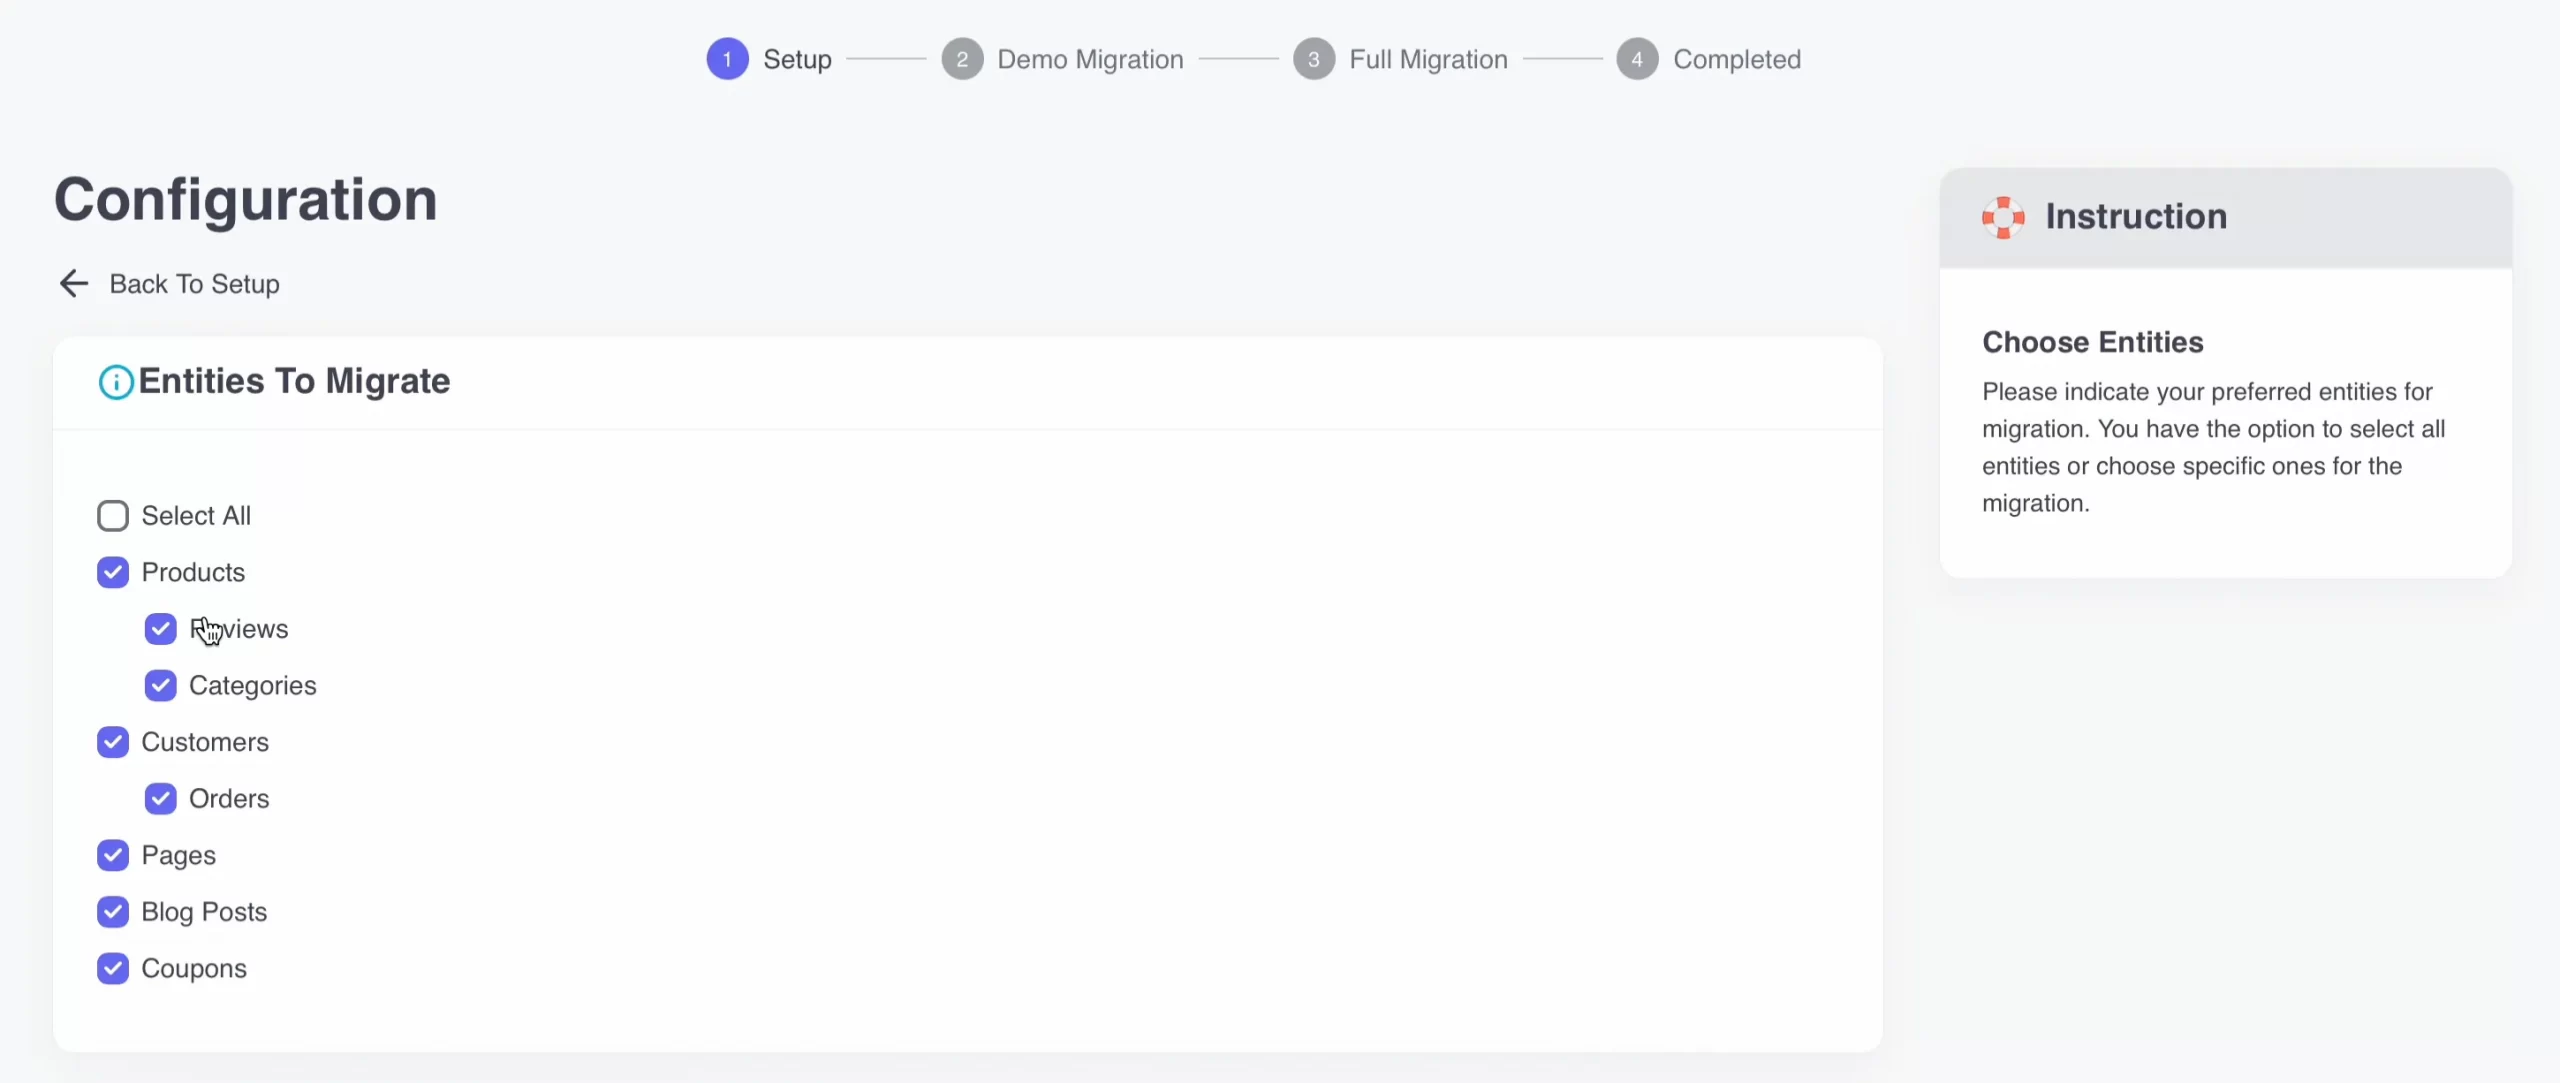
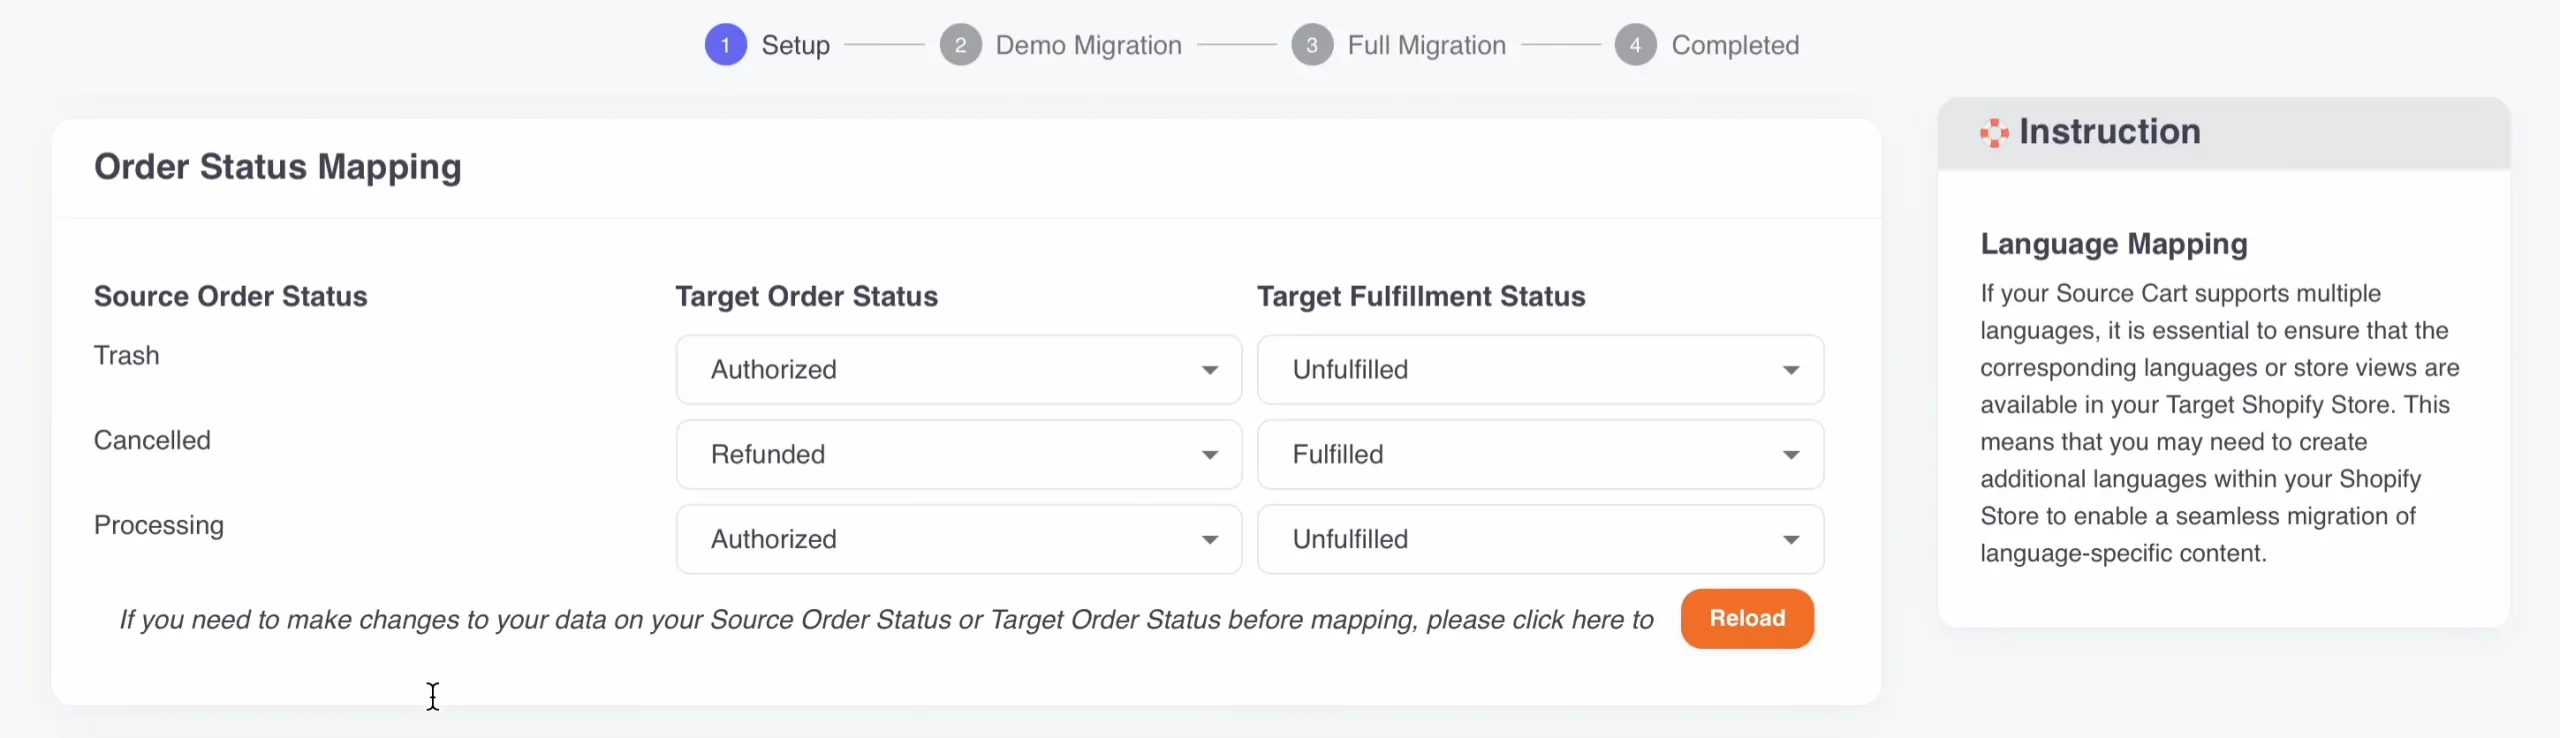
To help you extend your migration possibilities, LitExtension also offers Additional Options, Order Status and Language Mapping. Therefore, remember to choose other options in accordance with your business needs and requirements.
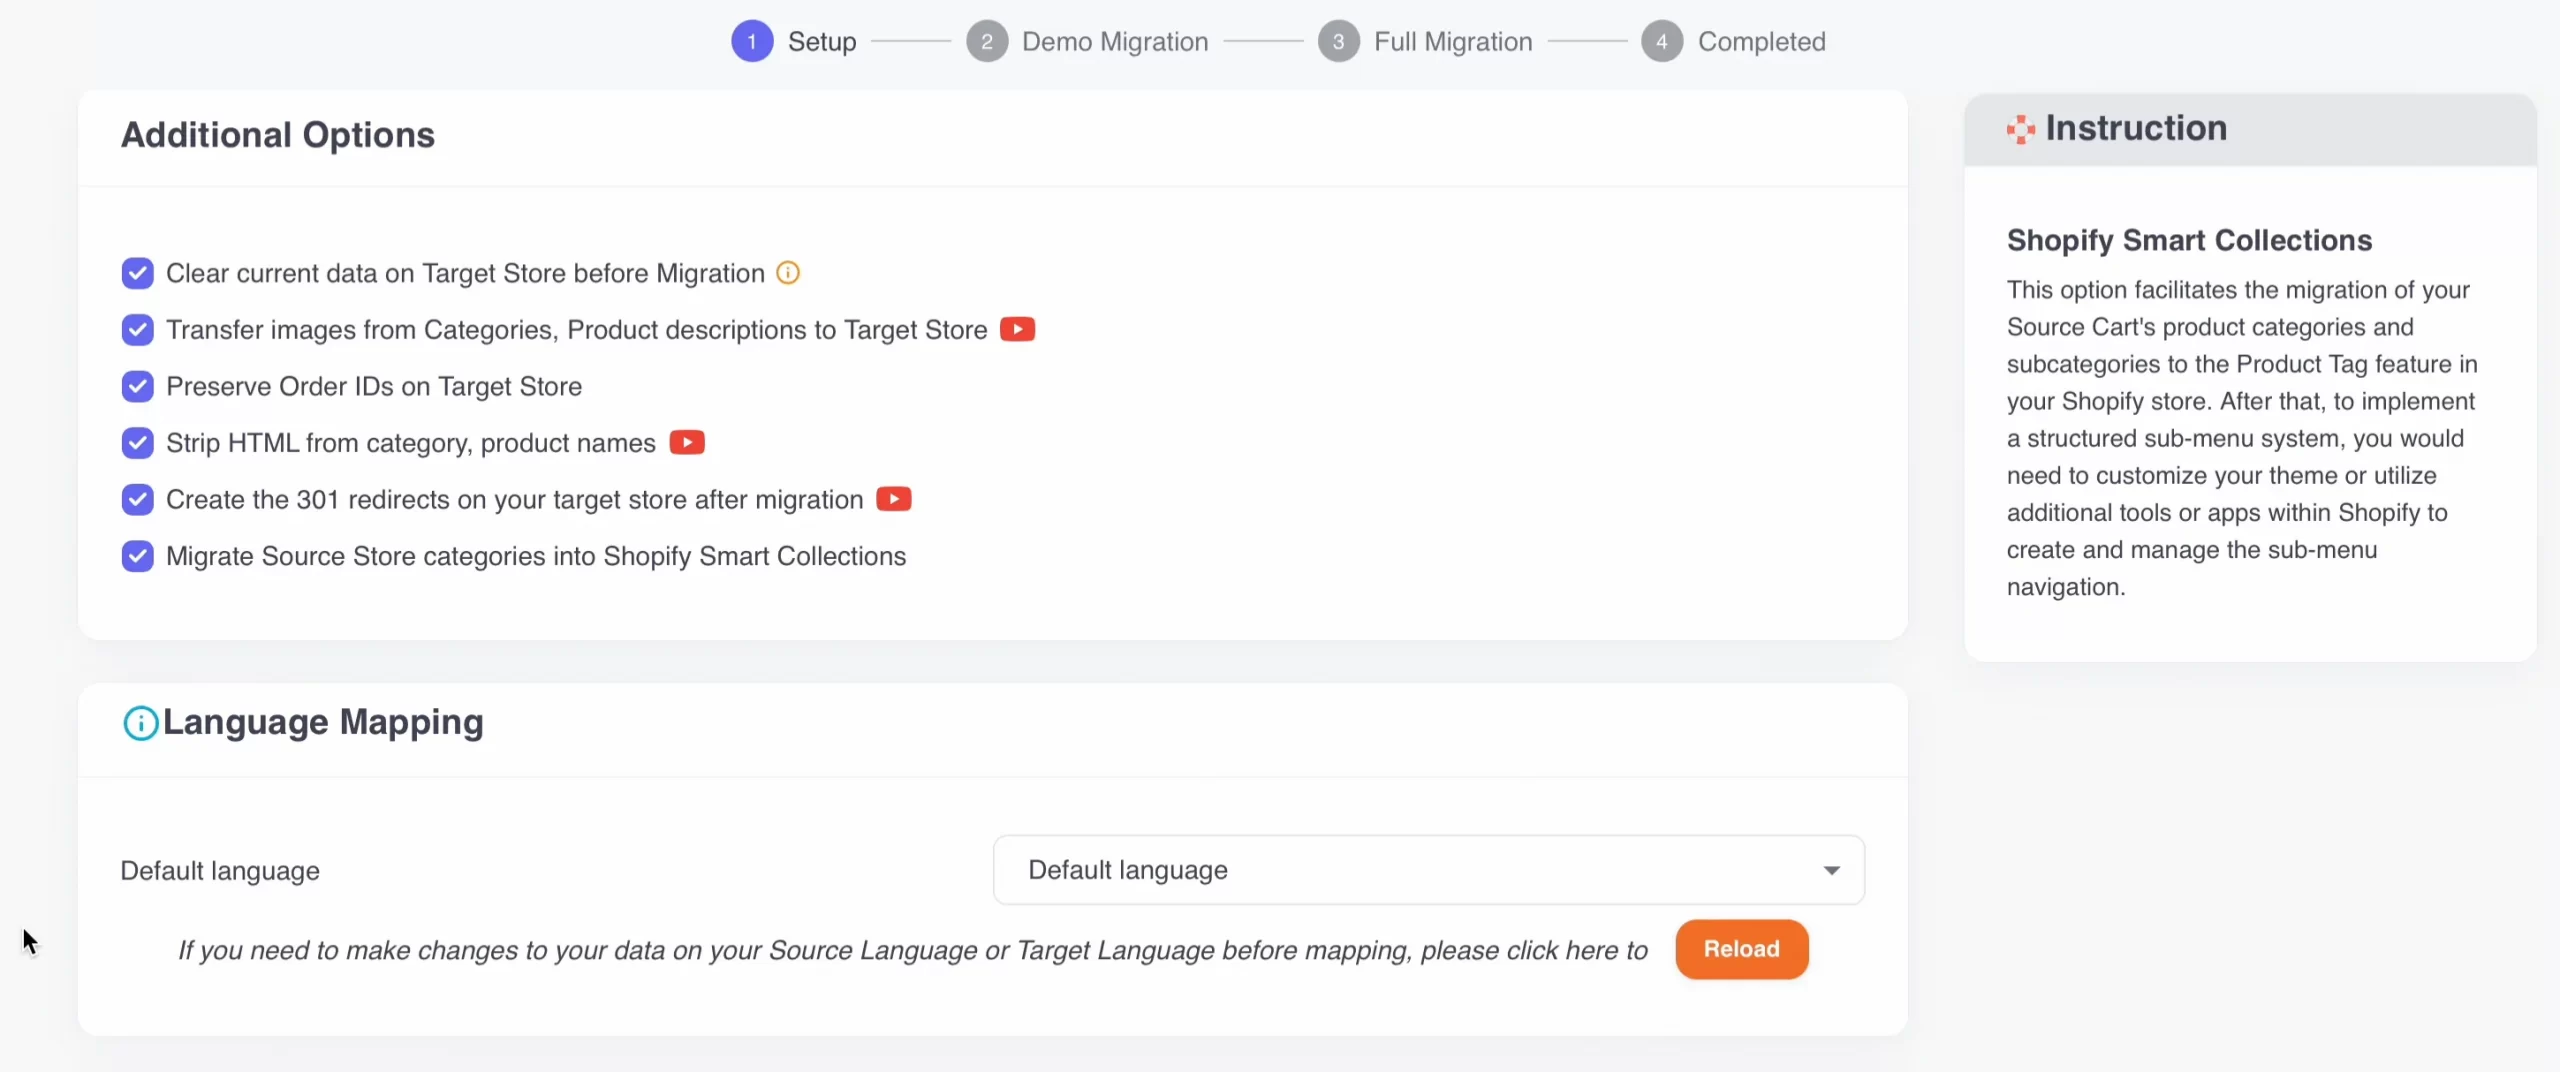
Also, since you're importing orders to Shopify, don't forget to map the order status.
Once everything is all set, you can now process the migration.
Step 3: Import Customers and Orders to Shopify
At this stage, LitExtension encourages you to run Free Demo Migration first to actually visualize the migration process. You can skip the demo process and jump right into Full Migration. The dashboard should look like this:
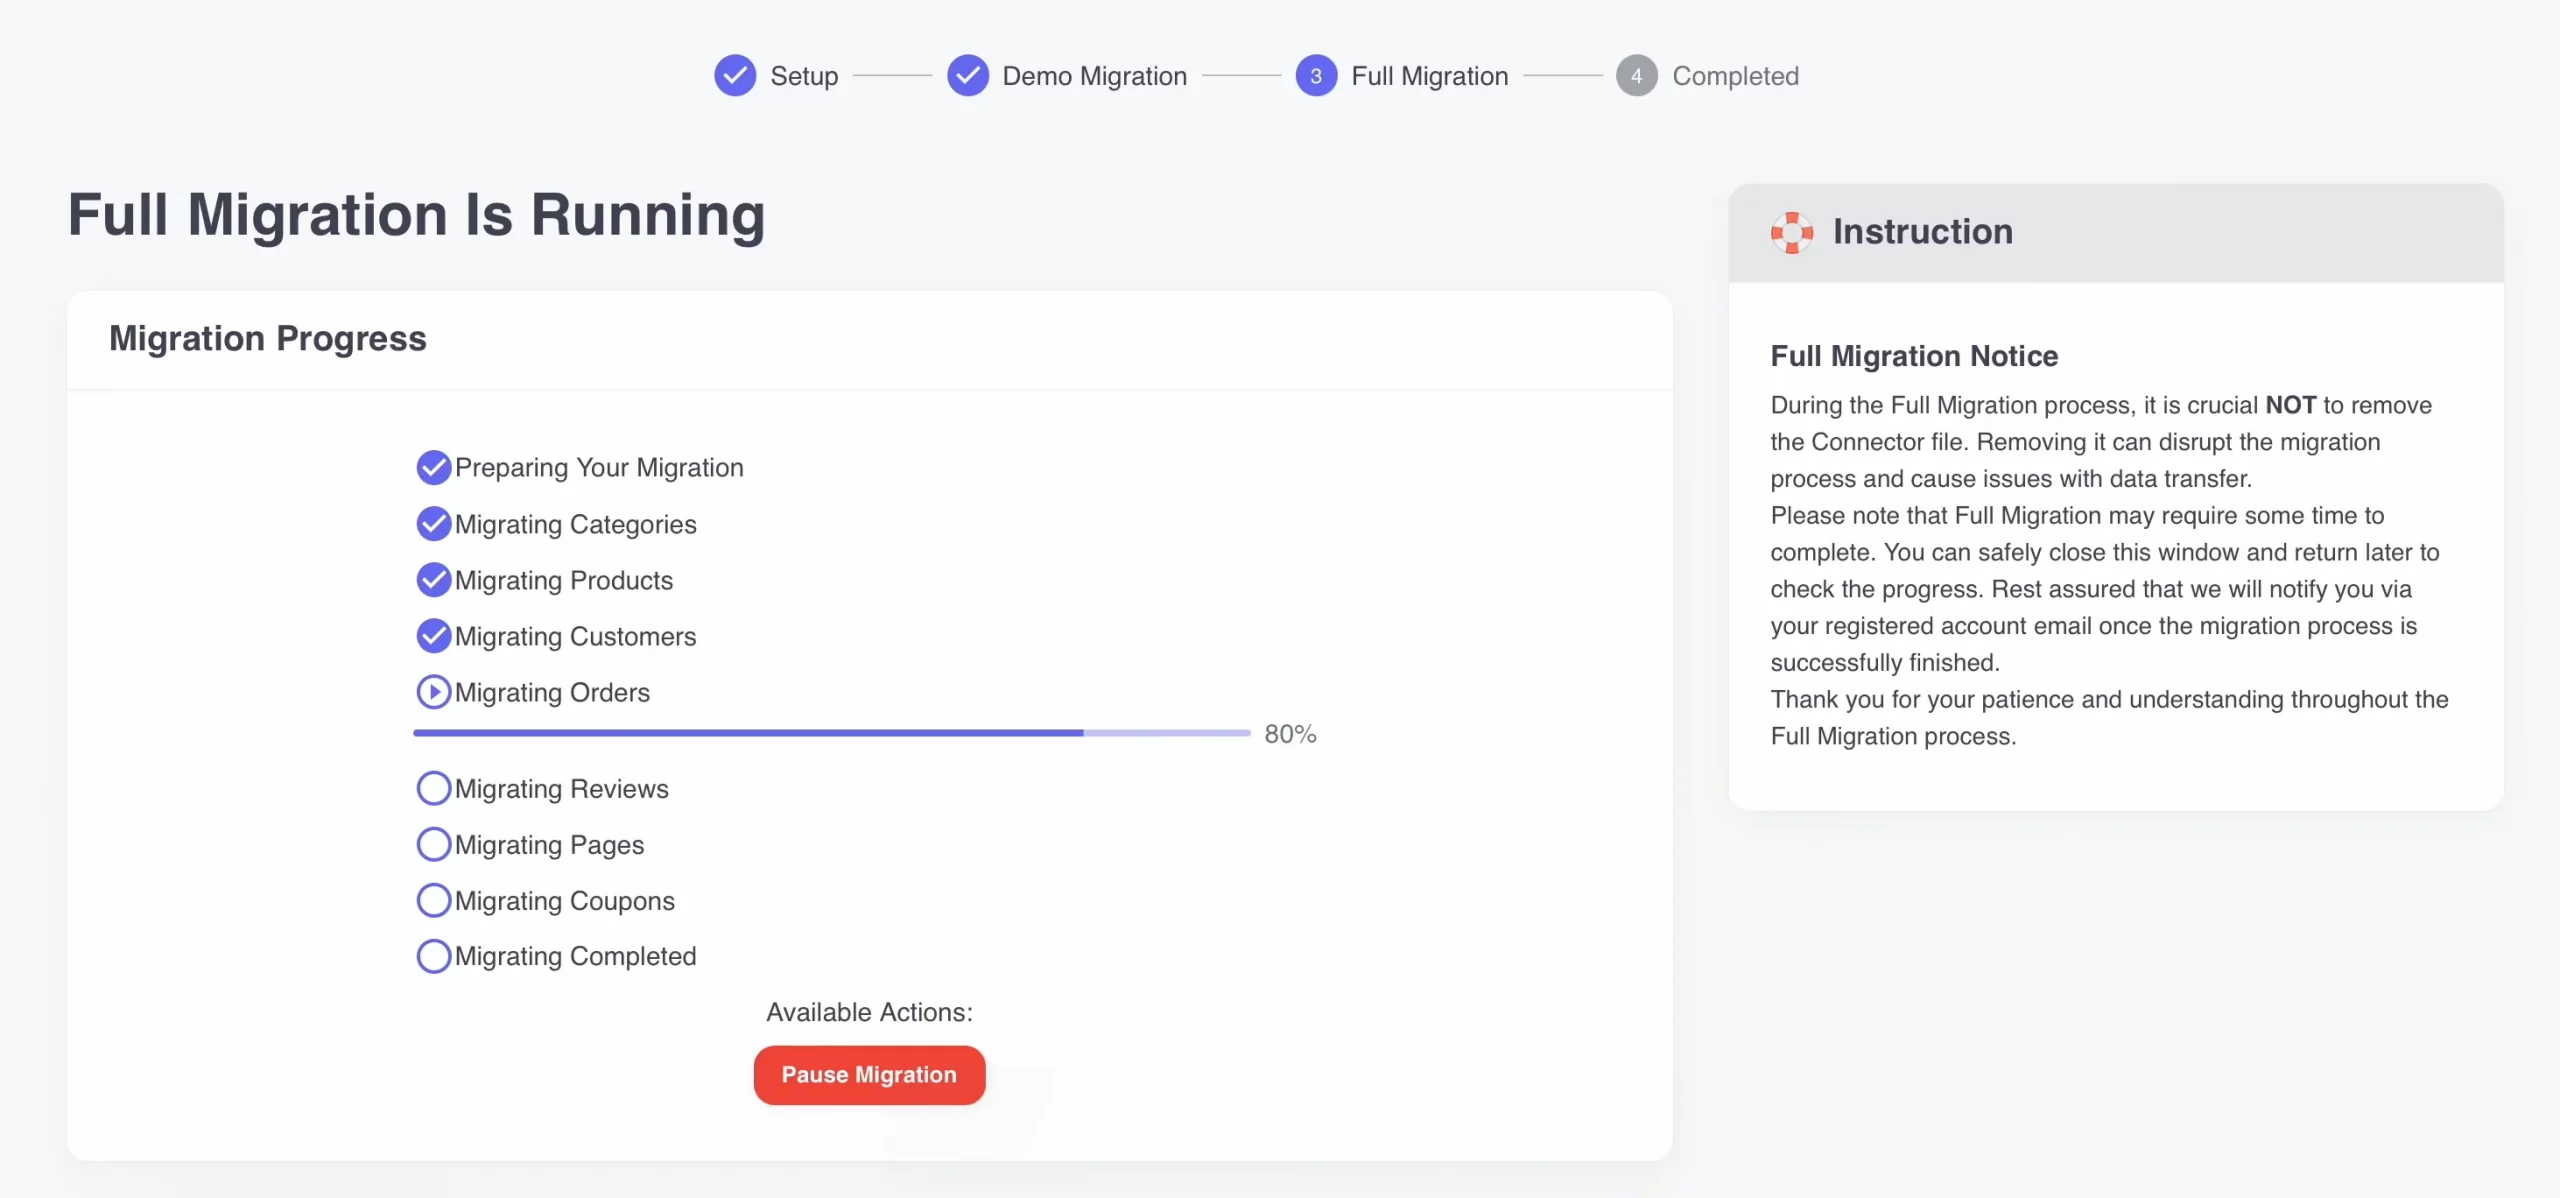
Once the migration starts, the LitExtension solution will run seamlessly on the server without a browser connection. Therefore, feel free to have a cup of coffee and get back when you receive an email notification if the process is complete.
Additionally, your current eCommerce store can still be up and running during the full migration. So, there will be no loss in revenue!
Import customers & orders to Shopify!
LitExtension ensures an accurate and secure migration to Shopify, empowering your business growth!

How to Import Customers and Orders to Shopify By Hand
Manually perform the Shopify import customers
1. From the Shopify dashboard
- Navigate to the “Customers” tab on the left side of your dashboard after logging in.
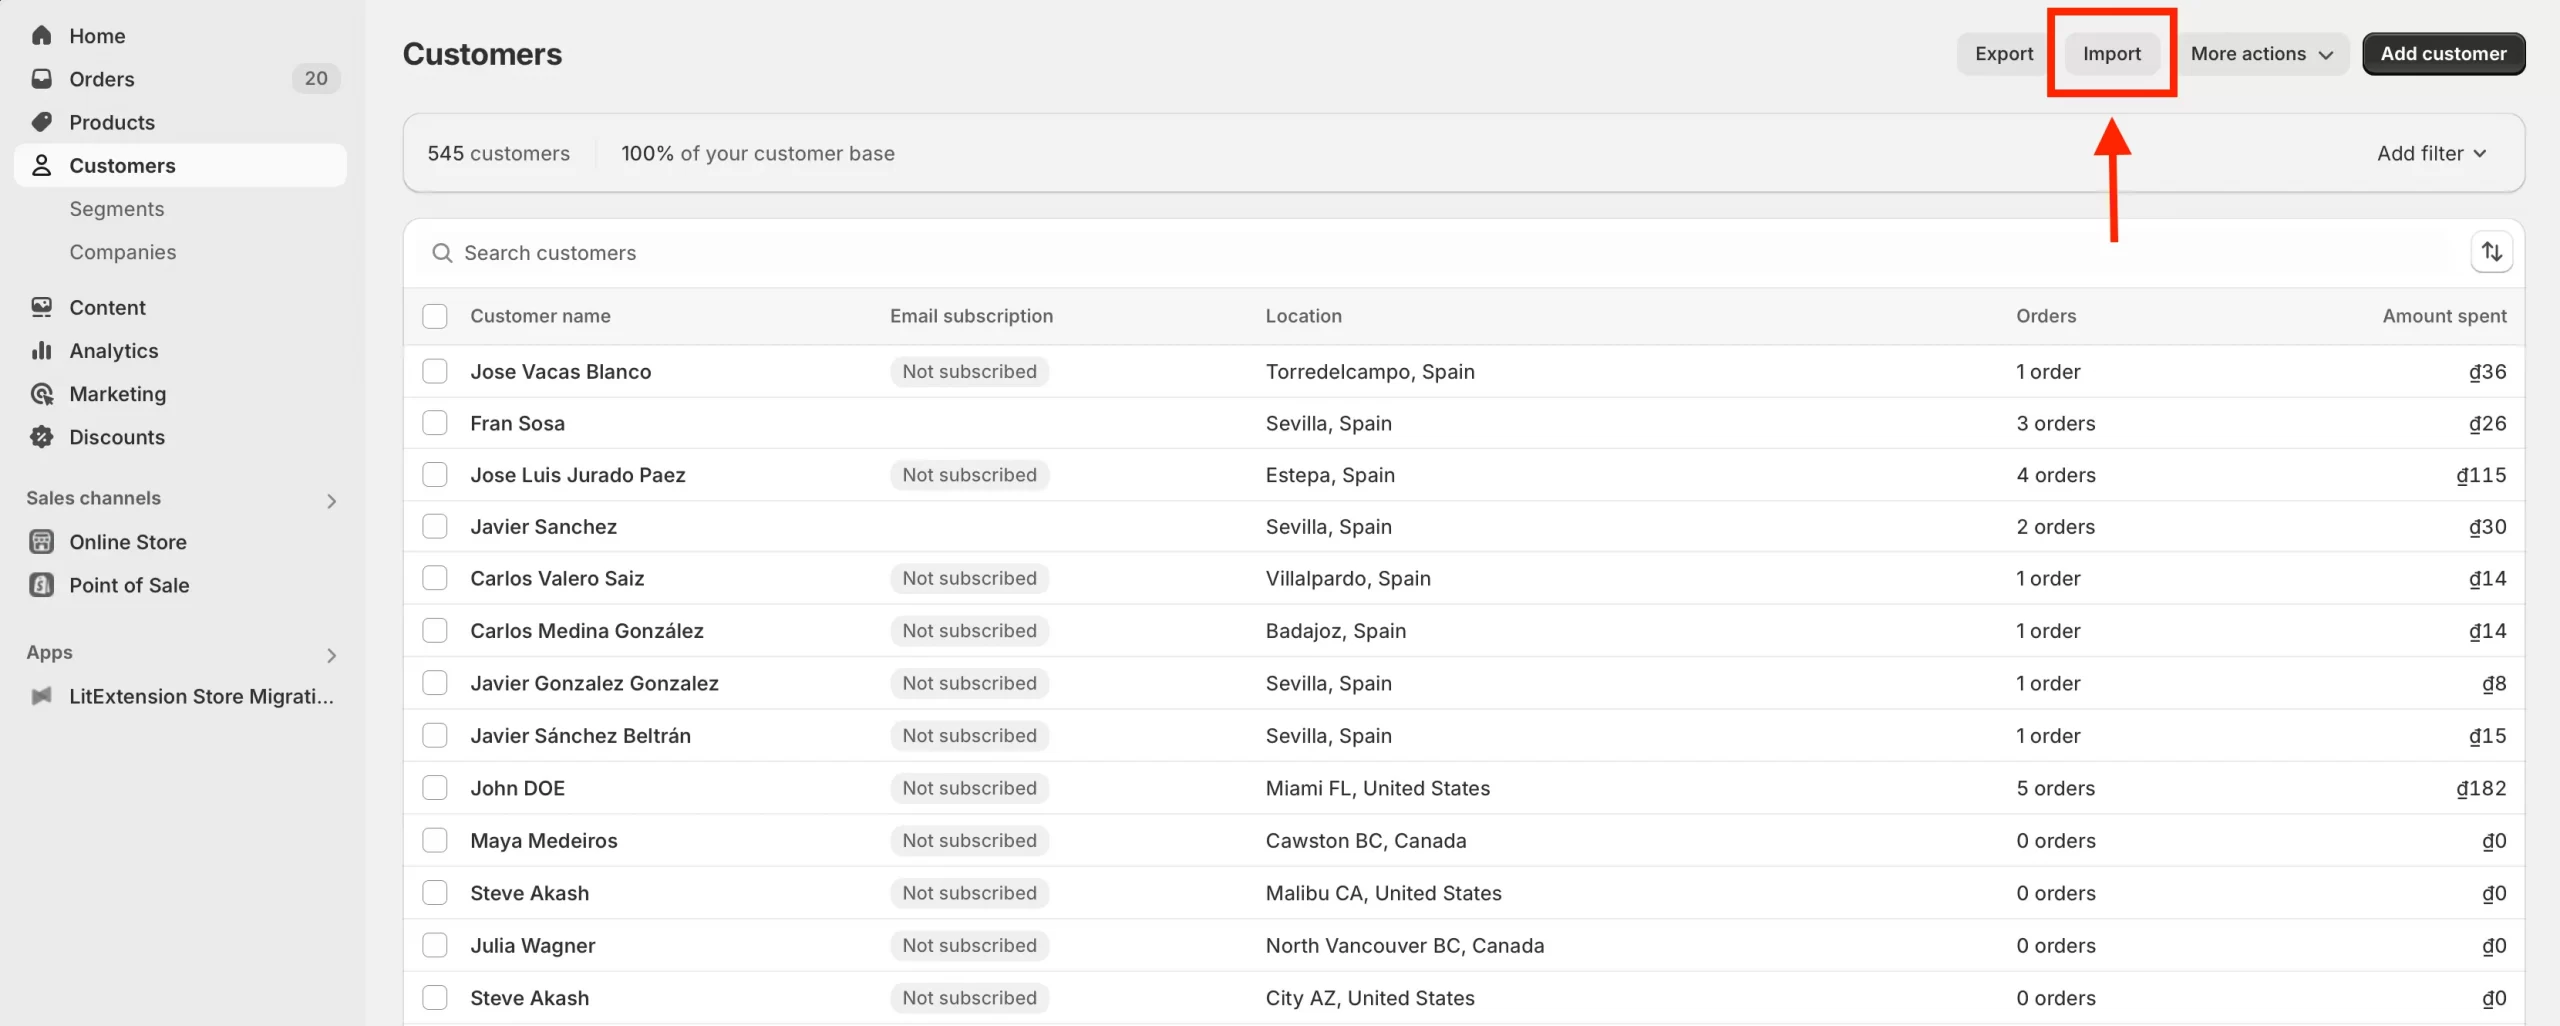
- Choose the “Import” button.
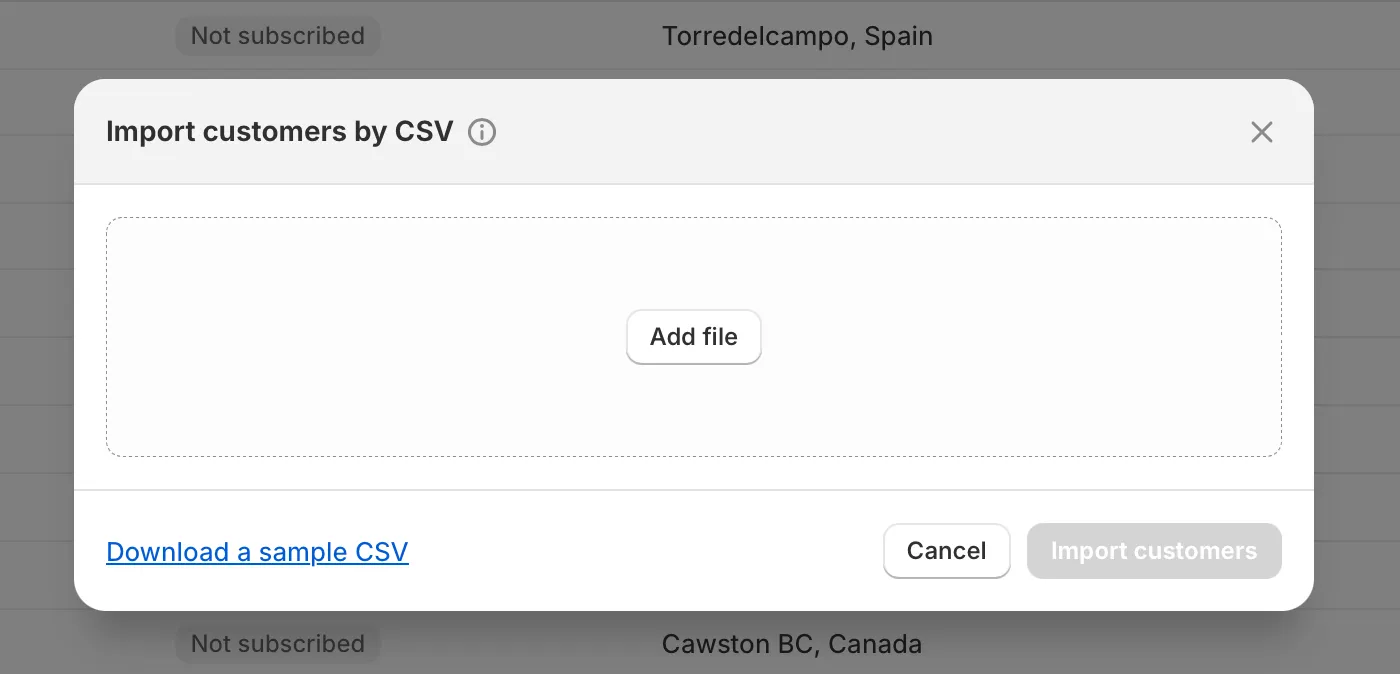
- Click on the “Add file” button to import your CSV files from your computer then review it.
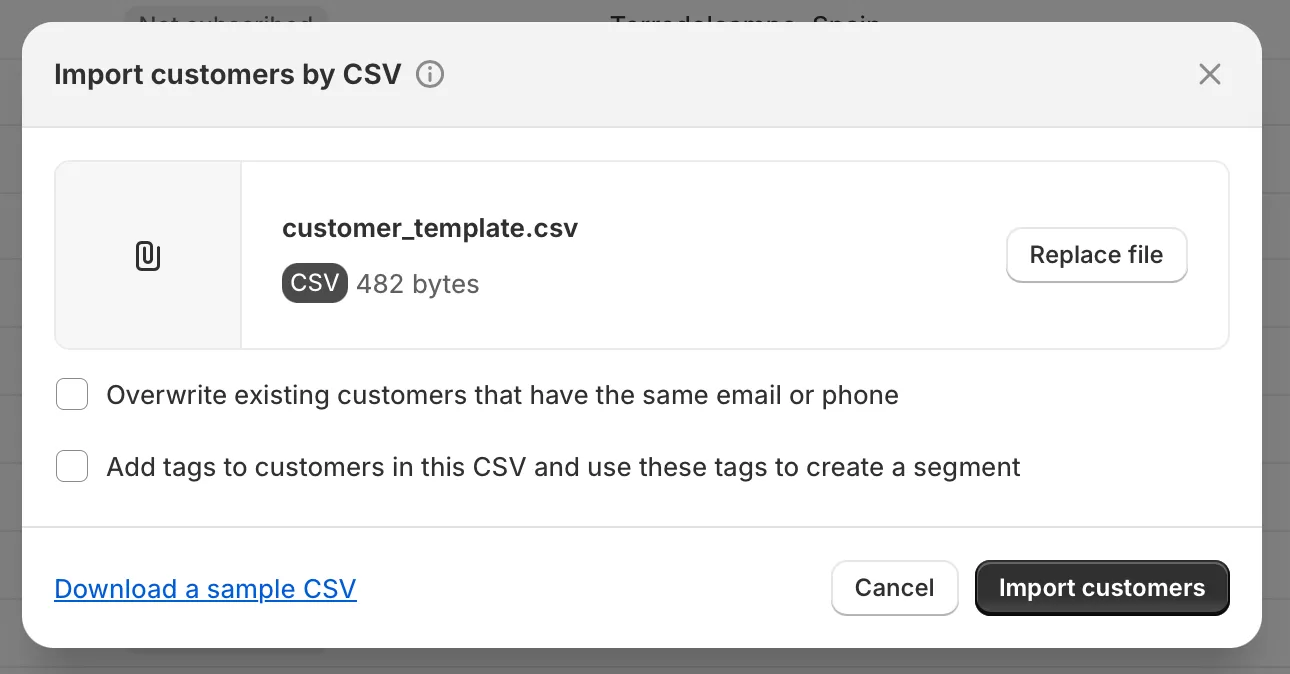
- Finally, press the “Import customers” button.
You can only import 1MB or less of customer CSV files. To get around this limit, you can import your customer records using several CSV files. For more details, you can take a look at our article on Shopify CSV Import.
2. Using the Store Importer app
- Go to Shopify App Store to find the Store Importer app > Add app, then Install the app in your Shopify dashboard.
- On the Import your data into Shopify page, select your current shopping cart (source cart) from the drop-down menu.
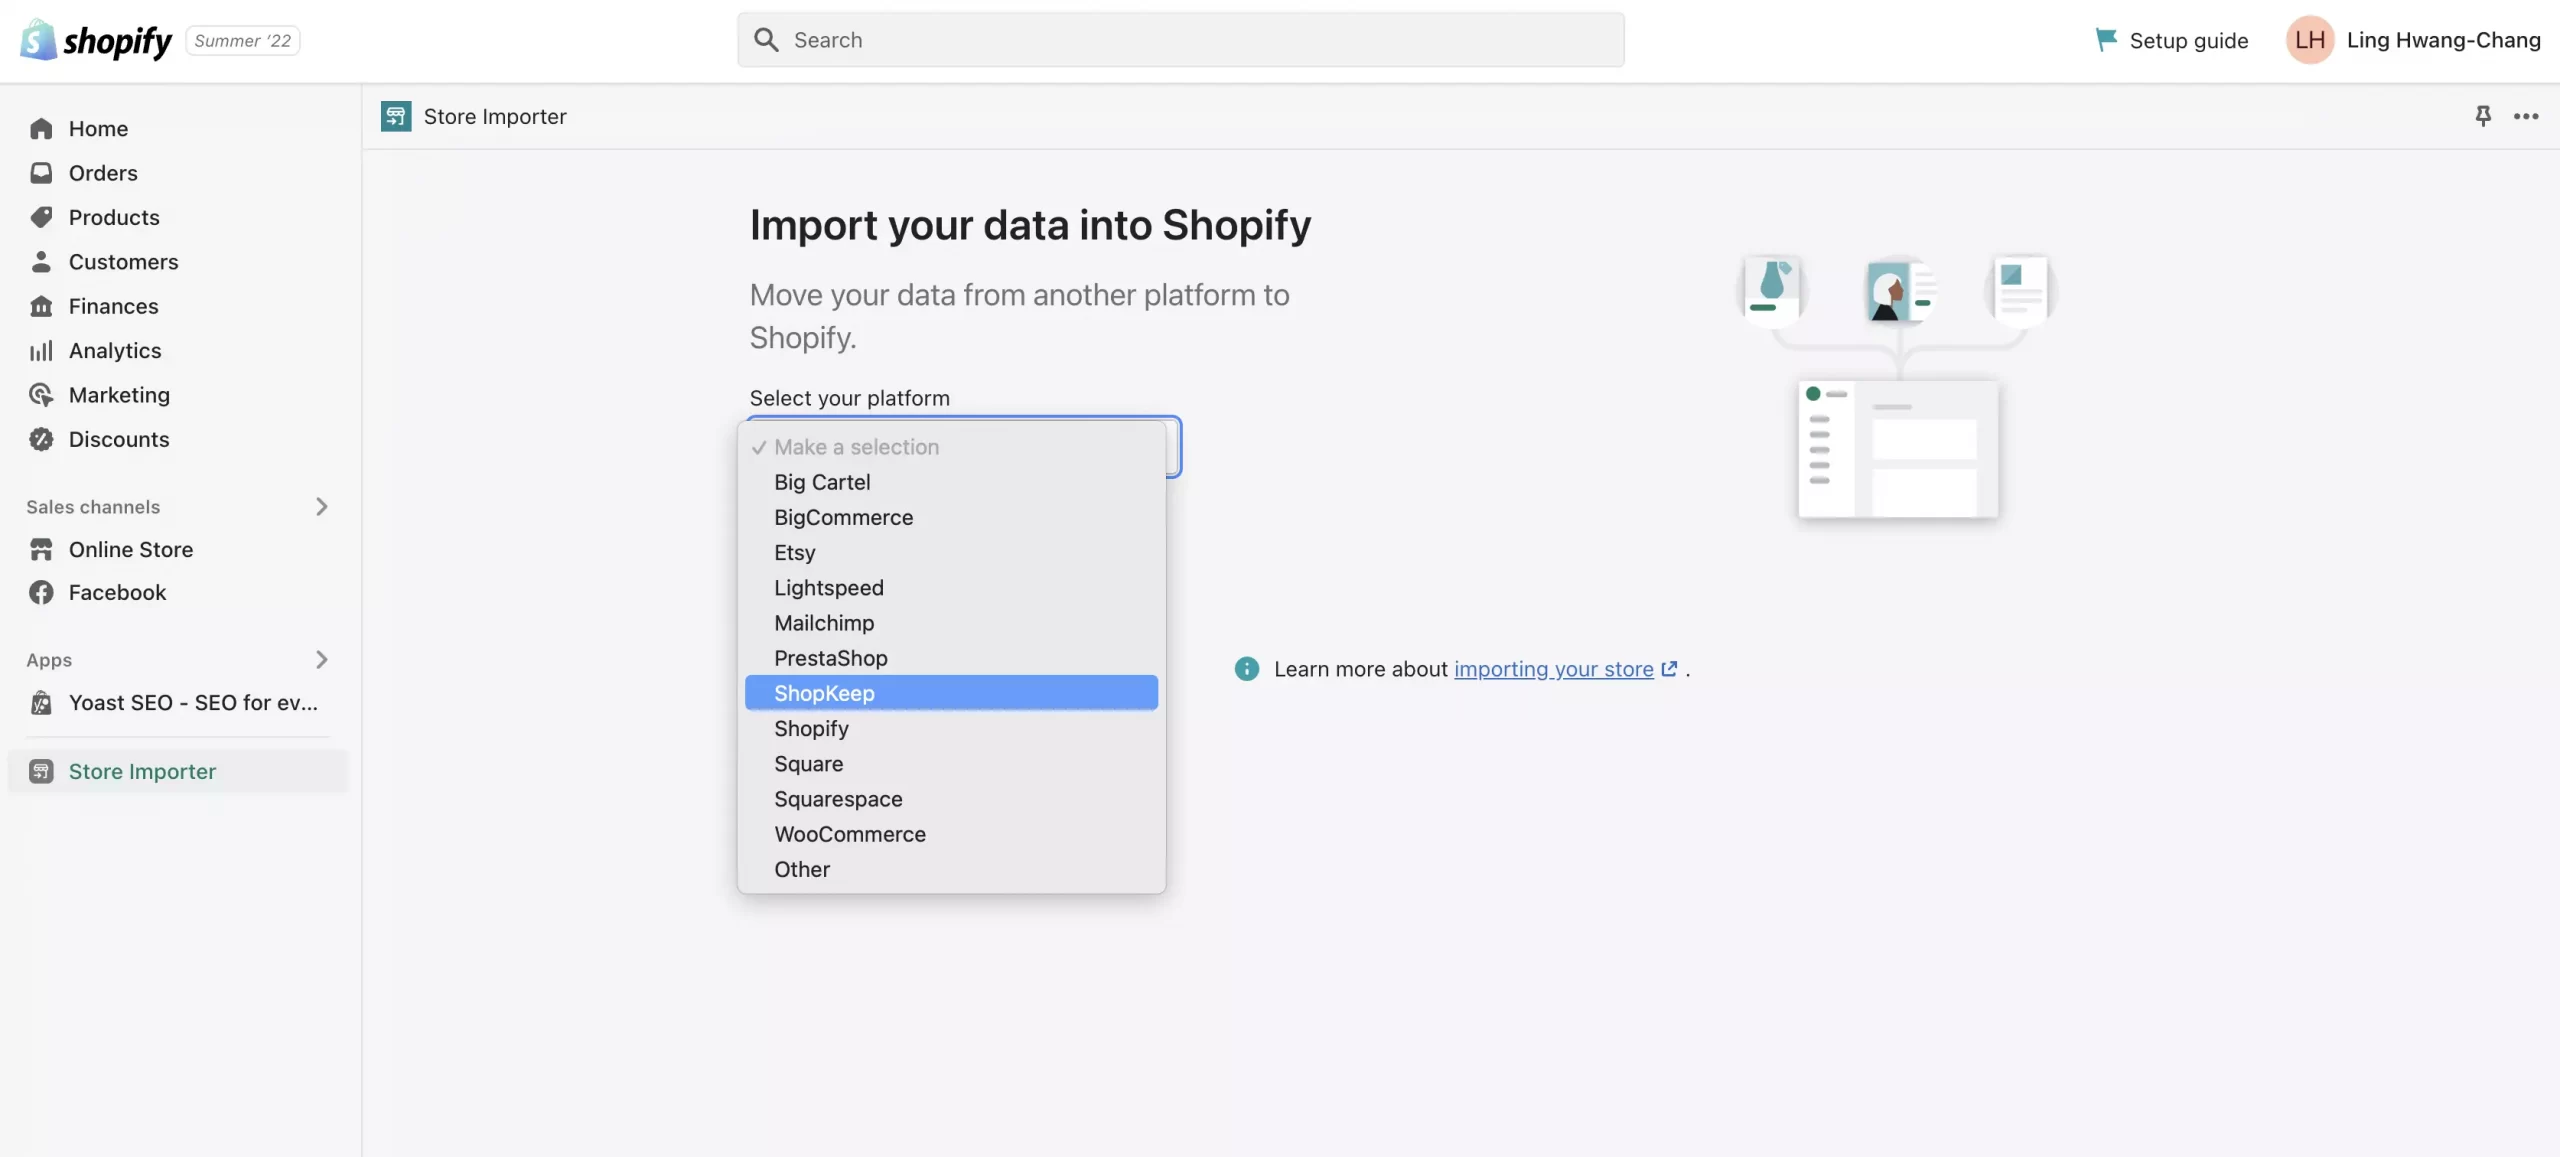
- Under Upload files, you should click Add file and select your exported files. You can select any number of CSV files.
- Click Continue import > Import.
Important note: Shopify has stopped supporting this Store Importer app since early 2023. If you want to import customers and orders to Shopify, please refer to other methods in this article.
How to import orders into Shopify manually
Currently, it's impossible to manually perform Shopify import orders, so users may need to find other ways to do this. You can use third-party apps or use the app that Shopify has exclusively provided. Each method has its pros and cons, we will give you specific information so that you can make a choice that suits your needs.
1. Using a third-party app
Choosing a good app to start importing orders into Shopify is difficult for those who lack knowledge. Don't worry! We have a suggestion for you: EZ Importer – Order Importer.
EZ Importer enables you to bulk import orders to Shopify easily via CSV. You won’t have to waste time adding fields to Shopify by hand. This app provides a customer data mapper to map the field headers in your CSV with Shopify's order fields.
Moreover, you don’t have to worry about your CSV files and “upload data not found” by using Shopify defaults feature. Specifically, this is how it works in 3 simple steps:
- Upload your CSV files.
- Map the headers of your CSV files to the appropriate Shopify fields.
- Review and import your data!
Explore more: EZ Importer – Order Importer on Shopify App Store
2. Using the Transporter app (Shopify Plus)
The Transporter app is an application used to perform Shopify import orders from CSV to Shopify Plus. Accordingly, you won't have to worry about modifying the form of CSV files that Shopify requires. This can save a lot of your time as there is no need to manually edit these files.
Particularly, the Transporter includes 2 main tools:
- Transporter command-line tool: Used to export and convert data from a supported platform into a CSV file.
- Transporter app: Used to enter order data into Shopify. This app uploads CSV files and is available from the Shopify App Store.
However, when using this app, your CSV files must at least include the object type name and use UTF-8 encoding.
Explore more: Shopify Transporter App on Shopify App Store
Unsure that your order and payment process work perfectly after Shopify import orders? Here are two ways you can do to check if it runs smoothly.
1. Test with Bogus Gateway to simulate a transaction
2. Place a real order, then cancel and get a refund
To learn more about how to do a test order on Shopify, please refer to this document.
Why Should You Move to Shopify?
Have you ever wondered, is Shopify worth it? Well, the answer is yes, and here are the reasons why.
Firstly, Shopify is fairly simple to use. It is built for everyone, from eCommerce experts to complete newcomers. You don't need any website development experience to set up a fully functional online store with Shopify.
Here are a few steps you could follow to get started on Shopify with no technical knowledge or coding skills required.
- Go to the Shopify homepage and create an account.
- Select the best Shopify theme and customize it to your liking.
- Set up crucial eCommerce functions (such as shipping, payments,…). At this stage, you can integrate with other third-party apps on the Shopify App Store to enhance the functionalities of your store.
- Purchase a Shopify pricing plan and publish your store.
Secondly, you can try all the powerful features that Shopify has to offer (including premium Shopify themes) for 3 days for free to catch a glimpse of how this platform works. Moreover, you can also make use of Shopify's “$1/month for 3 months” deal to save a huge amount of cost. Regarding Shopify pricing, currently, there are 3 main pricing plans, including Basic Shopify, Shopify, and Advanced Shopify. Each plan's key differences are summarized in the table below:
Basic Shopify $39/month | Shopify $65/month | Advanced Shopify $399/month | |
Transaction Fees *if not using Shopify Payments | 2.9% + 30¢ USD online 2.6% + 10¢ USD in person 2% 3rd-party payment providers | 2.7% + 30¢ USD online 2.5% + 10¢ USD in person 1% 3rd-party payment providers | 2.5% + 30¢ USD online 2.4% + 10¢ USD in person 0.6% 3rd-party payment providers |
Additional staff accounts *assign & manage staff's activities | — | 5 | 15 |
Custom apps | Standard | API PII access included | API PII access included |
Checkout capacity *automatically manage & operate stores | Standard | Standard | 10x |
Shipping Discount *shipping subsidies with leading carriers | up to 77% | up to 88% | up to 88% |
Duties and import taxes | — | — | fully supported |
Localized selling with custom markets | 3 markets | 3 markets | 3 included + $59/mo per added active market |
We recommend you go for Shopify or Advanced Shopify for outstanding features, including lower transaction fees, more staff accounts, advanced report systems, excellent workflow automation, and more inventory locations. For example, with the Advanced Shopify plan, you can customize the report systems to see what exactly you need!
Moreover, the platform also ensures satisfaction even for large stores, thanks to a collection of great plugins and applications. You can watch our latest Shopify Review and dive deeper into the cart here:
If you're selling elsewhere, migrating to a Shopify store could be beneficial. A proper Shopify migration will save you much effort in building a new store.
Import Customers and Orders to Shopify – FAQs
Can I import orders to Shopify? / Can I import customers to Shopify?
Yes, you can. There are 3 ways to import customers, products, and orders into Shopify. You can do so via separate CSV files, third-party apps, or LitExtension Shopify migration solution. As a whole, LitExtension automated solution will save you the most time and effort because you won't need CSV files to import. Explore more about our
How do I import past orders into Shopify?
Click Apps > Import store from your Shopify admin. Select Shopify from the drop-down menu on the Import your data into Shopify page. Click Add file under Upload files and select your exported files. You can select an unlimited number of CSV files.
Can I manually add orders to Shopify?
You can also manually create orders in your Shopify admin to record orders made outside of Shopify or to send invoices to your customers. Shopify's Orders page is where you manage all of your store's orders.
Can you import HTML into Shopify?
Shopify does not allow you to directly add an HTML file to the root directory of your store. However, you can verify your Shopify store with Google by editing the theme code and adding an HTML meta tag.
Conclusion
Overall, we have shown you how to import customers and orders to Shopify with manual importing, Shopify apps, and LitExtension solution. Each method has its advantages, but you will save a lot of resources with LitExtension automated solution.
Overall, if you find Shopify import orders and customers process too difficult and time-consuming, contact us to migrate data at LitExtension. We provide data transfer from one platform to a more powerful one with excellent service and 24/7 support.
If you like this article, don't forget to visit our LitExtension Shopify blog to find more topics like this. And, let's join our Facebook Community to get more eCommerce knowledge.

