Squarespace to WordPress migration is handled entirely by LitExtension’s All-in-One team, no technical skill required on your end. Our experts transfer products, orders, customers, and other essential store data, validated through a Demo Migration before the Full Migration, backed by experience across 140+ eCommerce platforms.
Squarespace’s built-in export does not include products, orders, or customers, and your design is rebuilt in WordPress, so our service focuses on your store data. Start with a Free Demo Migration to preview how your data will appear on WordPress. Once you approve the results, we run the Full Migration, and you’re covered by up to 60 days of support after it completes.




How to Perform Squarespace to WordPress Migration

Step 1: Consultant By LitExtension Experts
Our experts will attentively consider your requirements, suggesting necessary measures to guarantee optimal preparation for the migration.

Step 2: Data Mapping & Setting By Experts
We’ll configure your WordPress store, map your Squarespace data, and integrate essential plugins or apps for a seamless migration experience.

Step 3: Perform Full Data Migration
Perform full Squarespace to WordPress data migration. Once the process begins, our experts transfer your data with high accuracy, strong security, and full compliance.
How to Migrate from Squarespace to WordPress
There are two ways to move your Squarespace site to WordPress: hand the entire process to LitExtension’s migration experts, or handle the export and import yourself using Squarespace’s built-in tools. Below, we walk through both.
What Transfers in a Squarespace to WordPress Migration
Squarespace and WordPress store content very differently, so it helps to know what the built-in export covers before you choose how to move Squarespace to WordPress. The table below follows Squarespace’s own export documentation:
| Squarespace content | In the WordPress XML export? | What to know |
|---|---|---|
| Layout pages, text blocks, and image blocks | Yes | Imported as WordPress pages and posts, but the layout itself needs rebuilding. |
| One blog with its posts and comments | Yes, one blog only | Up to 1,000 comments per post. Choose your primary blog before exporting. |
| Other blogs | No | Only one blog page can be exported at a time. |
| Images | Links only | The file entries point back to Squarespace, so images must be imported separately. |
| Products, orders, and customers | No | Export products as a CSV, and use a migration tool for orders and customers. |
| Store, index, album, cover, calendar, portfolio, and info pages | No | These page types must be recreated in WordPress. |
| Audio, video, product blocks, and dropdowns | No | Recreate them with WordPress blocks or embeds. |
| Drafts, style settings, and custom CSS | No | Publish drafts you need before exporting, and save any custom code separately. |
| Navigation menus and design | No | Rebuild them with a WordPress theme or page builder. |
| URLs | They change | Plan permalinks and 301 redirects before launch. |
A site that is mostly pages and one blog can often be moved with the built-in export. A store with products, orders, customers, and a large media library is where most people choose an automated Squarespace to WordPress migration instead, because the XML file leaves those out.
Before You Migrate from Squarespace to WordPress
Before you migrate Squarespace to WordPress – whether manually or with our All-in-One service – there are two things you must take care of first. Skipping these steps is the #1 reason migrations go wrong:
- Buy WordPress Hosting & a Domain: You need a live, working hosting account with a fresh, blank WordPress installation ready to receive data before you run any migration tool. LitExtension (and any migration service) needs a destination site to write to – it cannot create your hosting for you.
- Do NOT Cancel Your Squarespace Plan: Keep your Squarespace store fully active until the entire migration is complete and you have thoroughly tested the new WordPress site. Your Squarespace account is the source LitExtension pulls data from – closing it early can permanently cut off access to your products, orders, images, and customer data mid-transfer.
Method 1: Migrate from Squarespace to WordPress with LitExtension
Migrate Squarespace to WordPress without losing data or search traffic. Our All-in-One service assigns you a dedicated Personal Assistant to handle the entire move, mapping your products, customers, and orders into WooCommerce so your new store is ready to sell from day one.
Step 1: Consultation & Planning
We analyze your current site structure and plan your move to WordPress.
- Technical Audit: We check your database, custom fields, products, and hosting.
- SLA Guarantee: We sign a Service Level Agreement covering timelines and deliverables.
- High-Speed Option: Large stores can use our multi-threaded tool to bypass server limits and reduce downtime (extra fee applies).
Step 2: Server Setup & Data Mapping
We prepare your target WordPress environment before moving any files.
- Platform Setup: We install WordPress and configure WooCommerce to receive your commerce data.
- Data Mapping: We match your Squarespace data to the correct WooCommerce fields so your products, customers, and orders display right.
- Custom Code: Complex layouts or unique code may require manual adjustments (extra fee applies).
Step 3: Demo Migration & Testing
We run a small test to ensure your data fits the new WordPress structure.
Our team moves a sample of your products and their images. We inspect the test site to fix formatting errors, broken links, or missing images before the final transfer.
Step 4: Full Migration
Once you approve the demo, we securely move your entire product catalog.
- Full Data Transfer: We move all products, customers, orders, and media. Engineers monitor the live transfer to fix errors instantly.
- SEO Protection: We create automatic 301 redirects to help reduce the SEO impact of the move.
Step 5: Quality Assurance
We audit your new WordPress site so you can review the results before launch.
- System Check: We test checkout flows, links, and database integrity.
- Client Review: You check the live site to confirm it meets your standards before launch.
Step 6: Data Syncing & Launch
We keep your new site updated with your latest sales.
- Recent Data Sync: Keep your Squarespace site live during the move. We sync new orders and customers right before launch to keep your WordPress store current.
- Free Support: Get up to 60 days of free technical support after your Full Migration completes.
- Refund Policy: We offer a 30-day money-back guarantee if we cannot fix critical data issues.
This is also when your domain gets pointed to your new WordPress site. Our team handles the DNS update as part of the launch, and if you run email through that domain, we make sure your MX records carry over correctly so your inbox keeps working without interruption.
Step 7: 24/7 Support
Our support team and your Personal Assistant remain available to help you.
- 24-Hour Reply: We guarantee a response to any support ticket within 24 hours.
- 24/7 Availability: Our help desk operates around the clock on weekdays and weekends.
- Direct Contact: Reach your Personal Assistant via ticket, email, phone, or live chat.
Method 2: Migrate Squarespace to WordPress Manually
You can migrate your site manually using the built-in export tool. This method is free but requires manual technical work to fix broken media and lost formatting.
Step 1: Export Squarespace Data
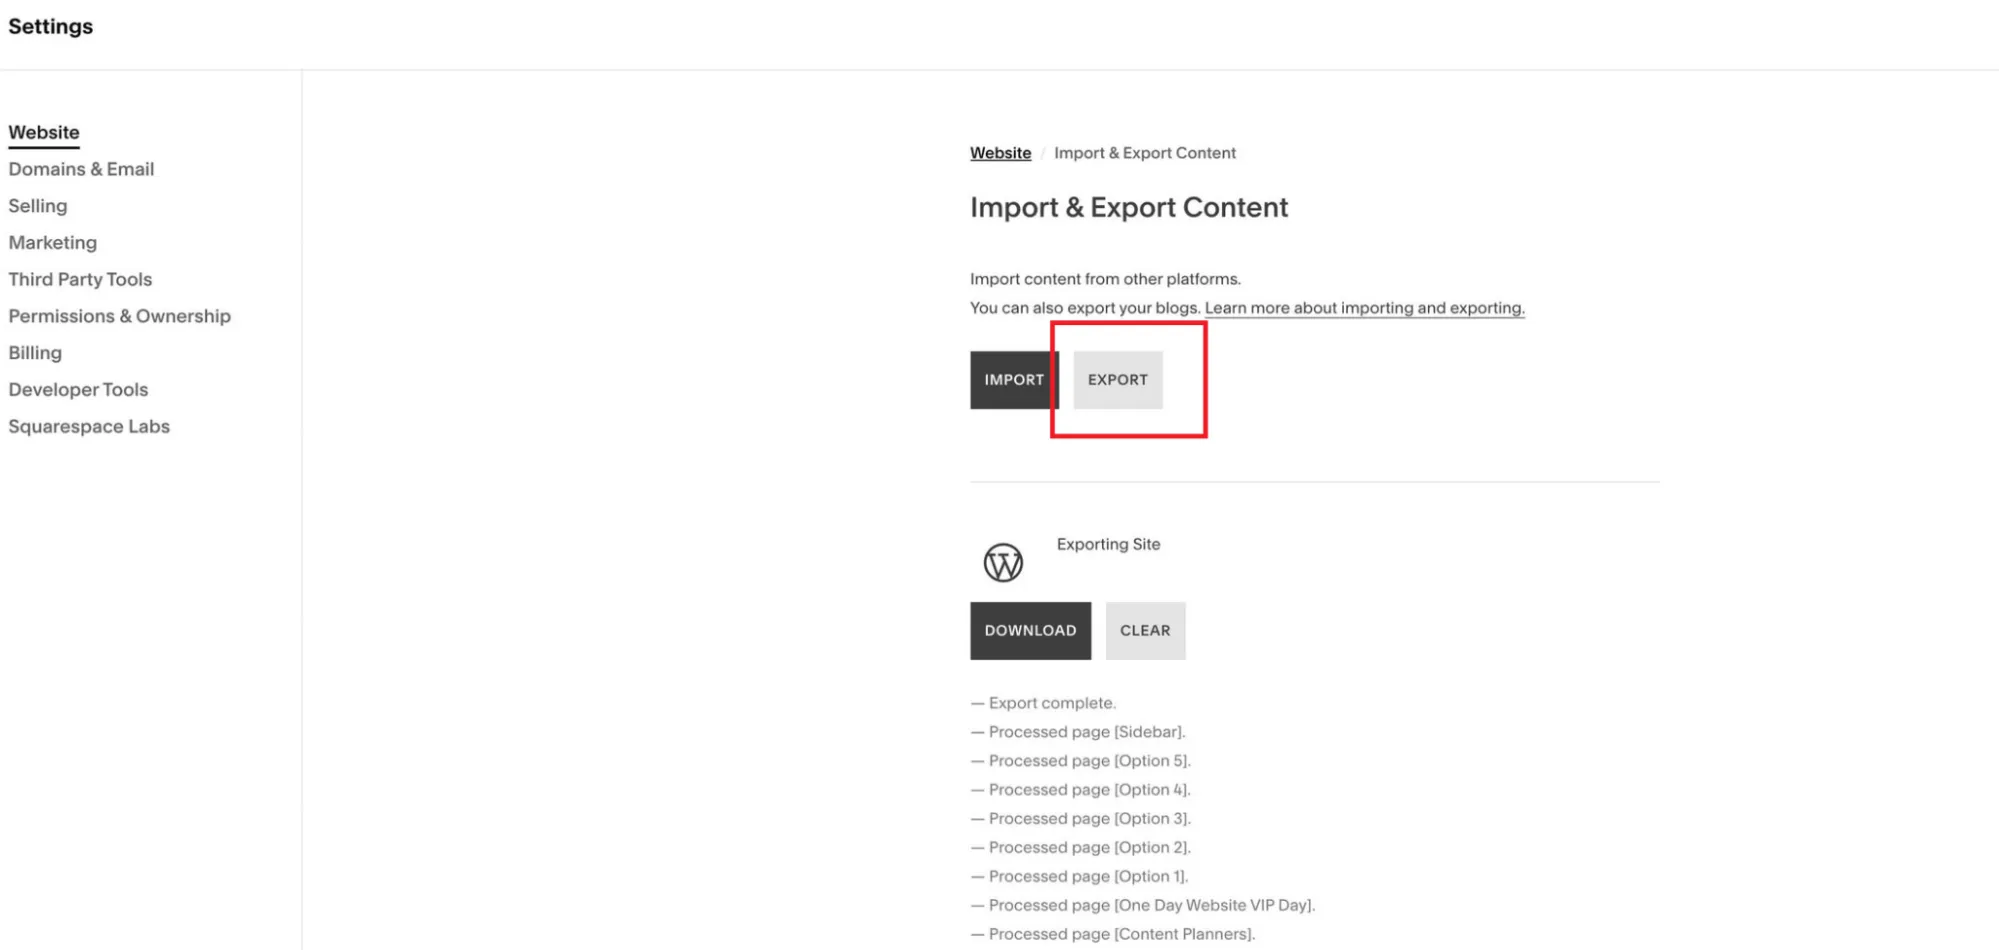
In your Squarespace dashboard, go to Settings > Advanced > Import/Export. Click Export and select the WordPress icon. Save the generated XML file to your computer. Before you export, it’s a good idea to backup Squarespace site as a safety net in case anything needs to be restored later.
A few limits to plan around before you export: if your site has more than one blog, Squarespace’s export only includes one of them, so you’ll need to pick your primary blog and handle the rest separately. Comments are capped at roughly 1,000 per post and can come through inconsistently on larger posts. And if any of your content sits behind a password or a membership/subscription area, it won’t be included in the export at all, so plan to rebuild that access-gated content by hand.
Two more conditions apply to Squarespace’s export. The site must be published with its availability set to Public, and trial sites cannot be exported. The export can also take several minutes to process, and in newer versions of the dashboard the panel is labeled Import & export content. Linked PDFs may appear in the XML file but will not import into WordPress, so download them and upload them to the Media Library yourself.
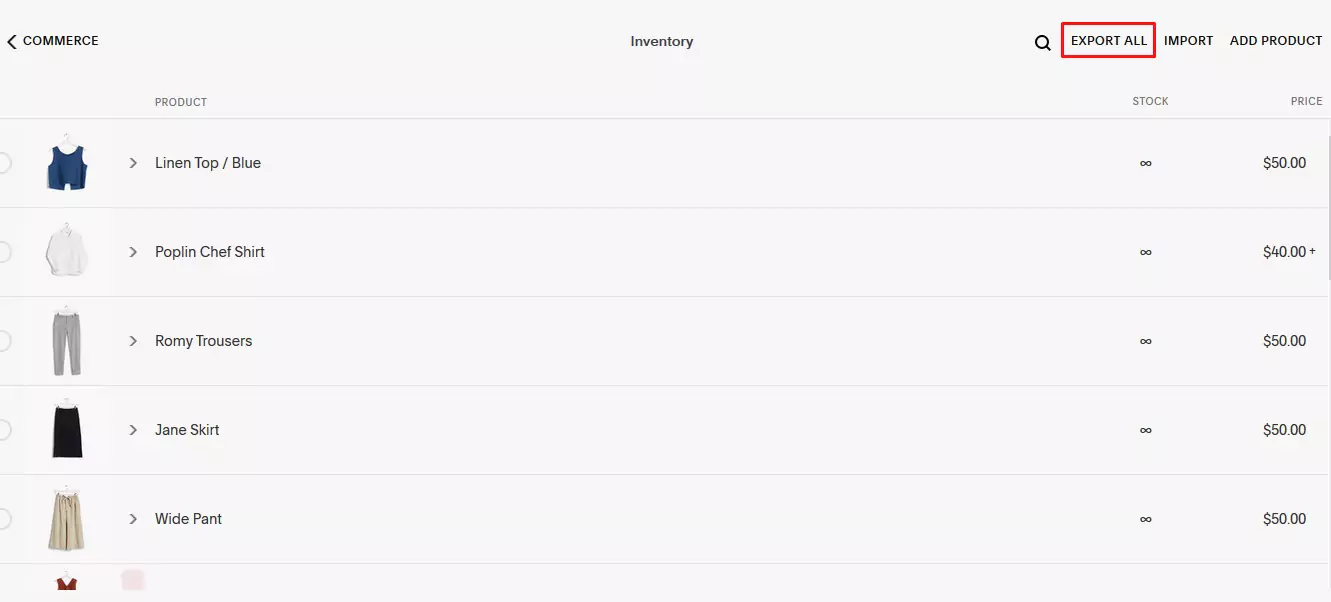
If you have an eCommerce store on Squarespace, your products are not included in the XML export. Export them as a CSV file instead. Go to Commerce > Inventory and click Export All in the top-right corner. Squarespace will generate a spreadsheet containing your product data, including titles, descriptions, prices, and other details.
Step 2: Import into WordPress
Import XML file: Log into your WordPress admin dashboard. Go to Tools > Import. Install the WordPress Importer tool. Upload the XML file you downloaded from Squarespace and click submit. If your site has more than one author, the importer lets you assign each author’s content to an existing WordPress user. If this is your first time working in the WordPress dashboard, a quick WordPress tutorial can help you get familiar with where these settings live before you start.
If your site is large, the import can hit your server’s memory limit partway through and fail with a timeout or “allowed memory size exhausted” error. If that happens, ask your host to raise the PHP memory limit, or split the XML file into smaller chunks and import them one at a time.
Import eCommerce data: In your WordPress dashboard, go to Products > Import. Click Choose File and upload the CSV file you exported from Squarespace. Then, select Continue to review the column mapping. WooCommerce will automatically match most fields, such as product names, descriptions, prices, SKUs, and stock quantities.
Verify that the mappings are correct, then click Run the Importer to start the import process. After the import is complete, review your products in Products > All Products to ensure all data has been transferred correctly.
Step 3: Import Images Manually
The standard XML export does not transfer images to your new server; it only links back to Squarespace. You must use a third-party WordPress plugin (like Auto Upload Images) or manually download and upload your media. Keep your Squarespace site publicly accessible while the images are imported, because both the importer and image plugins fetch each file from your live site, and some images added through external links may still need to be uploaded by hand. If you skip this step, your images will disappear when your Squarespace account closes.
Some image plugins are no longer actively maintained, so test them on a staging copy first and work in small batches if you hit timeouts. Always check a sample of posts afterward to confirm the images now load from your own Media Library, not from Squarespace.
Step 4: Fix Permalinks or Create 301 Redirects
To preserve your SEO rankings and prevent broken links after migrating from Squarespace to WordPress, try to keep your URL structure as close to the original as possible. In WordPress, go to Settings > Permalinks and configure a custom permalink structure that matches your Squarespace URLs.
For example, if your Squarespace blog posts live at /blog/post-title, choose Custom Structure and enter /blog/%postname%/. Older Squarespace blogs often add the date to the address, such as /blog-1/2016/3/6/post-title, which matches /blog/%year%/%monthnum%/%day%/%postname%/.
If an exact match isn’t possible, set up 301 redirects from your old Squarespace URLs to the corresponding WordPress pages. This ensures visitors and search engines are automatically directed to the correct content, helping preserve your search traffic and link equity.
After the migration, monitor your website for broken links and 404 errors using tools like Google Search Console. Any missing URLs can then be redirected to maintain a smooth user experience and protect your SEO performance.
Step 5: Rebuild Design and Missing Content
The Squarespace export tool moves standard pages and blog posts, but it drops product data, folders, index pages, event pages, audio blocks, and custom CSS. You must manually rebuild your eCommerce store using WooCommerce and recreate your website layout using a WordPress theme or page builder.
A few specific things to handle while you’re rebuilding: navigation menus don’t come across at all, so recreate them under Appearance > Menus once your pages are in place. Videos embedded from YouTube or Vimeo carry over fine since their embed code is part of the export, but any videos hosted directly on Squarespace need to be downloaded and re-uploaded manually. And if your site used custom JavaScript, save that code separately beforehand, since it isn’t included in the export either and needs to be added back into WordPress through a code snippet once your new site is live.
Step 6: Point Your Domain to WordPress
Once your content, images, and design are in place, it’s time to send visitors to your new site. You have two options:
- Update nameservers or DNS records: Keep your domain registered where it is and just point it at your new WordPress host. This typically takes 24-48 hours to fully propagate.
- Transfer the domain outright: Unlock the domain in Squarespace, get the authorization code, and move it to your new registrar or host so everything is managed in one place.
If you use this domain for email, update your DNS records carefully rather than just swapping nameservers outright, since an incomplete change can disrupt email delivery. Double-check your MX records are carried over before you consider the domain fully switched.
Step 7: Review and Test Your New Site
Once your content, design, and domain are in place, walk through your new WordPress site the way a visitor would. Test checkout flows on your rebuilt WooCommerce store, click through every menu item, and confirm images load correctly across pages. This is also the point where you install a page builder like Elementor or Divi to finish rebuilding your design, since Squarespace’s blocks don’t translate directly into WordPress themes.
How to Protect SEO When You Transfer Squarespace to WordPress
URLs are the biggest ranking risk when you convert Squarespace to WordPress. Squarespace uses its own address patterns, so many pages change unless you match them or redirect them. These steps protect the traffic you have already earned:
- Crawl your Squarespace site first: list every indexed URL with its title tag and meta description before you change anything.
- Match slugs where you can: every address that stays the same is one less redirect to maintain.
- Redirect in one hop: send each old URL to its closest matching WordPress page, not the homepage, and avoid redirect chains.
- Carry over metadata: move SEO titles, meta descriptions, headings, and image alt text into your WordPress SEO plugin.
- Keep Squarespace live until DNS settles: switch your domain only after the WordPress site is tested.
- Submit your new sitemap: add the WordPress site to Google Search Console and watch for 404 errors and indexing issues for several weeks.
Some ranking movement after changing platforms is normal, so judge the trend over several weeks rather than the first few days.
How Long Does It Take to Migrate Squarespace to WordPress?
The data transfer is often the quick part. A small site with a few pages and one blog can be moved in a few hours once hosting is ready, while a store with thousands of products, customers, and orders takes longer to map, test, and verify. Rebuilding the design, replacing Squarespace features with plugins, and setting up redirects usually take more time than the import itself, so plan your launch date around them.
LitExtension vs. Squarespace’s Native Export
Before you decide how to migrate Squarespace to WordPress, it’s worth knowing exactly what Squarespace’s own export tool can and cannot do – because the gap is bigger than most people expect.
| Data Type | Squarespace Default XML Export | LitExtension Automated Migration |
|---|---|---|
| Products | Not included in XML export | Fully migrated via API/database, including variants and pricing |
| Orders | Not supported | Fully migrated with order history intact |
| Customers | Not supported | Fully migrated with accounts and secure password reset |
| Images | Links back to Squarespace servers; breaks if account is closed | Automatically downloaded and uploaded to the WordPress Media Library |
| SEO URLs | Manual redirect setup required | Automatic 301 redirects generated |
In short: Squarespace’s built-in export was never built to move a store, it doesn’t include products, orders, or customers at all, and even the images it does export often break once your Squarespace account closes. LitExtension, by contrast, connects directly through API/database access to pull your entire eCommerce dataset – products, orders, and customers – and automatically migrates images straight into your WordPress Media Library, with nothing left behind.
Common Squarespace to WordPress Migration Issues
Squarespace is a closed system, while WordPress is open-source. This difference causes formatting and database conflicts. Here is how we fix them:
- Design Blocks: Squarespace uses unique layout blocks. We extract the raw HTML and text, then remap them into native WordPress Gutenberg blocks.
- Image Breakdown: Squarespace hosts images on its own network. If you close your account, your images break. Our tool downloads your media and uploads it directly to your new WordPress Media Library.
- SEO Drop & URL Links: Squarespace forces rigid URL links. We create bulk 301 redirects to map old links to new WordPress pages, helping reduce the impact on your Google rankings.
- Customer Passwords: Passwords are encrypted and cannot be copied. We migrate the customer accounts, histories, and data, then trigger an automatic password reset email on their first login.
Squarespace to WordPress Post-Migration Checklist
You can’t copy your Squarespace design over to WordPress exactly as it was, Squarespace’s design blocks and WordPress themes are built on completely different systems, so a 1:1 visual clone isn’t realistic. Once your data is in, work through this checklist before you consider the migration done:
- Verify your migrated data: Confirm every product, order, and customer transferred correctly by spot-checking a sample against your original Squarespace records.
- Test your WooCommerce store: Run a test purchase, check inventory counts, and confirm shipping and payment settings are configured correctly.
- Rebuild your design: Install a WordPress page builder like Elementor or Divi to recreate – or improve on – your original Squarespace layout.
- Check redirects and links: Click through your 301 redirects, and monitor Google Search Console for 404 errors in the weeks after launch.
- Confirm password reset emails: Since customer passwords can’t transfer directly, verify the automatic reset email triggers correctly on first login.
- Update MX records if needed: If you use this domain for email, double-check MX records carried over correctly during the domain switch.
When WordPress May Not Be the Right Fit
WordPress gives you more control, but it also gives you more to manage, including hosting, updates, backups, and security. If you only need a simple site and are happy with Squarespace’s all-in-one setup, staying put may be the better choice. WordPress makes the most sense when you need plugins, custom functionality, or full ownership of your hosting and data.
A very small site can be moved by hand, but a store with products, customer history, and rankings to protect is usually safer with a tested Squarespace to WordPress migration. Whichever way you migrate Squarespace to WordPress, back up first, test on staging, keep Squarespace active until WordPress is verified, and switch your domain last.
Join 200,000+ businesses that have migrated with LitExtension. Start a Free Demo Migration to preview how your Squarespace products, customers, orders, and URLs will be transferred to WordPress before running the full migration.
What Data Can Be Migrated From Squarespace to WordPress
Use the tabs below to see which Squarespace data fields we can migrate to WordPress.


-
Products
- Name, SKU, Short Description, Full Description, Status.
- Price, Special Price.
- Quantity, Manage Stock.Meta Title, Meta Description.
- Weight, Width, Height, Depth.
- Tags.
- Attributes.
- Variants.
- Thumbnail Image, Additional Images.
- Created Date.
Product Categories
- Name, Description.
- Image.
- Meta Title, Meta Description.
-
- First Name, Last Name, Email.
- Billing Address.
-
- Order ID.
- Order Date.
- Order Status.
- Order Items (Name, SKU, Option), Product Price, Quantity.
- Total Price.
- Sub Price, Discount Price, Tax Price, Shipping Price.
- Order Comments.
- Customer Name, Email.
- Tags.
- Billing Address.
- Shipping Address.
Required eCommerce plugin, such as WooCommerce, installed on WordPress. Can’t find the data you need to migrate? Contact us or click on the Live Chat in the right corner for a free consultation.


Leave The Work For The Experts

How Your Data Is Secured During Migration?

Server Security

Data Security

Data Access Restriction

GDPR Compliance

NDA

Payment Security
Why Choose Squarespace to WordPress Migration Services


Migrated From Squarespace To Other Platforms
In addition to WordPress, we also offer migration services from Squarespace to over 140 other eCommerce platforms.








Who We Truly Are? Let Our Customer Define!

I needed to migrate my portfolio from Squarespace to WordPress, and LitExtension was amazing. The migration was done quickly, and all my images and content were transferred without any issues. The support team was also very helpful, making sure everything was set up correctly on WordPress. I highly recommend their service to anyone making the switch!

LitExtension helped me migrate my Squarespace online store to WordPress, and I couldn’t be more satisfied. The service was professional, and they transferred all my products, customer data, and orders without any issues. Their support team was extremely helpful, answering all my questions and ensuring a flawless migration. I highly recommend LitExtension for anyone moving platforms!
LitExtension! Great partners for migration tasks when it comes to Squarespace. I have only great experience with these guys, in particular with Dean while working on lightonline.com.au. Very reliable team of people ready to get you out of trouble!

