
When launching a store or adding to your product range, WooCommerce import products becomes essential. WooCommerce provides multiple ways to handle this process, from simple CSV uploads to full-scale migrations.
There are 5 ways to import products to WooCommerce:
- Use the built-in CSV importer
- Work with LitExtension experts
- Install extensions and plugins
- WooCommerce import products with images
- Use a PIM or feed management system
Without further ado, let’s get started!
How to Import Products into WooCommerce Using CSV Files
WooCommerce’s built-in CSV importer lets you add or update products in bulk without installing another import plugin. This method works well when your product data can be arranged in WooCommerce’s supported CSV format.
Step 1: Prepare your product file
Export a few products from an existing WooCommerce store to use as a template, or download WooCommerce’s sample CSV file. Replace the sample data with your product details, keep the relevant column headers, and save the file as a UTF-8 CSV.
Back up your destination store and test a small batch before importing the full catalog. If you are updating existing products, include their current IDs or SKUs so WooCommerce can identify the correct records.
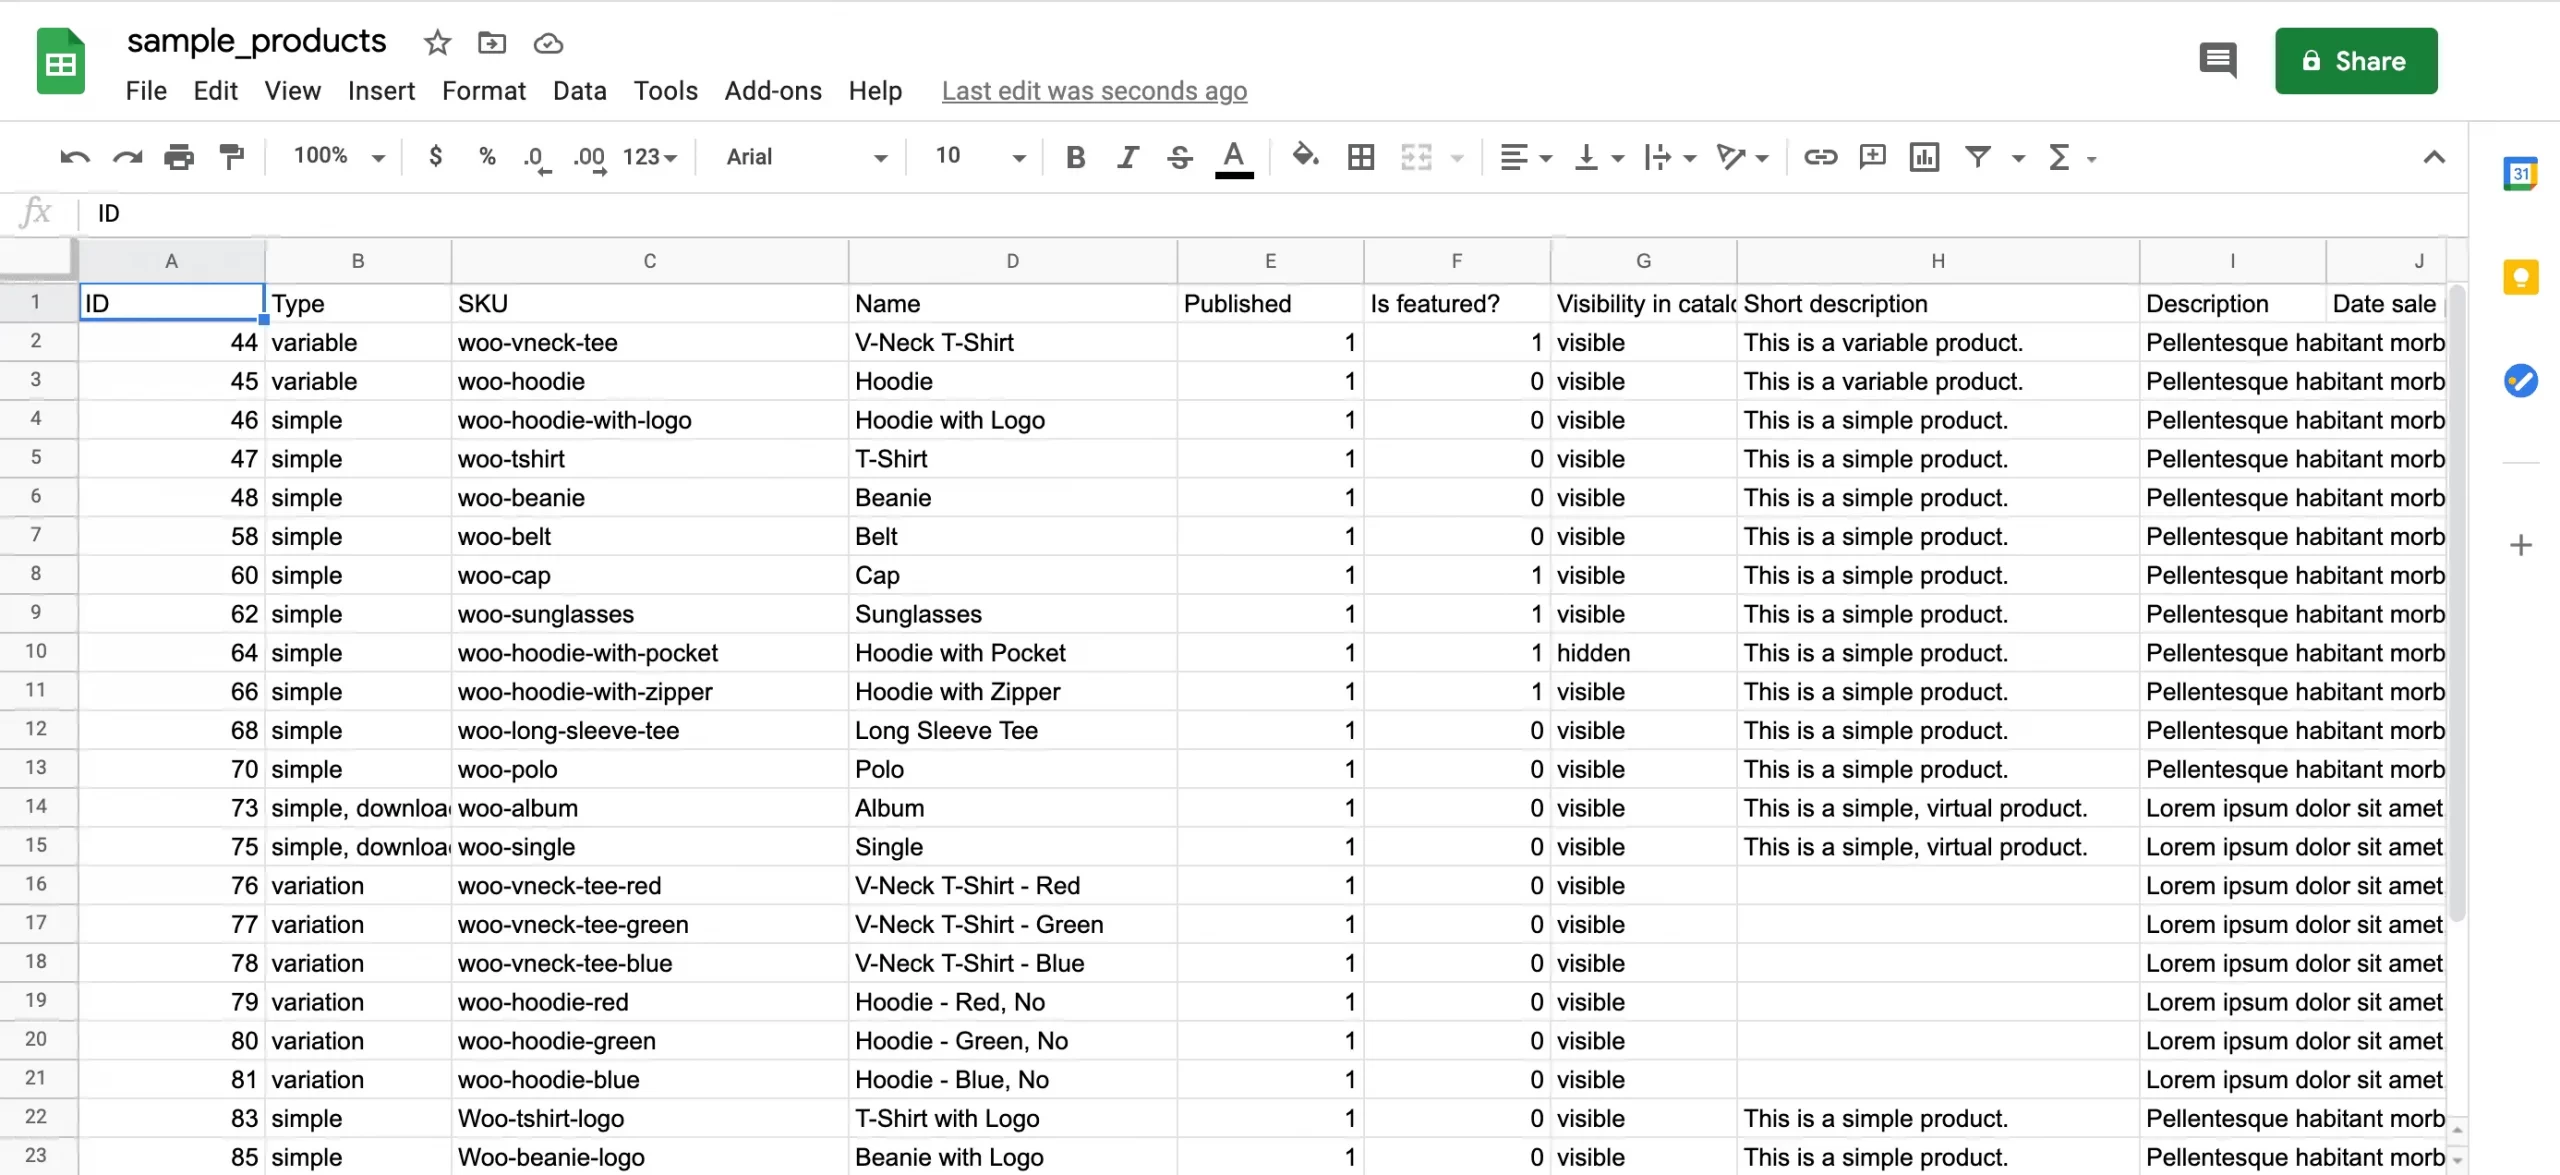
Step 2: Upload the CSV and choose your import mode
Go to Products > All Products > Import, then select Choose File and upload your CSV. Select Update existing products if you want to modify products already in your store; leave it unselected when creating new products.
For standard product updates, WooCommerce matches records by ID or SKU and skips rows that do not match an existing product. Check your identifiers before continuing.
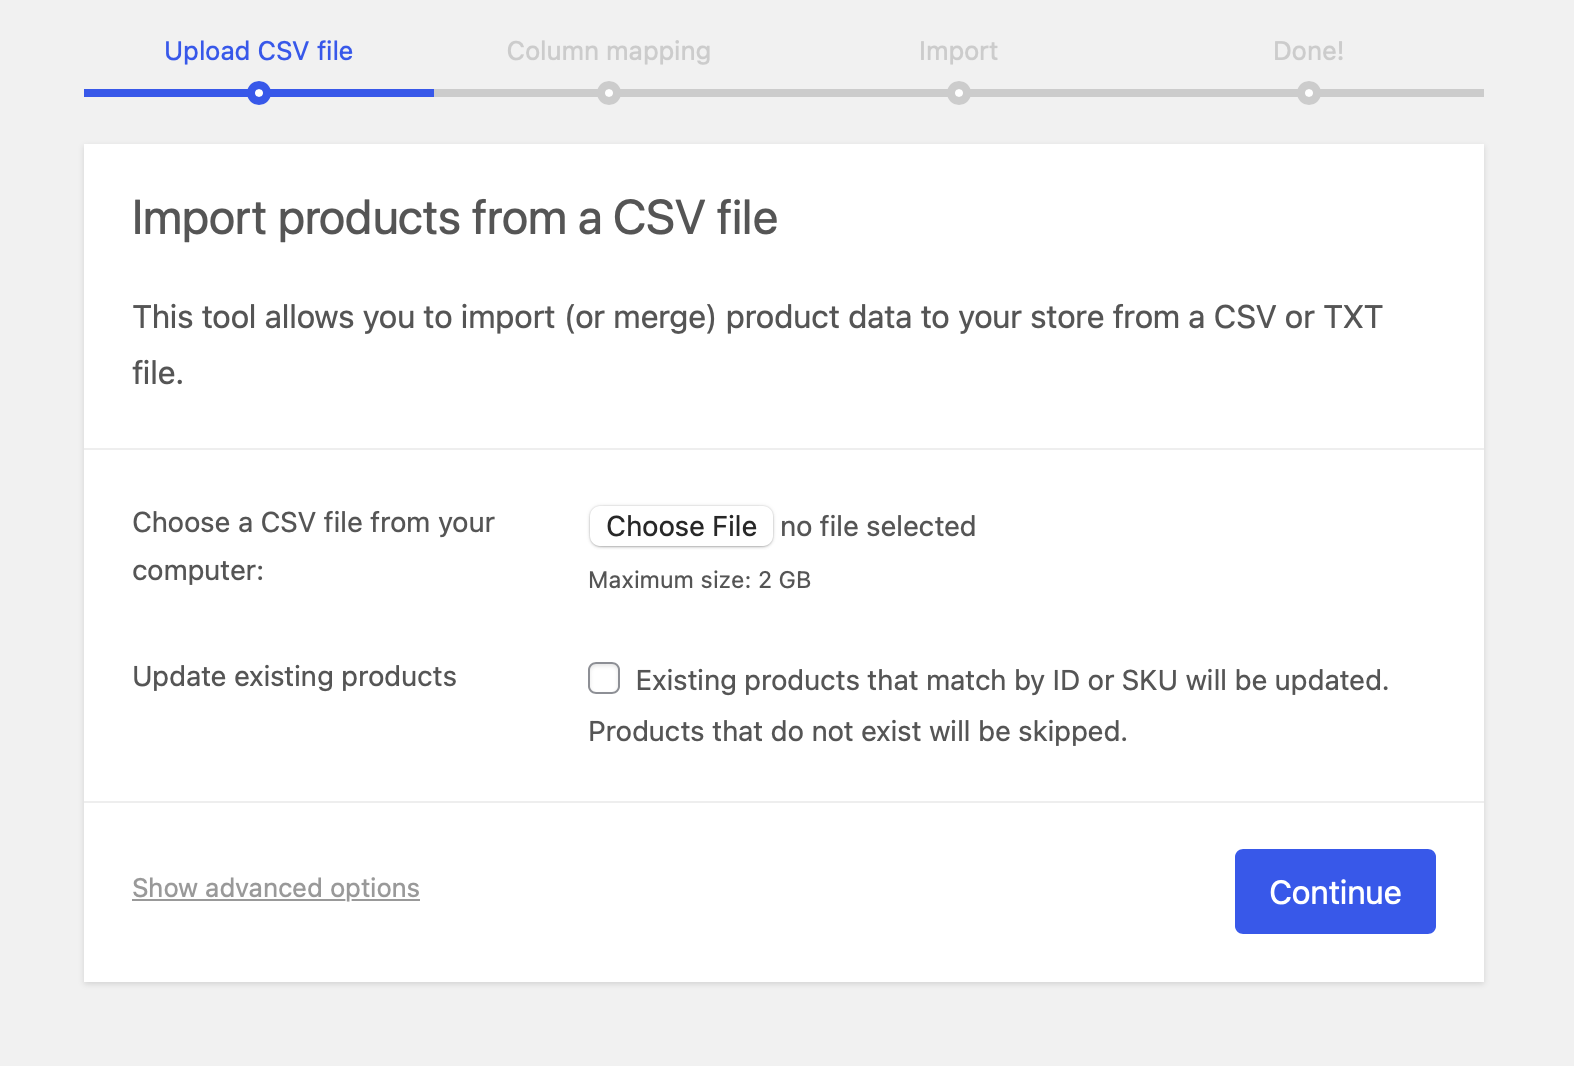
Click Continue to review the column mapping. The upload limit depends on your hosting configuration. If the file is too large, split it into smaller batches or ask your hosting provider about the available limits.
Step 3: Review the mapping and run the importer
WooCommerce automatically maps recognized column headers to product fields. Review each mapping, correct any mismatches, and select Do not import for columns you want to exclude.
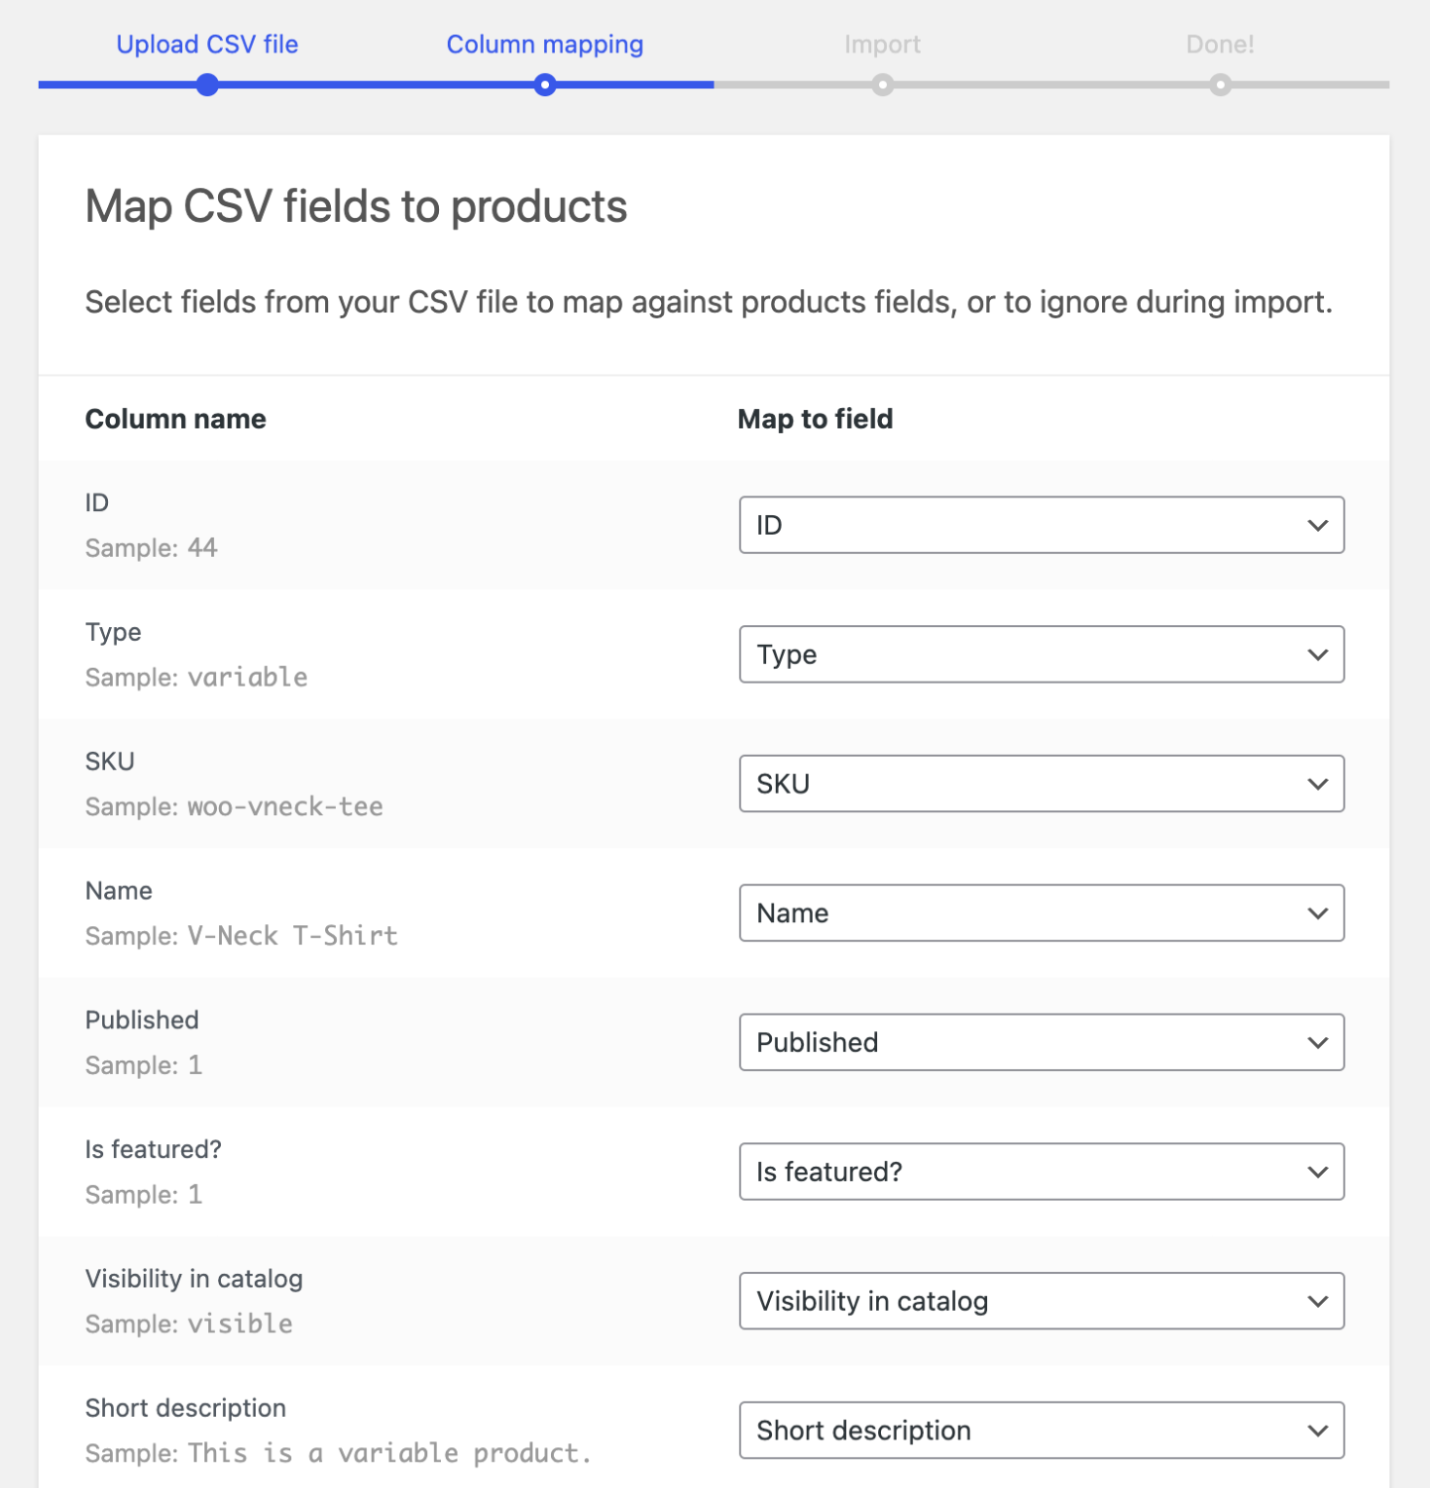
Click Run the importer and keep the page open until processing finishes. Review any failed or skipped records, then open a sample of products to check their names, prices, SKUs, stock, categories, and images.
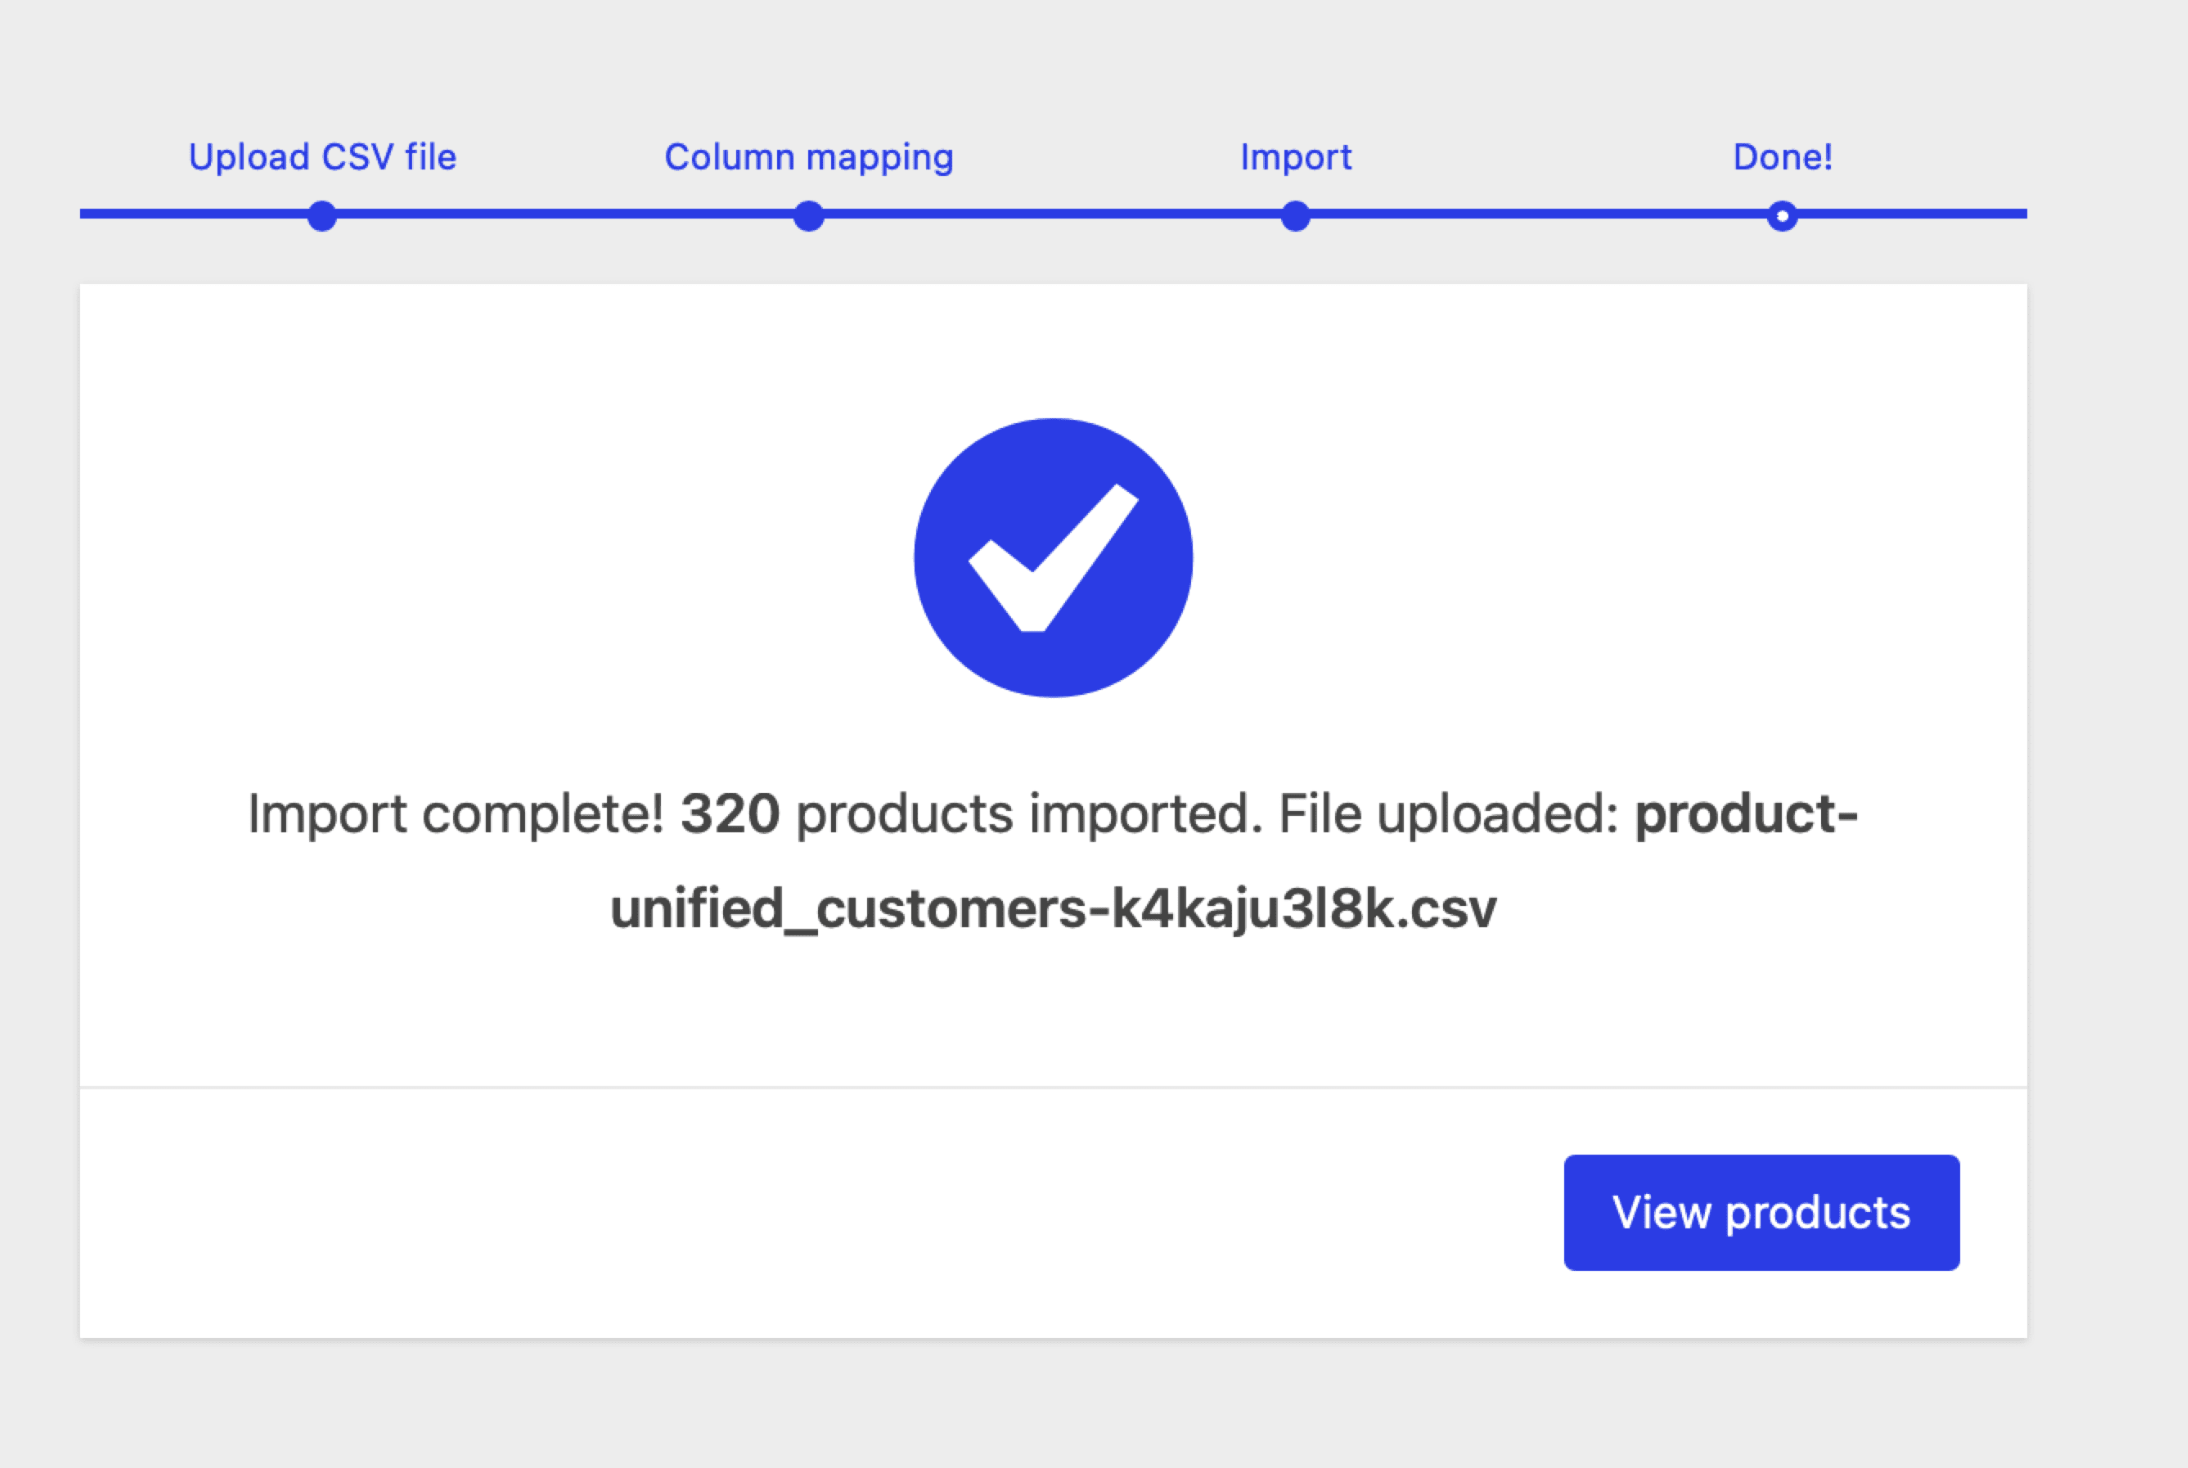
For CSV formatting rules, column examples, variable products, image references, and file-specific troubleshooting, follow our WooCommerce CSV import guide.
How to Import WooCommerce Products Using Plugins?
For store owners who prefer a hands-on approach, especially for ongoing updates or smaller catalogs, using a plugin is a flexible alternative. It’s also great if you need extra features like field mapping or scheduled imports. Some of the most popular WooCommerce import tools include WP All Import, Product Import Export for WooCommerce, and Product CSV Import Suite, among others.
In this section, we’ll walk you through how to import WooCommerce products step by step using the WP All Import plugin.
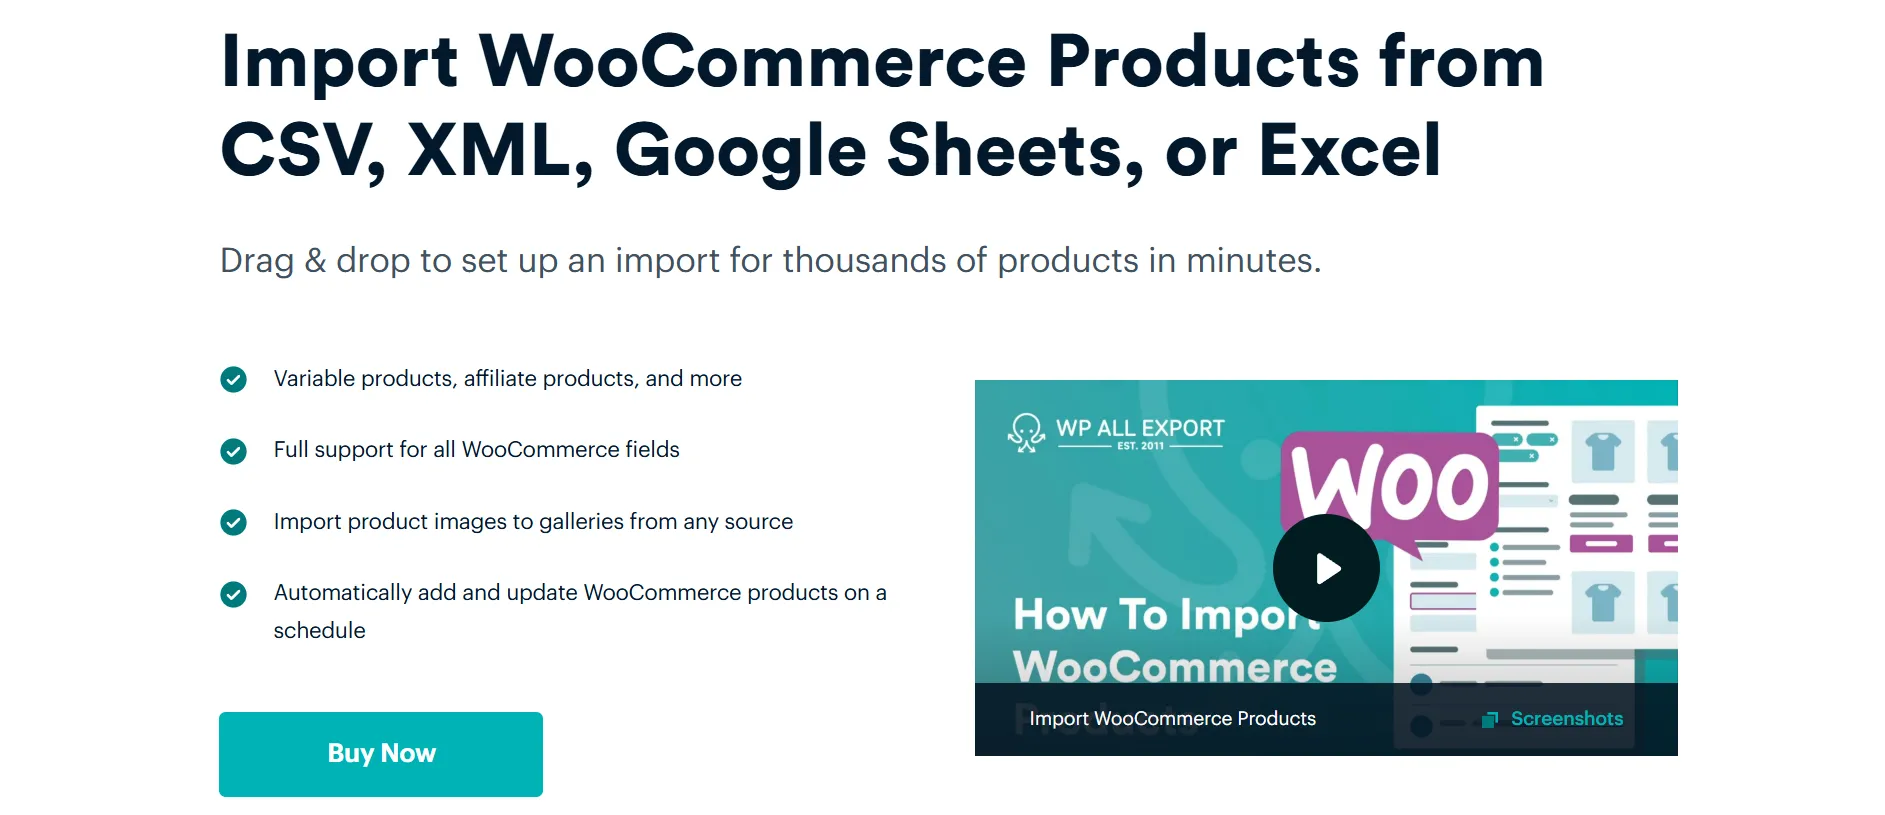
Here’s a quick summary of the steps on how to import WooCommerce products using a plugin:
- Step 1: Create a new import
- Step 2: Review your import file
- Step 3: Map data to WooCommerce fields
- Step 4: Configure import settings
- Step 5: Run the import and verify
Step 1: Create a new WooCommerce product import
First, go to All Import > New Import in your WordPress dashboard. Select or upload the file you want to import (CSV, XML, Excel, or even Google Sheets format). After that, choose “WooCommerce product” from the dropdown menu and click “Continue.”
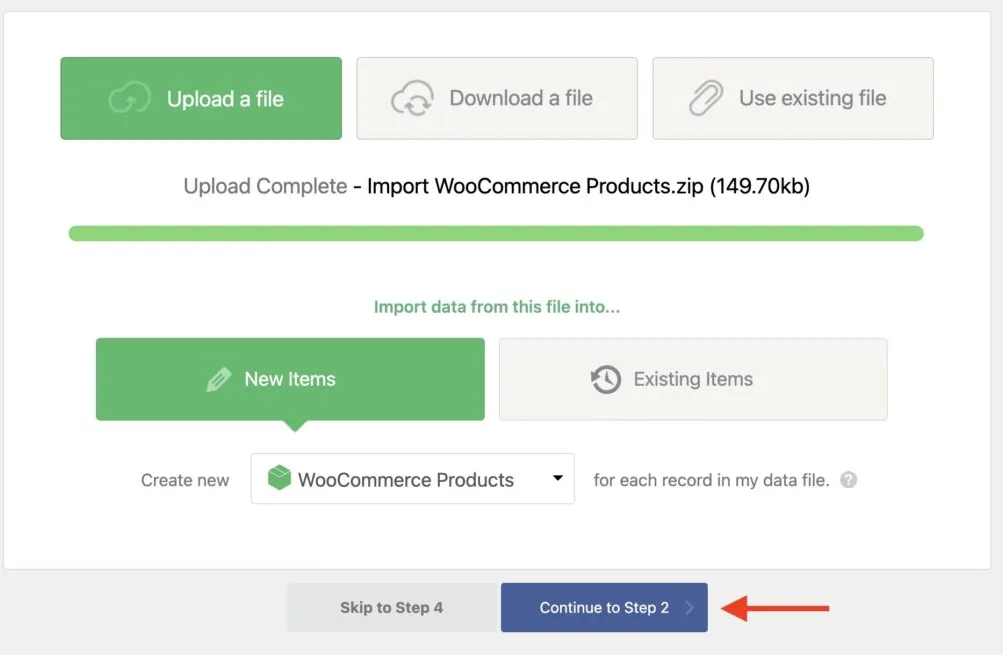
Step 2: Review your import file
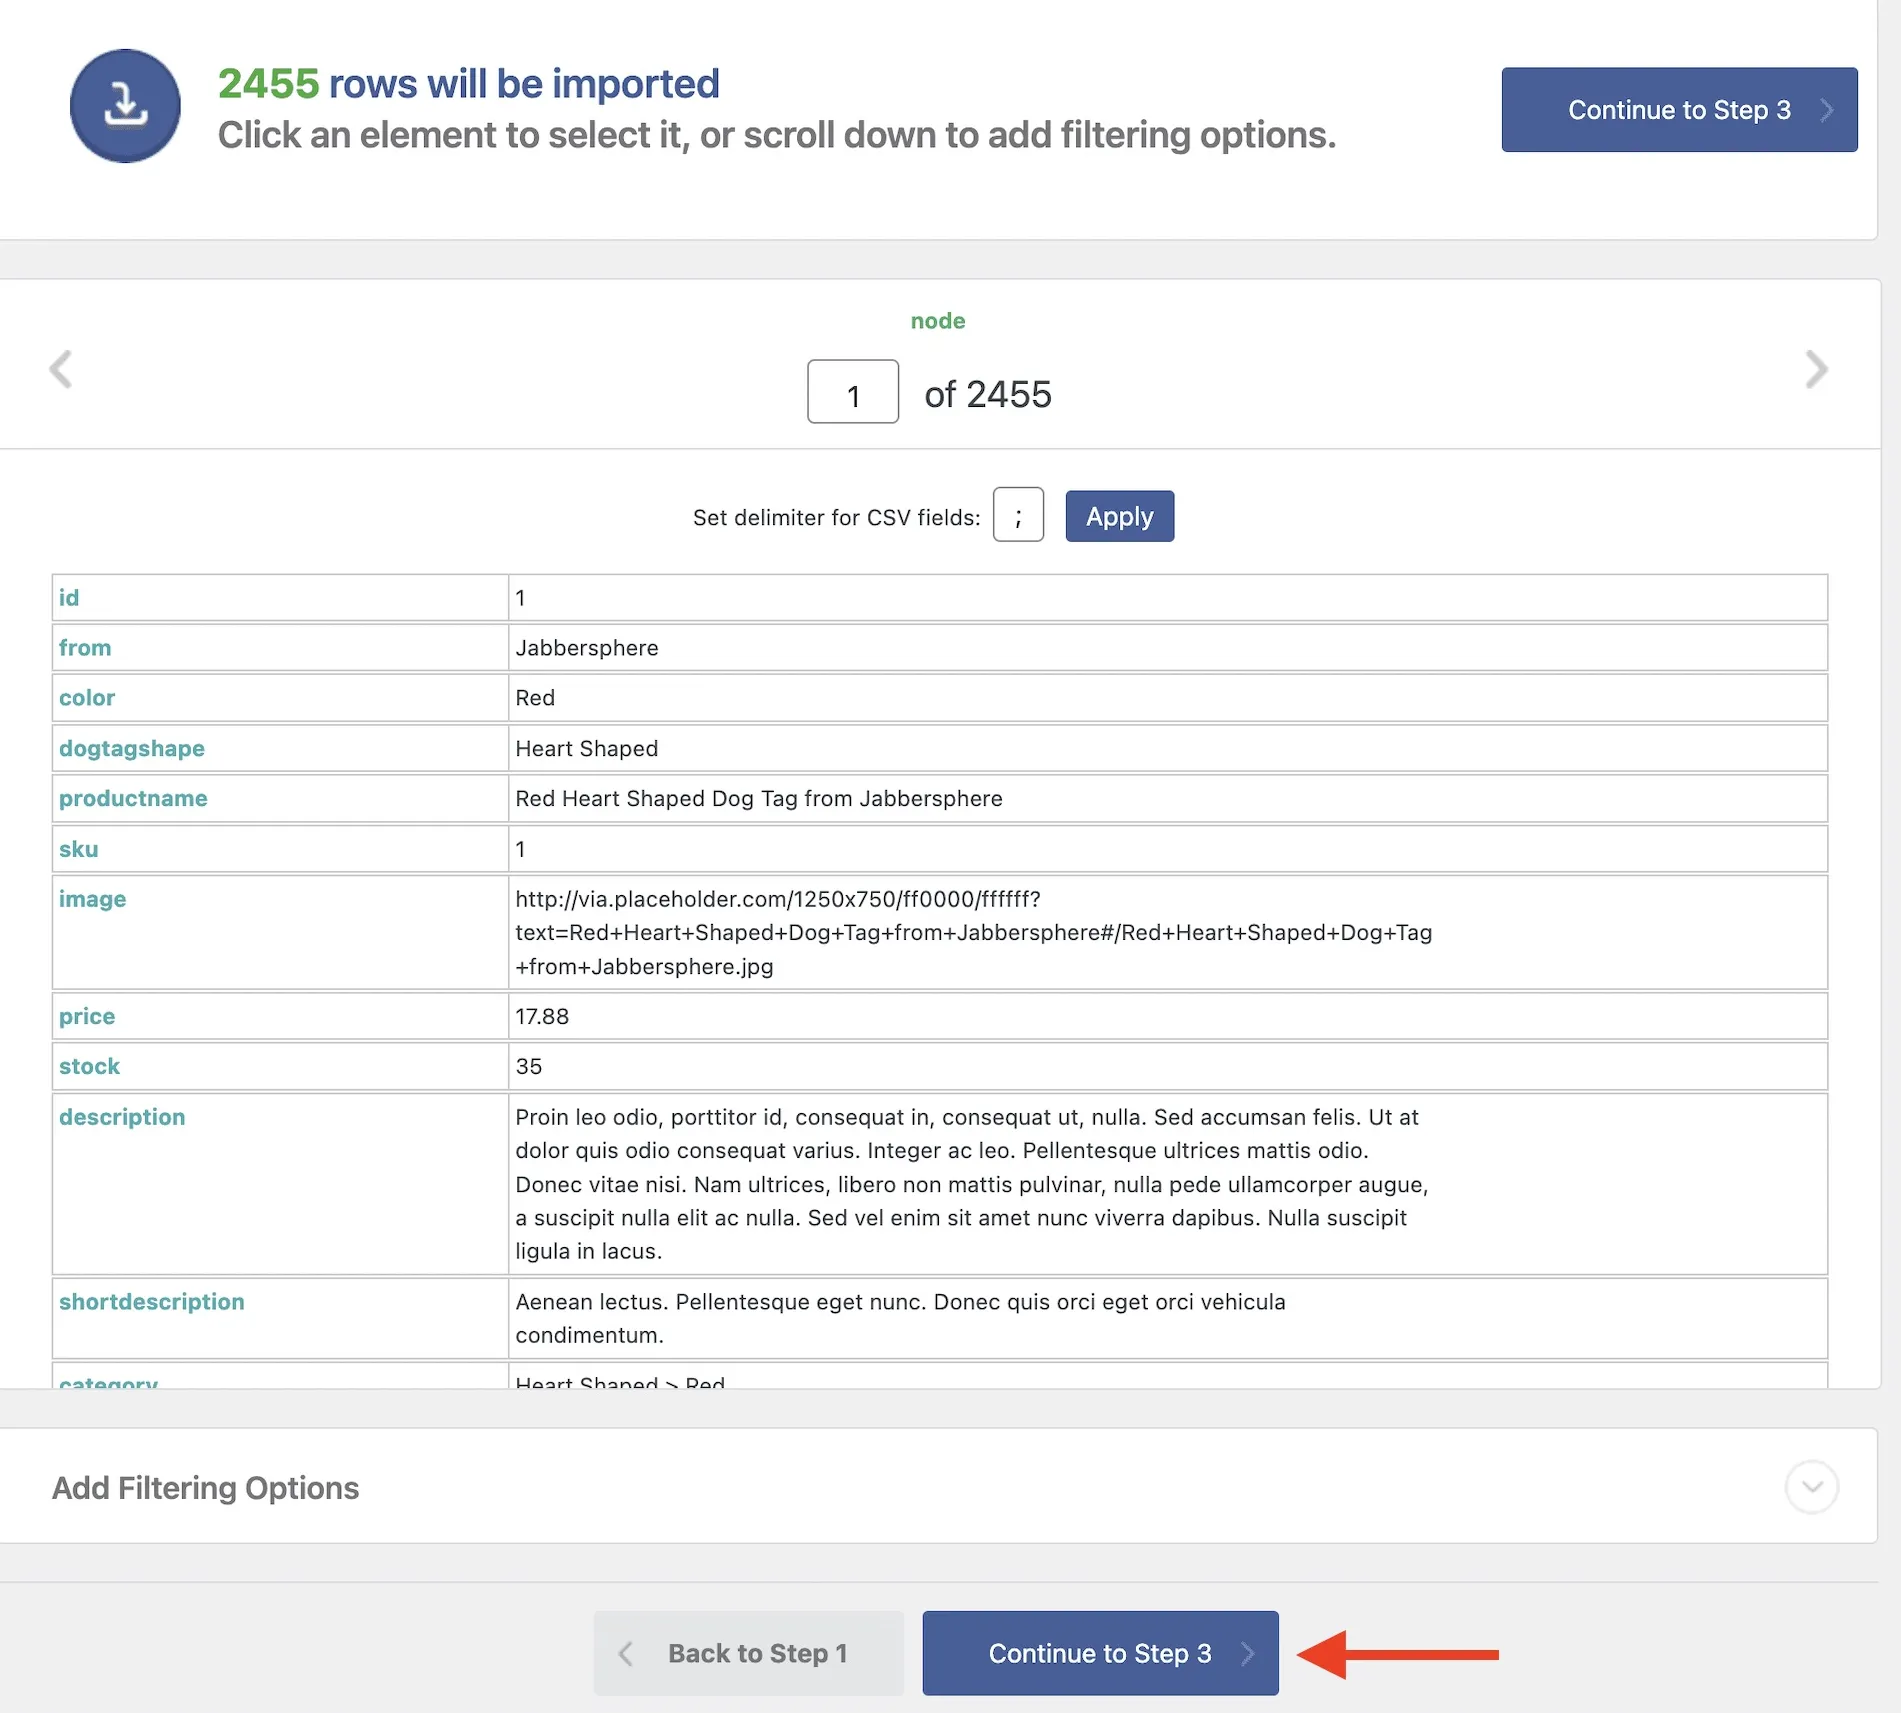
On the “Review import file” screen, you can check the data for accuracy:
- If you’re importing a CSV or Google Sheets file, adjust the field delimiter (e.g., comma, semicolon).
- If importing an XML or Excel file, choose which parent node to use for the import.
If necessary, use the “Manage filtering options” section (at the screen’s bottom) to limit which products get imported. (e.g., only import products above a certain price). Once done, click “Continue” to move on.
Step 3: Map data elements to product fields
Now, you will see a drag-and-drop interface, allowing you to map each field in your import file to the corresponding WooCommerce product fields.
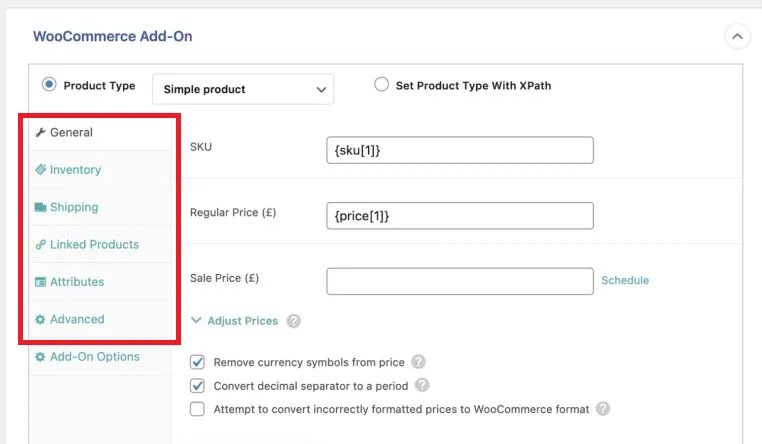
First, drag your data elements to the fields designed for the WooCommerce product title and description. Then, expand the “WooCommerce add-on” section to define the Product type (e.g., Simple, Variable).
After that, configure the product details. There are six tabs to manage this part:
- General Tab: Map fields for SKU, regular price, sale price, and adjust prices if needed. You can also set if the product is virtual or downloadable.
- Inventory Tab: Manage stock settings, stock status, backorder options, and whether the product is sold individually.
- Shipping Tab: Set the product’s weight, dimensions, and shipping class.
- Linked Products Tab: Define up-sells, cross-sells, and grouped products.
- Attributes Tab: Import product attributes for better sorting (e.g., color, size).
- Advanced Tab: Set purchase notes, menu order, enable reviews, and set catalog visibility.
After mapping all the necessary fields, click “Continue” to move to Step 4.
Step 4: Configure product import settings
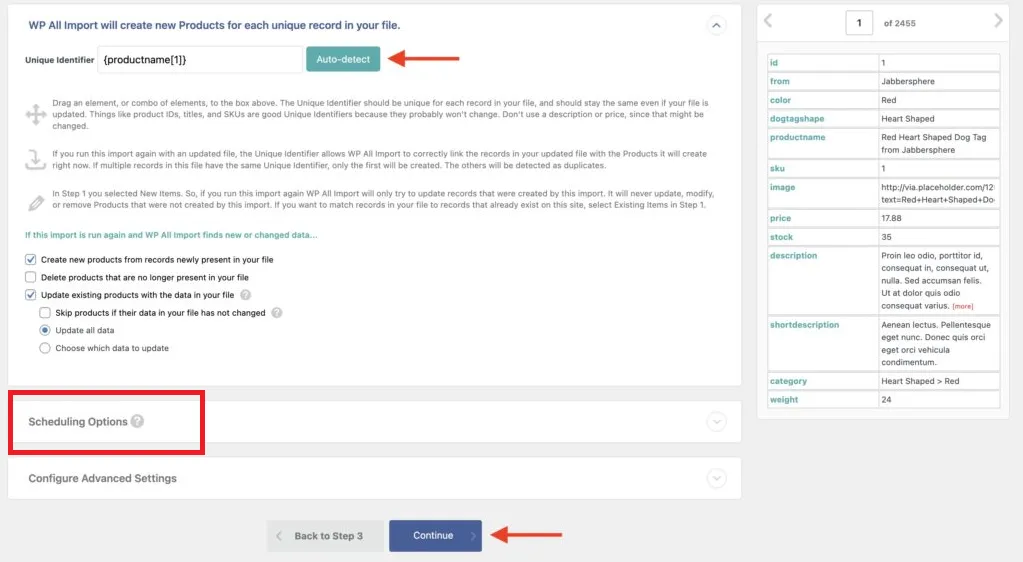
Use the “Auto-detect” button to generate a unique identifier for the import and ensure each product is correctly identified.
Below this section are “Scheduling options” and “Advanced settings,” but in most cases, the current default settings are sufficient for the import. You can revisit these options if needed later. For now, click ‘Continue’ to move on.
Step 5: Run the import and verify the results
The “Confirm & run” screen will show a summary of the import settings (which you have configured up to Step 4). Double-check everything, then click “Confirm & run import” to start the import process.
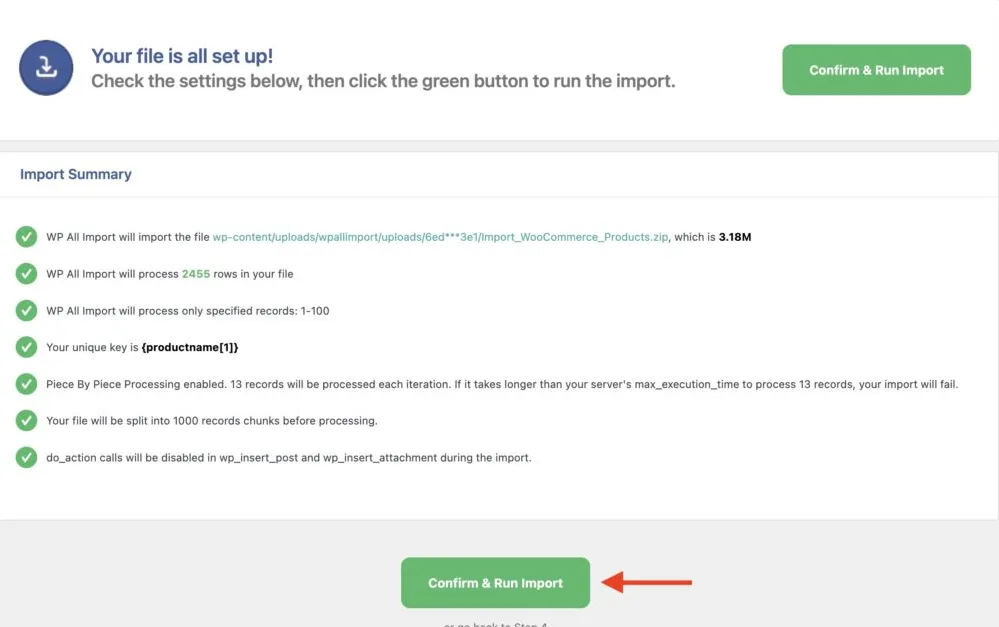
After the WooCommerce import products process concludes, go to Products > All Products in your WordPress menu to confirm all WooCommerce products were properly imported.
How to Import WooCommerce Products with Images?
Product images are one of the trickiest parts of any WooCommerce import products process, but they’re also one of the most important for converting browsers into buyers. Unlike text fields such as name or price, images can’t simply be typed into a spreadsheet cell. Instead, you need to reference them correctly so WooCommerce knows where to pull each picture from.
The good news is that the built-in WooCommerce importer handles images right out of the box, as long as you prepare your CSV file properly. This method is best for store owners who already have their product images hosted online or sitting in their WordPress Media Library.
Here’s a concise wrap-up of the WooCommerce import products process with images:
- Step 1: Host your images and prepare the Images column;
- Step 2: Reference your images in the CSV file;
- Step 3: Run the importer and verify your images.
Step 1: Host your images and prepare the Images column
Before you begin, it’s important to understand that WooCommerce cannot pull images straight from your local computer during a bulk import. Instead, your images must either be hosted online at a publicly accessible URL, or already exist in your WordPress Media Library before you run the import.
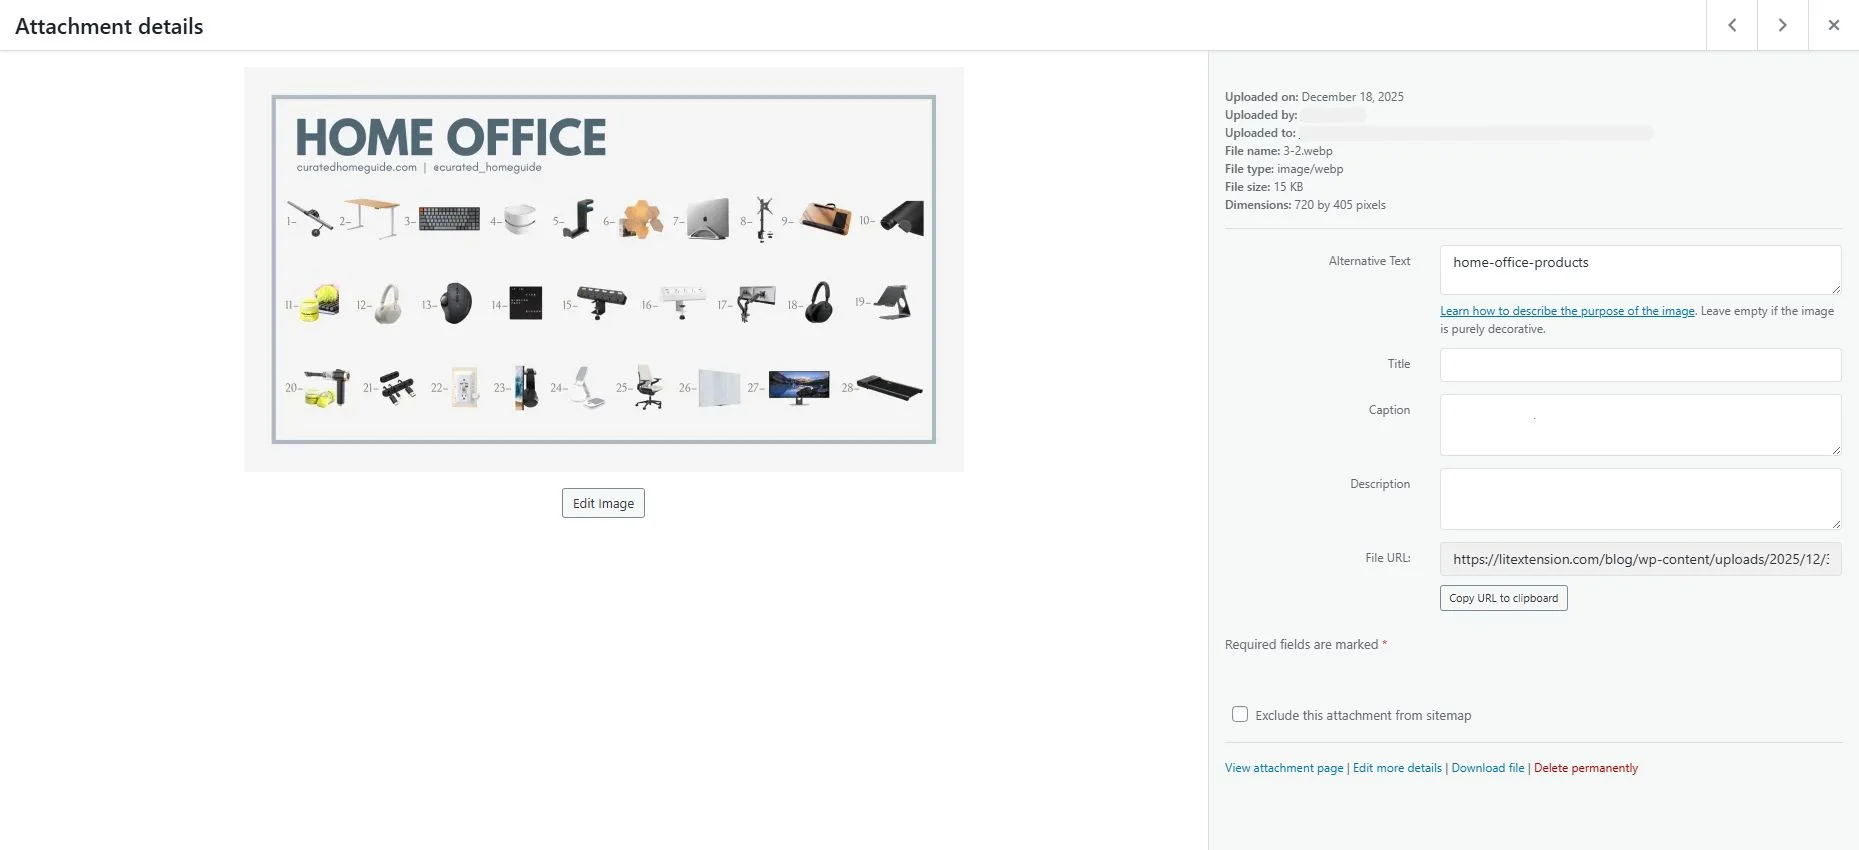
When you reference an image by URL, WooCommerce downloads the image from that URL, saves it in your media library, and links it to the product. This is why every link in your file needs to be live and reachable. A quick way to check is to open the image URL in a browser before importing; if the image is visible, you can use it, but if not, the URL may not be in the proper format.
Step 2: Reference your images in the CSV file
Enter your image references in the Images column, separating multiple URLs or filenames with commas. WooCommerce uses the first image as the featured product image and adds the remaining images to the product gallery.
Step 3: Run the importer and verify your images
After the import finishes, check a sample of products to confirm that their featured images and galleries display correctly. Look for missing or duplicated images before importing the rest of your catalog.
It’s also worth mentioning that the core WooCommerce CSV importer does not support adding or editing alt text for your product images. If image SEO and metadata matter for your store, this is a gap you’ll need to fill afterward, either manually or with a dedicated plugin.
For a handful of products, referencing images by URL or filename is perfectly manageable. However, if you’re migrating a large catalog with thousands of images and strict SEO requirements, the manual process can quickly become time-consuming and error-prone. In that case, our CSV Files Migration Service is a stress-free alternative, where a LitExtension Personal Assistant maps your image fields correctly and verifies that every picture lands in the right place before your store goes live.
Let Our Experts Handle Your Store Migration!
With the All-in-One Migration Service, our experts take care of everything, ensuring a seamless and stress-free migration.

How to Import WooCommerce Products Using a PIM or Feed Management System
A PIM (Product Information Management) system lets you store, enrich, and synchronize all your product data from one central location, then automatically push it to your WooCommerce store. Rather than treating your spreadsheet as the source of truth, a PIM becomes that source, feeding clean and consistent data into WooCommerce whenever you need it. This method is best for growing stores that manage large or complex catalogs, sell across multiple channels, or work with external suppliers.
To perform the WooCommerce import products process using a PIM, follow these steps:
- Step 1: Import your existing data into the PIM;
- Step 2: Enrich and structure your product information;
- Step 3: Sync your data to WooCommerce
Step 1: Import your existing data into the PIM
To begin, you’ll need to get your current product catalog into the PIM. All you need to do is simply download it from WooCommerce as a CSV and then import it into the PIM, after which you can start syncing your product information with your WooCommerce store.
From there, the PIM acts as your central repository, holding everything from SKUs and descriptions to images, attributes, and pricing in one organized place.
Step 2: Enrich and structure your product information
Next, you can polish your data before it ever reaches your storefront. This is where a PIM earns its keep, since it lets your team clean up descriptions, organize attributes, and manage digital assets without the risk of breaking anything live on your store.
Many modern platforms add automation at this stage too. For example, advanced PIM solutions integrate artificial intelligence for automated data enrichment, such as generating product descriptions based on attributes, tagging images with relevant keywords, or even translating content, while machine learning continuously checks for inconsistencies or missing information before it reaches customer-facing channels.
A key advantage here is field mapping. Because different source systems often label the same information differently, PIM automation lets you define rules for mapping these disparate attributes to a standardized attribute, then transform them for specific channel requirements, including unit conversions, text formatting, or conditional logic.
Step 3: Sync your data to WooCommerce
Finally, once your data is enriched, it’s time to push it to your store. Generally speaking, you have three ways to complete the WooCommerce import products process from a PIM, ranging from fully manual to fully automated.
- Manual export and import: Once your data is polished within the PIM, you can export it in a compatible format such as CSV or Excel, then complete the import into your WooCommerce store using the same steps as the built-in importer.
- PIM plus an import plugin: For a more hands-off approach, you can pair your PIM with a tool like WP All Import. To do this, you’ll need a PIM account with at least one output for a product feed, which is essentially a live link where all of your product information is sent in CSV or XML format.
- PIM plus a feed management system: For the most automated approach, it’s recommended to integrate your PIM with a feed management tool, configuring the settings to match WooCommerce’s requirements and mapping the PIM data fields to their counterparts so the enriched data syncs to your store.
The biggest benefit of these last two methods is that updates become continuous rather than one-off. With a feed-based setup, you can schedule automatic updates from the PIM to your WooCommerce store at whatever frequency you want, whether that’s every few hours or once per week, and still send manual updates whenever you like.
How to Import WooCommerce Products with LitExtension Experts?
If you’d rather skip the manual work, you can hand the process over to professionals. Our LitExtension experts are here to help!
With our CSV Files Migration Service, your project will be handled by a Personal Assistant (PA) who takes care of everything for you. They will review your CSV file, map all the fields correctly, and directly import every product detail into WooCommerce.

This way, you don’t need to lift a finger; the product migration is done for you quickly, securely, and with expert care.
To import products into WooCommerce, our experts will perform the following four steps:
- Step 1: Receive consultation from our experts
- Step 2: Customize & run a demo migration
- Step 3: Perform the full migration
- Step 4: Test the results
Step 1: Receive consultation from experts
To kick things off, we’ll need to understand exactly what kind of product data you’re working with. You’ll be scheduled to a 1-on-1 consultation where a LitExtension expert will review your CSV file, ask a few questions about your goals, and walk you through the process ahead.

You can upload your file to Google Drive or Dropbox and share access with us. From there, we’ll analyze the structure and make sure everything is aligned before moving forward with the migration to WooCommerce.
Step 2: Customize & run demo migration
Once we’ve reviewed your file, we’ll adjust the data format to match WooCommerce’s requirements. This might involve remapping columns, cleaning up fields, or restructuring the layout so the import goes smoothly.
Before anything goes live, we’ll run a demo migration using a small batch of products. This gives you a clear preview of how the data will look on your WooCommerce store, and a chance to request any changes before we proceed.
Step 3: Perform full migration
After you’ve approved the demo, we’ll move ahead with the full product import. Our team will handle everything from start to finish. During the migration, we closely monitor the process to make sure your WooCommerce product data is transferred cleanly and completely.
No matter how large or complex your catalog is, we make sure nothing is left behind and that your new WooCommerce store is set up just the way you need it.
Step 4: Test the results
When the WooCommerce import products is complete, we don’t just hand it over and walk away. Our QA team will carefully review the imported products to ensure all key details (names, images, prices, SKUs, stock, and categories, etc.) appear correctly on your site.
We’ll also walk you through the results so you can verify everything looks right on your end. If there’s anything missing or not quite right, we’ll fix it promptly before wrapping up the project.
Want to see how it all works in action? Watch our video walkthrough below for a visual look at the CSV Files Migration Service in action.
And that’s it, your WooCommerce product import is fully handled by our team, with zero manual effort on your part. It’s fast, accurate, and tailored to your specific needs.
WooCommerce Import Products, Done Right!
With LitExtension’s experts by your side, you can migrate safely and keep your business running flawlessly.
What Can You Do After the WooCommerce Import Products
Once your WooCommerce import products process is complete, the job is not quite done. There are a few important checks and follow-up actions you should take to make sure everything is running as expected on your store, as listed below:
1. Verify that your products appear correctly
The first thing to do is navigate to Products > All Products in your WordPress dashboard and confirm that every product has been imported. Check that the product names, prices, SKUs, categories, and stock statuses all look right. If you notice any missing fields or incorrect values, go back to your CSV file, make the necessary corrections, and re-run the import with the “Update existing products” function.
2. Check your product images
Images are one of the most common pain points after the WooCommerce import products process. Go through the products and confirm that the featured image and any gallery images are displaying properly. If images are missing, you may need to re-upload them to your Media Library and update the image field in your CSV before running the importer again.
3. Review stock and visibility settings
Check that each product is set to “Published” and that the stock status reflects your actual inventory, whether that is “In Stock,” “Out of Stock,” or “On Backorder.” For stores with a large catalog, you can use WooCommerce’s built-in bulk edit feature under Products > All Products to update stock status or visibility across multiple products at once, rather than editing them one by one.
4. Test your product categories and tags
Once the WooCommerce import products is done, navigate to Products > Categories to confirm that all categories were created and assigned correctly during the import. Mismatched category names or incorrect hierarchy structures are common issues that can affect both your store navigation and your on-site SEO.
5. Run a quick SEO check on imported product data
After the WooCommerce import products is complete, review a sample of your imported product pages and check that each one has a unique, descriptive product name and a clear description. If you are using an SEO plugin like Yoast or Rank Math, you can use their bulk edit features to update meta titles and descriptions where needed.
Troubleshooting Common WooCommerce Import Problems
To troubleshoot problems with WooCommerce import products, ensure your CSV file is saved in UTF-8 format and verify that product image URLs are correct and accessible to avoid missing images. For stalled imports or duplicate products, adjust server PHP settings and enable the “Update existing products” option during import.
Problem | Solution |
CSV file not uploading | Ensure the file is saved in UTF-8 format and meets WooCommerce's column formatting requirements. |
Incorrect product categories | Verify that category names in the CSV match the exact names in WooCommerce, including capitalization. |
Variations not linked to products | Make sure the parent product IDs and variation attributes are correctly defined in the CSV. |
Duplicate products created | Enable the "Update existing products" option to match products by SKU or ID during import. |
Import process stalls or fails | Check server PHP settings for memory limits, max execution time, and upload file size; adjust if needed. |
Products not appearing in the store | Confirm the imported products are set to "Published" and have valid stock or visibility settings. |
Bonus Reading: How to Export WooCommerce Products
Knowing how to WooCommerce import products is only half the picture. At some point, you will also need to export your product data, whether that is to create a backup before a major update, migrate to a new platform, or share your catalog with a supplier or third-party tool. Fortunately, WooCommerce’s built-in exporter makes this just as straightforward as the import process.
Here’s how to export WooCommerce products:
Step 1: Open the Export screen
To get started, navigate to Products > All Products in your WordPress dashboard. At the top of the page, click the Export button next to the Import button. This will bring up the export settings screen, where you can define exactly what product data you want to include in your file.
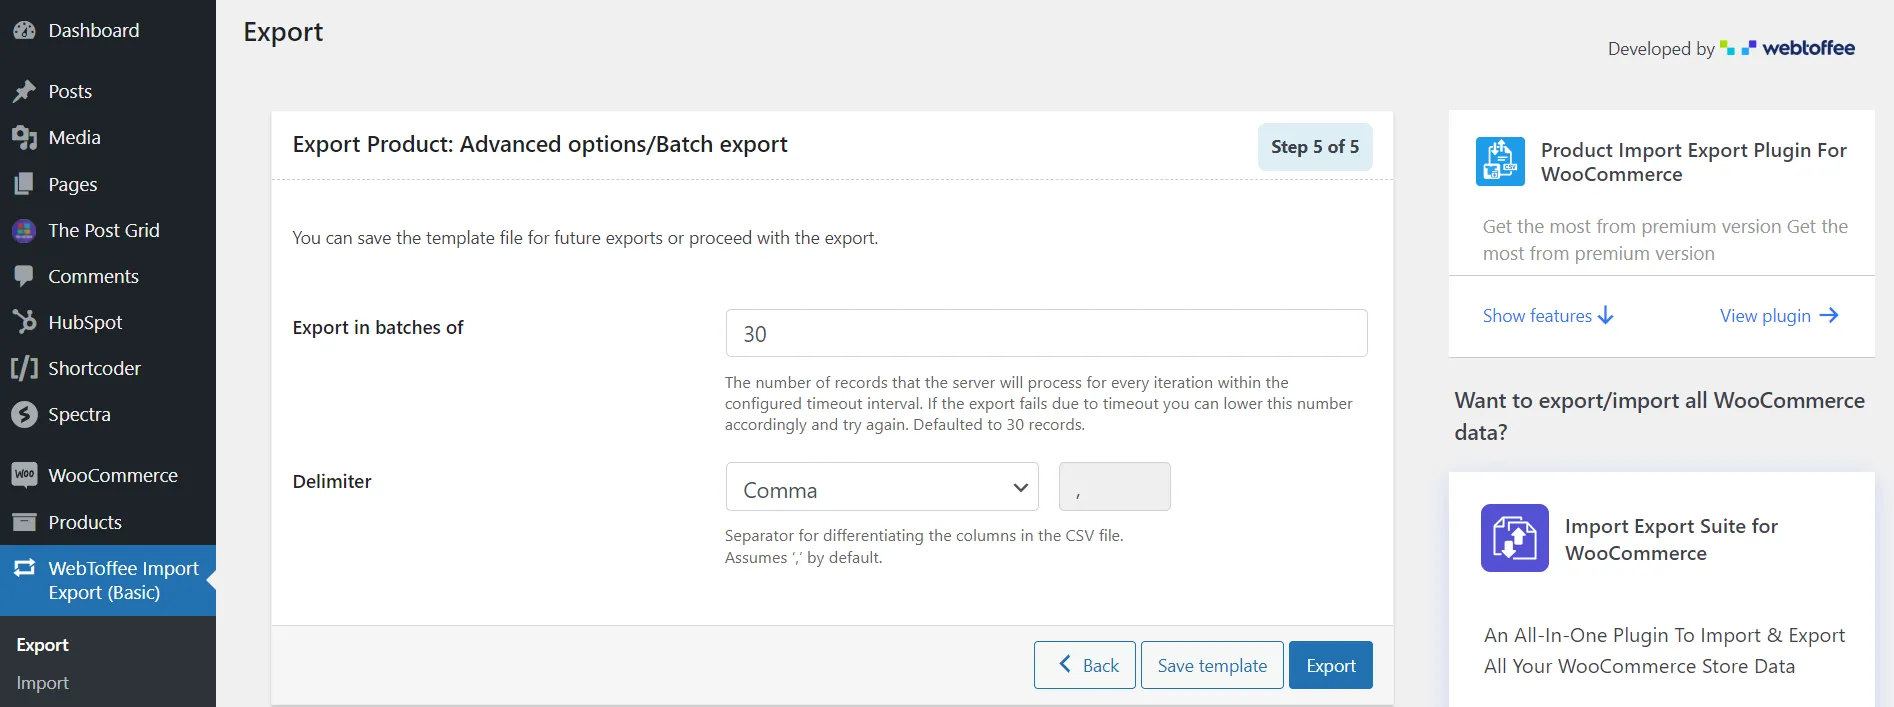
Step 2: Configure your export settings
On the export settings screen, WooCommerce gives you three filters to narrow down what gets exported. You do not have to export your entire catalog at once. These options let you keep the output clean and relevant to your specific needs.
- Which columns to export: Select all available product fields, or pick only the specific columns you need.
- Which product types to export: Filter by product type (simple, variable, grouped, or external/affiliate) so your file only contains the product types you are working with.
- Which categories to export: If you only need data from a specific product category, select it here to avoid pulling your entire catalog into the export file.
After that, click Continue when you’ve finished.
Step 3: Generate and download your CSV file
After confirming your settings, click Generate CSV. WooCommerce will automatically process the export and download the file directly to your device. You can then open it in Microsoft Excel or Google Sheets to review, edit, or use the data however you need.
WooCommerce Import Products: FAQs
How do I import products into WooCommerce?
Go to "All Products" > Products“> "Import.” Upload your CSV file and match up the fields accordingly, then click “Run the importer” to complete the process.
However, if you need additional features, consider using a specialized extension like WP All Import, Product Import Export for WooCommerce, or Product CSV Import Suite for WooCommerce instead.
How do I import products with custom fields in WooCommerce?
To import products with custom fields, you need third-party plugins like WP All Import and Product CSV Import Suite.
An even simpler option is to the LitExtension’s All-in-One package. You can have experts manage the entire migration process and handle your specific needs.
How do I bulk upload products to WooCommerce?
To bulk upload products, use WooCommerce's importer. However, since it's a free tool, this importer handles fewer products than all-in-one services like LitExtension.
How to create an Excel file to import WooCommerce Products?
To create an Excel file for WooCommerce import, simply open Microsoft Excel (or Google Sheets) and start adding your product data in a row-by-row format. Use column headers that match WooCommerce’s CSV format, such as:
- Name
- Description
- Short description
- SKU
- Regular price
- Sale price
- Categories
- Images
Once your data is ready, go to File > Save As, and export the file as a CSV (Comma Separated Values) file. You can then upload it using the WooCommerce built-in product importer.
Final Words
This article has detailed various methods for WooCommerce import products, each with its own advantages.
Nevertheless, to migrate your ENTIRE store to WooCommerce, the best choice is to partner with the LitExtension team. With over 15 years of experience, our LitExtension team has successfully migrated stores for more than 200,000 customers across 140 countries. Count on us to be there for you every step of the way, whether before, during, or even after your WooCommerce migration!


