The WooCommerce latest update (v9.7, April 2025) provides a critical opportunity to leverage the platform's newest technological advancements. To fully capitalize on this growth potential, understanding how to update WooCommerce using an optimal, secure method is even more essential than the version release itself.
While a manual upgrade WooCommerce approach remains a cost-effective choice, it carries inherent risks to data integrity if not executed properly. Managing your WooCommerce updates with a proven strategy is the best way to ensure long-term site stability.
In this article, LitExtension will guide you through the entire WooCommerce updates process, ensuring a safe and successful transition. We cover everything from A to Z, including:
- WooCommerce update methods
- How to safely update WooCommerce automatically with LitExtension
- How to update WooCommerce manually from WooCommerce system
- WooCommerce post-update activities
Let’s start!
PrestaShop CSV Import, Done Right!
Let our experts handle the migration while you focus on growing your business.

What's New in the Latest Version of WooCommerce?
In February 2025, WooCommerce announced updates to version 9.6.1, with version 9.7 to release on February 24, 2025. These versions introduce various improvements that will benefit online businesses.
So, what's new in this WooCommerce version?
The key features include:
- Modernized React-based payment settings
- Enhanced shipping displays in blocks
- Faster block editor performance (75% faster execution time)
- Smarter store notice handling
The API enhancements include:
- Improved stock handling
- New product variation filters
- Constants for product types/statuses
Also, the beta testing is available via the WooCommerce Beta Tester plugin, with a Release Candidate (RC) planned for February 10.f
For further information, kindly visit version 9.6 WooCommerce changelog details note.
WooCommerce Update Methods
Basically, updating WooCommerce involves upgrading multiple store components, including the database, theme, plugins, and payment gateways. The chart below will help you grab an overall picture of the whole WooCommerce upgrade methods.
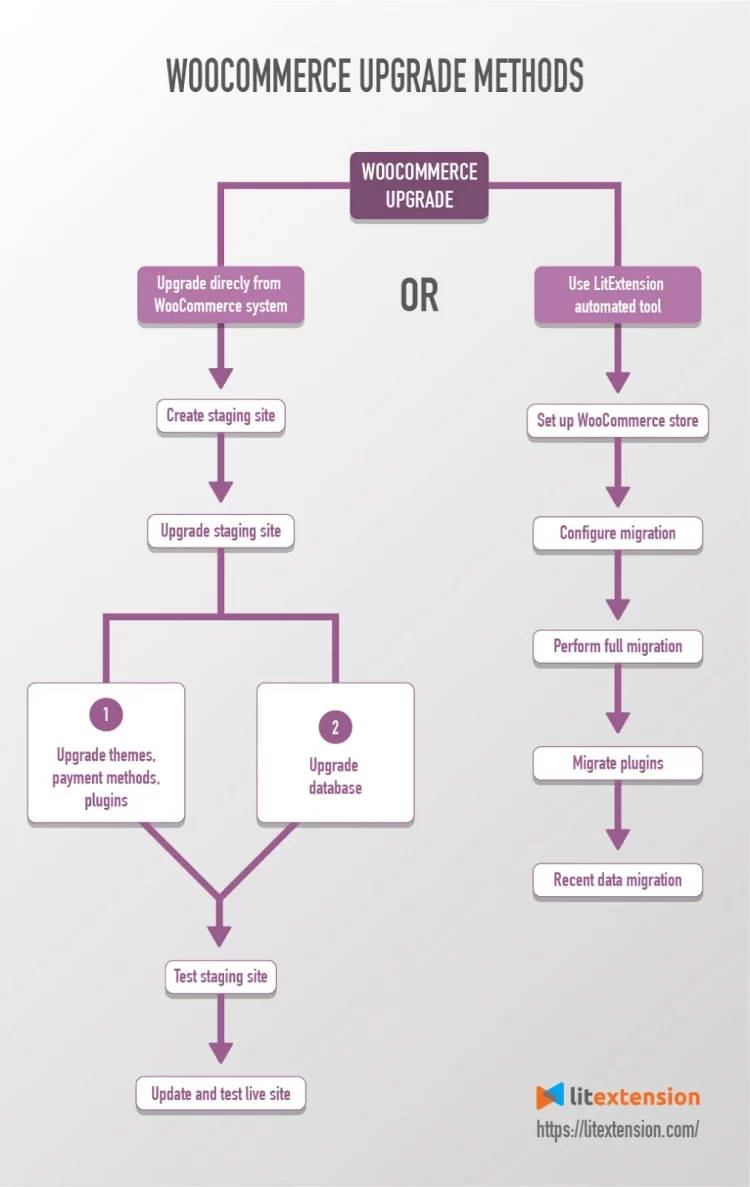
Although it’s straightforward to upgrade your store, there is still a possibility that you could end up with a few errors. The most common one detected is broken compatibility with legacy plugins/themes, which requires your time and effort to fix. If you are not careful, you’re likely to mess up your database.
Upgrading WooCommerce on its system requires manual operation throughout the entire process. On the other hand, LitExtension upgrade method is much more time-saving, with almost all steps executed automatically.
If I have one tip to share with you, I'd like to recommend an automated shopping cart migration service. Basically, you will only need to provide the URLs of the Source Store & Target Store and install the connector. Then, select the entities you want to migrate and let the tool automatically move them all to the new store.
5 Steps to Safely Update WooCommerce Automatically with LitExtension
To prepare for a WooCommerce update through data migration, generate a full backup because the future database relies entirely on your store entities, ensuring that any possible data loss must be excluded; always complete the necessary preparatory steps (Website files via FTP, Database via phpMyAdmin) before initiating the five-step migration process.
Before you begin: Crucial data safety steps:
Because implementing any small or substantial updates to your website requires caution, ensure your store is fully backed up:
- Website Files: Secure all website files (via FTP).
- Database: Secure your store's entire database (via phpMyAdmin).
Now, let's follow these five steps to update WooCommerce automatically:
- Step 1: Backup the files of your online store
- Step 2: Backup database of your online store via phpMyAdmin
- Step 3: Set up Source Cart and Target Cart
- Step 4: Configure the migration
- Step 5: Perform data migration from WooCommerce to WooCommerce
Step 1: Backup the files of your online store
You can process the backup without getting too complex via the FTP.
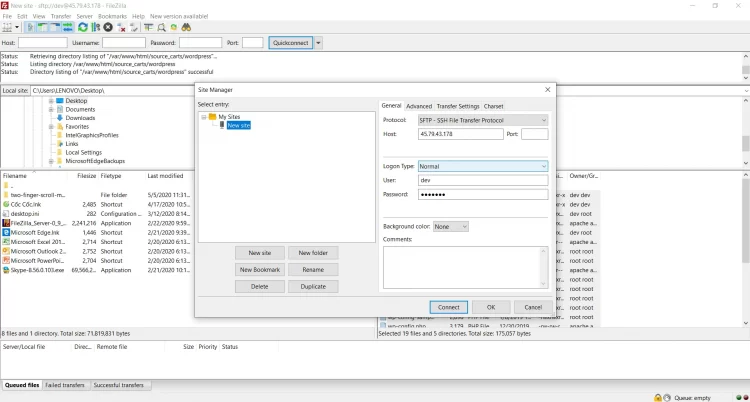
- Open FileZilla or other FTP software and log in to your managed server.
- Choose Protocol, enter “Host,” “User,” and “Password,” then hit “Connect.”
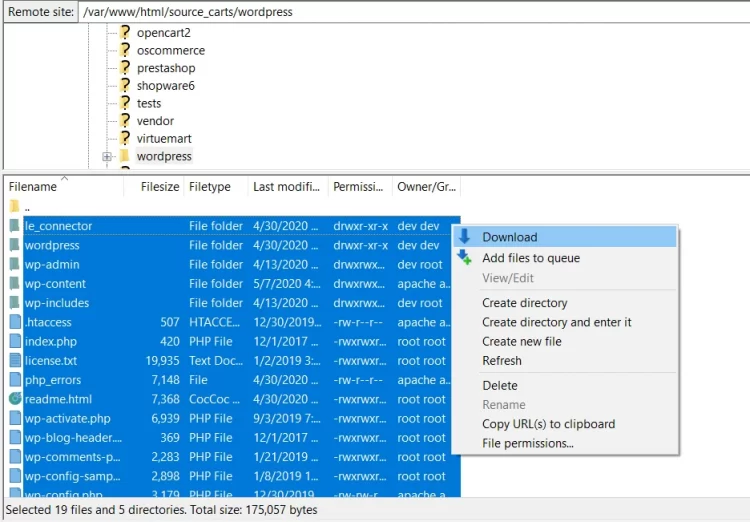
- Once you have successfully connected to your managed server, navigate to the folder where the WordPress application is installed. You will get a list of all the files your WordPress application uses.
- Select these files by clicking on a single file to download them. Next, you must right-click on the selected files and select “Download”.
It will take a couple of minutes to download your files, depending on the size of your website. When the process has finished, you can close FileZilla, and with that, you have successfully backed up the files of your WordPress site.
Step 2: Backup database of your online store via phpMyAdmin
Once you have backed up your website's files, you’ll need to finalize the backup procedure by backing up the database via phpMyAdmin.
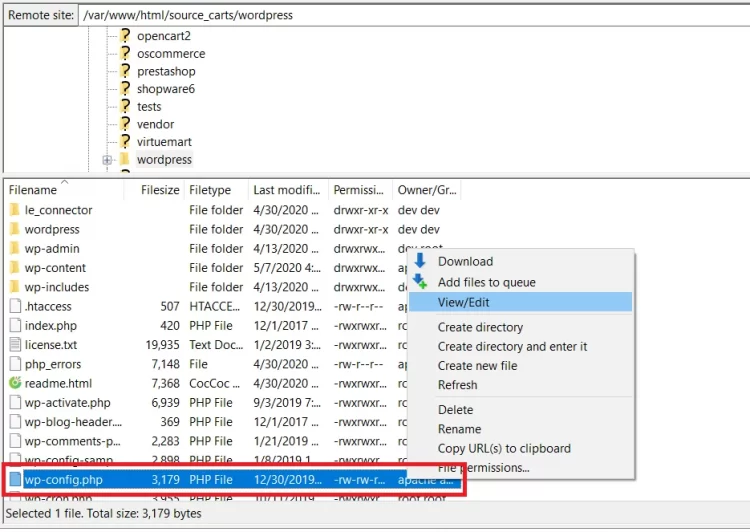
- In order to back up the database of your WooCommerce site, you need to know the database name. The database name is located in the file “wp-config.php”, you can find it in the list of all the files of your WooCommerce site.
- Once you find the file, right-click on it and select “View/Edit” to see the file's code.
- Now, you’ll need to log in to phpMyAdmin.
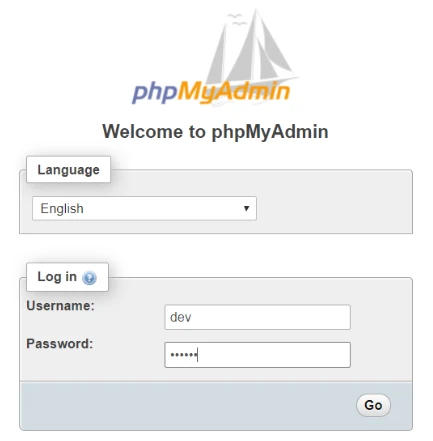
- Find the database by searching for its name.
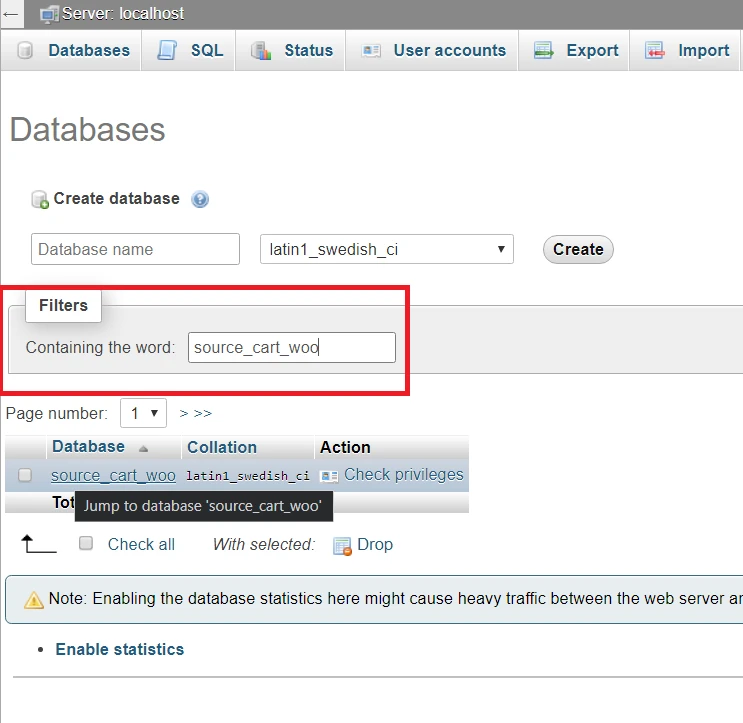
- Once you find the database, click on it, and you’ll be moved to the table view of the database. Simply click on the Export tab from the top navigation menu.
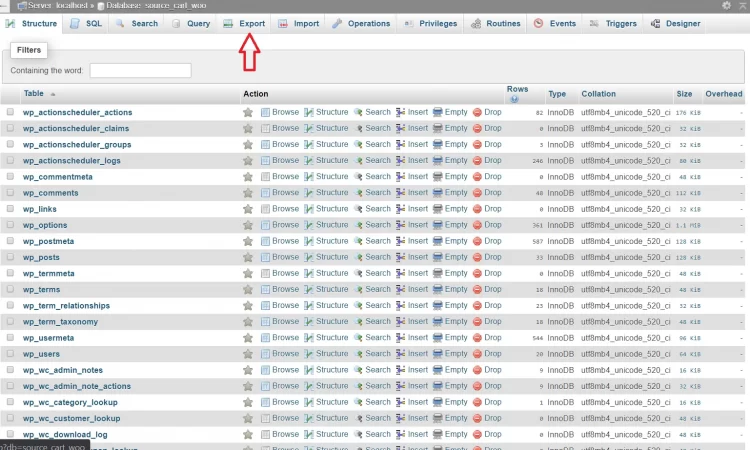
- Click on the “Go” button to download the files.

Step 3: Set up Source Cart and Target Cart
- Set up Source Cart
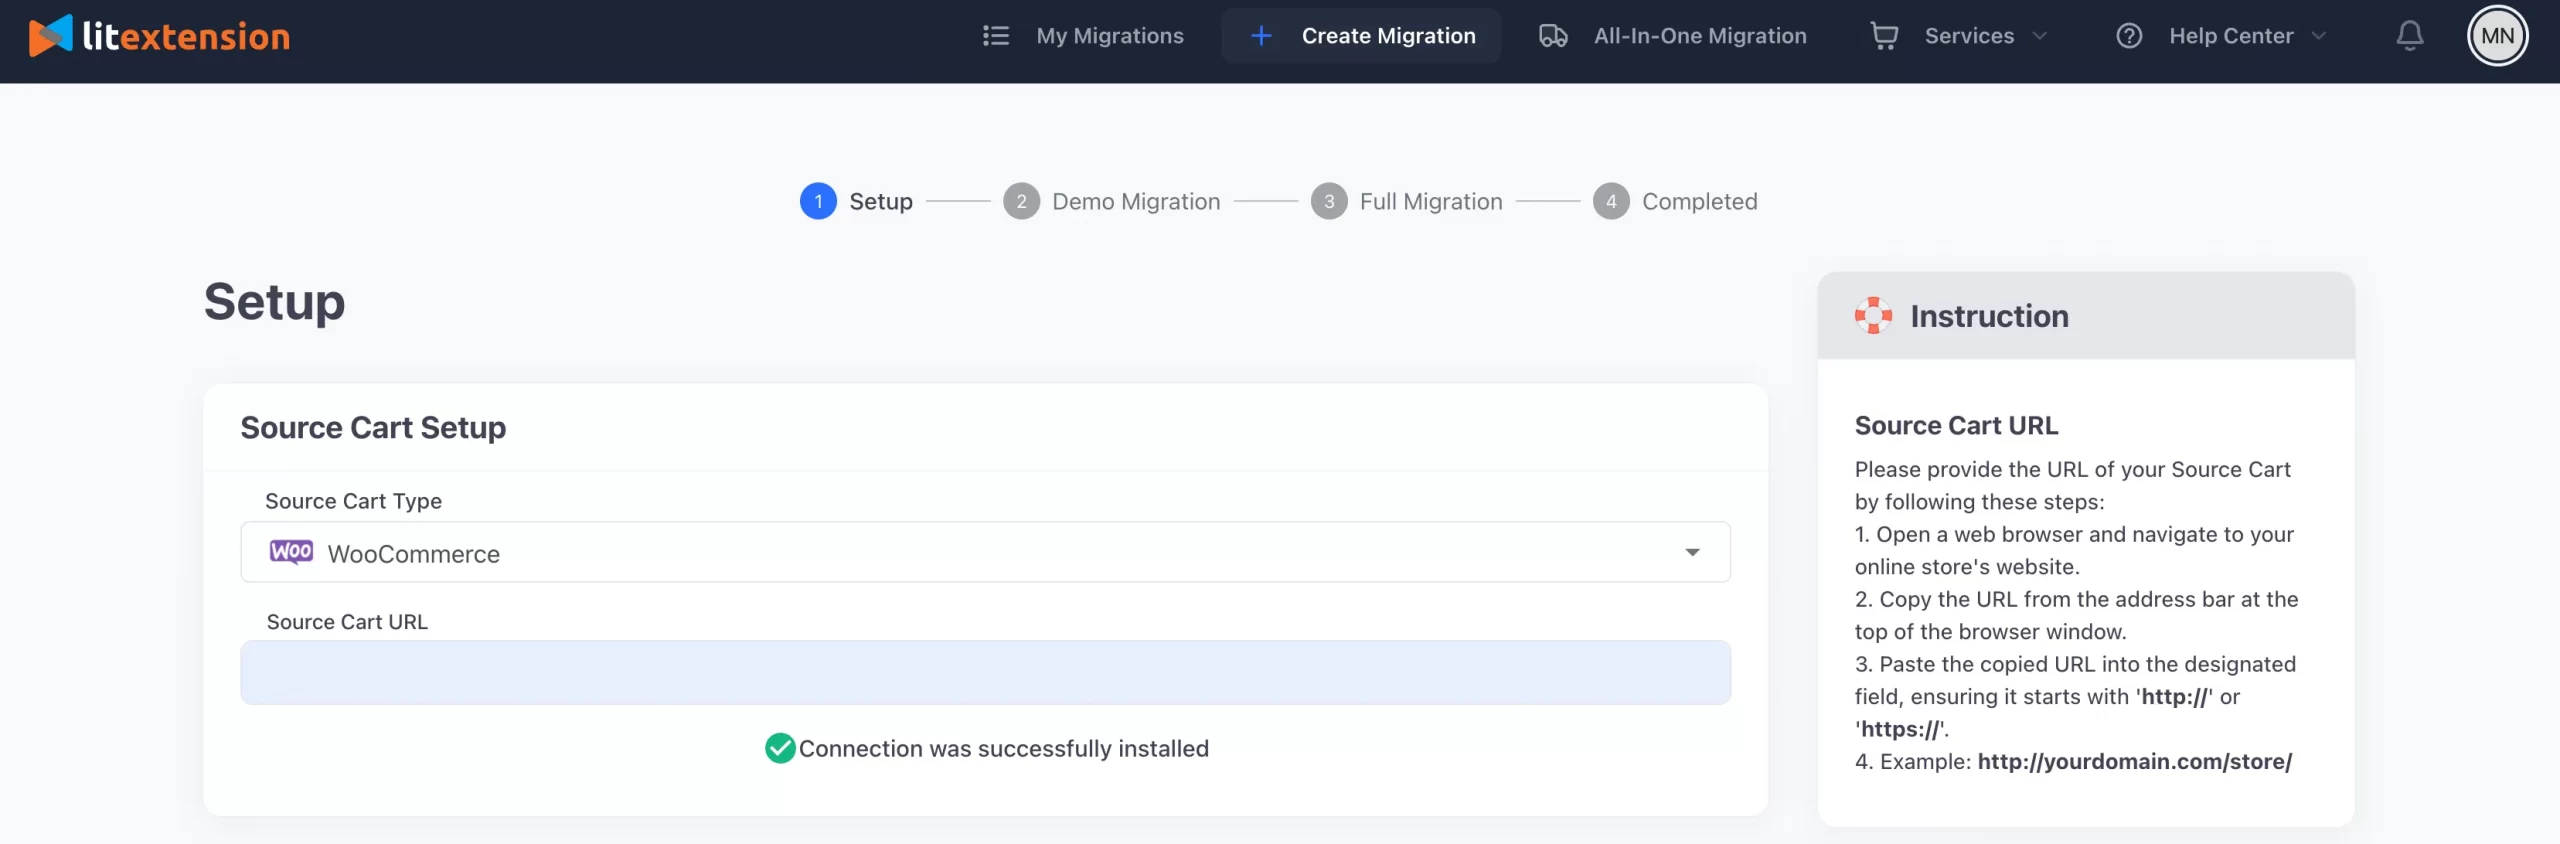
After logging in to the LitExtension page, click Create New Migration.
Choose WooCommerce as your Source Cart Type and fill in its URL in the corresponding field. Then, you’ll need to download LitExtension Connector. It’s a virtual bridge to connect data between your stores.
You can watch the video tutorial below to learn how to set up LitExtension connector within minutes.
After successfully installing the connector, the installation button will be checked automatically.
- Set up Target Cart
Repeat the same procedure for your WooCommerce target store. Download Connector, extract the zip file, and upload it to the WooCommerce target store’s root folder.
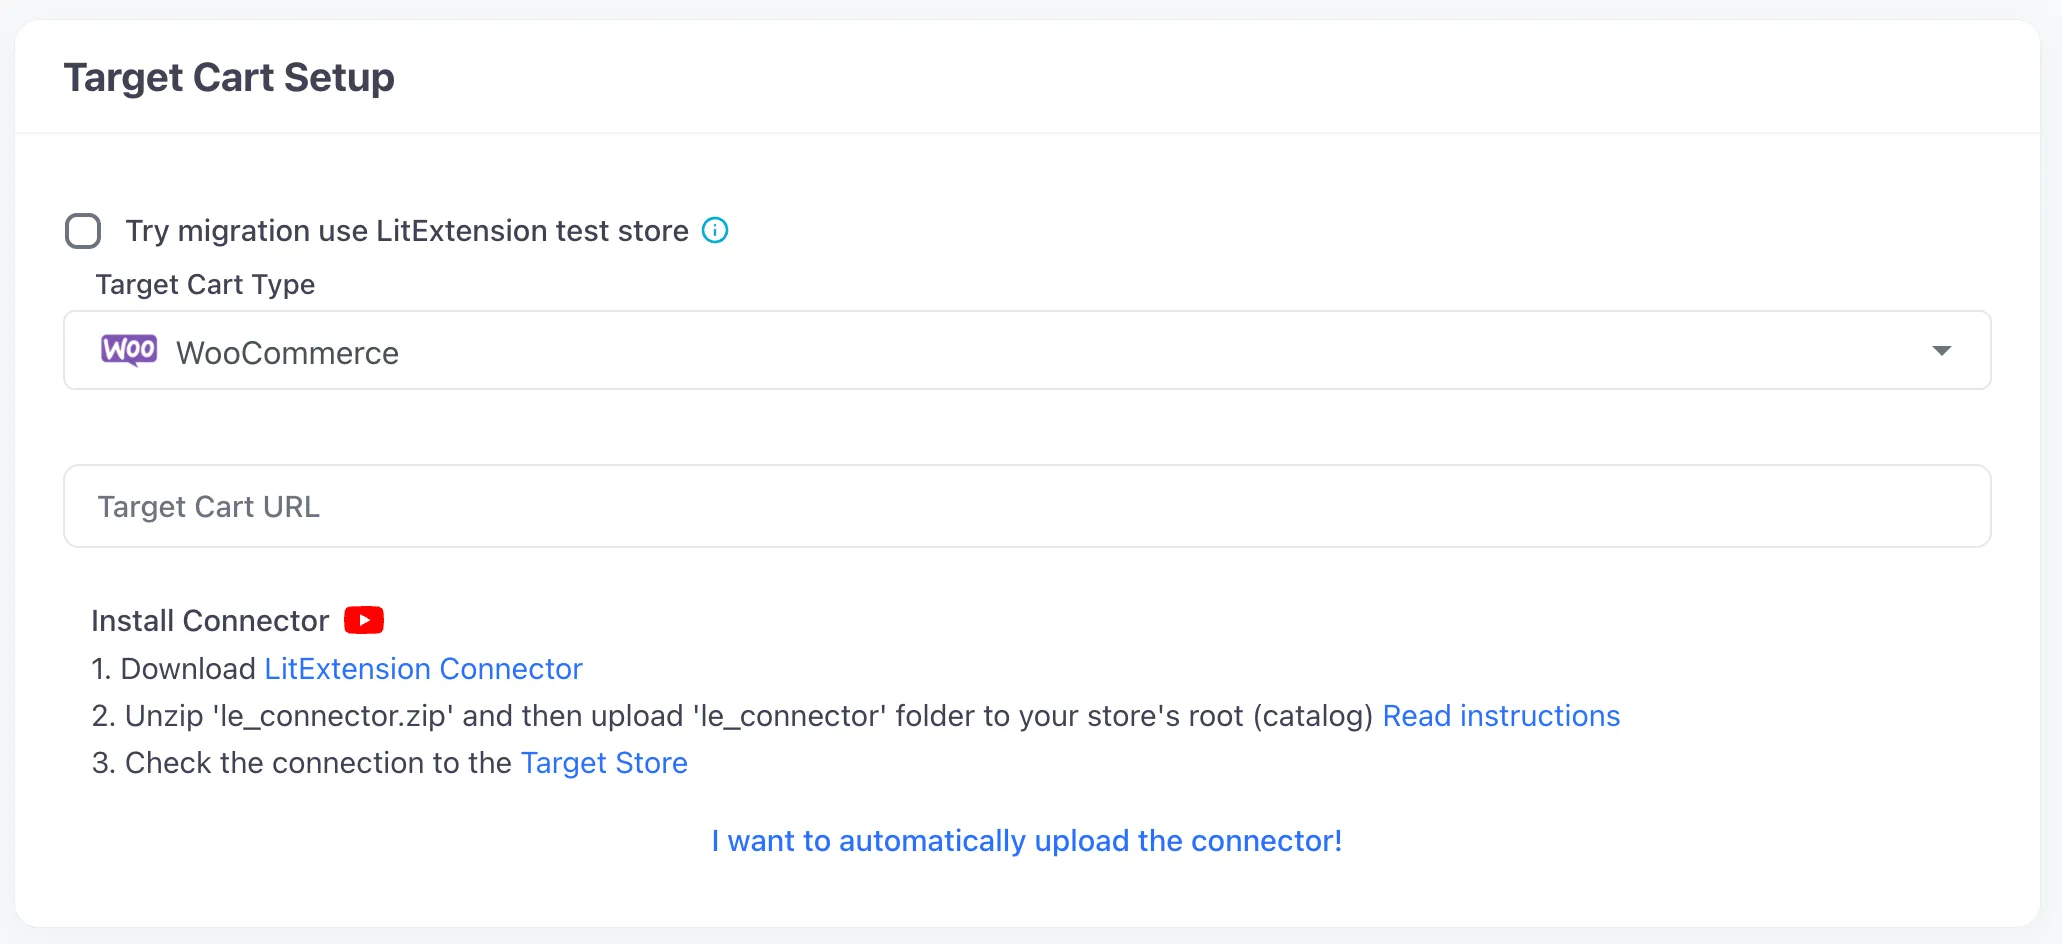
On the other hand, you can easily provide access to your store by filling in your cart’s URL, Admin username, and password.
In case you have any problems in this step, please contact LitExtension support agents to get your issues resolved as soon as possible.
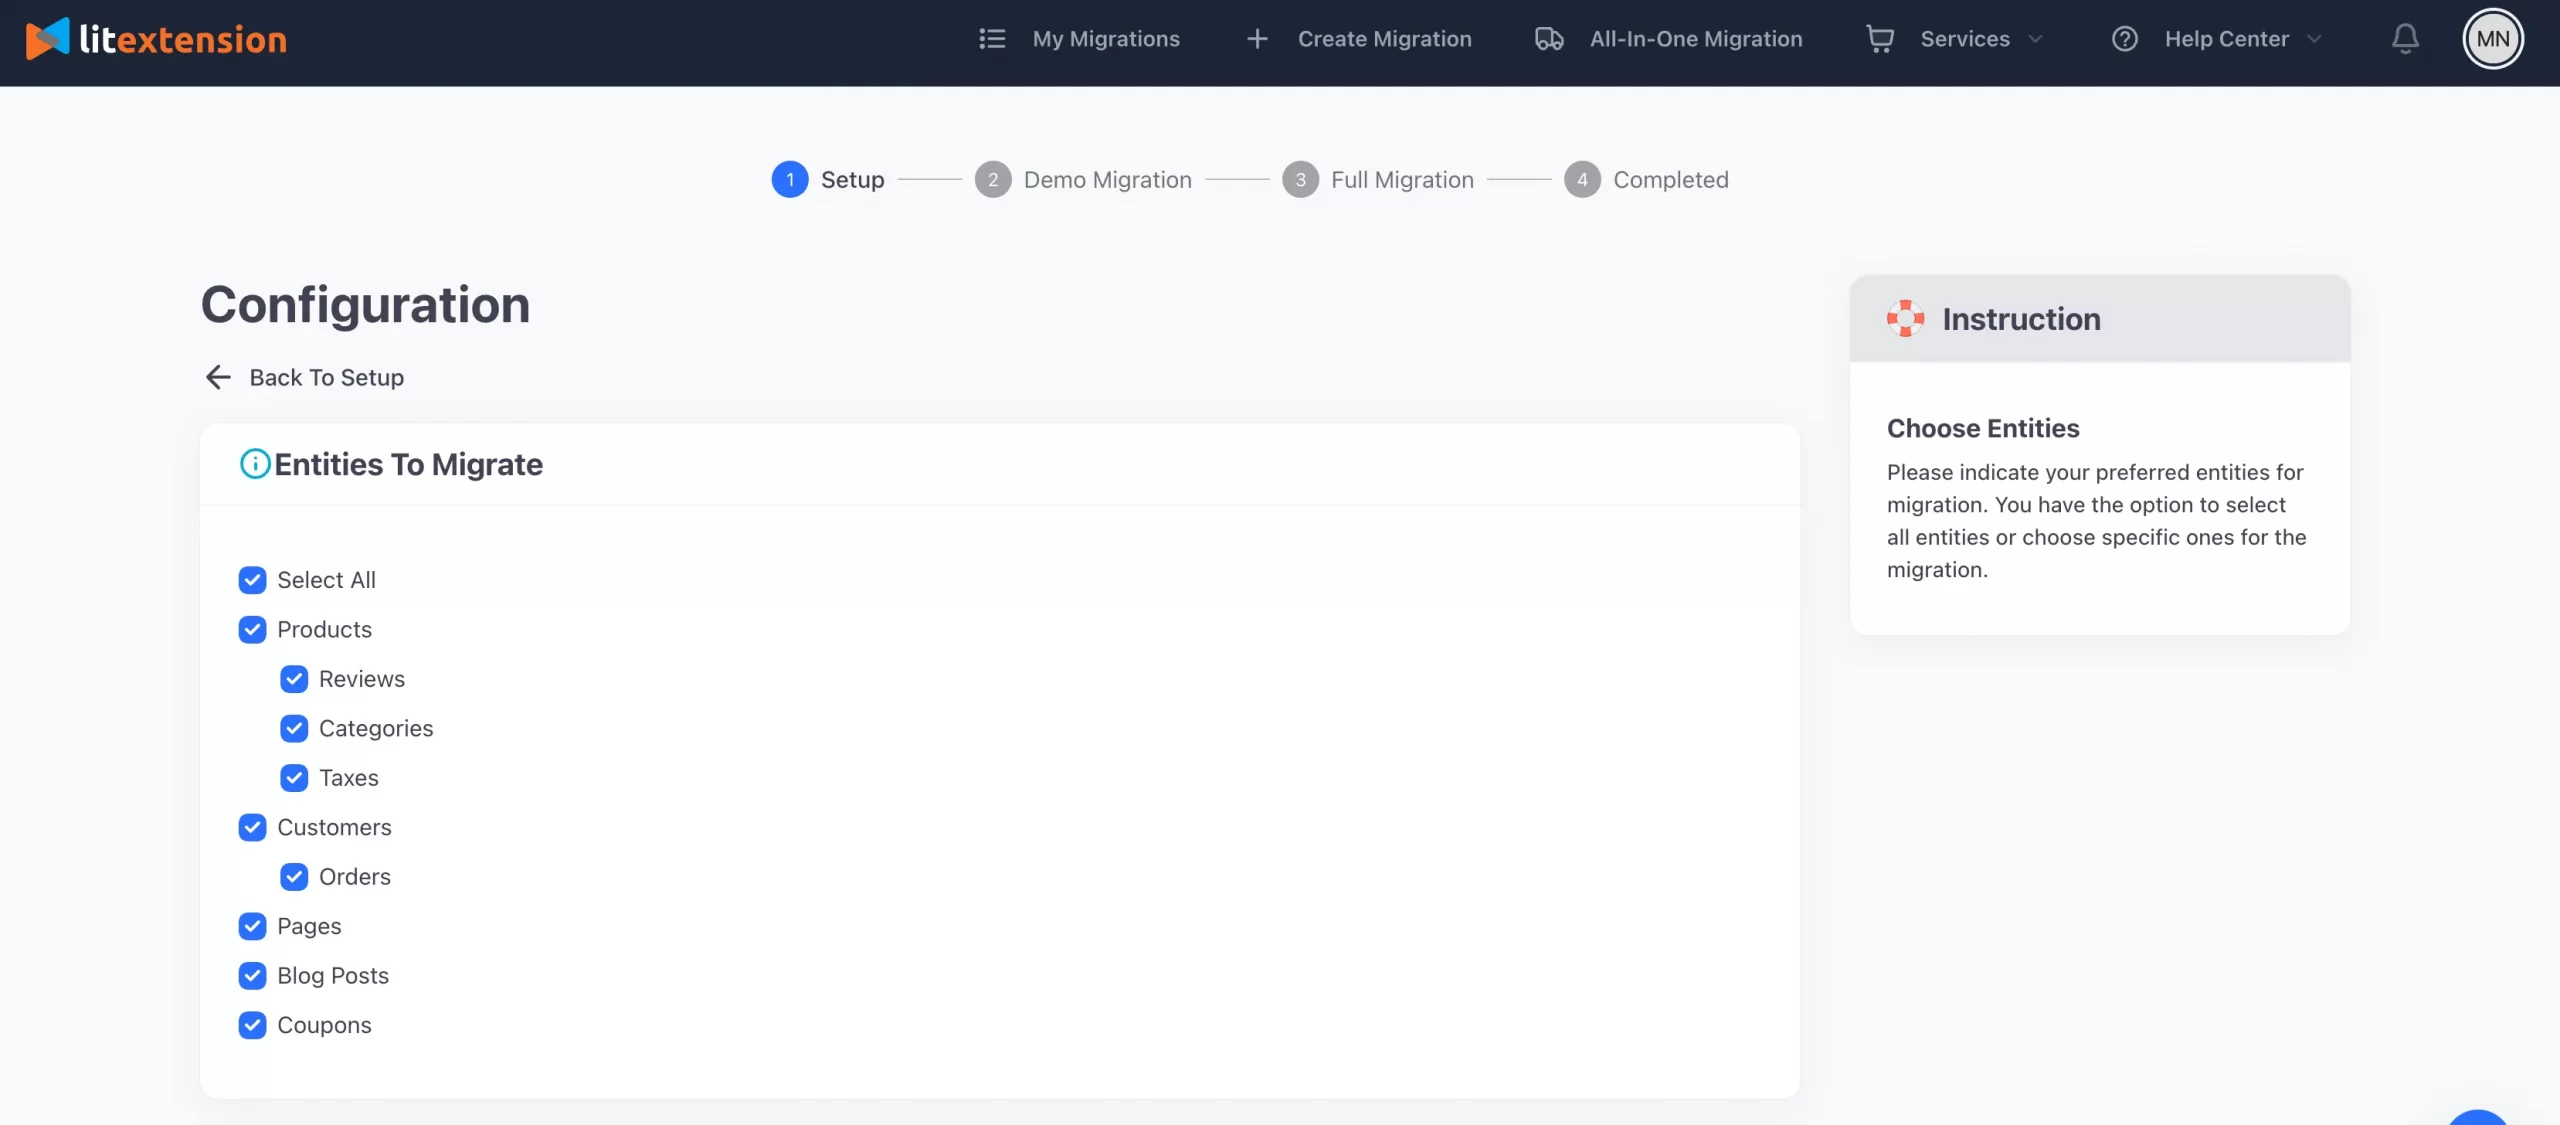
Step 4: Configure the migration
At this step, you can choose all your data or only the necessary ones to migrate.
When scrolling down, you can see our Additional Options.
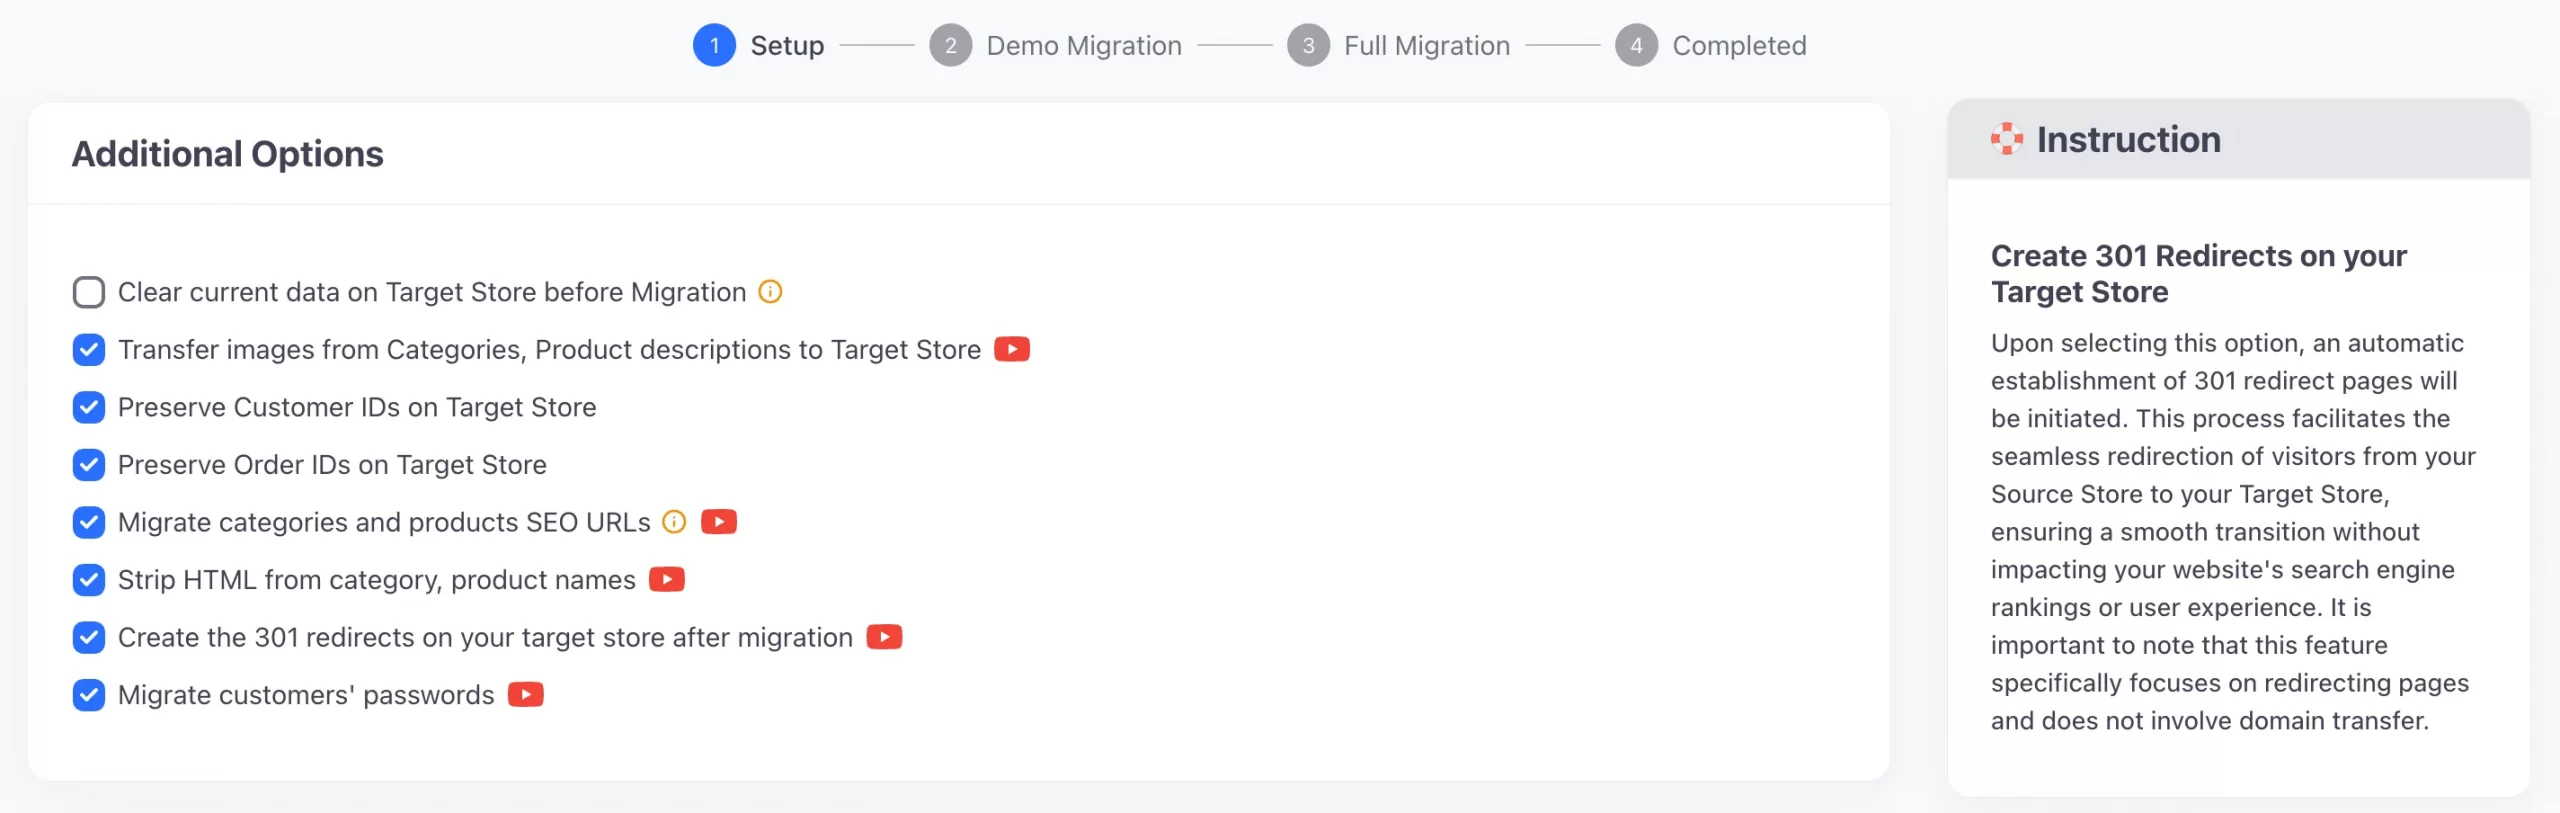
Let's talk a bit about LitExtension Additional Options:
- Migrate customers' passwords. This option lets your customer log in seamlessly after the migration of the eCommerce store.
- Create SEO & 301 Redirects. This option will help you preserve categories and product URLs for SEO rankings.
Don't miss a single benefit to enjoy a seamless WooCommerce update!
Moreover, don't forget that you can also map order statuses and customer groups.
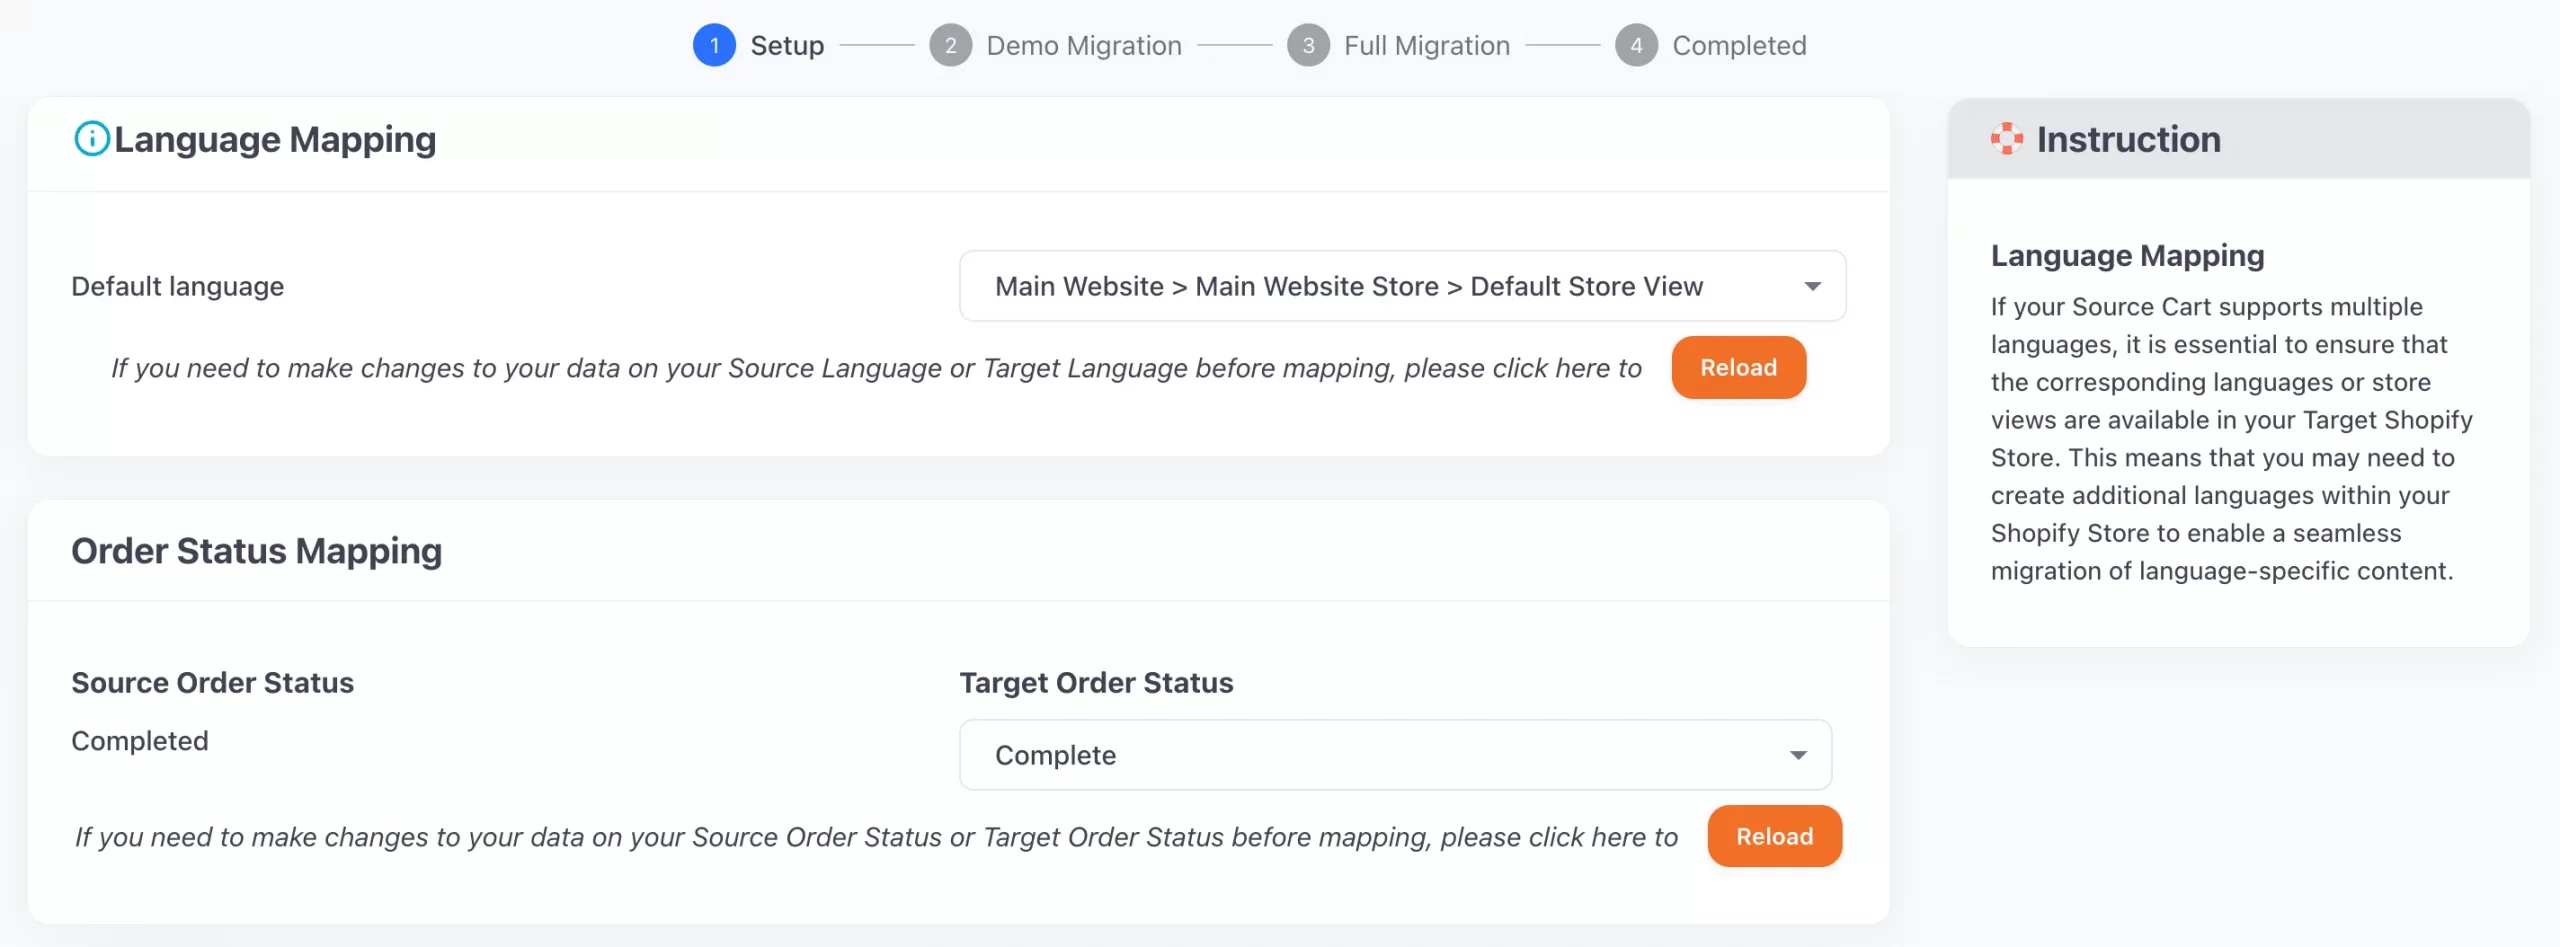
Choose the necessary descriptions and every data will be migrated respectively.
Step 5: Perform data migration from WooCommerce to WooCommerce
You can try the free demo first to catch a glimpse of how the system works. Or you can tick on “Skip Demo migration” to run the full WooCommerce update immediately.
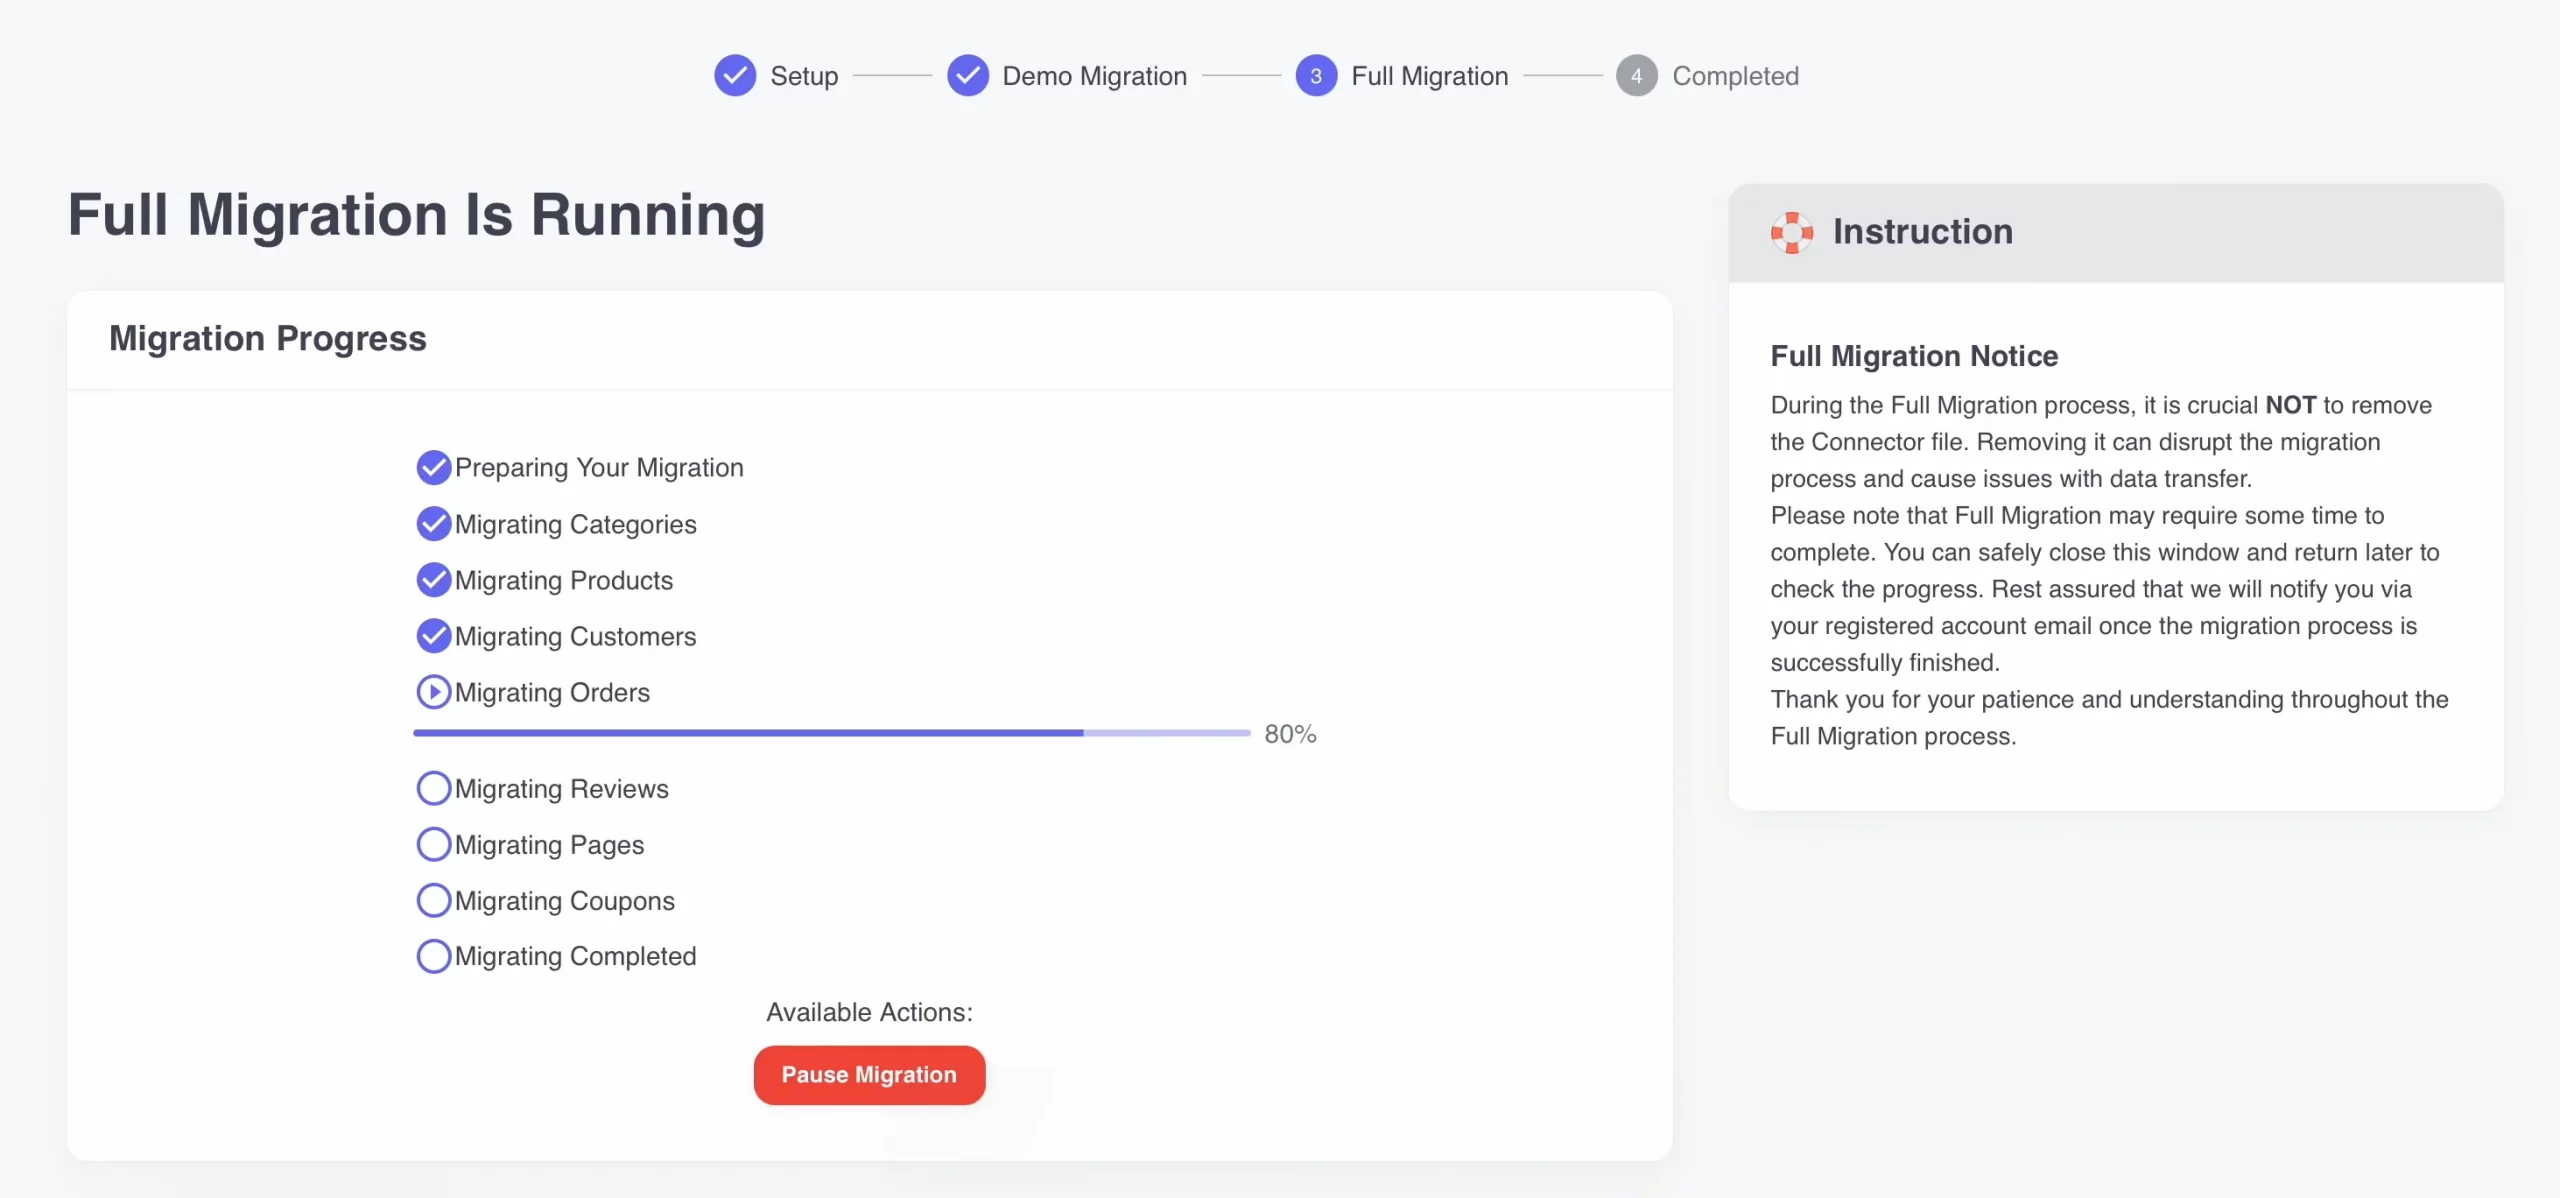
The full migration is started for the WooCommerce database update in progress. You can turn off your PC while LitExtension works with your data. You’ll get a notification via email when the process is completed.
How to Update WooCommerce Manually from WooCommerce System
If a new WooCommerce version is released, we can see the “Update” button beside WooCommerce plugins on WordPress admin site.
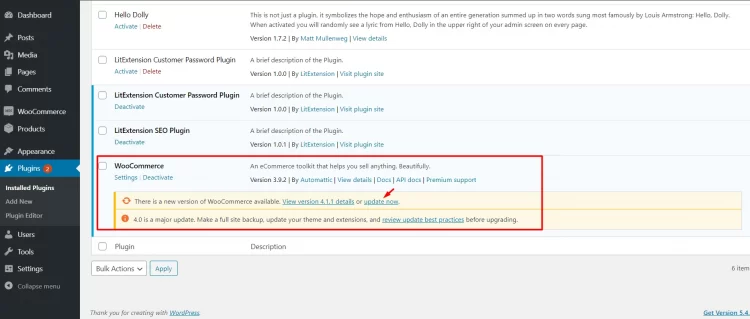
However, one should not choose to upgrade straight away this way since it potentially causes compatibility-related issues. In order not to put your long-established business in danger, always test upgrades on the staging site first and then upgrade on the live site.
Note: This method is more suitable for advanced WordPress users with a good understanding of MySQL database. If you are unsuitable for this method, we highly recommend you choose the prior one.
Step 1: Set up a staging site
As I mentioned before, upgrading WooCommerce via a live site involves serious risks. Thus, we recommend you test the upgrade on a staging site before applying it on the WooCommerce live site.
A staging site is basically an exact simulation of your existing website. Any changes you make on your testing environment have no effect on your live site. You will have 3 main ways to create a WooCommerce staging site:
- Use your hosting provider: Some hosting providers, such as Bluehost, SiteGround, or WP Engine, offer staging environments. However, this additional option comes with a higher plan fee.
- Use a plugin: You can use many WordPress plugins such as WP Staging Pro, WP Stagecoach or All-in-one WP migration to set up a staging environment.
- Create a staging site manually: This method gives you total control over the staging setup process.
If you don’t want to pay for a hosting provider or plugin, below is the manual staging site-creating process that you can easily follow:
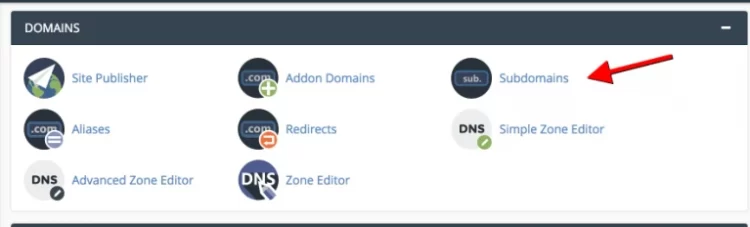
1. Log in to your cPanel and choose the Subdomains option
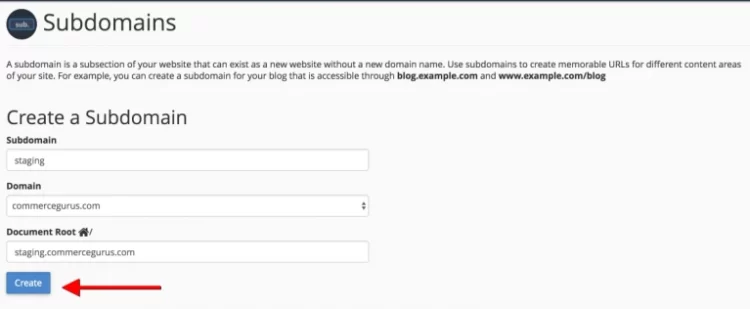
2. Enter the name of your Subdomain
Note: Your staging subdomain can not include the exact address of your main domain, or else it will end up being a directory inside your live store.
3. Click the Create button to generate a subdomain
The process might take a few minutes, depending on how large your store is. Once it completes, you can access and interact with your staging site exactly as you usually do on your live store.
Step 2: Update the staging site
Next, it’s time to update data to your staging site. Please note that themes, payment methods and plugins that are from third-party developers cannot update, you need to contact the third-party developer for compatibility and support on updates.
#1. Update theme
The manual theme upgrade process consists of these main steps:
- Log in to your WooCommerce.com account and download the latest version of your theme.
- Unzip, rename, and then compress the downloaded folder to a zip file again. If you don't change the file's name, an error will happen because there's already a theme folder on your server with the same name as the one in your ZIP file.
- On your website, go to Appearance > Themes > Add New
- Click Upload to upload the ZIP file you just renamed
- Go to Appearance > Themes > Activate
If your old theme has been customized, you need to reapply these modifications to the new one later.
#2. Update payment methods
WordPress allows you to modify, add, disable, and update payment methods for your WooCommerce store. To update your current payment gateways, stick to the steps below:
- In the WordPress menu column, go to WooCommerce > Setting.
- Click the Payment tab on the top of the page, and a list of payment methods will appear.
- Clicking the Manage button in the right-hand column and then go to update your payment methods
#3. Update plugins
On WooCommerce dashboard, go to Extensions > WooCommerce.com Subscriptions.
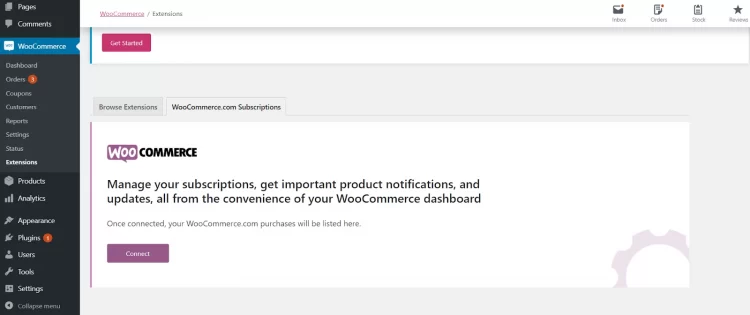
Right here, you need to connect your WooCommerce.com account to your WooCommerce store by logging into your WordPress account and allowing connection.
After that, you will be brought back to your WooCommerce.com Subscription tab with your account automatically connected. Then, you will see a list of products you have purchased from WooCommerce.com.
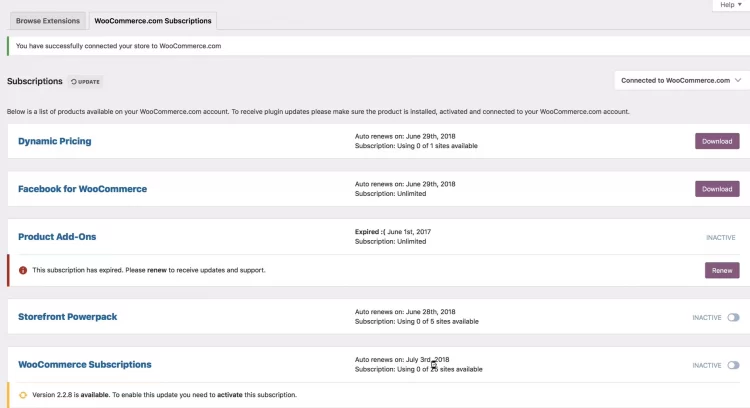
Right here, you can manage your extensions by choosing the following options: activate, renew or update. If there is a new version available, you will see an update notification with an update button beside the extension.
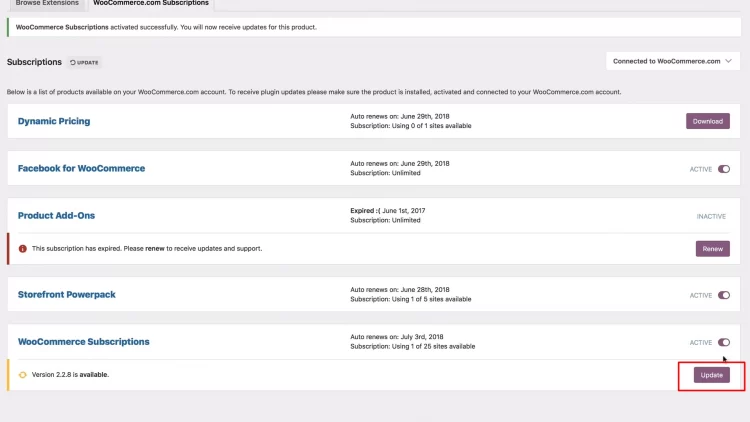
After clicking on this button, you will be navigated to the next update page. Now, you can click Select All to update all the extensions that have released new versions and are available for update.

#4. Update database
The database stores your products, orders, posts, and pages. The process of updating the WooCommerce database on the staging site includes two steps:
- Firstly, creating a new database
- Secondly, uploading the previous database into the newly created one.
1. Back up database
To have a database from the live site uploaded to the staging site, you have to export your database in a file first. Moreover, a backup ensures you can always roll back to the last version if the upgrade fails.
Database backup will not take your time. All you have to do is choose Tools > Export to export your site contents, including your pages, products, variations, orders, refunds, coupons, and media, in an XML file.
2. Upload database to the staging site
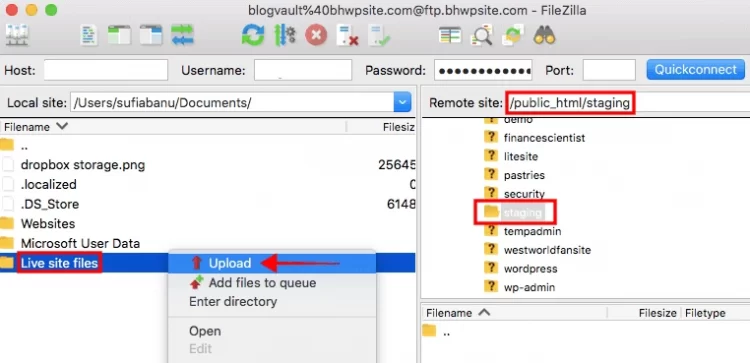
To be able to upload the database backup to the staging site, you need to use FileZilla, a free software for transferring files over the Internet. Open it and provide credentials when you have downloaded and set up FileZilla. Then, wait for the connection.
Next, navigate to Remote site > public_html > staging. Then, the backup folder that you downloaded will display on your local computer. Select it and right-click to choose Upload. Now, your backup folder is in your staging folder.
3. Create a new database for the staging site
Log in to your hosting account and navigate to Databases > MySQL Databases > Create New Database.
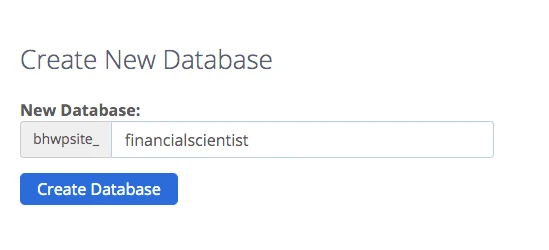
Next, generate a MySQL user for your database by scrolling down on the same page and establishing a new user.
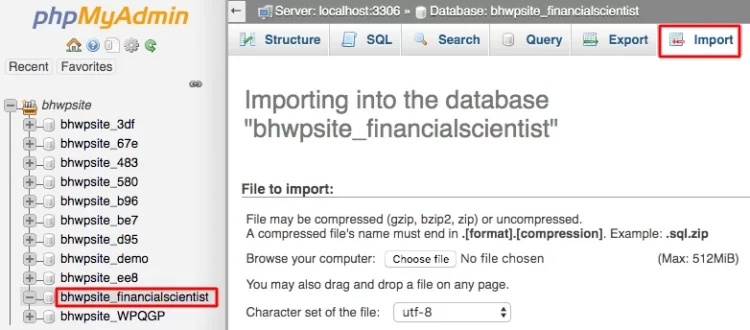
Subsequently, you should upload the previously downloaded database to this fresh database. Access phpMyAdmin through the hosting dashboard to complete this step.
Choose the recently established database, then click the “Import” option. This ensures that you're importing the correct database. Then, go ahead and import the database from your computer.
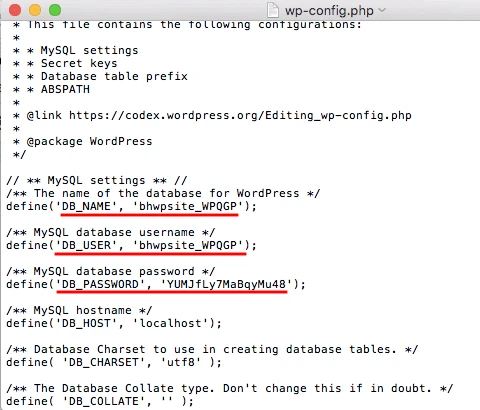
In this step, you'll adjust the wp-config file to establish a connection between the database and the staging site.
Using FileZilla, go to Remote site > public_html > staging > wp-config.php. Right-click on the file and choose Edit. Inside the file, you'll find details about your previous database (or your live site's database). Replace this information with the new database name, username, and password.
After making these changes, remember to save the file.
The website's URL will be displayed as follows: staging.yourwebsitename.com. You can use the same login credentials as those on your live website.
Step 3: Test site
The next important step is to test the updates data on your staging site to ensure compatibility. Besides compatibility, please ensure that you look into other aspects, including loading time, stability, and responsiveness. To do this, you must check both your store's back-end and front-end.
Note: For front-end tests, remember to execute tests via a clean browser session to ascertain that your website's cookies will not send you to your customers' most common use cases.
Check store back-end
- Check if there are any outdated items left in your backend
- Test updating personal information
- Try adding and removing products in your store
Check store front-end
- Try browsing the important pages including categories pages, individual category pages and single product pages, etc
- Check whether the search system works
- See whether you can make a purchase
- Try searching for any product, order, and customer
What are the possible errors?
The most common error is broken compatibility between extensions or plugins. Others are caused by WooCommerce itself, such as:
- Shortcodes are not executed in variation descriptions.
- Some orders miss variation attributes.
- During checkout, the billing and shipping fields are misplaced.
- Emails are being sent multiple times.
- There's a redirect loop when attempting to access your site.
Step 4: Push the site to live
Before you put the staging site into use, you need to switch your live store to maintenance mode. Despite causing store downtime, this action will guarantee you will not miss any new orders placed during this phase. When finished, remember to remove your maintenance mode.
As I previously mentioned, the testing environment could be generated in 3 ways. If you create a staging environment via your hosting or plugin, you could push the changes from the staging site to the live site with their options.
On the other hand, if you follow the manual method to set up the staging site, you have to upgrade your live WooCommerce store to the latest version. After that, download the files and database from your staging site and then upload them to your live site using the same process we discussed before.
Should You Update WooCommerce?
Yes, regularly updating WooCommerce is essential to maintain your store's security, performance, and compatibility. Updates include critical security patches that safeguard your site from potential threats, reducing the risk of vulnerabilities.
Moreover, updates often deliver performance enhancements and new features that improve your store's functionality. They also ensure smooth integration with the latest versions of WordPress and third-party plugins, helping your website run efficiently without compatibility issues.
Is It Safe to Update WooCommerce?
Yes, it is generally safe to update WooCommerce, but there are important precautions you should take to avoid potential risks. Always start by backing up your WooCommerce website, including both your site files and database. This ensures that you can easily restore your store to its previous state if something goes wrong during the update process.
Testing updates in a staging environment is highly recommended. A staging site is a clone of your live website where you can safely test updates without affecting your customers or sales. This approach helps identify compatibility issues with themes, plugins, or custom code before applying changes to your live store.
Additionally, review the update changelog provided by WooCommerce to understand what changes are being introduced. This can help you anticipate any adjustments needed for custom features or integrations. For large or complex stores, consider scheduling updates during off-peak hours to minimize disruptions to your business operations.
How Long Does It Take to Update WooCommerce?
The update process usually takes a few minutes, especially for small to medium-sized stores with minimal customizations. However, the duration can vary based on several factors. If your store has a large database, extensive product catalogs, complex custom integrations, or numerous third-party plugins, the process may take longer—ranging from 15 minutes to over an hour.
The time required also depends on whether you're performing a manual or automated update. Automated updates using tools like LitExtension are typically faster because they streamline many steps. Manual updates, especially when creating backups, setting up staging environments, and testing for compatibility, can extend the process significantly.
For major updates, it's recommended to allocate additional time for thorough testing, both before and after the update, to ensure everything functions correctly. Scheduling updates during off-peak hours can help minimize disruptions to your business operations.
Why Update WooCommerce with LitExtension?
First and foremost, performing a WooCommerce update with LitExtension doesn’t require any particular technical knowledge and just takes you a few simple steps. Secondly, your current store still operates normally, so you can rest assured that your sales activities will run normally.
Moreover, LitExtension provides a flexible pricing policy. The migration cost (starting from $79) solely depends on the entities and additional options you choose.
Last but not least, one of our key leverage over other upgrading methods is that our Free Demo allows you to see how efficiently the tool works before making your decision.
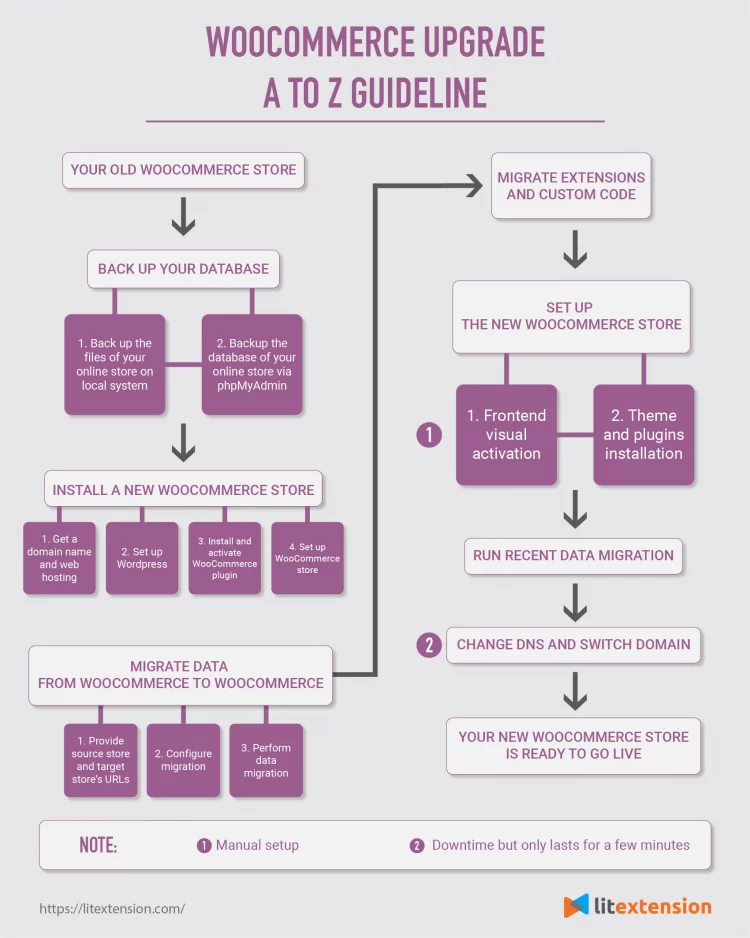
To help you understand the whole process, we have compiled all the key steps in this infographic.
Your WooCommerce Upgrade, Done Right
With LitExtension’s experts by your side, you can migrate safely and keep your business running flawlessly.
CONTACT US NOW
WooCommerce Post-Update Activities
Your WooCommerce store has just been elevated to a more advanced version. However, there are some tasks that need to be done to fully complete your new store.
1. Check results after migration
Once you've completed updating all your data, go to your new store and verify the accurate migration of all entities, custom code, and extensions.
Follow this article's guidelines to check the result after the WooCommerce update.
2. Theme and plugins installation
Your new store won’t be completed without getting clothed with a new look and extending functionality with plugins. There is plenty of beautiful templates and powerful plugins that may be well-suited to your business, functionality, and style needs. You can look for them on WooCommerce Theme Store and WordPress plugins.
3. Migrate incrementally and update data
The data transfer using LitExtension has been successfully finished, and now you have some time to set up your new store. This includes tasks like customizing the design, familiarizing yourself with the new admin panel, and exploring new SEO features.
During this period, your old store remains active and continues to receive new entities or updates. You also have the option to make changes to your old store.
Therefore, it's crucial to ensure that all new entities and updates are transferred to the target store to maintain its up-to-date status.
LitExtension offers you 3 options that can address this concern
- Recent Data Migration: This function enables you to automatically transfer all the new data that appear in your source store after the complete platform switch.
- Re-Migration: This option helps you to transfer everything all over again including data that has been transferred before, data that newly appears in your source store, and data that has been updated.
- Smart Update: It updates data that has been modified in your Source Store after the migration. At the same time, LitExtension Migration Tool will move any new data in your old store to your new one. This option can solve the problem better and quicker than a re-migration.
All these 3 options are free and you can use them for unlimited times under these conditions:
- You have performed full migration with LitExtension within 3 months for Basic and 6 months for All-In-One Package.
- The total additional entities are less than 10% of the total number of entities in the initial migration.
Note: Having updated data, now you need to regenerate images on the front end just like what you did after the full migration.
WooCommerce Update – FAQs
What is the latest version of WooCommerce?
As of April 2025, the latest version of WooCommerce is 9.7, which includes performance enhancements, security patches, and full compatibility with WordPress 6.6.
Where do I find my WooCommerce version?
To check your WooCommerce version, go to WordPress Dashboard → Plugins → Installed Plugins, then locate “WooCommerce.” The version number will be displayed next to the plugin name.
How do I update WooCommerce to the latest version?
You can update WooCommerce through your WordPress Dashboard > Plugins > Installed Plugins, then click Update Now next to WooCommerce. For major updates, test first on a staging site.
How do I manually update my WooCommerce database?
After updating WooCommerce, if a database update is required, you’ll see a notification at the top of the dashboard. Click Update WooCommerce Database and wait for the process to complete.
Is it safe to update WooCommerce without breaking my store?
Yes, updating WooCommerce is safe if done correctly. Always back up your website, test updates in a staging environment, and make sure all plugins/themes are compatible. This helps avoid crashes during the WooCommerce upgrade.
What can go wrong during a WooCommerce update or upgrade?
During a WooCommerce update or upgrade, issues like plugin conflicts, theme incompatibility, layout breaking, or checkout errors can occur. To avoid these, always test updates in a staging site and ensure all extensions are compatible before going live.
Final Words
Updating WooCommerce is a crucial step in maintaining the security, performance, and efficiency of your online store. By following the outlined steps, you ensure a smooth transition to the latest version, minimizing potential risks and maximizing new opportunities.
You don’t have to navigate this process alone. With LitExtension, you have a trusted partner to handle the migration efficiently, saving you time and effort. Whether you choose an automated or manual update, staying up to date will help keep your store competitive and optimized for success.
Let's visit LitExtension WooCommerce blog and join our community to get more eCommerce knowledge.

