Magento 2 upgrade to latest version ensures your store stays secure, fast, and compatible with the latest features. But without the right preparation, it can lead to broken modules, data issues, or even downtime.
In this guide, we’ll walk you through the four main methods:
- Upgrading Magento using Composer
- Manually updating Magento
- Updating to Magento 2 with LitExtension
- Upgrading to Magento 2.4.7 using Web Setup Wizard
Let’s start with the reason why every Magento store owner should keep their version up to date.
Magento Upgrade Made Easy!
Let our experts handle the migration while you focus on growing your business.

How to Perform Magento 2 Upgrade Using Composer
Our checklist:
- Enable maintenance mode (bin/magento maintenance:enable)
- Disable cron jobs (bin/magento cron:remove or ./vendor/bin/ece-tools cron:disable)
- Back up composer.json (cp composer.json composer.json.bak)
- Remove unnecessary packages (if switching editions)
- Require new Magento version with Composer
- Update metadata and clear cache directories
- Run bin/magento setup:upgrade
- Disable maintenance mode and restart Varnish (if used)
- Test your frontend, backend, and extensions
For most Magento stores, Composer is the recommended method to perform upgrades. It gives you better control over dependencies, extensions, and system updates, especially for stores with custom development or third-party integrations.
From version 2.4.2 onward, Magento only supports Composer 2. If you are looking to upgrade from a version prior to 2.4.1, it's essential to perform a preliminary upgrade to a version that aligns with Composer 2, using Composer 1, before proceeding to upgrade to Composer 2 for versions beyond 2.4.2.
1. Enable maintenance mode
To get things started, activate maintenance mode to restrict access to your store while the Magento 2 upgrade is in progress.
Follow this guideline to install the application, which enables you to use the Magento maintenance CLI command. Then, the steps become much easier. All you have to do is copy and paste the following command for maintenance mode enablement:
bin/magento maintenance:enable [--ip=<ip address> ... --ip=<ip address>] | [ip=none]
The “–ip=<ip address>” option allows you to exclude a specified IP address from maintenance mode, which is helpful for situations like developers working on maintenance. For instance, this command line will enable maintenance mode for everyone except 192.0.2.10 and 192.0.2.11:
bin/magento maintenance:enable --ip=192.0.2.10 --ip=192.0.2.11
Once you've put the application into maintenance mode, it's crucial to halt all message queue consumer processes. You can identify these processes by running the command “ps -ef | grep queue:consumers:start”, followed by executing the “kill <process_id>” command for each consumer. In a multi-node setup, you should perform this task on each node.
2. Disable cron jobs
Starting the upgrade procedure while asynchronous processes, like message queue consumers, are active can potentially lead to data corruption. Therefore, we must disable the cron jobs.
Different Magento editions will require distinct command lines to perform the task. In other words, for those of you who are using Adobe Commerce on cloud infrastructure, paste this snippet:
./vendor/bin/ece-tools cron:disable
Meanwhile, Magento Open Source users will need the following source code:
bin/magento cron:remove
You then start all message queue consumers manually to ensure that all messages are consumed using:
bin/magento cron:run --group=consumers
When the cron job finishes, you can execute the ps aux | grep 'bin/magento queue' to keep track of the task process.
3. Create a composer backup
At this step, create a backup for your composer.json file with this command line:
cp composer.json composer.json.bak
4. Manage the packages
Moving forward, we will include or exclude specific packages based on your requirements. Specifically, when migrating from Magento Open Source to Adobe Commerce, you will need to remove the Magento Open Source package.
composer remove magento/product-community-edition --no-update
5. Update your instance
Then, update your installation by utilizing the specified syntax for the composer require-commerce command:
composer require-commerce magento/<product> <version> --no-update [--interactive-root-conflicts] [--force-root-updates] [--help]
As you can see, there are a few command options included, and each takes on a special role:
<product>: The package for the upgrade should be either product-community-edition or product-enterprise-edition for on-premises installations.<version>: The version of Adobe Commerce or Magento Open Source to which you are performing the upgrade, such as 2.4.3.--no-update: Deactivates the automatic updating of dependencies.--interactive-root-conflicts: This enables you to interactively review and modify any outdated or customized values from prior versions that do not align with the version you are upgrading to.--force-root-updates: Replaces all conflicting custom values with the standard Magento values.--help: Provides comprehensive information regarding the plugin’s usage.
6. Upgrade metadata
We’re almost there! But, before that, we have to update the metadata. Here are the steps:
Step 1: Open your composer.json file and modify the name, version, and description according to your requirements.
Step 2: Paste in the update command line:
composer update
Step 3: Clean the var/ and generated/ subdirectories:
rm -rf var/cache/*
rm -rf var/page_cache/*
rm -rf generated/code/*
Step 4: Make adjustments to the database schema and data as necessary
bin/magento setup:upgrade
Step 5: Turn off maintenance mode
bin/magento maintenance:disable
Step 6: If your store uses Varnish for page caching, don’t forget to restart it:
service varnish restart
7. Double-check your work
That’s everything for the Magento 2 upgrade to latest version! Open a new tab and fill in your store’s URL to verify the success. If the upgrade does not go as planned, your storefront will not load correctly.
Another scenario is that you may receive a message saying, “We're sorry, an error has occurred while generating this email.” To solve the problem, here’s how:
- Switch to a user with root privileges, then reset file system ownership and permissions.
- Empty the following directories:
var/cache/,var/page_cache/, andgenerated/code/. - Review your store on a new browser.
Now that the codebase is updated, apply any database changes required by the new Magento version: bin/magento setup:upgrade. This may also regenerate indexes or apply patch data.
If your store is in production mode, recompile and redeploy static files:
bin/magento setup:di:compile
bin/magento setup:static-content:deploy -f
This step ensures your store’s frontend and admin panel load correctly.
Once you’ve confirmed that the site is working, take it out of maintenance mode:
bin/magento maintenance:disable
At this point, you can re-enable cron jobs and run a full test of your store:
- Check the homepage, product pages, checkout, and admin panel
- Verify that all installed extensions still work properly
- Monitor logs (
var/log/system.log)for any errors
If anything goes wrong, you can restore from the backup and review Composer or server logs for issues.
How to Perform Magento 2 Latest Version Update Manually?
Our checklist:
- Download the latest Magento 2 release package
- Back up your full Magento store (files + database)
- Replace old files with new ones (accept overwrite)
- Run SSH commands
- Test both frontend and admin after upgrade
- Apply this only to a staging site first, not live
If you’re not using Composer—or prefer to upgrade Magento manually—you can do so by downloading the latest release package and replacing your current installation. This method is more technical and should only be used if Composer is not available or if you're working in a non-Composer Magento setup.
1. Download the latest Magento 2 version
First, download the latest version of Magento 2 and extract the zip file into your store’s root directory. Extract the file and click “Yes” if the system prompts to replace any existing files.
2. Run SSH Commands
After unzipping the Magento upgrade folder, it’s time to make use of these SSH commands:
php bin/magento setup:upgrade
php bin/magento setup:static-content:deploy
php bin/magento cache:clean
php bin/magento indexer:reindex
These commands will refresh the database schema, upgrade dependencies, and clear caches. Once this process is complete, you can verify the functionality of both the Magento 2 frontend and admin panel to ensure that everything operates correctly following the upgrade.
Important note: A manual Magento 2 upgrade carries a higher risk if done incorrectly. Always test this on a staging site first before applying it to your live store.
How to Upgrade Magento 2 with LitExtension?
Our checklist:
- Prepare both Source (old) and Target (new) Magento stores
- Install LitExtension Connector on your Magento root folder
- Choose migration entities (products, customers, orders, etc.)
- Run demo or full migration
- Verify data on frontend and backend after migration
For store owners who prefer a safe Magento 2 upgrade without technical risks, LitExtension offers a powerful solution: Magento Migration & Upgrade Service.

Instead of upgrading your existing site directly (which can risk breaking your live store), LitExtension builds a new Magento environment on the latest version and migrates your data over, ensuring a smooth, disruption-free transition. Here’s how the process works:
Step 1. Prepare the Source and Target stores
- Source Store: Your current live Magento store (e.g., Magento 2.3.6, 2.4.5)
- Target Store: A new Magento 2.4.8 installation (clean setup, hosted separately or in a staging environment)
To begin with, register an account or sign in on the LitExtension website. You can also use your existing Google or Facebook account to access this.
From your user panel, navigate to the “Create New Migration” tab at the top of the screen, where you can set up the Source and Target Cart.
Select “Magento” from the drop-down for both sections, then fill in the URL in the corresponding field. After that, download our LitExtension Connector to your Magento root folder. This connector acts as a bridge between your Magento database and the LitExtension team.
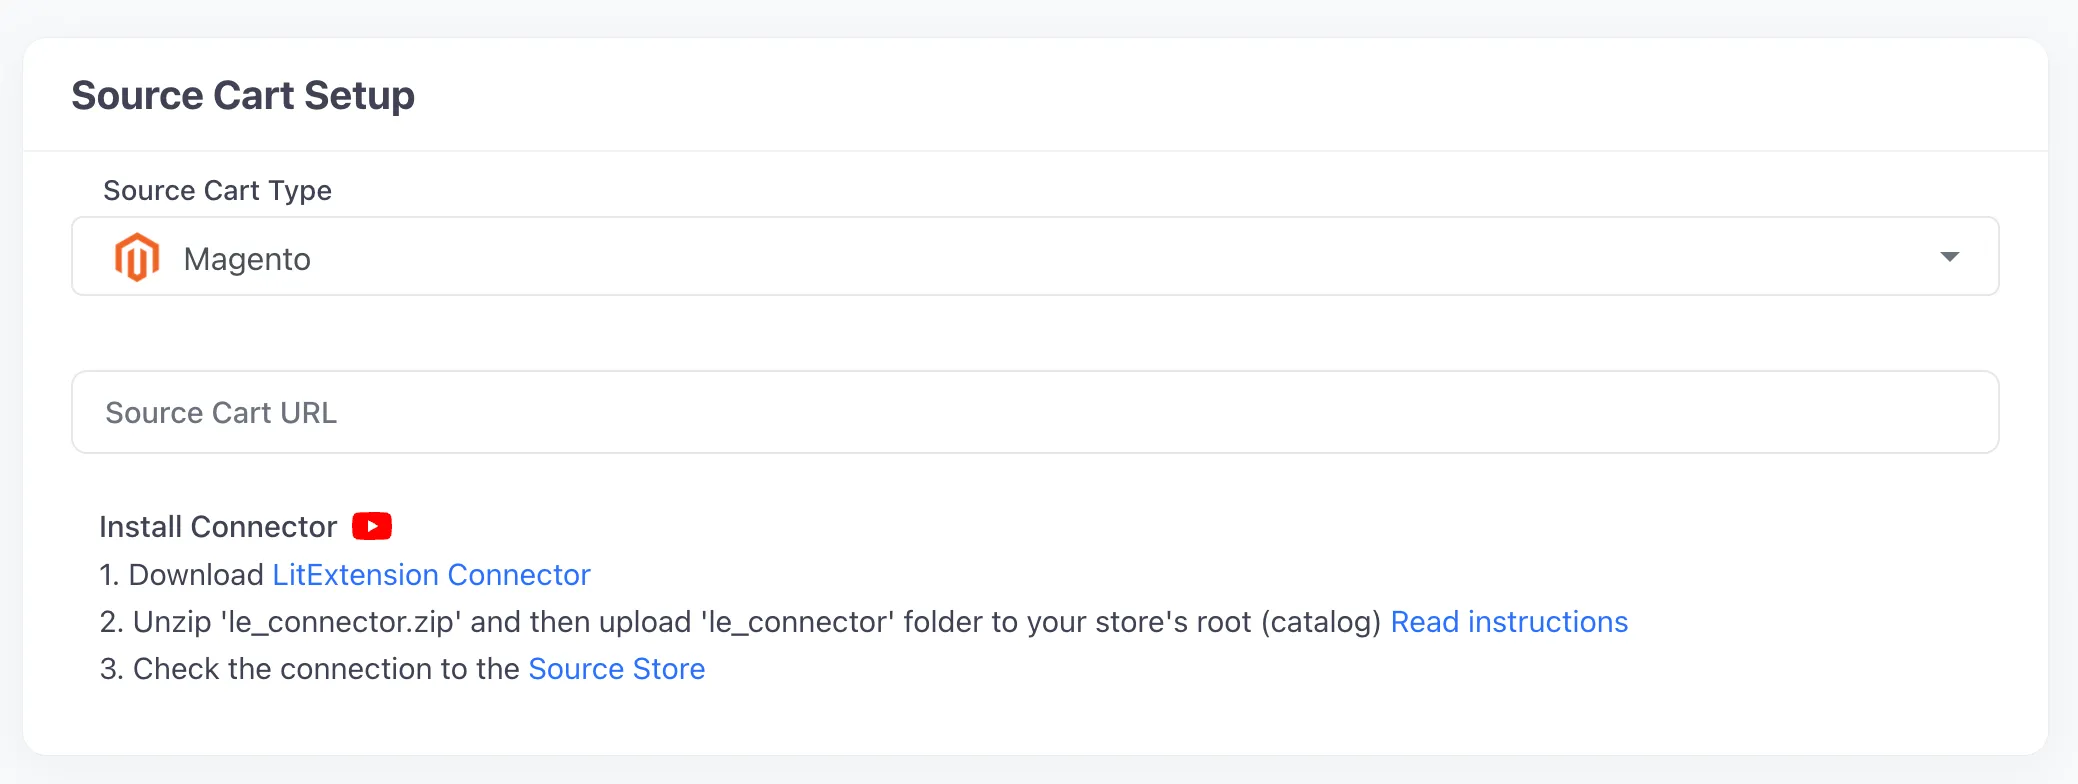
Immediately after that, the Connector Installation will be automatically checked and displayed on the screen without requiring manual intervention. Once you have completed the process, click “Next” to proceed to the next phase.
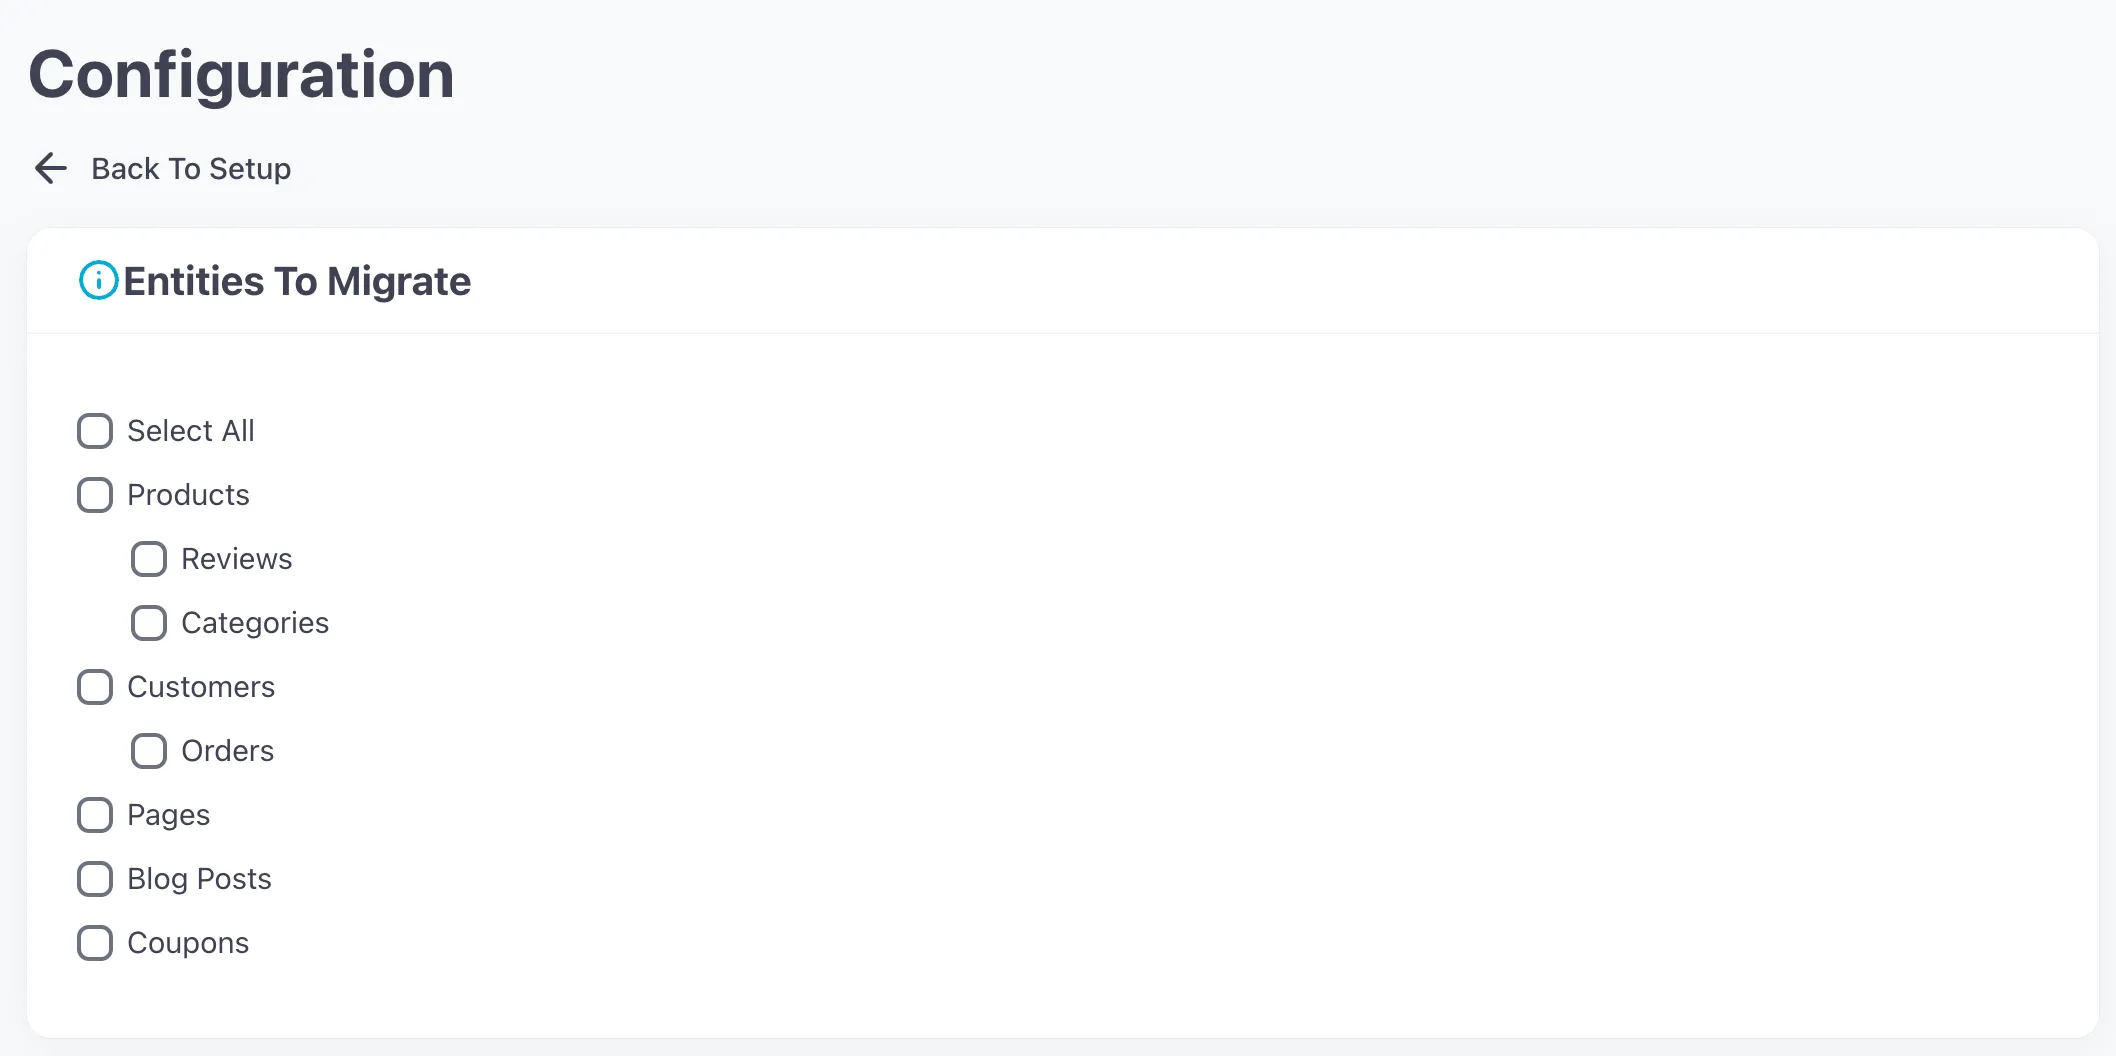
Step 2. Choose migration entities
At this stage, LitExtension allows you to transfer almost all data types during your Magento 2 upgrade to latest version. Thus, you can either tick all of them or only tick the necessary categories you want (products, customers, orders, etc.). This depends on your purpose.
Moreover, LitExtension also provides various Additional Options to extend your data import functionality. In other words, these features help you address serious problems that often arise after a migration.
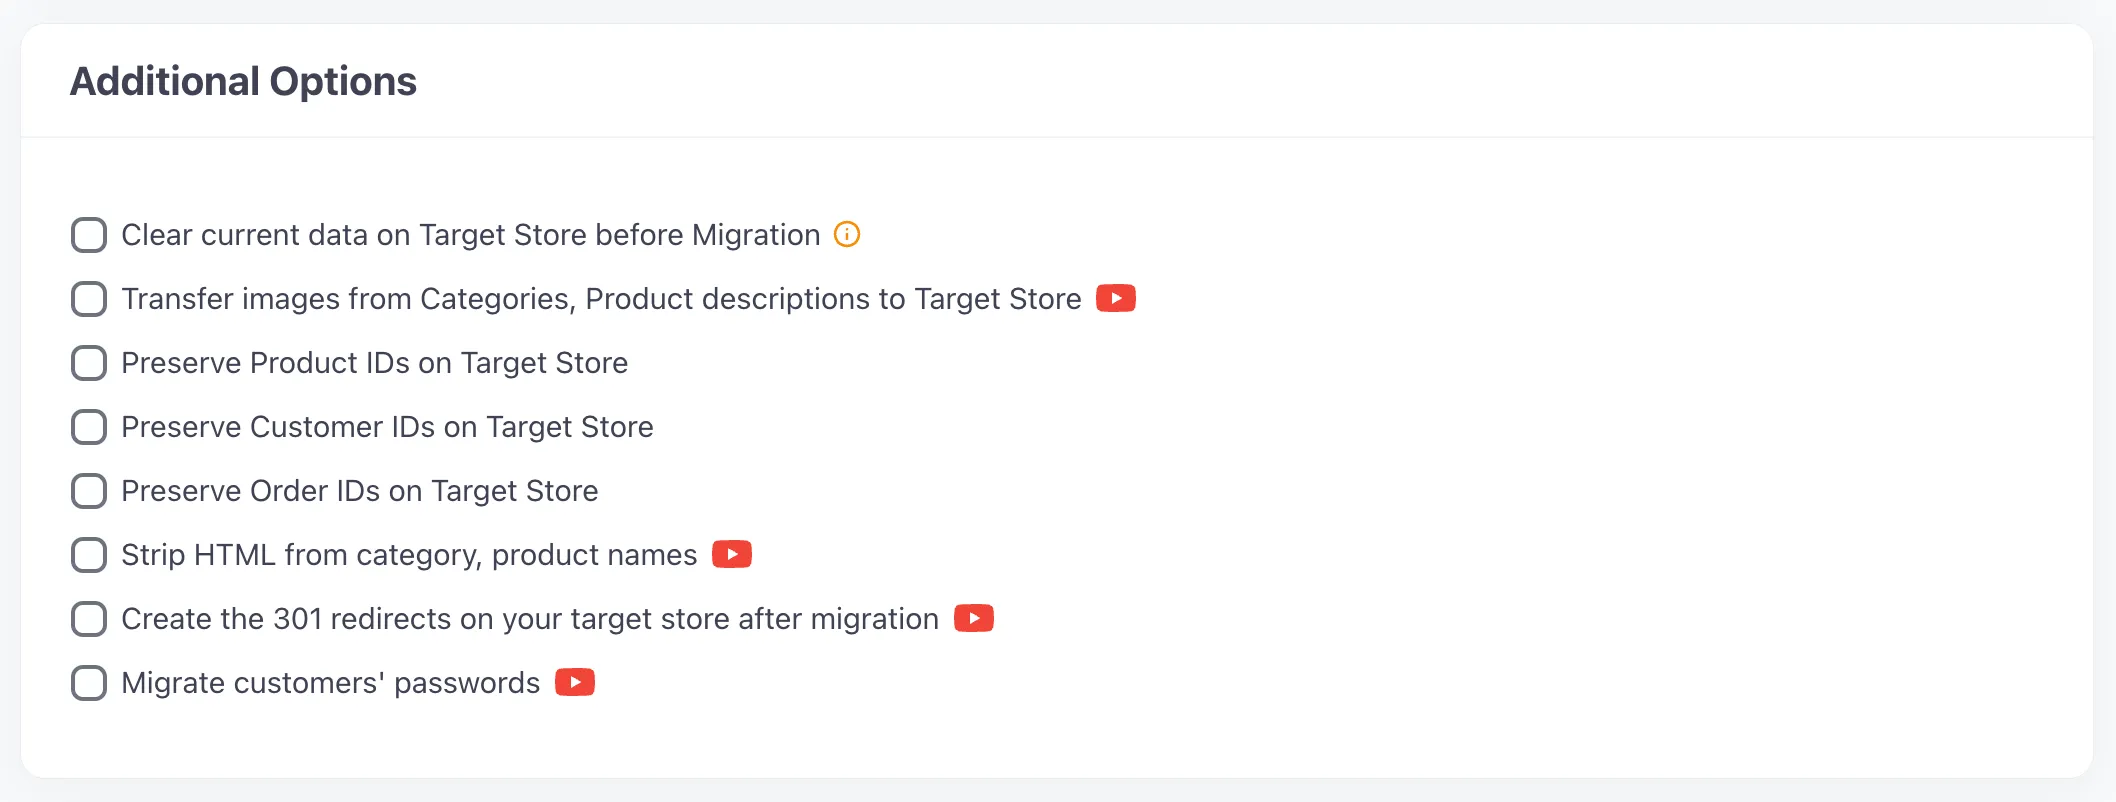
For example, selecting the SEO URLs Migration option will help you maintain your pages' position on search engines after upgrading.
And one more thing—remember to match the Language, Order Status, and Customer Groups between the two Magento 2 versions for the best display.
Step 3. Upgrade Magento to the latest version
Finally, it’s time to upgrade Magento 2 to the latest version. If you haven’t decided about the LitExtension service, run the free demo beforehand. This demo only performs with a limited number of entities; however, you will see the same procedure as the actual migration.
Otherwise, you can tick “Skip the Demo migration” to jump right into Full Migration. Once the Magento upgrade starts, it will run seamlessly on the server. This means that it is completely safe to turn your PC or browser off!
If you don’t have time to perform the process and would like assistance from experts, consider our All-in-One Migration Package. A Personal Assistant (PA) with in-depth knowledge of Magento will take care of your project and keep you updated throughout.
Have some questions about this option? This video may help you:
Perform post-migration checks and go live
When the migration is successful, you need to check the results to ensure everything is upgraded correctly to Magento latest version. To help you out, we have a comprehensive list of all the post-upgrade activities after the you upgrade your Magento store:

Remember to verify your data in both the backend and frontend after completing the upgrade process. For the data to show on the front end, you need to run the command line to resize images, reindex, and clear the cache as follows:
php bin/magento setup:upgrade
php bin/magento setup:static-content:deploy
php bin/magento cache:clean
php bin/magento indexer:reindex
Note: By default, out-of-stock products are disabled on the Magento store. In simpler terms, they will not be shown on the front end and will not be visible to your customers.
Next, update all the newly incurred data with LitExtension’s post-migration services. As your website remains operational throughout the upgrade process, it's expected that you will encounter new orders and customer data:
- Recent data migration facilitates the transfer of any newly generated entities.
- Smart update ensures that all modifications to your data, including any newly introduced entities, are promptly migrated.
Your Magento Upgrade, Done Right!
With LitExtension’s experts by your side, you can migrate safely and keep your business running flawlessly.
How to Upgrade to Magento 2.4.7 with Web Setup Wizard?
Our checklist (for Magento 2.3.x only):
- Log in to Admin Panel → System > Tools > Web Setup Wizard
- Enter Authentication Keys under System Configuration
- Confirm your PHP version meets requirements
- Start the System Upgrade process
- Wait for completion and test your store afterward
The Web Setup Wizard in Magento 2 provides a simplified way to manage extensions, modules, and perform system upgrades directly from the Admin Panel, eliminating the need to manually edit the source code.
However, please note that starting from Magento 2.4.0, the Web Setup Wizard is no longer supported for upgrades. If you’re using Magento 2.3.7, 2.3.6, or any 2.3.x version, you can still use this method. For Magento 2.4.0, 2.4.5, 2.4.6, or 2.4.7, we recommend upgrading via Composer or using the LitExtension migration service instead.
If your Magento version is older than 2.4.0, follow the steps below for a safe Magento 2 upgrade using the Setup Wizard:
- Firstly, go to System > Tools > Web Setup Wizard from the admin panel.

- Then, enter the Authentication Keys into the System Configuration and save to continue.
- Finally, activate the System Upgrade. Be aware that you may receive a request to update PHP to the latest version as part of the procedure.
Why Should You Perform the Magento 2 Upgrade?
After the discontinuation of Magento 1, businesses and online retailers turned to its successor, Magento 2. It introduced a range of new features and enhanced flexibility, offering businesses a robust platform to adapt to evolving customer needs and industry demands.
A Magento 2 upgrade to latest version is not optional, but rather a necessary part of running a stable and secure eCommerce site. When you stay on an outdated version, your store is more likely to face:
- Security risks
- Performance issues
- Extension and theme conflicts
- Compatibility problems with newer PHP or MySQL versions
That’s why Adobe Magento continues to release new versions of Magento with improvements across performance, security, and platform support.
For example, as of April 2025, the latest version of Magento is Magento Open Source 2.4.8. Released in March, this update introduces several important enhancements that affect compatibility, performance, and future-proofing. Here are the key highlights of Magento 2.4.8:
- Full support for PHP 8.4 and MariaDB 11.4
- MySQL 8.4 LTS compatibility
- OpenSearch as the new default search engine (replacing Elasticsearch)
- Dependencies like
league/flysystem,monolog, andless.phphave been upgraded. Old libraries such asjQuery/fileUploaderandExtJShave been replaced by Uppy and jsTree. - A new TinyMCE editor (7.3.0) for better content editing
If you’re still using an older version, such as 2.4.5 or earlier, a Magento 2 upgrade helps ensure long-term stability and prevents unexpected issues in the future.
What to Prepare Before The Magento 2 Upgrade?
It’s worth noting that each Magento 2 upgrade release is compatible with specific versions of PHP, database systems, libraries, and extensions. So before jumping into the upgrade, it’s essential to ensure your environment meets the requirements of Magento 2.4.8 (or any version you’re targeting).
1. Backup your Magento store completely
Before making any changes, you should back up both the Magento file system and the database of your Magento site. This includes:
/pub,/app,/vendor, and/generatedfolders- Your theme and extension files
- Media files (product images, banners)
- Your Magento MySQL database
It will matter the most when the Magento version upgrade fails or breaks your site; a full backup allows you to roll back quickly without data loss.
2. Check if your server meets Magento system requirements
Each Magento version is accompanied by updated system requirements, particularly regarding PHP, database engines, and supported libraries. Upgrading without verifying these may result in critical errors or broken functionality.
Below is a breakdown of system requirements for Magento 2.4.6, 2.4.7, and 2.4.8, so you can compare them and make necessary adjustments before proceeding to the Magento 2 upgrade to latest version.
| Component | Magento 2.4.6 | Magento 2.4.7 | Magento 2.4.8 (latest) |
| PHP | 8.1 | 8.1 | 8.4 (8.1 removed) |
| MySQL | 8.0 | 8.0 | 8.4 LTS |
| MariaDB | 10.4 / 10.6 | 10.6 | 11.4 |
| Elasticsearch | Supported | Supported (deprecated) | Deprecated |
| OpenSearch | Optional (1.2) | Recommended (2.5) | Default (2.11) |
| Composer | 2.x | 2.x | 2.x |
| TinyMCE Editor | 5.x | 5.10.2 | 7.3.0 |
| JS Libraries | jQuery/fileUploader, ExtJS |
Partial replacement |
Replaced with Uppy + jsTree |
Magento 2.4.8 completely drops support for PHP 8.1, and Elasticsearch is now fully deprecated. If your environment still uses them, you’ll need to upgrade your server stack before upgrading Magento.
If you want to check your current environment, run these SSH commands:
php -v         # Check PHP version
mysql -V       # Check MySQL version
composer -V    # Check Composer version
You can also check the search engine used by inspecting your env.php configuration or checking Admin > Configuration > Catalog > Catalog Search.
3. Review extensions, custom modules, and theme compatibility
Many store owners forget this step. After a Magento 2 upgrade, incompatible extensions or themes may break your frontend or cause conflicts. You should do this:
- Review each installed module (especially those from third parties)
- Visit the extension provider’s site to confirm Magento 2.4.8 support
- Update modules if newer versions are available
- If you’ve made core code customizations, test those in a staging environment.
For custom-built features, consider asking your developer to conduct a code audit.
4. Plan for maintenance mode and cron control
Magento upgrades to latest version require you to:
- Enable maintenance mode to prevent frontend visitors from seeing errors
- Disable cron jobs temporarily to avoid scheduling conflicts during setup
You’ll run these steps later in the Composer or the manual Magento 2 upgrade process, but it's good to understand them ahead of time.
5. Ensure SSH access and Composer setup
Upgrading Magento is a straightforward process that you can manage using the command line interface (CLI). To get started with your upgrade, you'll need a few things:
- SSH access to your server
- Magento CLI privileges (
bin/magento) - A working installation of Composer 2.x
If you’re unsure about these, contact your host or developer to confirm CLI access. Once everything is prepared, you’re ready to begin the upgrade.
Magento 2 Upgrade: Challenges & Real-World Insights
A Magento 2.0 upgrade may seem straightforward in theory, but in reality, it often comes with unexpected complexities, especially for stores that have custom code or multiple third-party extensions. Based on feedback from Magento forums, Reddit threads, and real-world projects, here are some key upgrade challenges you should be aware of.
1. Dependency conflicts (Composer, PHP, extensions)
Magento upgrades often require updating PHP or replacing old libraries. If your extensions depend on outdated versions, you’ll likely face Composer dependency conflicts that prevent the upgrade from completing.
→ Recommendation: Before upgrading, audit all extensions and Composer packages to ensure they support the target Magento version.
2. Custom code breakage
If your store relies on custom themes, plugins, or overrides, changes to the Magento core may break them. Developers often need to refactor or rework logic, which adds time and risk.
→ Recommendation: Use the Magento Upgrade Compatibility Tool and code audits to identify and fix incompatible customizations early.
3. System errors and resource limitations
It’s not uncommon to run into errors like:
Cannot allocate memoryCannot create the directoryClass does not exist or missing a constructor error
These are usually related to server resources, permissions, or misconfigured file structures after the upgrade.
→ Recommendation: Upgrade server resources if needed and double-check all file permissions before and after the upgrade.
4. Time and cost to upgrade to Magento 2
A basic upgrade might take 20–60 hours. But for stores with deep customizations, 100–200+ hours is not unusual, especially when frontend and performance work is involved.
For this reason, some merchants eventually move to SaaS platforms like Shopify or BigCommerce to avoid the long-term technical burden.
→ Recommendation: Plan carefully with realistic timelines, budget extra for post-upgrade QA, and prioritize critical features first.
Knowing these challenges ahead of time will help you plan more effectively for your Magento upgrade project. However, even with careful preparation, specific technical errors can still occur during the upgrade process. In the next section, we’ll break down the most common Magento upgrade errors and how to fix them.
Common Magento 2 Upgrade Errors (and How to Fix Them)
Upgrading Magento can bring its own set of challenges, but you’re not alone. Many users encounter similar issues, particularly when working with Composer, server settings, or custom code. Here’s a guide to some common upgrade issues you might face, along with handy solutions inspired by Magento best practices. Let’s tackle these together!
1. Component dependency conflicts
Component dependency conflicts are the most common issue when upgrading Magento stores. These happen when certain components require conflicting versions of dependencies, such as when the JSON file is edited incorrectly.
To resolve dependency conflicts, review extension requirements carefully to ensure compatibility with the new Magento versions. It's also advised that you manage dependencies through Composer JSON or other dependency management tools.
2. “Can't Create Directory” error
Next, the “Can't Create Directory” error is also a common issue during the Magento update process. It occurs when the Magento system attempts to create directories for cache, session, or file storage but encounters permission restrictions.
To address this issue, it's best to run the php bin/magento setup:di:compile command to ensure that the system has adequate write permissions to directories and files before upgrading Magento. You should also adjust server configurations or consult your hosting providers to resolve filesystem-related issues.
3. “Cannot Allocate Memory” error
Lastly, the “Cannot allocate memory” error also stands out as a significant concern for Magento users. This error arises when the system has exhausted its memory resources while attempting to execute processes during the Magento upgrade.
To sort things out, merchants should assess system resources before the upgrade or increase the server's RAM by adjusting memory allocation. You can also optimize Magento performance by using caching mechanisms or code refactoring.
Tips for A Successful Magento 2 Upgrade
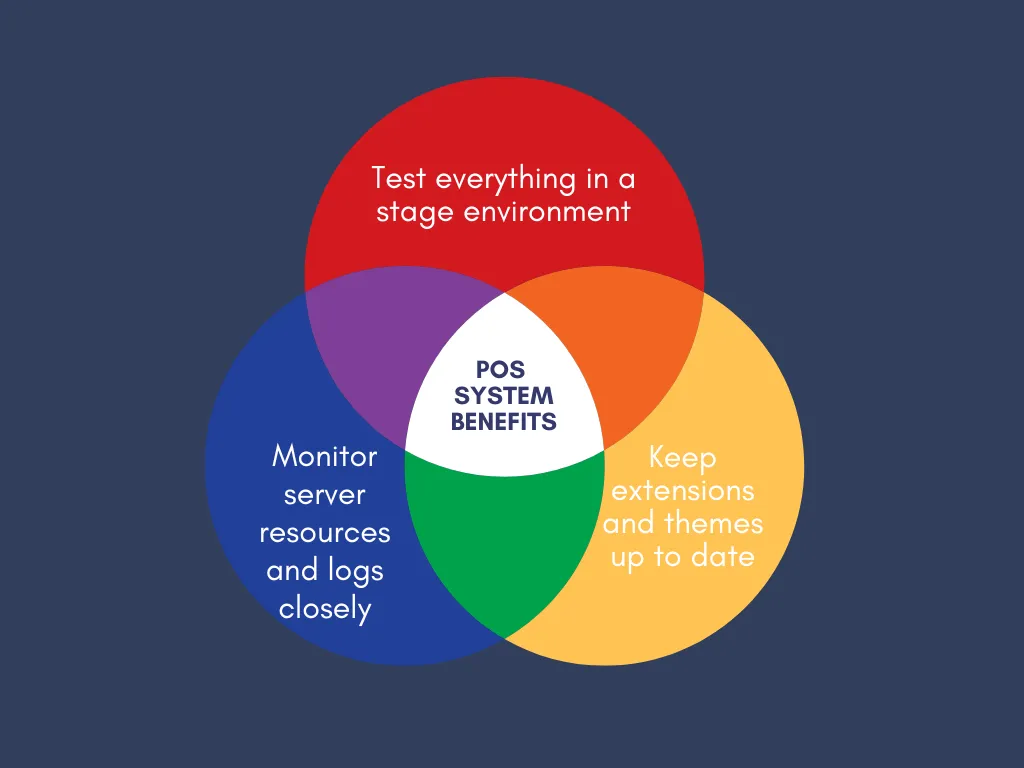
Test everything in a staging environment
Keep in mind that a staging site prevents upgrade failures from impacting your live store.
To set this up, first create a copy of your Magento installation, including files and the database, on a separate subdomain or server. Make sure it uses the same PHP, MySQL, and server configuration as your production environment.
Once it’s ready, you should perform the upgrade steps on this staging store exactly as you would on your live site. Afterward, run functional tests: browse products, place test orders, check the checkout flow, and log into the admin panel. Only when you confirm that the staging store works flawlessly should you replicate the upgrade on production.
Keep extensions and themes up to date
Needless to say, incompatible extensions or themes are a major source of upgrade errors. To avoid such disasters, you should first list all modules installed on your Magento store with the command:
bin/magento module:status
For each extension, visit the vendor’s site or Magento Marketplace to check if it supports the target Magento version. Download and install the latest releases, or disable/remove modules that are no longer maintained.
Monitor server resources and logs closely
Lastly, Magento upgrades consume a lot of memory and CPU, so preparation is key.
Before starting, check your server’s PHP memory limit and increase it if needed by editing the php.ini file (e.g., memory_limit = 2G). Also, confirm that you have sufficient disk space for Composer operations and cache rebuilding.
During the upgrade, keep a second terminal open to watch log files in real time with:
tail -f var/log/system.log
This helps you catch dependency conflicts or permission issues immediately. If you hit a “Cannot allocate memory” error, restart PHP-FPM or temporarily add more RAM to your server. After the upgrade, continue monitoring logs for hidden errors that may affect store performance.
Upgrade Magento 2 to Latest Version: FAQs
Which Magento version is latest?
As of April 2025, the latest Magento version is Magento Open Source 2.4.8, released in March 2025. It introduces PHP 8.4 support, MySQL 8.4 LTS compatibility, OpenSearch as the default search engine, and updated core libraries.
How do I update Magento 2 to the latest version?
The recommended way to update Magento 2 to the latest version is by using Composer.
You’ll need to:
- Enable maintenance mode
- Update Magento dependencies in Composer
- Run composer update
- Clear caches, upgrade the database, recompile, and redeploy static content
How do I upgrade Magento 2 to 2.4.7?
To upgrade Magento 2 to version 2.4.7, ensure your server supports PHP 8.1. Then, use Composer with the following command:
composer require magento/product-community-edition 2.4.7 --no-update

composer update

bin/magento setup:upgrade

bin/magento setup:di:compile

bin/magento setup:static-content:deploy -f
What is the command for Magento upgrade?
The basic Composer command to start a Magento upgrade is: composer require magento/product-community-edition [target-version] --no-update
composer update
Why is upgrading Magento so difficult?
Magento upgrades are difficult because they often involve: dependency management, custom code and extension conflicts, system resource demands (server RAM, CPU, disk permissions) and frontend and backend compatibility issues.
How to upgrade Magento 2.4.5 to 2.4.6?
You can upgrade from 2.4.5 to 2.4.6 using Composer by enabling maintenance mode, disabling cron jobs, updating your composer.json to require version 2.4.6, and then running composer update followed by bin/magento setup:upgrade. Always test in a staging environment first and back up your store before starting.
How to upgrade to Magento 2.4.8?
To move to 2.4.8, make sure your server supports PHP 8.4 and MariaDB 11.4, since older versions are no longer compatible. Then, follow the standard Composer upgrade flow: update the Magento package version in composer.json, run composer update, apply database changes with bin/magento setup:upgrade, and redeploy static content.
Is Magento 2.4.8 end of life?
No. Magento Open Source 2.4.8, released in March 2025, is the latest supported version and not yet end of life. Adobe continues to provide security patches and updates for the 2.4.x line, so upgrading ensures ongoing support and long-term stability.
Final Words
A Magento upgrade is a critical part of maintaining a secure, high-performing online store. However, they often involve more than just updating files, especially when dealing with custom modules, third-party extensions, and evolving system requirements.
While the upgrade process can be complex, especially for customized stores, careful planning and the right upgrade method — whether through Composer, manual file replacement, or professional migration services like LitExtension — can make a major difference.
Before you start, always remember:
- Check compatibility carefully (PHP, MySQL, extensions, custom code)
- Use a staging environment first
- Back up everything
- Allocate realistic time and resources for testing and debugging
If you want a faster, safer Magento upgrade to 2.4.7 or any version without the technical hassle, feel free to explore our Magento Upgrade Services. Our experts are here to help you move to the latest Magento version smoothly and securely.
Find more eCommerce insights via our LitExtension blog or Facebook community group.

