Is your Webflow store starting to feel a bit cramped? Are you struggling with customization, integrations, or transaction fees? In that case, migrating from Webflow to WordPress is the perfect solution. This powerful platform offers outstanding scalability and a vast ecosystem of plugins and themes for your site.
Without further ado, let’s explore the steps!
Choose the manual migration method if you:
- Have a simple Webflow website.
- Are comfortable with WordPress and CSV imports.
- Prefer a low-cost, DIY approach.
Choose LitExtension’s All-in-One Migration Service if you:
- Have a complex website or online store.
- Need accurate SEO and data preservation.
- Prefer experts to handle the migration safely end to end.
Data Migration vs. Theme Conversion: What to Know?
One of the biggest points of confusion when people search for how to convert Webflow to WordPress is that “migration” isn’t just one task – it’s two separate processes, and mixing them up is where most projects go wrong.
- Theme/design conversion – turning your Webflow layout into a working WordPress theme. This is a front-end coding job, typically done with a tool like Udesly (which exports your Webflow design into a WordPress- or Elementor-compatible theme) or by hiring a developer through a marketplace like Codeable.
- CMS data conversion – moving the actual content that lives inside your site: blog posts, pages, products, categories, tags, customer accounts, and order history.
To convert Webflow to WordPress completely, you need to handle both pieces:
- Convert the interface using Udesly or a developer from Codeable.
- Convert the CMS data – this is the part that’s easiest to get wrong and the most costly to lose.
Why You Should Consider Migrating From Webflow To WordPress
Many businesses find that WordPress offers the room they need to grow truly. So, what exactly makes WordPress a more appealing platform for scaling your online store? Here are four primary reasons:
- Design Flexibility: WordPress provides superior versatility with over 12,000 customizable free and premium themes, allowing you to easily adapt and switch your site’s layout as your brand evolves.
- Add-ons & Integrations: With a massive ecosystem of over 63,000 plugins covering SEO, marketing, and CRM, WordPress offers endless possibilities to expand your store’s functionality compared to Webflow’s limited options.
- Affordable Costs: As a free open-source platform, WordPress is highly budget-friendly (you only pay for cheap hosting and a domain name), avoiding Webflow’s pricier eCommerce plans and publishing restrictions.
- eCommerce Capability: Powered by WooCommerce, WordPress offers a highly customizable, feature-rich online store solution (including inventory management, multichannel sales, and dropshipping) that easily scales for businesses of any size.
Need Help To Migrate to WordPress?
LitExtension provides a well-optimized All-in-One migration service for your data transfer!

What to Do Before the Migration
A well-planned migration right from the beginning is far less likely to run into data loss or unexpected downtime. Hence, before you start moving your website from Webflow to WordPress, take some time to prepare your site and completing the checklist below:
1. Back up your Webflow website
Although the migration process shouldn’t modify your live site, unexpected errors can still occur during data export, import, or site configuration. Therefore, having a recent backup ensures you can quickly restore your website if something doesn’t go as planned.
Fortunately, Webflow makes this process straightforward by allowing you to generate manual backups from your project settings. Before proceeding to the next step, verify that your backup has been created successfully and is available for restoration if needed.
- Press Command + Shift + S (Mac) or Control + Shift + S (Windows).
- Enter a description for your backup and click Save.
- You can verify that your backup has been saved by going to Settings > Backups.
2. Review your website content
Secondly, you should audit your existing website and determine exactly what needs to be migrated. Specifically, go through your pages, blog posts, CMS collections, images, downloadable files, and other media assets to make sure nothing important is overlooked.
Plus, this is also a good opportunity to remove outdated or unnecessary content. That way, not only you can reduce the amount of data, but it’s also easier to verify that everything has been transferred correctly once the migration is complete.
3. Prepare your WordPress website
At this point, your WordPress website should be ready before you begin importing any data. You need to choose a reliable hosting provider, install WordPress, and complete the initial setup so you have a functioning environment ready to receive your content.
Furthermore, it’s best to select a WordPress theme that matches your desired design and install any essential plugins, especially if you plan to recreate functionality that previously relied on Webflow.
4. Freeze content updates
Any new pages, blog posts, products, or CMS items created during the export won’t automatically appear in your WordPress site, which results in missing or inconsistent data.
Hence, until you finish exporting your Webflow content, avoid making additional changes to your live website until the migration has been completed. If your website must remain active during the migration, keep track of any new content published during this period so it can be transferred later.
How to Migrate from Webflow to WordPress
Before you export Webflow to WordPress, make sure everything is ready for a smooth migration. Use this pre-migration checklist to avoid issues and keep your move simple and organized:
Step 1: Export your Webflow content
- Log into your Webflow account and access the project you want to migrate.
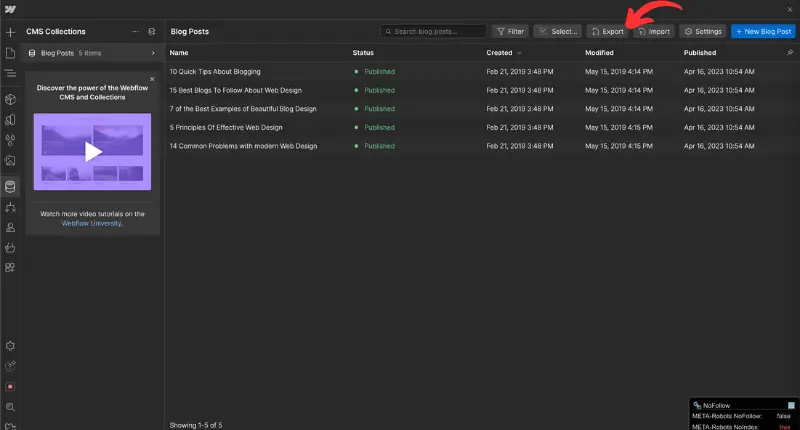
- On the left sidebar, click on CMS Collections. This is where your Webflow content is organized. Choose the specific collection you want to export (e.g., Blog Posts).
- Next, click Export at the top right of the page. This will download a CSV (Comma-Separated Values) file containing all the items in that collection. Repeat this process for each collection you want to migrate, saving each CSV file to your computer.
By the end of this process, you’ll have a set of CSV files containing all the essential data from your Webflow site, including text, images, and other relevant information.
Important note: Once you’ve exported your content, refrain from making further changes in Webflow. Any new content added will not be included in the migration.
Step 2: Import Webflow Content to WordPress Website
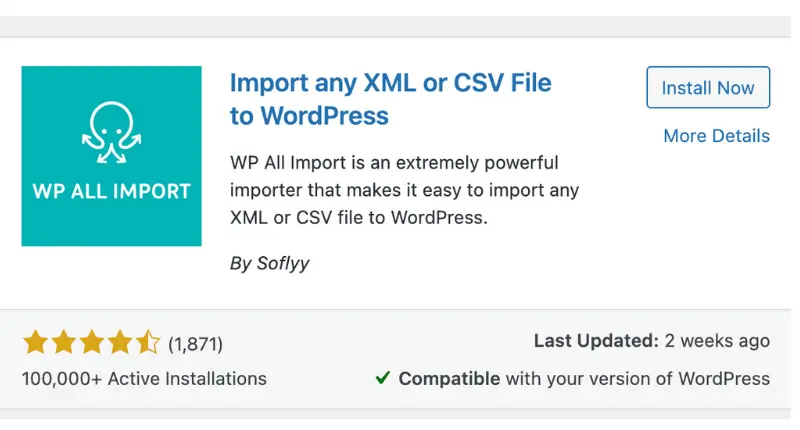
From your WordPress dashboard, go to Plugins > Add New Plugin and search for “wp all import“.
Click on Install to activate this free plugin.
In your WordPress dashboard, navigate to All Import > New Import.
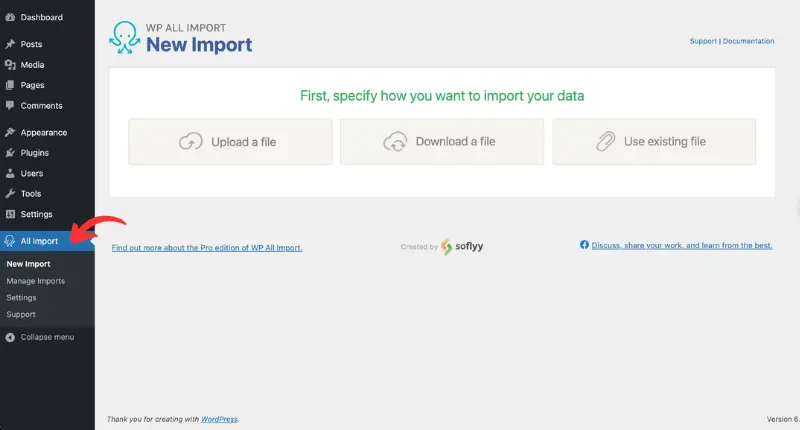
Click Upload a file and select the CSV file you exported from Webflow.
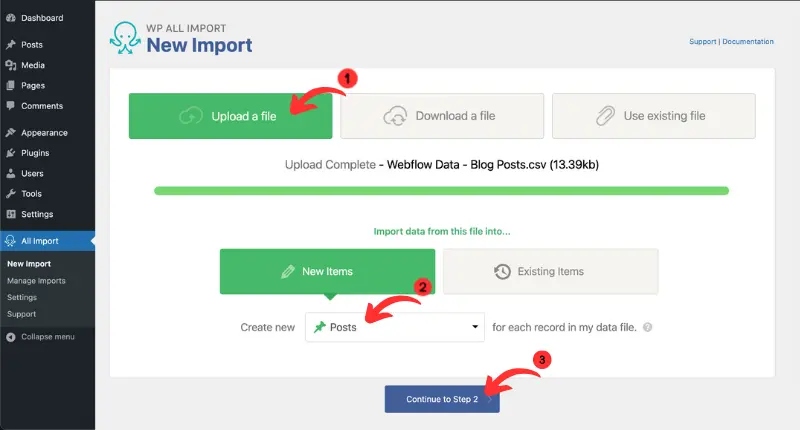
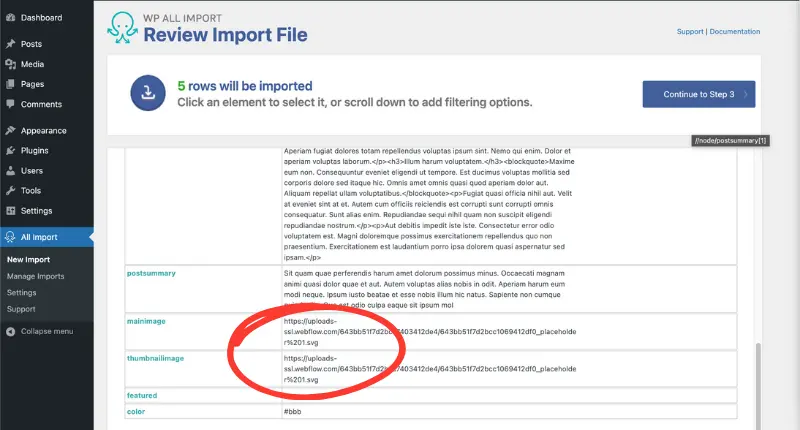
Keep in mind that image export is not automatic. You’ll need to download images manually from Webflow and re-upload them to your WordPress media library. WP All Import can help automate the process of finding and replacing image URLs.
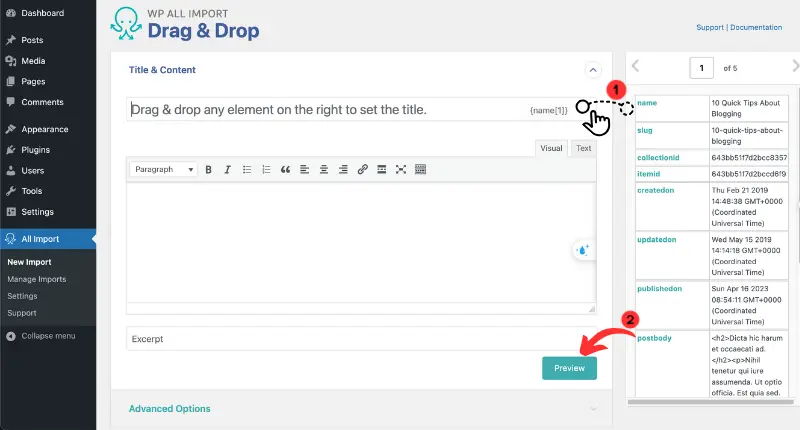
Drag and drop each Webflow data field (e.g., “name,” “post-body”) to its corresponding WordPress field (e.g., “title,” “content”).
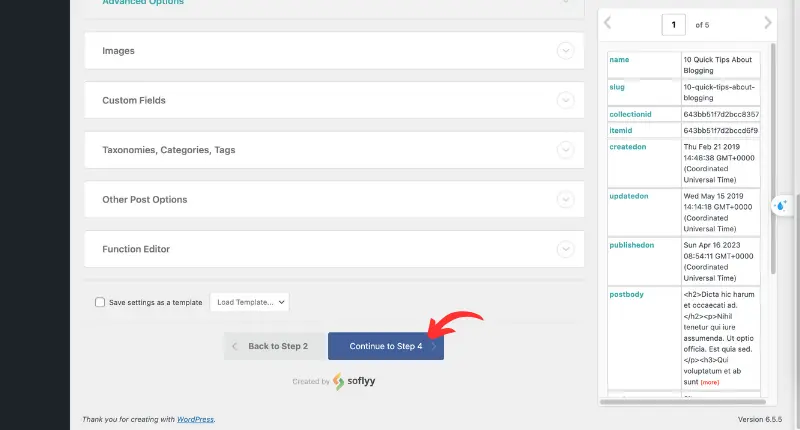
Scroll down and click Continue to Step 4.
- Click Auto-Detect so the plugin assigns a unique identifier to each imported item.
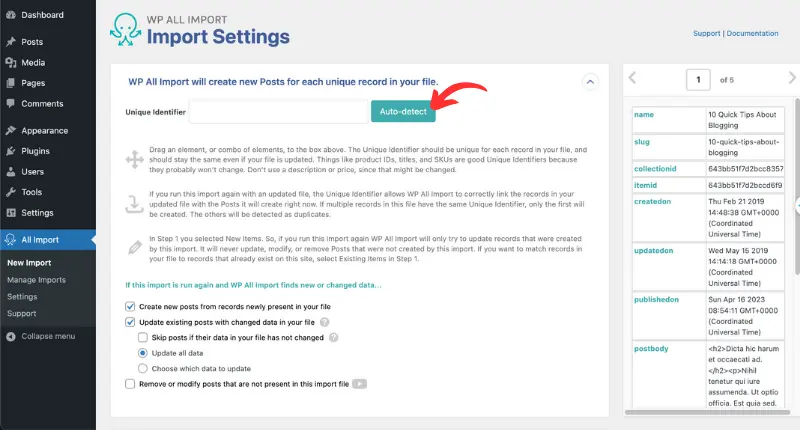
- Review your data mapping and image placements. Once you’re confident everything is correct, click Continue and then Confirm & Run Import to start the process.
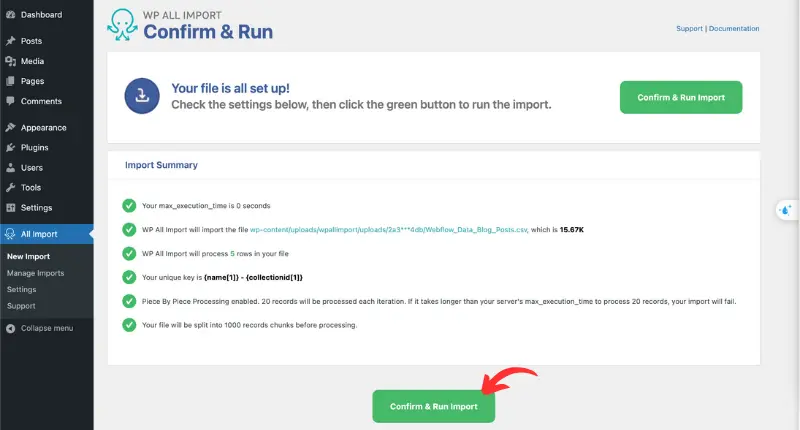
- Your WordPress website will now integrate your Webflow content, allowing for further customization and refinement.
After your content has been successfully migrated, you can personalize your new WordPress site and ensure visitors can easily find it.
Step 3: Setup WordPress Store
Your existing Webflow design will not automatically transfer to WordPress. Fortunately, WordPress offers thousands of customizable themes (both free and paid) to help you recreate your desired look. You can choose one that aligns with your style and needs. Even if the theme isn’t an exact match initially, you can easily tailor it to your preferences.
Tips: To ensure your website looks great on all devices, choose a responsive theme that automatically adjusts to different screen sizes.
Step 4: Configure your WordPress permalinks
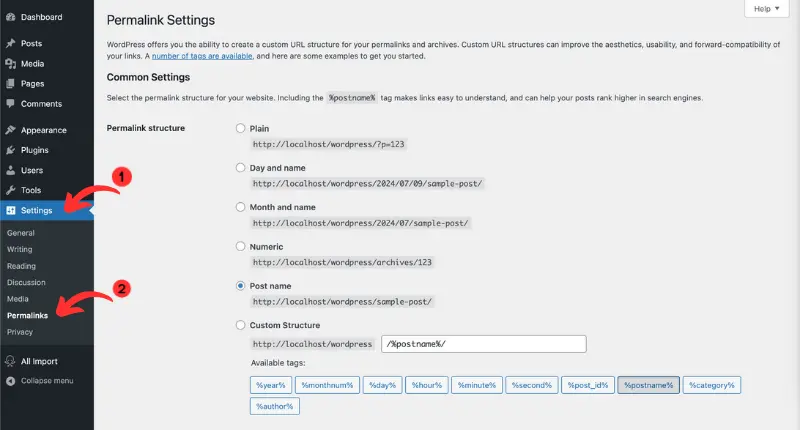
Next, you’ll need to customize your WordPress permalinks. Permalinks are simply the URLs of your website’s pages and posts.
In your WordPress dashboard, navigate to Settings > Permalinks. Here, you’ll find several options for structuring your URLs. We suggest choosing the “Post name” option. It creates simple, clear URLs that include the title of your page or post, which is better for user experience and search engines to understand and index your content.
Step 5: Point your Webflow domain to WordPress
Initially, your domain name (e.g., mysite.com) will still be directly linked to your old Webflow site. To redirect visitors to your new WordPress site, you’ll need to update your domain’s DNS settings to point to your new hosting provider’s servers. Your web host will provide the necessary nameserver information, which you can enter in your domain registrar’s control panel. Some hosts even offer domain management directly within their platform.
Once these post-migration steps are complete, your new WordPress site will be ready to launch. LitExtension’s support team is always available to assist you with any technical issues related to data migration.
What’s Next? A Quick Post-Migration Checklist
The migration is completed, but that doesn’t mean the work is over! At this stage, you should take time to verify that everything is functioning as expected:
1. Verify your imported content
Needless to say, you should review your migrated content to ensure everything has been transferred correctly. These include:
- Pages
- Blog posts
- Images
- Media files,
- CMS content
- Products
- Categories
- Customer accounts
- Order history.
2. Test your website functionality
Next, it’s time to test the core functionality of your new WordPress website.
You can browse different pages, submit contact forms, search for products, create test accounts, and complete a test purchase if you’re running an online store. Similarly, you should also check navigation menus, buttons, internal links, and any third-party integrations to ensure they work as expected.
3. Review your SEO settings
Migrating to a new platform can affect your search engine visibility if SEO settings aren’t configured properly. Therefore, you should:
- Compare your page URLs with the original Webflow site
- Implement 301 redirects where necessary
- Verify that your title tags, meta descriptions, and image alt text have been preserved.
It’s also a good idea to regenerate your XML sitemap and submit it to Google Search Console after launching your new website. That way, search engines can discover and index your updated pages more efficiently.
4. Monitor performance
Last but not least, after your site goes live, you need to continue checking for broken links, missing images, crawl errors, and performance issues. By monitoring your website closely after launch, you will be able to resolve any remaining problems before they affect your visitors or search rankings.
Migrate Webflow to WordPress with LitExtension’s All-in-One Package
If your Webflow website is full of useful blogs, categories, and data from various extensions, don’t risk a manual migration. Hand-copying content is prone to errors, data mismatches, and compatibility issues. Furthermore, complex features like photographs often require separate export and import procedures.
Fortunately, LitExtension’s WordPress migration service can solve all of these problems. Our careful handling of your large database guarantees a smooth and error-free transfer, even when dealing with those pesky third-party extensions.
Let’s see how it is to convert Webflow to WordPress using LitExtension, following these simple steps!
Migrate to WordPress in a Flash
LitExtension provides a well-optimized All-in-One migration service for your data transfer!
Step 1: Schedule a consultation
To get started, reach out to us at LitExtension, the #1 Shopping Cart Migration Expert, to schedule a personalized consultation. This meeting is free and one-on-one via Google Meet. We’ll learn about your website’s unique needs and migration goals.
To get the most out of our consultation, we recommend scheduling at least 2 hours in advance. It’s also helpful if you come prepared with specific questions or requests about your migration.
Step 2: Receive expert guidance & agree on a plan
Based on your needs, we’ll provide a comprehensive technical assessment. This includes outlining the most effective migration strategy, detailing the specific data to be migrated (e.g., pages, posts, categories, products), and explaining how we’ll preserve your SEO rankings. We’ll also discuss any customization options available to tailor the migration to your specific needs.
Once you’re happy with the proposed plan, we’ll move forward with payment. Our All-in-One Migration Package, with the final price depending on your website’s complexity and unique requirements.
Step 3: Configuration and customization
With LitExtension’s All-in-One migration package, our PA handles the entire configuration process, making sure your Webflow website is moved smoothly to WordPress.
We’ll carefully migrate all your essential content, including pages, blog posts, categories, tags, and media files. If you have an online store, we’ll also transfer your products, categories, variants, customer data, and order history, maintaining valuable customer relationships.
In addition to standard content migration, we offer enhanced functionalities. These include 301 redirects to preserve your SEO rankings and images embedded within product descriptions. Moreover, if you use custom fields in Webflow, we will map and migrate them into WordPress.
We understand that every site is unique. So, feel free to let our expert know about any customization requests during your consultation. The Webflow to WordPress migration will then be tailored to your needs.
Step 4: Preview with a demo migration
Before committing to the full migration, you’ll have the opportunity to preview how your Webflow content will appear on your new WordPress site. A demo migration will be performed, transferring a limited amount of data to your WordPress site. This allows you to:
- Visualize the results: See how your content, layout, and design elements will look on the WordPress platform.
- Test functionality: Ensure that any interactive features or integrations are working as expected.
- Provide feedback: Request adjustments or modifications before proceeding with the full migration.
Step 5: Reviewing the demo
Take your time to review the demo migration results thoroughly. Our team is available to answer any questions and address any concerns you may have. We’ll proceed with the full migration once you’re satisfied with the demo and have approved the results.
Step 6: Perform full migration
With your approval, we’ll initiate the full migration of your Webflow data to your new WordPress site. Rest assured that your Webflow site will remain live and operational throughout the entire migration process.
Step 7: Migration result testing
Once your migration is complete, our experts meticulously check the data to ensure everything has transferred flawlessly from Webflow to WordPress. This includes:
- Ensuring that all your data has been transferred wholly and accurately.
- Verifying that all internal and external links are functioning correctly.
- Confirming that all features and integrations are working as expected.
You’ll have the opportunity to review the migrated site yourself. If you have any questions or notice anything that doesn’t seem quite right, just ask – our experts are here to help.
Step 8: Ongoing support and data updates
We’re committed to your success long after the migration is complete. Here’s what you can expect:
- Recent data migration: We will transfer any new data you add to your Webflow site after the initial migration (e.g., new blog posts and product updates) to your WordPress site.
- Smart update service: In case you make changes to existing data on your Webflow site, our service will automatically synchronize those changes with your WordPress site, ensuring everything stays up-to-date.
With the LitExtension AIO package, you’ll receive six months of unwavering support from our expert team, whether you have questions about your new WordPress site or encounter technical hiccups. Moreover, we stand behind the quality of our service and offer a 30-day money-back guarantee if you’re not completely satisfied with the migration results.
Conclusion
Moving to WordPress can be a game-changer if your website has outgrown Webflow’s capabilities. With its robust SEO tools, extensive customization options, and thousands of plugins, WordPress provides the scalability and flexibility you need.
We hope this guide has equipped you with the knowledge and resources needed to export Webflow to WordPress successfully. If you prefer a hassle-free experience, consider LitExtension’s migration services. With over a decade of experience and thousands of successful migrations, we’re here to ensure your transition is seamless and accurate.
For more insightful guides and tips on website migration, explore LitExtension’s blog and join our thriving Facebook community of global entrepreneurs. We’re excited to be part of your journey towards a more robust and customizable website platform.