To add a product to Shopify, go to Products > Add product in your Shopify admin, enter the product details, upload media, set the price and inventory, and click Save. You can then preview the product and confirm that it is available on the right sales channels.
This guide explains how to add products to Shopify manually in eight steps. It also covers bulk product imports, product management, and common reasons a new product may not appear on your storefront.
- Step 1: Login to your Shopify account;
- Step 2: Write the product details;
- Step 3: Add media for each product;
- Step 4: Add product to collections and assign tags;
- Step 5: Adjust other settings;
- Step 6: Add product variants;
- Step 7: Optimize for search engines;
- Step 8: Publish products.
Here is the complete process:
How to Add Products to Shopify Manually: 8 Steps
Step 1: Login to your Shopify account
If you do not have a Shopify store yet, create one and complete the initial setup. If you already have a store, log in to your Shopify admin.
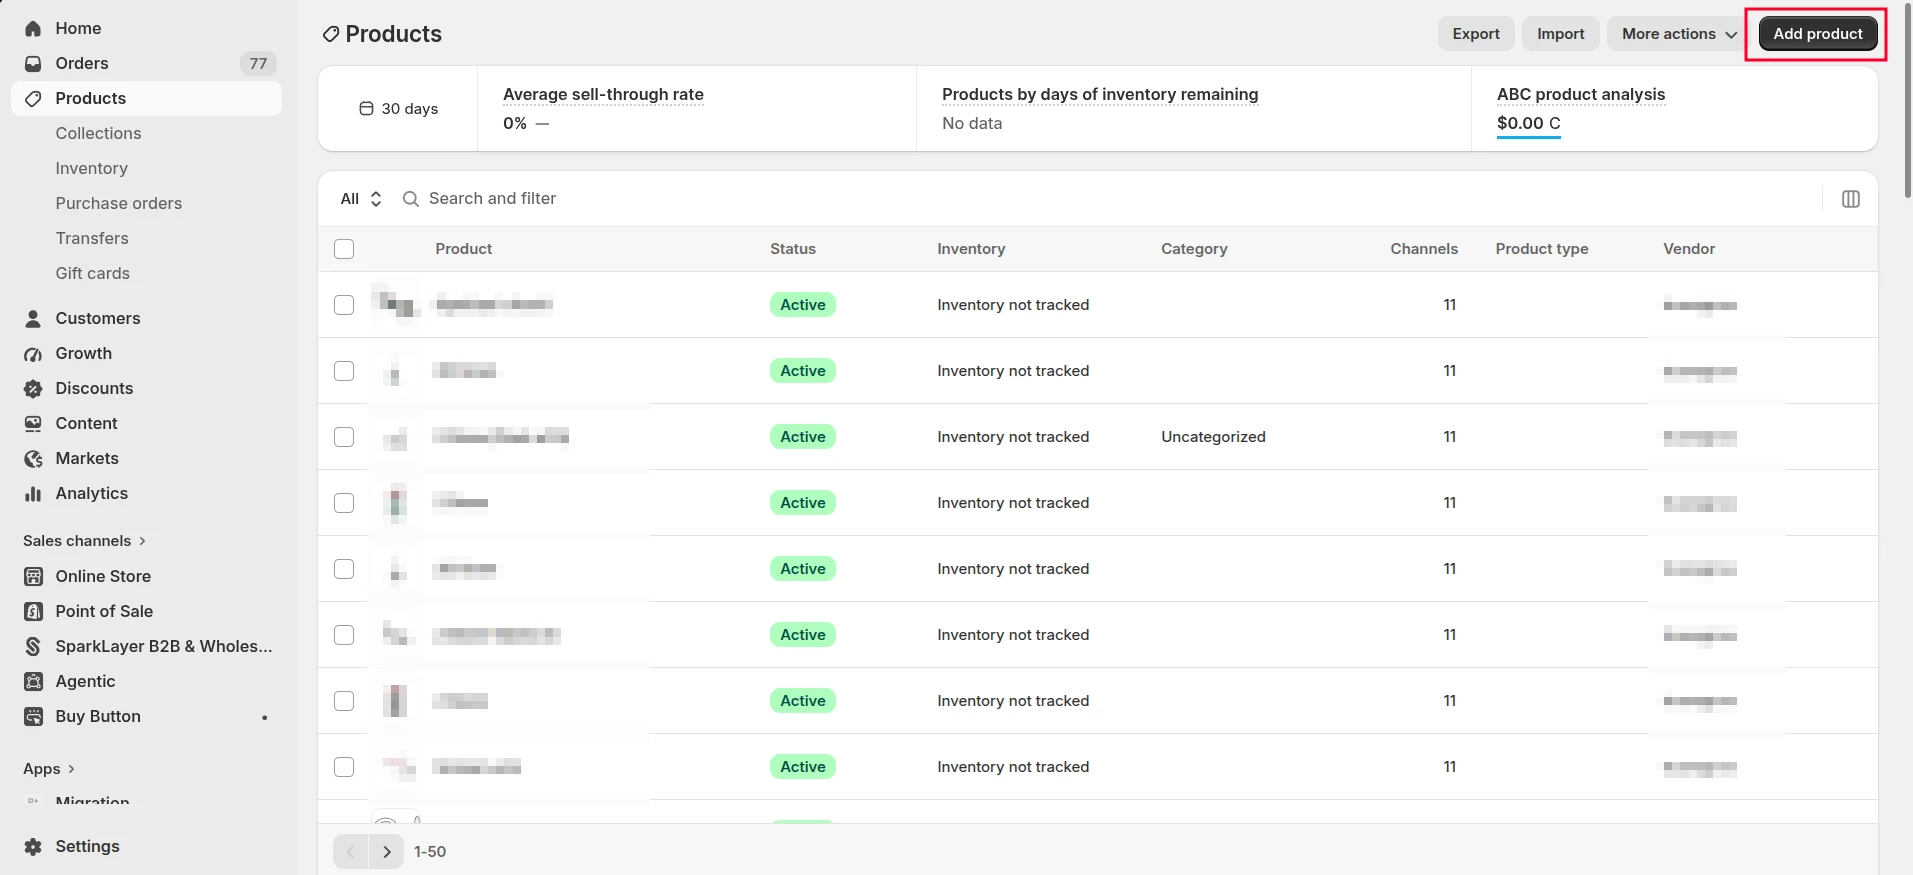
For this manual method, open Products from the left-hand menu and click Add product. This opens a new product page where you can enter and organize all the information customers will see. If you are new to the admin, our broader Shopify tutorial explains the main areas of the dashboard.
Step 2: Write the product details
Start with a clear, specific product title. A useful title tells shoppers what the item is and includes important differentiators such as the brand, model, material, color, size, or pack quantity when relevant. Avoid vague titles and unnecessary keyword repetition.
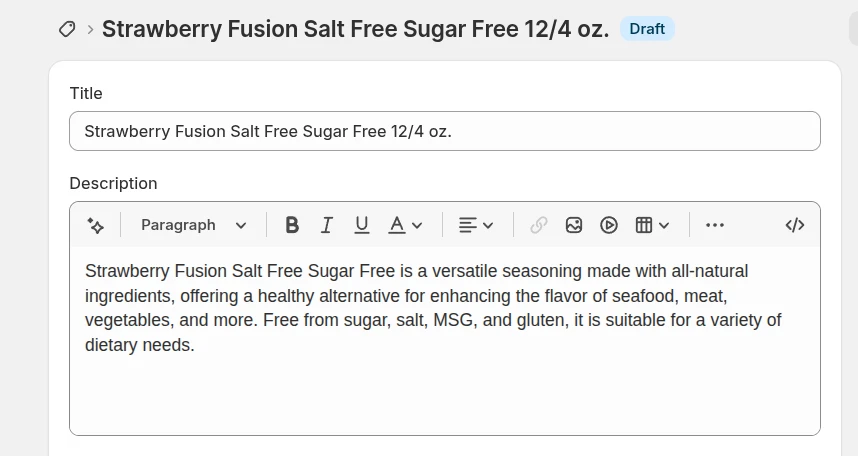
Next, use the Description field to answer the questions a customer is likely to ask before buying. Depending on the product, include:
- Main features and benefits
- Materials or ingredients
- Size and dimensions
- Care or usage instructions
- Other product-specific details
Break long descriptions into short paragraphs, headings, and bullet points so shoppers can scan them easily. Shopify’s rich text editor also lets you format text and add links, images, or videos.
Tip: Shopify Magic can draft a product description from the details you provide. Review generated copy for accuracy, brand voice, and unsupported claims before publishing it.
Step 3: Add media for each product
In the Media section, click (+) to upload product images, videos, or 3D models. You can also drag supported files directly into the upload area.
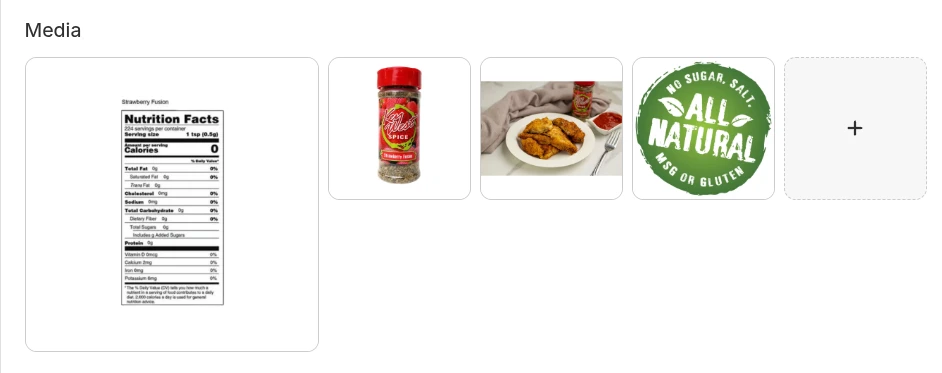
Use sharp, consistent media that shows the product from multiple angles and highlights important details. Shopify uses the first media item as the default product media. Drag and drop the files to change their order.
Tip: Optimize your product images before uploading them. Appropriate dimensions and compressed files help preserve image quality without adding unnecessary page weight. Add concise, descriptive alt text for accessibility.
In the Product category field, browse Shopify’s standard taxonomy or search for the most accurate category. The selected category can make relevant category metafields available and can help Shopify understand how the product should be classified.
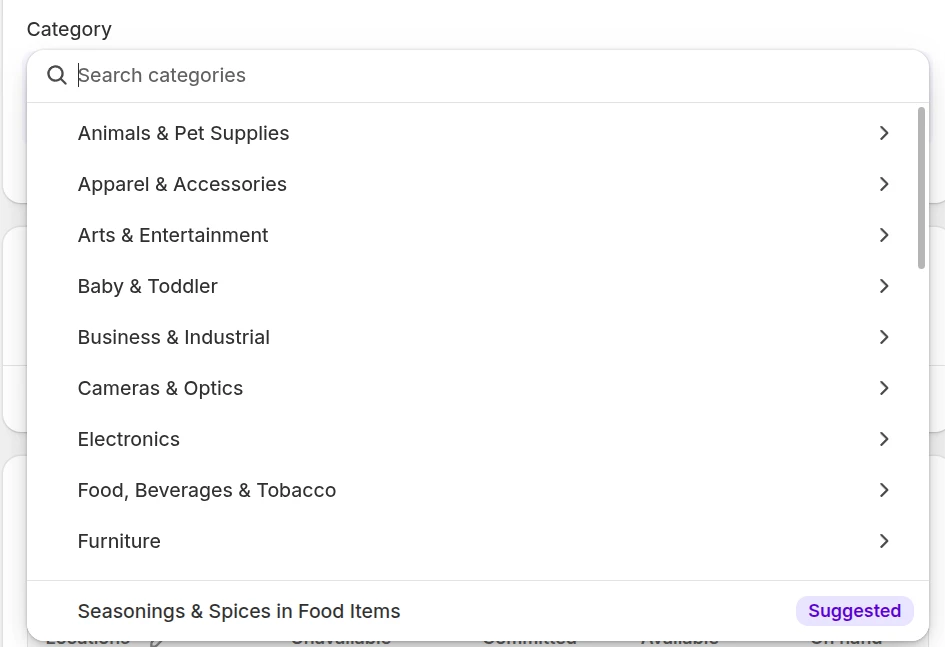
Product categories and collections serve different purposes: a category is a standardized product classification, while a collection is a group of products you create for store navigation and merchandising. To build a customer-facing group of products, follow our guide on how to add a category in Shopify.
Step 4: Add product to collections and assign tags
Use Shopify collections to group related products for store navigation, seasonal campaigns, or merchandising. In the product organization area, click the collection field and select one or more existing manual collections when appropriate.
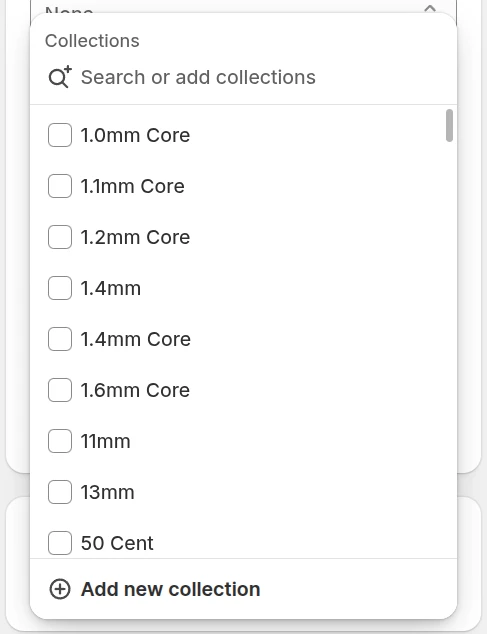
If you need a new group, create a Shopify collection first. Shopify supports two collection types:
- Manual collection: You choose which products to include individually.
- Automated collection: Shopify automatically includes products that match conditions based on tags, price, product type, vendor, or other attributes.
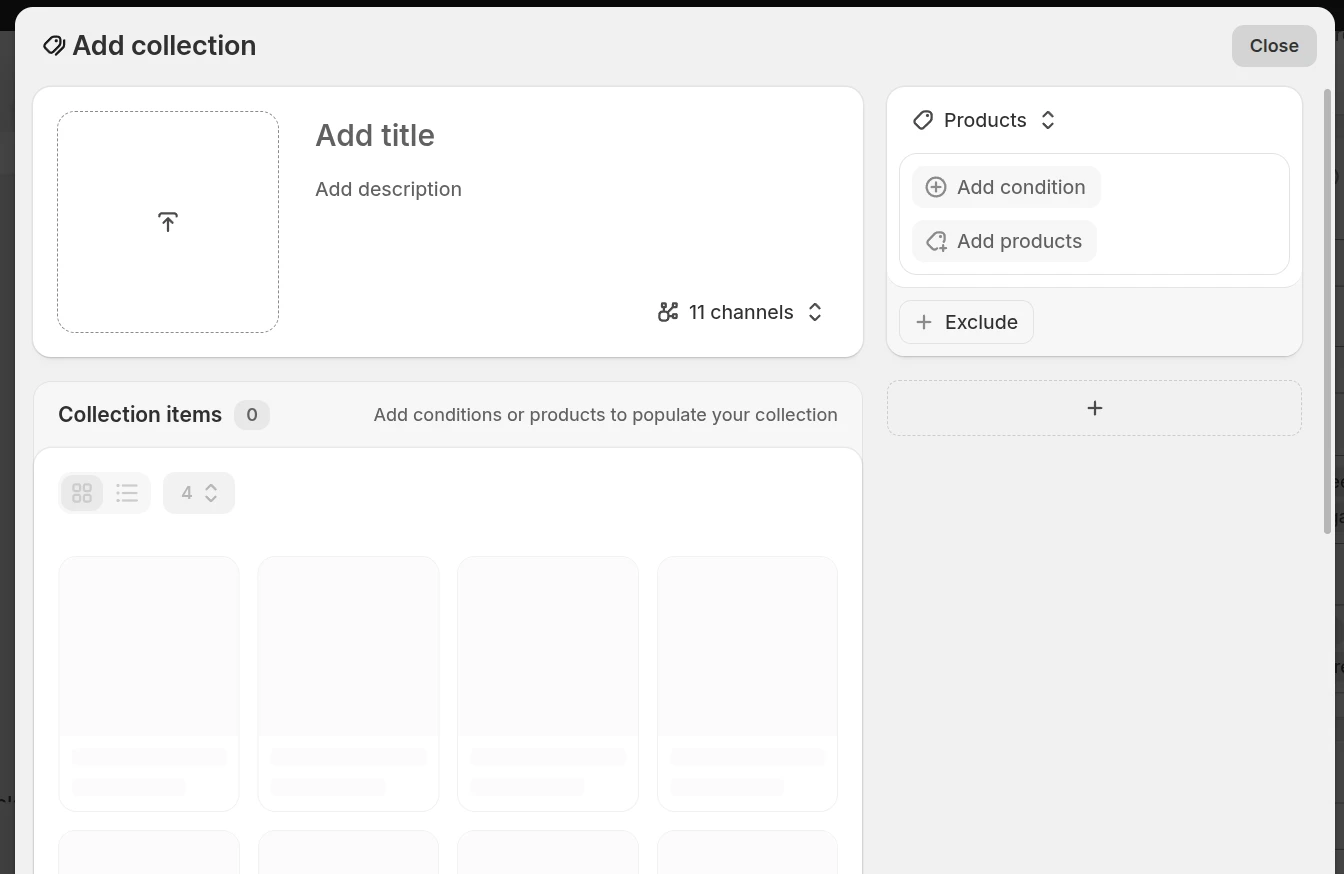
A product can appear in multiple collections. For example, a linen shirt could belong to both “Men’s Clothing” and “Summer Essentials.” Products that meet the conditions of an automated collection are added automatically; you do not assign them from the product page.
Note: If a collection has no featured image, some themes may use an image from a product in that collection.
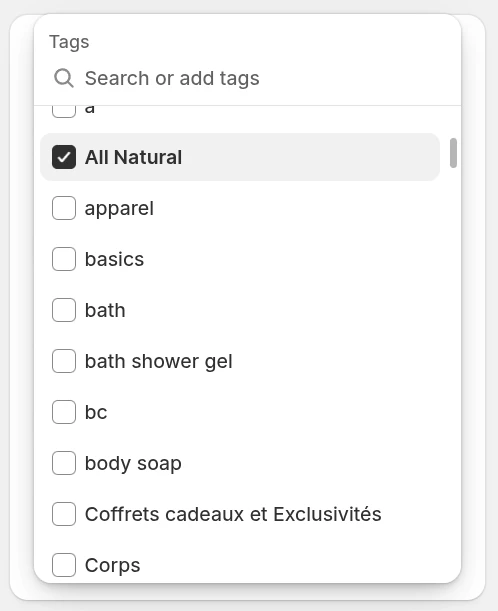
Next, move to the Tags field. Select an existing tag or enter a new one and click Add. Tags are searchable labels that help organize products, support storefront search, and define conditions for automated collections. Use a consistent naming system and avoid creating near-duplicate tags.
Step 5: Adjust other Shopify products settings
Next, complete the settings that affect price, stock tracking, fulfillment, and international shipping. These fields may apply to the product itself or to each variant. For advanced input requirements, you can also learn how to add custom text field on Shopify product page.
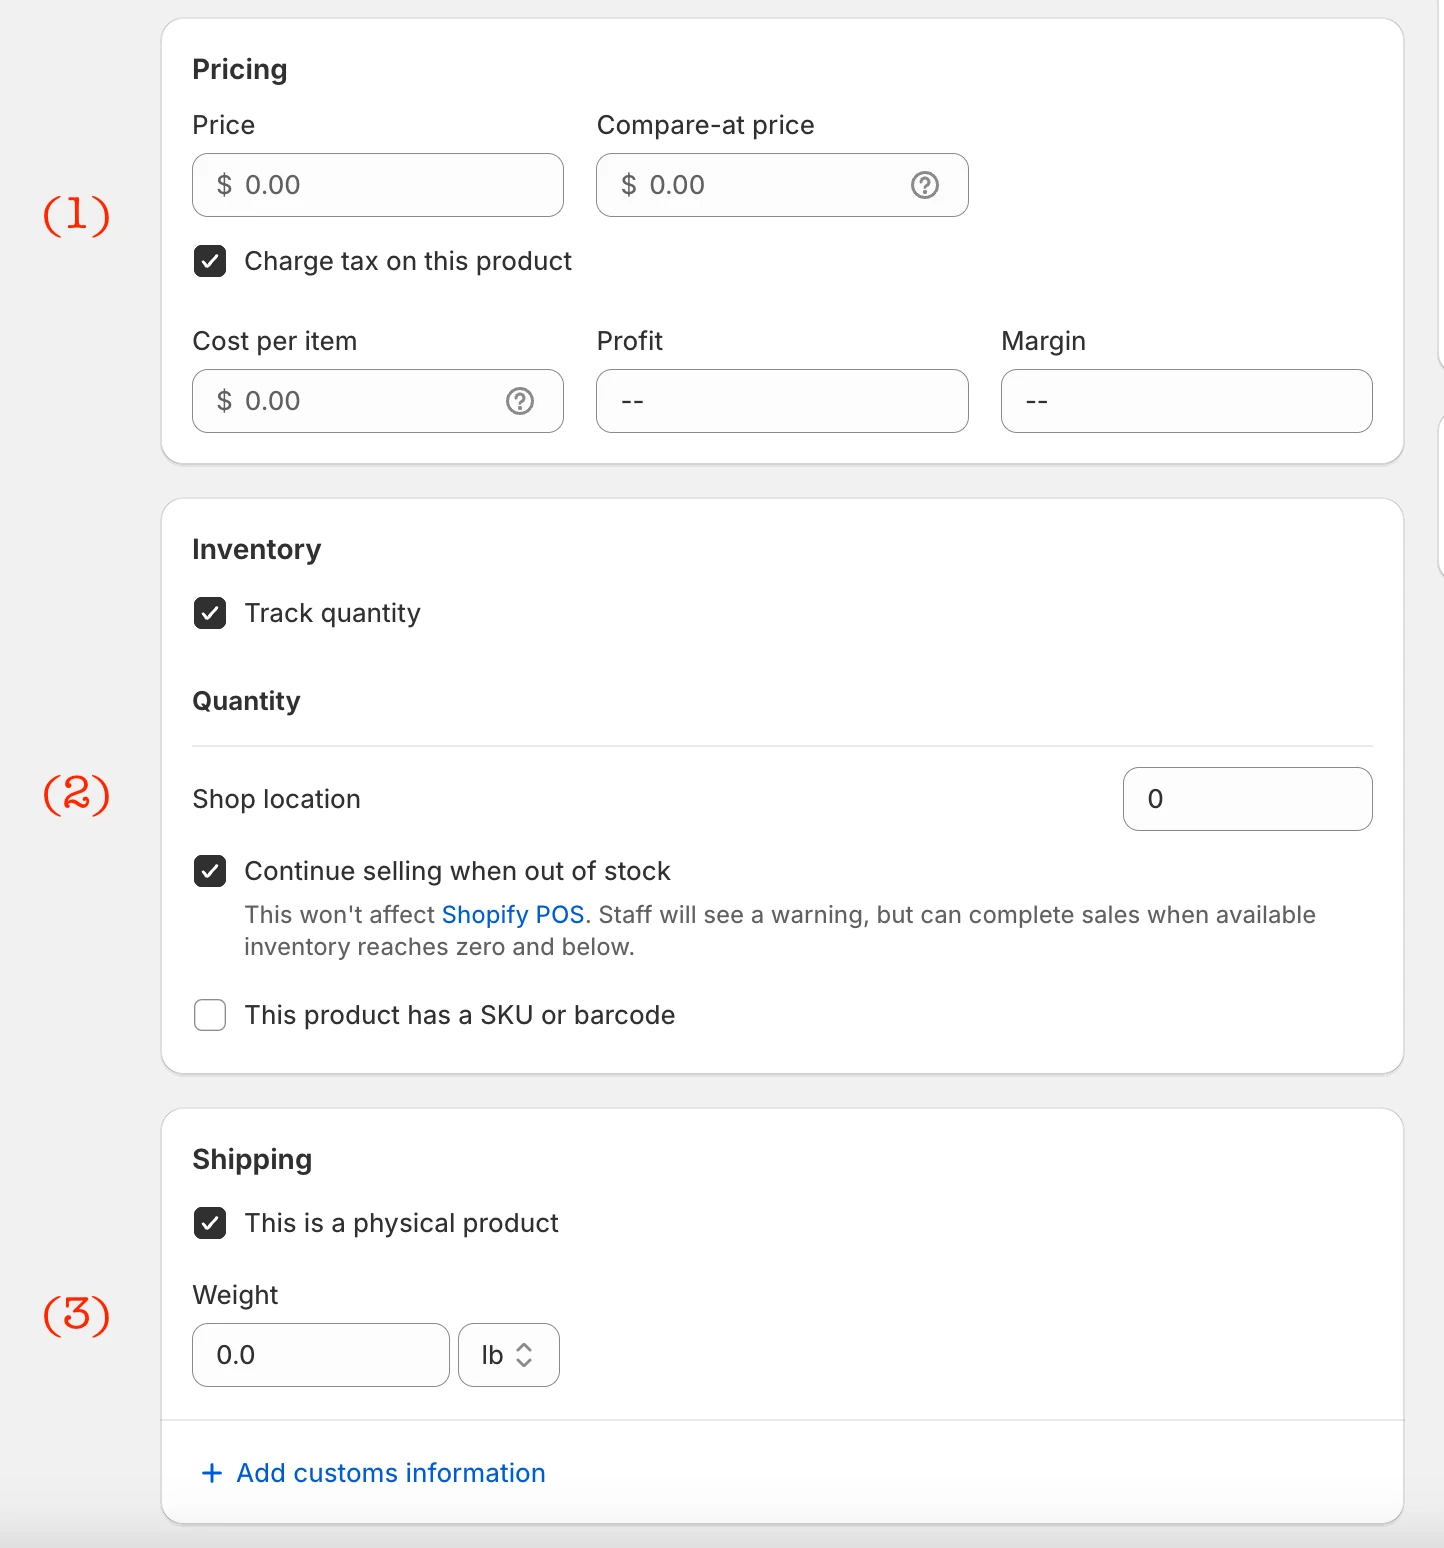
(1) Pricing
Enter the regular selling price. If the item is on sale, use the Compare-at price to show the original price where permitted. Add the cost per item if you want Shopify to calculate projected profit and margin. Discount codes and automatic discounts are created separately in the Discounts section of Shopify admin.
(2) Inventory
Add an SKU or barcode when you use one, and enable Track quantity if Shopify should monitor stock for the item. Set the available quantity for each location. Only select Continue selling when out of stock when you intentionally accept backorders or preorders.
(3) Shipping
For a physical product, confirm that shipping is required and enter an accurate weight. Add the country/region of origin and Harmonized System (HS) code when they are needed for international customs documentation. Digital products generally do not require shipping.
Step 6: Add product variants
If a product comes in different versions, use the Variants section to add options such as size, color, material, or style. Click + Add options like size or color, enter an option name, and add its option values.
For example:
- Option name: Size
- Option values: Small, Medium, Large
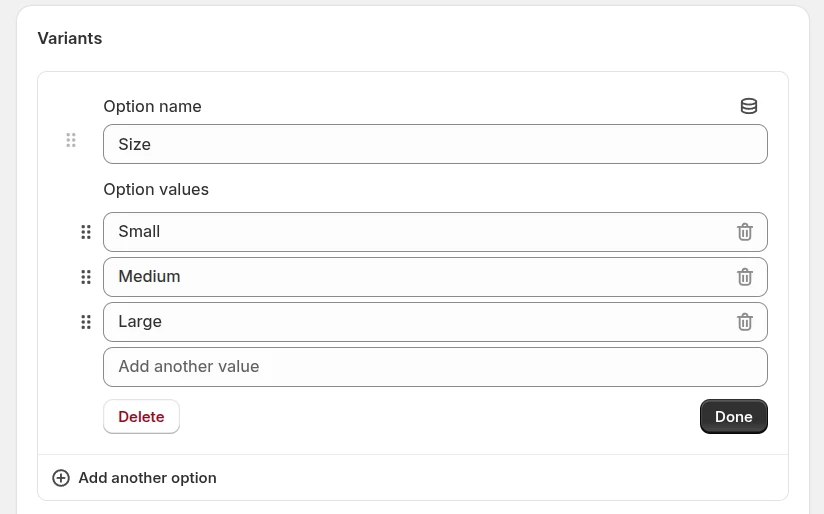
Select + Add another option if the product needs more than one option. Shopify supports up to three options per product. The maximum number of variants available for a product can depend on your store and the apps or theme features you use, so check the current Shopify variant limit before building a large variant structure.
After Shopify generates the variant combinations, review them and remove combinations you do not sell. You can then set a separate price, inventory quantity, SKU, barcode, and image for each variant where needed.
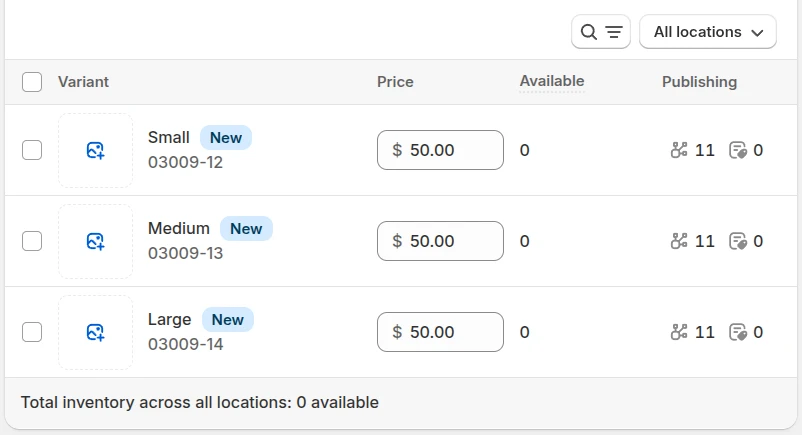
For a more detailed walkthrough, see our guide on how to add variants on Shopify. Click Done after entering the option values, then save the product when you finish reviewing all variants.
Step 7: Optimize for search engines
In the Search engine listing section, click the pencil icon to edit how the product may appear in organic search results. You can customize the page title, meta description, and URL handle.
Write for the shopper first. Use a descriptive page title, summarize the product’s main value in the meta description, and keep the URL handle short and readable. If you change the handle of an existing live product, make sure the old URL redirects to the new one.
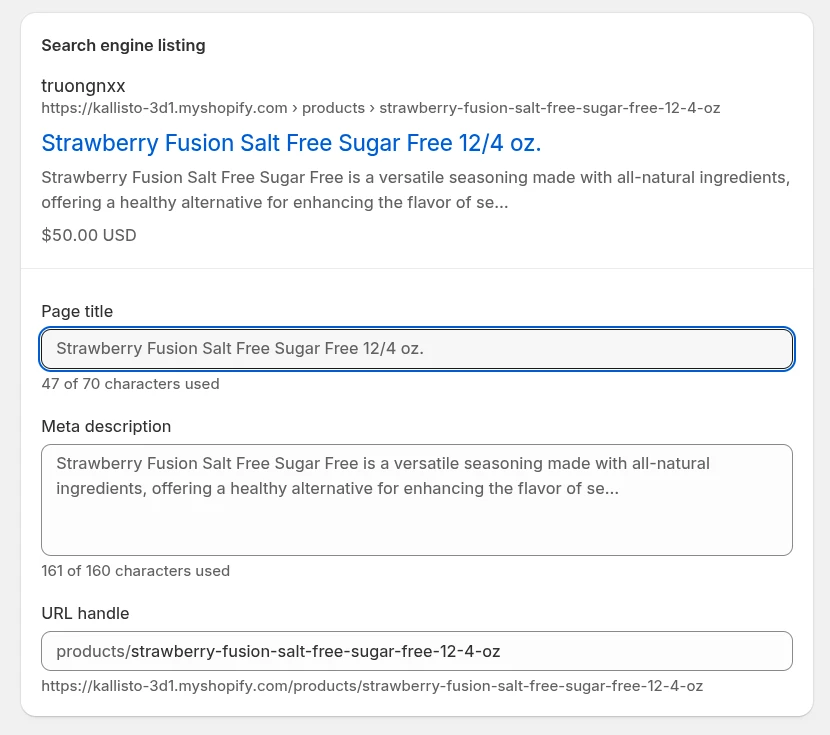
An optimized search listing can:
- Improve visibility and click-through rates from search engines.
- Provide a clear and compelling first impression to potential customers.
Tip: Follow these practical Shopify SEO tips when adding a product:
- Choose one primary search topic based on the product and the shopper’s intent, not search volume alone.
- Use relevant terms naturally in the title, description, image alt text, and search listing without repeating them unnaturally.
- Use a Shopify SEO app only when it solves a specific technical or workflow need.
Step 8: Publish products and preview
Before publishing, check the title, description, media, price, inventory, variants, shipping details, organization, and search listing. Then confirm the product status and sales-channel availability.
New products are set to Active by default. Use Draft if the listing is not ready, or Unlisted if it should be purchasable only through its direct URL. In the Publishing section, select the sales channels where the product should be available, and click Save.
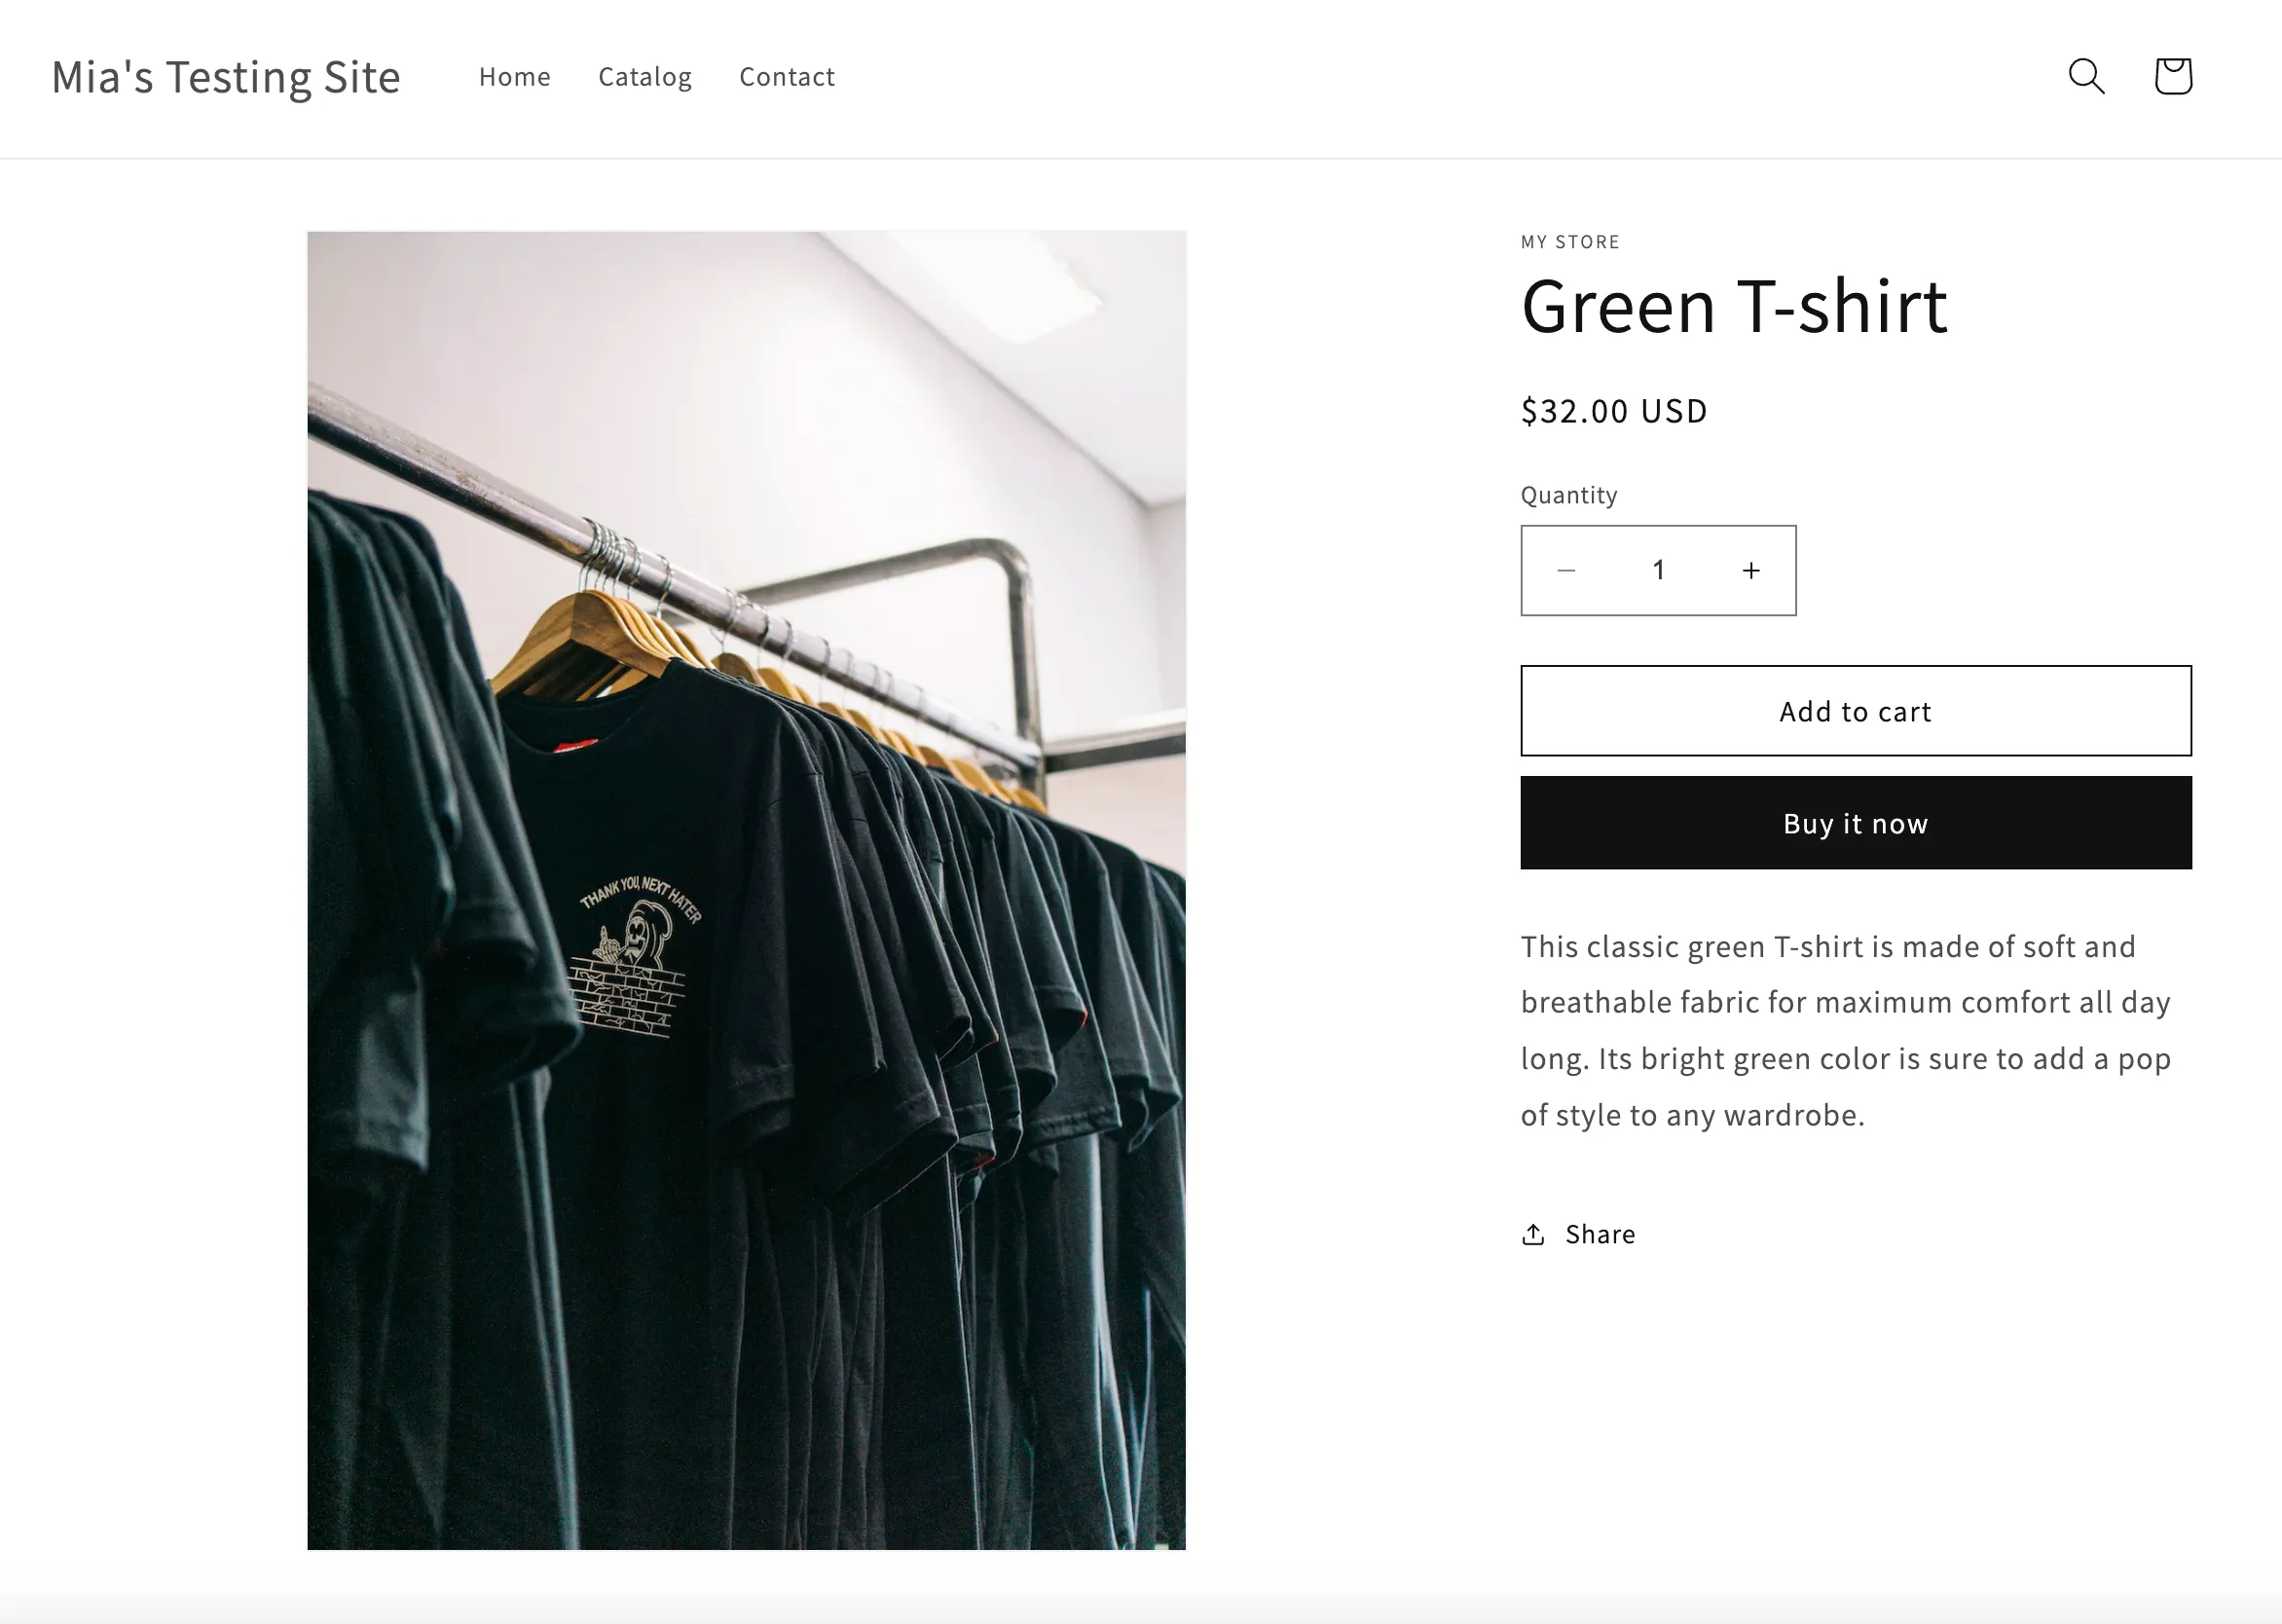
After saving, click Preview to check the product page on your storefront. Confirm that the media, variant selector, price, inventory message, and add-to-cart controls display correctly. Saving a product does not guarantee storefront visibility if its status, publishing settings, or collection conditions prevent it from appearing.
How to add a product using the Shopify mobile app
The mobile workflow is shorter but uses the same product fields:
- Open the Shopify app and tap Products.
- Tap +, then select Add product.
- Enter the title and other product details, add media, and set the price, inventory, and shipping information.
- Tap Save or the checkmark.
Open the saved product and use View on Online Store to check how it appears to customers.
Checklist before you publish a Shopify product
Use this quick check to prevent the most common listing issues:
- The title and description are accurate and easy to scan.
- Images are clear, ordered correctly, and have useful alt text.
- The price, compare-at price, tax setting, and cost are correct.
- Inventory, SKU, barcode, weight, and customs information are complete where applicable.
- Every variant has the right price, media, and inventory.
- The product has an accurate category, vendor, type, collections, and tags.
- The status is correct and the intended sales channels are selected.
- The search listing and URL handle are ready for publication.
How to Import Products from Other Websites to Shopify
Manual entry works well for a small catalog. If you need to add many existing products, you can migrate them from another platform or import a Shopify-compatible CSV file.
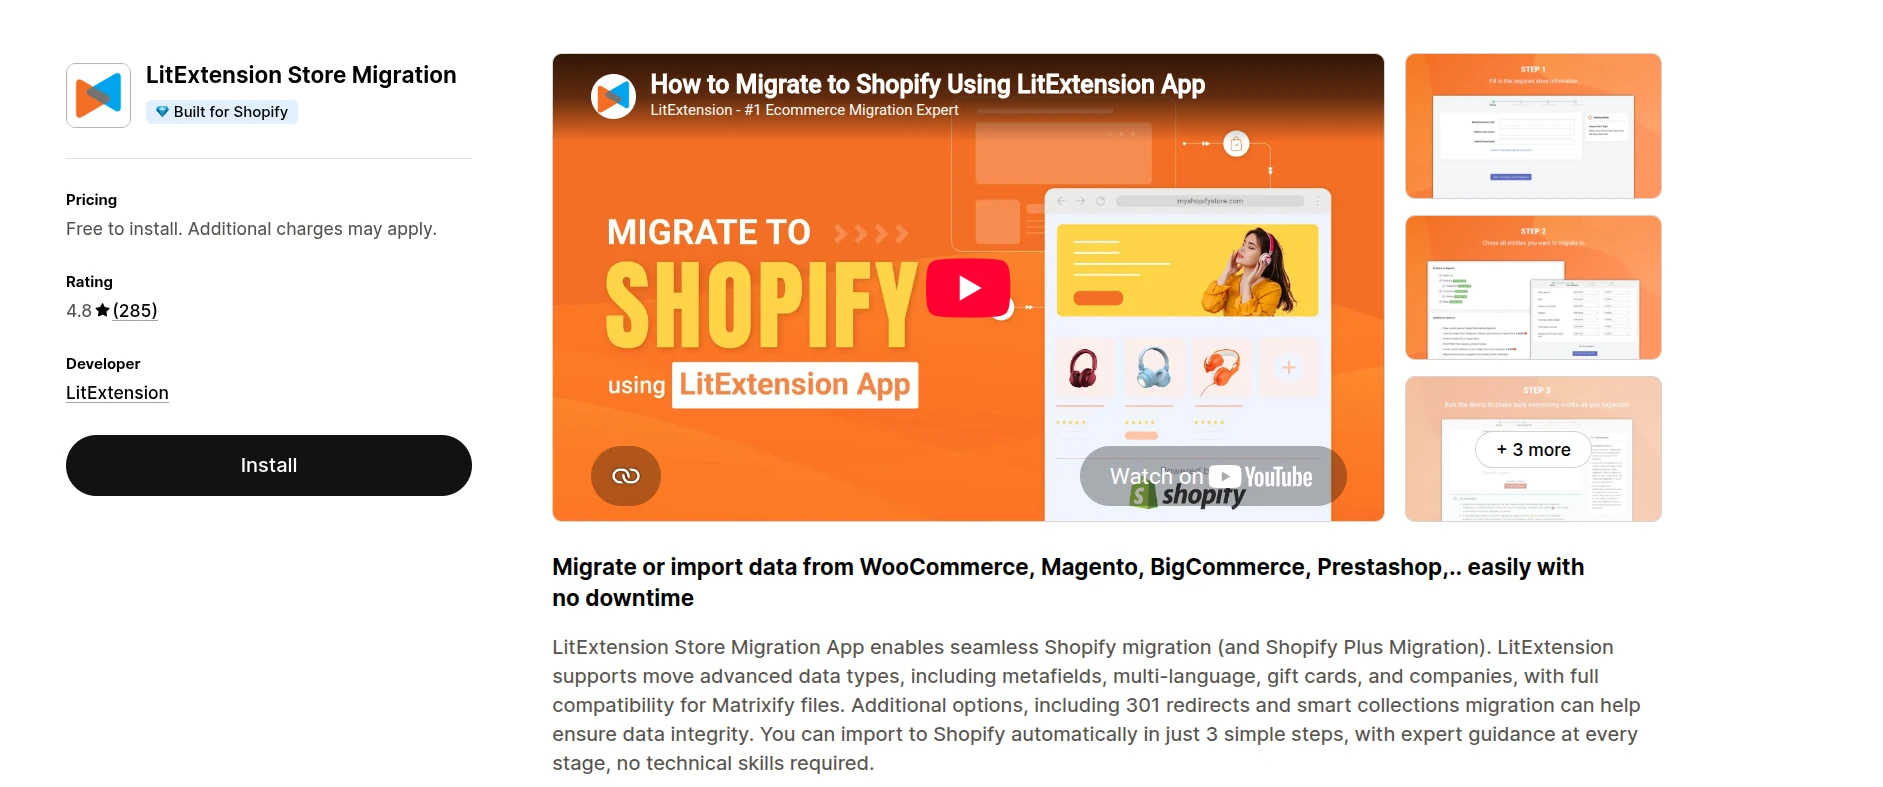
1. Import Shopify products with LitExtension
LitExtension transfers products from another eCommerce platform to Shopify without requiring you to rebuild the entire catalog manually. The process has three main steps:
Step 1: Set up your source store
From your Shopify admin, install the LitExtension Store Migration app and start a new migration.
First, select your current eCommerce platform as the Source Cart and provide the requested store details. Depending on the platform, you may need to enter your store URL, upload the LitExtension Connector, or provide API credentials.
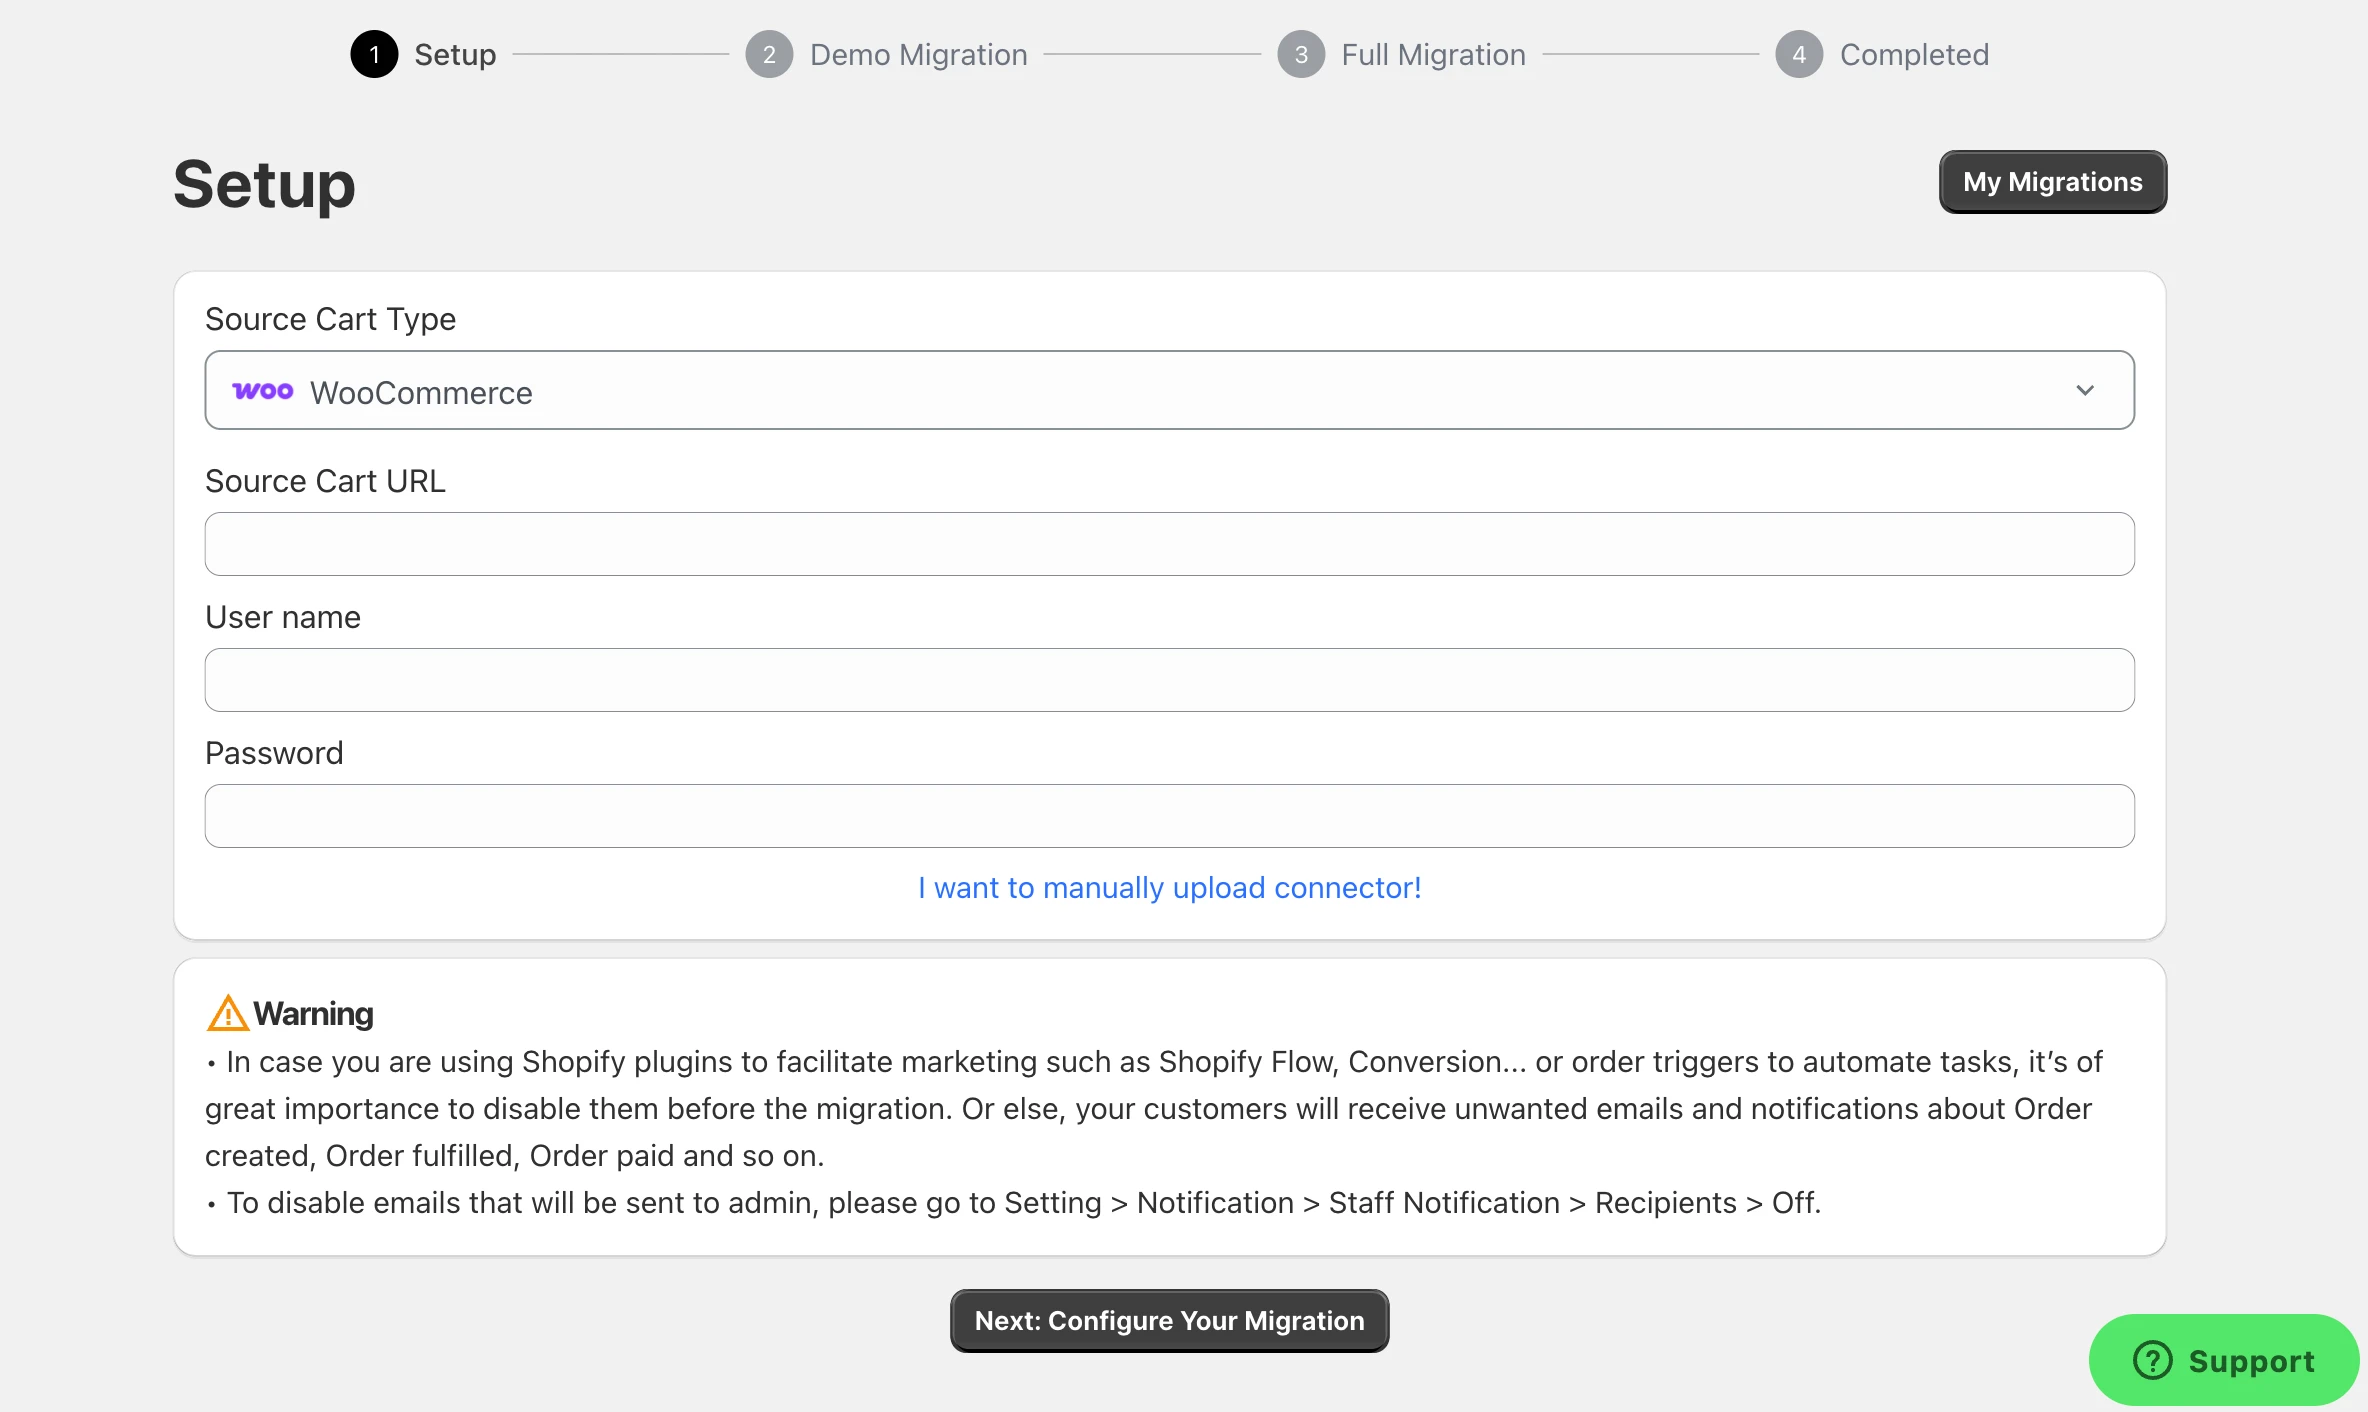
Your Shopify store will already be connected as the Target Cart through the app. Click Next: Configure your Migration to continue.
Step 2: Select products and configure the migration
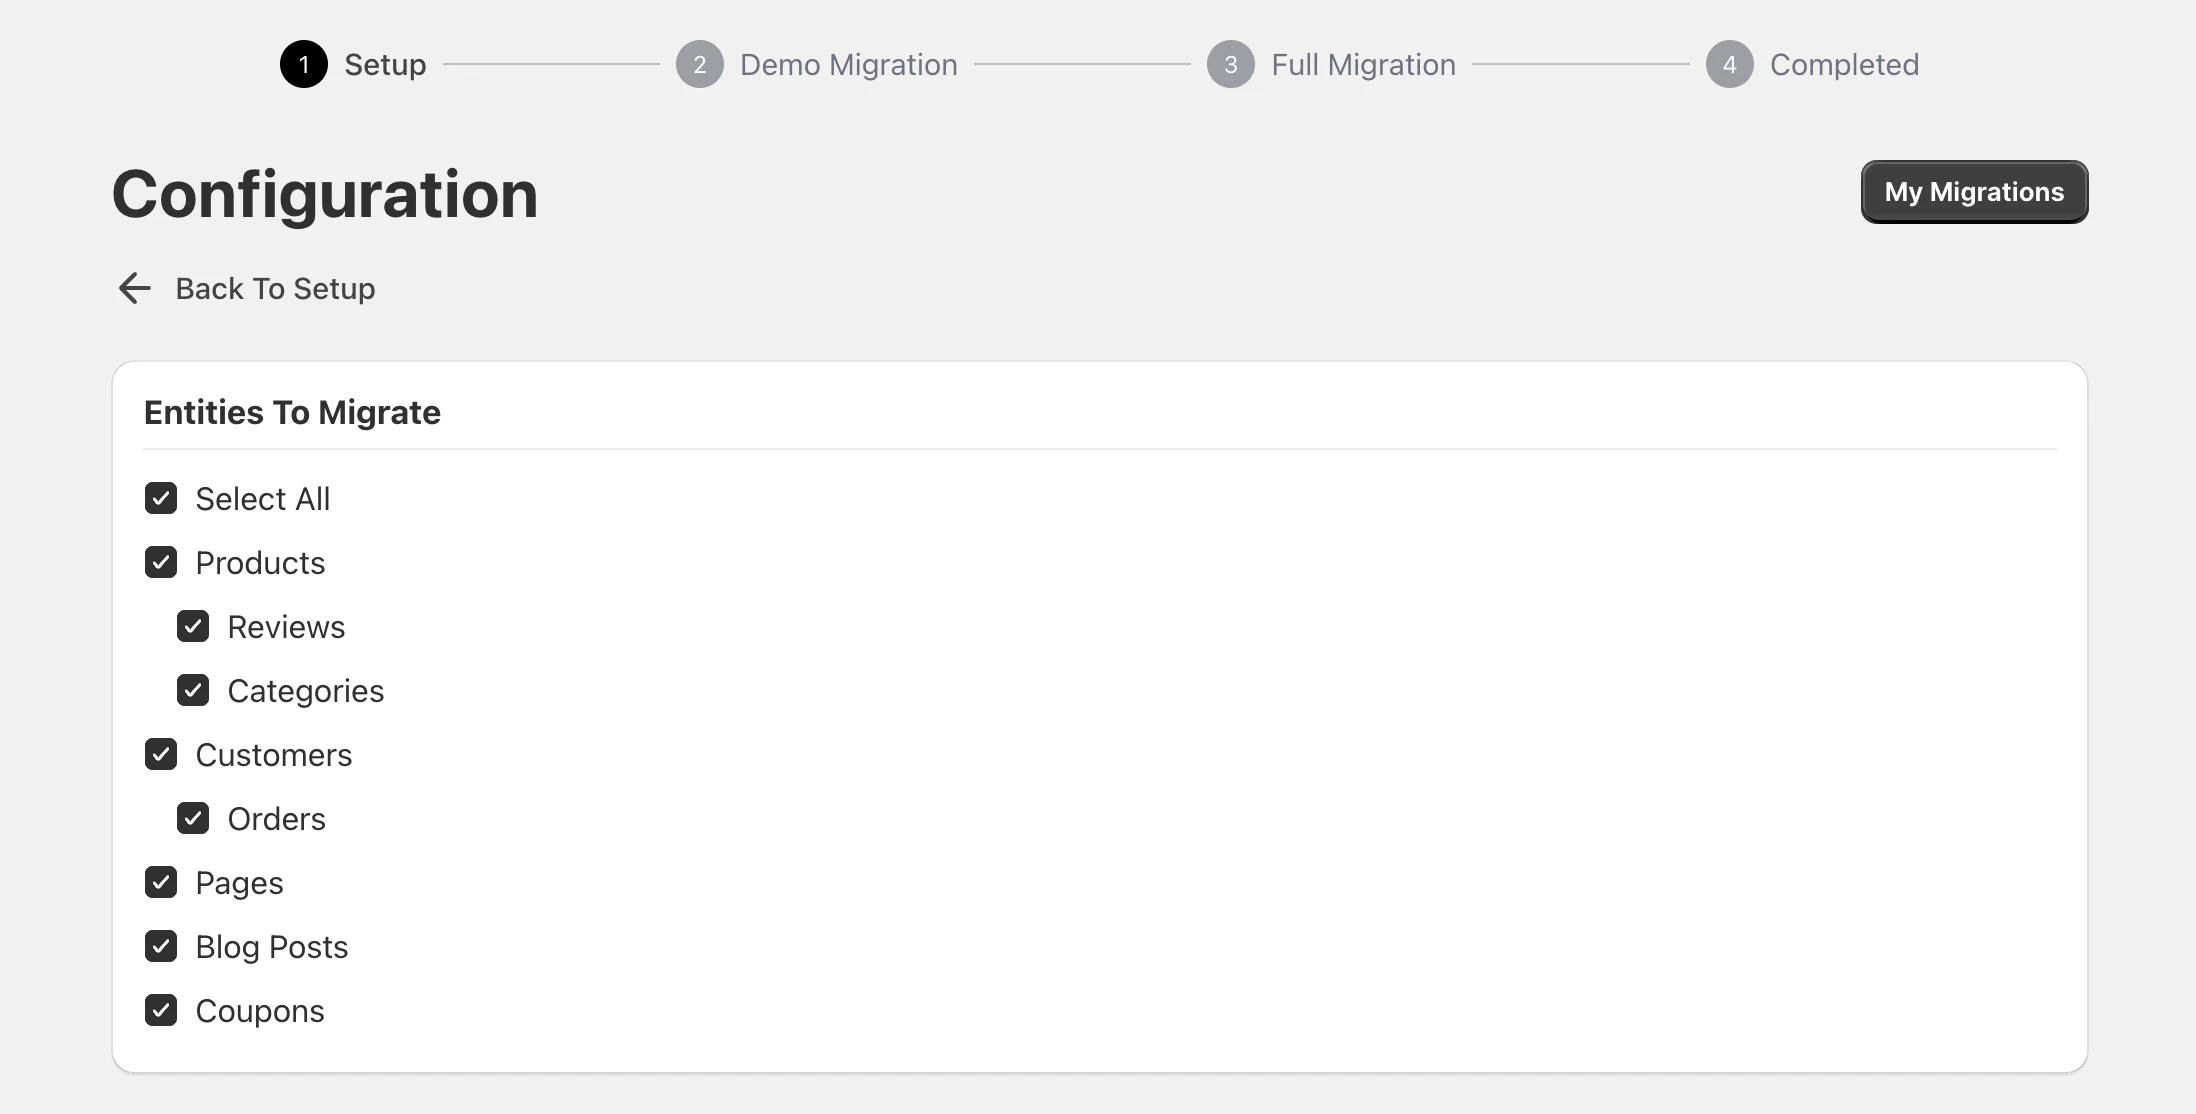
On the migration configuration page, select Products as the data type to migrate. You can also select supported data such as orders, customers, and pages when you need a broader store migration.
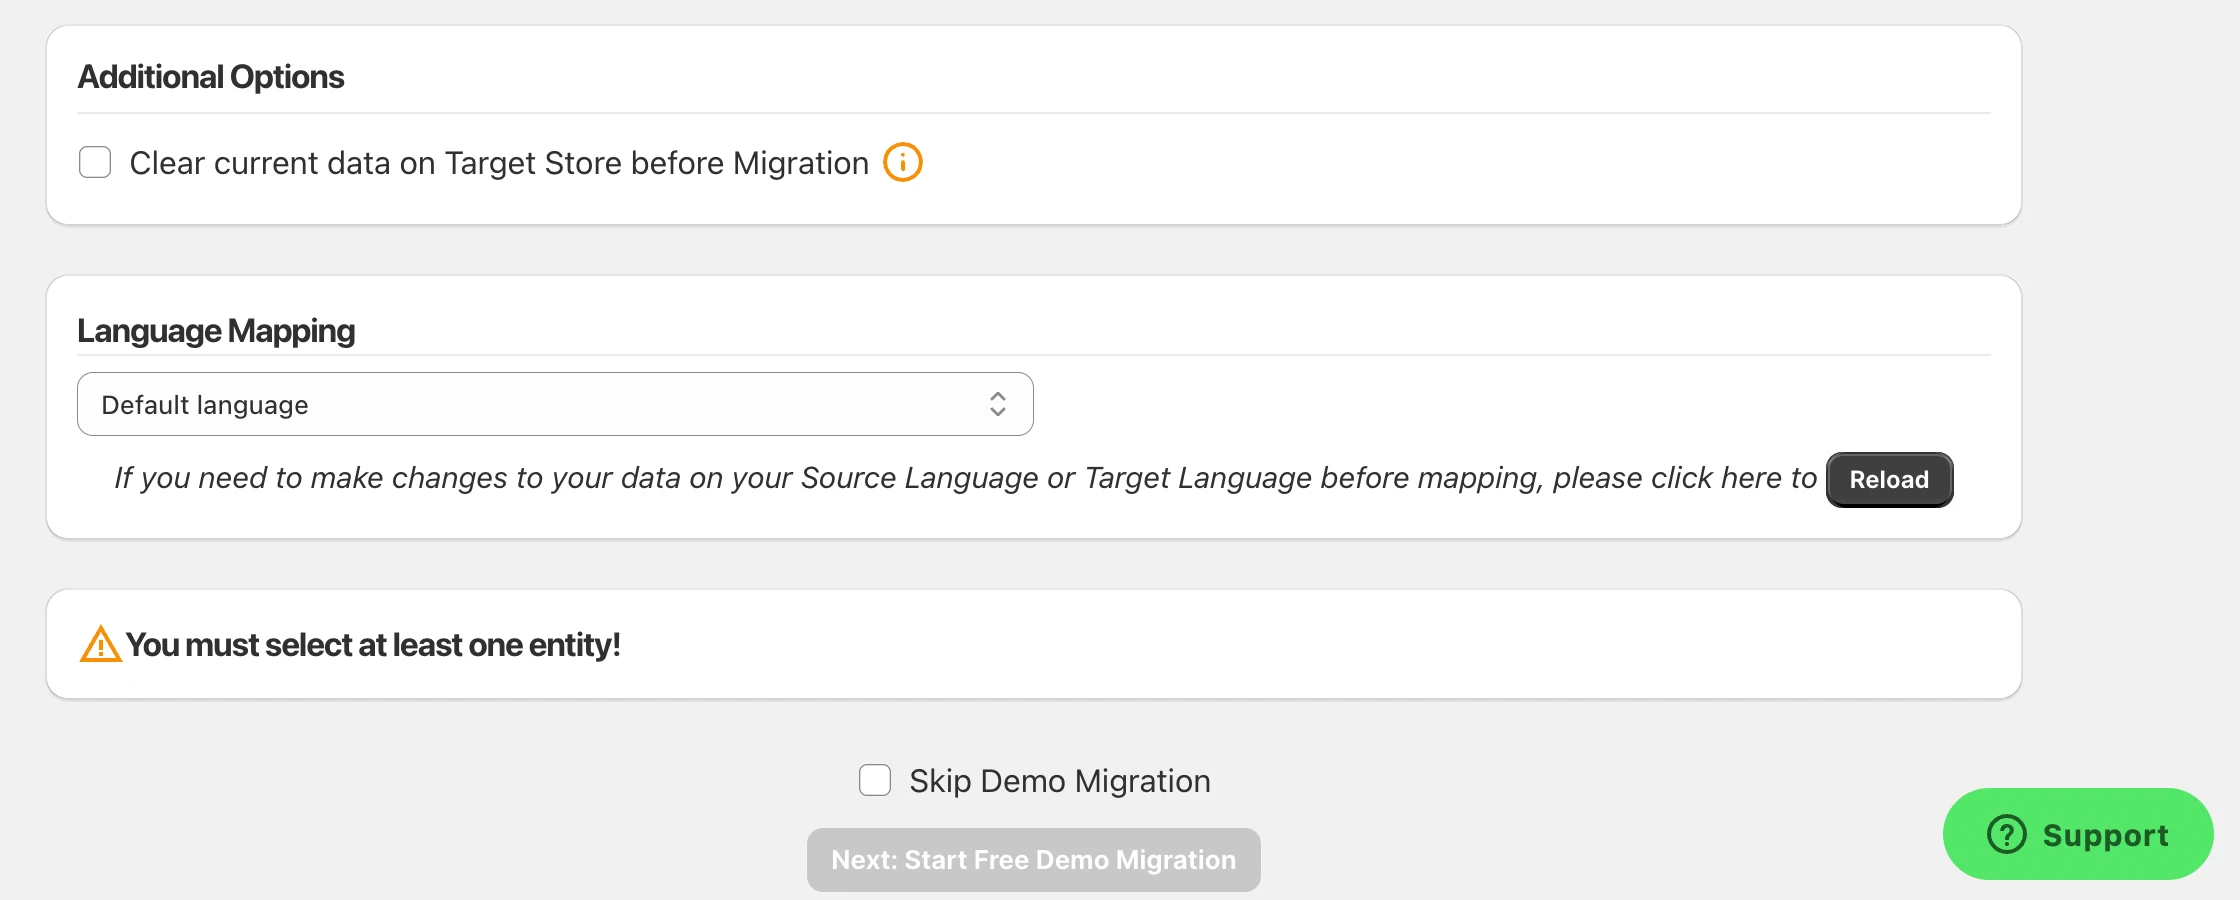
You can also choose Additional Options based on your store requirements and map the language between two platforms.
Step 3: Run and review the migration
After reviewing the settings, click Next: Start Free Demo Migration. You can test the setup with a free demo migration of up to 100 entities, or select Skip Demo Migration and proceed to the Full Migration.
LitExtension will run the transfer in the background, so you do not need to keep your browser open throughout the process. When the migration is complete, you’ll receive an email notification. You can reopen the app and check the result.
For complex catalogs or custom requirements, LitExtension’s All-in-One Migration Service provides an expert-managed option from setup through result review.
Let Our Experts Handle Your Shopify Migration!
With the All-in-One Migration Service, our experts take care of everything, ensuring a seamless and stress-free migration.
2. Import Shopify products with CSV files
If your product data is already in a spreadsheet and fits Shopify’s required format, a Shopify CSV product import can be a practical bulk-upload method.
Download Shopify’s sample product CSV and use it as the template. Do not remove or rename required headers, and map the source data to the correct Shopify columns. Product CSV files cannot exceed 15 MB; split a larger catalog into multiple valid files. Once the file is ready:
- From your Shopify admin, go to Products.
- Click Import in the upper-right corner.
- Upload your completed CSV file.
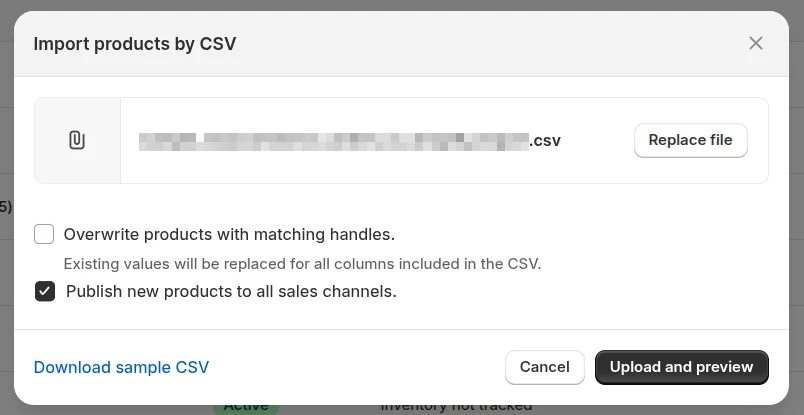
- Review the import settings and product preview.
- Click Import products to begin the process.
When the import finishes, inspect several simple and variant-heavy products. Check titles, descriptions, images, prices, SKUs, inventory, options, and URL handles. Correct formatting problems in the CSV before importing the affected records again.
For a closer look at each step, watch our video tutorial on how to import products to Shopify using a CSV file.
Bonus: Further Actions to Manage Shopify Products
After adding products, you can archive, delete, duplicate, publish, or update them from Shopify admin. Here are the most common follow-up actions.
1. Archive products on Shopify
Archiving removes a product from sale without permanently deleting its information.
- From your Shopify admin, go to Products.
- Open the product you want to archive.
- Click Archive product on the product details page.
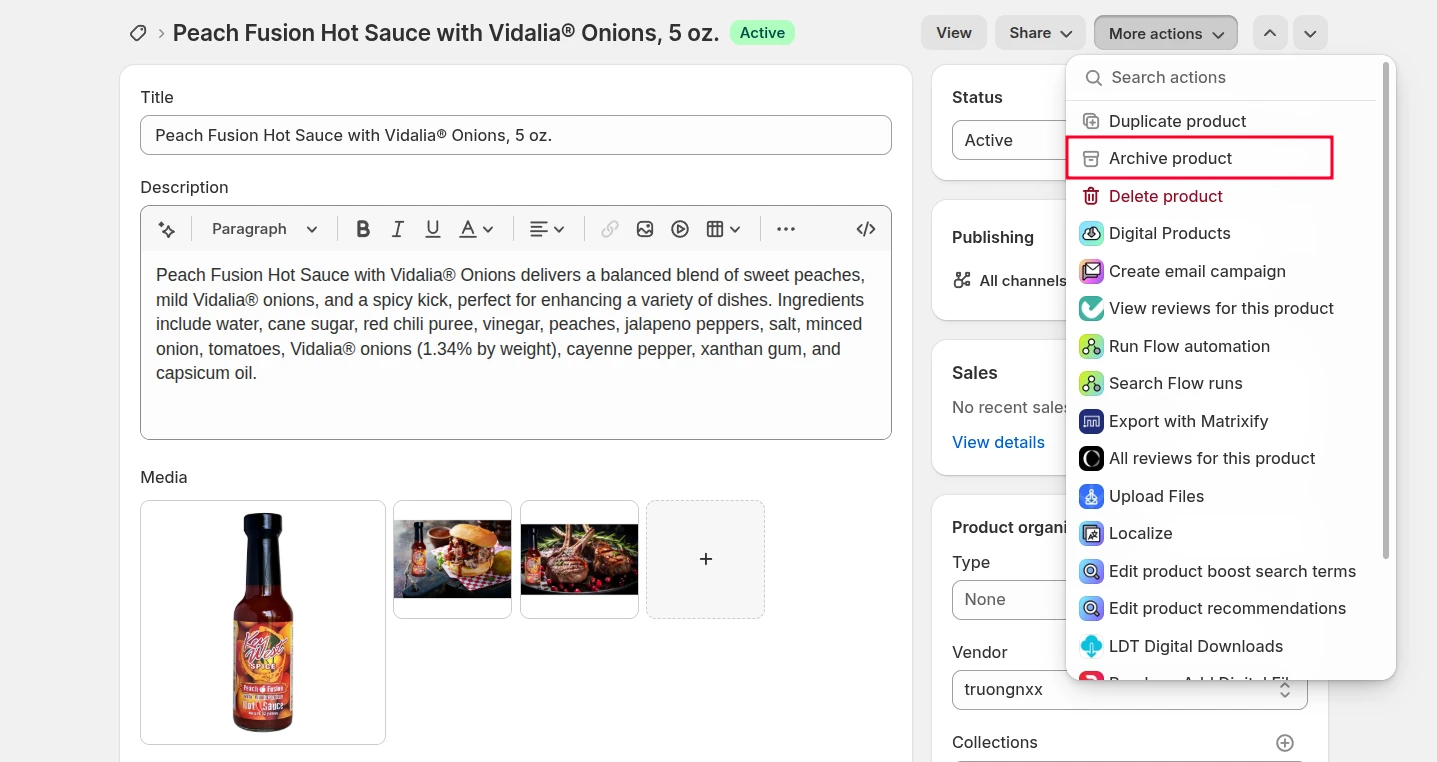
- Select Archive product again to confirm.
The product will move to the Archived tab and can be restored later.
2. Delete products on Shopify
If you no longer need a product:
- Go to Products and open the product.
- Click Delete product on the product details page.
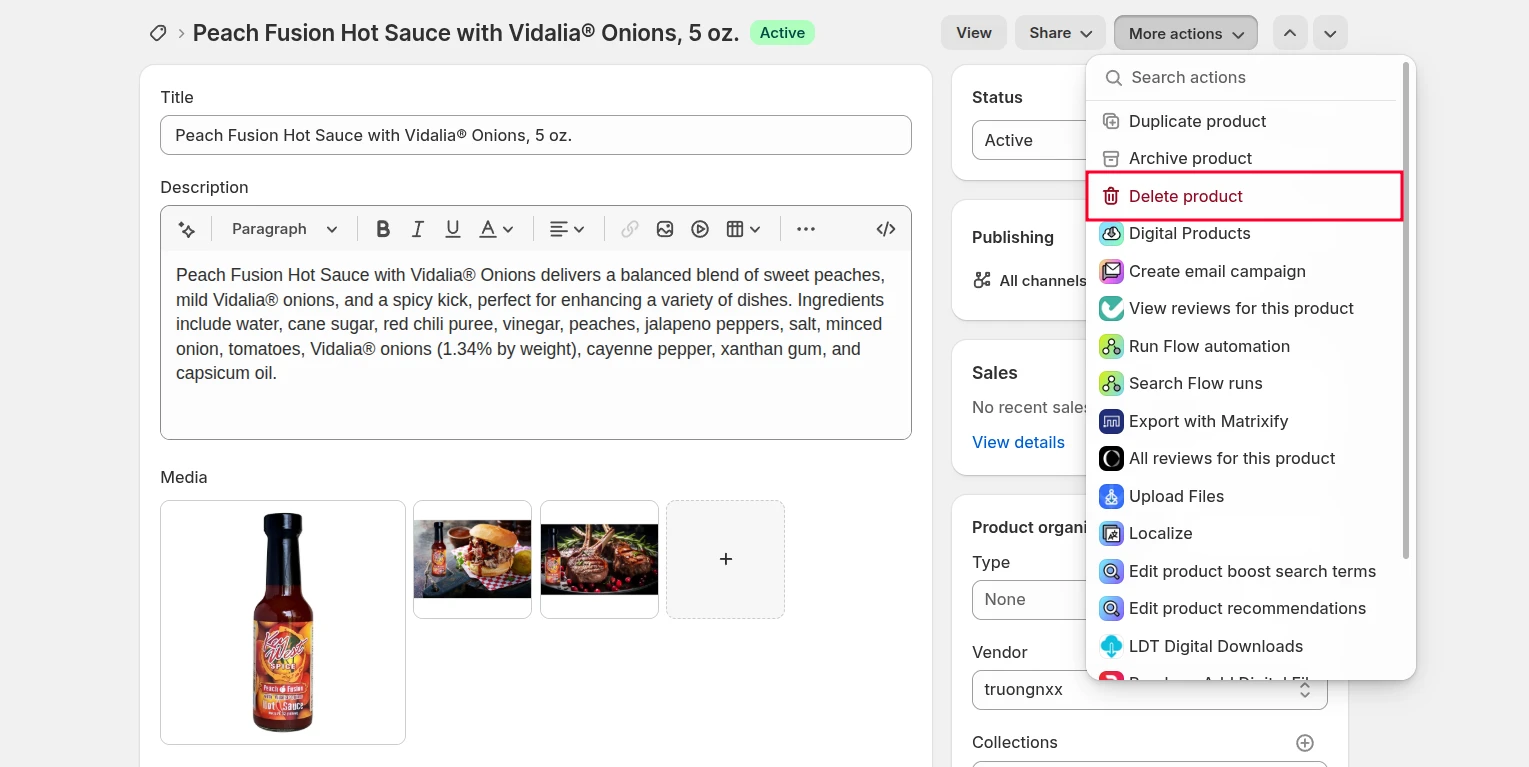
- Select Delete product again to confirm.
Deleted products cannot be restored. If you may sell the product again, consider archiving it instead.
3. Duplicate a product
Duplicating saves time when a new product shares details with an existing one. Shopify creates a separate product that you can edit without changing the original.
- From Products, open the product you want to copy.
- Click Duplicate.
- Enter a title for the new product and select the product details you want to copy.
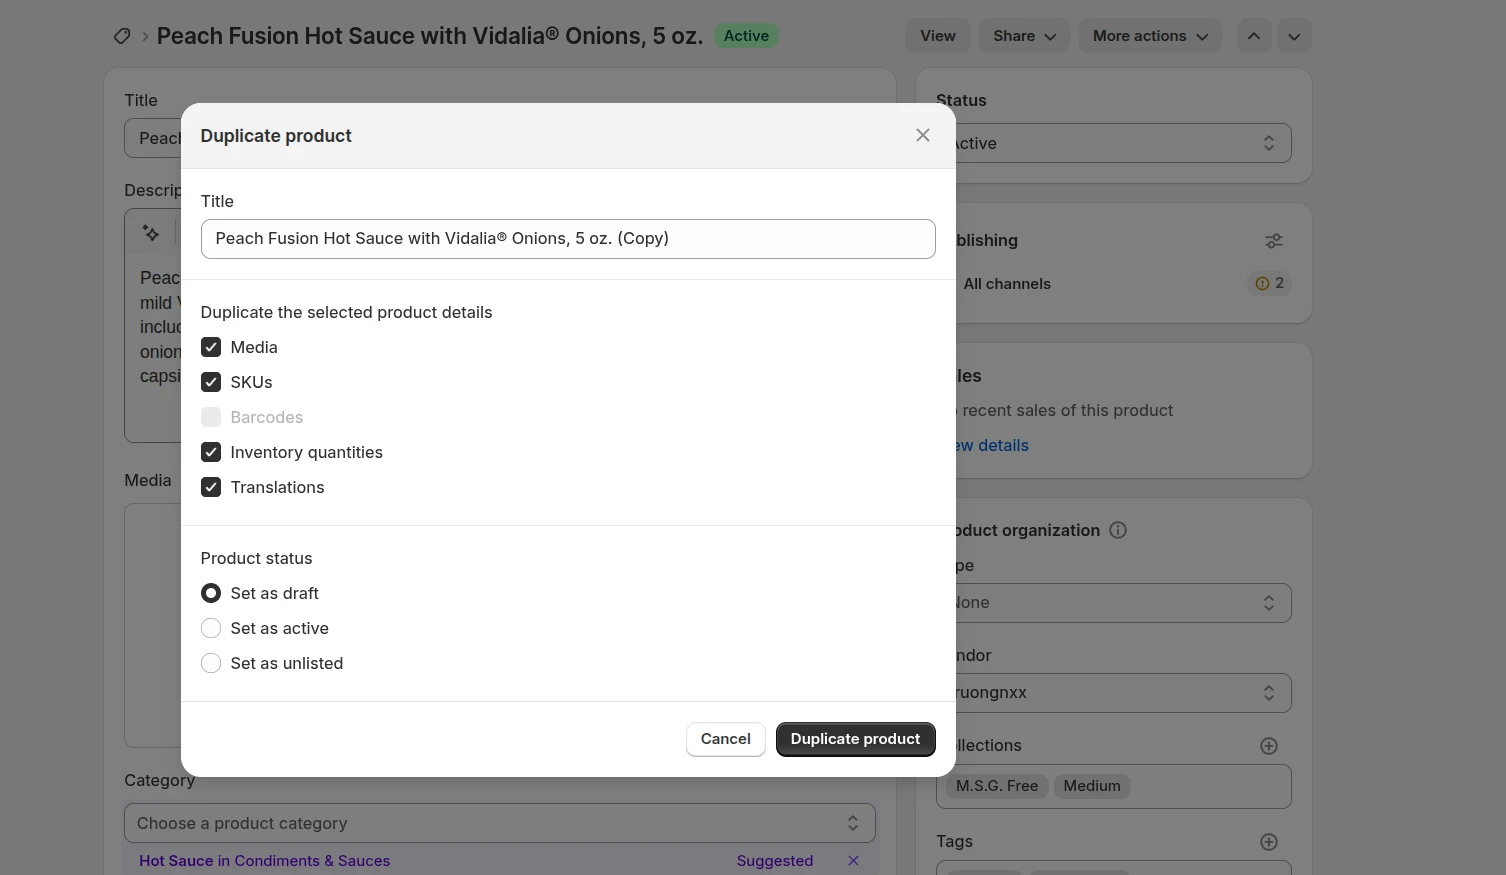
- Choose its status: Draft, Active, or Unlisted.
- Click Duplicate product and update any necessary details.
Note: Videos and 3D models are not copied to the duplicated product.
4. Set product availability
You can control which sales channels display an active product.
- Open the product from your Shopify admin.
- Find the Publishing section and click the adjustment icon.
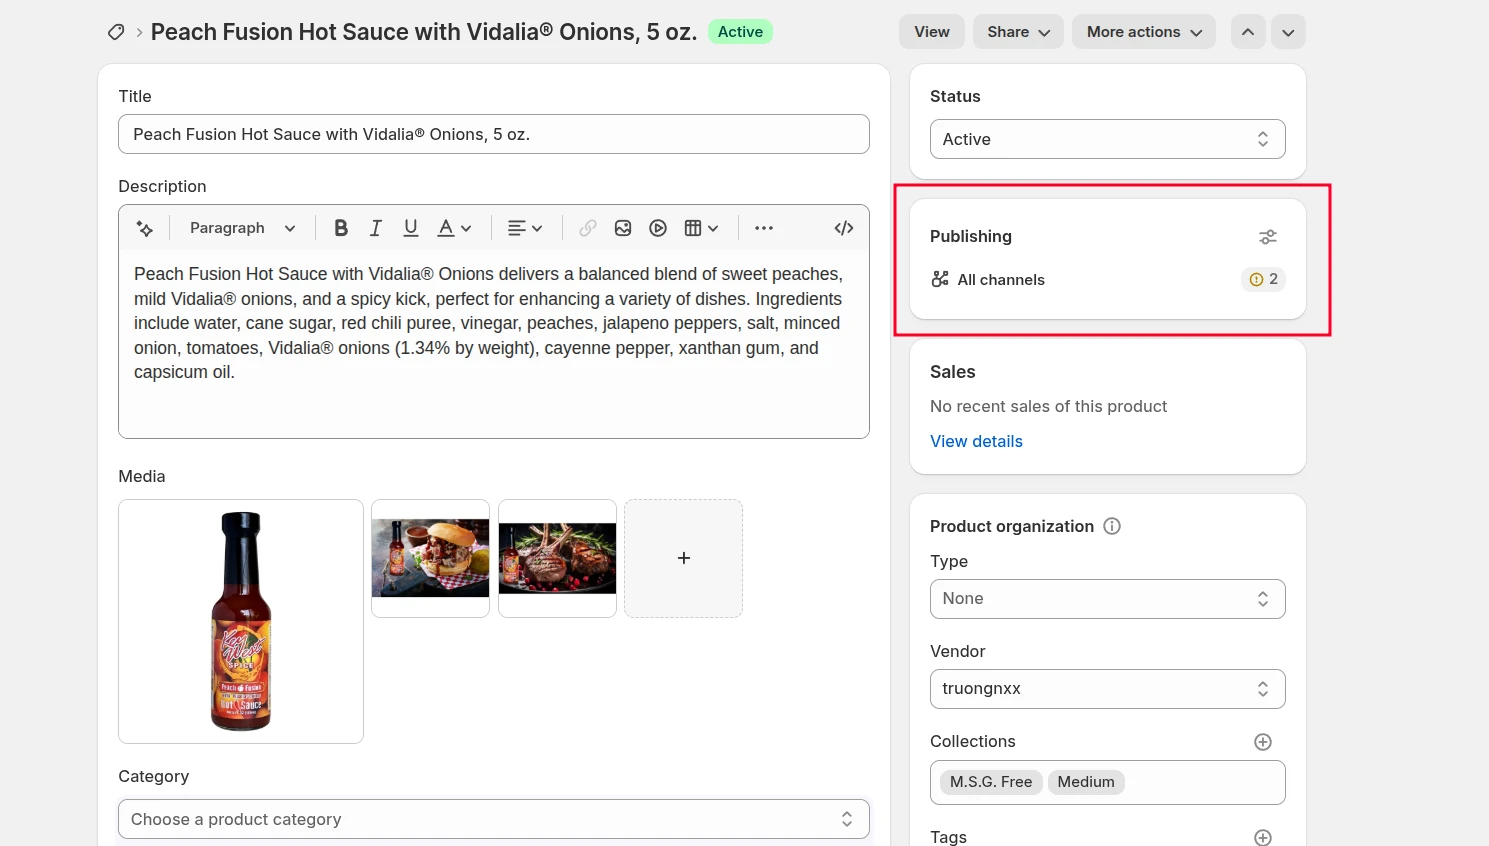
- Select or deselect the relevant sales channels.
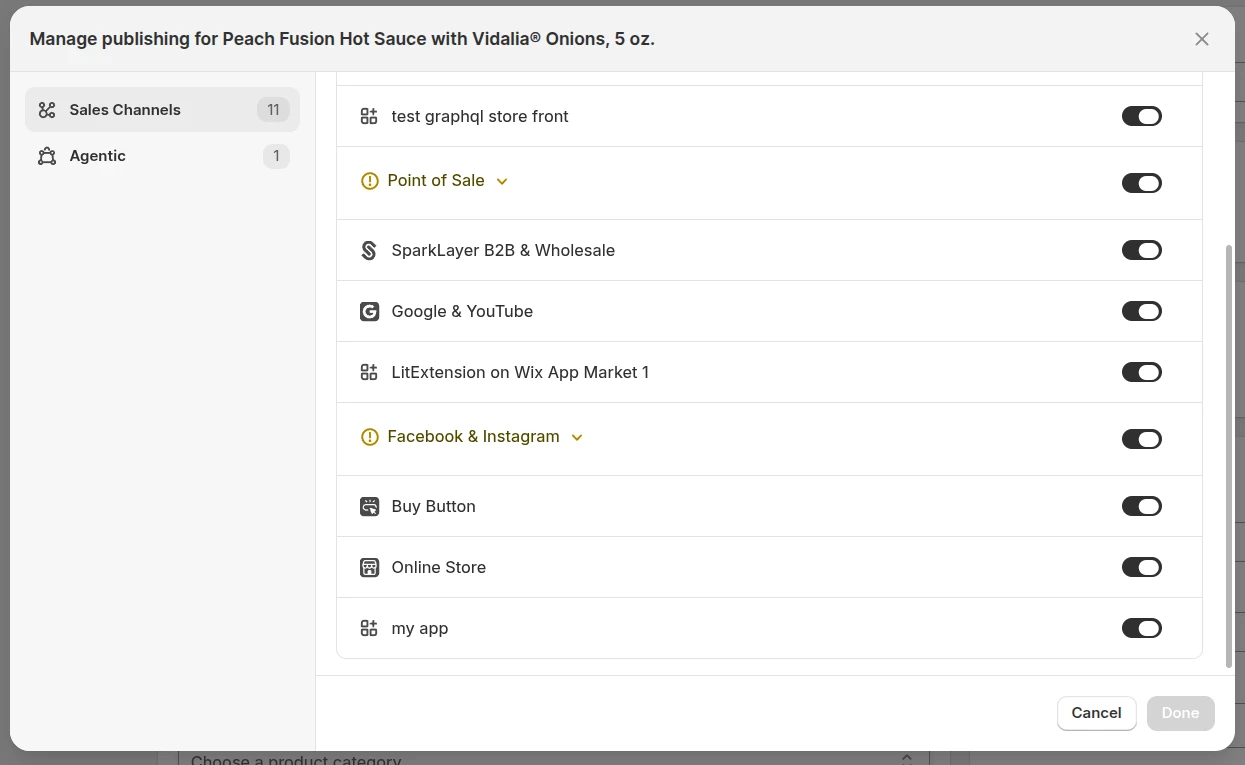
- Click Done, then save the product.
To make the product accessible only through its direct URL, change its status to Unlisted.
5. Add a barcode
Add a barcode only if you have a valid identifier for the product or variant. The location of the field depends on whether the product has variants.
- For a product without variants, enter the code in the Barcode (ISBN, UPC, etc.) field.
- For a product with variants, open each variant and enter its corresponding barcode.
- To scan a barcode using the Shopify mobile app, tap the barcode icon and position the code within the camera frame.
How to Add Products to Shopify: FAQs
Why are my products not showing up on Shopify?
A product may not appear on your storefront if its status is set to Draft, Archived, or Unlisted, or if it has not been published to the Online Store sales channel.
Open the product in Shopify admin and check its Status and Publishing settings. If it should appear in a collection, confirm that it was added to the manual collection or matches every required automated-collection condition. Also check whether your theme or an app hides sold-out products.
How many products can I add to Shopify?
Shopify does not set a general limit on the number of products you can add. However, a non-Plus store with 500,000 or more variants can create no more than 10,000 new variants within a 24-hour period through an app or CSV import.
This daily limit does not apply to Shopify Plus stores.
How do I optimize Shopify product pages for SEO?
A well-optimized product page needs a descriptive title, original copy that answers buying questions, useful media with accurate alt text, and a concise search listing. Add relevant internal links and structured product data through a compatible theme, and avoid copying a manufacturer’s description across many stores.
How do I add product variants on Shopify?
From Shopify admin, open the product and find the Variants section. Click + Add options like size or color, enter an option name and its values, and add more options if needed. Shopify generates the combinations, which you can then review and edit with separate prices, SKUs, inventory quantities, barcodes, and images.
How do I add multiple products to Shopify at once?
Use a Shopify-compatible product CSV or a migration app. For CSV, go to Products, click Import, upload the file, review the import details, and select Import products. Each product CSV must be no larger than 15 MB, so split larger catalogs into valid smaller files.
Final Words
You can add a single product from Products > Add product, or use a compatible CSV or migration solution for a larger catalog. Whichever method you choose, review the saved listings on the storefront and confirm their status, sales-channel availability, variants, inventory, and media before launch.
For more help, explore our other Shopify tutorials. If you are moving products from another platform and need help with complex catalog data, contact LitExtension to discuss your migration requirements.