WooCommerce import customers and export tasks have become increasingly common as stores adopt more marketing tools, CRM systems, and multichannel setups. A reliable process ensures your data moves safely from one system to another without breaking customer accounts or losing important information.
In this guide, we will walk you through the following key points:
- When to import/export WooCommerce customers;
- Easy steps to import WooCommerce customers;
- Detailed guide to export WooCommerce users.
Let’s get started!
When Do You Need Import Export WooCommerce Customers?
Your customer data won’t stay still as your store grows, and you’ll need to move it from time to time. Importing or exporting WooCommerce customers helps you handle those changes smoothly. Here are the main situations where it becomes necessary.
1. Migrate from another platform to WooCommerce
If you’re moving to WooCommerce from Shopify, Magento, BigCommerce, or any other platform, importing customers ensures those users can log in to the new store without creating accounts again. This helps you retain loyalty and avoid friction during migration.
2. Sync with CRM or email marketing tools
Many businesses export customer data to connect with tools like HubSpot, Mailchimp, Klaviyo, or Salesforce. Having clean customer exports makes it easier to segment audiences, automate campaigns, and run targeted marketing.
3. Back up your customer database
Regular exports allow you to keep safe, offline copies of customer information. This protects your store in case of site crashes, hosting failures, or plugin conflicts.
4. Analyze and segment customer behavior
Exporting customers gives you flexible datasets for deeper analysis. You can build reports, segment buyers, and better understand purchasing trends without relying solely on WooCommerce’s built-in tools.
5. Merge or split stores
If you own multiple stores or are restructuring your business, import–export tools help you combine customer lists or duplicate them across stores while preserving all key data and account details.
6. Support staging and development environments
Developers often export customers from a live site and import them into a staging environment for testing. This keeps test environments realistic without exposing sensitive data manually.
How to Import WooCommerce Customers With CSV File?
WooCommerce does not support WooCommerce import customers as a built-in feature. That’s why you'll need to install a third-party plugin to import data to WooCommerce.
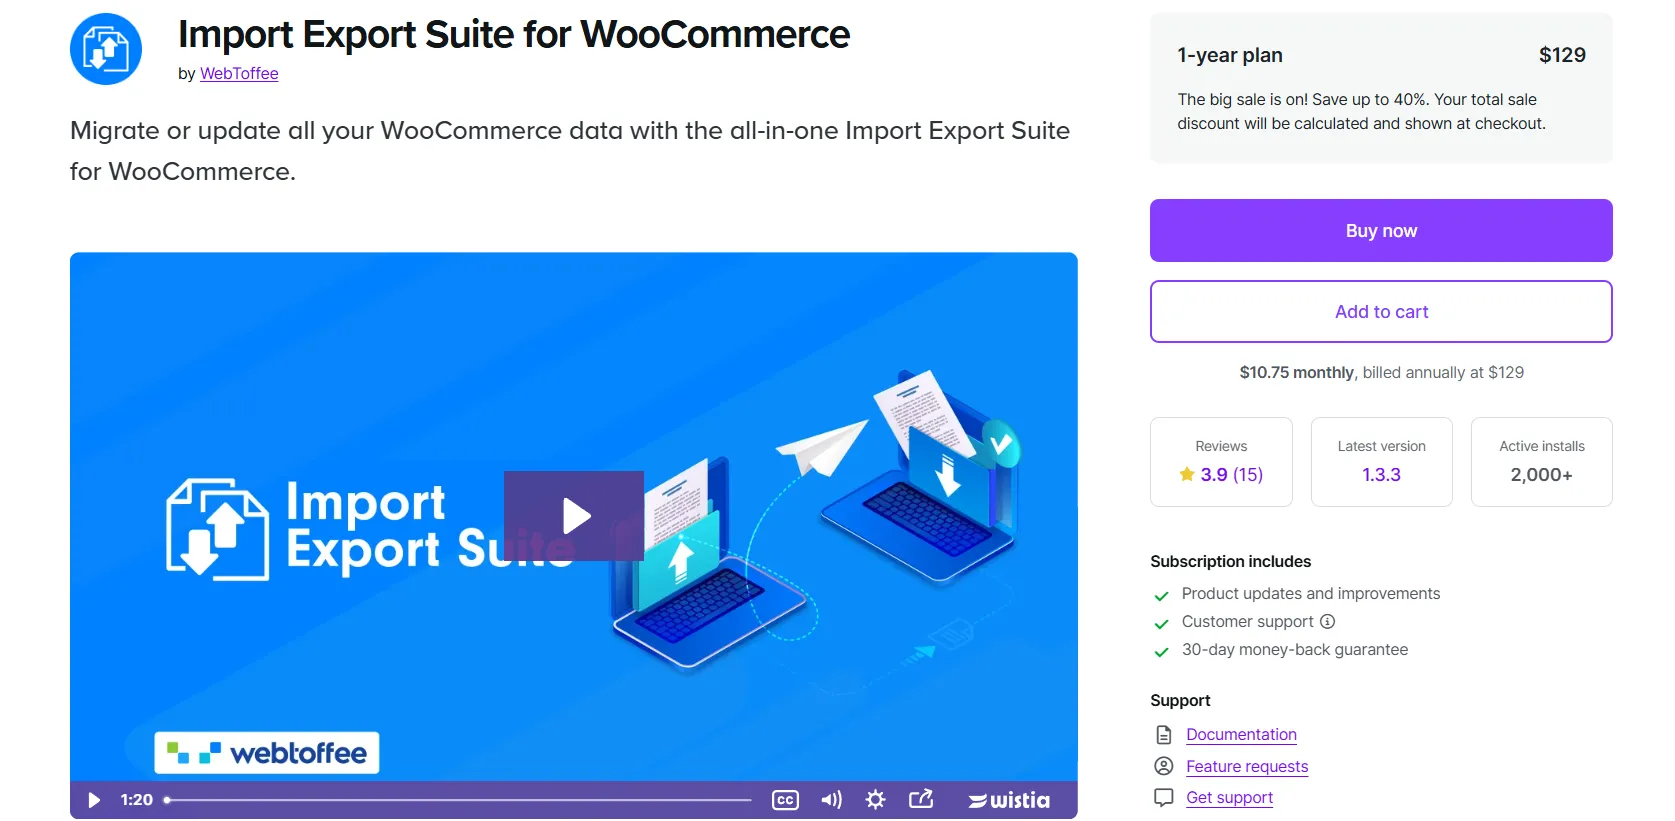
In this article, we'll work with the Import Export Suite for WooCommerce by WebToffee plugin for demonstration. We chose this plugin because it’s one of the most stable, well-maintained solutions, and it offers clear CSV mapping options that make the import process easier for beginners.
Of course, depending on your workflow, other extensions may work as well, so always check your plugin’s documentation for specifics.
Here's how to perform WooCommerce import customers using the WebToffee Import Export plugin.
Step 1: Map customers data
First, you’ll need to map each column in your CSV file to the corresponding WooCommerce customer fields. This step ensures that the plugin understands what each piece of data represents – such as login details, customer IDs, email addresses, and profile information.
If your CSV headings don’t match WooCommerce’s default format, this mapping step keeps everything aligned so the data imports correctly without errors.
Below is an overview of the main customer fields you’ll encounter and the formats they accept.
Column name | Explanation | Accepted format |
ID | Identification number | Numerical Example: 1317, 26515 |
customer_id | Identification number of the customer. | Numerical Example: 1317, 26515 |
user_login | Can include: email, id, name. | Alpha-numeric characters Example: [email protected] |
user_pass | Login password of the customer. | Alpha-numeric characters Example: password1 |
user_nicename | Slug of a nicer-looking name stored only in the database. This value is not displayed in the user’s details page. | Alpha-numeric characters. Example: customer-nice-name |
user_email | Email address of the customer. | Alpha-numeric characters. Example: [email protected] |
user_url | URL of the user’s/customer's website. | Alpha-numeric characters. Example: yourstore.com/customer/name |
user_registered | Registration date of the customer. | Numerical. Example: 2016-05-26 |
display_name | Display name of the customer. | Alpha-numeric characters. Example: John Doe |
first_name | First name of the customer. | Alpha-numeric characters. Example: John |
last_name | Last name of the customer. | Alpha-numeric characters. Example: Doe |
user_status | Customer's status. | 0 - Inactive 1 - Active |
nickname | Nickname of the customer. | Alpha-numeric characters. Example: johndoe101 |
description | Description or short bio of the customer. | Alpha-numeric characters. |
locale | Local language which the user prefers. | Text Example: English, Espanol |
shipping_first_name | First name in the shipping address. | Text Example: John |
shipping_last_name | Last name in the shipping address. | Text Example: Doe |
shipping_company | Name of the shipping company. | Text Example: DHL |
shipping_address_1 | First address of the shipping company. | Alpha-numeric characters. Example: 123 Sample Street |
shipping_postcode | Customer's postal code. | Numerical Example: 123456 |
shipping_city | City of the shipping company. | Text Example: Fort Myers |
shipping_state | State of the shipping company. | Text Example: Florida |
shipping_country | Country of the shipping company. | Text Example: United State |
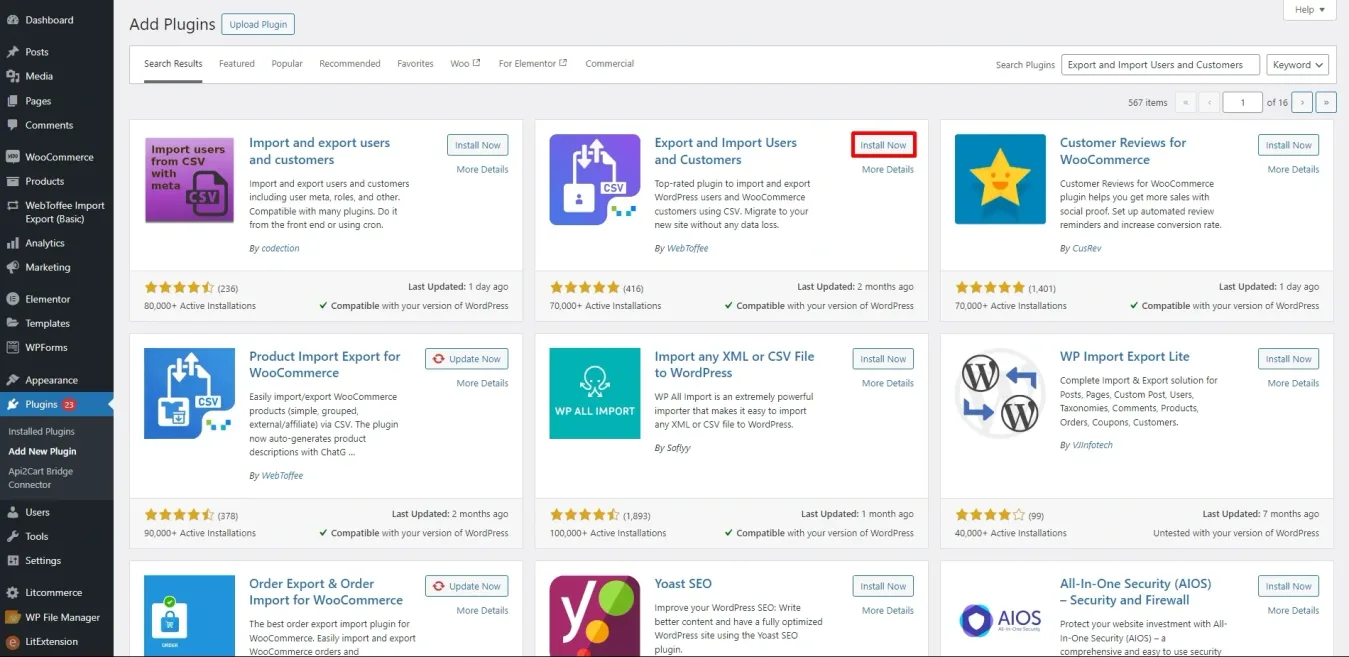
Step 2: Install the plugin
To proceed with the customer import, you’ll need to install the Import Export Suite for WooCommerce by WebToffee plugin.
Open Plugins > Add New in your WordPress dashboard, search for the plugin, then install and activate it. Once activated, the plugin will add a dedicated import–export menu inside WooCommerce.
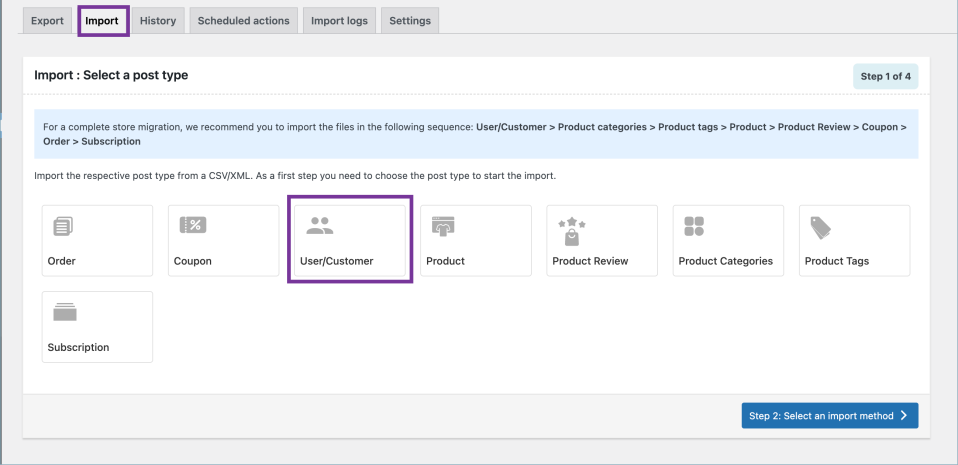
Step 3: Select the import method
From your WordPress dashboard, go to the WebToffee Import Export menu and select Import. Then open the User/Customer tab and click Step 2: Select import method.
At this stage, you’ll need to choose how you want to import your file. If your CSV was generated using the same plugin, select Quick import. This option skips several steps because the file format already matches the plugin’s requirements.
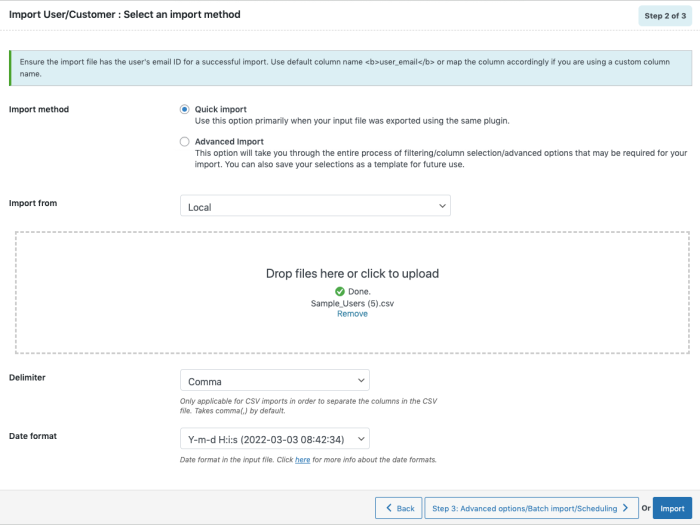
If your CSV comes from another platform or tool, choose Advanced import so you can review, filter, and map your fields before bringing the data into WooCommerce.
After selecting your method, upload your CSV file by dragging it into the upload box. Choose Import to continue. If you’re using the Advanced method, click Step 3: Advanced options/Batch import to move forward.
Step 4: Map import columns
When you reach the mapping screen, the plugin will divide your WooCommerce customer fields into three groups. Review each group and match your CSV columns accordingly:
- Default fields: username, email, first name, last name, and billing/shipping details.
- Meta (or custom fields): membership levels, CRM IDs, loyalty points, or any extra profile fields your store uses.
- Hidden meta fields: These fields store internal or system-level data. They usually don’t need to be mapped unless you’re restoring a full site or migrating highly specific backend information.
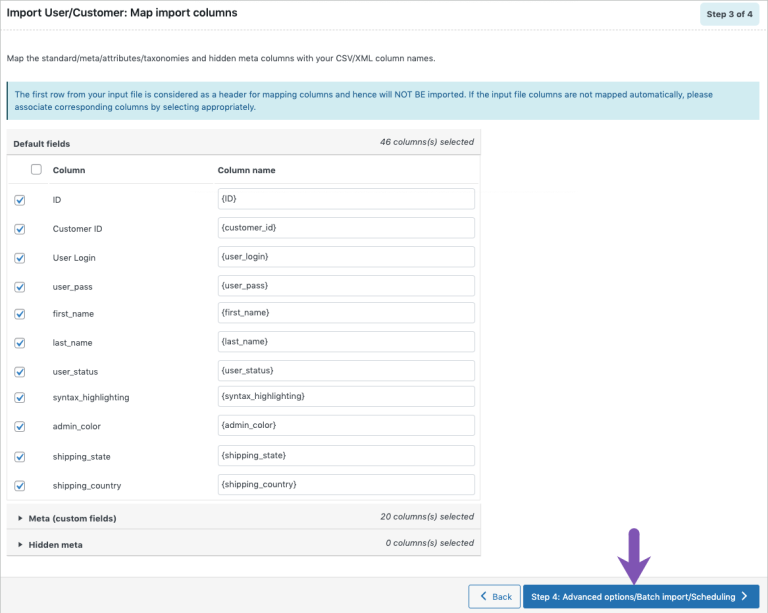
After completing the mapping, click Step 4: Advanced Options/Batch Import/Scheduling to continue.
Step 5: Configure advanced options/scheduling
When you reach this step, the plugin will display several advanced settings that control how your customer data is handled during import. You can also save these settings as a template for future imports if needed:
- Update Only: Choose Yes to update data only for customers who already exist in your store. Choose No if you want the plugin to process all rows in your CSV, creating new users when needed.
- Match users by: Select whether the plugin should identify users based on ID, Email, or Username.
- Existing User Action: Decide whether to Skip or Update a user when the system finds a match.
- Email new users: Enable this if you want WooCommerce to automatically send a welcome email to newly created accounts.
- Advanced timeout options: In the expanded Advanced Options panel, you can set how many records are processed per iteration. If your server times out during import, reduce this number and try again.
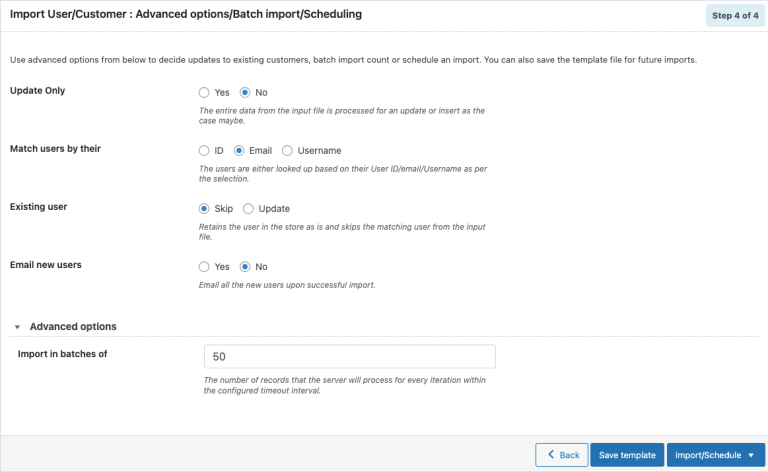
At the bottom of the page, you can choose to Import your customers right away or Schedule the job.
To schedule the import
Select Schedule, and you’ll be taken to the cron scheduling page. The plugin offers two scheduling methods:
- WordPress Cron: Runs when there is traffic on your site. It checks timestamps and triggers your scheduled import when the set time arrives.
- Server Cron: Generates a unique URL that you can add to your server’s cron jobs. This is more reliable and ideal for large data imports since it doesn't depend on site visitors.
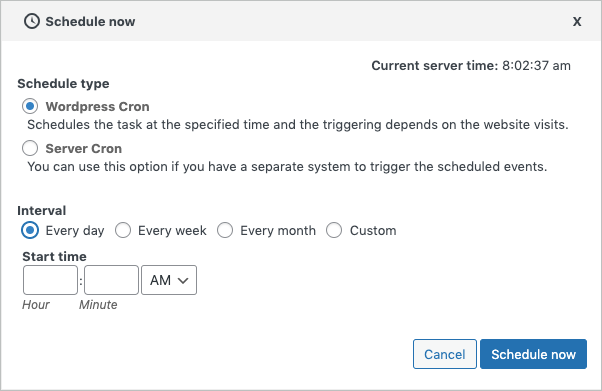
You can schedule the import to run daily, weekly, monthly, or on a custom schedule, and you can specify the exact time it should run. When ready, click Schedule Now.
To import immediately
Choose Import to run the process right away. After completion, a pop-up will show how many customers were imported successfully and how many failed (if any).
How to Export WooCommerce Customers to CSV?
Now that you know how to import customer data, let’s look at the opposite process – export WooCommerce customers to a CSV file. This is useful when you need to back up your data, migrate to another platform, or prepare information for email marketing and CRM tools.
The process is just as straightforward, and we’ll walk through it step by step using the same WebToffee Import Export Suite plugin.
Step 1: Decide the post type
To export WooCommerce customers list, go to WooCommerce > Import Export Suite and switch to the Export tab.
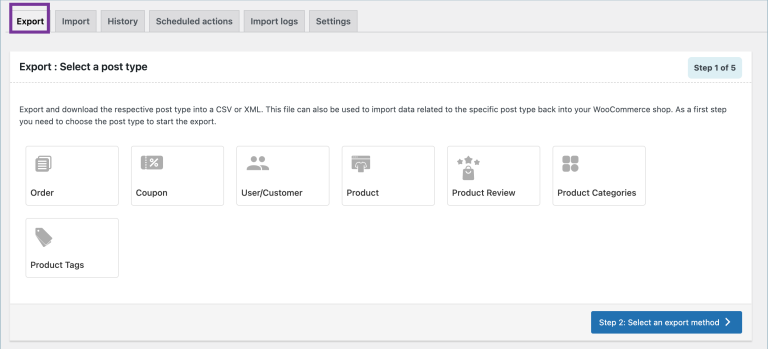
From here, select Users/Customers as your post type. This tells the plugin exactly which data set you want to export before moving on to the next steps.
Step 2: Choose the export method
After opening the WooCommerce users export screen, you’ll be asked to choose how you want to generate your customer CSV file. The plugin offers three different export methods, each designed for a specific level of control and customization.
Method 1: Quick export
Quick export provides the fastest way to download customer data using the plugin’s standard fields. If you need more than the basic fields, you can enable extra groups like Meta (custom fields) or Hidden meta by selecting their checkboxes.
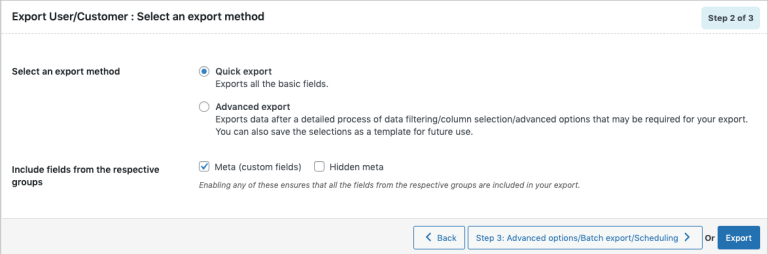
You can export right away or continue to Step 3 to apply filters.
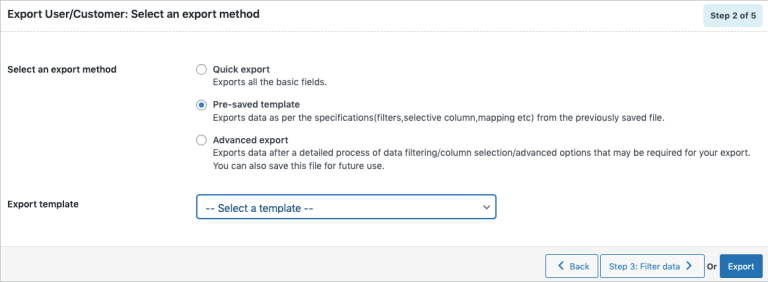
Method 2: Pre-saved template
A pre-saved template lets you reuse settings you saved during a previous Advanced Export. This option loads all your earlier filters, column selections, and mappings, so you don’t have to rebuild your configuration. You can choose a template from the drop-down and either export right away or move to Step 3 for additional adjustments.
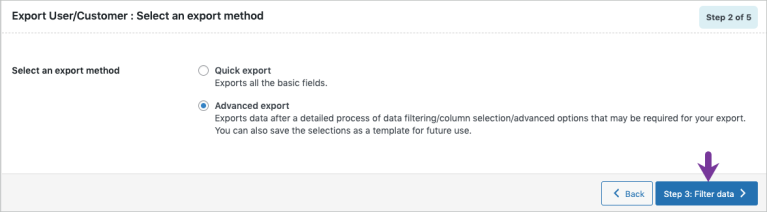
Method 3: Advanced export
Last but not least, this method gives you full control over the export process. You can apply detailed filters, choose specific fields, reorder columns, and configure advanced settings. It’s also where you can save your setup as a template to reuse later.
Step 3: Apply filters to your data
When you move to Step 3, the plugin shows several filters that let you control exactly which customers you want to export. These options help you narrow down large datasets and extract only the information that matters.
You can adjust the following filters:
- Total number of users to export: This sets how many users you want to include in the export. For example, entering 500 with a skip count of 10 will export users from the 11th to the 510th record.
- Skip first n users: This lets you skip a specific number of users at the beginning of the list. For example, entering 10 skips the first ten users in the export.
- User Roles: This filter lets you export only customers who belong to selected roles.
- User Email: This allows you to export customers based on their email addresses.
- Date From: This exports customers who registered on or after the date you choose.
- Date To: This exports customers who registered up to the selected date.
- Sort Columns: This option lets you sort the exported data by specific columns.
- Sort By: This sets the sort order, which defaults to ascending.
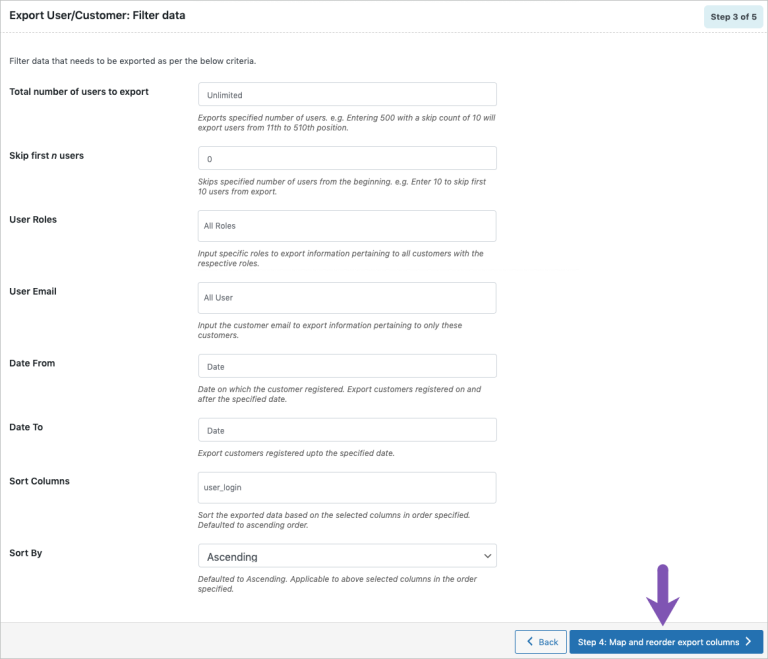
After adjusting your filters, click Step 4 to continue.
Step 4: Map and arrange your export fields
At this stage, you can map and rearrange the columns that will appear in your export file. The fields are grouped into three sections:
- Default fields: Core WooCommerce customer fields that you can rename or reorder.
- Meta (custom fields): Extra fields added by plugins or custom setups that you can include if needed.
- Hidden meta: System-level fields that you may export for more technical or detailed data needs.
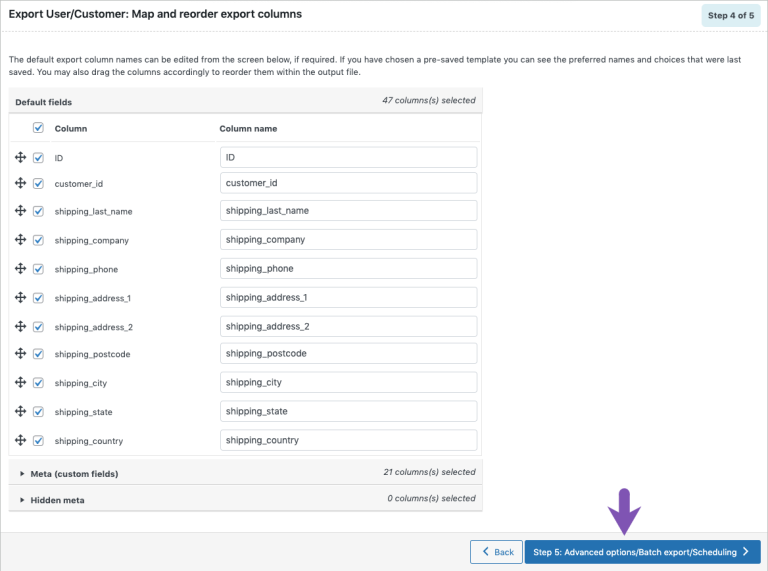
After organizing your columns, click Step 5 to proceed.
Step 5: Configure advanced settings
When you reach Step 5, the plugin displays several final settings that let you control how your export file is generated. You can adjust the following options before completing the export:
- Export guest users: Include data from guest checkouts if you want these records in your file.
- Export file name: Set a custom filename, or leave it blank to let the system generate one automatically.
- Export file format: Choose between CSV or XML depending on your needs.
- Delimiter: Select the character used to separate columns in your CSV file (the default is a comma).
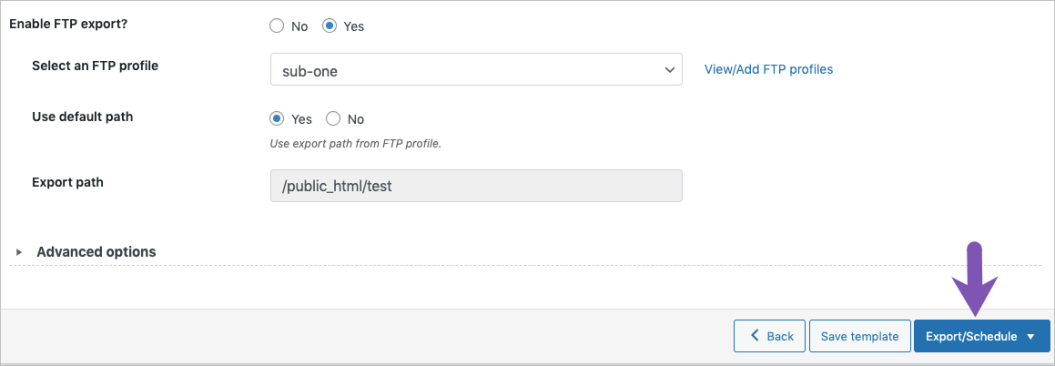
- Enable FTP export: Upload the exported file directly to an FTP location by selecting a profile and path.
If you expand Advanced options, you can also control how many records the server processes per iteration. Lowering this number can help if your export times out on larger datasets.
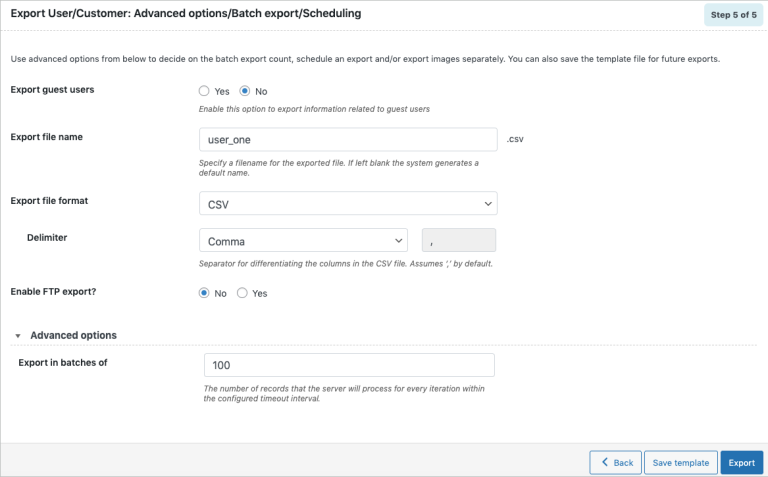
You can save these settings as a template if you want to reuse the same configuration in future exports. Once everything looks right, click Export to generate your file or choose to schedule the export if you want it to run automatically.
How to Perform WooCommerce Import Export Customers with Experts?
Importing or exporting WooCommerce customers with a plugin is convenient, but it’s not always smooth. Large CSV files can break, field mapping can get confusing, and complex stores often run into timeout errors or missing data.
Instead of struggling through the process alone, you can rely on LitExtension to handle your migration from start to finish. Backed by 14 years of experience, our team manages every detail – ensuring a seamless WooCommerce transition, no downtime, and complete peace of mind.
Step 1: Consultant by LitExtension experts
The first step in performing a WooCommerce import customers and export with LitExtension is consulting with our team of experts.
During this step, we explain the process, answer your questions, and recommend the best approach to ensure an accurate, trouble-free transfer. This initial assessment lays the foundation for a smooth and reliable migration.
Step 2: Data mapping & setting by experts
In this step, our team carefully maps every customer field from your old platform to the correct WooCommerce structure. We handle core details like names, emails, addresses, and order history, along with any custom fields unique to your business.
Additionally, we also take the time to review your data structure to ensure that everything is aligned properly. Our team adjusts the settings to accommodate your specific requirements, whether it's handling complex customer data or ensuring seamless integration with your WooCommerce store.
With this level of attention, we make sure no information is misplaced or overlooked. Your customer data is prepared accurately and configured correctly for WooCommerce, creating a stable foundation for a smooth and uninterrupted migration.
Step 3: Perform full WooCommerce import/export
Once the data mapping is complete, our team runs the full customer import/export to transfer all records into your WooCommerce store. This includes core details like contact information, purchase history, and any custom fields.
We use advanced automation to handle large data volumes efficiently while minimizing errors or data loss. Throughout the process, we run checkpoints to make sure every field is correctly formatted and working properly in WooCommerce.
With our experience and specialized tools, we complete the import quickly and with minimal downtime, ensuring your customers can access their accounts without interruption.
Let Our Experts Handle Your WooCommerce Migration!
With the All-in-One Migration Service, our experts take care of everything, ensuring a seamless and stress-free migration.

WooCommerce Import Customers: FAQs
How to import customers in WooCommerce?
WooCommerce does not include a built-in customer importer, so you’ll need a plugin like Import Export Suite for WooCommerce (WebToffee). After installing the plugin, go to WooCommerce > Import Export Suite > Import, choose Users/Customers, upload your CSV file, map your fields, and run the import. The plugin will create or update customer accounts based on your settings.
How to migrate WooCommerce customers?
To migrate customers from another platform to WooCommerce, you can export your customer data as a CSV file, then import it into WooCommerce using a plugin. For large or complex databases, most merchants choose a professional migration service like LitExtension. We handle data mapping, customer passwords, order history linking, and full migration with zero downtime.
How do I add customers to WooCommerce?
You can add customers manually by going to Users > Add New in your WordPress dashboard and creating an account. For bulk additions, use a CSV import plugin to upload multiple customer profiles at once. This is the fastest option when setting up a new store or migrating from another platform.
How to export WooCommerce customers to CSV?
Use the same Import Export Suite plugin and go to WooCommerce > Import Export Suite > Export. Choose Users/Customers, select your export method (Quick, Template, or Advanced), apply filters if needed, and download the CSV file. The export will include all selected customer fields and metadata.
Final Words
In short, the WooCommerce import customers process is essential for businesses looking to maintain their customer base during platform changes or updates. Whether you're migrating from another platform or simply need to import customer data into your WooCommerce store, using the right tools and methods ensures accuracy and efficiency.
If you like this article and want to learn more about WooCommerce tutorial, don't forget to check out other WooCommerce blogs on our website.

