As their businesses evolve over time, it’s quite common for Shopify merchants to start moving their goods and items between different stores. Nevertheless, to smoothly transfer products from one Shopify store to another – without major hiccups or downtime – you definitely need to do much more than just copy and paste!
Fortunately, after months of testing, our team has managed to compile several tried-and-true methods tailored neatly to fit your store’s size. Keep scrolling through our article to learn more about:
- How to transfer products from the Shopify dashboard
- Steps to transfer your products using a Shopify app
- Advanced store migration with LitExtension
- Extra tips for a successful product transfer
Without further ado, let’s get started!
Transfer Products from One Shopify Store to Another From The Dashboard
Shopify’s built-in Import/Export tool is a free way to transfer products between stores, especially for a smaller catalog. Your CSV can include product descriptions and image URLs, so you don’t need to copy those manually.
Nevertheless, there are a few limits to keep in mind.The CSV won’t keep products synced after the transfer, variant metafields aren’t supported, and collection assignments aren’t included in the export. Large exports can also time out, though you can split them into smaller filtered files.
If this method fits your needs, here’s how to transfer products from one Shopify store to another through the dashboard:
Step 1. Export products from the Source Store
First of all, you must log in to the Shopify admin panel of your current store, then go to the “Products” tab on the left-handed menu. Click on the “Export” button in this section to begin the export process!
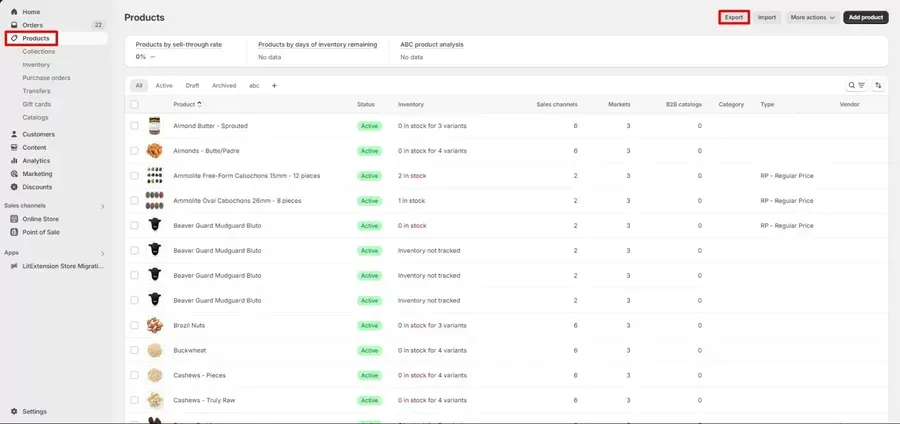
In the pop-up that appears next, you may choose whether to export all products or only specific ones.
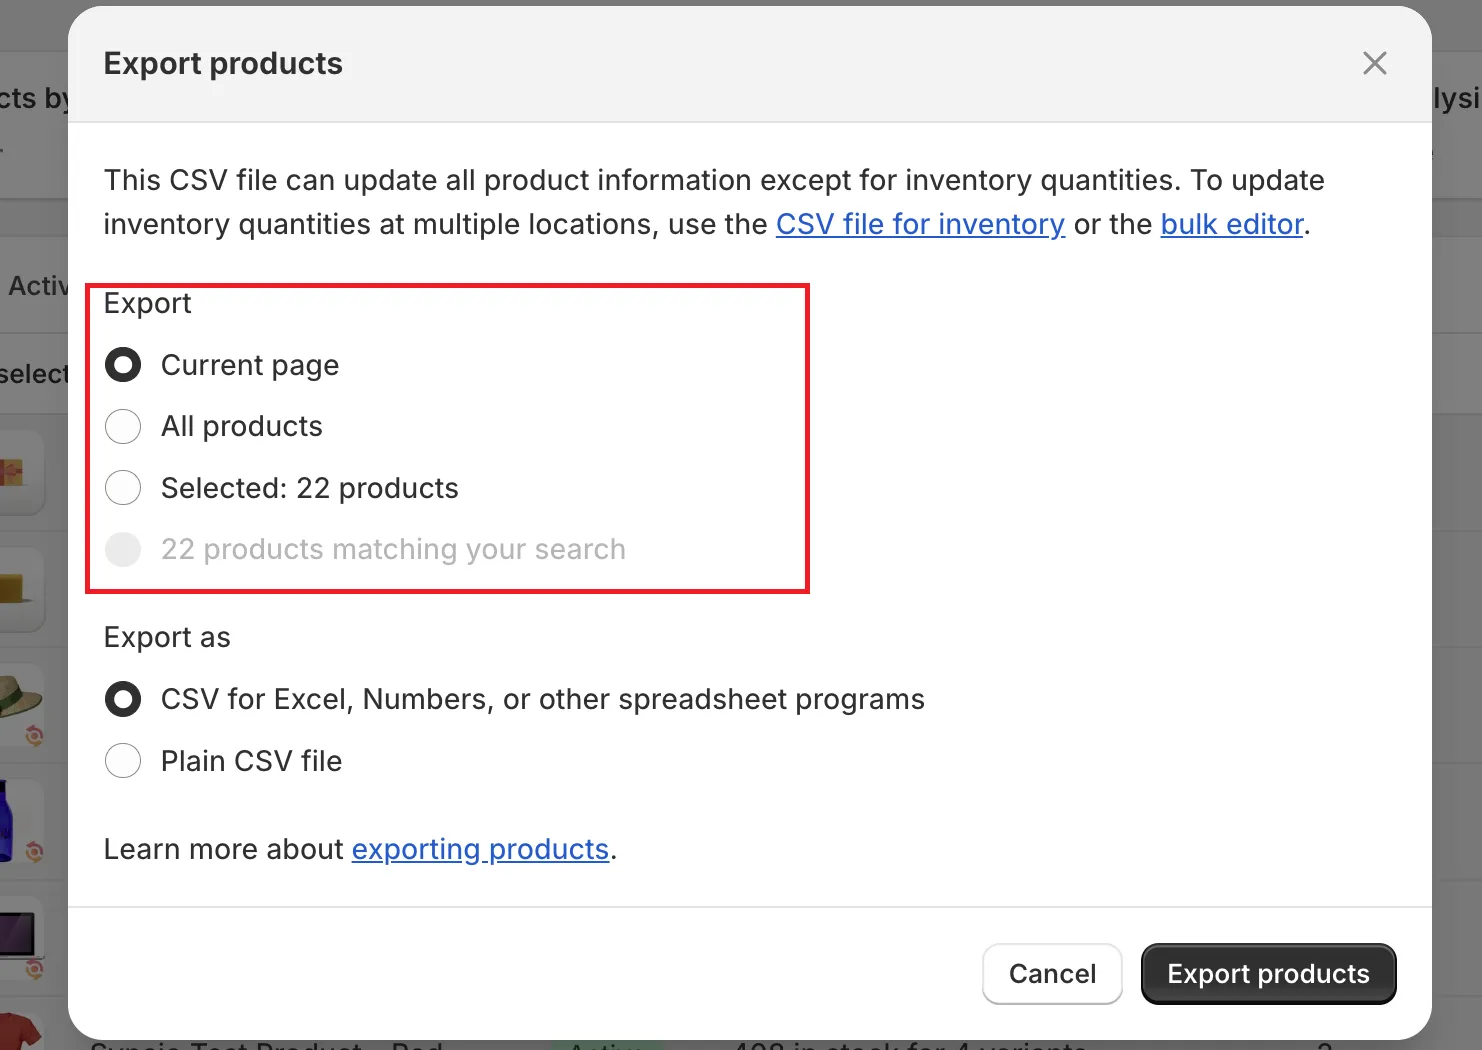
Next, review the “Export Type” settings:
- Advanced File: We recommend this one if you want to work with the CSV file in Google Sheets or Excel.
- Simple CSV File: CSV is best for working in plain-text editors.
Once done, click “Export products” to download the CSV file.
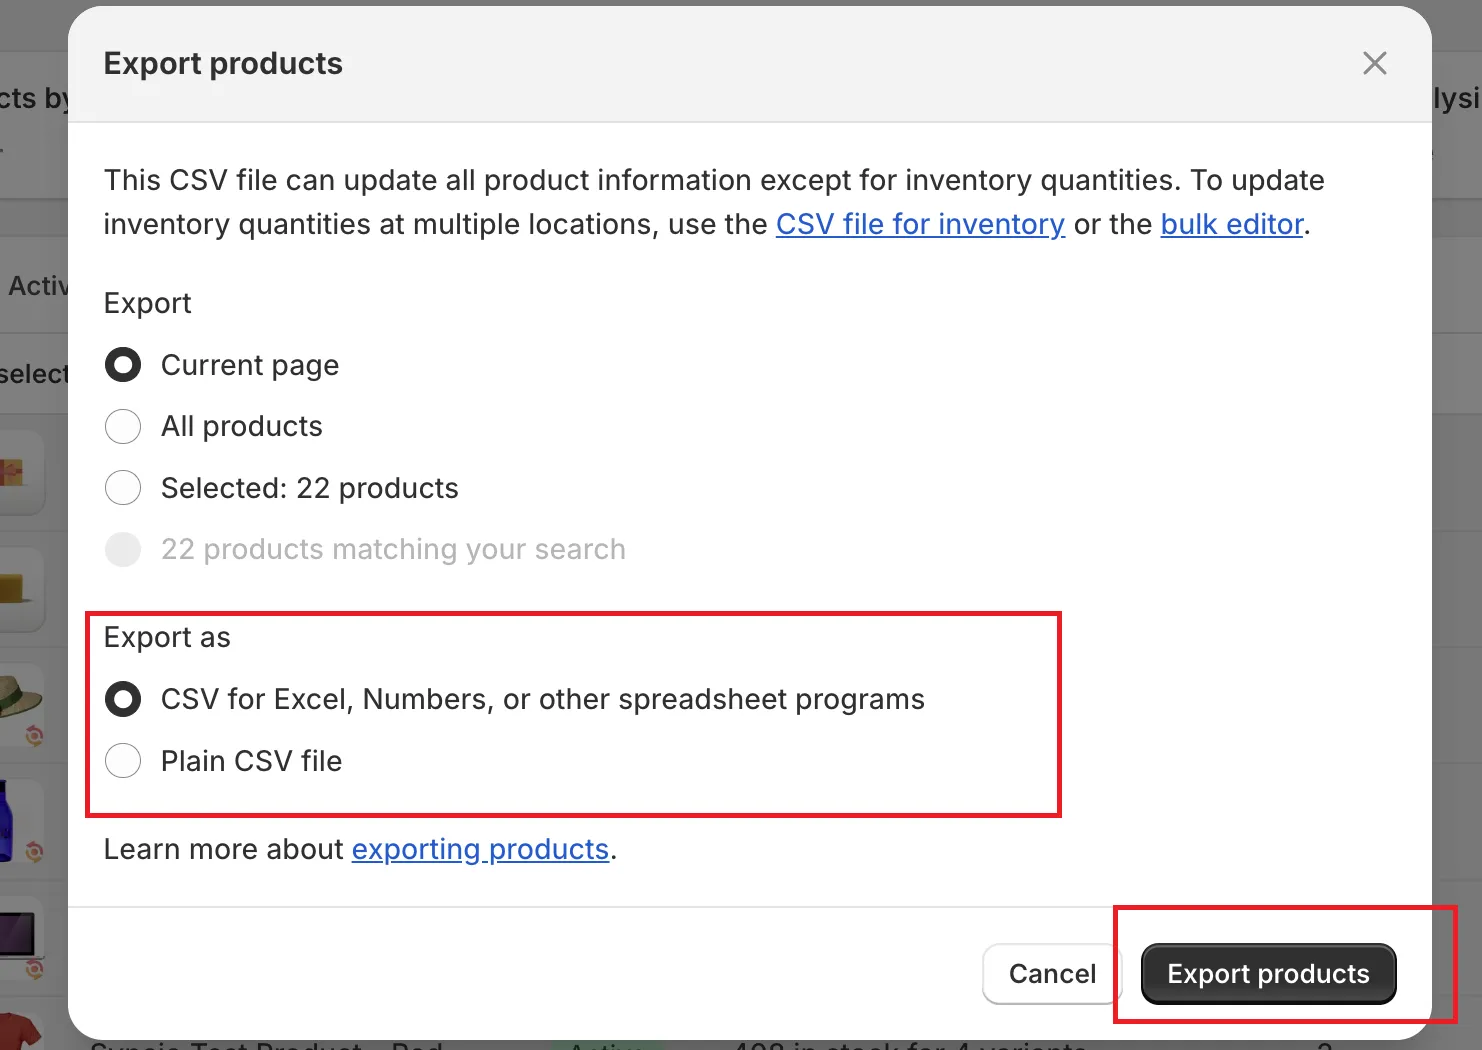
Step 2. Prepare the CSV file for import
Now, open the exported CSV file and review the column headers to ensure they match the product fields of your new store. Most importantly, double-check (or even triple-check when necessary) that the data in the CSV matches the source store’s products. Don’t forget to correct any errors where applicable!
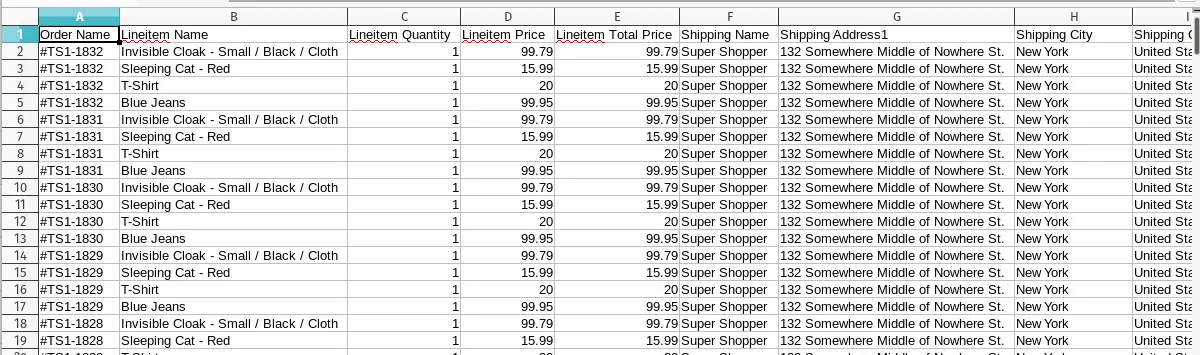
At this step, please make sure to check the product image URLs in your CSV. Shopify uses these links to download the images during import, so keep the source store and its products accessible until the transfer is complete.
Step 3. Import products into the new store
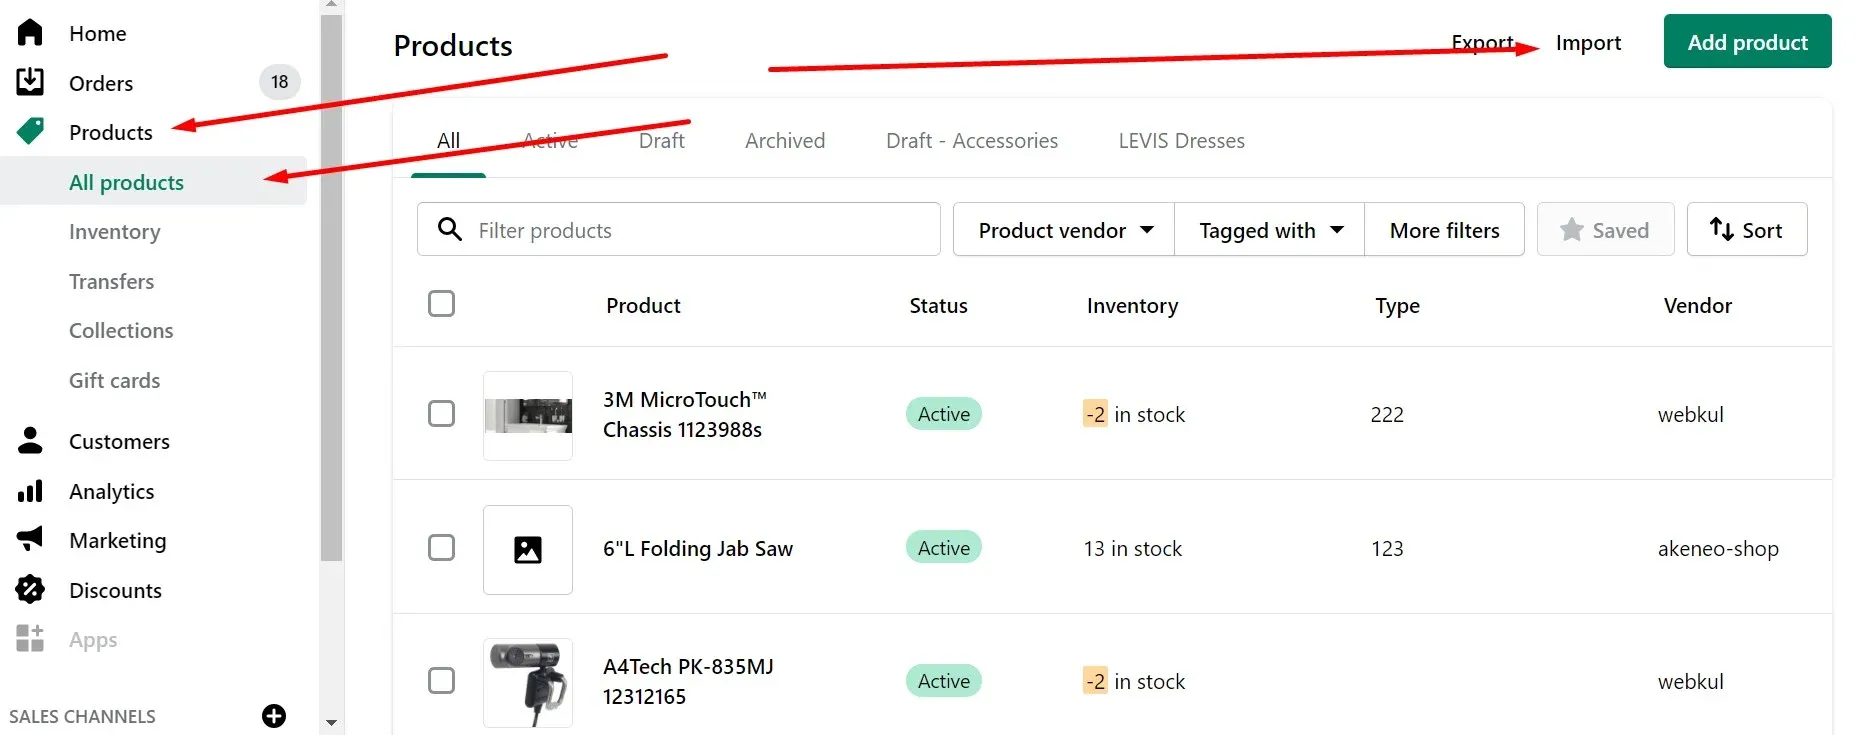
Next, as demonstrated in this Shopify tutorial, log in to the Shopify admin panel of your new store and navigate to the “Products” > “All Products” tab. Click the “Import” button in this section to attach the CSV you prepared earlier.
You’ll see two options:
- Overwrite any current products with the same handle: This option replaces existing products with the same handles in your new store.
- Publish new products to all sales channels: If you check this option, your new products will be published across all your sales channels.
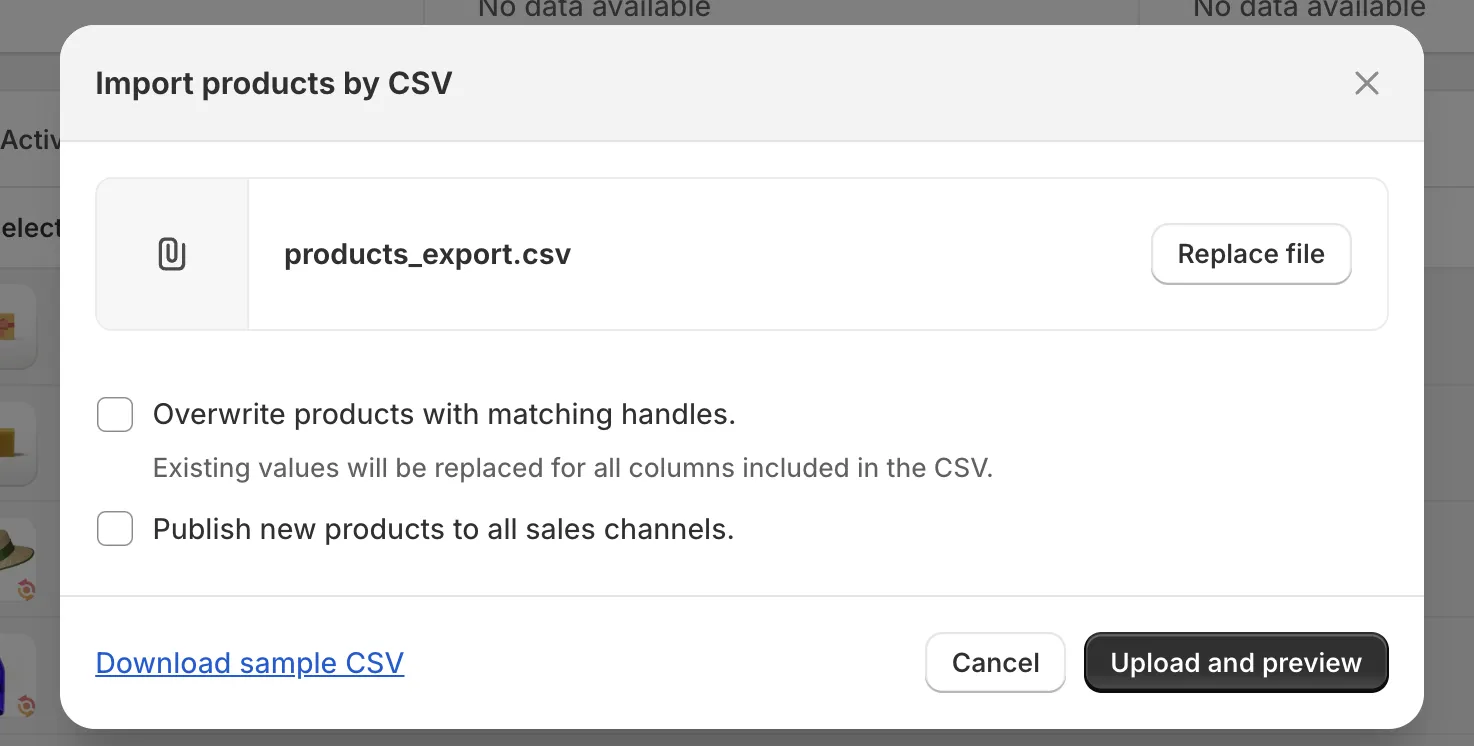
Preview the first product to confirm everything is aligned properly; once satisfied, click “Import” to transfer the product data! Shopify will process the CSV and add all these products to your second Shopify store.
Transfer Products from One Shopify Store to Another Using An App
Given the clear limitations of Shopify’s built-in Import/Export feature, it’s no surprise many merchants turn to third-party apps instead. That inspired our team to conduct tons of research and hands-on testing to help you find the best possible options.
Over the past few months, all our members have tried almost every big name out there, including StoreRobo, MigrationPro, and Matrixify. Still, we must say none of them quite hit the mark like Syncio. Unlike its one-size-fits-all competitors, Syncio is built specifically to sync between Shopify stores (and WooCommerce ones), meaning the process is smooth and straightforward.
Plus, the app is extremely budget-friendly. Their Free plan already lets you transfer up to 25 products, and if you’re looking for more, their paid plans start at just $19 a month. Not to mention, the fact that it can effortlessly transfer product descriptions and images already gives it a huge edge over Shopify’s built-in tool.
On the other hand, be aware that Syncio isn’t a 100% perfect solution: it mostly works best for medium-sized stores with relatively simple requirements. The total costs can rise up to $129/month with your product count, add-ons, and source store usage.
Still excited to give it a try? Let’s walk through how to copy Shopify store to another account with Syncio:
Step 1. Install Syncio on the Source Store
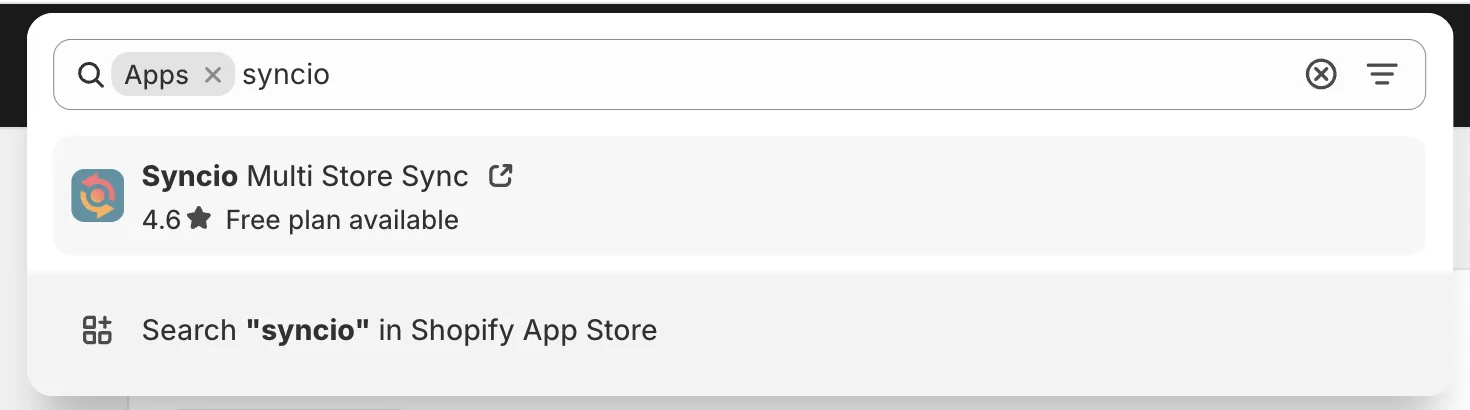
For starters, log into your Shopify Admin for the Source Store (where your products currently reside). Once done, use the search bar at the top to search for “Syncio” and select “Syncio Multi Store Sync” from the results. Click the “Install” button next to it!
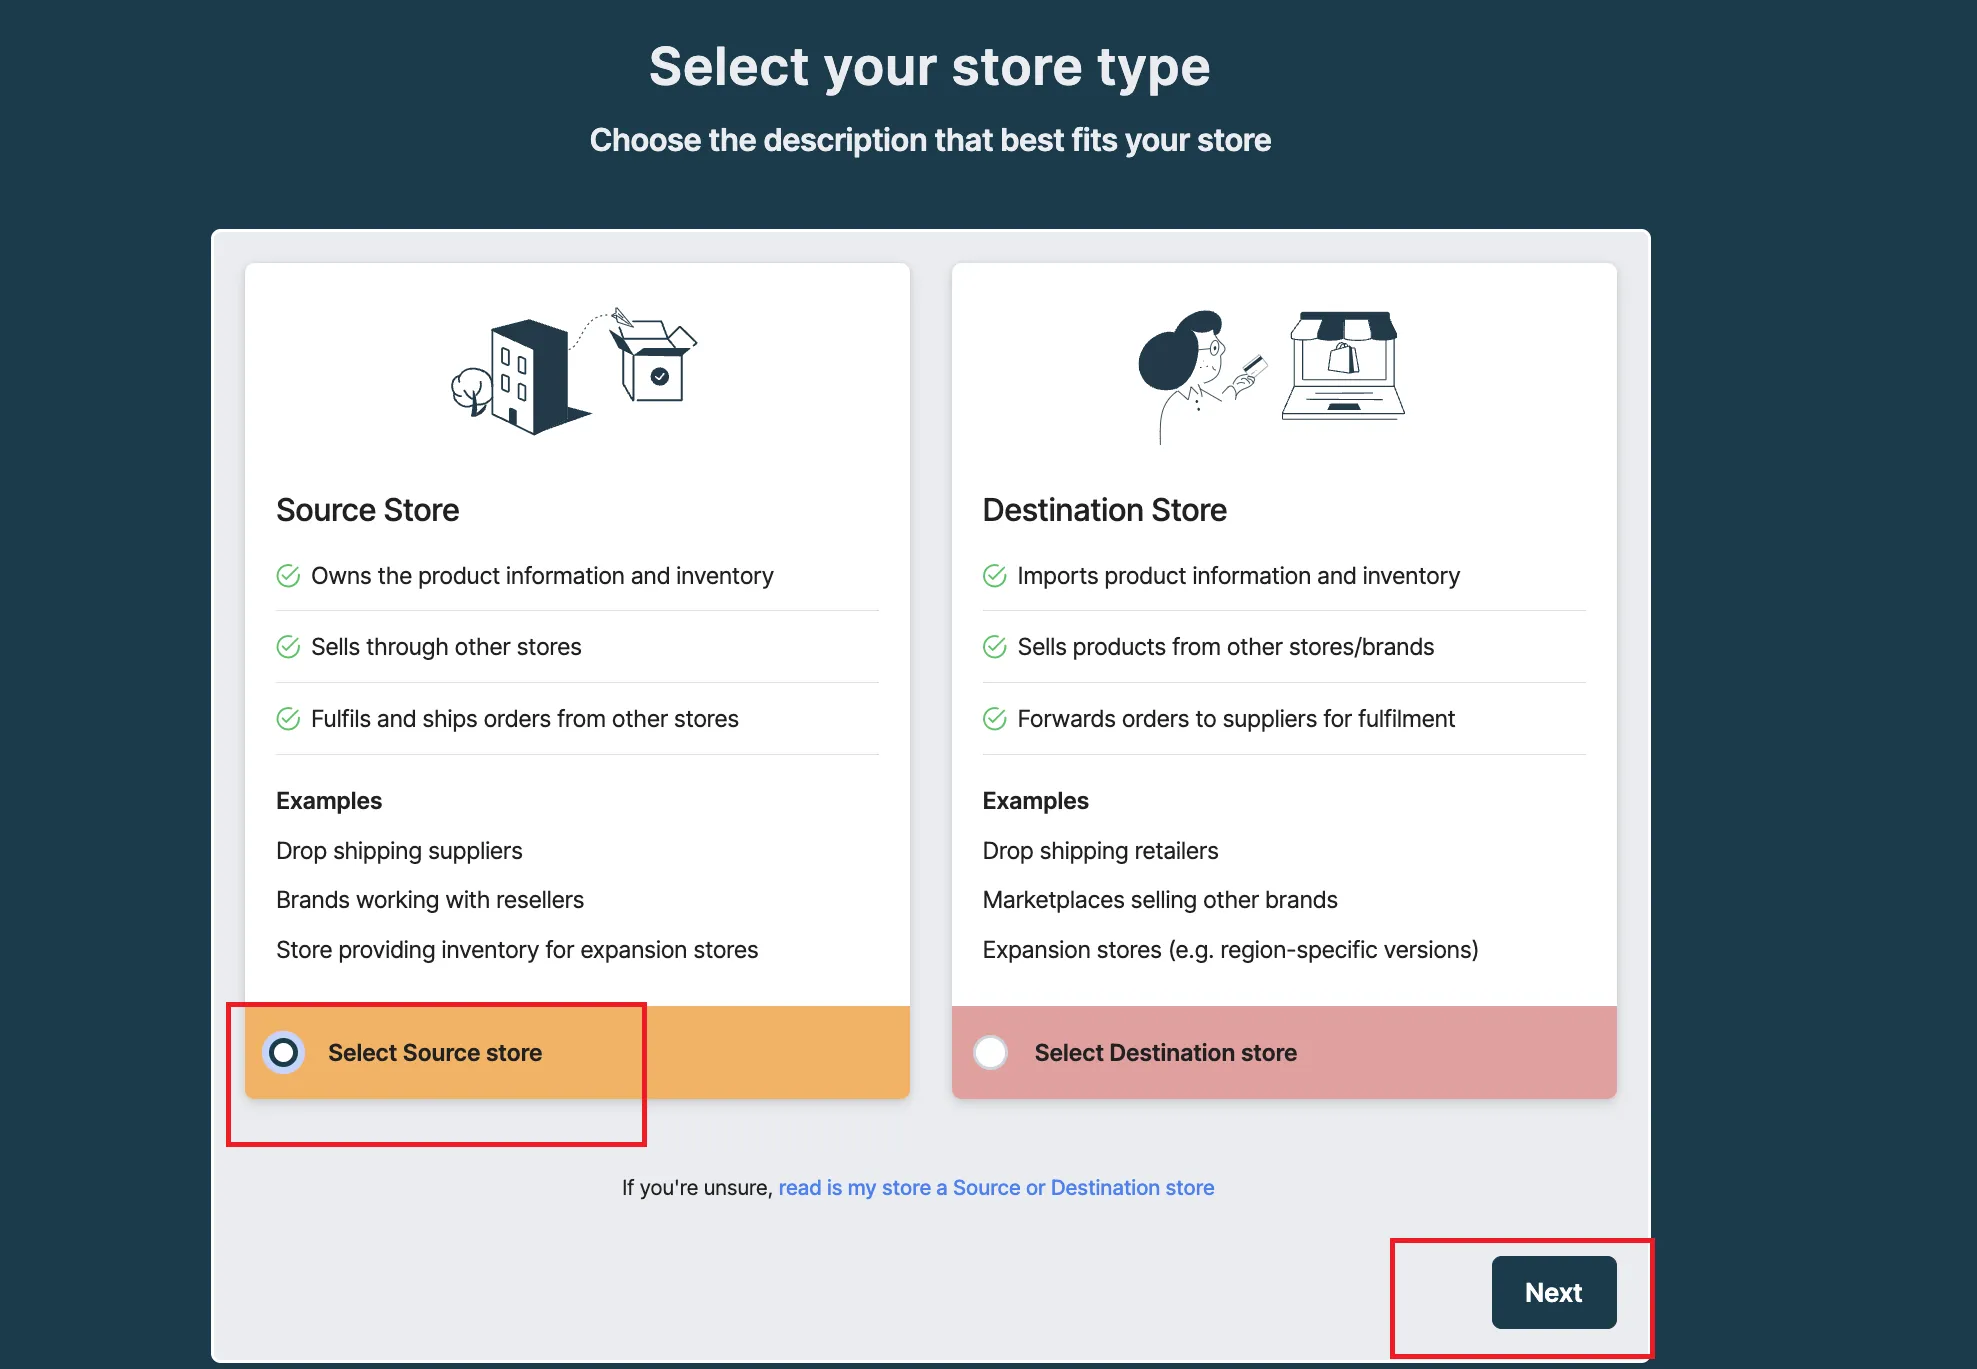
- After the app is installed, select “Source Store” and click “Next.”
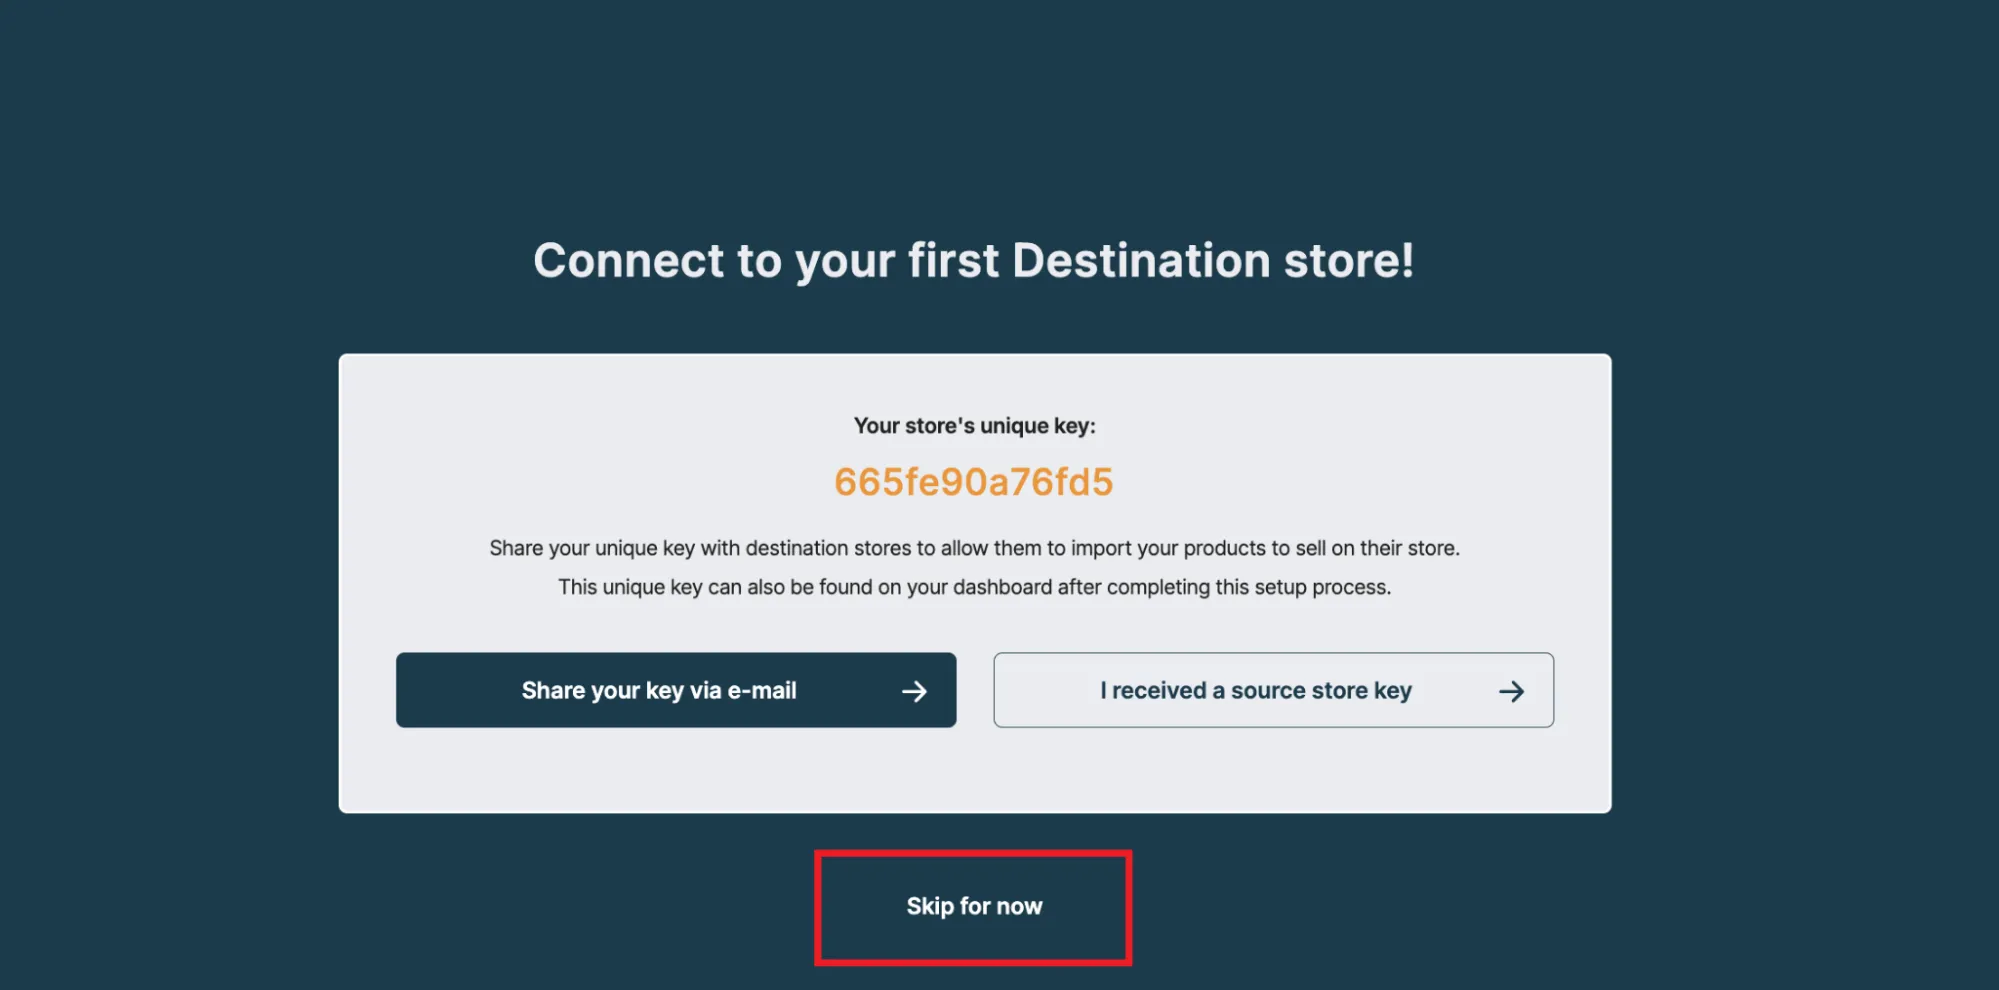
- You’ll see a page with your store’s Unique Key. Copy this key and store it safely; you’ll need it later.
- Click “Skip for now,” then select “Continue to dashboard.” And that’s it; your Source Store is ready for the product transfer.
Step 2. Install Syncio on the Destination Store
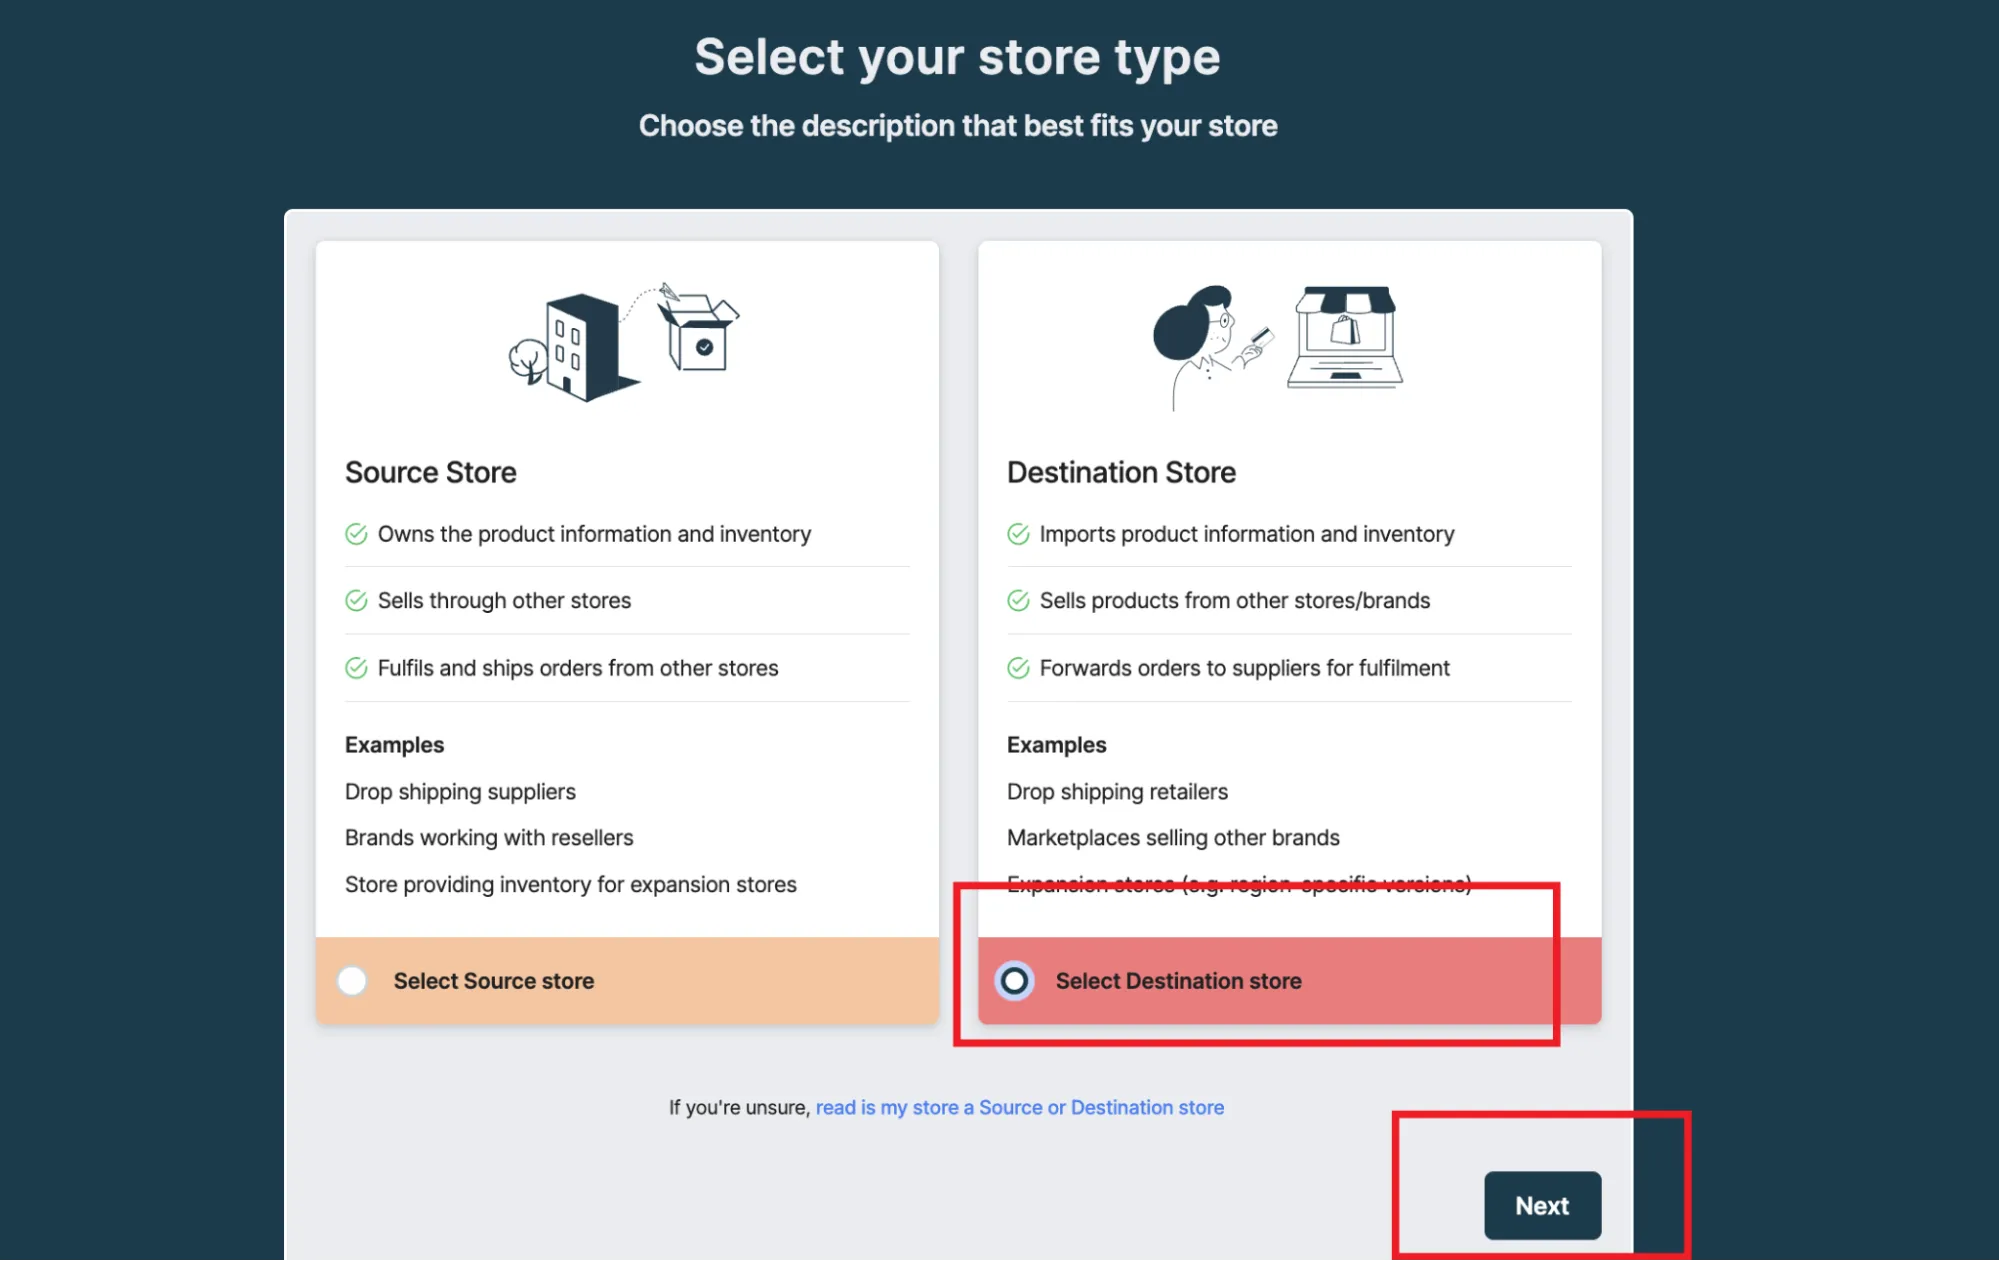
Now, log into Shopify Admin for the store where you want to transfer the products (Destination Store). Here, repeat the same steps from Step 1 to install Syncio on the Destination Store:
- Open the app, and when prompted, select “Destination Store” and click “Next”.
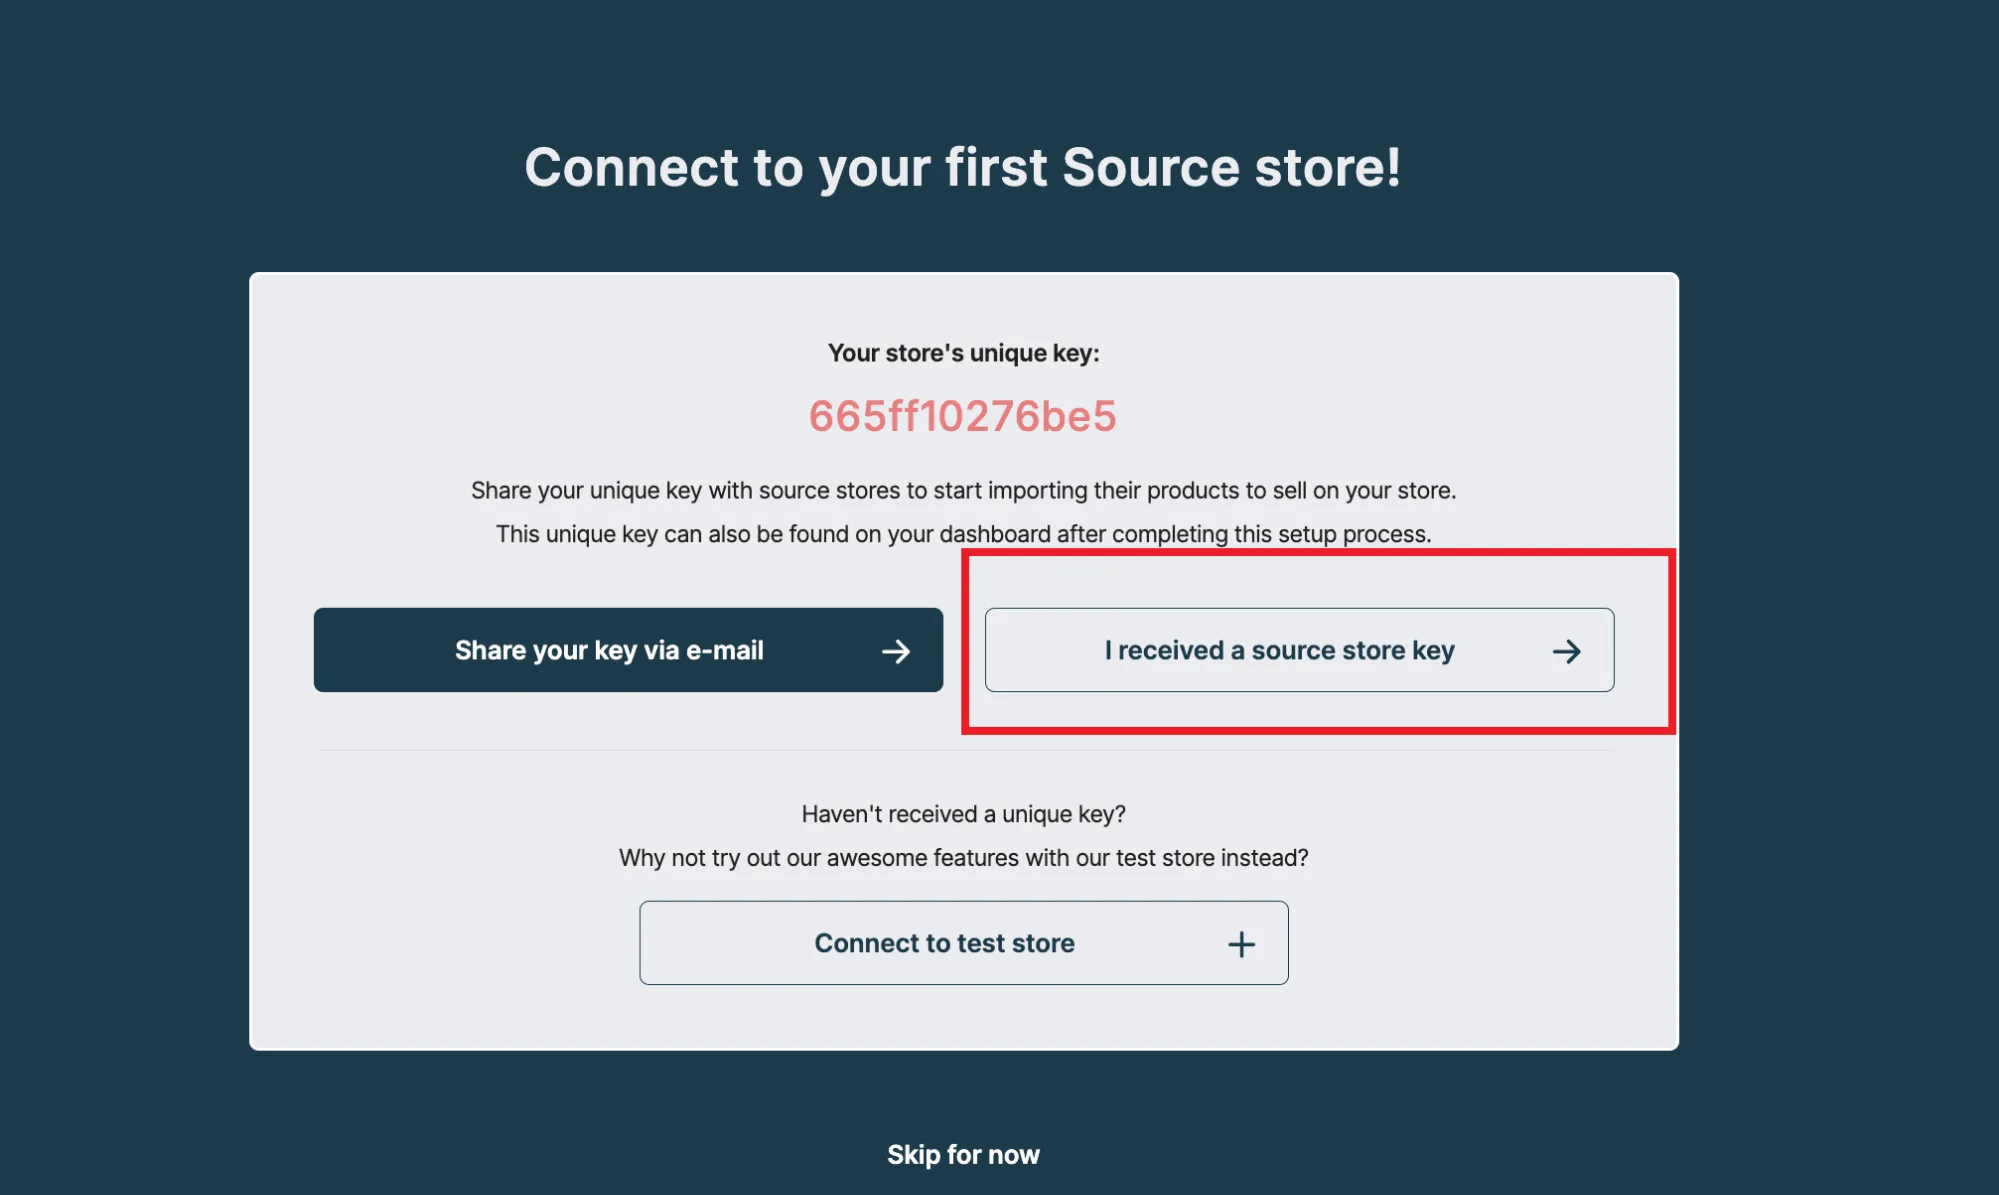
- On the next screen, select “I received a source store key.”
- Paste the Unique Key you copied from the Source Store and click “Connect.”
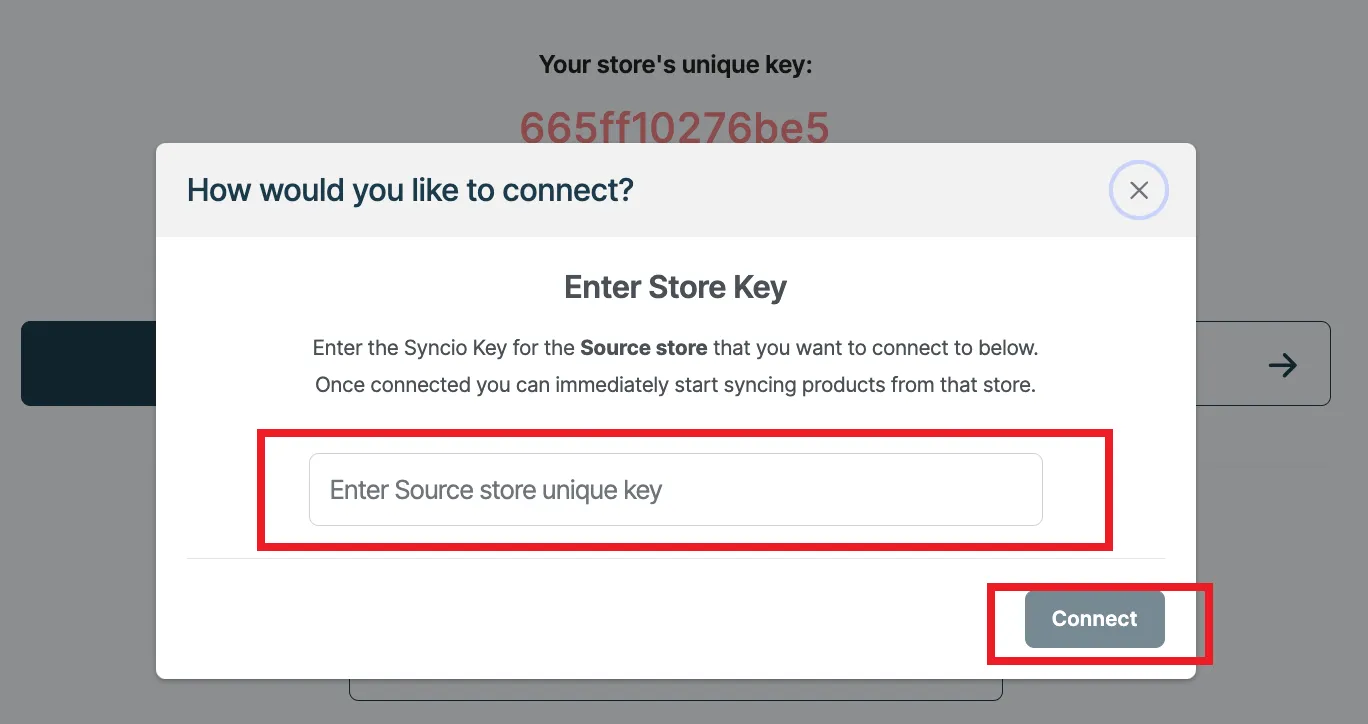
And just like that, your two stores are properly connected!
Step 3. Choose products to transfer
Next, in the Syncio Dashboard for your Destination Store, click on the “Products” tab in the left-hand menu. Then, use the “Select a Source Store” dropdown to choose the Source Store you just connected a few minutes ago!
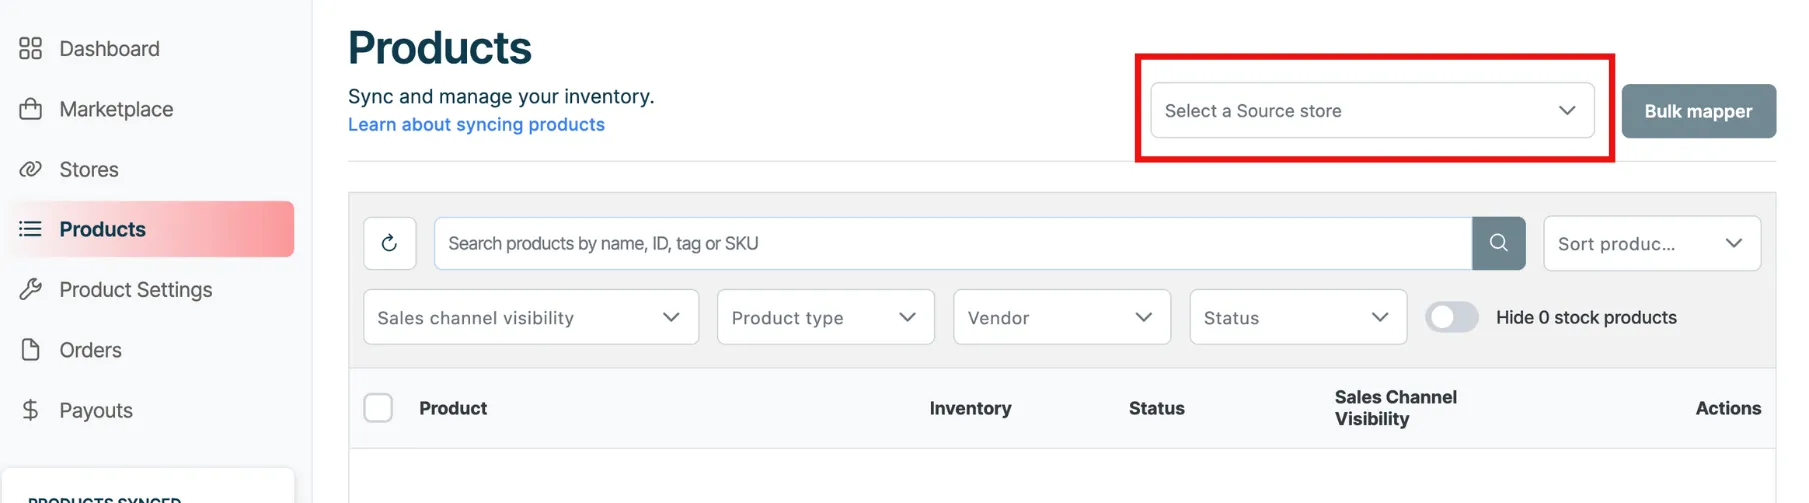
From there, you have two options:
- Transfer in bulk: Simply use the checkboxes to select all products, then click the “Sync” button at the top. You can also use filters like product name, vendor, or tag to smooth out the process.
- Transfer single products: For this option, select the checkbox next to each product you want to transfer, then click the “Sync” button.
Now, all the chosen products will be transferred with all attributes, including titles, images, descriptions, and variants!
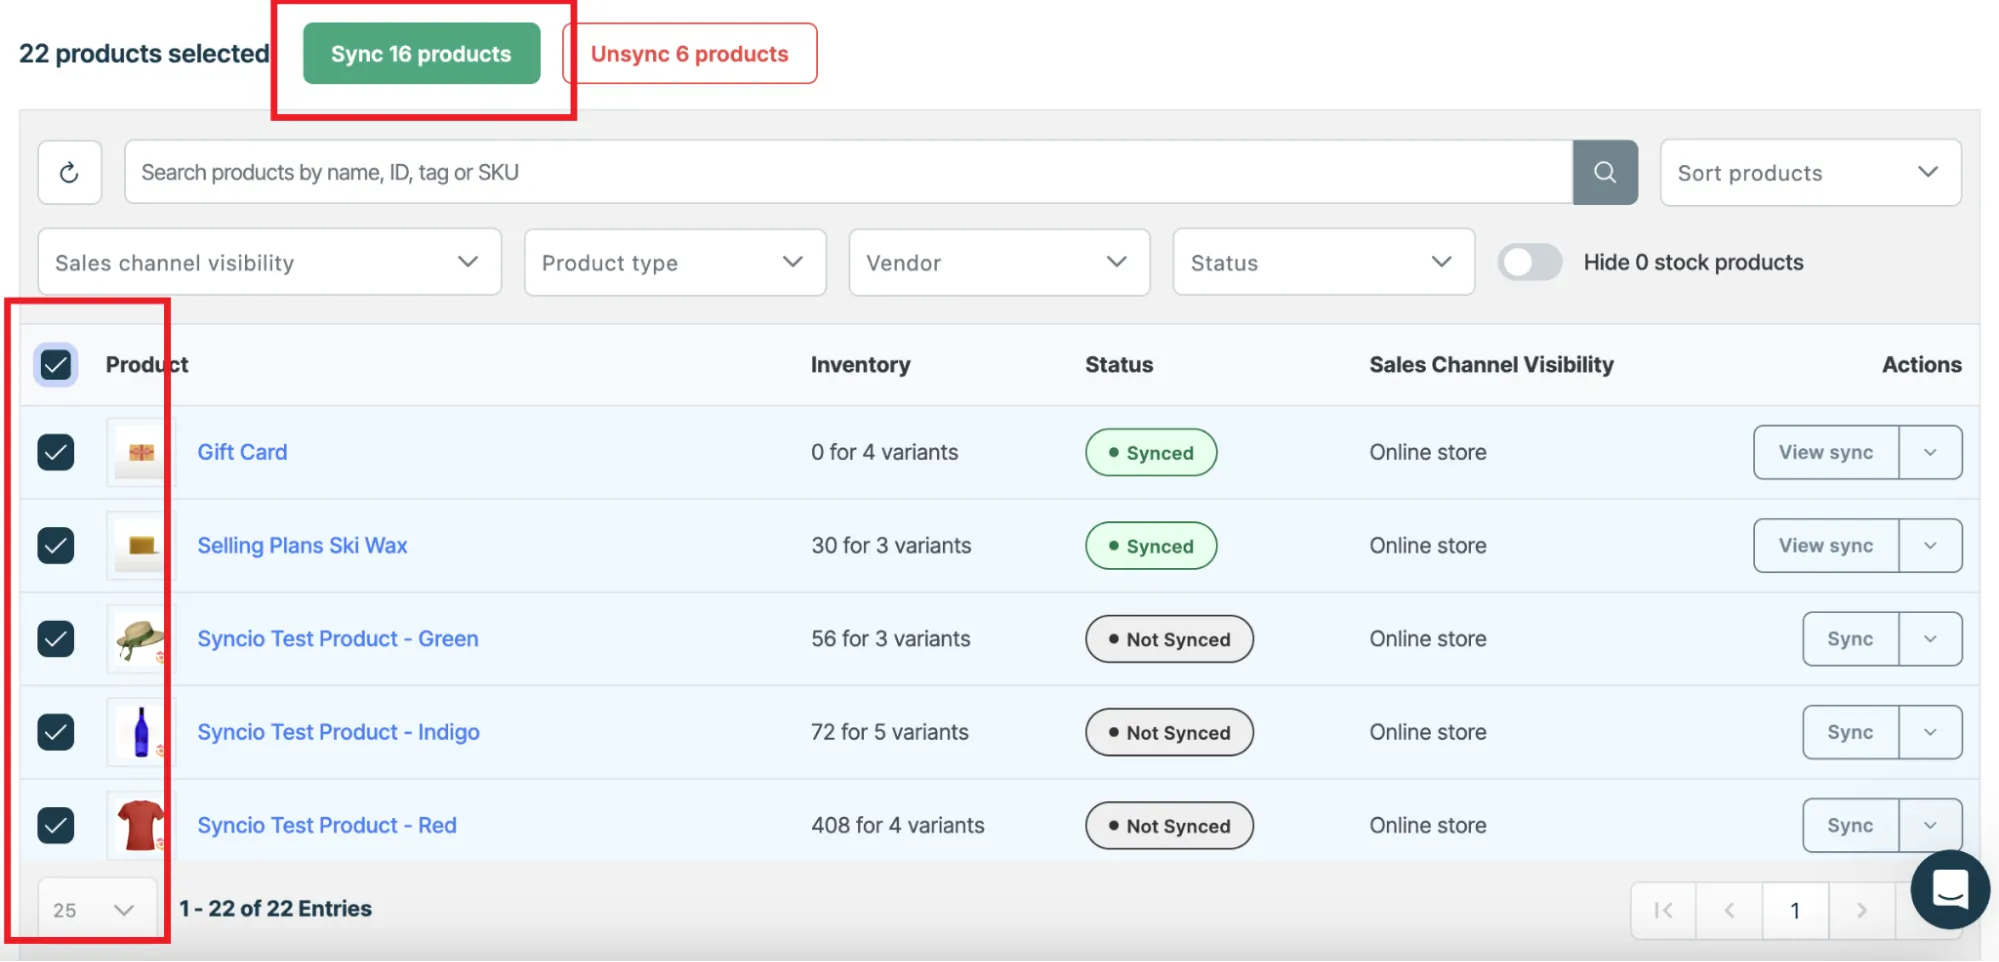
So, in just three easy steps, you’ve just nailed how to transfer products from one Shopify store to another. But if you want some adjustments to the inventory sync, we’ve got you covered with an optional Step 4 to wrap things up.
Step 4. (Optional) Configure product sync
As a rule of thumb, Syncio will automatically sync stock levels between the Source and Destination Stores whenever there are updates. But what if you want to deactivate this sync? No problem; we will show you the easiest way to turn it off:
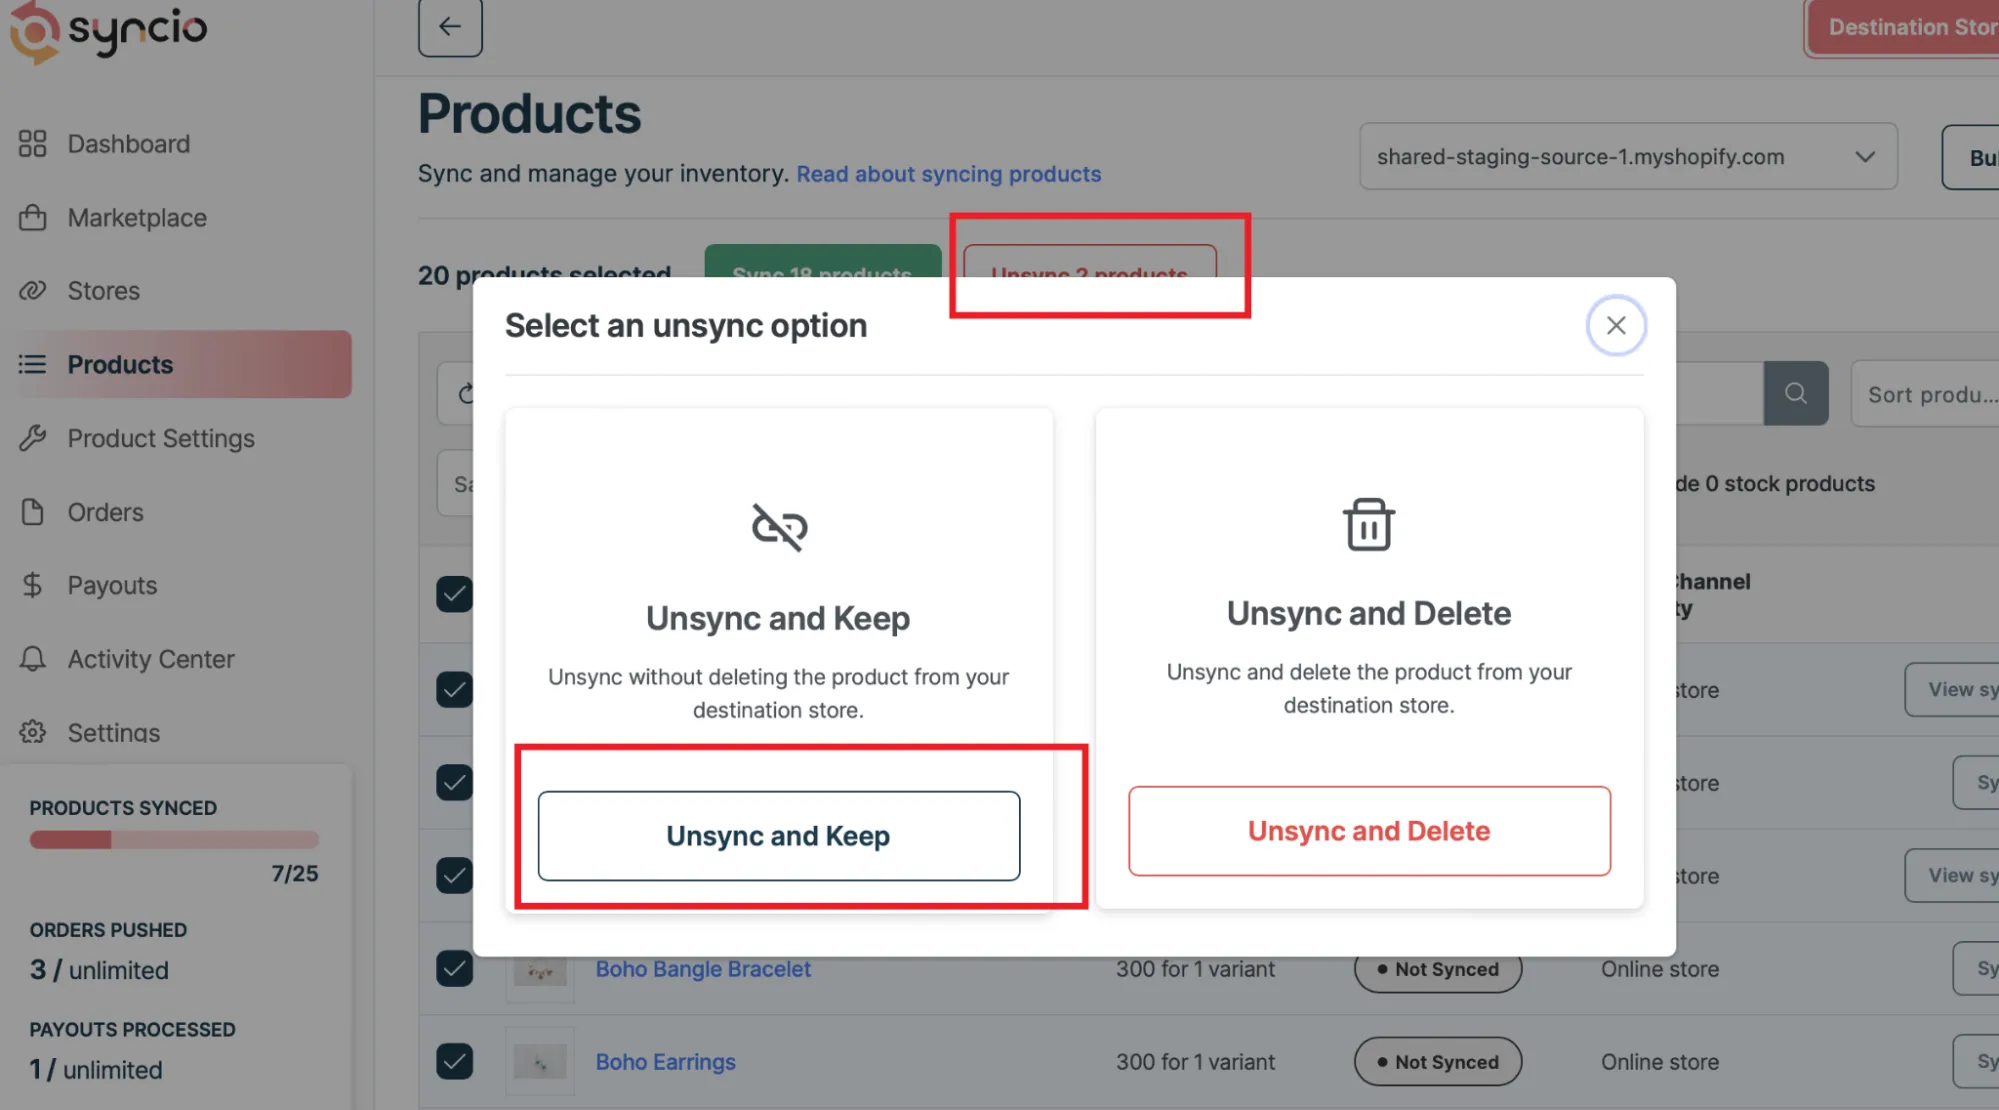
Select the products you want to stop syncing, then click the “Unsync” button at the top (right next to “Sync.”)
Choose “Unsync and Keep” so that you can still retain the products in the Destination Store without syncing.
Advanced Store Migration with LitExtension
The methods above work well for a straightforward product transfer. A larger catalog or a move that includes customers, orders, and custom fields takes more planning. You need to decide how the data should map to the new store and check that everything arrives as expected.
As an official Shopify partner with over 15 years of migration experience, LitExtension can manage that process for you through our All-in-One Migration Service. A Personal Assistant (PA) works with you from the initial review through the full transfer:

- Step 1. Consult with LitExtension experts: Share what you want to transfer and any specific requirements for your new Shopify store. Your Personal Assistant (PA) will review the scope and recommend a migration plan.
- Step 2. Map your data and prepare the Shopify store: Your PA will work on the data mapping and migration settings, then run a demo. You can review the results and request adjustments before the full migration.
- Step 3. Perform the full migration: Once you approve the demo, your PA will run the full transfer and check the data in your new store. They’ll also help address any issues found during the final review.
And our support doesn’t end when the full migration is complete. You’ll have access to post-migration services, including Recent Data Migration, Re-migration, and Smart Update, plus technical support for up to 60 days after the migration.
Let Our Experts Handle Your Shopify Migration!
With the All-in-One Migration Service, our experts take care of everything, ensuring a seamless and stress-free migration.

Extra Tips for A Smooth Shopify Product Transfer
Our guide has just explored three different ways to transfer products from one Shopify store to another.
Nevertheless, whether you settle for Shopify’s built-in tool or go all-in with LitExtension’s packages, product transfer isn’t just about product transfer. There are still a few crucial tasks to keep in mind if you want your store to run smoothly after the move:
Backup your data
Even with a well-planned transfer, we never know when something might go wrong – especially when handling custom fields or a Shopify import metafields configuration. Without a backup, you’d have to piece every data together manually, which is frustrating and incredibly time-consuming.
Fortunately, backing up your store doesn’t have to be a headache! In fact, you can totally use the same export methods we already covered earlier. Only this time, you’ll stash the file somewhere safe instead of importing it to a new store.
And here’s another pro tip: make a few extra copies in different formats (you can check how to export Shopify products here). That way, if the worst scenarios happen, you’re always one step ahead with a solid backup solution.
Update DNS settings
As its name suggests, the DNS (Domain Name System) settings tell the internet where to send your customers. If you don’t update it after the product transfer, your customers could end up on a blank page or your old store – a total disaster for your future sales!
All in all, make sure to focus on these two records: the “A” record (which directs your domain traffic) and the “CNAME” record (which handles subdomains or any other sections linked to the domain). And once you’ve made the updates, remember to double-check the web for the first 48 hours to confirm the changes have spread across all product pages.
Keep monitoring your store post-transfer
We all know it’s very tempting to sit back once the transfer is done, but hold off! Just like moving into a new house, you now need to make sure nothing got lost in the move:
- Pretend you’re a customer and test the checkout process yourself. For instance, you may add items to the cart, choose a product variant, or use different payment options. Just make sure everything flows smoothly!
- Check that all product images are showing up and descriptions are 100% correct. Also, you definitely don’t want any mysterious price changes either; everything should match what your customers expect.
- And what if the new store seems fine at the moment? Don’t let your guard down; issues might still appear much later! You should visit the site every day (or at least 2-3 times a week) to catch any potential glitches before they snowball.
FAQs
Can I copy a product from one Shopify store to another?
Definitely. A quick manual process can easily get the job done! Simply upload the product image to your second store and copy over the description. After that, make sure the prices and shipping info stay the same.
How do I transfer products from one Shopify store to another?
You can transfer products using Shopify’s Import/Export tool, though some data types might not come through. Another great alternative is the Syncio app, which can transfer up to 1,000 products between stores.
And how about a full store migration aside from product transfers? In that case, contacting migration services like LitExtension is your best bet.
How do I migrate from one Shopify store to another?
Moving between Shopify stores: If you need to transfer supported data from an existing Shopify store to a new one, explore our Shopify-to-Shopify migration solution.
With the Basic package, you can handle the entire migration yourself with simple, guided steps. Or, if you prefer to leave it to the pros, the All-in-One package lets the experts manage every single detail for you. Just pick the package that best fits your needs, and you’re all set!
Conclusion
We’ve walked you through the ins and outs of how to transfer products from one Shopify store to another.
Overall, while the built-in Import/Export tool and Syncio app certainly have their benefits, nothing quite compares to the ease of LitExtension’s migration packages. They all guarantee a smooth, hassle-free Shopify migration that leaves no stone unturned! Plus, with our team by your side every step of the way, you’ll have all the support you need to tackle any issues and start selling in your new store with total confidence.