WordPress is one of the most used platforms on the entire Internet, gaining a reputation for its easy customization, powerful features, and beautiful WordPress website designs. That being said, there might be some circumstances in which you might need to take down your site. This article will show you how to uninstall WordPress in a few simple steps.
Please keep in mind that WordPress itself has two different versions, WordPress.org & WordPress.com. However, in the scope of this article, we will solely focus on the uninstallation of the self-hosted version of WordPress. Keep reading to discover:
- Three circumstances you need to uninstall WordPress
- What to prepare before the uninstallation
- How to uninstall WordPress from a hosting service
- How to uninstall WordPress from cPanel
- What to do after the uninstallation of WordPress
- How to reinstall WordPress
Let's get started!
Why Do You Need to Uninstall WordPress?
1. Your WordPress got hacked
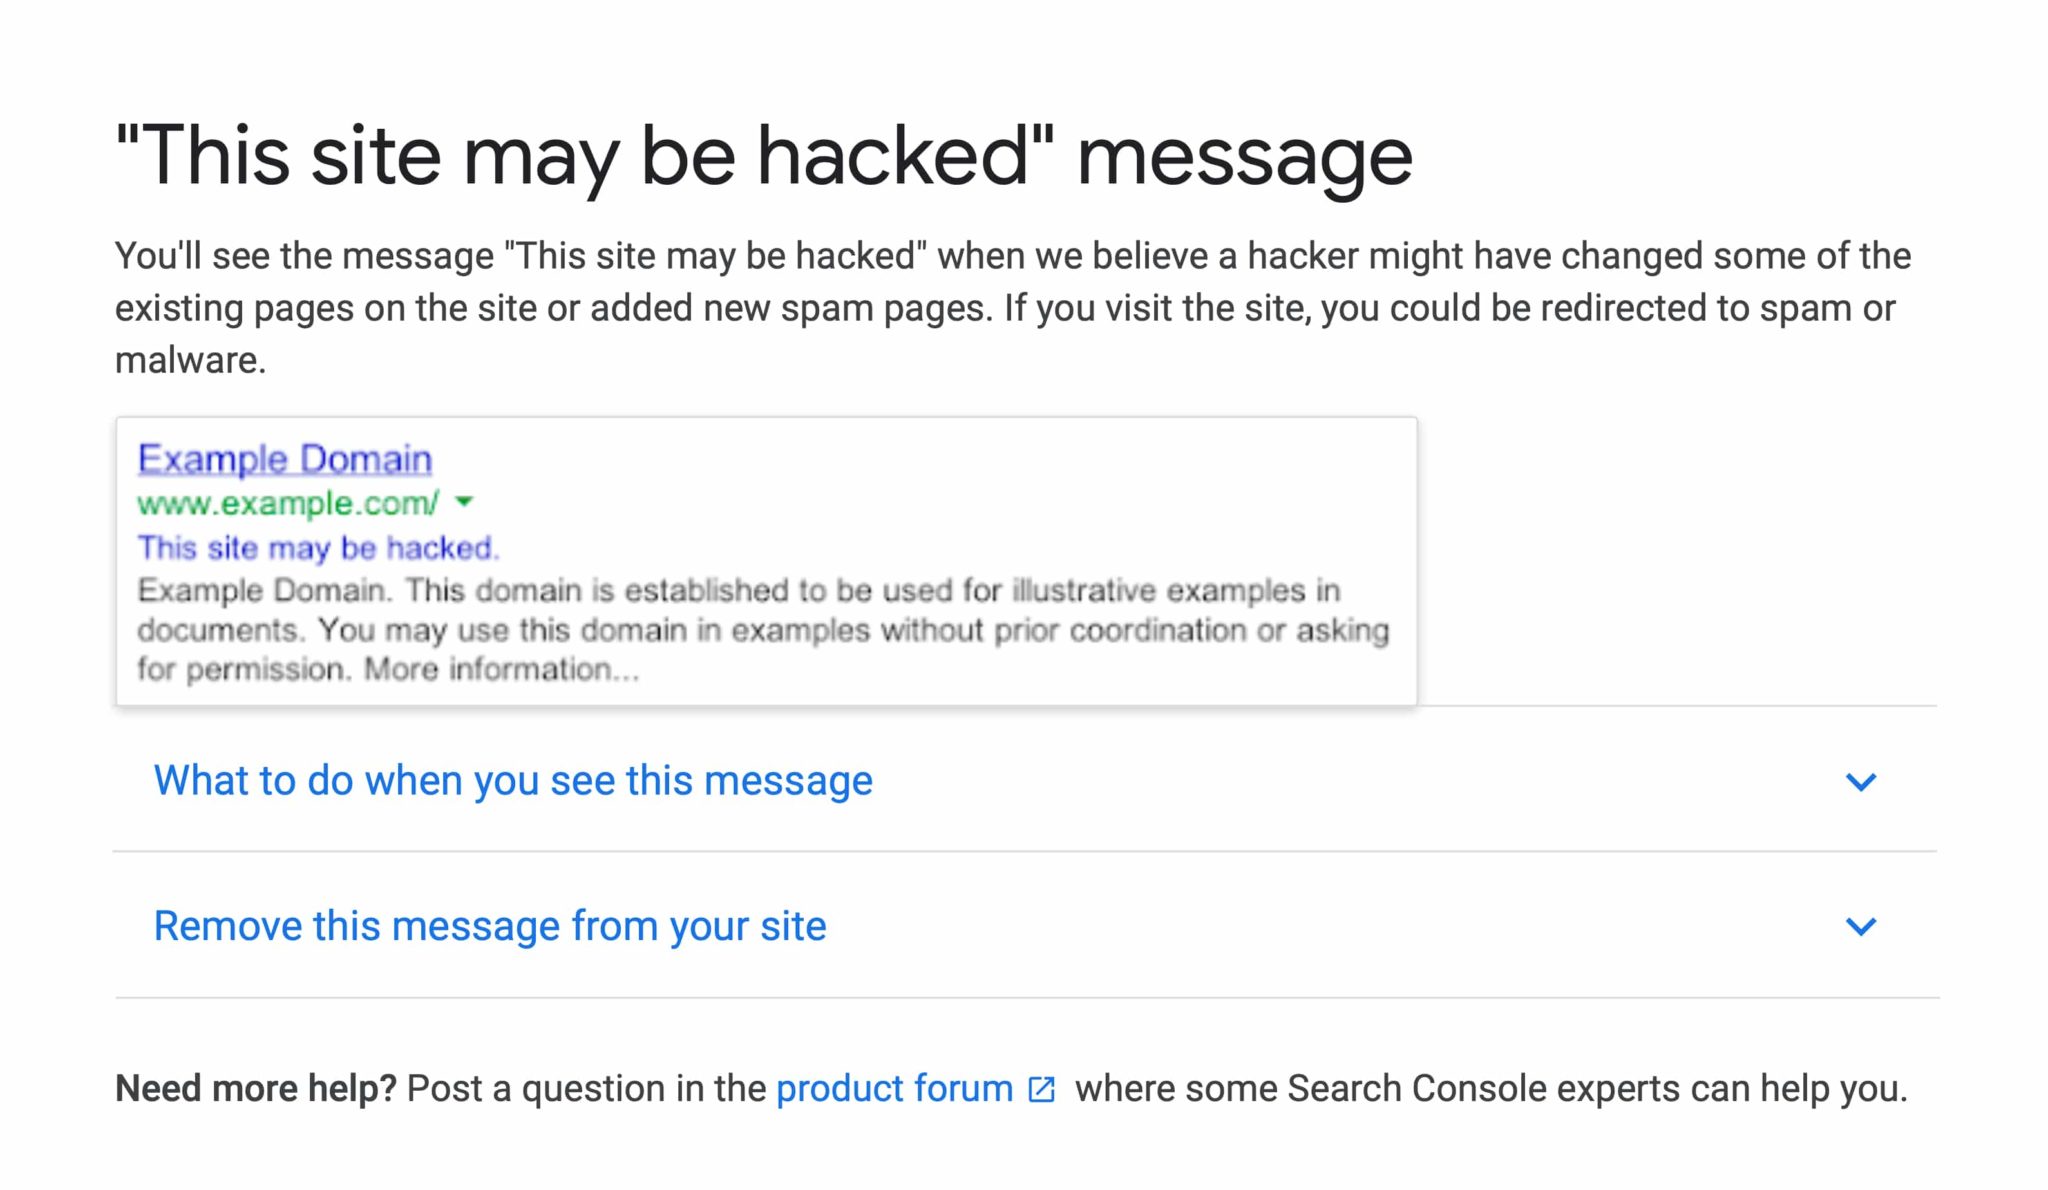
Being hacked is one of the worst scenarios that could happen to your WordPress website. The nature of open-source software allows hackers to access and corrupt your admin panel and database through WordPress plugins or add-ons. Although this negative action can come in different types, here are some warning signs to detect suspicious activities on your website.
- Search engines (Google, Bing,…) block/blacklist your WordPress website.
- The hosting providers disable your website.
- It is unable to log in/access the Admin Panel.
- Unauthorized behaviors might occur (creation of new users, sudden drop in website traffic, suspicious growth of traffic,…)
- Your WordPress website receives a red flag due to malware distribution
Different severity levels might have different damaging effects on your WordPress installer. In case of a hack, it is recommended to uninstall WordPress and begin the installation process again.
2. You want to start over from scratch
There might be problems and errors that cannot be troubleshot. Therefore, uninstalling WordPress and performing a fresh installation could be a good solution. By doing this, users can resolve the issues without affecting their website data.
Another reason to install a new WordPress software is the change in hosting provider. Each hosting provider offers different values and support at different pricing levels. Therefore, in some circumstances, you might want to switch to another service to host your WordPress website.
In this case, you need to uninstall WordPress from your current hosting and reinstall it in your new hosting destination.
3. Another platform is more suitable
WordPress is undoubtedly a top-of-the-class software developer for building a website. However, in some cases, you might find that this open-source solution is no longer a good fit. Consequently, you’ll need to uninstall WordPress and move on to another platform.
If you want to switch to a fully hosted solution, moving to Wix could be an ideal choice for building your site. Besides, if you want to build a website for your online business, consider moving to Shopify to take full advantage of its top-notch features. On the other hand, if you are familiar with open-source software and want to stick with it, you can consider using Joomla.
Store Migration Made Easy With LitExtension!
LitExtension offers great migration solutions that help you transfer your data from the current eCommerce platform to a new one accurately, painlessly with utmost security.

What to Prepare Before You Uninstall WordPress?
1. Understand the difference between deleting content only vs deleting the entire site
Before you uninstall WordPress, it's important to understand that “removing your site” can actually mean two very different things. Choosing the wrong one could either leave behind data you wanted gone or wipe out files you intended to keep. Therefore, let's clarify both options.
Deleting content only is the lighter option. This action removes your posts, pages, media, comments, and users, but it preserves your site's foundation, including your backups, SSL certificate, and site URL. In other words, your WordPress installation stays intact and ready to use, simply emptied of its content. Delete entire site, on the other hand, is the complete removal. This option wipes out your content, your database information, your backups, and every directory inside your site folder. Once it's done, nothing remains of your WordPress installation.
To put it simply: choose delete content only if you plan to keep building on the same installation, and choose delete entire site if you want WordPress completely gone. Either way, remember that both actions are irreversible, so make sure your backup is safely stored before you proceed.
2. Create 301 redirects
The 301 is a special HyperText Transfer Protocol (HTTP) status code. It indicates that the current page has been permanently moved to another location. When there are changes to your URLs, you should perform a 301 redirect to avoid the 404 Not Found error. Moreover, this action also ensures that users and search engines are automatically led to their desired destinations.
Before uninstalling your WordPress website, you may need to create redirects to preserve your current ranking on search engine results pages. It is vitally important, especially for sites with good traffic and a high position on SERPs.
There are two methods you can follow to effectively set up a 301 Redirect. If you are tech-savvy with a strong background in technology, you can manually redirect your URL by using the .htaccess file.
An important note to keep in mind is that this web server configuration file is highly sensitive to changes. Even a tiny mistake can lead to severe internal server errors to your WordPress website, so don’t forget to create a .htaccess file backup before configuration.
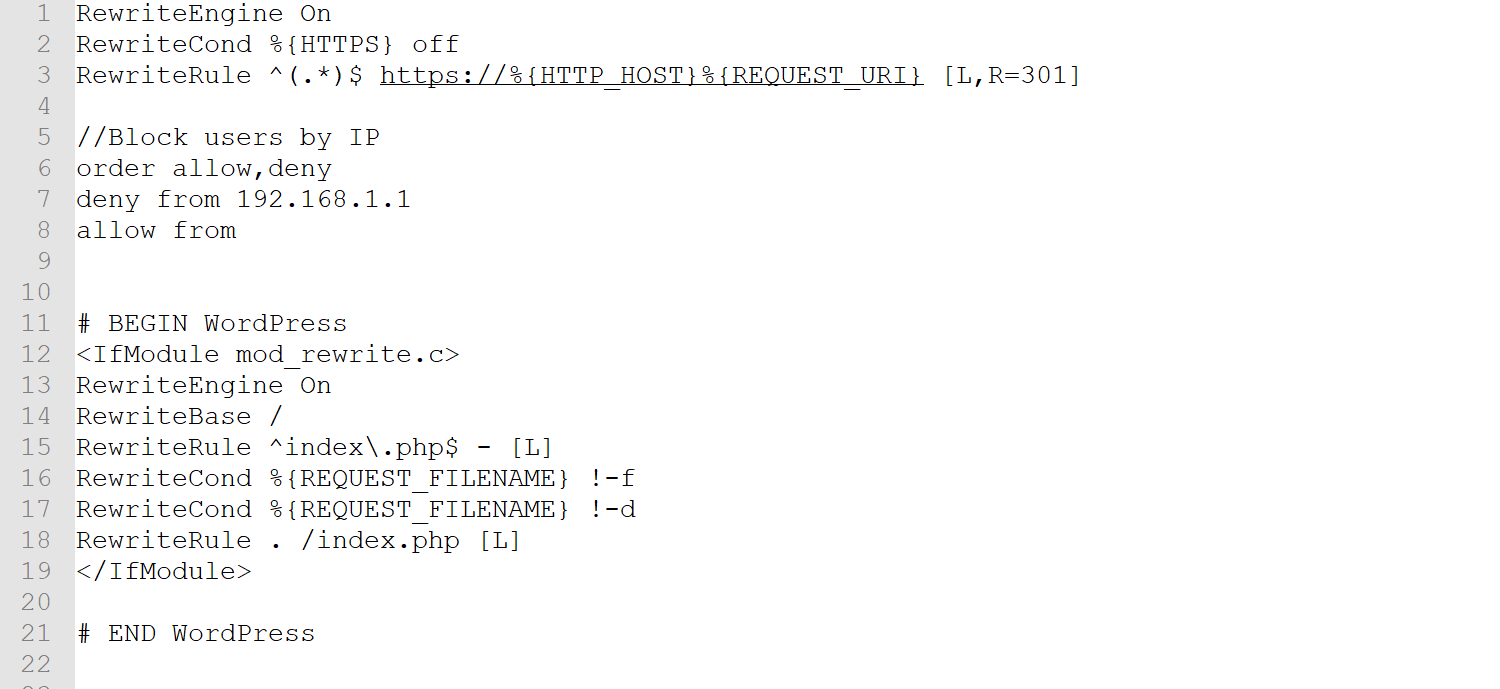
To config this .htaccess file, you need an FTP Client to access your store. Now that the connection is successful, go to your WordPress root folder, find this web server configuration file, and edit it using Notepad or any other plain text editor.
Unfamiliar with the underlying technology? Don’t worry. You have full access to a plethora of WordPress plugins in the Marketplace to assist you. These plugins will help you set up the 301 redirects and detect 404 URLs in your website. No coding or technical skills are required.
3. Backup Database
Before making any changes to your software, it is vital to create a database backup. This backup might be your savior in the event of accidents, computer crashes, or errors during updates. Besides, it can be useful when you decide to restore the old WordPress website someday.
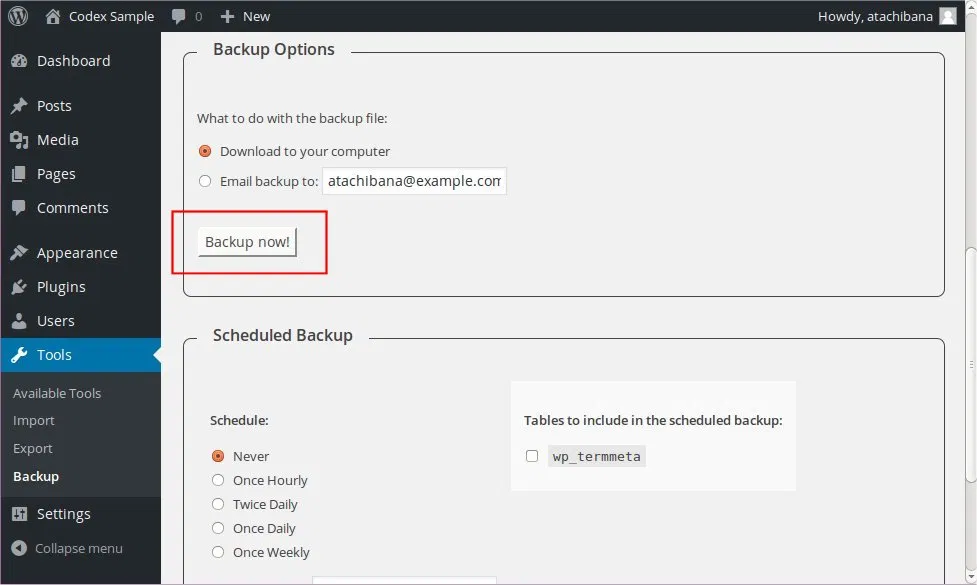
There are two things that you need to pay attention to when backing up data. The first part is the WordPress website (including the core installation, themes, plugins, images, code files, and additional static web pages). Also, you will need to back up the WordPress database. Follow these instructions to back up your WordPress site before proceeding to uninstall WordPress.
One more thing. You should save your backup anywhere you like, except for your web hosting account. It will prevent your file from being badly affected when a hack occurs. You can keep your backup file on your computer, on a separate storage device, or upload it to a cloud storage provider like Google Drive or Dropbox.
Now that you have successfully backed up your website, you are ready to uninstall WordPress. You can perform it manually by using the cPanel or delete this software from your hosting dashboard.
Learn through real-world examples:
- WordPress SEO Migration: How to Perform and Checklist
- How to Migrate Magento to WordPress with LitExtension?
- How to Backup WordPress Site with 3 Methods (Latest Guide)
How to Uninstall WordPress from a Hosting Service?
1. Uninstall WordPress Bluehost
To uninstall WordPress from Bluehost hosting, follow these steps:
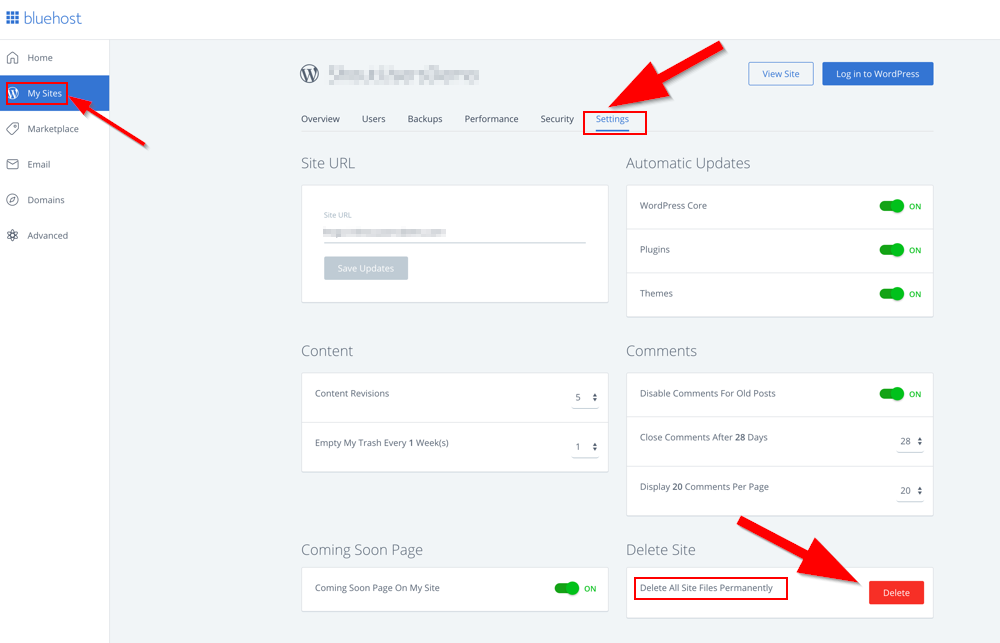
- Log in to your Bluehost Admin Dashboard
- Navigate to My Site > Manage Site
- In your WordPress installation interface, switch to Settings.
- Find the Delete section at the bottom of the page.
- Choose Delete and confirm the site deletion.
2. Uninstall WordPress GoDaddy
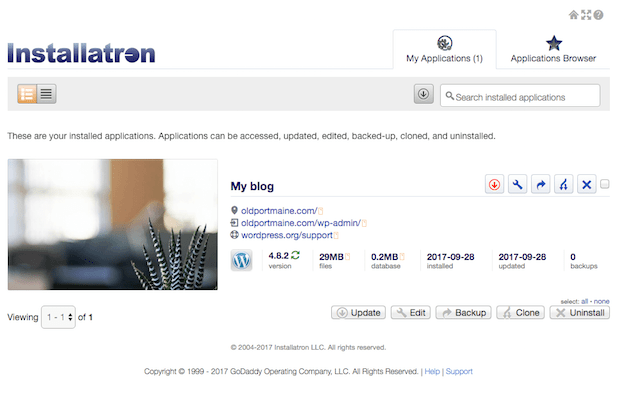
- First, Log in to the GoDaddy Admin Dashboard
- In the Web Hosting section, choose Manage, then go to the cPanel main page
- Go to Web Application, select
- Choose the WordPress website you intend to delete, then select Uninstall.
3. Uninstall WordPress Hostinger
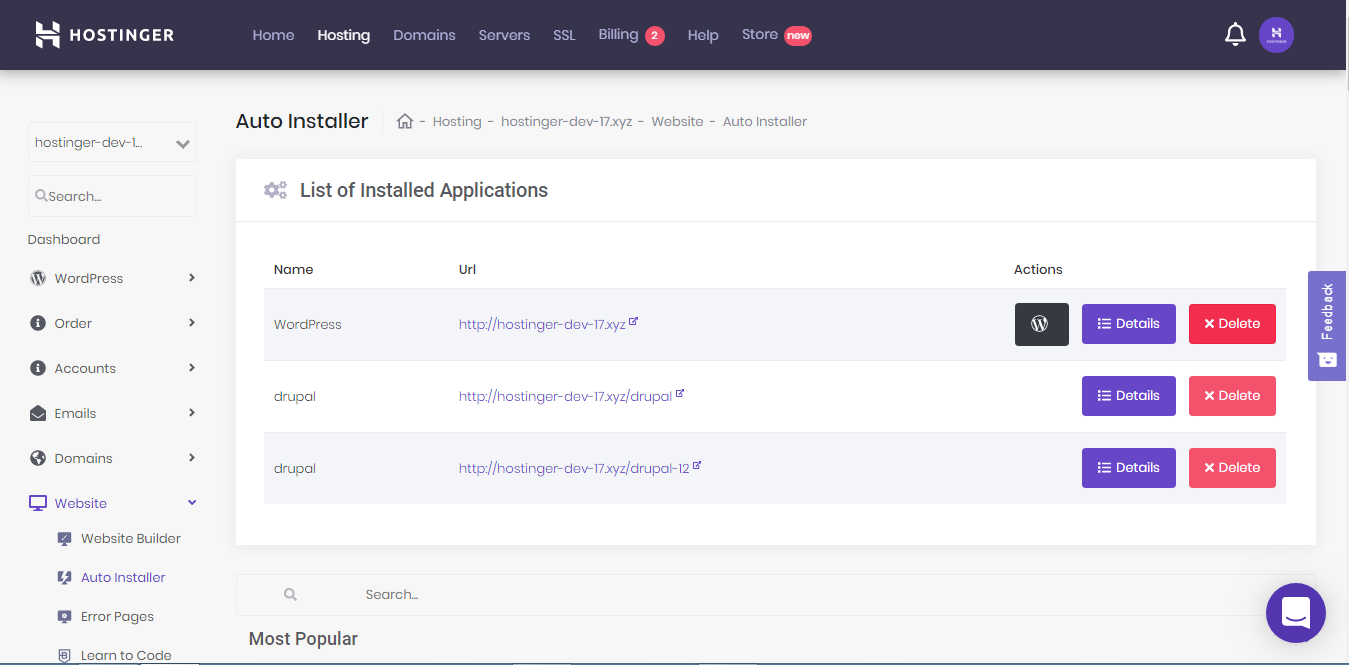
- Sign in to your Hostinger CPanel
- Choose the Auto Installer option in the Website section
- Find WordPress in the List of Installed Applications, then select Delete
- Choose Confirm in the confirmation screen to proceed
Now that the uninstallation process is completed, your WordPress website will be inaccessible. You will encounter the 403 Forbidden error when connecting to WordPress. Please note that uninstalling WordPress from any hosting provider will automatically erase all of your WordPress data and current settings. So make sure to keep a backup in store for unexpected conflicts and problems.
How to Uninstall WordPress from cPanel?
cPanel is an online graphical user interface (GUI). It is designed as a control panel to simplify the website hosting process. cPanel enables users to publish websites, manage domains, and create and organize web files. Several hosting providers automatically distribute cPanel in their hosting package.
Below is a step-by-step tutorial to uninstall WordPress from your cPanel.
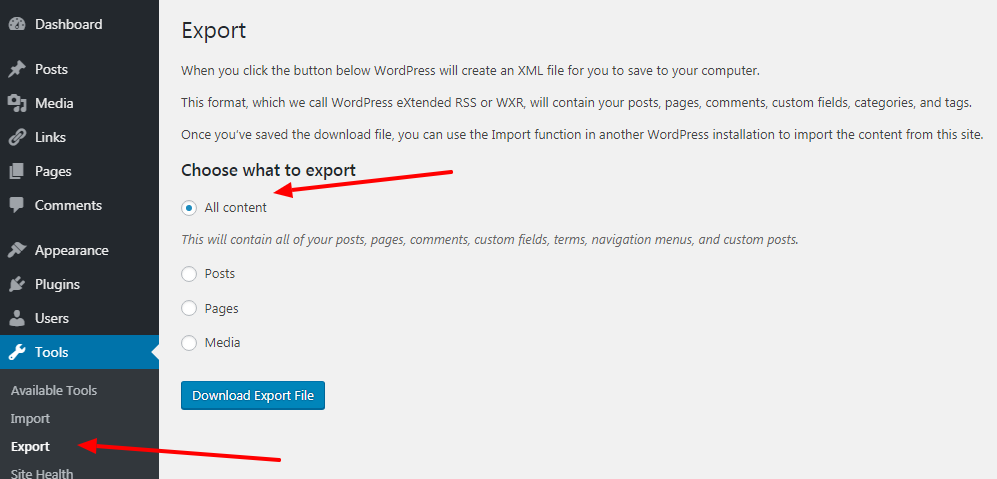
Step 1: Export content
- Log in to the WordPress Admin Panel.
- Go to Tools > Export in the menu bar.
- Navigate to Choose what to export section, then put a tick to All Content
- Choose Download Export File at the bottom of the page.
- Your content will be exported as an XML file.
This step only creates a backup of all the content on your website, excluding plugin data. In order to secure your themes, add-ons, and other media files, scroll down for the next step of this tutorial. For more information, please check out our article on how to export WordPress posts here.
Step 2: Download the wp-content folder
The wp-content folder contains all of your other website data besides content. By downloading this folder, you will save lots of time uploading the media files later. Furthermore, this action also helps to preserve your SEO score on search engines.
To download the wp-content folder, you need to use cPanel.
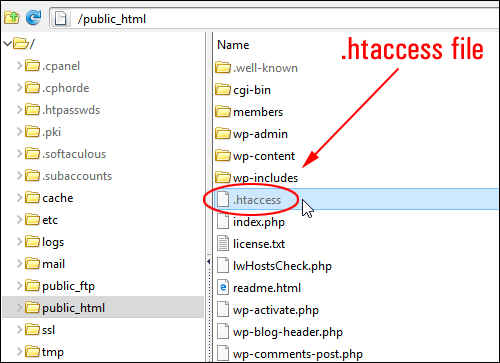
- After signing in to your cPanel account, open the File Manager.
- Open the public_html folder in the menu bar on the left.
- Navigate to the wp-content in the directory.
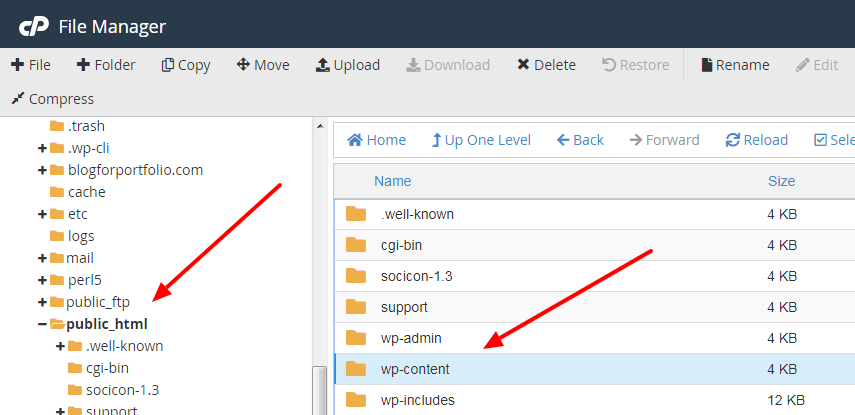
- Right-click on this folder and choose Compress.
- In the Compress pop-up, select Zip Archive as Compression Type.
- Hit the Compress File(s) button. Then, wait for it to download.
Step 3: Properly uninstall WordPress
After backing up your data, it’s time to wipe out all files and folders from the directory.
- Enter your File Manager.
- Choose Select All in cPanel's navigation menu
- Click Delete in the main menu
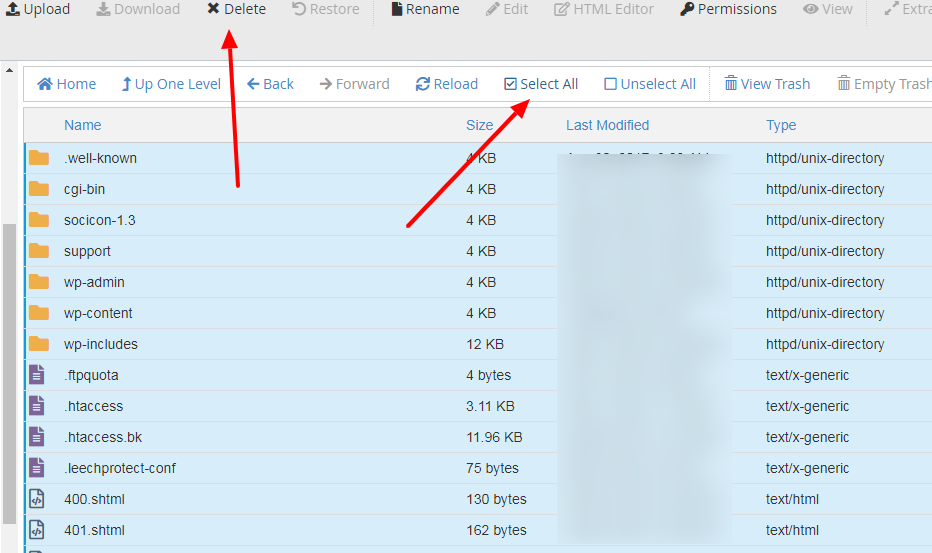
- Hit the confirmation button in the pop-up screen to completely erase all your WordPress data.
Please keep in mind that this action is irreversible. Once you decide to proceed, you cannot restore the deleted data on your WordPress website. That’s why it is vital to keep a backup of your important information.
Step 4: Delete the WordPress database
Deleting your WordPress files is only half of the job. Your website's content, including posts, pages, users, and settings, actually lives in a MySQL database that sits separately from those files. Therefore, to completely uninstall WordPress and avoid leaving orphaned data behind, you'll need to remove this database as well.
Not sure which database belongs to your site? You can confirm it by checking the wp-config.php file in your WordPress root folder, which contains the database connection details that identify the correct one (iPage).
Once you've identified the right database, follow these steps:
- Log in to your cPanel account.
- Scroll to the Databases section and open MySQL Databases.
- Find your WordPress database in the Current Databases list.
- Click Delete next to the database you want to remove.
- Confirm the deletion when prompted.
Now that both your files and your database are gone, WordPress has been completely removed from your hosting account. Please keep in mind that this action is irreversible, so make sure your backup is safely stored before you proceed. If you ever plan to rebuild the site, you can simply create a fresh database and reinstall WordPress from scratch.
What To Do After Uninstalling WordPress
Successfully removing WordPress isn't quite the end of the process. Once your files and database are gone, there are a few important follow-up actions that will protect your SEO, tidy up your hosting account, and set you up for whatever comes next. Therefore, don't close your dashboard just yet; let's walk through what to do after you uninstall WordPress.
1. Confirm your 301 redirects are working.
If you set up redirects before uninstalling, now is the time to test them. Visit a few of your old URLs and make sure they point to the right destinations rather than returning a 404 error. This step preserves the SEO value you worked hard to build and keeps both users and search engines from landing on dead pages.
2. Check your hosting and domain status.
Uninstalling WordPress does not cancel your hosting plan or your domain registration. Consequently, if you no longer intend to use them, you'll need to cancel each one separately. On the other hand, if you plan to build a new site, your hosting and domain are ready and waiting.
3. Remove leftover files and databases.
Sometimes a manual uninstall leaves behind stray files, unused databases, or old backups in your hosting account. Take a moment to scan your File Manager and MySQL Databases section, then clear out anything you no longer need. This frees up storage space and keeps your account clean.
4. Decide on your next step.
With WordPress fully removed, you essentially have a blank canvas. You might reinstall a fresh copy of WordPress, switch to a hosted solution like Wix, or move your online store to a platform such as Shopify. Whichever direction you choose, make sure the backup you created earlier is safely stored, since it holds the content you may want to bring with you.
In short, the steps to uninstall WordPress are really just one stage in a larger transition. By verifying your redirects, reviewing your hosting, and clearing out leftovers, you'll close this chapter cleanly and be ready to start the next one with confidence.
Bonus Reading: How to Reinstall WordPress
In many cases, learning how to uninstall WordPress is only half of the story. If you're clearing out a broken installation or fixing stubborn errors like locked MySQL tables, you'll likely want to reinstall a fresh copy afterward. Therefore, here's a quick overview of how the reinstallation process works once your old version is gone.
Step 1. Set up a fresh database
Rather than reusing the old one, it's often cleaner to create a new MySQL database along with a new username and password through your cPanel. To do this:
- Log in to your cPanel, open MySQL Databases
- Enter a name in the Create New Database field, and click Create Database.
- Next, scroll down to MySQL Users, add a new user with a strong password, and click Create User.
- Finally, under Add User to Database, select your new user and database, grant All Privileges, select Make Changes, and save.
Step 2. Upload a clean copy of WordPress.
- Head to WordPress.org/download and download the latest version, then unzip the file on your computer.
- Connect to your site using an FTP client or cPanel's File Manager.
- Navigate to your root folder (usually public_html), and upload the contents of the unzipped WordPress folder there.
- Visit your domain, and WordPress launches its setup wizard, asking for database details.
Step 3. Run the WordPress installation
- On the setup screen, enter the database name, username, and password you created in Step 1. L
- Leave the host field as localhost unless your provider specifies otherwise.
- Click Submit, then Run the install.
- Fill in your site title, admin username, password, and email.
- Click Install WordPress, and log in to your fresh admin dashboard with the credentials you just set.
Step 4. Restore your content and media
- Using FTP or File Manager, re-upload your saved /wp-content/uploads/ folder (your images and media) and your theme files in /wp-content/themes/ to the matching folders on your new installation.
- Then, in your WordPress dashboard, go to Tools > Import.
- Install the WordPress importer, and upload the XML export file you downloaded before uninstalling.
- Check the Download and import file attachments box, then run the import.
Uninstall WordPress – FAQs
Does uninstalling WordPress delete my content permanently?
Yes, uninstall WordPress removes your files and, when you delete the associated database, your posts, pages, and settings as well. This action is irreversible, which is why creating a backup beforehand is essential. As long as you've exported your content and saved your wp-content folder, you can restore everything later even after a full uninstall.
Will uninstalling WordPress cancel my hosting plan or domain?
No. Removing WordPress only deletes the software and its data from your account; it does not cancel your hosting plan or your domain registration. If you no longer need them, you'll have to cancel each one separately through your hosting provider. Otherwise, both remain active and ready for a new installation.
Should I uninstall WordPress to fix errors, or is there a better option?
Uninstalling should generally be a last resort rather than a first response. Most common WordPress errors are fixable through troubleshooting, and a full uninstall is best reserved for situations like an unrecoverable hack or persistent issues that nothing else resolves. If you do reinstall afterward, you can restore your backed-up data and pick up where you left off.
Conclusion
To sum up, if you want to reinstall a fresh version of WordPress or you need to get rid of a hacked WordPress website, uninstalling your current version of this software is necessary.
These WordPress tutorials have demonstrated two main ways you can use to uninstall WordPress. You can either delete your website data directly from your cPanel or use your hosting provider's auto-installer to remove this software.
Don’t forget to create 301 redirects for your website before uninstalling WordPress. This action will maintain your SEO score and keep your current ranking on search engine results pages. Furthermore, a database backup is crucial for restoring your data in case of errors or conflicts.
Last but not least, should you have any questions or concerns regarding the uninstallation of WordPress, don’t hesitate to check out our LitExtension Resources and visit the LitExtension blog section to get more information and insight.
Explore guides for better results:
- How to Update WordPress Manually and Automatically | Method
- WordPress Migration Checklist: A Complete Roadmap

