Introduction
Magento is among the biggest and most well-known names in the eCommerce market. Though Magento is a powerful platform hosting more than 270,000 websites currently, it could be pricey and tricky for non-tech users.
This is when PrestaShop comes to the rescue. PrestaShop is a feature-rich eCommerce platform with many themes and add-ons for users to set up their stores quickly. Besides, PrestaShop allows users to customize their sites easily and flexibly since it is an open-source cart. Moreover, the platform offers a considerably lower price than Magento. Overall, compare 2 platforms PrestaShop vs Magento that PrestaShop has proved to be better than Magento in terms of assisting beginners or small-to-medium businesses.
If you find Magento too complicated and too expensive to use, switching to PrestaShop might be a great option. Manually performing the data migration from Magento to PrestaShop is possible, but the process requires lots of time and effort, especially for store owners with minor technical skills. Moreover, your website is more prone to data loss or conflict if the migration goes wrong.
In this article, I will guide you through three simple steps to migrate your data quickly, securely, and automatically from Magento to PrestaShop, with the help of LitExtension.
Want to Migrate to PrestaShop?
If you are intending to migrate to PrestaShop, LitExtension offers a great migration service that helps you transfer your data from the current eCommerce platform to a new one accurately, painlessly with utmost security.
3 Simple Steps to Migrate from Magento to PrestaShop
Step 1. Prepare
1. Back up data from your Magento store
Creating a backup database for your site before migration is crucial. This file will come in handy in case of error, and you need to re-run your process.
A quick heads up before we dive into the detailed guide: Please check this Magento backup guideline to understand some points you need to pay attention to when performing the backup. Though Magento 1 and 2 have different interfaces, they share the same backing up procedure.
- On the Magento Admin Panel, select System > Tools > Backup.
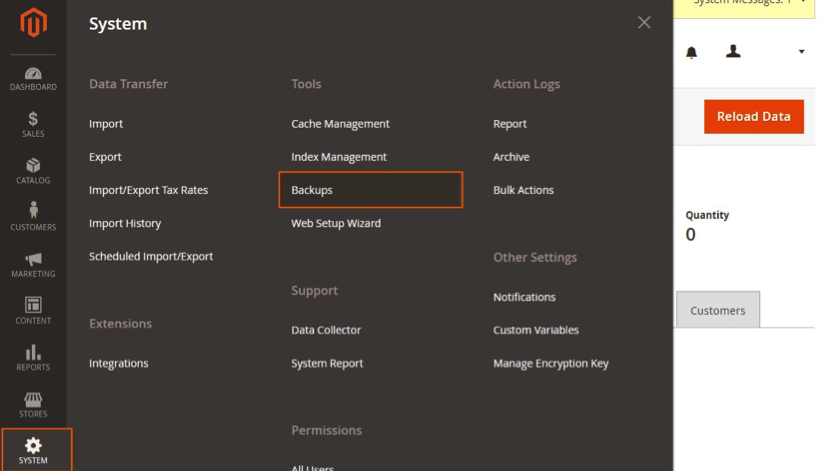
- Select backup type (including System Backup, Database and Media Backup, Database Backup) in the upper-right corner.
- Choose backup options. You can create a Backup name for an easy reference afterward.
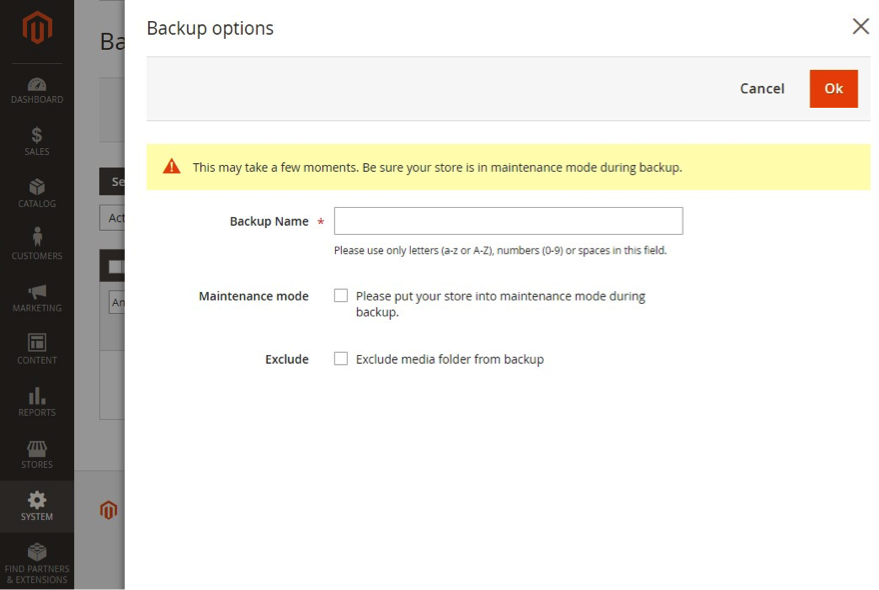
At this stage, you can tick on Maintenance mode to prevent data change during the backup. Magento will automatically turn off this mode once the process is completed, and you will receive a notification.
2. Set up your new PrestaShop store
When you are done backing up your data, you can go straight to the migration from Magento to PrestaShop if you already own a PrestaShop store. But if you don’t, it’s time to set up a new one on the PrestaShop platform. Generally, the PrestaShop installation includes the following steps.
- Download PrestaShop zip file
- Upload to the server
- Create a database
- Add database information
- Select a name for your store
- Select theme and upload logo
- Add product.
In case you are still confused about the installation, here is a step-to-step tutorial to create a basic PrestaShop store:
Don't forget to upgrade your PrestaShop store to the latest versio for more advanced features, allowing you to drive sales with ease!
Step 2. Perform the data migration with LitExtension
1. Register and log-in
First, you need to sign up or log in to LitExtension site using your registered email. There are options to sign in with Facebook or Google as well.

2. Fill in carts information
- Enter your Magento Source Cart information
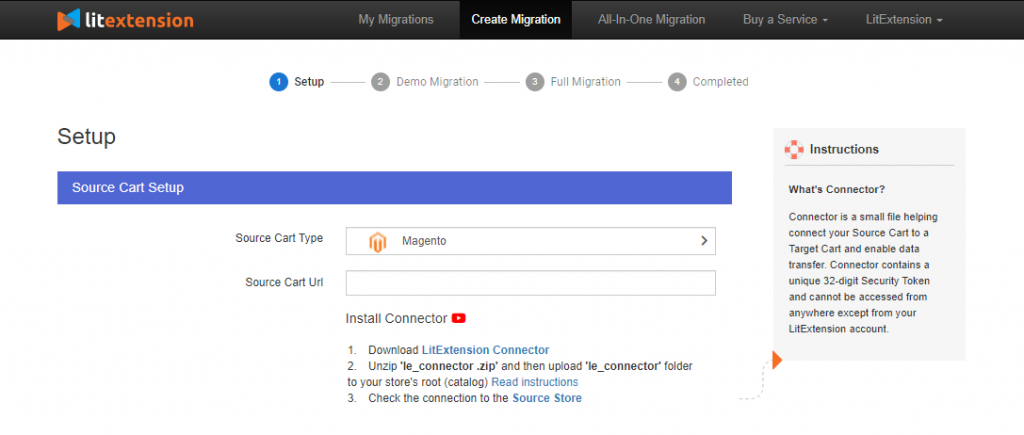
Magento Source Cart
After logging in to LitExtension site, select Create New Migration on the top right corner. It will then direct you to step 1 of the migration process. In the drop-down menu, select Magento as your Source Cart Type and provide its URL.
Next, you need a Connector. A Connector is a particular access port that plays the role of a “virtual bridge” to establish a connection between your shopping carts and perform data exchange. You can download the LitExtension Connector zip file using the provided hyperlink, extract the download file and place it into your store’s root folder. If your connector is installed correctly, this notification will show up, and you can proceed to the next step of migration.
In case you have any trouble installing, don’t hesitate to contact our customer support agents via live chat and ticket system.
- Enter your Target Store information
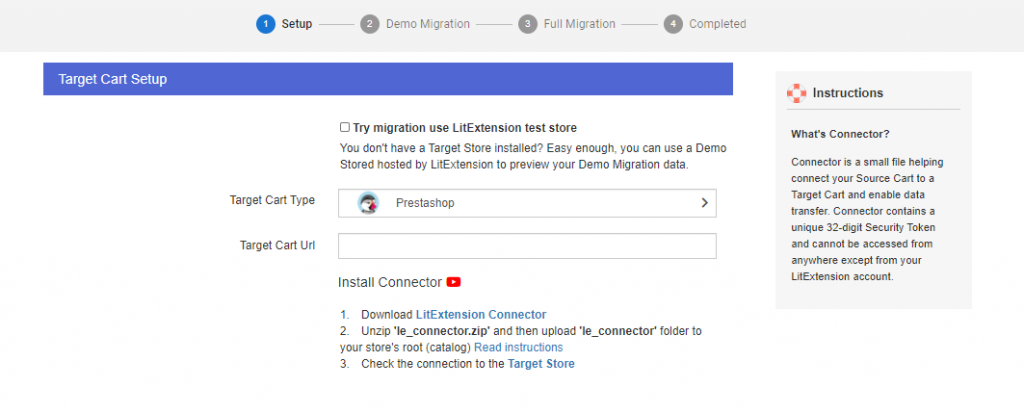
PrestaShop Targetcart
Select PrestaShop as your Target Cart Type in the drop-down menu and provide your target cart URL. Download LitExtension Connector and follow the same steps that I have mentioned above.
In this step, you can check on Try migration use LitExtension test store if you haven’t set up your target store yet. This action will allow you to take a quick look at LitExtension’s migration process.
3. Select entities to migrate
You can either choose certain parts you want to migrate or tick on Select all to transfer all entities to your new site.
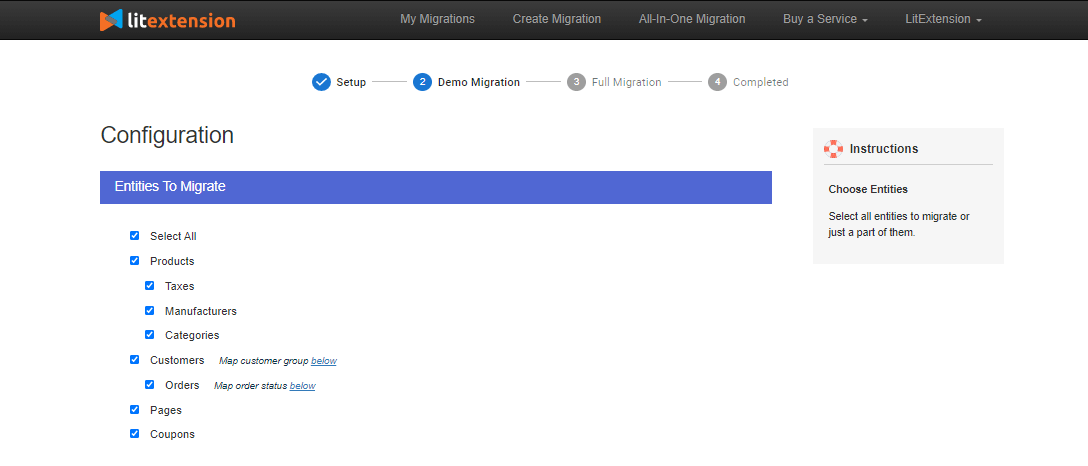
Besides the basic entities, LitExtension also offers several Additional Options to ensure your new store’s effectiveness. These options include free and paid ones, including Migrate customers’ passwords, and Migrate categories and products SEO URLs.
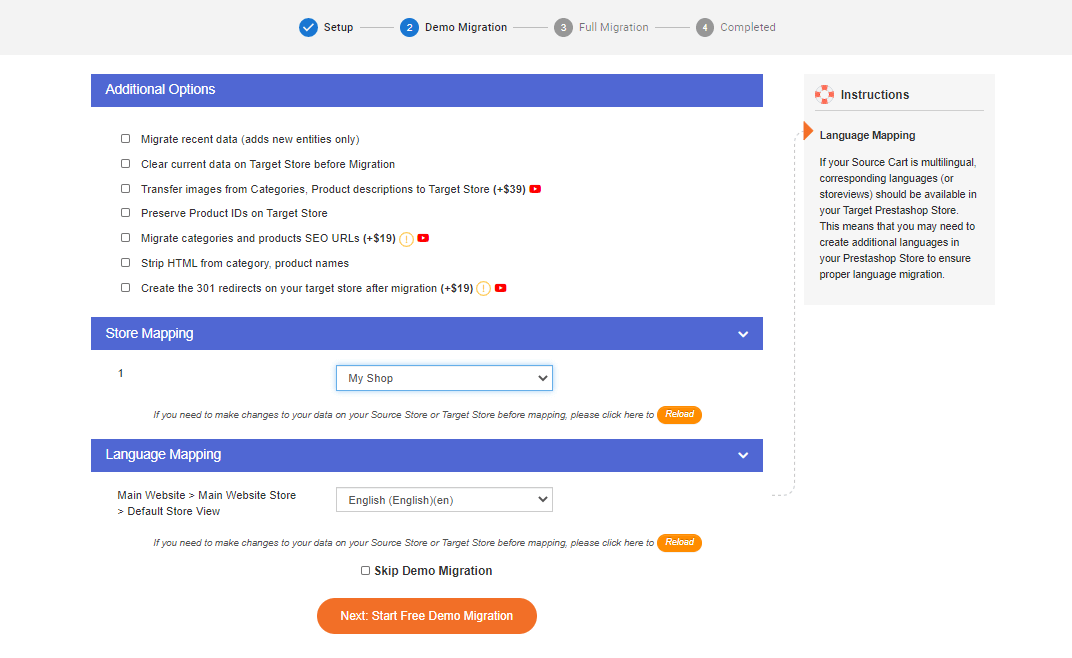
4. Run Migration
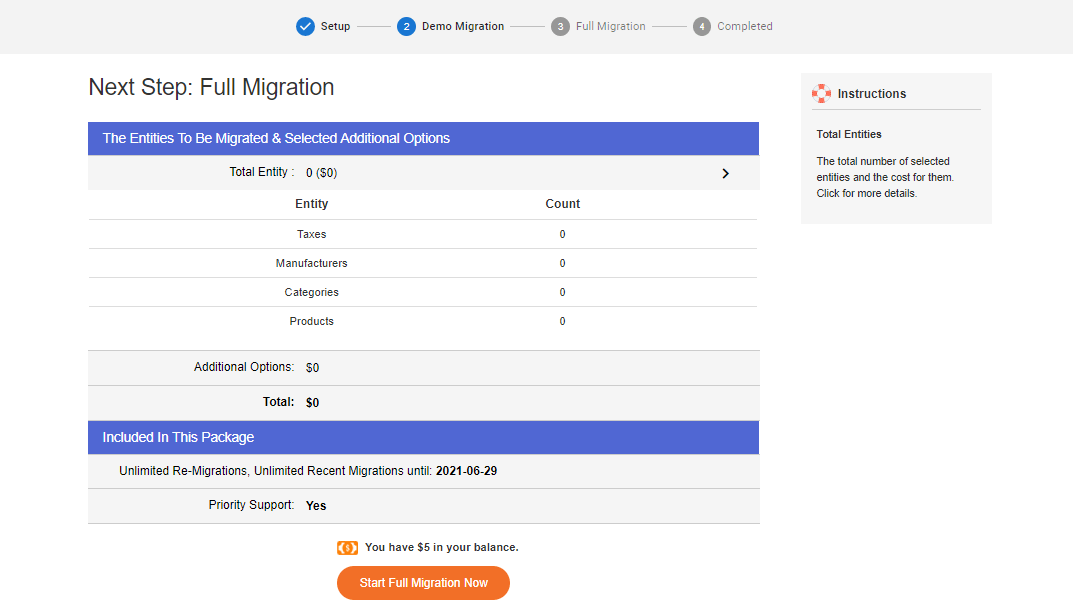
After selecting the entities you want to migrate, let’s continue to the Demo Migration. The demo version works identically as the full migration but limits to 200 entities only.
You can skip this step and proceed straight to Full Migration. This process might take several hours to complete, and you will receive a notification via registered email when it’s done. In the meantime, you can shut down your computer and wait as the process is executed on our server. You can immediately log in to your new store to check the result right upon completion.
Save Time Migrating to PrestaShop?
Our All-in-One Migration Package will come and help you all the way! During the whole process, you will have a Personal Assistant with you and give out ultimate support.
Step 3: Perform post-migration activities
After successfully transferring data from Magento to PrestaShop, it is essential to put some finishing touches on your new website.
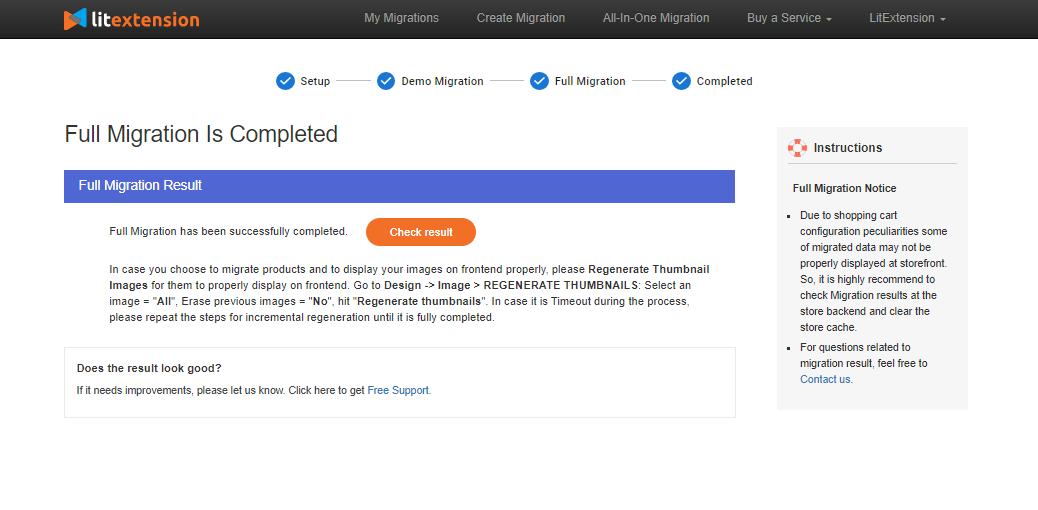
1. Check if your data has been migrated accurately.
Once the migration from Magento to PrestaShop is completed, you should double-check to see whether your data was transferred successfully and thoroughly. LitExtension migration service will minimize the chance of conflicts to as low as possible, so you won’t have to worry about data loss.
2. Install new themes
Your website’s design plays a crucial role since it is the first thing that grabs customers’ attention when they first enter your virtual store. Therefore, don’t forget to select a theme to represent your style and improve customers’ experience.
Unfortunately, themes and templates cannot be transferred in the migration process. You can either design your own interface from scratch or customize from thousands of pre-built templates that PrestaShop offers. In case you have a hard time choosing which theme is the best for your store, here is our article about best Prestashop themes that will help you
3. Add new extension
Extensions will further enhance your website’s ability, boost your store’s performance, and even bring a better experience to your customers. PrestaShop offers over 3000 modules for your eCommerce store, divided into ten different main categories, including business-wise and customer-wise matters. These modules will help to administer your website better, track traffic, and build customer loyalty.
4. Perform recent data migration
During the migration, LitExtension will not require you to close your store temporarily. Therefore, you can continue your business as usual. New orders and customers might come up in the process, when you are configuring your new store. These incurred data won’t show up on your new website, and this is when Recent Data Migration option comes in handy.
Recent Data Migration will assist you in transferring newly appeared entities from Magento to PrestaShop. You can use this option free-of-charge and for an unlimited time within three months from the full migration. But there’s a condition: the total additional data is no more than 10% of the total number of entities in your initial migration.
5. Change DNS and switch domain.
Put merely, Domain Name System (DNS) is a “virtual interpreter.” It translates a human-readable domain name into an IP address so that users can access information online. It’s crucial to point the existing domain to your new store’s IP address after your website has been migrated successfully.
You need to perform this action manually. However, if you find it confusing and daunting, LitExtension will help you change DNS and switch domains for a single fee.
Final Words
In conclusion, moving from Magento to PrestaShop would be a smart move for beginners and small merchants. PrestaShop’s simplicity in use and diversity in the number of add-on features will help your business blossom. This article has visualized three simple steps to transfer your virtual warehouse from Magento to PrestaShop with LitExtension.
LitExtension has been receiving many good reviews on different platforms. We have been receiving 4.8 out of 5 stars from more than 350 users on TrustPilot. On FinancesOnline, LitExtension gets a score of 8.8, along with 96% user satisfaction. If you still have your doubt, feel free to try out the Demo Migration yourself to get the overall look at how it works.
With nine years of experience in the shopping-cart migration field, LitExtension guarantees to provide you an accurate, seamless, and secure migration process. In case you have any inquiries, don’t hesitate to contact us via live chat, email, or ticket system. Let's join our community to get more eCommerce knowledge.
Good luck!
