Managing URL redirects is a critical aspect of running a successful Magento 2 eCommerce store. This guide is tailored for Magento site managers or administrators, web developers, and SEO specialists who aim to master the art of managing Magento 2 redirect. By the end of this guide, you’ll understand:
- Types of redirects available in Magento 2;
- How to create Magento 2 URLs redirect;
- And how to troubleshoot common challenges.
Now, let LitExtension join the journey with you!
What Are URL Redirects in Magento 2?
URL redirects in Magento 2 ensure that users don’t encounter dead ends when accessing pages that have been moved, renamed, or removed. For eCommerce businesses operating on Magento 2, redirects play a crucial role in preserving the customer journey and maintaining website credibility.
Redirects tell browsers and search engines to forward traffic from an old URL to a new one. For example, if a product page URL is updated, a redirect ensures customers and search engines find the correct page, protecting both user experience and SEO.
Why is Magento 2 redirect important?
- They improve navigation by directing users to the right pages, even if the original URLs are outdated.
- Proper redirects maintain SEO rankings by transferring link equity from old URLs to new ones.
- Redirects also keep traffic data accurate, preventing analytics gaps caused by broken links.
When implemented correctly, Magento 2 redirects enhance both user experience and search engine performance.
How to Create Redirects in Magento 2
Magento 2 offers multiple methods for creating and managing URL redirects. These methods cater to a range of technical expertise, from store administrators with no programming knowledge to developers who need advanced functionality.
Method 1: Use Magento 2 Admin Panel
The Magento 2 admin panel provides an intuitive interface for creating URL redirects without requiring coding skills. It’s ideal for quick fixes and managing individual redirects. Here’s the step-by-step guide:
1. Log in to the Admin panel
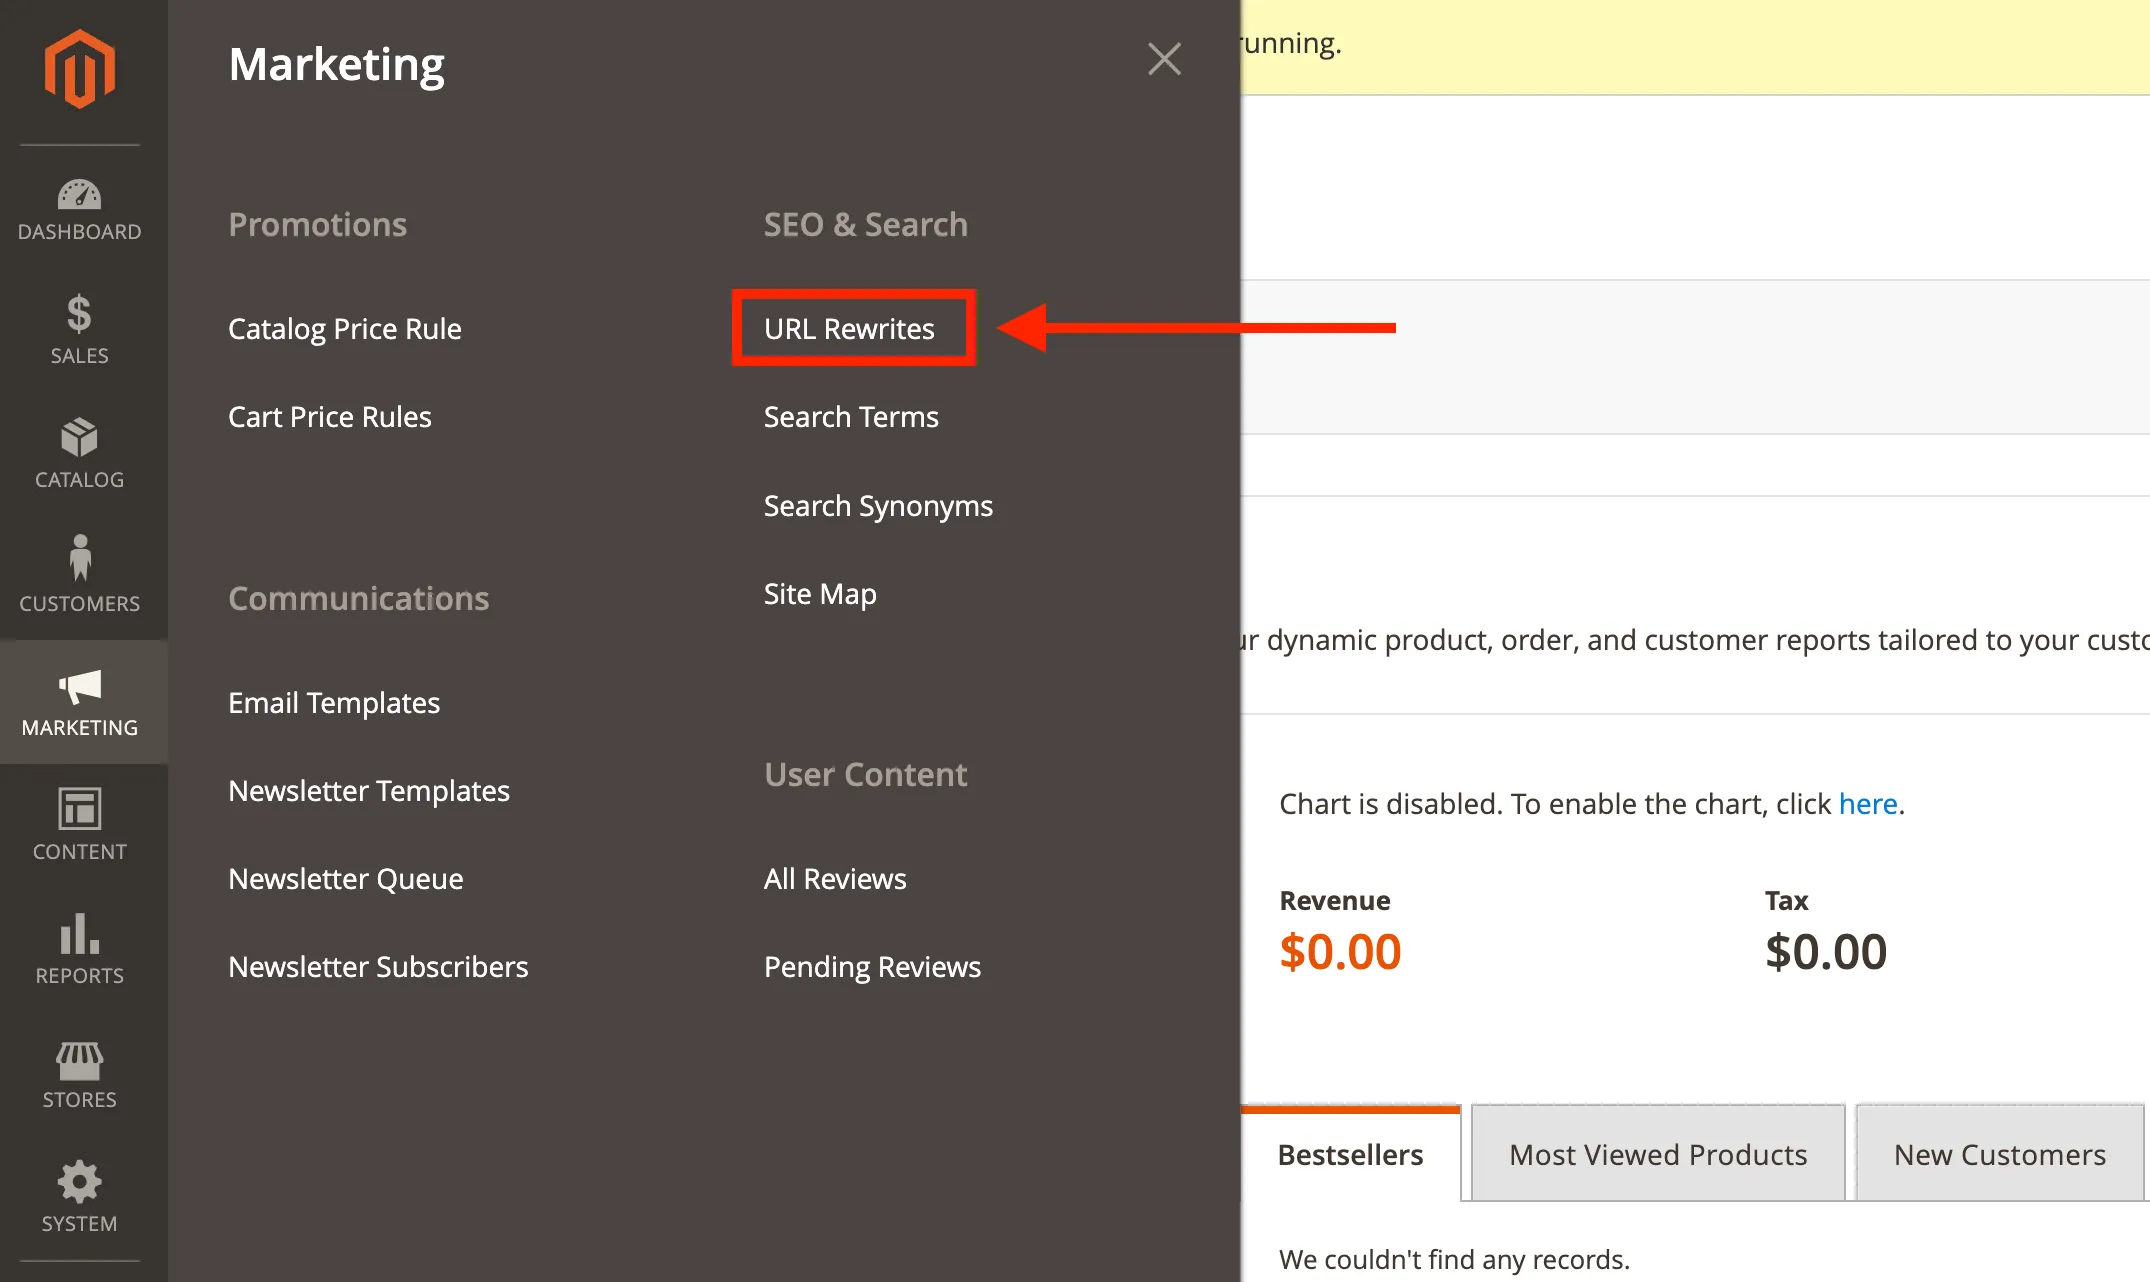
Start by logging into your Magento 2 admin dashboard. From there, head over to Marketing > SEO & Search > URL Rewrites.

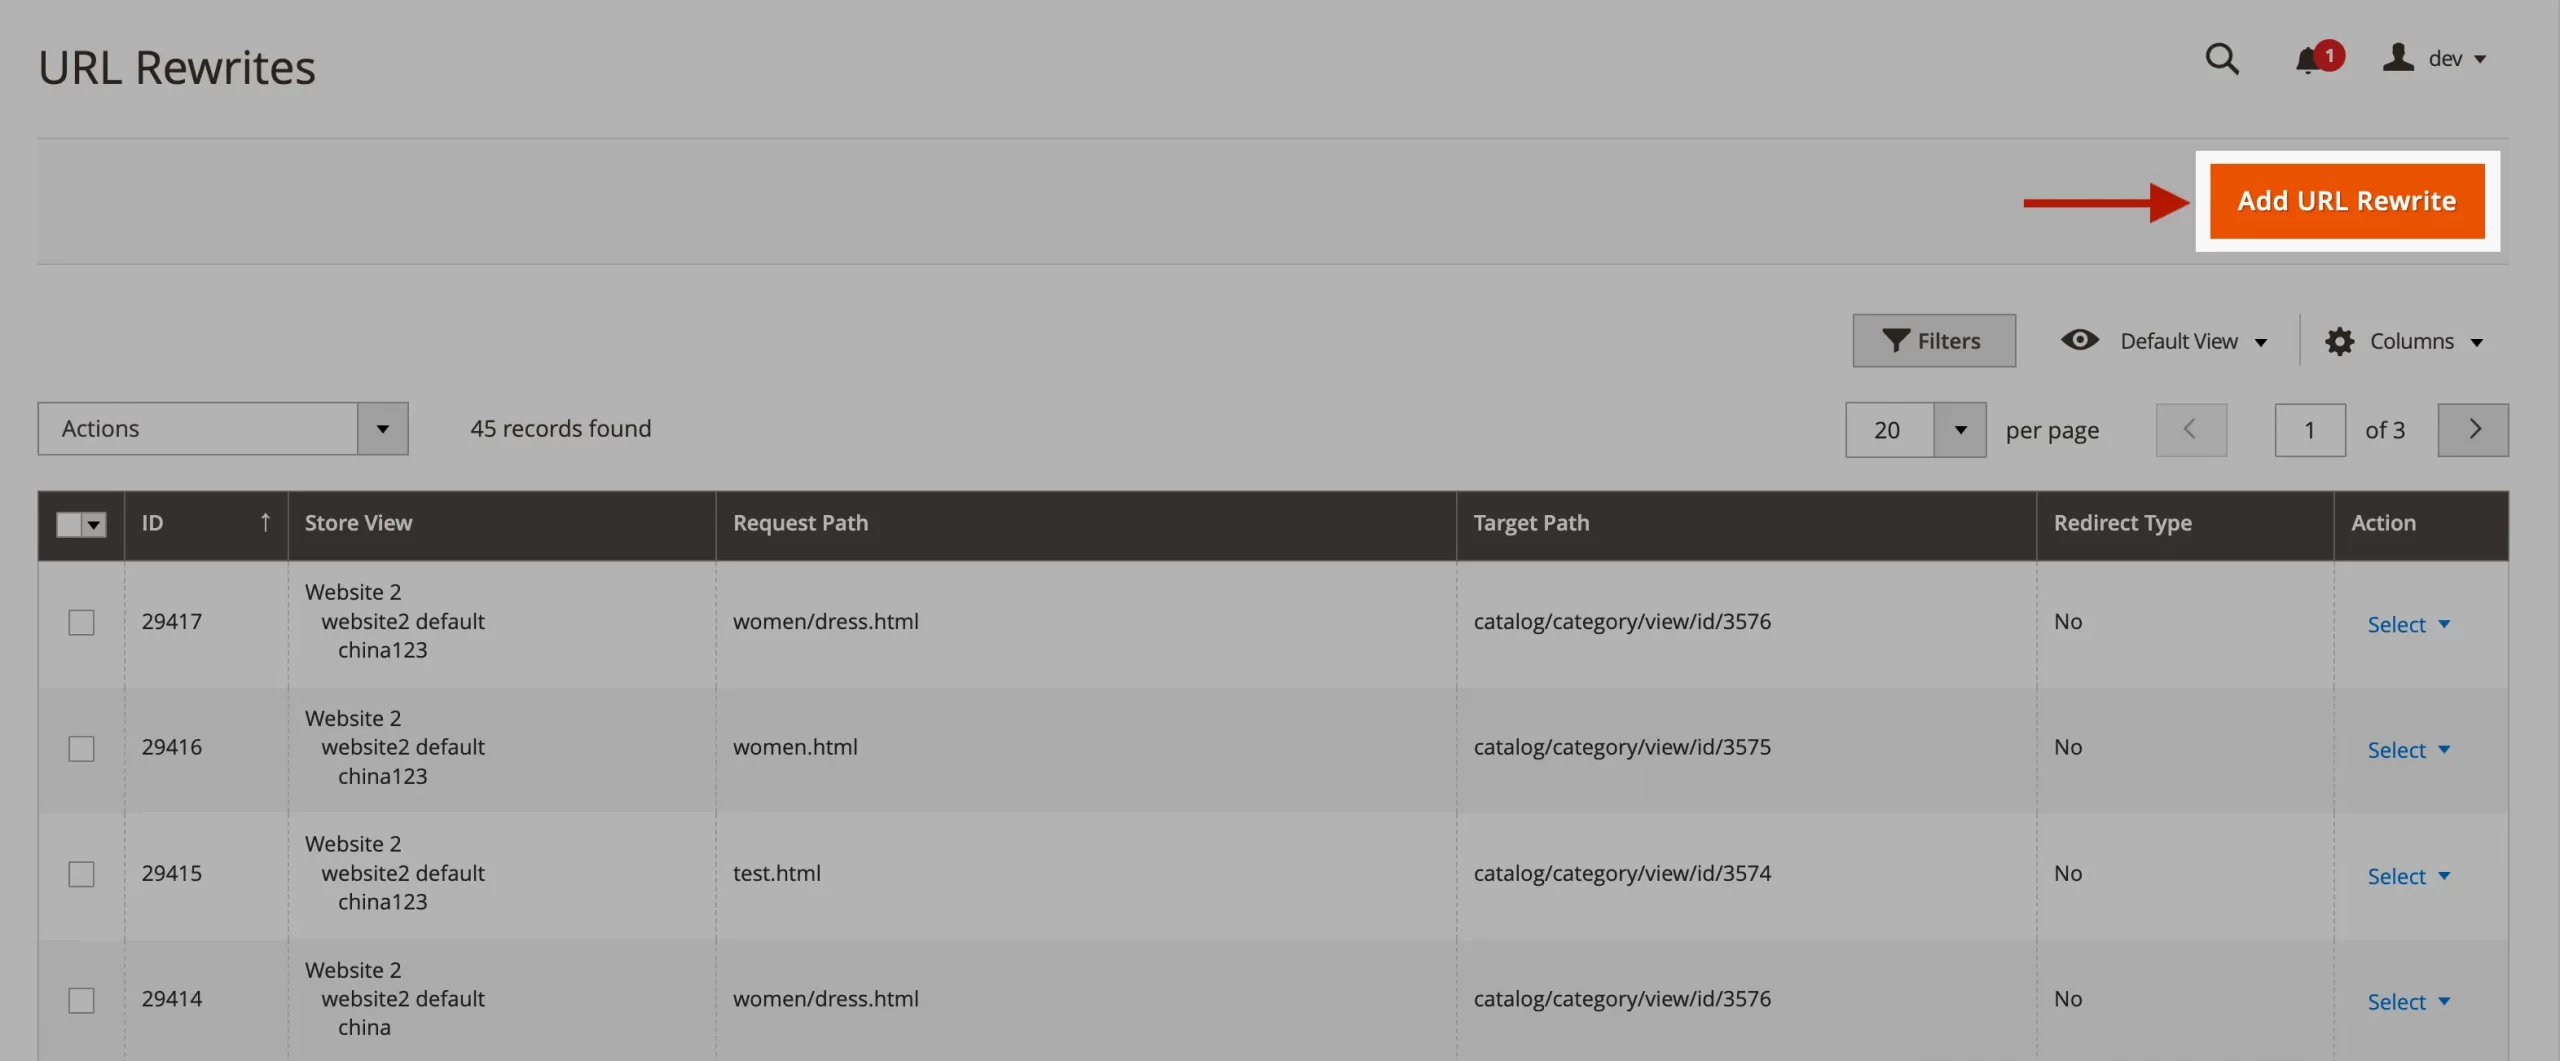
2. Add a new URL Rewrite
Click on the “Add URL Rewrite” button. You’ll be prompted to select the type of redirect you want to create:

- Product Redirects: Ideal for retired or updated product pages.
- Category Redirects: Useful when reorganizing categories.
- Custom Redirects: For URL changes that don’t fall under product or category redirects.
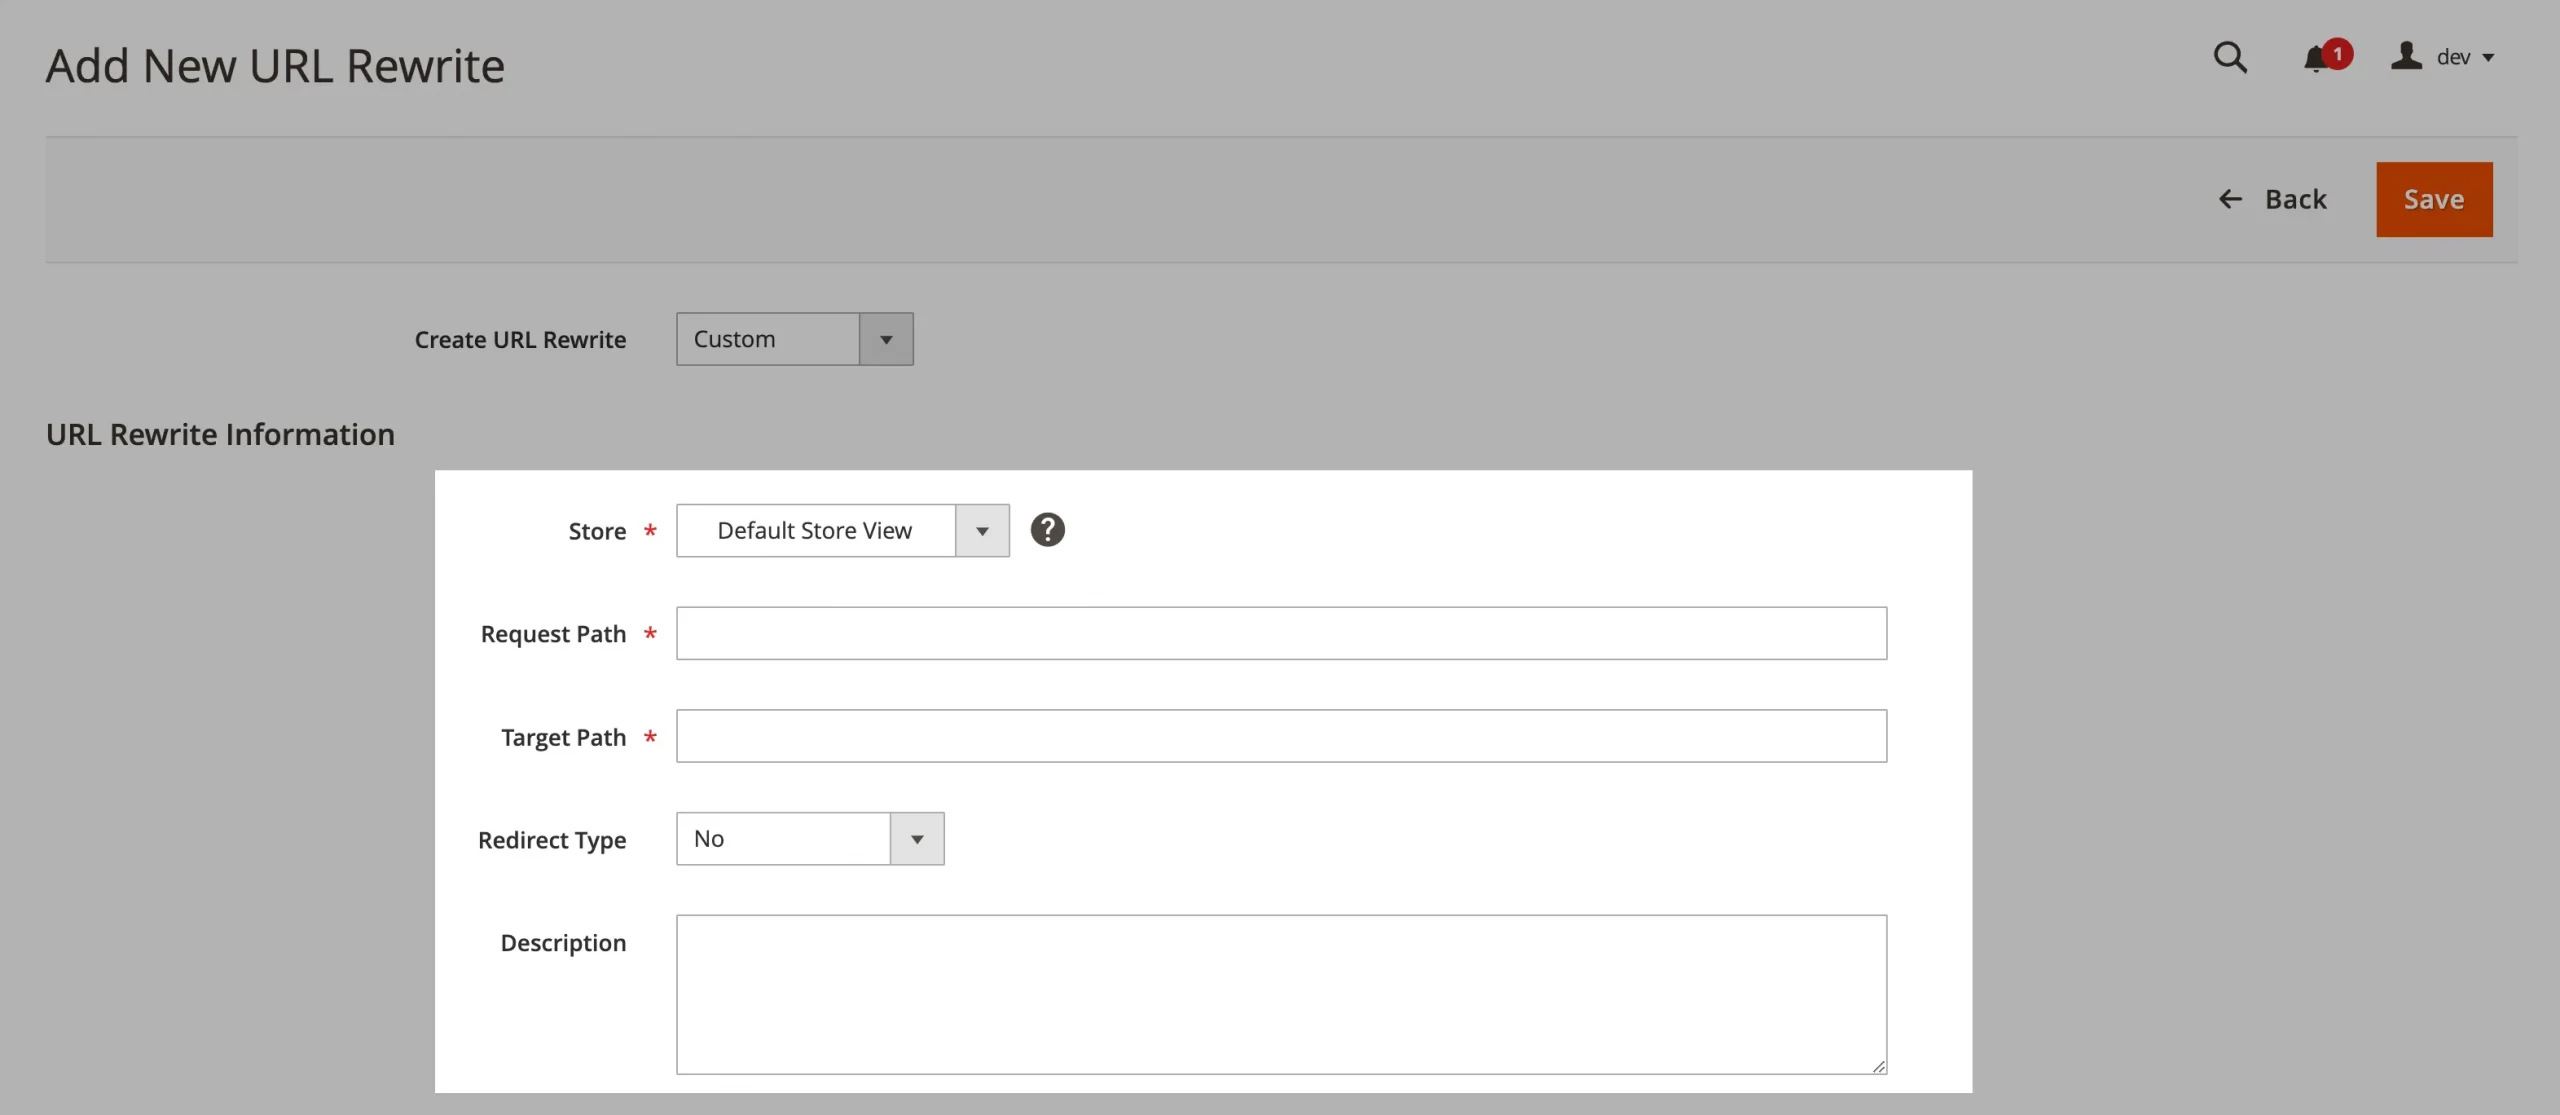
3. Configure the redirect
Enter the details for your redirect:

- Request Path: The old URL you want to redirect from.
- Target Path: The new URL you want to redirect to.
- Select whether the redirect is temporary (302) or permanent (301) depending on your needs.
4. Save and test
Click Save to confirm your changes. Test the redirect by entering the old URL in your browser to ensure it leads to the intended page.
Editor’s note: Using the Magento admin panel for redirects is simple and user-friendly, making it a great option for non-technical users. However, it’s not the best choice for bulk updates or complex scenarios. For those, server-side or programmatic methods are more efficient.
Method 2: Edit the .htaccess file
If you’re looking for efficiency and flexibility, editing the .htaccess file is a powerful option for managing server-side redirects. Here’s the step-by-step guide:
1. Access the server
Use an FTP client like FileZilla or your hosting provider’s control panel to locate the .htaccess file in Magento’s root directory.
2. Add redirect rules
For a simple 301 redirect, you can use:
Redirect 301 /old-url /new-url
For wildcard redirects (redirecting multiple URLs with similar patterns), you can use:
RedirectMatch 301 ^/old-directory/(.*)$ /new-directory/$1
To remove query parameters, let’s use:
RewriteCond %{QUERY_STRING} .
RewriteRule ^old-page$ /new-page? [R=301,L]
3. Save changes
After saving your changes to the .htaccess file, clear Magento’s cache and test the redirects by visiting the original URLs.
Editor’s note: Editing the .htaccess file is an efficient way to handle complex redirect scenarios. While it’s highly effective for large-scale changes, such as domain migrations or URL restructures, it does require technical knowledge and careful testing to avoid errors.
Method 3: Create Magento 2 redirect programmatically
For developers handling advanced requirements, programmatic redirects offer unmatched flexibility and control. This method is ideal for scenarios involving dynamic or conditional redirects.
1. Set up a custom module
Start by creating the basic structure for a Magento 2 module, including files like registration.php and module.xml.
2. Add logic Magento 2 redirect from controller
Next, add code to your controller to handle the redirect. Here’s a Magento 2 redirect example:
public function execute()
{
$this->getResponse()->setRedirect(‘https://example.com/new-url', 301);
}
Then, define dynamic conditions, such as user roles or language preferences, for the redirect.
3. Register and deploy the module
Run php bin/magento setup:upgrade to register the module and clear the cache.
4. Test and monitor
Thoroughly test the redirect across all applicable scenarios to ensure it functions as intended.
Editor’s note: Programmatic redirects are ideal for developers who need full control over complex redirection logic. While they require technical expertise, they enable highly customizable solutions for advanced use cases.
Method 4: Use third-party extensions
The final method is to use 3rd-party extensions. Third-party extensions simplify redirect management which makes them a great choice for large-scale eCommerce stores or non-technical users.
But first, which features should you look for in a Magento 2 redirect extension? Let’s find one that offers:
- Easily import or export redirect rules in bulk using CSV files.
- Monitor redirect performance and spot errors with visual tools.
- Handle wildcards, query parameters, and subdomains with ease.
Here are the steps to use a Magento redirects extension:
- Select a trusted provider like Amasty, Mageplaza, or Aheadworks.
- Use Composer or upload the files manually to your Magento instance.
- Access the extension’s dashboard from the admin panel and define your redirect rules.
- Run tests to ensure the redirects are functioning correctly without conflicts.
Editor’s note: Extensions offer a quick and scalable way to manage redirects, especially for larger eCommerce stores. They streamline the process, making it easy to handle even complex redirect tasks, regardless of your team’s technical expertise.
Pro tips: When setting up a 301 redirect in Magento 2, you can use the admin panel, .htaccess file, or programmatic methods. However, if you're planning a platform migration or handling a large-scale URL structure update, managing 301 redirects manually can be time-consuming and prone to errors. If you’re migrating your store from Magento 2 to another platform or restructuring your site, LitExtension SEO URLs migration can take the hassle out of setting up 301 redirects. Our migration service includes an option to automatically create 301 redirects from your old URLs to the new ones.
Types of Redirects in Magento 2
1. 301 redirects (permanent redirect)
A 301 redirect is your go-to solution when a URL needs to be permanently moved to a new location. It’s the most widely used and SEO-friendly type of redirect because it passes the full SEO value, or link equity, from the old URL to the new one.
When should you use 301 redirects?
- If you're moving to a new domain.
- When you’re permanently reorganizing product categories or updating URLs.
- For combining duplicate pages into a single, consolidated version.
For example, redirecting example.com/old-product to example.com/new-product seamlessly guides both users and search engines to the right page.
How does it affect SEO? Search engines like Google treat 301 redirects as permanent changes, updating their index to reflect the new URL. This ensures you retain your rankings and don’t lose valuable traffic.
2. 302 redirects (temporary redirect)
A 302 redirect is your solution when a URL change isn’t meant to be permanent. It tells search engines that the original URL will eventually return, so they shouldn’t treat it as a permanent move.
When should you use 302 redirects?
- Running A/B tests on different landing pages.
- Setting up temporary pages for limited-time promotions or events.
- Redirecting during maintenance or redesign work.
For example, redirecting example.com/promo to a campaign page that’s only active for a short period.
So, what are the SEO considerations here? Unlike a 301 redirect, a 302 doesn’t transfer the full SEO value (link equity) to the new Magento 2 redirect URL. So, you should use it with caution since leaving a 302 redirect in place for too long can confuse search engines and hurt your rankings.
3. 303 redirects (see other)
A 303 redirect comes into play after a user submits a form via a POST request. It ensures users aren’t able to accidentally submit the same form again by refreshing the page.
303 redirects are often used when:
- Redirecting users to a confirmation or thank-you page after completing an order.
- Navigating to a specific page after submitting a contact form.
For example, redirecting from example.com/submit-form to example.com/thank-you ensures users receive confirmation without resubmitting data.
If you ask for SEO, it’s rarely used for SEO purposes but significantly improves user experience by avoiding duplicate actions.
4. 307 redirects (temporary redirect)
A 307 redirect works similarly to a 302, indicating a temporary URL change, but with one key difference: it preserves the original HTTP method (e.g., GET or POST) during the redirection.
When should you use it:
- Temporary URL changes where the HTTP method must remain consistent.
- When adhering to HTTP/1.1 standards.
For example, 307 redirects are for redirecting an order tracking page while maintaining the original request method.
For SEO impact, like a 302, it doesn’t transfer the full SEO value to the new URL. You can use it for cases where preserving request methods is critical.
5. 410 redirects (content gone)
A 410 redirect is used when a page is permanently removed, signaling to search engines that the content is gone and won’t return. Unlike a 404 error, which indicates a page can’t be found, a 410 explicitly states that the page has been intentionally removed.
When should you use 410 redirects:
- Retiring outdated products or services.
- Cleaning up pages that no longer serve a purpose or have no replacements.
For example, returning a 410 status for example.com/expired-product ensures search engines understand the content is no longer available.
For SEO, it tells search engines to remove the page from their index. Yet, you should use 420 redirects carefully to avoid unnecessarily losing valuable traffic.
Seamlessly migrate to Magento!
LitExtension can safely transfer your products, customers, and orders to unlock more growth on Magento.

Common Challenges in Managing Magento 2 Redirects
While Magento 2 makes it possible to manage URL redirects effectively, it’s not without its hurdles. Poor implementation or oversight can lead to frustrating issues that impact both user experience and SEO performance.
1. Handle redirect loops
Redirect loops happen when a URL points to another, which eventually redirects back to the first one, creating an infinite cycle. This can confuse browsers, trigger errors, and disrupt your site.
Why it happens:
- Misconfigured rules in .htaccess or the Magento admin panel.
- Multiple conflicting redirects are pointing to each other.
Solutions:
- Use tools like Screaming Frog or Redirect-Checker.org to identify looping issues.
- Audit all existing redirects for conflicts.
- If using .htaccess, ensure there are no overlapping wildcard rules.
2. Lose valuable referral data
When redirects aren’t handled properly, referral data can be lost, making it difficult to track where your traffic is coming from. This can lead to gaps in your analytics and poor decision-making.
Why it happens:
- Redirecting to a different domain without proper tracking parameters.
- Using 302 redirects when a 301 is appropriate.
Solutions:
- Always use 301 redirects for permanent changes to retain link equity and referral data.
- Add UTM parameters to ensure proper tracking in tools like Google Analytics.
- Test referral paths regularly to catch and correct any discrepancies.
3. Manage wildcard redirect inefficiencies
Wildcard redirects are great for handling multiple URLs, but they can backfire if not configured correctly. For example, a poorly written rule might redirect unrelated pages or entire directories unintentionally.
Why it happens:
- Broad rules that apply to more URLs than intended.
- Performance degradation due to overly complex rules.
Solutions:
- Use a tool like Regex101 to test your redirect rules before applying them.
- Narrow down wildcard patterns to target only the necessary URLs.
- Regularly audit and optimize wildcard rules to improve accuracy and performance.
4. Resolve conflicting rules in .htaccess
When you rely on .htaccess for redirects, overlapping or conflicting rules can cause serious headaches. It’s easy to break your site if the file isn’t managed carefully.
Why it happens:
- Using multiple modules or extensions that modify the .htaccess file.
- Adding manual rules without understanding the existing configuration.
Solutions:
- Consolidate similar rules to reduce redundancy.
- Use version control (e.g., Git) to track changes in your .htaccess file.
- Comment your rules to explain their purpose, making it easier for others to understand.
5. Ignore query parameters in redirects
Query parameters, such as tracking codes, can complicate redirects if not accounted for. They may lead to broken links or failed tracking, which can harm both user experience and analytics.
Why it happens:
- Rules fail to consider URLs with parameters.
- Redirects ignore or mishandle appended tracking information.
Solutions:
- Use .htaccess rules or Magento extensions to account for query parameters:
RewriteCond %{QUERY_STRING} .
RewriteRule ^old-page$ /new-page? [R=301,L] - Test key pages to ensure parameters are redirected properly.
- Prioritize commonly used parameters in your analytics for redirect configuration.
Magento 2 Redirect: FAQs
URL redirects play a key role in keeping your website user-friendly and ensuring visitors can easily find what they’re looking for, even if the page URL has changed. They also protect your SEO efforts by transferring traffic and search rankings from old URLs to new ones.
- For users: Redirects prevent frustrating broken links and make navigation smoother.
- For SEO: They help maintain link authority and reduce the risk of losing valuable rankings.
Setting up a redirect in Magento 2 is straightforward and here’s the steps using admin panel:
- Go to Marketing > SEO & Search > URL Rewrites.
- Click “Add URL Rewrite,” then specify the Request Path (old URL) and the Target Path (new URL).
- Choose whether it’s a 301 (permanent) or 302 (temporary) redirect, save, and test.
To redirect a 404 error page in Magento 2, go to Marketing > SEO & Search > URL Rewrites, and create a new redirect rule. Enter the URL of the 404 page in the Request Path field and set the Target Path to Magento 2 redirect 404 to homepage or another relevant page. Save the redirect to ensure visitors are guided to the correct location.
To redirect all HTTP traffic to HTTPS in Magento 2, update your settings in Stores > Configuration > General > Web by setting the Base URL and Base Link URL to use https:// and enabling Use Secure URLs for both the frontend and admin. Next, add a redirect rule in your .htaccess file to force HTTPS. Test the changes by accessing your site using http:// to confirm it redirects to https://, and clear the Magento cache to apply the updates.
In Magento, the Request Path is the URL that users or search engines are trying to access, while the Target Path is the new URL where they are redirected. The Request Path is the old or outdated URL, and the Target Path points to the updated or intended destination.
Wrapping Up!
Managing Magento 2 URL redirect is crucial for eCommerce managers, developers, and SEO specialists. Proper redirects ensure users and search engines are directed to the right pages when URLs change, preserving a smooth experience and protecting SEO.
Key insights include choosing the right redirect type, 301 for permanent changes, 302 for temporary ones, or others like 307 and 410 based on the situation. Magento 2 offers flexible methods for implementation: the admin panel for simple redirects, .htaccess for server-side control, programmatic solutions for advanced needs, and third-party extensions for bulk management.
We hope you found this article insightful and now have a clear understanding of Magento 2 redirect. For more content like this, be sure to visit the Magento blog section and join our eCommerce community to gain further insights and connect with fellow business owners.


