A Shopify SEO migration involves moving an old store to Shopify while preserving organic rankings by mapping old URLs to new ones, implementing 301 redirects, verifying canonical tags, and auditing content. 11 key steps include:
- Audit existing SEO
- Define your Shopify SEO migration strategy
- Export all URLs
- Backup SEO data
- Map redirects one-by-one
- Transfer metadata
- Configure canonical tags
- Rebuild internal links
- Optimize images and speed
- Submit your sitemap
- Monitor and fix SEO issues
To understand each step in detail, let’s explore further!
Phase 1: Pre-migration & Preparations
1. Audit existing SEO
A migration usually goes wrong not because of technical errors, but because no one clearly defines what needs to be preserved. That’s why the first step is always understanding your current SEO performance in detail.
At this stage, the goal is to identify which pages actually matter. Not every page deserves the same level of attention – some drive traffic, some drive revenue, and some barely get indexed.
A good starting point is checking data from Google Analytics and Google Search Console. These tools help reveal:
- Which pages bring in the most organic traffic;
- What keywords your site is currently ranking for;
- Where conversions or revenue are coming from.
Once you have this, you’ll know exactly which pages cannot afford to lose rankings during migration. Everything else becomes secondary.
2. Define your Shopify SEO migration strategy
Needless to say, a well-thought-out migration strategy keeps everything organized and dramatically reduces the chance of SEO hiccups. Without a clear plan, you will end up lost!
To map out the process, spend some time defining the scope of your Shopify migration. Ask yourself, “Am I just switching platforms, or am I doing a full redesign?”
- If you're simply migrating data to Shopify, the process is more straightforward. However, even a data-only migration usually requires redirect mapping due to Shopify’s fixed URL structure, so you’ll still need to ensure URLs, content, and metadata transition properly.
- However, if you're redesigning the site (changing layouts, structures, or URLs), things become more complex. Extra caution is an absolute must to avoid disrupting your current SEO.
Next, set clear phases for the migration. Don't try to do it all at once; you should break it down into smaller chunks so that every step will get the attention it needs. Otherwise, rushing through the migration will likely cause you to miss numerous key details, which inevitably end up hurting your SEO performance.
3. Export all URLs
Before migrating, you need a complete list of your current URLs. This includes not just product and category pages, but also blog posts, landing pages, tag pages, filtered URLs, and any older pages that still receive traffic.
This list is essential for mapping redirects later, helping ensure users and search engines are sent to the correct new URLs instead of hitting 404 pages.
On most eCommerce platforms, you can export product and category URLs from the backend or via CSV files. However, other types of URLs, such as blog content or landing pages, may require manual collection.
In addition, Google Search Console can help uncover URLs that standard exports might miss. Its URL Inspection tool and sitemap data are especially useful for identifying pages that are still indexed but may no longer exist in your CMS.
For larger stores, using a crawling tool is the most reliable way to capture all existing URLs, including those not visible in standard exports, and reduce the risk of missing important pages.
4. Backup SEO data
One of the easiest ways to lose SEO value during migration is not through broken pages, but through missing details like meta titles, descriptions, or alt text. These elements can quietly disappear or change without notice. Having a backup gives you a reliable reference to restore anything that doesn’t transfer properly and makes it easier to compare before and after.
At the same time, capturing your current performance helps you understand what “normal” looks like before the migration. Metrics like organic traffic, keyword rankings, and page speed give you a baseline to compare against later. Without this, it becomes much harder to tell whether a drop is part of normal fluctuation or a real issue that needs fixing.
Most eCommerce systems allow you to export product and page data through CSV files, which usually include key SEO fields. Depending on how your store is structured, some elements may need to be checked or compiled manually to make sure nothing important is missed.
Discover Shopify tools and resources:
- What is Shopify? How does Shopify work?
- Shopify Tutorials: A Step-by-Step Guide for Beginners
- Shopify Launch Checklist to Grow with Confidence
Phase 2: During Migration to Shopify
5. Map redirects one-to-one
File and content aside, do not forget your 301 redirects. Their role is to inform search engines that your old page has permanently carried over the SEO values to the new URL. Failure to set them up properly will lead both search engines and your visitors to “Page Not Found” addresses, which is a big no-no for SEO.
From our own experience, the best way to handle this is by creating a URL map:
- Start by listing every URL from your old site in a spreadsheet.
- Then, to each old URL, put the corresponding Shopify URL where that content will live after the migration.
For example, if your old product page was example.com/product-123, make sure it maps to shop.example.com/product-123. This one-to-one mapping ensures that search engines will still find your pages and keep their rankings steady.
Once your mapping is ready, you can implement the redirects in Shopify. The platform includes a built-in URL redirect manager, and you can also import redirects in bulk via CSV, which makes handling large volumes much more efficient.
6. Transfer metadata
Once your data has been migrated into Shopify, metadata is one of the first things you should review. Even when it’s included in the import file, differences in platform structure can cause titles or descriptions to be missing, duplicated, or slightly altered.
A practical approach is to let the import run first, then review key pages instead of trying to fix everything up front. Focus on pages that previously performed well, as even small changes can impact rankings or click-through rates.
When reviewing metadata, keep these points in mind:
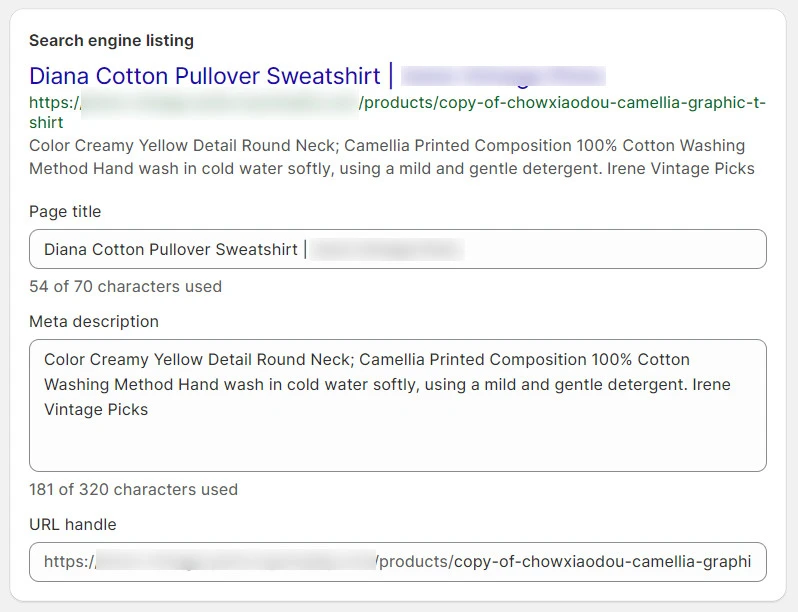
- Fill in all SEO fields in your import file to avoid Shopify defaulting to product titles, which can create duplicate meta titles.
- Aim for ~50–60 characters for titles and 155–160 for descriptions, even though Shopify allows up to 70 and 320.
- Use tools like Screaming Frog or Matrixify exports to quickly identify missing, duplicated, or truncated metadata at scale.
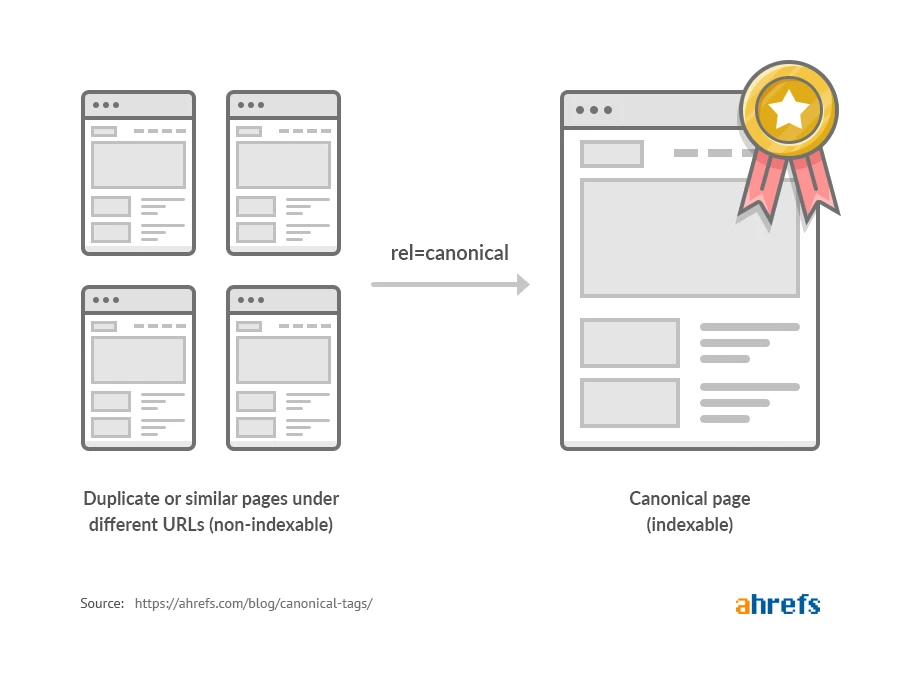
7. Verify canonical tags
With metadata in place, the next step is making sure search engines understand which version of each page should be indexed. This becomes especially important on Shopify, where the same product can appear under different URLs depending on collections.
To handle this, Shopify sets canonical tags automatically. In standard themes, they correctly point to the main product URL (/products/[handle]), even when the product is accessed through collection-based paths like /collections/[collection]/products/[handle]. As a result, this default setup is reliable and typically doesn’t require any changes.
That said, the real concern isn’t Shopify’s default behavior, but whether anything overrides it. Third-party apps, custom theme code, or headless implementations can modify or remove canonical tags, which may lead to duplicate URL issues.
To confirm everything is working as expected, you can start by checking a few product pages directly. For a more reliable validation, use Google Search Console’s URL Inspection tool. This helps you verify not only the declared canonical, but also which version Google actually selects, as the two may differ.
Learn how to optimize your Shopify store:
- How to Transfer Domain To Shopify in 3 Simple Steps
- How to Migrate from Wix to Shopify in 6 Steps
- Checklist to Set Up Shopify Store after A Platform Migration
Phase 3: Pre-Launch Testing
8. Rebuild internal links
Once your page signals are in place, the next step is making sure your internal links still work as expected. Internal links help search engines crawl your site and understand how your pages are connected.
After migration, it’s common for internal links to break or still point to old URLs. This often happens because links inside content, such as blog posts or product descriptions, are stored as hardcoded URLs (for example, https://oldsite.com/…). These don’t update automatically when your data is imported into Shopify.
Instead of trying to fix everything at once, you should focus on the most important areas first:
- Navigation menus, homepage sections, and footer links, as these appear site-wide and carry the most weight
- Featured sections and key internal links that guide users to high-priority pages
- Links inside blog content and product descriptions, where hardcoded URLs are most common

For larger stores, checking links manually isn’t practical. You can use a crawling tool like Screaming Frog to quickly generate a report of broken internal links and identify issues at scale.
As a safety net, 301 redirects from Step 5 will ensure broken links still resolve correctly. However, relying on redirects alone creates unnecessary redirect hops, so updating internal links directly remains the cleaner long-term solution.
9. Optimize images and speed
After structure and linking are in place, the final layer to review is performance. This is where images and site speed come into play, and it’s often where changes become noticeable after migration.
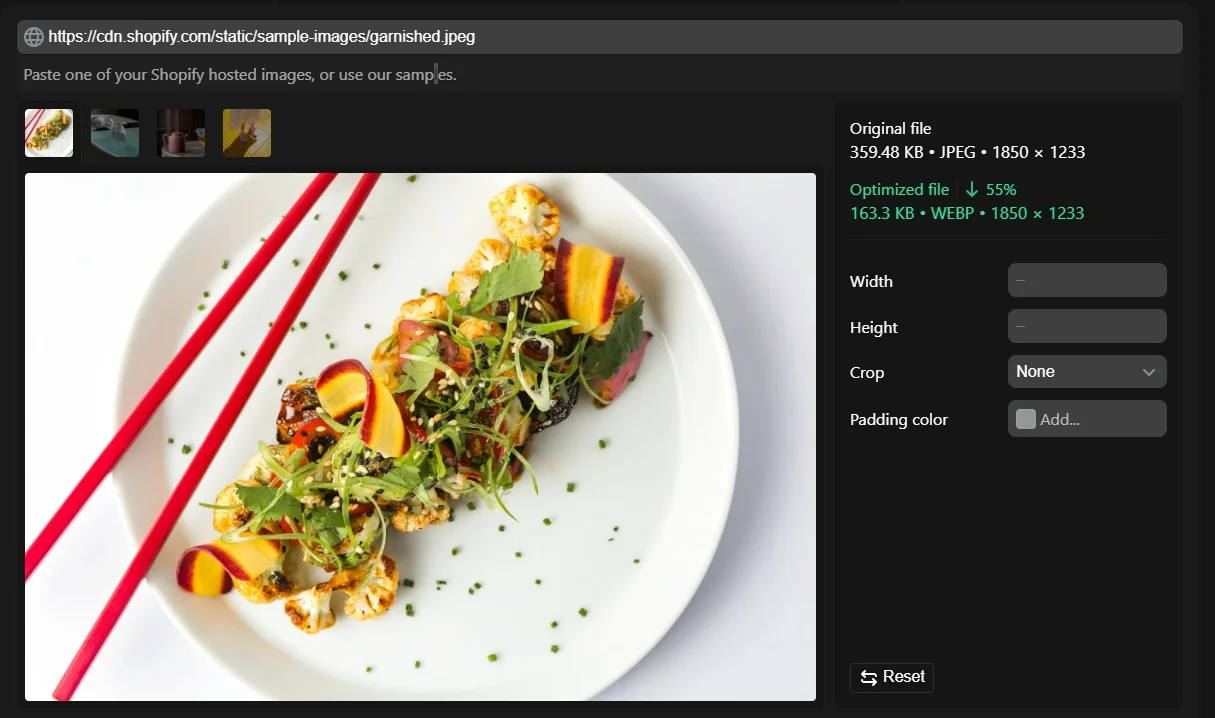
During migration, images may be rehosted or renamed, and alt text is one of the most commonly lost elements. This happens because Shopify stores alt text at the image (asset) level, not within product data fields. When importing via CSV, image files are usually reattached without their original alt attributes, unless these are explicitly included and mapped.
That said, Shopify also improves image handling by default. Its CDN automatically delivers images in modern formats like WebP when supported, and uses dynamic image transformation URLs to serve properly sized images based on the user’s device. As a result, some performance gains can happen automatically after migration, even if images are rehosted.
To review this effectively, you should check a few key pages and evaluate both SEO and performance together. This includes confirming that images still have descriptive alt text, ensuring file sizes are reasonable, and verifying that pages load smoothly across devices.
Phase 4: Post-Launch & Monitoring
10. Submit your sitemap
The sitemap, as its name suggests, shows Google exactly where to go and what's important on your site. You should submit your sitemap as soon as your new store is live and your domain is pointing to Shopify. Submitting it too early, while your site is still in development or password-protected, won’t yield results since Googlebot can’t access your content.
Fortunately, we have some great news. Shopify automatically generates your sitemap for you. It’s available at yourstore.com/sitemap.xml, and this file is actually a sitemap index that links to multiple sub-sitemaps, including:
- Products (e.g., sitemap_products_1.xml)
- Collections (e.g., sitemap_collections_1.xml)
- Pages (e.g., sitemap_pages_1.xml)
- Blogs (e.g., sitemap_blogs_1.xml)
This is useful to keep in mind, as Google Search Console may report issues at the individual sitemap level rather than the main index. By default, Shopify also keeps your sitemap clean by excluding noindex pages and password-protected content, so you don’t need to manually filter these out.
All you need to do now is to head over to Google Search Console, go to the “Sitemaps” section, and submit your sitemap URL:
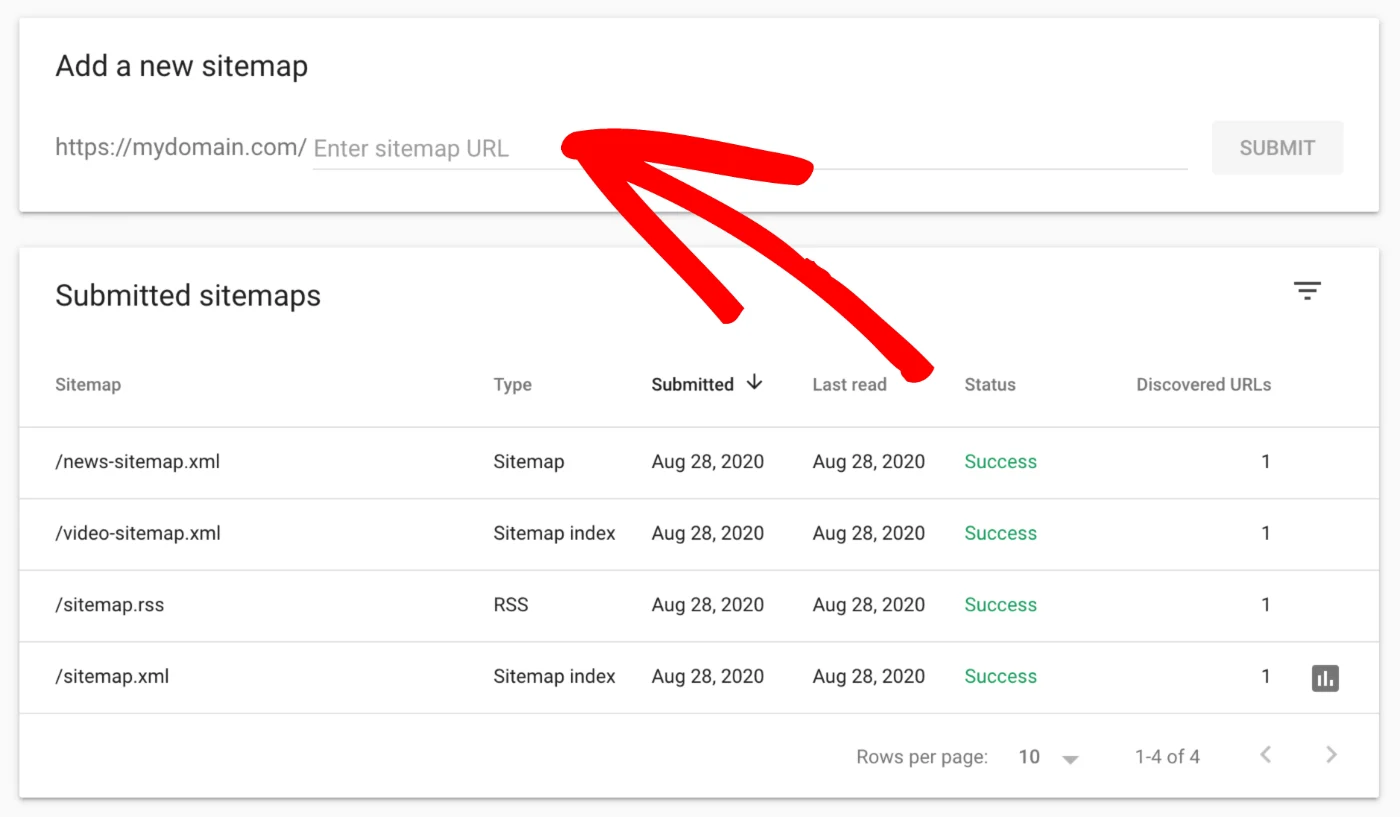
After submission, keep an eye on Search Console to catch any crawl issues or indexing errors, so you can fix them before they affect your rankings.
11. Monitor and fix SEO issues
Once your store is live, this is where everything starts to show. Even with careful preparation, small SEO issues can still appear after migration – and catching them early makes a big difference.
At this stage, what matters most is visibility in Google Search Console. You’ll want to monitor how Google is crawling and indexing your site by focusing on a few key reports:
- Coverage (Indexing) report to identify noindex pages, 404s, redirect issues, and soft 404s.
- Core Web Vitals report to spot performance regressions across page groups.
- URL Inspection tool to check how Google sees and indexes individual pages.
Taken together, these signals give you a clear picture of whether pages are being discovered and indexed as expected after migration. As you review the data, patterns start to matter more than individual errors. Broken links, indexing gaps, unexpected traffic drops on previously strong pages, or emerging duplicate content signals are all worth paying attention to.
Some fluctuation is completely normal in the first few weeks. The goal here isn’t to react to every small change, but to identify patterns. If certain pages don’t recover or errors keep appearing, that’s usually a sign that something needs to be fixed.
Why Shopify Migrations Risk SEO Traffic?
Even with a smooth Shopify migration, SEO can take a hit if key elements aren’t handled carefully. Here are the main reasons behind it:
Old URLs break when redirects are not properly set up
When you move to Shopify, your URLs often change (for example, adding /products/ or /collections/). If you don’t map old URLs to new ones with 301 redirects, both users and search engines will land on 404 pages. Over time, Google drops those old URLs from its index, and you lose the rankings they built. Even with 301 redirects preserving most link equity, some SEO value is still lost if not handled properly.
Metadata gets lost during migration
Meta titles and descriptions don’t always transfer cleanly, especially if you’re using different fields or structures across platforms. Missing or duplicated metadata makes your pages less relevant in search results, and you may also see lower click-through rates because your snippets are no longer optimized.
URL structure changes affect existing SEO signals
Your previous platform might allow fully customized URLs, while Shopify follows a fixed format. That means keyword-rich URLs could be altered or shortened. Even with redirects in place, search engines need time to reassess these new URLs, which can temporarily weaken your rankings.
Duplicate content appears without canonical tags
Shopify adds canonical tags by default to handle cases where multiple URLs can exist for the same product. However, custom themes or third-party apps can override or misconfigure them. When that happens, search engines may index multiple versions of the same page, causing ranking signals to be split across duplicates instead of consolidated.
Image SEO is not preserved
During migration, image files may be renamed, rehosted, or lose their original alt text. This reduces your chances of appearing in image search and removes valuable on-page signals that help search engines understand your content. It’s especially noticeable on product-heavy stores where images play a big role in SEO.
As you can see, SEO performance isn’t automatically preserved during a Shopify migration, and even small mistakes can lead to ranking loss. If you’re not fully confident handling the technical side, it’s easy to miss critical details along the way. That’s where LitExtension can help, with a fully managed migration service designed to keep your data and SEO intact.
Shopify Migration Made Easy With LitExtension!
LitExtension offers great migration solutions that help you transfer your data from the current eCommerce platform to a new one accurately, painlessly with utmost security.

Why Do You Need an SEO Migration for Shopify?
When you migrate your eCommerce store to Shopify, one of the most crucial aspects to consider is the impact on your search engine rankings and overall online visibility. SEO is the backbone of any online business, and ensuring your migration strategy includes effective SEO practices can make or break your store's post-migration performance.
Here's a closer look at why you need an SEO migration for Shopify and how it can enhance your business.
Improved site performance and speed
One of the most immediate improvements you’ll notice after moving to Shopify is site performance. Speed plays a direct role in both user experience and search rankings, so even small improvements here can have a noticeable impact.
Shopify is built with performance in mind, which makes it easier for your store to load quickly without heavy technical setup. A few key factors behind this include:
- Optimized hosting infrastructure: Shopify provides fast, secure hosting with a built-in CDN, helping your store load quickly across different regions.
- Built-in image optimization: Images are automatically compressed, reducing load time without extra manual work.
- Lightweight, optimized themes: Shopify themes are designed for speed, helping you avoid unnecessary code that can slow down your site.
Enhanced search engine visibility
Beyond speed, Shopify also makes it easier to maintain and improve your search engine visibility. However, this only works when the migration is handled properly – otherwise, it’s just as easy to lose rankings as it is to gain them.
When everything is set up correctly, Shopify’s structure supports SEO in a way that’s both practical and scalable:
- Built-in SEO features: Shopify offers essential SEO tools like customizable meta tags, automatic sitemaps, editable URLs, and image alt text.
- Structured data markup: Product pages come with built-in schema, helping search engines display rich snippets like ratings, prices, and availability.
- Internal link optimization: Migration is a chance to improve your internal linking, helping distribute SEO value to key pages.
URL structure optimization
With performance and visibility covered, the next layer to consider is how your URLs are structured. This plays a key role in how both users and search engines navigate your site.
A clean, consistent URL structure makes your content easier to crawl, index, and interpret. During an SEO migration for Shopify, this is also where a lot of SEO value can either be preserved or lost. Shopify gives you the flexibility to manage this effectively:
- Customizable URL slugs: You can optimize URLs with relevant keywords to align with your SEO strategy.
- Easy 301 redirects: Shopify lets you quickly redirect old URLs, preserving rankings and traffic.
- Clear URL structure: Organized product and category URLs improve navigation and help search engines understand your site.
How Much to Migrate to Shopify Without Losing SEO?
The cost of migrating to Shopify can vary widely depending on how complex your store is and how much SEO you want to preserve. Instead of a fixed number, it’s more helpful to look at typical ranges based on migration type:
- $300 – $1,000: Basic or DIY migrations using automated tools, suitable for smaller stores with simple structures.
- $2,000 – $15,000: Small to mid-sized projects handled by freelancers or agencies, including data migration and essential SEO setup.
- $10,000 – $50,000+: More complex or enterprise-level migrations with integrations and detailed SEO preservation.
- $30,000 – $100,000+: Shopify Plus migrations for high-volume, highly customized stores.
These ranges are based on our experience and already factor in the key elements that typically affect migration cost, such as:
- Data volume (number of products, variants, pages)
- Platform complexity (e.g. WooCommerce vs Magento)
- Level of customization (pre-built theme vs custom development)
- SEO scope (redirect mapping, metadata transfer, structure optimization)
- Integrations (e.g. ERP like NetSuite or CRM systems)
So in practice, your final cost will depend on how these factors apply to your store.
Shopify SEO Migration: FAQs
Does Shopify automatically do SEO?
Sort of! Shopify takes care of a few SEO basics right off the bat. For example, it adds canonical tags to your pages to stop duplicate content from clogging up search results. The platform also generates a sitemap.xml for you automatically, which includes links to your products, pages, main product images, blog posts, and collections.
Is Shopify any good for SEO?
Yes. Shopify supports SEO with features like properly implemented canonical tags and an auto-generated sitemap.xml. Its sitemap index covers key content types including products, pages, collections, blog posts, and images, helping search engines discover and understand your site structure efficiently.
Where do I change my SEO on Shopify?
In Shopify, SEO settings are available across different content types, not just pages:
- Pages: Online Store > Pages
- Products: Products > select a product
- Collections: Products > Collections
- Blog posts: Online Store > Blog posts
In each case, scroll to the “Search engine listing preview” section and click “Edit website SEO” to update your title, description, and URL.
Which SEO tool is best for Shopify?
There’s no single “best” SEO tool for Shopify, as it depends on your needs. For technical SEO and site audits, tools like Screaming Frog or Ahrefs are commonly used, while apps like Plug In SEO or Smart SEO can help manage on-page elements directly within Shopify. In many cases, a combination of tools works best.
Final Words
That's a wrap on our Shopify SEO migration checklist! Of course, you might run into some extra hurdles (depending on the complexity of your store), but these steps are the solid foundation to keep your site running smoothly.
And what if you'd rather skip the headaches altogether and make sure your migration goes off without a hitch? Let LitExtension take care of everything for you! With over 12 years of experience and 300,000+ successful migrations in 100 countries, our team knows exactly how to make your Shopify migration seamless and stress-free. Leave it to us, and you'll be up and running in no time!
For more information, check out our Shopify guides and join our Facebook Community.
Explore Shopify solutions for every stage of your business:
- How to Clone Shopify Store in 6 Steps
- Shopify Login by 3 Methods: A Complete Guide
- How to Delete Shopify Account or Close Shopify Store

