Are you building your first eCommerce store on WooCommerce, yet being intimidated by its steep learning curve? Worry not, as I’ll walk you through a detailed WooCommerce tutorial that’s easy to follow, even for beginners.
In the following sections, I’ll cover:
- The basic WooCommerce setup costs;
- A step-by-step WooCommerce setup guide;
- Useful tips to grow your WooCommerce store.
Let’s wait no more and get right into it!
WooCommerce Migration Made Easy!
LitExtension offers great migration solutions that help you transfer your data from the current eCommerce platform to WooCommerce accurately, seamlessly with utmost security.

Is WooCommerce Free to Use?
WooCommerce itself is completely free to install and use. As an open-source WordPress plugin, it gives you all the essential tools to start selling online without paying any monthly fees. You can list products, manage inventory, accept payments, and customize your store design right from your WordPress dashboard.
Running a WooCommerce store involves extra costs beyond the free plugin itself. Expect to spend around $5–25/month for hosting, $15/year for a domain, and $30–100 for a premium theme. Extensions, design, and management can bring your total to roughly $1,000–60,000 per year, depending on your store’s size and features. For a detailed breakdown, check out our WooCommerce pricing guide.
How to Set Up Your WooCommerce Store in 9 Steps?
Next, in this section, we’ll walk you through the exact steps to set up your WooCommerce store from scratch. This WooCommerce tutorial includes 9 essential steps to get your store ready:
- Step 1: Choose a domain
- Step 2: Download WordPress
- Step 3: Install WooCommerce plugin
- Step 4: Configure WooCommerce settings
- Step 5: Add new products
- Step 6: Customize the storefront
- Step 7: Install WooCommerce extensions
- Step 8: Secure your website
- Step 9: Start selling
If you prefer a visual walkthrough, we’ve also included a WooCommerce tutorial video right below to help you follow along easily.
Let’s get started!
Step 1: Choose a domain & web hosting
Setting up a WooCommerce store involves a certain amount of coding. Still, we can always streamline the process by preparing a detailed WooCommerce tutorial checklist. By that, you will know exactly what you need to prepare in advance.
To build a WooCommerce store from scratch, here’s what you need to put together beforehand:
- A WordPress hosting account;
- A domain name;
- and an SSL certificate.
First, get yourself a host, a place where you store all the website files. There are several options you can choose from. Bluehost and SiteGround are two of the names that WordPress recommends. Other than that, A2 Hosting is also a good option to consider.
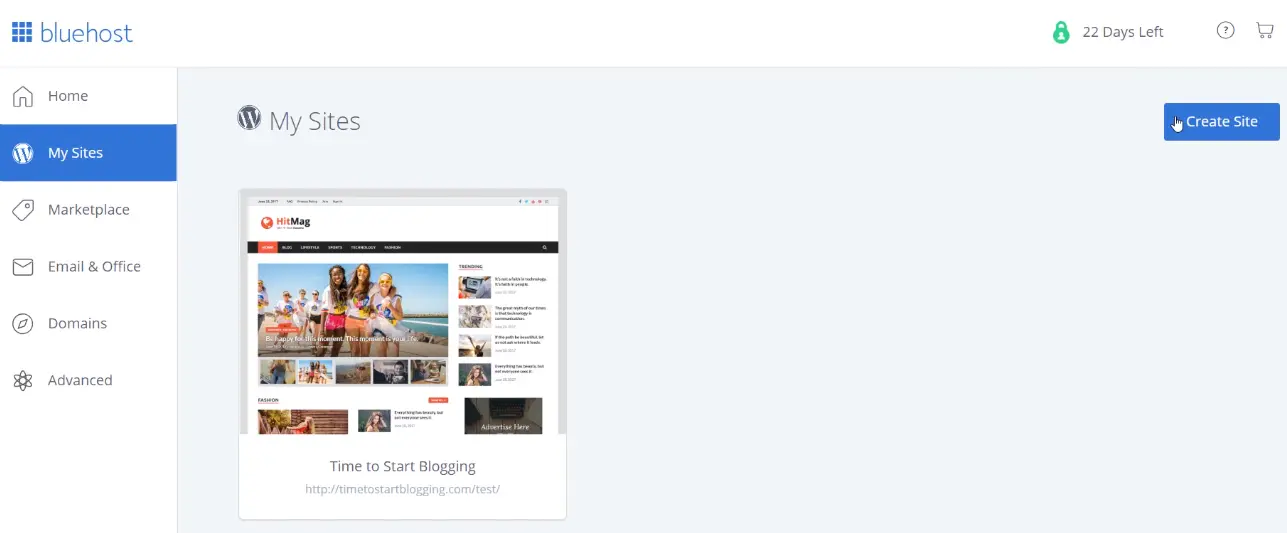
After making your decision, proceed to build a new WordPress page. Log in to the hosting website, select a plan based on your needs, and then you’ll be asked to create a new domain name. If you currently own one, you can fill in the details instead.
Here are my tips for picking the best domain for your WooCommerce webshop:
- Use your brand name;
- Use keywords related to your products;
- .com extension is a plus;
- Do not use numbers or hyphens in your domain name.
After picking a domain name, pick a hosting plan and complete your purchase. The hosting provider will send you an email with information to log in to your hosting dashboard. This is also the place where you manage your website.
Step 2: Download WordPress
The next step in this WooCommerce tutorial is to download WordPress. But before that, please make sure your hosting environment meets the minimum system requirements. You’ll need PHP 8.0 or higher, MySQL 5.7 or MariaDB 10.4 or greater, and HTTPS support for security. Most modern hosting providers already include these by default, but it’s best to double-check to avoid compatibility issues later.
Option 1: One-click WordPress installation
Most hosting providers offer a “one-click” WordPress installation with the purchase of a hosting plan. All you need to do is click on the “Install WordPress” or “Create Website” button on the hosting dashboard.

Just a few seconds later, the hosting provider automatically generates a WordPress account for you. The login details will be shown on the screen; make sure to copy them for later usage.
Option 2: Manual WordPress installation
If your hosting provider doesn’t offer one-click installation, you can manually install WordPress by following these steps:
- Download and unzip the package from WordPress.org.
- Create a database for WordPress on your web server, as well as a MySQL (or MariaDB) user who has all the privileges for accessing and modifying it.

- Find and rename wp-config-sample.php to wp-config.php, then edit the file (see Editing wp-config.php) and add your database information. It’s worth noting that the install program will create the wp-config.php file for you anyway. Hence, this step is optional, and you can skip it if you like.
- Upload the WordPress files to the desired location on your web server. Make sure to disable the option to convert file names to lowercase.
- If you want to integrate WordPress into the root of your domain (e.g. http://example.com/), move or upload all contents of the unzipped WordPress directory (excluding the WordPress directory itself) into the root directory of your web server.
- If you want to have your WordPress installation in its own subdirectory on your website (e.g. http://example.com/blog/), create the blog directory on your server and upload the contents of the unzipped WordPress package to the directory via FTP.
- Run the WordPress installation script by accessing the URL in a web browser. This should be the URL where you uploaded the WordPress files.

For more information regarding WordPress manual installation, please refer to the WordPress official guide. There should be no big problems if you follow their instructions carefully.
Step 3: Install WooCommerce plugin
Now that you’ve got a WordPress website, let’s move to the most crucial part in this WooCommerce tutorial, when you learn how to set up a new store! There are several ways to do this, but I will, of course, show you the easiest one.
From your WordPress dashboard, go to Plugins > Add New, then search for “WooCommerce”. Click Install Now, and once the installation is complete, select Activate.

After activation, WooCommerce will automatically launch its setup wizard, guiding you through key configurations. Read the usage tracking docs, tick the box, and then click on “Set up my store” to get started. If you prefer to configure everything manually, you can also click “Skip guided setup” and proceed with the next steps later.

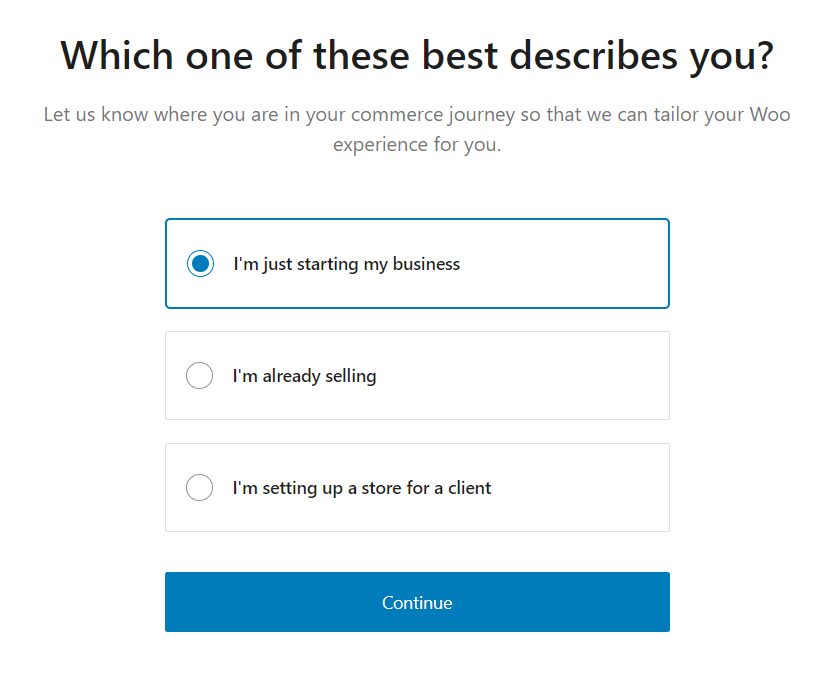
Once you begin the setup, WooCommerce will ask for a few essential details to tailor your store configuration. First off, let them know whether you are setting up a WooCommerce store for your business or you’re doing it for a client.
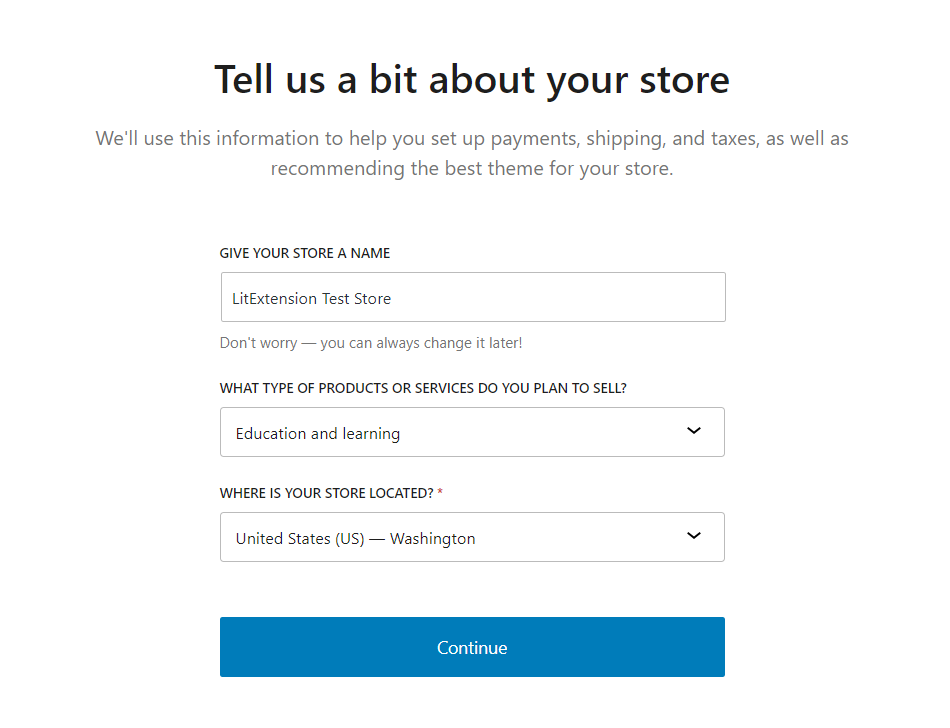
Next, fill in your store name, select product types, and provide your store location. Since these details provide a foundation for further tax and shipping configurations, make sure you enter them correctly. Hit “Continue” when you’re done.
Based on the information you provide, WooCommerce will suggest suitable free features for your business. These cover most eCommerce abilities your store would need, from payments, shipping, and automated tax rates, to promoting your products through content and ad campaigns.
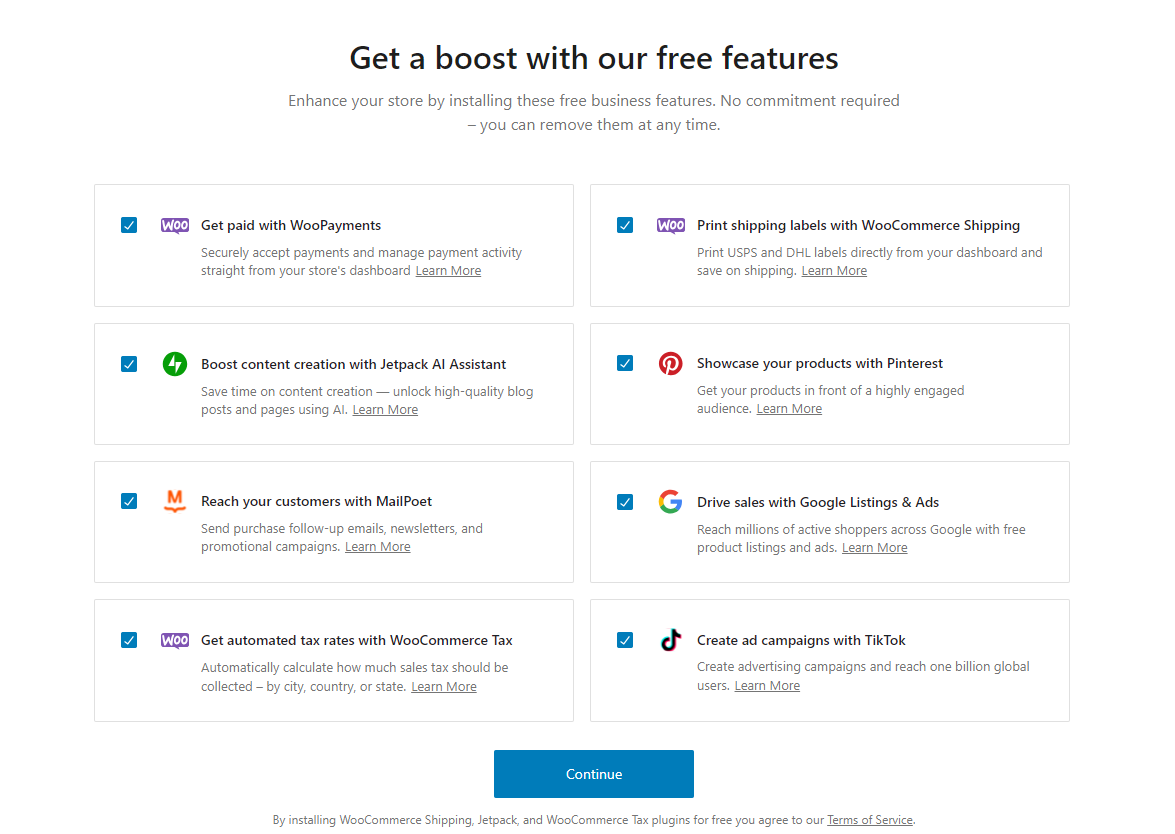
If you feel this is quite early to add eCommerce features to your store, click on Skip this step to process to the next step. You can always come back later to enhance your eCommerce ability.
Step 4: Configure WooCommerce settings
Once you finish adding the basic information about your WooCommerce store, you will land right on the WooCommerce dashboard. From here, you’ll see a detailed checklist of what you should do next with your store.
Nevertheless, you should configure a few other settings before adding the first products. From your dashboard, go to WooCommerce > Settings. You will see a number of tabs on the page, including General, Product, Shipping, Payments, and so on. Our WooCommerce tutorial will continue with the detailed guide on each setting right below.
1. General settings
This is where you’ll define the basic information that affects almost every part of your store.
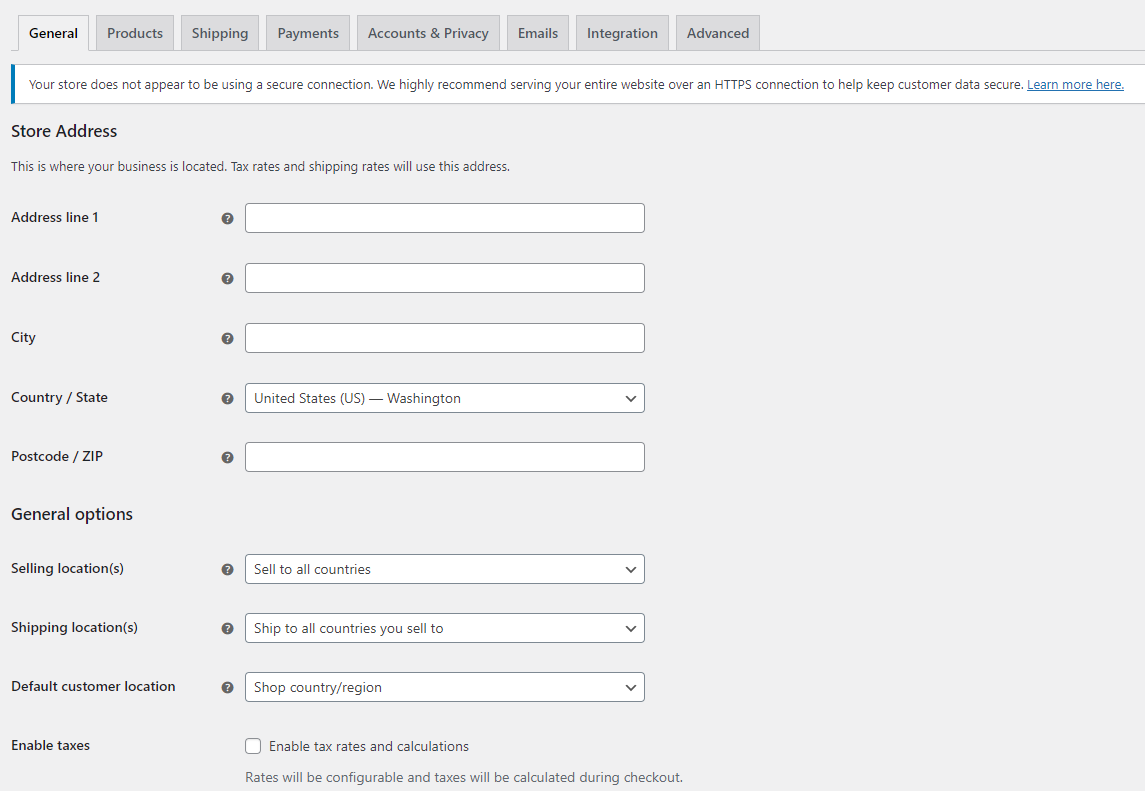
- Store address: Enter your physical business address, including country, city, and postal code. This helps WooCommerce calculate shipping rates and taxes correctly.
- Selling locations: Choose whether you want to sell to all countries, specific countries, or just your own. If you only sell domestically, select “Sell to specific countries” and enter your target region.
- Shipping locations: Decide where you’ll ship products – the same countries you sell to, or only certain ones. You can update this later when setting up detailed shipping zones.
- Default customer location: This determines how WooCommerce estimates taxes and shipping before a customer enters their address. You can set it to “Shop base address” for local-only stores, or use “Geolocate” for international stores.
- Enable taxes: Tick this box if you plan to charge taxes. It will automatically add a Tax tab to your settings, which you’ll configure later.
- Currency options: Choose your store’s default currency, along with its position (left/right of the price), thousand separator, and decimal separator. For example, US-based stores might use “$” before the amount with a period as the decimal separator.
Click “Save changes” at the bottom before moving on to the next tab.
2. Products settings
The Products tab is where you control how your products behave and are managed. There are 5 smaller sections:
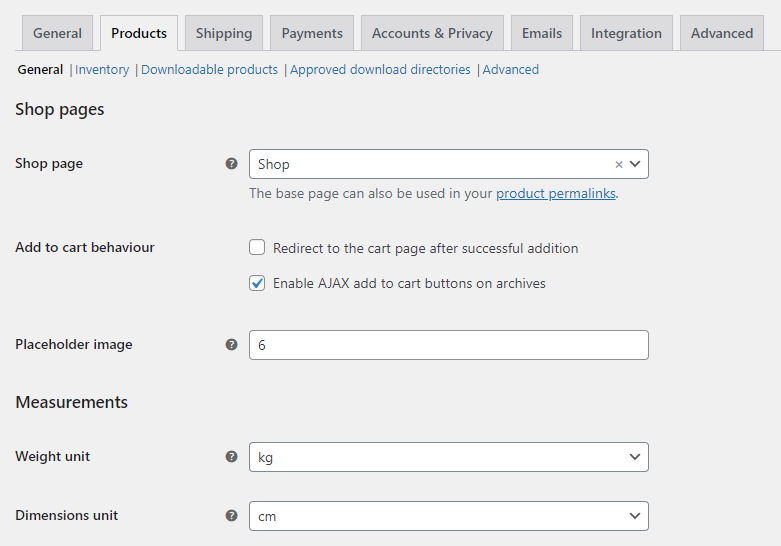
In the General tab, you will see Shop pages, Measurements, and Reviews configuration options. The Inventory section is where you activate stock management and set up low-stock alerts. The Downloadable Products section lets you choose your file download methods, while the Approved download directories show the permitted URLs. Lastly, you can configure the product attributes lookup table in the Advanced tab.
3. Tax settings
If you enabled taxes in the General settings, a new Tax tab will appear in your WooCommerce dashboard. This section helps you define how taxes are calculated and displayed across your store.
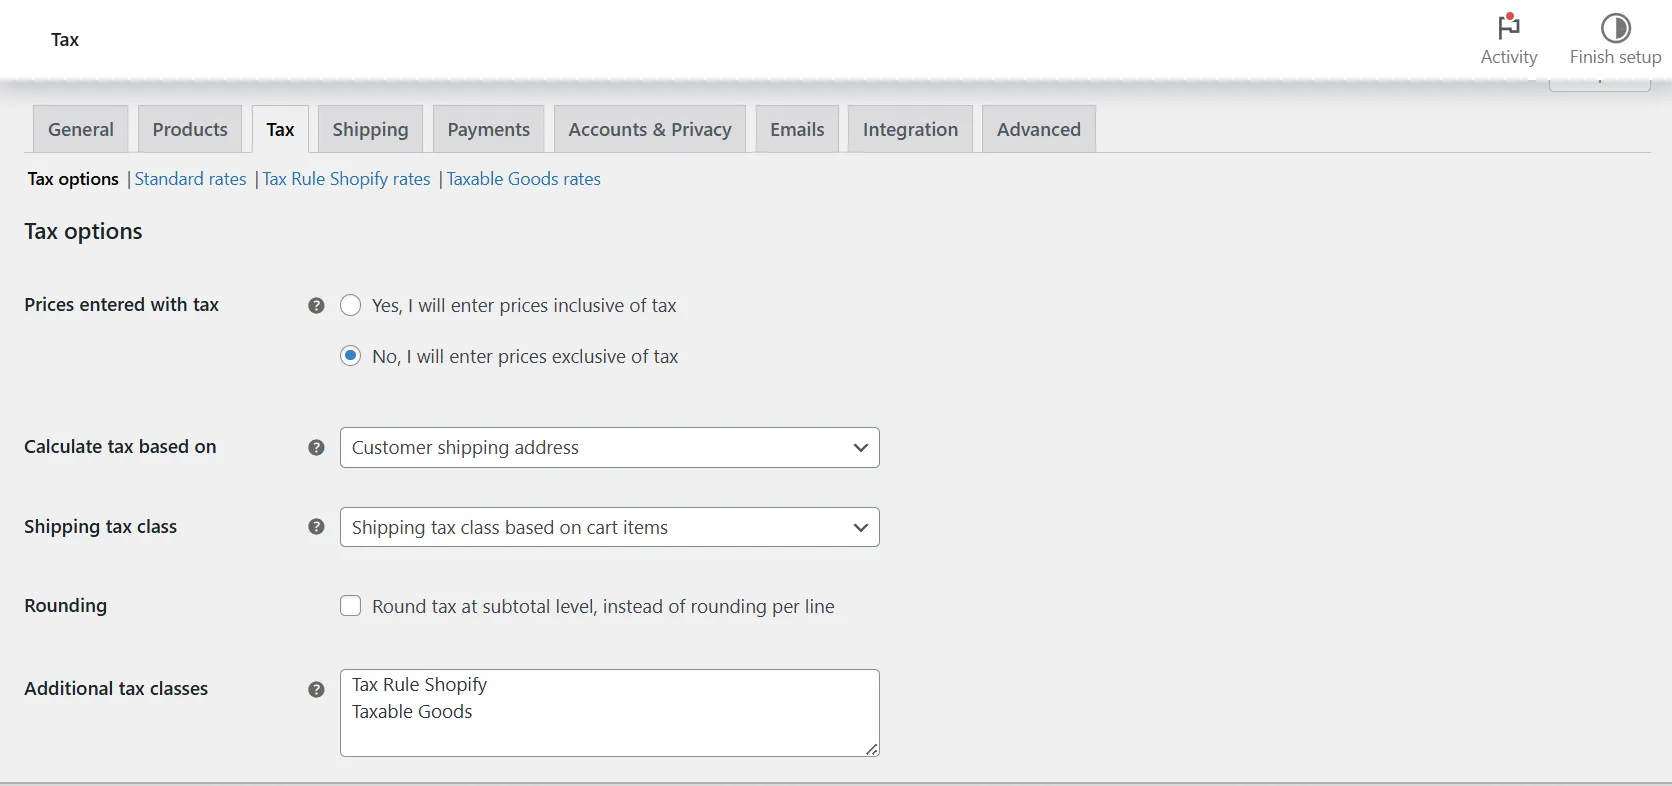
You can start by choosing whether to enter product prices inclusive or exclusive of tax. For example, if your listed prices already include tax, WooCommerce will automatically calculate and show the tax portion at checkout.
Next, configure how taxes are calculated based on your store address, customer billing address, or shipping address. You can also decide how tax totals appear on invoices and at checkout (as a single total or broken down by rate).
In the Standard rates section, add specific tax rates for countries, states, or regions. WooCommerce allows you to import CSV files for bulk tax setup, which is useful if you sell internationally. For stores based in countries like the US, UK, or EU, you can install extensions such as WooCommerce Tax or Jetpack Tax to automate rate updates.
Once everything is set up, double-check a few sample orders to ensure your tax rules apply correctly before going live.
4. Shipping settings
Moving on to the next step of the WooCommerce tutorial, the Shipping settings are only necessary if you sell physical products.

Start by setting up shipping zones. Each zone can have different methods, such as flat rate, free shipping, or local pickup, depending on where your customers are.
Next, review your shipping options. You can decide whether to display shipping costs immediately or only after a customer enters their address.
If your products vary in size or weight, create shipping classes. This helps you group similar items and apply customized rates more efficiently. Once done, your store will show accurate delivery options and costs for every customer.
5. Payment Settings
The Payment tab gives you full control over how customers complete their purchases. In this step, you can select and activate one or more payment options depending on your business type, location, and target market.
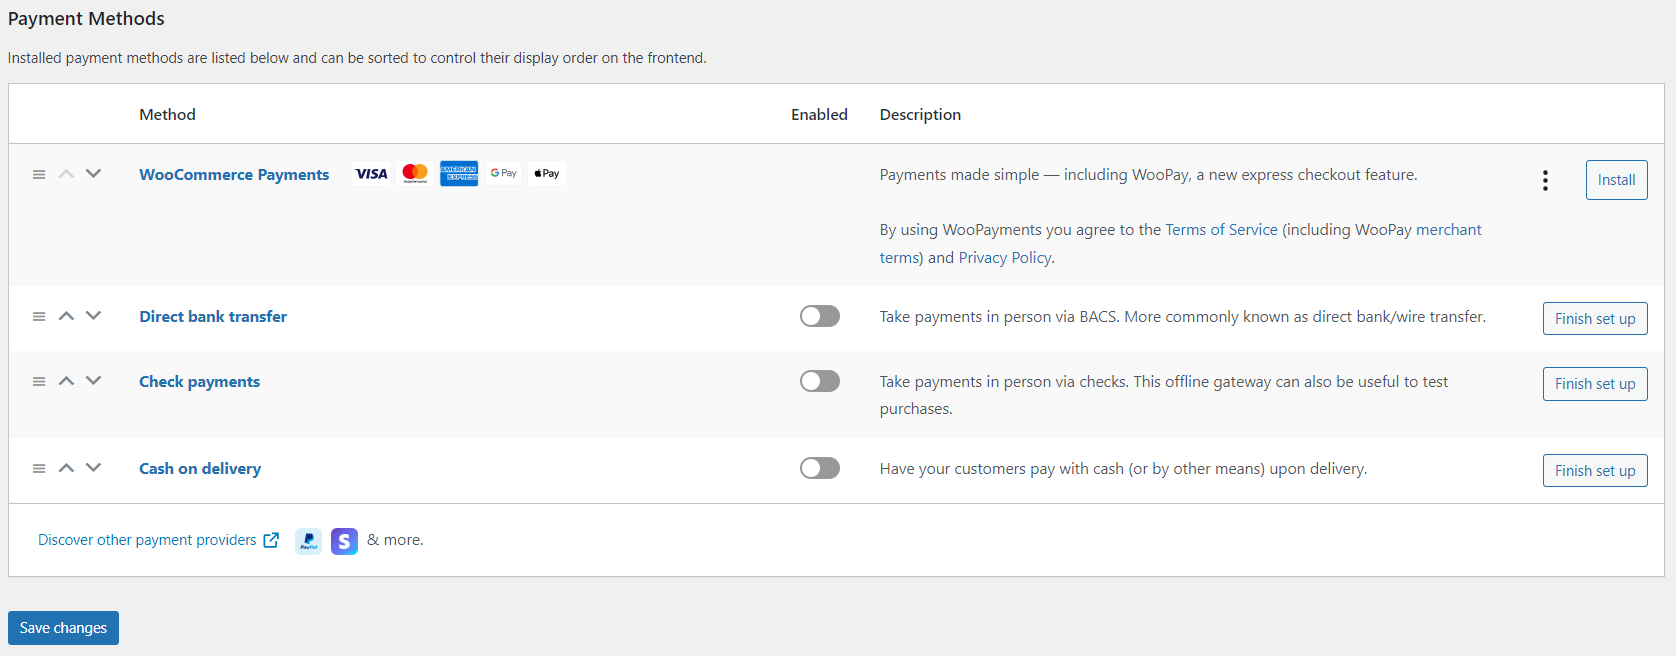
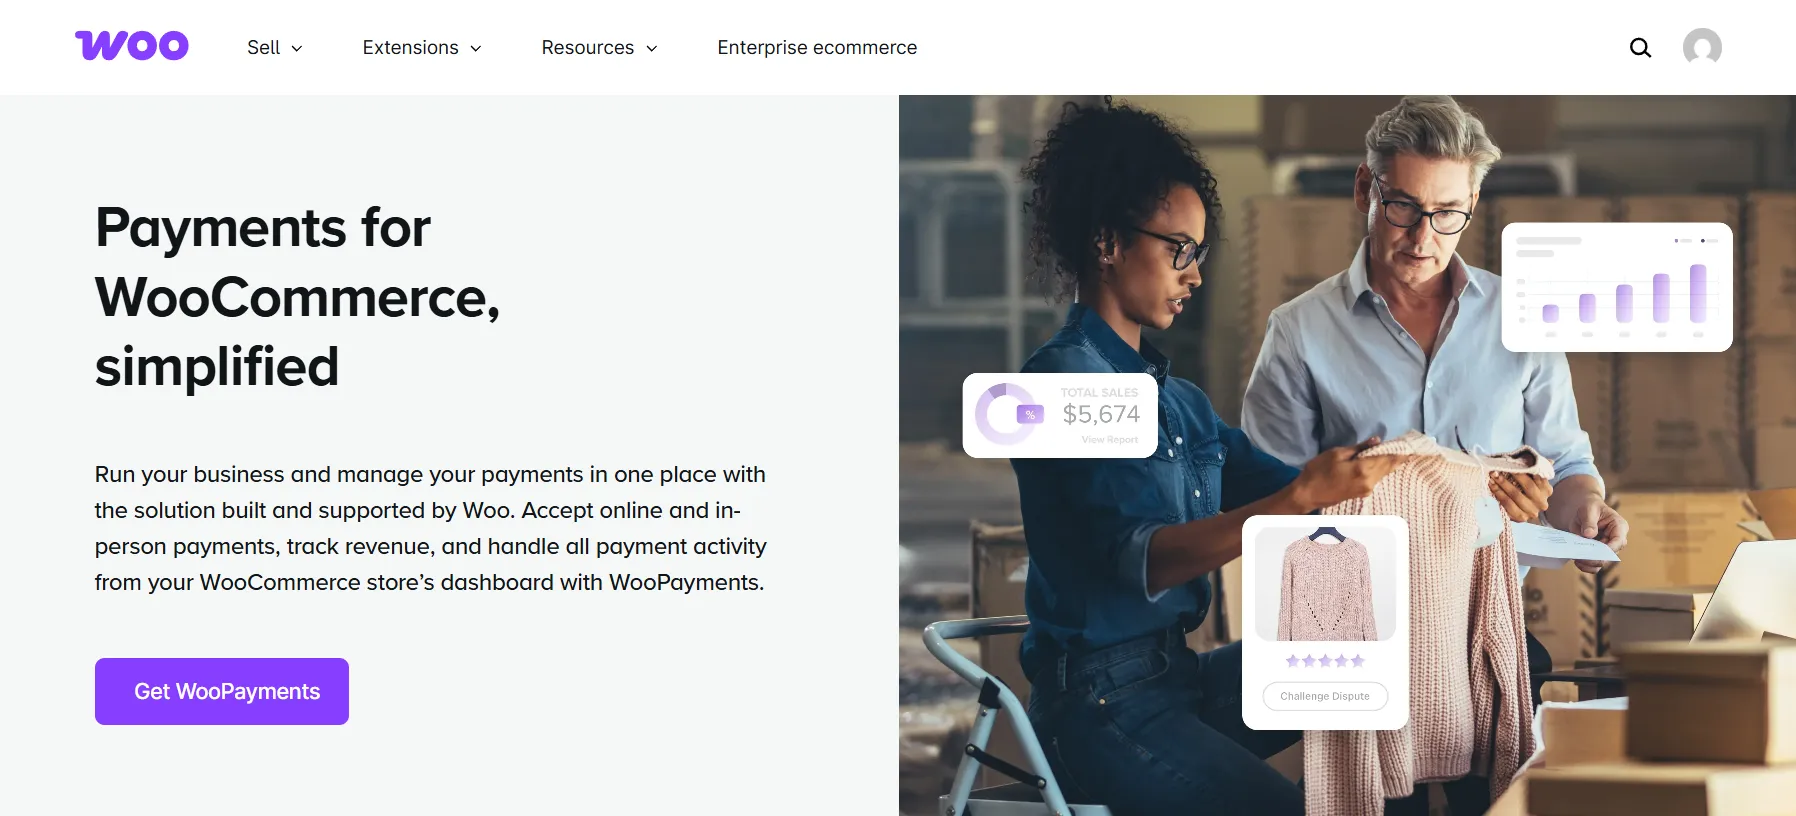
WooCommerce supports a wide range of gateways, including WooPayments, Stripe, Square, PayPal, and more. We recommend starting with WooPayments, as it includes credit card processing and multiple payment methods in one setup. Check if WooPayments is available in your country, and if so, take the next step to get started right away.
Beyond WooPayments, you can choose other providers based on customer preferences:
- Card payment processors such as Stripe, Square, or Viva Wallet let customers pay directly with credit or debit cards.
- Alternative payment providers like PayPal or Amazon Pay allow users to pay using accounts they already trust, making checkout faster and more secure.
- Buy now, pay later (BNPL) options, including Afterpay, Affirm, or Klarna, give customers flexibility to pay in installments. BNPL usage is projected to grow by 290% by 2027, so it’s a great way to improve conversions.
- Crypto payments can also be enabled using extensions from Coinbase, HAYVN, and others – ideal for tech-forward audiences.
Clicking on any gateway will take you to its setup screen, where you can edit the title, description, and checkout instructions.
If you’re unsure which provider is best for your WooCommerce store, check out our detailed WooCommerce payment gateways review to compare the top options.
6. Account & Privacy Settings
In the Account & Privacy section, you’ll be able to configure several actions related to Guest checkout, Account creation, Account erasure requests, and Personal data removal.
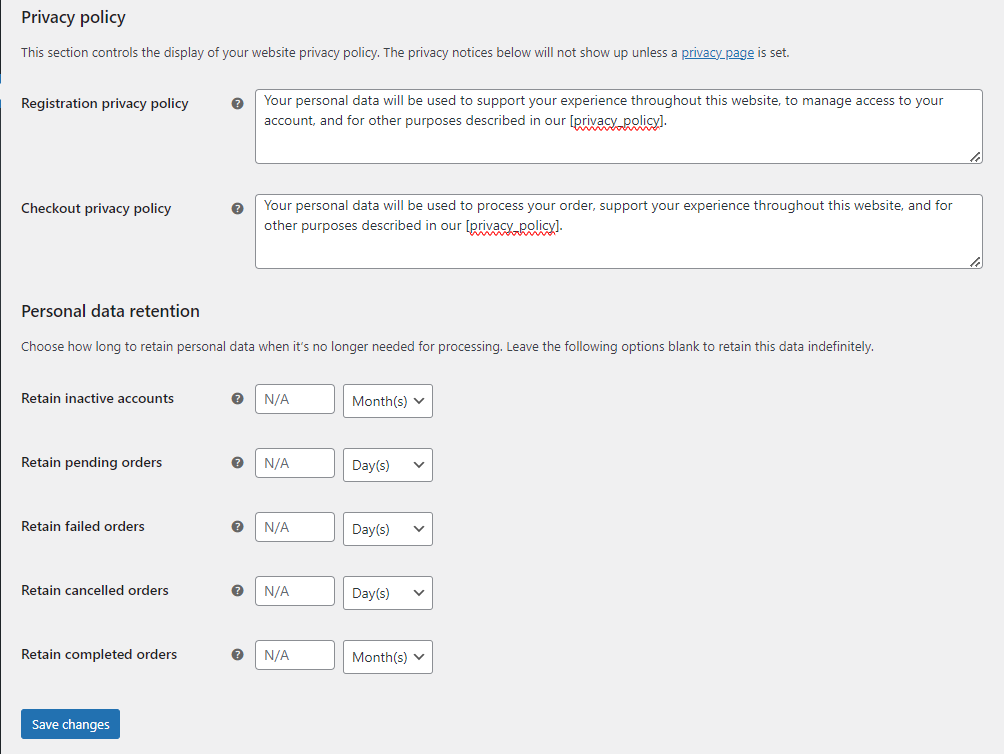
It’s also possible to control the display of your website's privacy policy. You can set up the registration and checkout privacy policies for your WooCommerce store.
Lastly, don’t forget to choose how long to retain personal data in the Personal Data Retention section. Hit “Save changes” when you complete your settings.
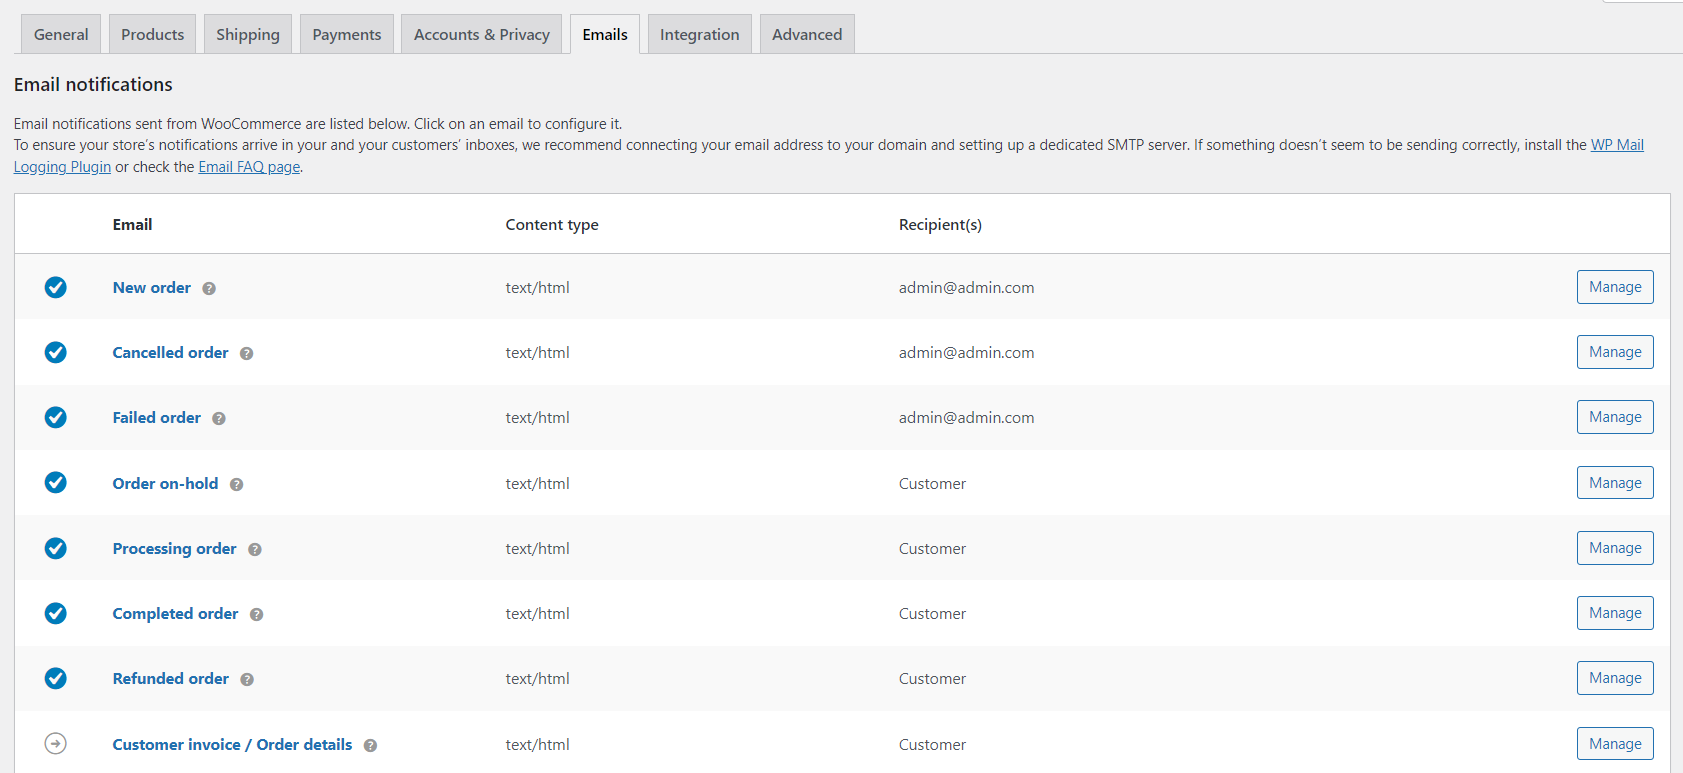
7. Emails settings
The Email tab allows you to enable email notifications for any actions on your WooCommerce store, from new orders and cancellations to refunds and customer notes. What’s more, you will be able to configure email sender options and customize WooCommerce emails to your preferences.
8. Integration settings
The Integration tab lets you connect WooCommerce with third-party tools that help you manage and grow your business. Depending on which plugins or extensions you’ve installed, the available integrations may vary. By default, this section will include two smaller tabs for MaxMind Geolocation and Google Analytics.
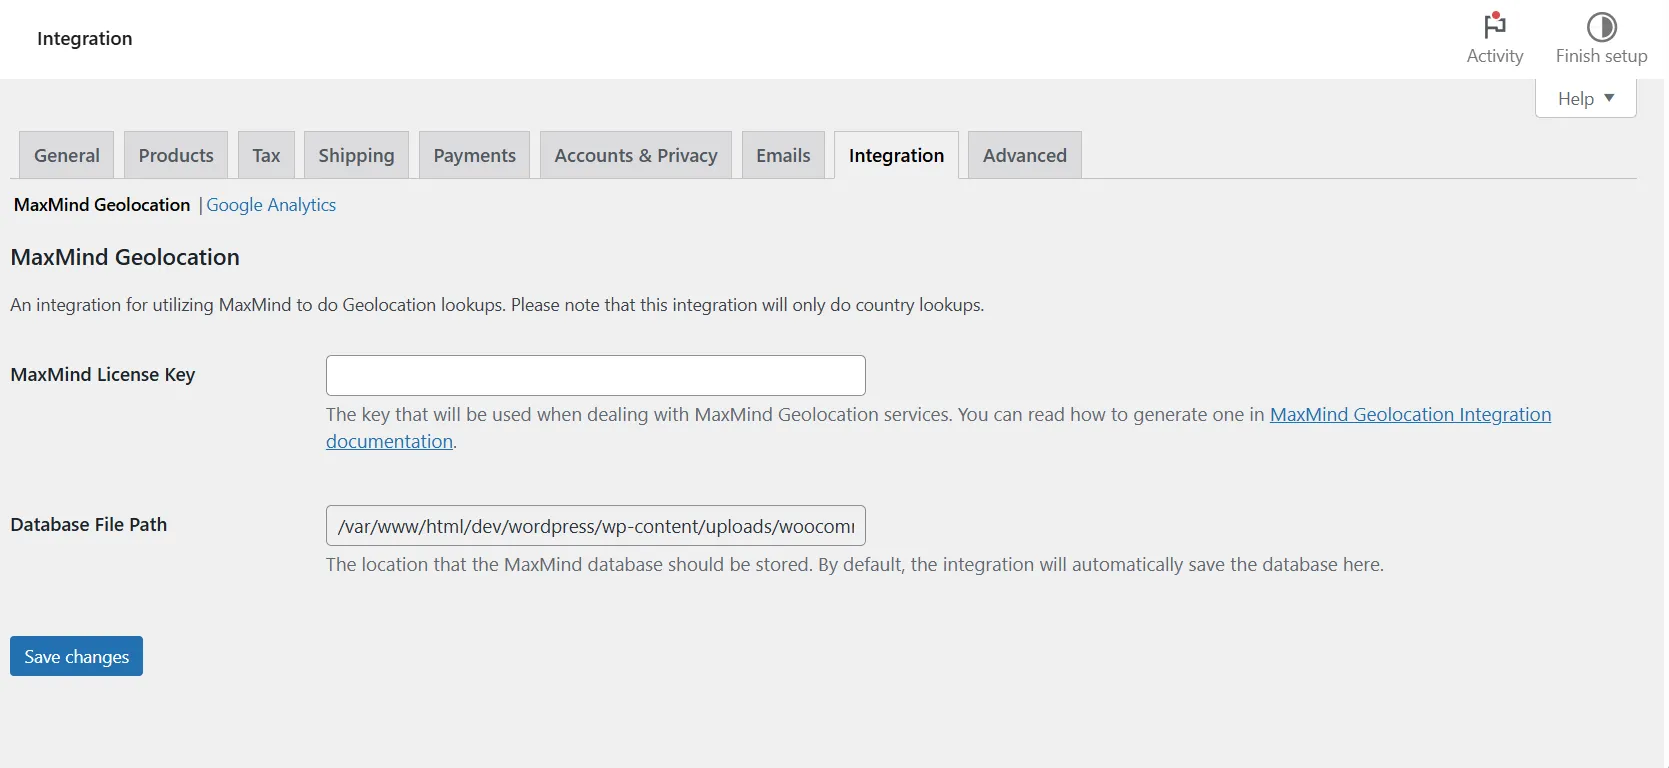
MaxMind Geolocation helps detect a customer’s country automatically, improving checkout accuracy and tax calculation. To use it, generate a MaxMind License Key and enter it in the provided field. You can also link Google Analytics to track store traffic, conversions, and customer behavior for better marketing insights.
To connect an integration, simply install the relevant plugin and return to this tab to configure API keys or tracking IDs. Once enabled, these integrations give you deeper insights into your sales performance and marketing effectiveness.
Step 5: Add Products in WooCommerce
With your store settings complete, it’s time to start adding products – the core of your WooCommerce shop. This is where you present what you sell and show customers why it matters.
Go to your WordPress dashboard > Products > Add new product. This opens the product editor, which looks similar to a blog post editor but includes options for pricing, inventory, and more.

1. Add product title and description
Start by giving your product a clear, descriptive title. A strong title improves visibility and helps shoppers quickly understand what you’re offering.
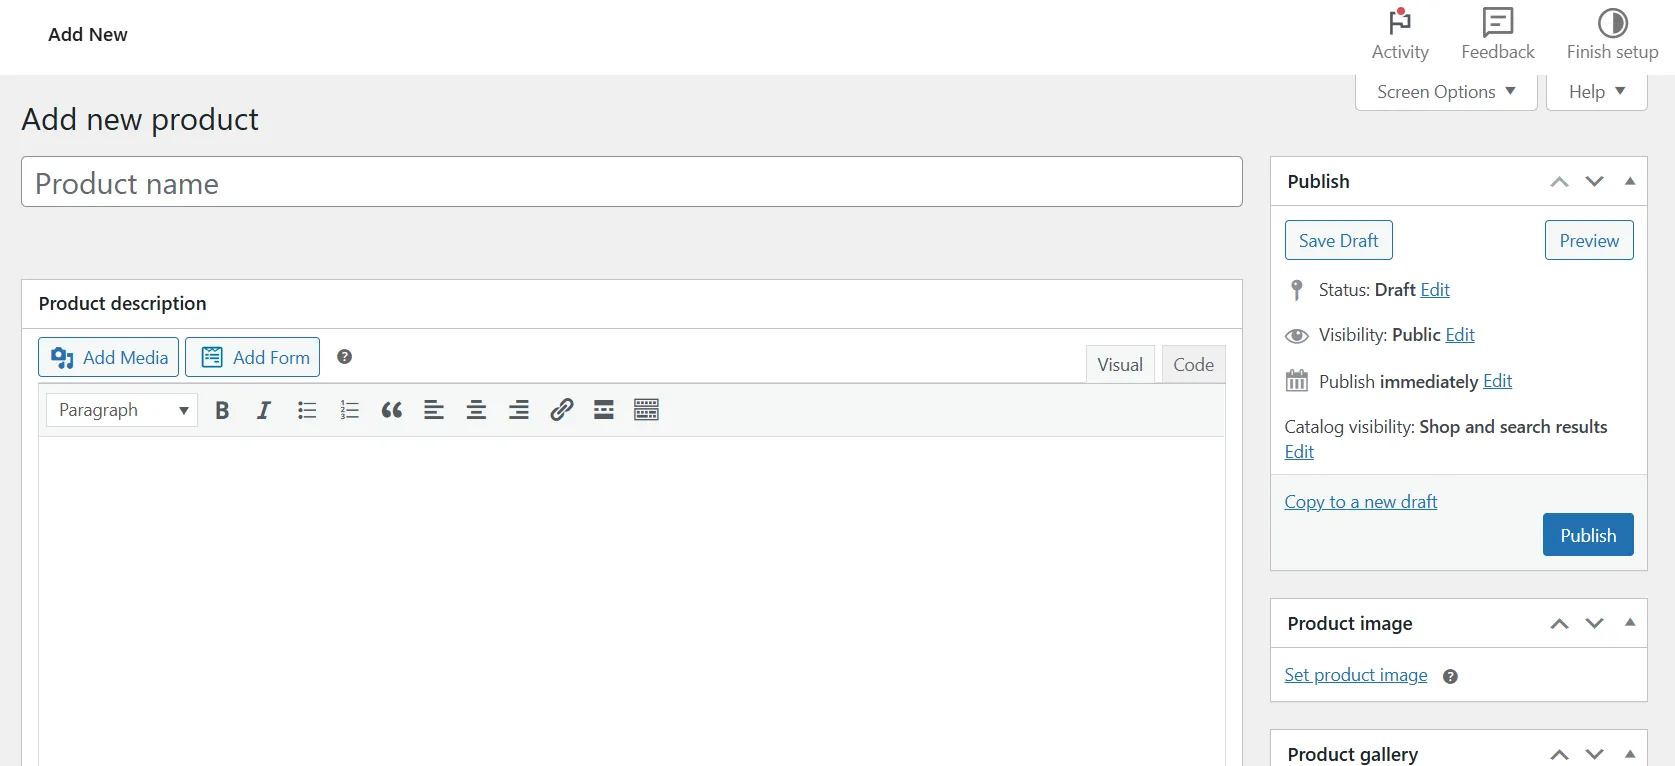
In the large text box below, write your main product description. Think of this as your storytelling space – highlight what the product does, its key features, and why it’s worth buying. You can also use bullet points, headings, or images to make it easier to read.
2. Configure product data
Scroll down to the “Product” data panel. This is where you define what type of item you’re adding and set its details. WooCommerce supports several product types:
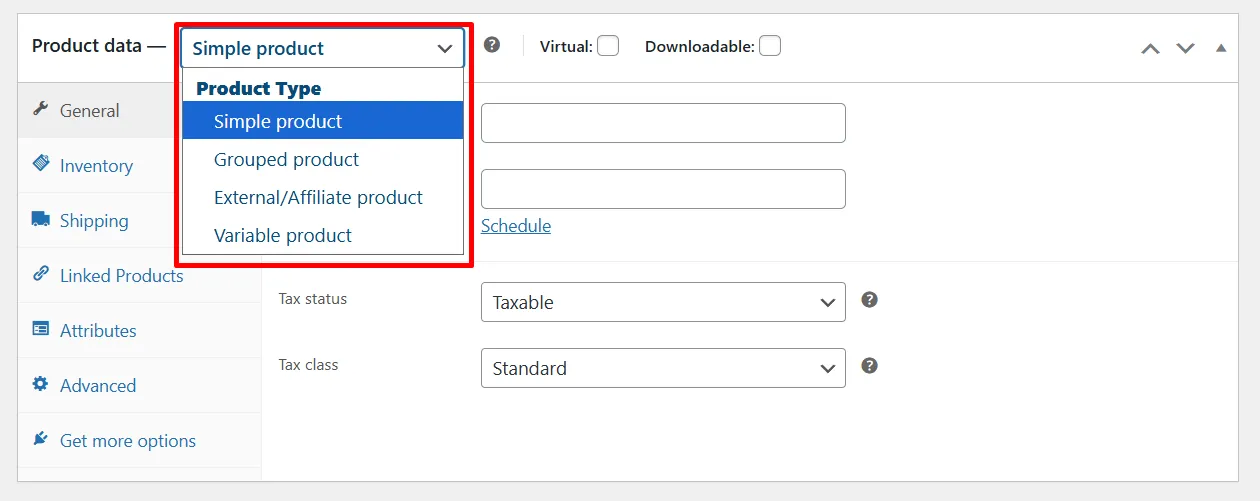
- Simple product: for standard items with no variations.
- Grouped product: A collection of related products that customers can buy individually. For example, a set of notebooks sold as separate items within one group.
- External/Affiliate product: Used for items listed on other websites. Instead of an “Add to Cart” button, your product links to an external page where the customer completes the purchase.
- Variable product: for items that come in different options such as size or color.
- Virtual or downloadable product: for digital goods or services that don’t require shipping.
Inside this section, you can:
- Set your regular and sale prices in the General tab.
- Manage stock levels and create SKUs in the Inventory tab.
- Enter weight and dimensions under Shipping for accurate delivery rates.
These settings help WooCommerce manage your inventory, pricing, and fulfillment automatically.
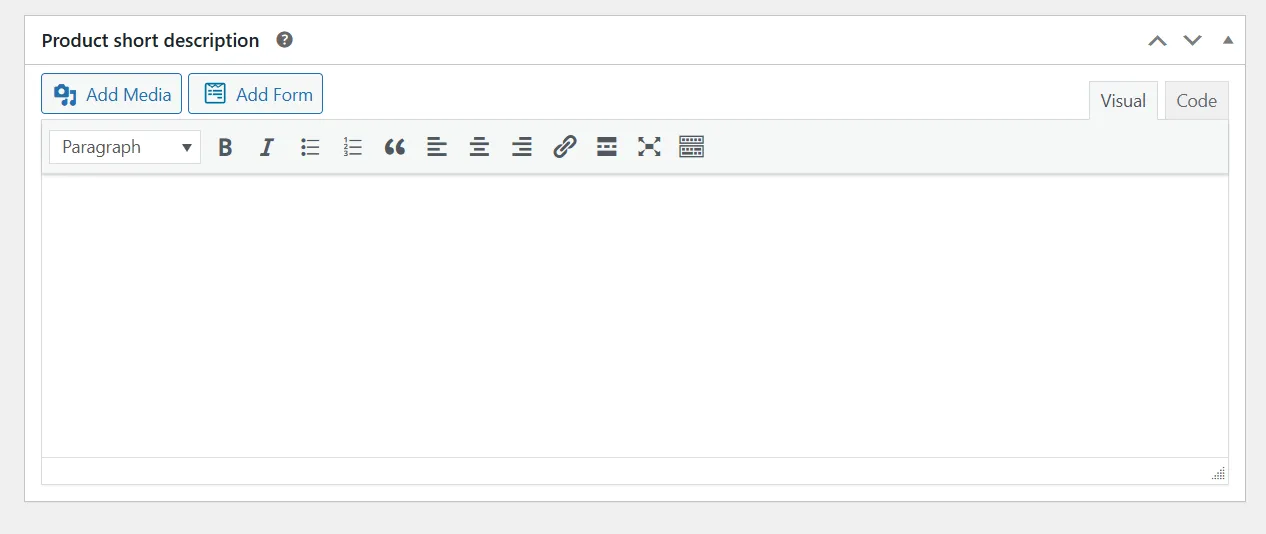
3. Write a short description
Below the product data section, you’ll find the Short description field. This appears next to the main product image on your product page. Keep it brief and highlight your product’s most appealing benefit to grab attention quickly.
4. Add categories and tags
On the right-hand side, you can organize your product using categories and tags.
- Use categories to group similar products, like “T-shirts,” “Jackets,” or “Accessories.”
- Use tags for more specific details such as “cotton,” “eco-friendly,” or “summer collection.”
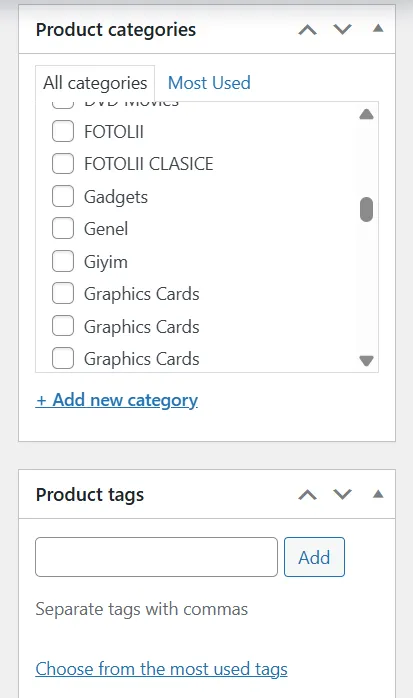
This structure makes it easier for customers to browse and improves your store’s search performance.
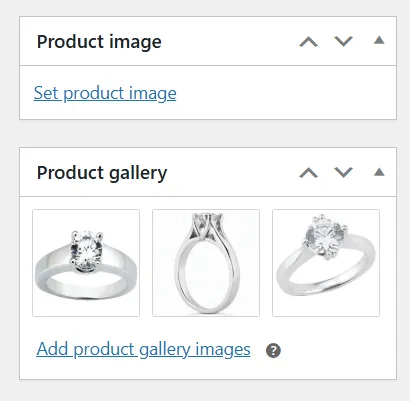
5. Upload product images
Visual presentation is key. Upload a high-quality featured image that clearly represents your item, and add more photos to the product gallery. Include close-ups, lifestyle shots, and different angles to help customers visualize the product better.
6. Publish and review
When you’re ready, click “Preview” to see how your product page looks. Make sure all information and visuals are correct on both desktop and mobile. Then, click “Publish” to make it live.
Once you’ve added and published your first product, you can repeat the process for the rest of your catalog.
If you already have an existing eCommerce store and are migrating to WooCommerce, you can save time by importing all products from a CSV file. Simply click Start Import and use the built-in WooCommerce CSV importer to upload your product data from a CSV file.
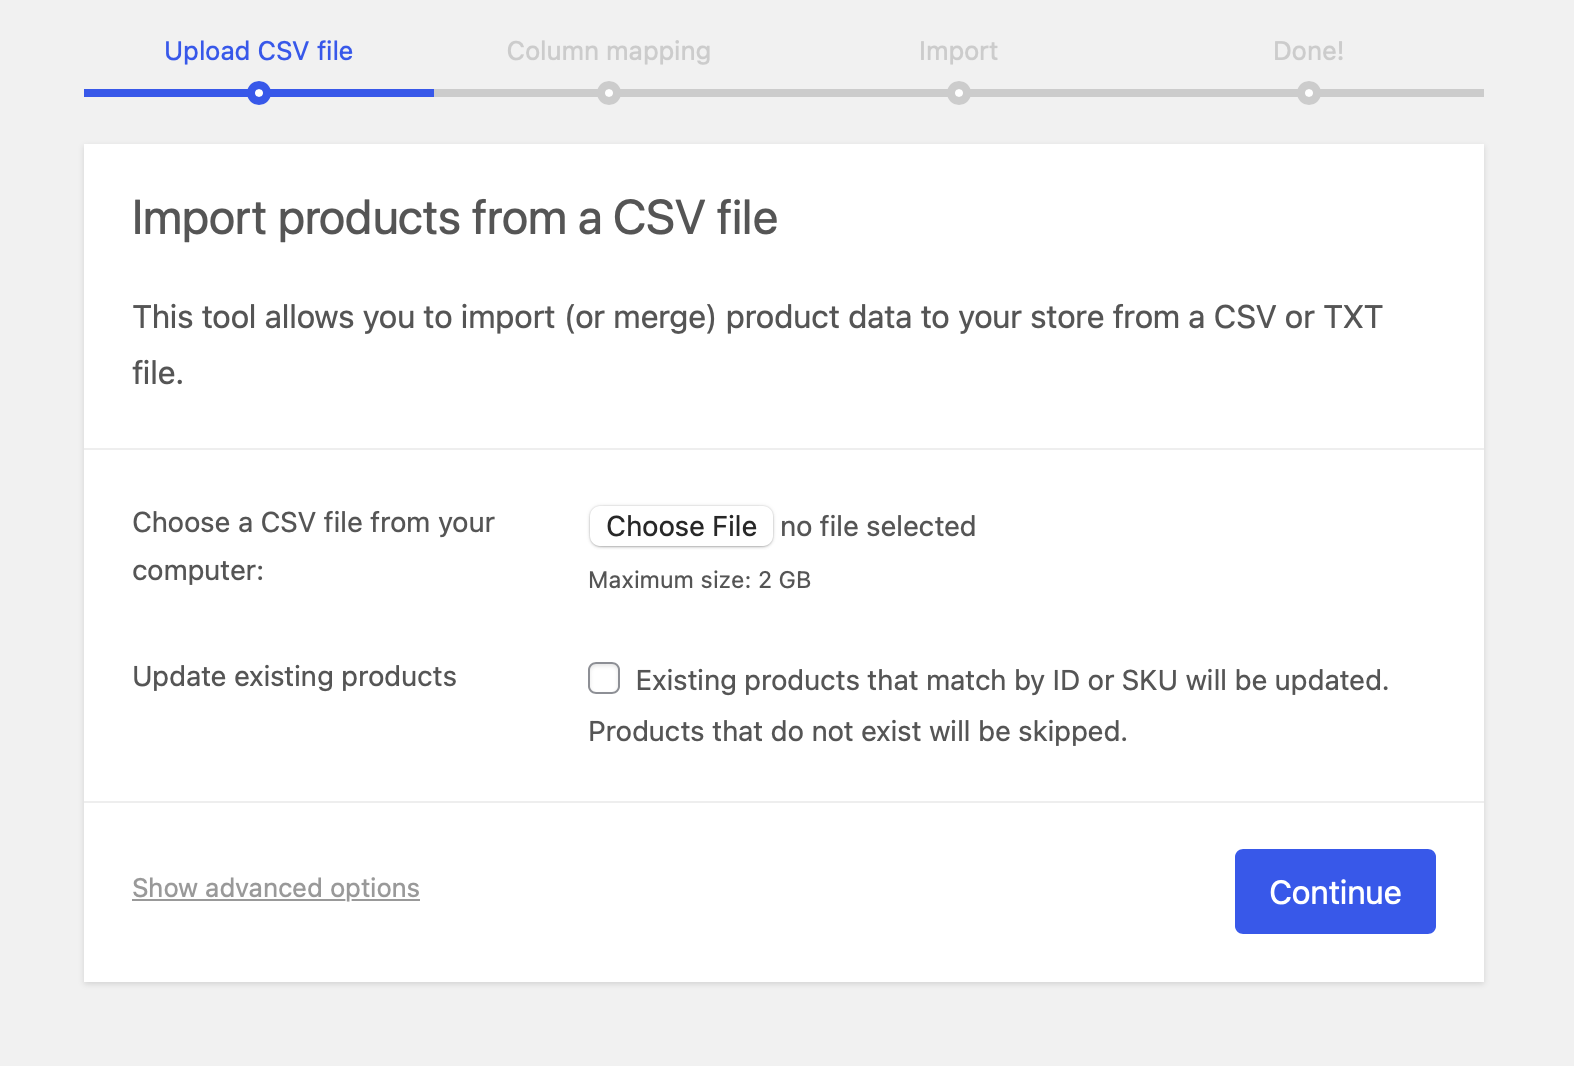
For those of you who prefer a faster and more seamless option, LitExtension can handle the entire CSV file migration. Our service helps transfer product data, customers, and orders from your old store to WooCommerce accurately and securely.
Step 6: Customize your storefront
Your storefront is the face of your online business – it’s where visitors form their first impression of your brand. WooCommerce gives you complete control over your store’s appearance, so you can create a design that feels professional and uniquely yours. In this step, our WooCommerce tutorial will guide you to set up the following elements:
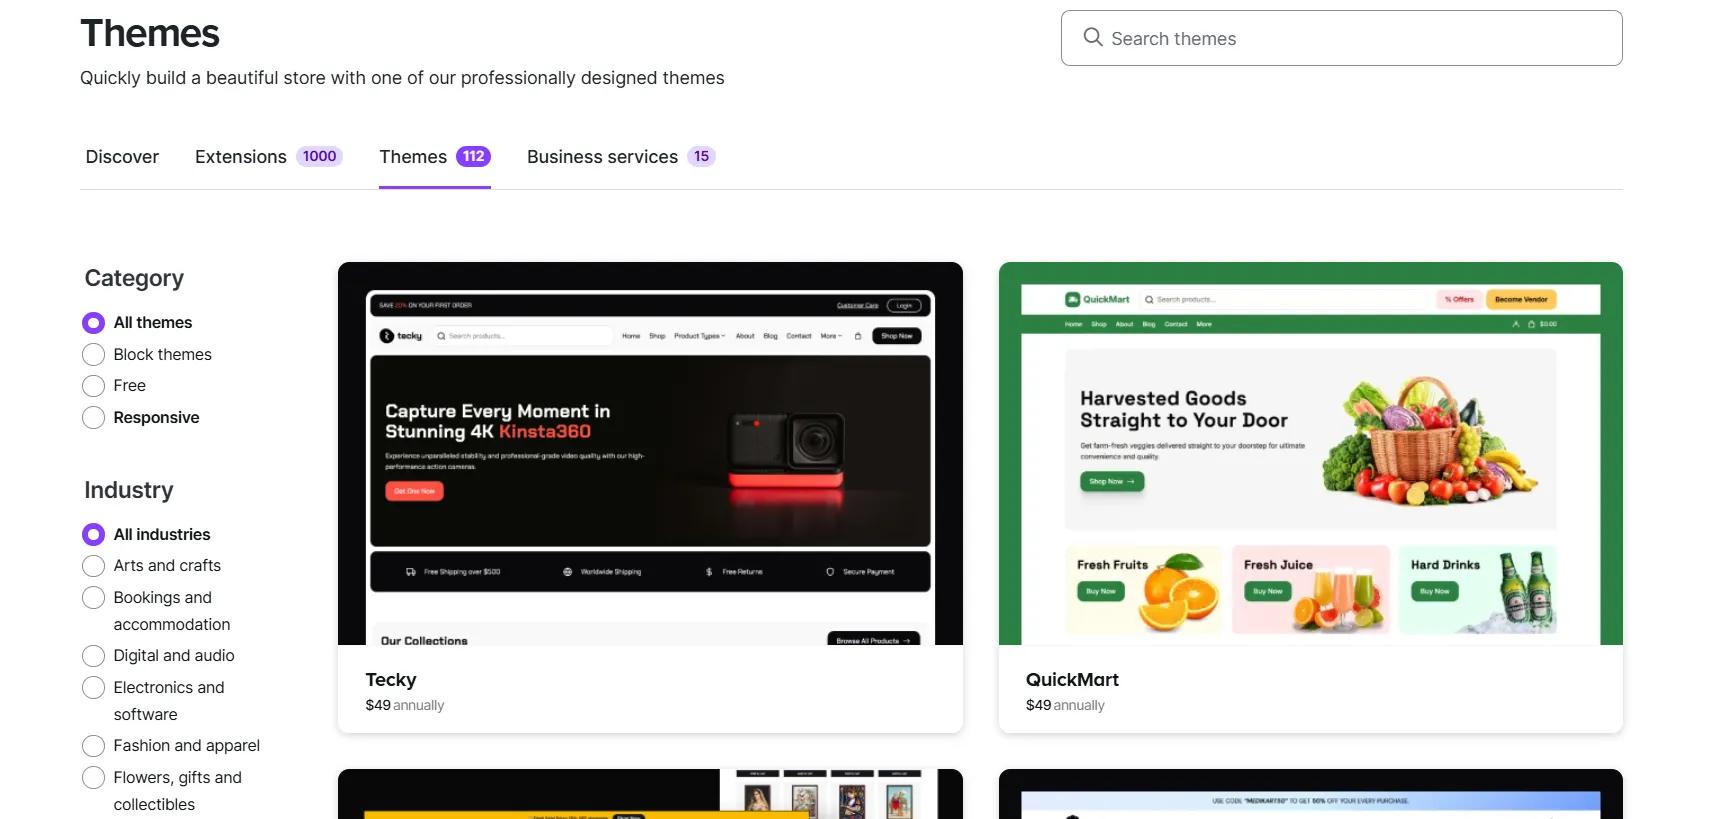
1. Pick a theme
Your theme determines how your online store looks and feels. WooCommerce comes with a default theme, but you can easily change it. Explore the WordPress Theme Directory or browse premium options in the Woo Marketplace. We have handpicked a few of the best WooCommerce themes that are beautifully designed and feature-rich so that you can try them out yourself.
Here’s how you can add and customize a WooCommerce theme:
- Click on Choose your theme from the WooCommerce checklist, or navigate to Appearance > Themes.
- From here, you can select a theme from WooCommerce’s suggestions below or upload the theme you have purchased beforehand.
- On the theme you favor, click on “Install”.
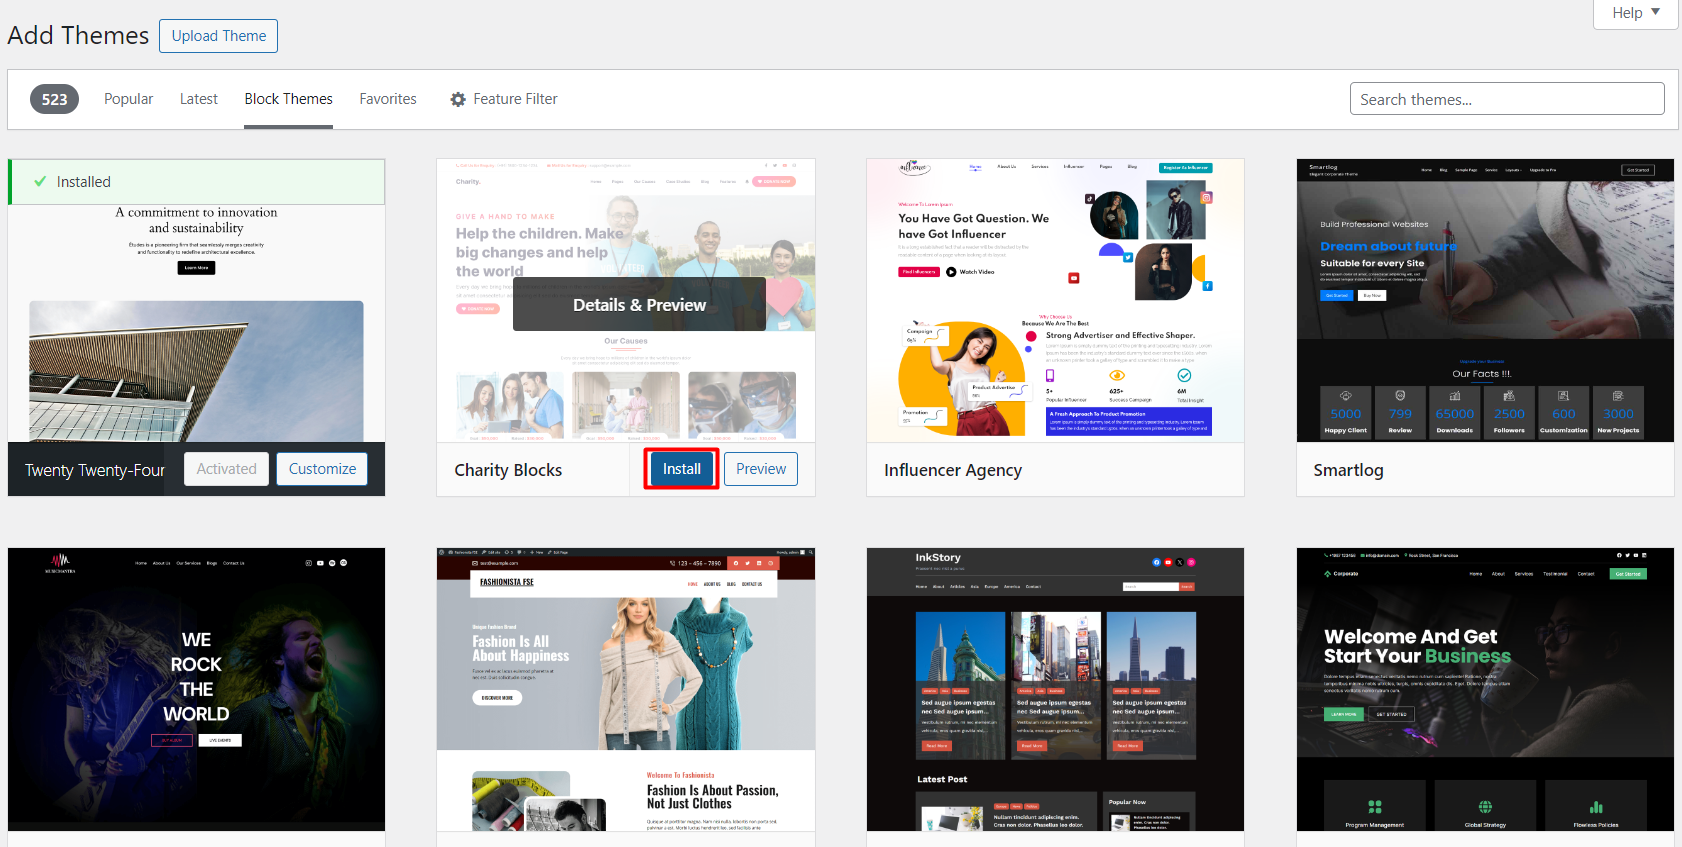
- Next, hit “Activate”. You will be directed to your theme collections. Click on Customize to access the Editor Page.
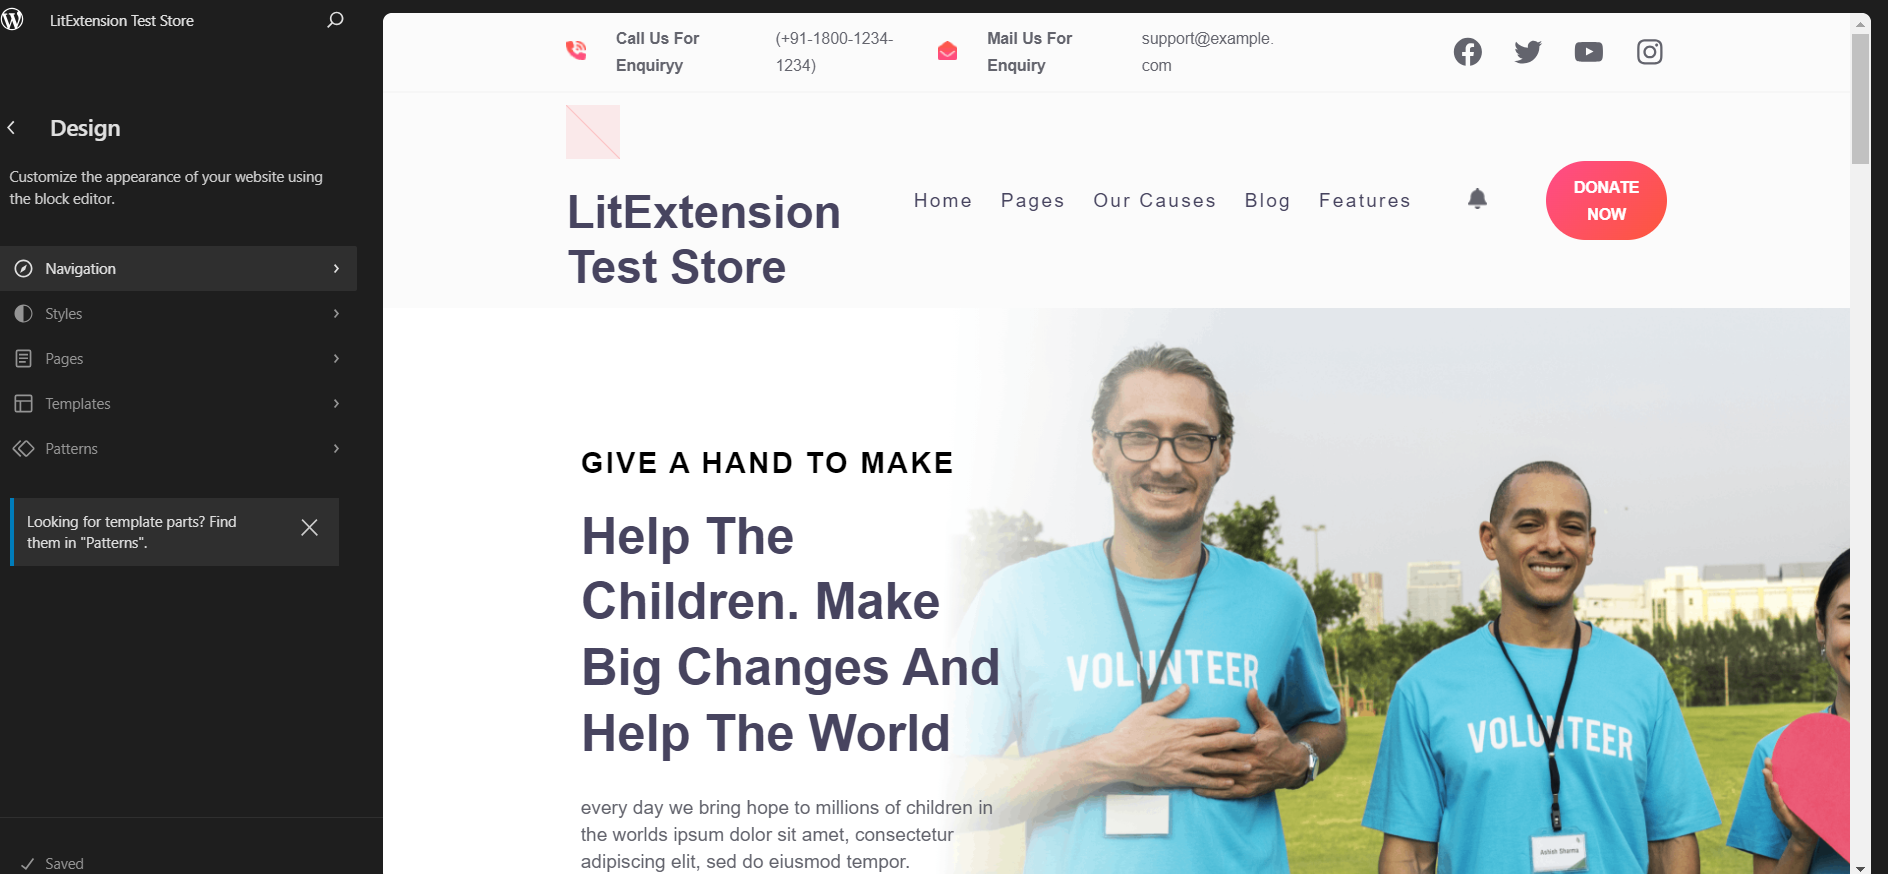
- With the block editor, you can customize Navigation, Styles, Pages, Templates, and Patterns. It’s amazing that there’s a preview of how your store looks after each update.
Keep in mind that switching themes after your store is live can affect how your content and products appear. To stay safe, consider using a backup tool, which automatically saves your data. That way, you can restore your site if something breaks after a design change.
2. Add your logo
Your logo is an essential part of your store’s identity. It’s often the first visual customers associate with your brand. If you don’t already have one, WordPress offers a partnership with Fiverr’s Logo Maker, which helps you design a logo in minutes. As your store grows, you can always upgrade to a professional, custom logo that reflects your brand’s personality and values.
3. Create your main menu
A well-organized menu helps customers navigate your site easily. Make sure to include the essential pages every store needs: Home, Shop, About Us, Contact, and links to your Shipping and Privacy Policies. These pages should be easy to find and clearly labeled.
Most stores feature a main menu at the top of the page, a footer menu at the bottom, and sometimes a sidebar menu for extra navigation. If your store has multiple product categories, enable breadcrumbs so shoppers can easily track where they are and move between sections.
Step 7: Install WooCommerce extensions and add-ons
WooCommerce's ultimate strength comes from its extensions and add-ons. These extensions function precisely like those of WordPress, and you can use the same method to install them in your WooCommerce store.
To install extensions:
- Go to WooCommerce > Extensions or open the Woo Marketplace.
- Browse categories such as Payments, Marketing, Shipping, or Store Management.
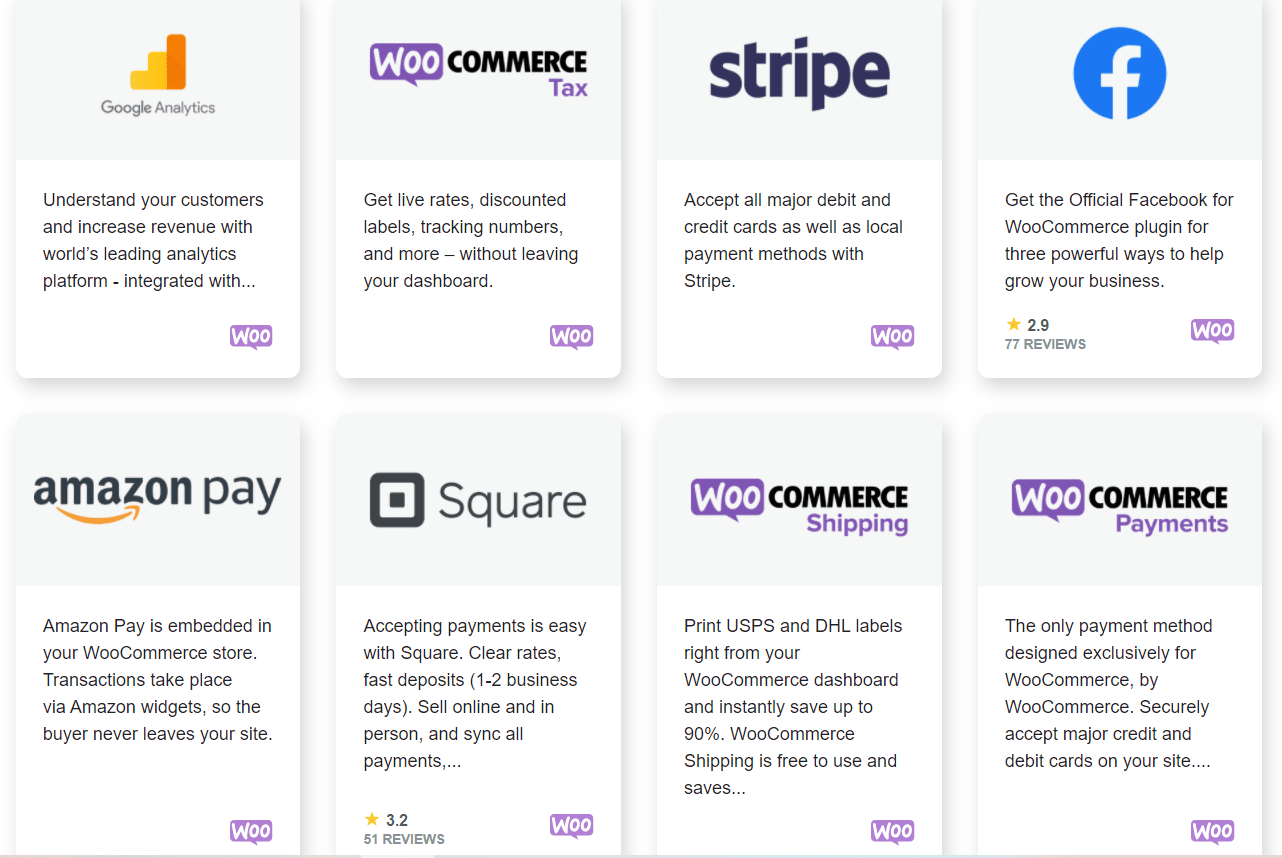
- Click on an extension you want to use, select “Add to Store”, and follow the prompts to activate it.
If you’re not sure where to start, here are a few popular options to explore before launch:
- Woo Subscriptions for memberships and recurring orders.
- WooCommerce Bookings for scheduling appointments or rentals.
- MailPoet for collecting emails and sending newsletters.
- Table Rate Shipping for flexible shipping rates by weight or location.
- Product Add-Ons for letting customers personalize their purchases.
Installing key extensions at this stage allows you to test features, configure workflows, and make sure your store is fully prepared before going live. For more recommendations, check out our guide to the best WooCommerce plugins to find tools that fit your business goals.
Step 8: Secure your website
Before launching your WooCommerce store, make sure it’s protected from security risks. Even small stores can be targets of attacks, so it’s important to put basic safeguards in place early.
Start by choosing a reliable hosting provider that includes SSL certificates, firewalls, and automatic backups. If your host doesn’t offer SSL, install one manually or in your hosting panel to ensure all customer data is encrypted.
Next, keep your site secure by using trusted plugins and extensions only from official sources. Regularly update WordPress, your theme, and all plugins to patch potential vulnerabilities.
Finally, protect your admin area with a strong password and enable two-factor authentication (2FA) for all administrators. You can also install a security plugin like Jetpack Security to monitor threats and block suspicious activity automatically.
By taking these steps, you’ll create a safe environment for both your business and your customers.
Step 9: Start selling
Congratulations, you’ve done setting up a new store with our WooCommerce tutorial! You can spend more time configuring your store to the finest detail, or be ready to note down some tips that can help to improve your eCommerce business.
Tips to Build and Grow Your WooCommerce Store
So, our WooCommerce tutorial has shown you all the steps on how to set up a WooCommerce store. But this is just the beginning of your eCommerce journey. To make the most out of it, you should implement several WooCommerce practices and see what goes along with your store.
Thus, in this section, I’ll be showing some specific, proven steps you can take to enhance your store and improve sales.

1. Start an email list
Not everyone decides to buy a product the first time they visit your WooCommerce store, so it’s essential to build an email list. This direct way of communication allows you to keep in touch with potential customers and persuade them to return to your store.
Below are some possible ways you can increase sales for your WooCommerce store using email:
- New product announcement;
- Abandoned cart emails;
- First-time customer discounts;
- Holiday sales;
- Birthday wishes and special coupons.
You can create an email newsletter on your own using our suggestions on WooCommerce email customization. In case you are not confident with your expertise, WooCommerce allows integrations to various email marketing services, such as Omnisend, HubSpot, SendinBlue, MailChimp, etc.
2. Boost your site loading speed
As there are more and more WooCommerce sites competing in the digital landscape, you have to provide the best possible user experience. A slow-loading website not only affects store traffic and credibility but also results in losing customers to competitors.
To optimize your WooCommerce store for loading speed, you can take on the following techniques:
- Optimize your images using image compression plugins such as EWWW Image Optimizer, TinyPNG, Smush, etc.;
- Use a high-quality hosting service;
- Increase WordPress memory;
- Disable AJAX Cart Fragments in WooCommerce.
3. Improve checkout process
Improving WooCommerce checkout flow is one of the make-or-break factors in enhancing the entire shopping experience on your WooCommerce store. The checkout process is when the final conversion happens, so you should never lose any customers at this stage.
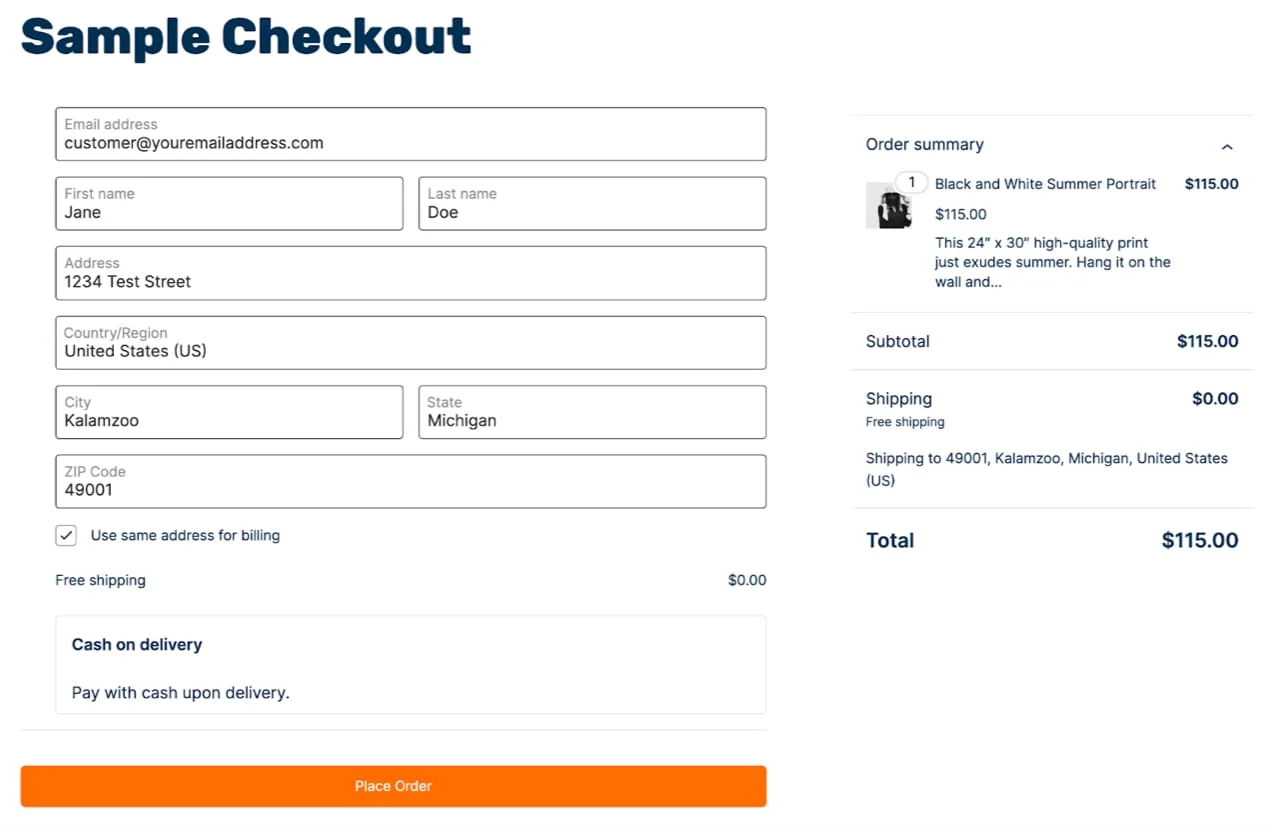
A WooCommerce checkout page includes details like your customers' information, their purchase details, and payment options. It’s essential to pay attention to these details while applying the best practices to improve the checkout process.
Here are some popular strategies for your consideration:
- Only include the necessary fields in your checkout form;
- Reduce the number of steps a customer has to go through to finish their purchase;
- Offer multiple payment options;
- Eliminate the surprise costs, such as fees, taxes, or a coupon that can be applied;
- Simplify the account creation process.
4. Apply discounts and coupons
WooCommerce discounts and coupons are some of the most effective ways to attract new customers, reward loyal ones, and overall, increase conversion rates.
Providentially, it’s straightforward to set up WooCommerce coupons.
- From the WooCommerce Dashboard, navigate to Marketing > Coupons.
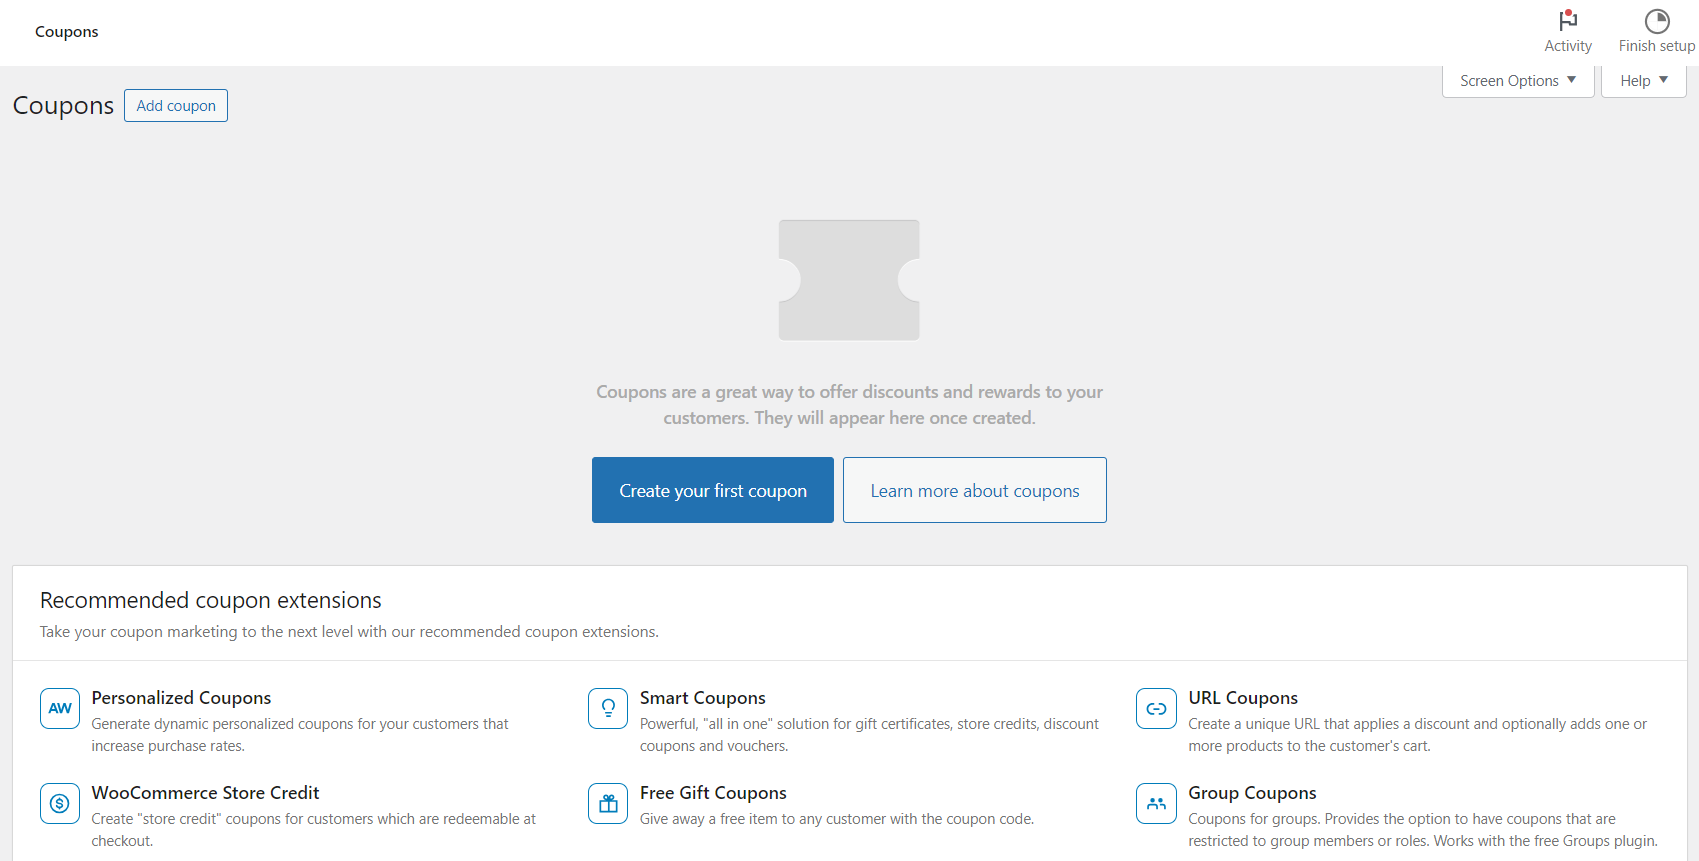
- Click on Add coupon, or press Create your first coupon if it’s the first time you are creating one.
- Enter a coupon code or click Generate coupon code to have random codes generated by WooCommerce. Fill in some details about the coupon if you like.
- Next, choose the discount type as “Percentage discount” and set the value as “15,” as shown in the screenshot below.

- Don’t forget to set an expiration date for your coupon.
- Finally, hit “Publish“. Now you can share the coupon with your customers.
WooCommerce Tutorial: FAQs
Is WooCommerce beginner friendly?
Yes. WooCommerce is one of the most beginner-friendly eCommerce platforms, especially if you already know how to use WordPress. The setup wizard WooCommerce guides you through adding products, configuring payments, and setting up shipping. Its dashboard is simple to navigate, and most tasks like managing orders or tracking inventory can be done without any technical experience.
How does WooCommerce work?
WooCommerce is a plugin that adds full eCommerce functionality to a WordPress website. After installation, it turns your site into an online store where you can list products, accept payments, manage orders, and view reports from the same dashboard. You can also extend its capabilities with free or paid extensions for marketing, shipping, and accounting.
Is it hard to use WooCommerce?
Not at all. WooCommerce is easier to use than it looks. You can install it from the WordPress repository, add your products, set up shipping and payments, and start selling right away. Its dashboard is simple to navigate, and with detailed documentation and a large support community, managing your store is straightforward even for beginners.
Can WooCommerce handle 50,000 products?
Yes. WooCommerce can support large catalogs with 50,000 products or more if your hosting environment is properly optimized. For best performance, choose a reliable hosting provider, use caching, and optimize your images and database. Many medium and large businesses run high-volume stores on WooCommerce successfully.
Is WordPress required to use WooCommerce?
Yes. WooCommerce is built specifically for WordPress, so you need a WordPress site to use it. Once your site is set up, you can install WooCommerce from the WordPress dashboard and start creating your online store right away.
Final Words
Setting up WooCommerce may seem like a lot to take in at first, but once everything falls into place, you’ll see how flexible and powerful it can be. Hopefully, our WooCommerce tutorial has made things easier for you to set up your WooCommerce store.
In case you’re currently running a store on another platform, the good news is our WooCommerce migration service can help you make the process a lot faster!
With LitExtension, you won’t have to import data from your current store to WooCommerce manually. Instead, all you need to do is fill in basic information about your stores, and all of your data, including products, orders, and customers, will be automatically migrated to your new store.
You can also join our active community and read other WooCommerce blogs to get more eCommerce knowledge.

