As one of the most popular content management systems, Joomla rolls out major and minor releases every few months to keep merchants secure and up-to-date. Knowing how to perform a thorough Joomla update for your site, therefore, is an extremely crucial skill if you want to maintain a thriving business!
Today’s article will cover everything you need to know about this topic, including:
- How to perform a Joomla update (for all versions)
- How to update Joomla via installation (up to Joomla 2.5)
- Built-in migration between Joomla versions
- Advanced migration solution with LitExtension
- Bonus tips when updating Joomla
Without further ado, let's get started!
Simple Joomla Update: How to Update Joomla
For a quick, straightforward update, the platform offers a convenient built-in tool easily accessible from the dashboard. Just follow these four simple steps, and you’ll complete your update in minutes!
Step 1. Back up your current Joomla site
Before starting, you need to have a fresh backup of your site first. Your hosting provider might create automatic backups, but don't rely solely on them. Instead, create your own to ensure the data is safe.
Step 2. Access the update component
Next, click the “Update Now” button on your main page to access the update component.

Here, choose “Write files directly” (default) or “Write files using FTP” to upload the new Joomla core files.

The reminder “You are strongly advised to make a backup.” will appear on the screen while you're at it. If you still haven't backed up your site at this point, return to Step 1 to do it before proceeding!
Step 3. Perform the Joomla update free
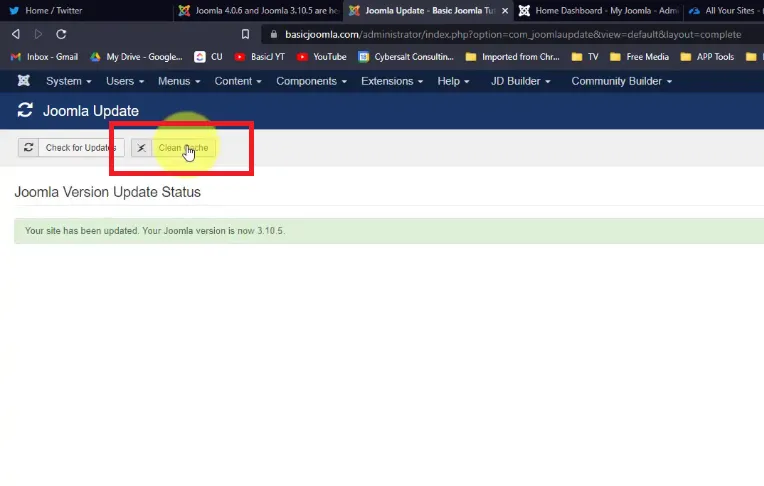
Now, click the “Install the update” button to begin your update. When it's completed, you will see a success message with the new Joomla version installed.

Make sure you clear your browser cache so all the template CSS changes will be properly reflected.
Step 4 (Optional). Check the Joomla update notice
Finally, on the Joomla! Update screen, click the “Options” button, then go to the “Update server” tab. You have two options here:
- Default: Shows the latest update for your current major release.
- Joomla! Next: Shows the latest update for the newest major version.
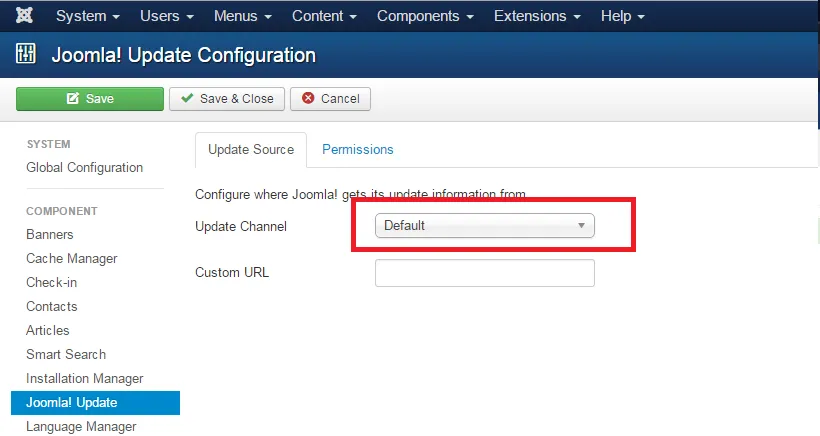
No matter which option you go for, clear the cache again to refresh the notice if the update still hasn't been detected. And that's it!
How to Update Joomla via Installation
Our easy update above doesn’t work for you? Try the Joomla install alternative instead.
However, keep in mind that this (admittedly outdated) method is only compatible with Joomla 2.5 or earlier, meaning it carries a much higher risk of bugs and security vulnerabilities. Not to mention, performing Joomla update 3 auf 4 is basically impossible at this point. Proceed with caution if you still want to try it out:
Step 1. Back up your site
Again, before the Joomla update, make sure you have a backup of the current Joomla site. Either create your own or double-check the automatic backup of your hosting provider.
Step 2. Find the update file
Next, find the correct update file for your version. For example:
- If you're updating to a new major release (e.g., 1.7.3 to 2.5.0), use this file: Joomla_2.5.0-Stable-Update_Package.zip.
- For updates within the same release series (e.g., 2.5.0 to 2.5.1), click the file titled Joomla_2.5.0_to_2.5.1-Stable-Patch_Package.zip.
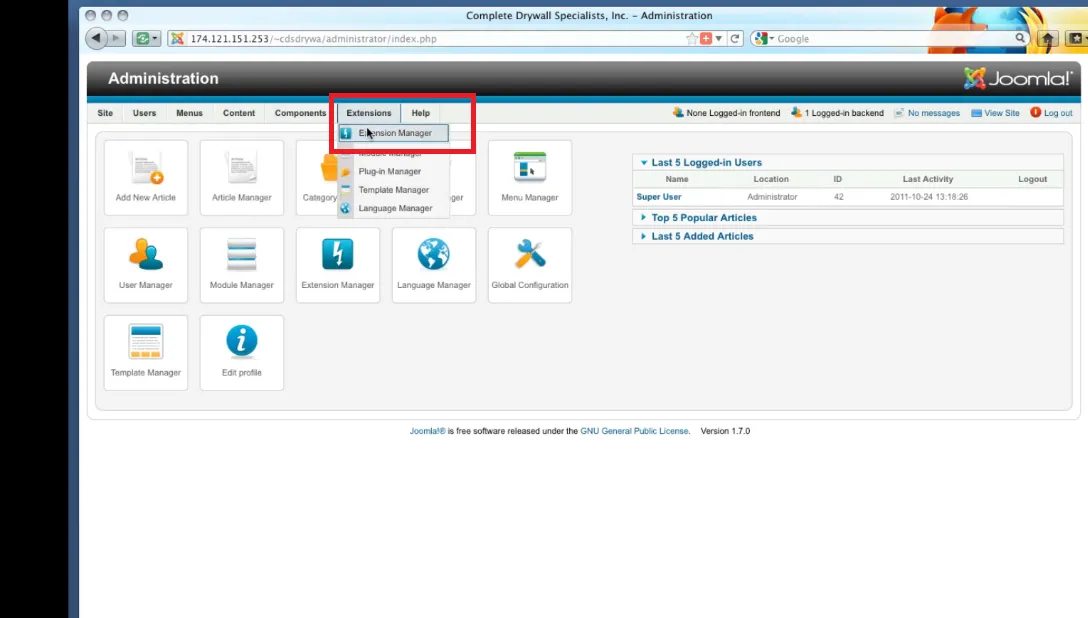
Once done, return to the Administration page and click “Extensions” > “Extension Manager.”
Step 3. Perform the Joomla installation for an update
Here, you will have three options for installing the update. Let us show you what to do with each.
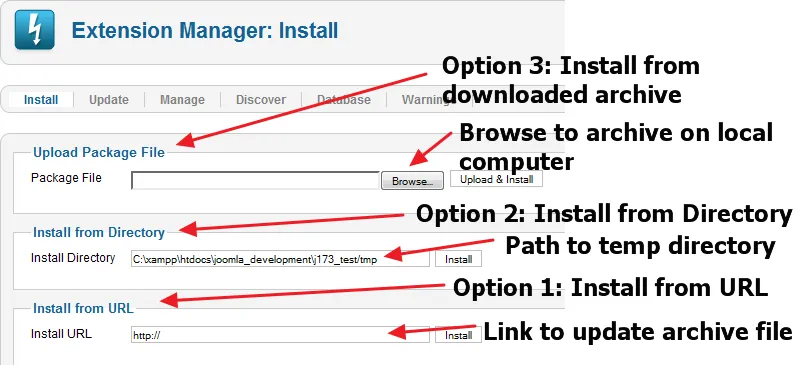
Option 1: Install from the URL
To install from the URL:
- First, open the “Extension Manager: Install” screen in your Joomla dashboard.
- Next, enter the URL of the archive file in the “Install URL” field.
- Once done, click “Install.”
Option 2: Install from the Directory
For this approach, you need to complete the following:
- Unpack the archive file on your local computer.
- Next, use FTP to upload the unpacked files to a temporary directory on your server. (e.g. /home/myuser/myjoomla/tmp/upgrade251.)
- Then, in the “Extension Manager: Install” screen, enter the full path to the directory on your server.
- After that, click “Install.”
Option 3: Upload package file
This option requires a strong connection between your computer and the server. If you are confident yours can handle the update, complete the following tasks in order:
- Download the update file to your local computer.
- Then, in the “Extension Manager: Install” screen, click “Browse” and select the archive file.
- Finally, click “Install.”
Congratulations! Your Joomla site is now updated successfully.
Migrate between Joomla Versions via The Built-in Tool
Although the Joomla update process is convenient, it only works best when the old and new versions belong to the same line (for example: the 1.5.20 and 1.5.24 patches, both of which belong to Joomla 1.5.).
So what if the major update has drastically altered the CMS structure (e.g., upgrade Joomla 3 to 5 or Joomla 2.5 to 3)? In that case, migrating straight to a new line is a much better choice here!
You will basically transfer compatible components from the older version to the new one, then find available alternatives for the old, incompatible features once the migration concludes. For those planning to rebrand or repurpose their sites, this migration provides an excellent opportunity to implement new functions or clean out outdated data that’s no longer of good use.
Curious how to do it right? Keep scrolling to learn how to transfer from one Joomla version to another (say, 3.10 to 4.3.4) for small to medium-sized stores:
Step 1. Set up the development environment
First, ensure your current hosting provider meets the technical requirements of the new version. Suppose you migrate from Joomla 3.1 to Joomla 4.3; your hosting must satisfy all the following criteria:
- PHP version from 7.2.5 onward
- Zlib compression support
- XML support
- INI Parser support
- JSON support
- MB string overload off.
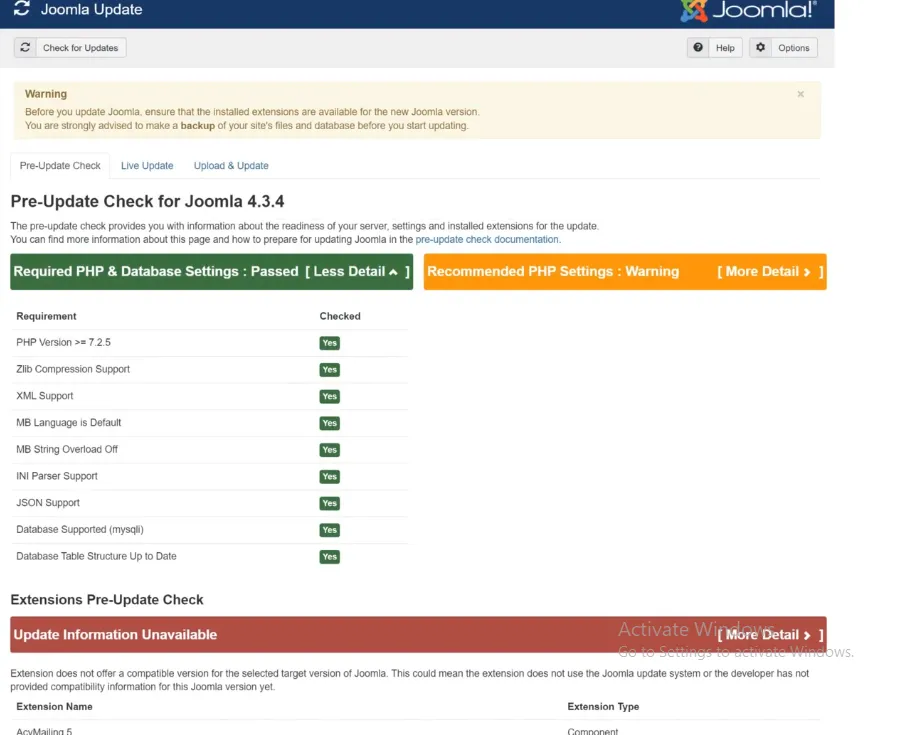
Next, update your core site to the latest version (e.g., from 3.1.0 to 3.1.6) using our update guide above. Delete any menu items, categories, or articles if necessary and ensure everything works as expected.
And don't forget to create a backup! We recommend storing the site's backup in one of the four following places:
- A subdomain (e.g., test.yoursite.com)
- A subdirectory (e.g., yoursite.com/test)
- A local device using XAMPP, WAMP, LAMP, or MAMP
- A temporary domain (if switching hosting providers).
Step 2. Update your extensions
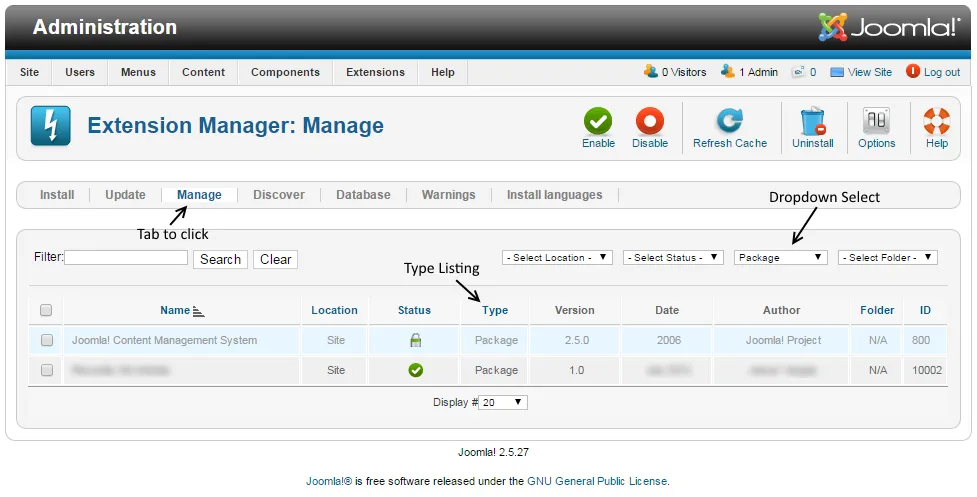
Now, go to “Extension Manager” > “Manage tab” to find all your installed extensions and uninstall any unused or incompatible ones. You can use the “Type” drop-down menu to filter them by Plugin, Module, Component, Package, etc.
Once done, go to “Extension Manager” > “Update tab” > “Find updates” to update all compatible extensions. Remember to check with the extension developers to confirm these extensions can truly work with the new Joomla version.
Step 3. Migrate to the new version
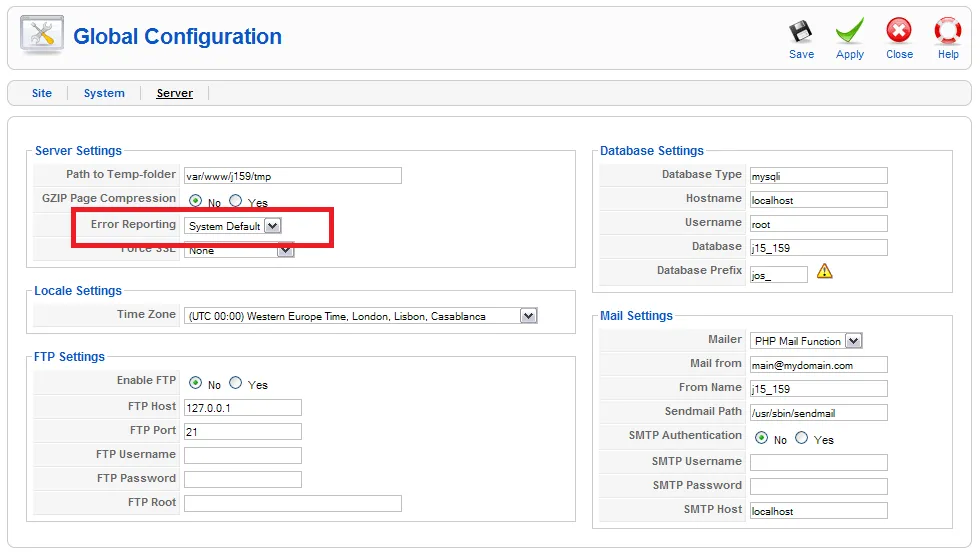
Now, go to “System” > “Global Configuration” > “Server tab” and set “Error Reporting” to “Maximum.”
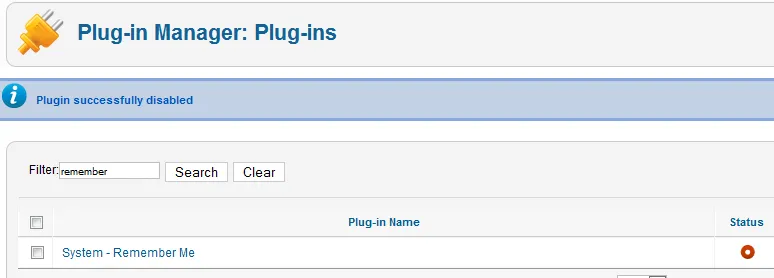
Then, navigate to “Extensions” > “Plugin Manager” to disable the “Remember Me” plugin.
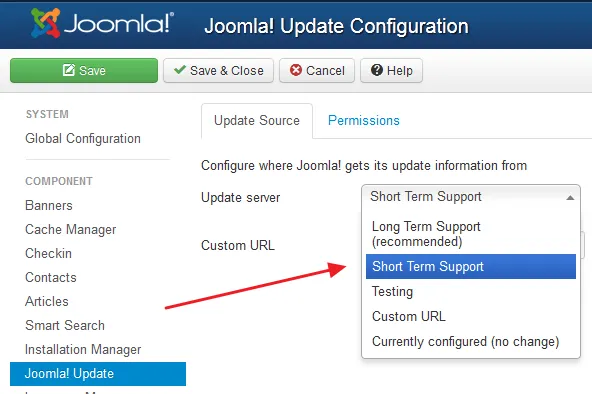
Once done, go to “Extension Manager” > “Update” and choose “Short Term Support.” (Don't select “Long Term Support” yet since you still have to make sure the new Joomla version works with your site). Then, hit “Save” > “Install the update” to change the Joomla core to the new version.
Step 4. Post-migration checks
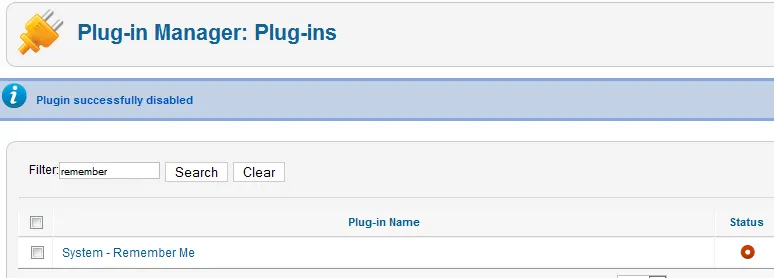
After you log in to the new Joomla admin interface, go to “Extensions” > “Plugin Manager” and enable the “Remember Me” plugin again. Visit your site's front end to ensure it's working, even if the template isn't perfect.
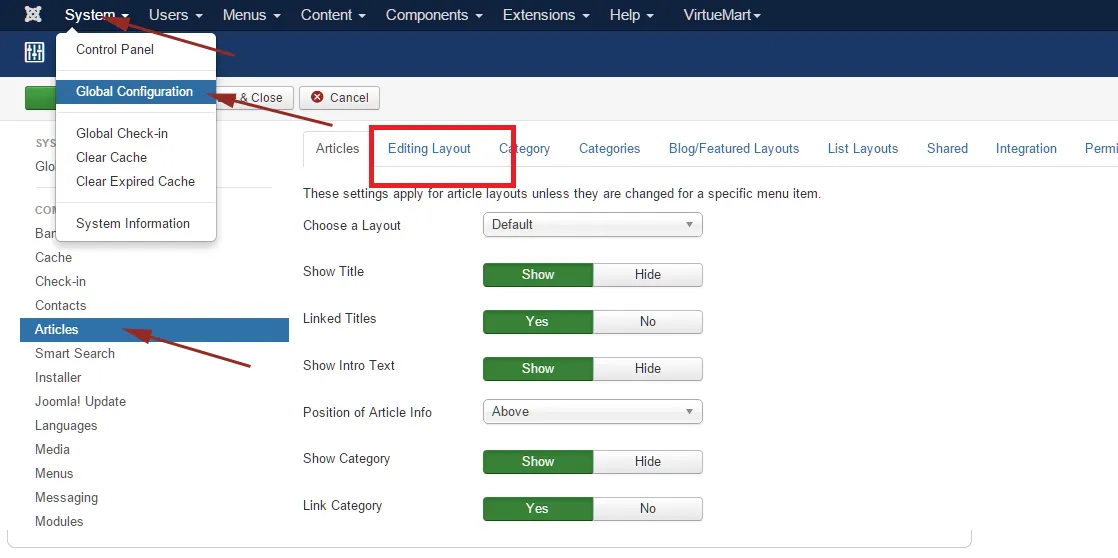
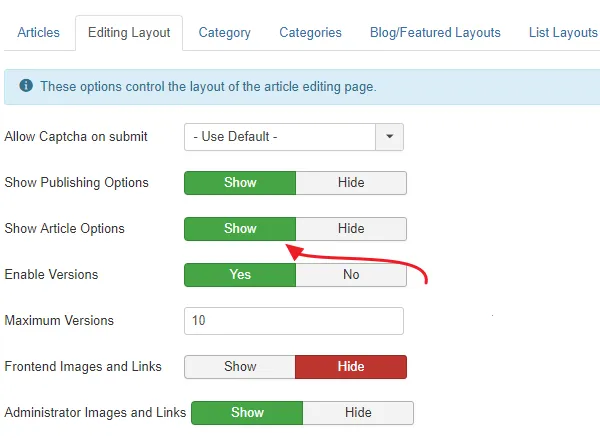
Finally, clear your browser cache. Then, go to “System Content” > “Global Configuration” > “Articles” > “Editing Layout” and set “Enable Versions” to “Yes.”
Keep editing and updating wherever applicable, and don't forget to create a backup every step of the way. Once satisfied with the results, you can officially run your brand-new Joomla business!
Advanced Joomla Migration with LitExtension
Although the built-in migration process involves just four steps, each task takes significantly more time than you might expect. For instance, checking and deleting content and features alone can take at least a few weeks for medium to large stores. On top of that, you’ll need to remove all incompatible extensions and reinstall them (or find their alternatives) after the migration — hardly a time-saving solution!
That’s where LitExtension Joomla Migration comes in as the ultimate choice for your Joomla update and migration. With our comprehensive All-in-One package, you can say goodbye to technical headaches. All you need to do is sit back and relax while we handle the entire process for you at a competitive price!
Here’s how our migration service works:

Step 1. Consultant by LitExtension experts
First, schedule a consultation with our team of migration specialists. During this session, we will discuss and analyze all your specific needs, including the types of data to migrate — such as customer records, products, orders, categories, or customized features.
Once we finalize your requirements, you’ll sign a Service Level Agreement (SLA) and make the payment. From this point, we’ll take care of everything while you keep selling!
Step 2. Data mapping and setting by experts
Next, our experts will prepare your Joomla migration by:
- Setting up redirects to maintain SEO rankings
- Creating secure backups to protect your data
- Cleaning and organizing your store’s data
- Installing necessary extensions and plugins
- Adjusting any additional settings based on your requirements.
Furthermore, to ensure your satisfaction, we offer unlimited demo migrations throughout this process so you can monitor progress and provide feedback as needed.
Step 3. Perform full Joomla migration
Finally, with everything in place, our team will perform the full migration for your store and keep you informed every step of the way. Any questions or concerns you have will be properly addressed within 12 hours. Plus, additional options (e.g., preserving order IDs or stripping HTML) are incorporated at no extra cost.
Post-Migration Support: We’re Here for You
Once the migration is complete, we’ll thoroughly review your new store to confirm it runs smoothly and meets all your initial requirements. And even after this stage, our dedicated support still goes strong:
- For 30 days after the migration, enjoy unlimited re-migrations (free) and recent data migration (free if it makes up less than 5% of the total).
- For 90 days, you can get unlimited smart updates for your existing data — again, at no charge. Your data accuracy is our top priority!
Time to Migrate Your Joomla Store!
With LitExtension, you can migrate to a new Joomla line seamlessly without hassles.

Bonus: 3 Joomla Update Golden Rules
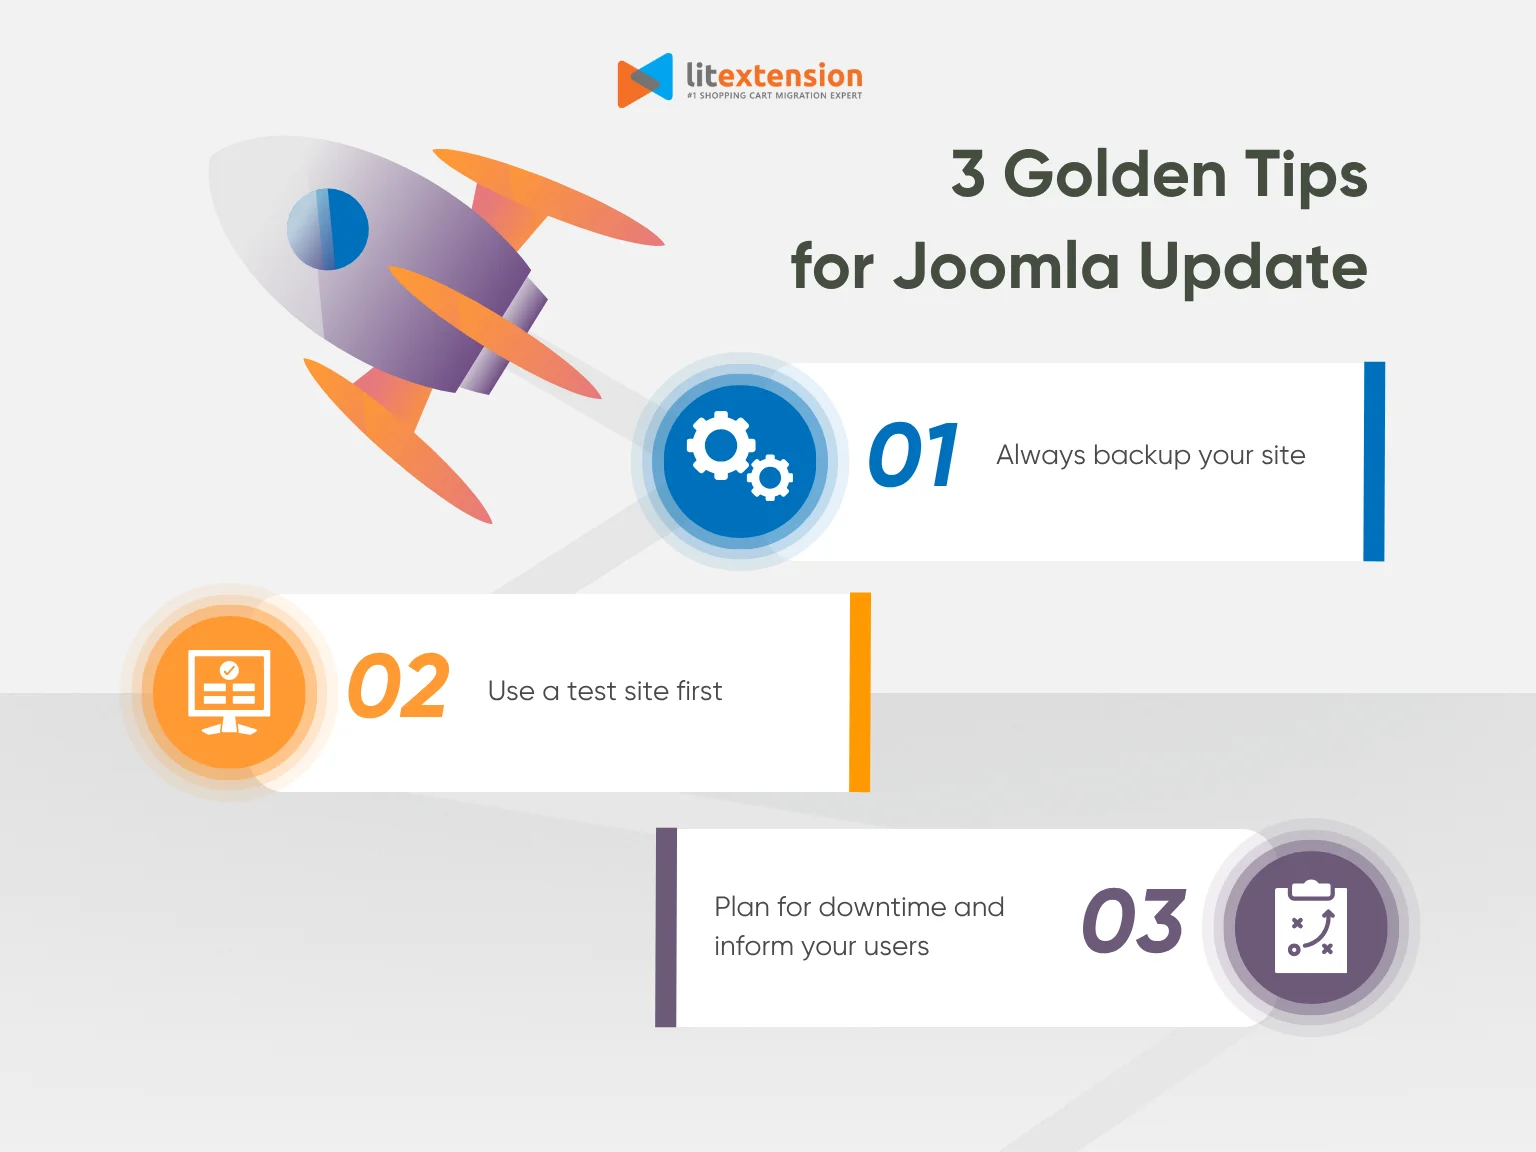
To ensure your update goes smoothly without any issues, always keep these three golden tips in mind:
Always back up your site
We have touched on this tip in our guides, but it wouldn't hurt to mention it one more time!
Before you begin any update, ensure you have a complete backup of your Joomla site (both your site files and the database). Reliable tools like Akeeba Backup can be of great help here; simply copy all your site files and export the database via pHpMyAdmin. That way, if anything goes wrong during the update, you can always restore your site anytime you want to.
Use a test site first
Another tip is to avoid performing the Joomla update directly on your live site if possible. Instead, set up a test environment (like a duplicate store) where you may safely test the update! As a result, issues (if any) can be identified and resolved instantly without affecting your live site.
Plan for downtime and inform your users
A Joomla update may require brief downtime (especially if issues arise), so we recommend planning your update during off-peak hours to minimize disruption. Don't forget to inform your users in advance!
Of course, for those who want little to no downtime, we highly recommend choosing LitExtension as your trusted partner. With our smooth, optimized migration process, your current store can keep selling and operating without interruptions. Customers won’t even notice any changes happening behind the scenes!
Joomla Update: FAQs
How do I update my Joomla version?
Click the "Update now" button and choose "Write files directly" (default) or "Write files using FTP." Then, hit "Install the update."
What is the latest version of Joomla?
5.2.2. is currently the latest version of Joomla. You can check Joomla's "Release news" section to stay updated on all the major and minor releases.
How do I update Joomla 3.9 to 4?
Click the "Update now" button and choose "Write files directly" (default) or "Write files using FTP." However, since Joomla 3 and Joomla 4 have quite different structures, we suggest contacting LitExtension for a thorough migration instead.
Does anyone still use Joomla?
Yes. Over 958,000 live websites are using Joomla as of this writing, according to statistics from BuiltWith.
Final Words
Performing a Joomla update, all in all, is relatively straightforward. Unfortunately, it might lead to serious compatibility issues down the line if the old and new versions have drastically different structures!
That’s why we highly recommend opting for a thorough, inclusive migration with the help of trusted services like LitExtension. With over 12 years of experience and 200,000+ satisfied customers across 100 countries, we have more than enough expertise to deliver a smooth, hassle-free Joomla migration no matter the obstacles. Let us take the heavy lifting off your shoulders and handle everything for you from start to finish!
For more information, check out our Joomla guides and join our Facebook community.
