If you’re looking to install Magento 2, you’re in the right place. But let’s be honest: installing Magento isn’t exactly beginner-friendly. Between strict system requirements, Composer commands, and file permissions, the setup process can feel overwhelming, especially if it’s your first time.
No worries, in this guide, we'll walk you through 4 methods to install Magento 2, including:
- Method 1. Via Composer
- Method 2. Via GitHub
- Method 3. Via Zip Archive
- Method 4. Via the Cloudways platform
- Method 5. Install Magento 2 with XAMPP on the local host
And, if you are setting up a new store to migrate to Magento, LitExtension can be your trusted partner in data transfer.
Magento Migration Made Easy With LitExtension!
LitExtension offers great migration solutions that help you transfer your data from the current eCommerce platform to a new one accurately, painlessly, and with utmost security.

Magento 2 Installation Guide – 5 Methods to Choose
Method 1. Install Magento 2 via Composer
Composer is the most common method to install Magento 2. Let's follow the steps below carefully, and we’ll guide you through each command and what it does.
Step 1. Log in as the File System Owner
Before running any Magento CLI commands, you should make sure you're acting as the correct file system owner – the user who has permission to write to the Magento directory. This prevents file permission issues during installation and later operations.
Depending on your setup, there are two common ways to do this:
If you are using bash, run the following line:
su <file system owner> -s /bin/bash -c "<command>"
If the file system owner does not allow logins, use:
sudo -u <file system owner> <command>
Once you've logged in, add <app_root>/bin to your system PATH so you can run Magento commands globally. Or, you can run the commands below:
cd <app_root>/binand./magento <command><app_root>/bin/magento <command>
Step 2. Get the metapackage
Once logged in as the file system owner and inside your web root folder, use Composer to download Magento 2 Open Source:
composer create-project –repository-url=https://repo.magento.com/ magento/project-community-edition <installation directory>
You’ll be prompted to enter your Magento Marketplace authentication keys that you've retrieved before. Please note that if you've configured authentication keys via auth.json or environment variables, you won’t need to enter them manually.
Step 3. Set file permissions
Once Composer finishes downloading Magento, you need to set the correct file and folder permissions to allow the web server to read/write necessary files:
cd /var/www/html/<magento install directory>
find var generated vendor pub/static pub/media app/etc -type f -exec chmod g+w {} +
find var generated vendor pub/static pub/media app/etc -type d -exec chmod g+ws {} +
chown -R :www-data . # For Ubuntu
chmod u+x bin/magento
These commands ensure:
- All necessary files are writable by the web server group.
- The Magento CLI tool is executable.
Step 4. Install the application
Finally, run the setup installation command:
bin/magento setup:install \

--base-url=http://localhost/magento2ee \

--db-host=localhost \

--db-name=magento \

--db-user=magento \

--db-password=magento \

--admin-firstname=admin \

--admin-lastname=admin \

[email protected] \

--admin-user=admin \

--admin-password=admin123 \

--language=en_US \

--currency=USD \

--timezone=America/Chicago \

--use-rewrites=1 \

--search-engine=opensearch \

--opensearch-host=os-host.example.com \

--opensearch-port=9200 \

--opensearch-index-prefix=magento2 \

--opensearch-timeout=15
Step 5. Post-installation configuration
Now that Magento is installed and permissions are set, it's time to finalize your setup. These post-installation tasks will help ensure your store runs efficiently, securely, and is ready for real traffic.
To begin, visit the Magento admin panel using the custom admin path you configured during installation: http://yourdomain.com/adminsecure. Log in using the admin username and password you created in Step 4.
Then, it's time to switch to production mode. Magento installs in developer mode by default, which is helpful for debugging but slows down performance. Before going live, switch to production mode for improved speed and stability.
From your Magento root directory, run: php bin/magento deploy:mode:set production, and this will compile code and static files, disable automatic file generation, and improve caching behavior. This may take a few minutes, depending on your server. If you see permission errors, double-check that file/folder ownership and permissions are correct.
Step 6. Verify the Magento 2 installation
Before you begin building your store or customizing themes, take a few minutes to verify that everything works correctly.
Open your browser and go to: http://yourdomain.com/
You should see Magento’s default Luma theme on the homepage. If it loads properly:
- Your server, PHP, database, and base URL are all configured correctly
- Magento's public-facing frontend is ready

If the page returns an error or displays a blank screen, check your web server logs to verify permissions and rewrite rules.
After that, log in to your Magento admin: http://yourdomain.com/adminsecure, enter your admin credentials, and you land on the Magento dashboard. Click around:
- Go to Stores > Configuration
- Open Reports > Statistics
- Navigate to System > Cache Management
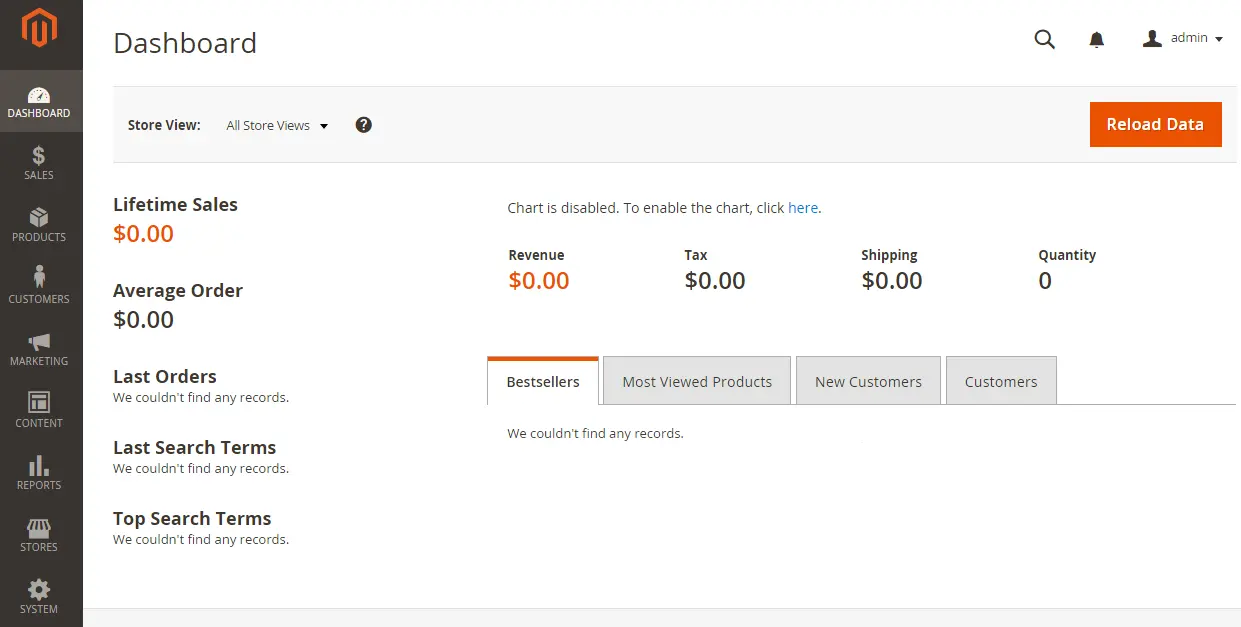
If everything responds correctly, your backend is working perfectly.
Method 2. Install Magento 2 via GitHub
Another popular option is to install via GitHub. Some think this method only works with sample data, but we've found that it works just fine on its own! Here's how:
Install Magento 2 via Github without sample data
- First, you need to get the Magento 2 files. You can either clone the Magento 2 repository (click here) or download the necessary release from here.
- Make a new, empty directory to store the Magento 2 files.
- Navigate to the new directory and run the command below:
git clone [email protected]:magento/magento2.git - Wait for the deployment to complete, then install the required dependencies by running:
composer install - Now, it's time to install Magento 2! Use the following command, making sure to replace the placeholders (base-url, db-password, db-name, admin-password, and admin-email) with your specific details:
php -f bin/magento setup:install –base-url=http://m2.loc/2.07/github/ –backend-frontname=admin
–db-host=localhost –db-name=m2git –db-user=root –db-password=inchoo –admin-firstname=Magento
–admin-lastname=User –[email protected] –admin-user=admin –admin-password=magento456
–language=en_US –currency=USD –timezone=America/California –use-rewrites=1 - Open your web browser and go to the local URL you set during installation. If the page loads correctly, congratulations!
Install Magento 2 via Github with sample data
We just told you how to install Magento 2 via GitHub without sample data. If you want to install the sample data in the setup as well, here's how:
- First, go to your web root directory. Make sure it's not the Magento 2 directory!
- Run the following command to clone the Magento 2 sample data repository:
git clone [email protected]:magento/magento2-sample-data.git - Go to this cloned Magento 2 directory, then run the command below to link the sample data to the Magento 2 installation:
php -f dev/tools/build-sample-data.php — –ce-source=”your Magento CE install dir” - For Linux users, set the correct permissions and ownership:
chown -R :your web server group name
find . -type d -exec chmod g+ws {} \; - Navigate to the var/ folder in your Magento 2 directory and clear the cache with the following command:
rm -rf cache/* page_cache/* generation/* - Finally, install the sample data using these commands:
php bin/magento setup:upgrade
php bin/magento setup:di:compile
Now, the sample data should be successfully installed on your Magento 2 setup!
Method 3. Via Zip Archive
Next on our list is Zip Archive, which does involve some code and commands but is slightly easier than Composer. You need to keep three main steps in mind:
- Download the source code from this link.
- Upload the downloaded archive to your current server and extract it into your root Magento directory. Just use the extract/unzip function for your shared hosting. However, if you're operating on your own server, run these commands instead:
# File .tar.gz
tar zxf <yourfilename># File .zip
unzip <yourfilename> - Then, add a write permission to the pub, app/etc, var folders:
chmod 777 -R var
chmod 777 -R app/etc
chmod 777 -R pub - Launch the installation wizard, then follow the prompts to complete the installation of Magento 2.
Method 4. Via the Cloudways platform
If using codes and commands (like those in our guides above) isn't your strong suit, the Cloudways platform is a fantastic alternative! Just follow these six simple steps:
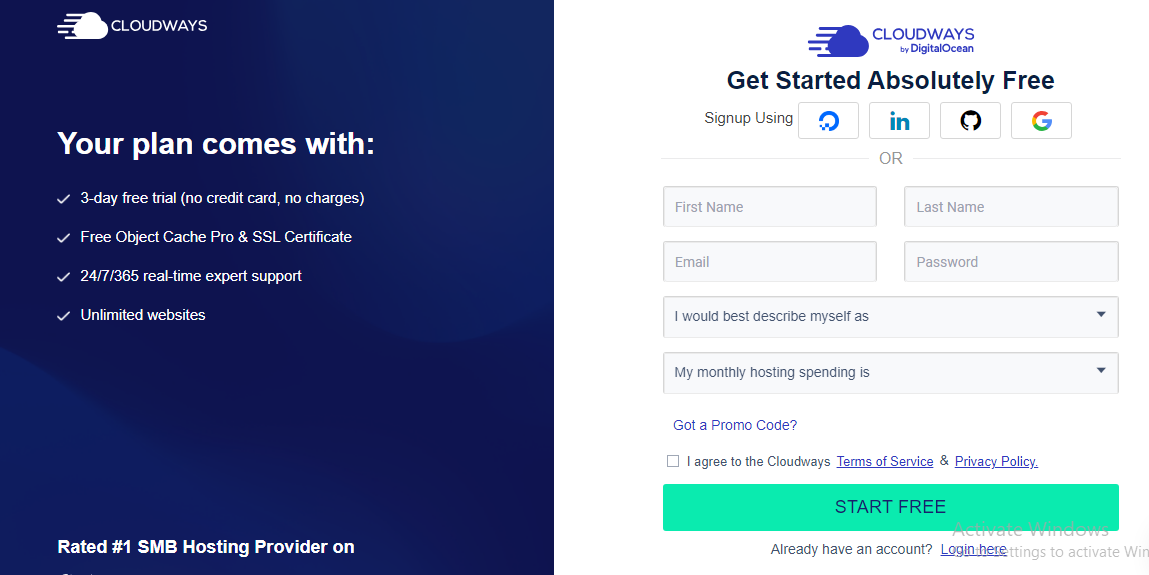
- Log in to your Cloudways account or create one.
- Create a new server, then choose the Magento version from the Application dropdown. Provide application and server details.
- Choose your preferred Cloud Provider. Select the server size and bandwidth that best suit your needs.
- Choose your desired server storage. And don't worry, this option is not set in stone; you can always scale it up later if needed.
- Pick a server location. Click Launch Server. That's it!
- Once the server preparation is complete, proceed to the Application Management section. Use Access Details to sign in to your store.
Method 5. Install Magento 2 with XAMPP on localhost
If none of the above options works for you, why not try XAMPP to install Magento 2? Let us guide you through the process:
- Install XAMPP, then download the package from this Magento website.
- Create a new folder named “Magento” in the xampp/htdocs directory.
- Extract the downloaded archive to the Magento folder, then open the XAMPP Control Panel, navigate to Apache, and click on Config.
- From the menu that appears, select PHP (php.ini).
- Locate these lines: extension=php_xsl.dll and extension=php_intl.dll, and Remove “;” at the beginning.
- Go back to the XAMPP Control Panel, then start both MySQL and Apache.
- Open your browser and go to localhost/magento2. Agree to the terms and proceed with the Magento setup.
Considerations Before You Install Magento 2
Before diving into the actual installation process, it’s crucial to prepare your environment. Magento 2 is a powerful platform, but it also has strict requirements. Setting things up properly now will save you hours of debugging later.

1. Verify your server meets Magento system requirements
Before you install Magento 2, the single most important step is confirming that your server environment meets Magento's technical requirements. Skipping this check is the leading cause of failed installations, cryptic error messages, and broken storefronts, so treat this as a non-negotiable first step, not an optional one.
Pay close attention to your PHP version in particular; this is the most frequent compatibility mismatch. Magento 2.4.x dropped support for PHP 7.x entirely, so if your server is still running an older PHP version, you'll need to upgrade it before proceeding.
Once you've confirmed all components meet the requirements above, you're ready to move on to the next preparation step to install Magento 2.
2. Install Composer on your server
Magento 2 is built around Composer, a PHP dependency manager, for installing and managing code packages. If you haven’t installed Composer yet, use the steps below:
php -r “copy(‘https://getcomposer.org/installer', ‘composer-setup.php');”
php composer-setup.php
sudo mv composer.phar /usr/local/bin/composer
Then confirm the installation:
composer –version
FYI: Magento 2 no longer uses the Web Setup Wizard — Composer is required for all installations starting from version 2.4 and up.
3. Generate authentication keys from Magento Marketplace
To download Magento packages via Composer, you need to authenticate with repo.magento.com using access keys linked to your Magento Marketplace account.
To get started, create a Commerce Marketplace profile and use it to generate two authentication keys (each with 32 characters). Ensure these keys are linked to a MAGEID (the primary contact's login credentials for your account) that has permission for the Adobe Commerce packages!
Let us break down the steps for you:
- First, go to the Commerce Marketplace and log in. Don't have an account yet? Click Register.
- Click on your account name (top corner on the right) > Choose My Profile.
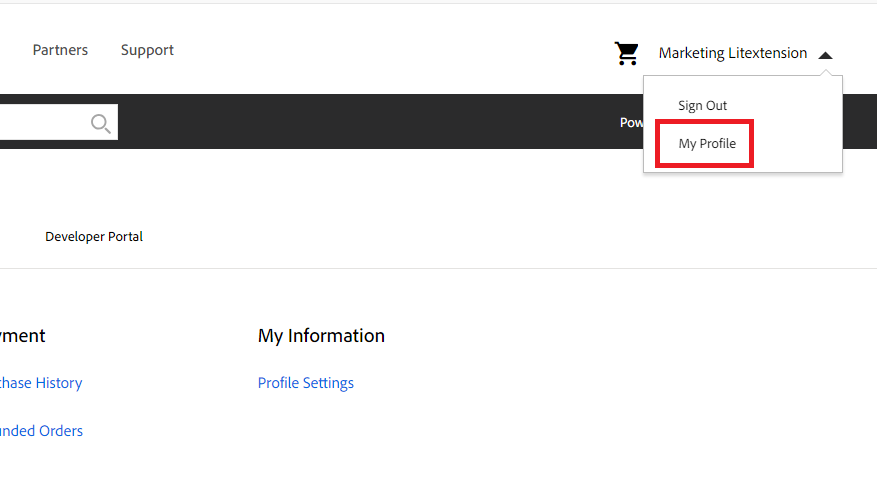
- On the Marketplace tab, choose Access Keys. Click on Create New Access Key and enter the keys' names. Then, click OK.
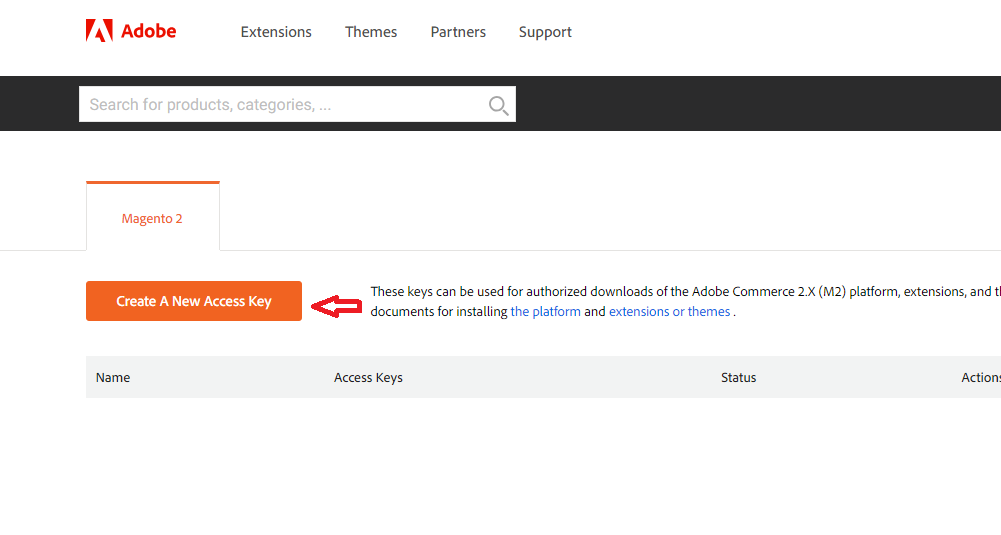
- You will now see new private and public keys connected to your account. Click on these keys to copy them to the clipboard. That's it! We're now one step closer to our Magento 2 setup.
These keys act like your credentials for Composer. When prompted during the Magento installation process, you’ll use the public key as your username and the private key as your password.
Note: Save your keys in a secure password manager so you can reuse them when updating or adding new extensions in the future.
4. Understand Magento’s technology stack (optional)
In addition to setting up the system, it is helpful to understand the technologies that Magento 2.4.8 relies on. This makes development, customization, and scaling much smoother, especially for agencies or teams working with multiple merchants.
Here’s a closer look at the stack that powers Magento:
Stack layer | Technology |
Backend language | PHP 8.3 (latest supported version in Magento 2.4.8) |
Dependency management | Composer 2.8 – required for installing Magento and managing dependencies |
Coding standards | Complies with PSR-1, PSR-2, PSR-3, and supports PSR-4 (recommended for autoloading) |
Frontend technologies | HTML5, CSS3, LESS, RequireJS, KnockoutJS, JQuery |
Caching solutions | – Redis (object/session caching) |
Version control | Git (optional but recommended for dev workflows, deployment, and version tracking) |
With this stack in place and your environment ready, you’re now set to begin the installation process.
Troubleshooting Common Errors When Installing Magento 2
Even experienced Magento developers occasionally hit a wall during the installation process. The good news is that the vast majority of errors you'll encounter when you install Magento 2 are well-documented and entirely fixable. Below is a breakdown of the most common issues, what causes them, and exactly how to resolve each one so you can get your store up and running without unnecessary delays.
Error | Cause | Solution |
PHP version incompatibility | Your server is running a PHP version that Magento 2.4.x does not support | Switch to a supported PHP version. On most hosting panels like cPanel or Cloudways, this can be done from the dashboard without CLI access. |
Composer running out of memory | HP's memory_limit is set too low (commonly 128M or 256M | Temporarily disable the memory limit for Composer. Alternatively, update memory_limit in your php.ini file during installation, then revert it afterwards. |
MySQL connection access denied | Incorrect database credentials in your install command, or the MySQL service is not running. | Double-check your database name, username, and password. Then verify MySQL is running. |
File and directory permission errors | The web server user doesn't have the correct ownership or write permissions on Magento's directories. | Set the correct ownership with permisssion in your Magento directory. |
Composer authentication failure | Your Magento Marketplace authentication keys are missing, incorrect, or not properly configured in auth.json. | Regenerate your keys from the Magento Marketplace under My Profile → Access Keys, then update your auth.json file at ~/.composer/auth.json |
Install Magento 2 – FAQs
Can I install Magento 2 without Composer?
Technically yes, but it’s not recommended. Magento deprecated the Web Setup Wizard in version 2.3.6, and Composer has been the official method ever since. It offers better dependency management, cleaner version control, and long-term flexibility.
What PHP version is best for Magento 2.4.6?
Magento 2.4.6 officially supports PHP 8.1 (recommended) and PHP 8.2 (starting from 2.4.6-p1). You should avoid PHP 7.4 or older — support has ended and they’re no longer secure or compatible with the latest Magento versions.
Note: Magento 2.4.8 supports PHP 8.3 as of March 2025.
Do I need a license for Magento Open Source?
No, Magento Open Source is 100% free to download and use under the OSL 3.0 license. You don’t need to pay for a license — but you’ll need to handle your own hosting, support, and development.
Why is it so difficult to install Magento 2?
Magento 2 is powerful — but it’s also complex. It requires a properly configured Linux server, Composer, PHP extensions, and a search engine like Elasticsearch and correct file permissions and CLI installation.
Can I switch from Open Source to Adobe Commerce later?
Yes — Magento is designed to be upgrade-friendly.
You can migrate from Open Source to Adobe Commerce at any time by purchasing an Adobe Commerce license, installing the Adobe Commerce edition or migrating your database, modules, and theme (if compatible).
Final Words
We've guided you through 6 easy steps to install Magento 2. Although some coding is involved, the process remains quite straightforward.
However, if you're new to this and need to migrate from another platform to Magento as soon as possible, our experienced LitExtension Expert team is ready to help.
We have assisted over 200,000 customers worldwide, from more than 100 countries, in migrating their stores to various platforms, with a satisfaction rate of 99% or higher. You need zero technical knowledge during the entire process, and our 24/7 support team will be with you every step of the way.
Visit our LitExtension blog and join our eCommerce community for more support.

