If you're running a WordPress site, you might eventually need to export WordPress database for backups, migration, or troubleshooting. And yet, many users find this process very daunting, especially when encountering unexpected hiccups like data corruption or incomplete exports.
But don't worry; we're here to help you through it all! In this article, our team will discuss 5 different ways to export WordPress database:
- How to export the database using phpMyAdmin
- How to export using SSH
- How to export with WP-CLI
- How to migrate your store using third-party plugins
- How to migrate your store with LitExtension
Are you ready? Let’s get started!
Export WordPress Database: A Quick Overview
First, before exploring the different export methods, let's take a moment to clarify what exactly this export process is meant to achieve!

Simply put, exporting a WordPress database means all the data (your posts, pages, user info, etc.) will get saved in a specific format that can be read by most database systems available. This is important for three reasons:
- Safety: Having a database backup means that if something goes wrong (e.g., server crash or hacker attack), you can quickly bring your website back online with minimal downtime.
- Flexibility: Need to pull just a few posts or pages for a new project? A WordPress export database will let you do that easily. There's no need to start from scratch when repurposing some of your content.
- Website migration: If you're moving to a new hosting provider or switching servers, the export WordPress database ensures all your site's data can facilitate the move without a hitch.
Migrate your online store smarter!
LitExtension can safely transfer your data to unlock more growth on the new platform.

How to Export WordPress Database phpMyAdmin
Are you a beginner looking to avoid the technical deep dive? Then, this free, open-source tool is perfect for you, especially if you're working with simple or smaller databases! You don't even need to turn to the command line during the entire process.
However, one catch with phpMyAdmin is that it's not included in all hosting providers. For instance, platforms like Cloudways use an alternative called Adminer, which serves similar purposes but is not as easy to use. So, make sure your hosting provider supports phpMyAdmin before proceeding to the steps below:
Step 1. Select your database
First, log in to your web hosting control panel (usually cPanel) and click the “phpMyAdmin” icon. (Have no cPanel on your host? Then try appending /phpmyadmin to your site URL).
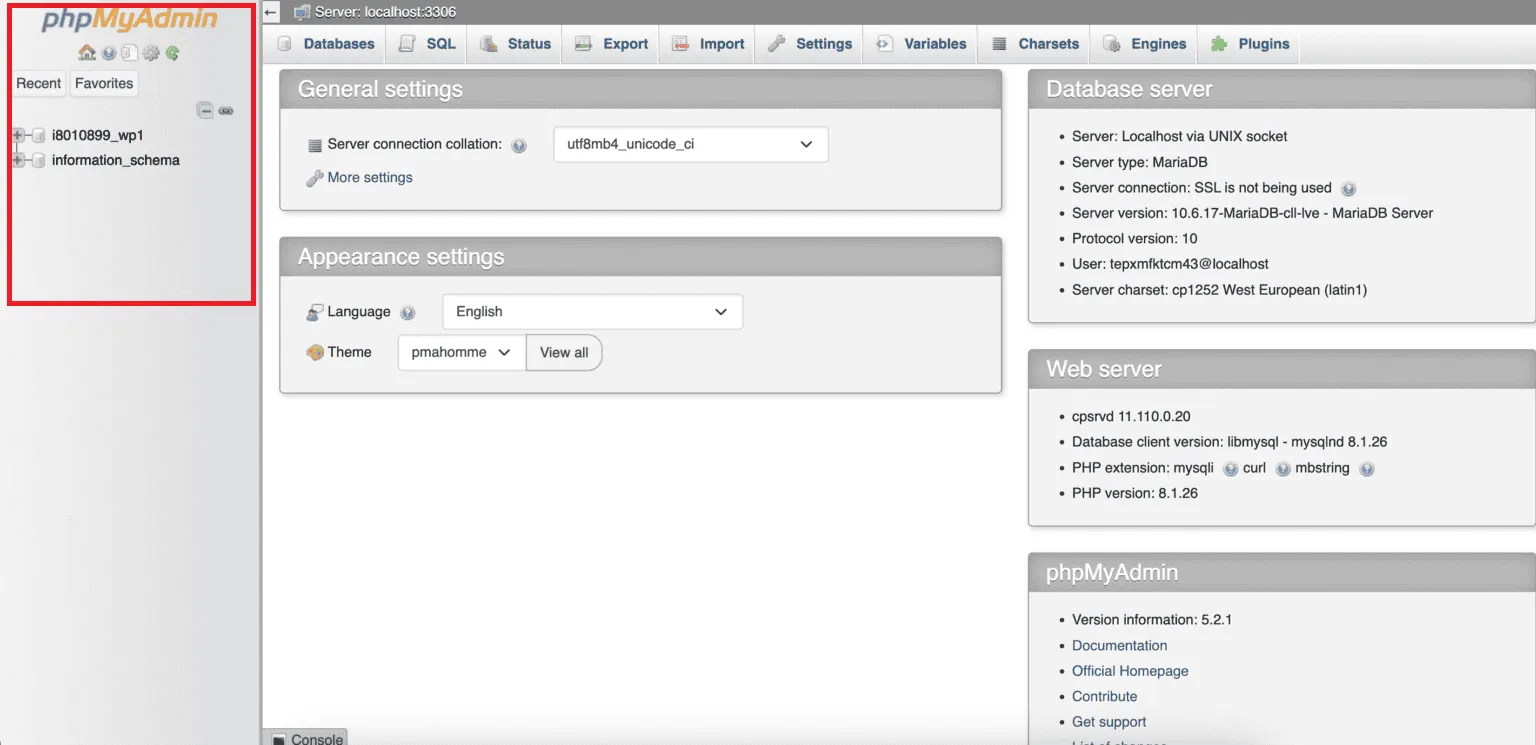
Once in phpMyAdmin, find a list of databases on the left-hand side, then click the database name associated with your WordPress site.
Step 2. Select your export method
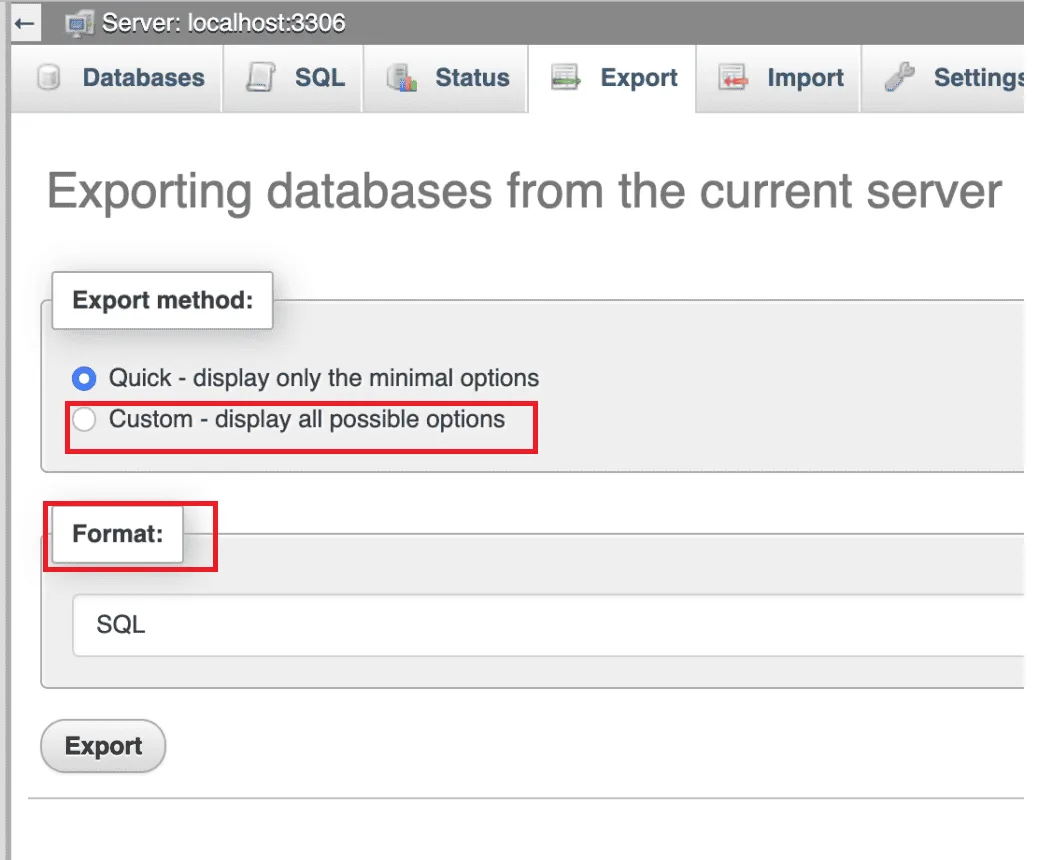
After selecting the database in Step 1, click the “Export” tab at the top. When the export screen shows up, choose the “Custom” option under the “Export Method” section.
Next, from the dropdown menu, choose “SQL” as the format (though you can select CSV if preferred).
Once done, scroll to the “Tables” section and ensure all tables are selected to back up the entire database.

Step 3. Export WordPress database
Finally, scroll to the bottom and click the “Export” button to start the export process. Your database file (in SQL format) will be downloaded to your computer!

How to Export WordPress Database Using SSH
Now, let's talk about SSH (short for Secure Shell). It's a powerful protocol that gives you secure, remote access to servers and ensures the connection between your computer and the server is locked down tight.
However, that means you'll need a solid grasp of command-line interfaces (CLI) and a basic understanding of server management to export WordPress site databases. Without that technical know-how, the following steps might be a bit tricky:
Step 1. Log in to your server
First, open your terminal or command prompt, then type the following command:
ssh username@server_ip
Make sure to replace “username” with your actual server user name and “server_ip” with your server's IP address! Once done, press “Enter” to connect.
Step 2. Run the mysqldump command
After connecting, run this command to back up your database:
mysqldump -u database_user -p database_name > C:\Backups\wordpress_backup.sql
Remember to replace “database_user” with your database username and database_name with your WordPress database name. Also, adjust “C:\Backups\wordpress_backup.sql” with the location and name you want for the backup file.
After that, press “Enter.”
Step 3. Export WordPress database
When prompted, type your database password and press “Enter.” Your WordPress database backup is now created! To confirm the backup is complete, list the files in your directory by typing:
ls -lrt
Now, check if you see the file “wordpress_backup.sql;” if it's there, the backup was successful! You just need to download this backup file to your local drive for safekeeping.
How to Export WordPress Database Using WP-CLI
Another common approach is to use WP-CLI (WordPress Command Line Interface). As its name suggests, you can skip the admin dashboard entirely to handle everything from the command line — whether it's a database export, plugin update, or theme installation!
But before we go into the steps, here's a word of caution: although WP-CLI isn't too complex, you still need to be comfortable using basic command lines or terminals. Read our instructions carefully to avoid hiccups along the way:
Step 1. Log in to the WordPress server
The first thing to do is to open the terminal and use the SSH command to access your WordPress server:
ssh username@wordpress-ip-address
Make sure to replace “username” with your actual username and “wordpress-ip-address” with the IP address of your server.
Step 2. Locate the WordPress root directory
Once logging in, navigate to the folder where WordPress is installed. The simplest way to do so is by running this command:
cd /var/www/html/wordpress
Step 3. Export WordPress database
Now, create a backup of your WordPress database using this command:
wp db export
Note that this command will automatically export WordPress website database in your current directory. If you prefer another storage location, use this command:
wp db export /backup/wp-backup.sql
Replace /backup/ with a specific folder you choose, and that's it!
How to Migrate A WordPress Database
We've just covered how to export WordPress database with 3 methods, which are ideal if you simply want to create a WordPress backup or extract specific data. But for a full WordPress site migration, you'll likely need a more comprehensive alternative! Here are two highly recommended migration approaches you may consider:
To use the WP Migrate DB plugin (Basic)
Among the many options available for export database WordPress plugin, WP Migrate stands out with overwhelmingly glowing reviews. And true to the “Migrate” in its name, WP Migrate goes beyond regular exports to handle a simple store migration pretty well! Here's how to get started:
Step 1. Adjust the settings
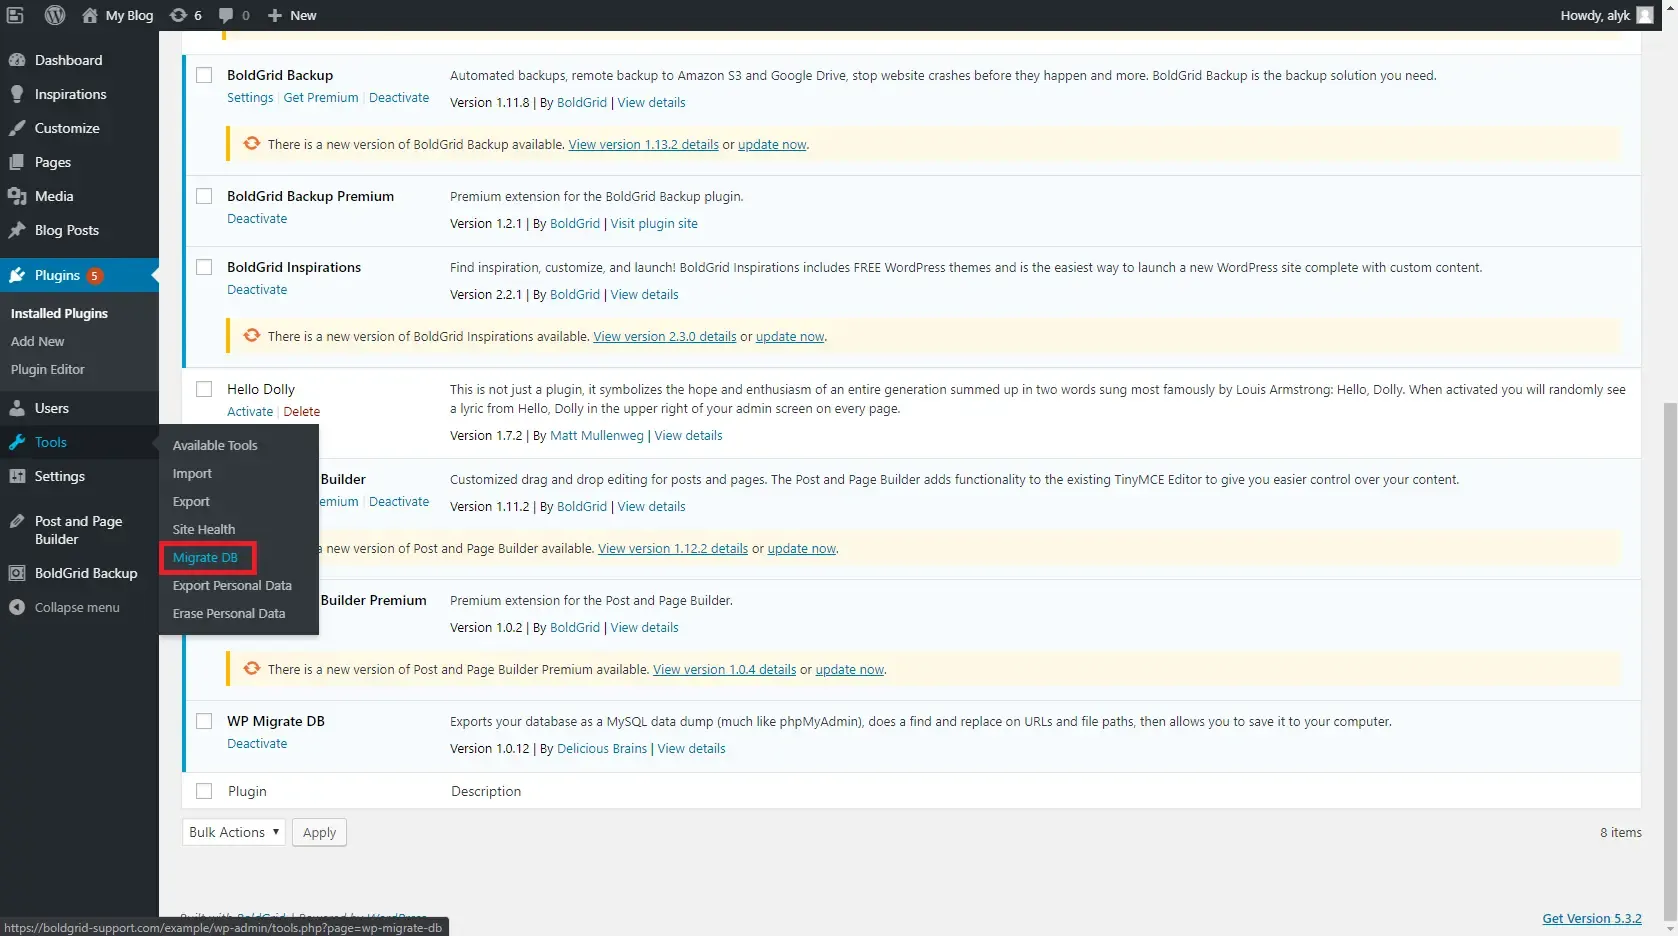
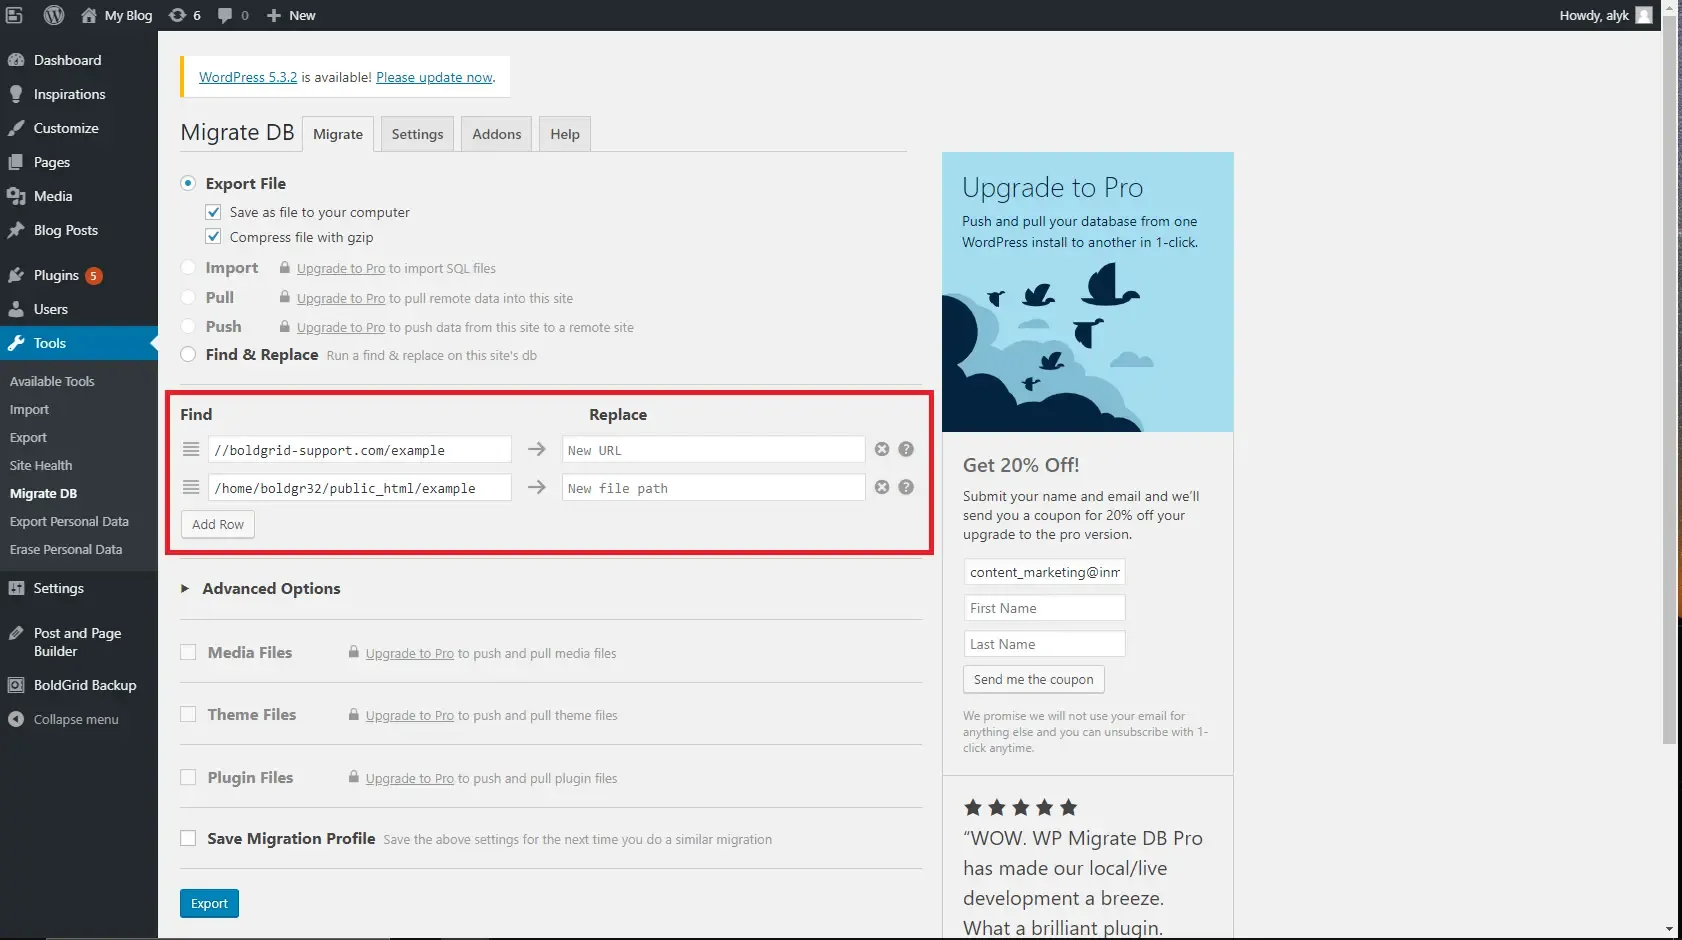
Go to the sidebar in your WordPress dashboard, click “Tools,” and select “Migrate DB.”
On the Migrate DB page, check the box for “Save as file to your computer” if it's not already selected. Also, for large databases, you can also check the box for “Compress file with gzip” to make the download faster.
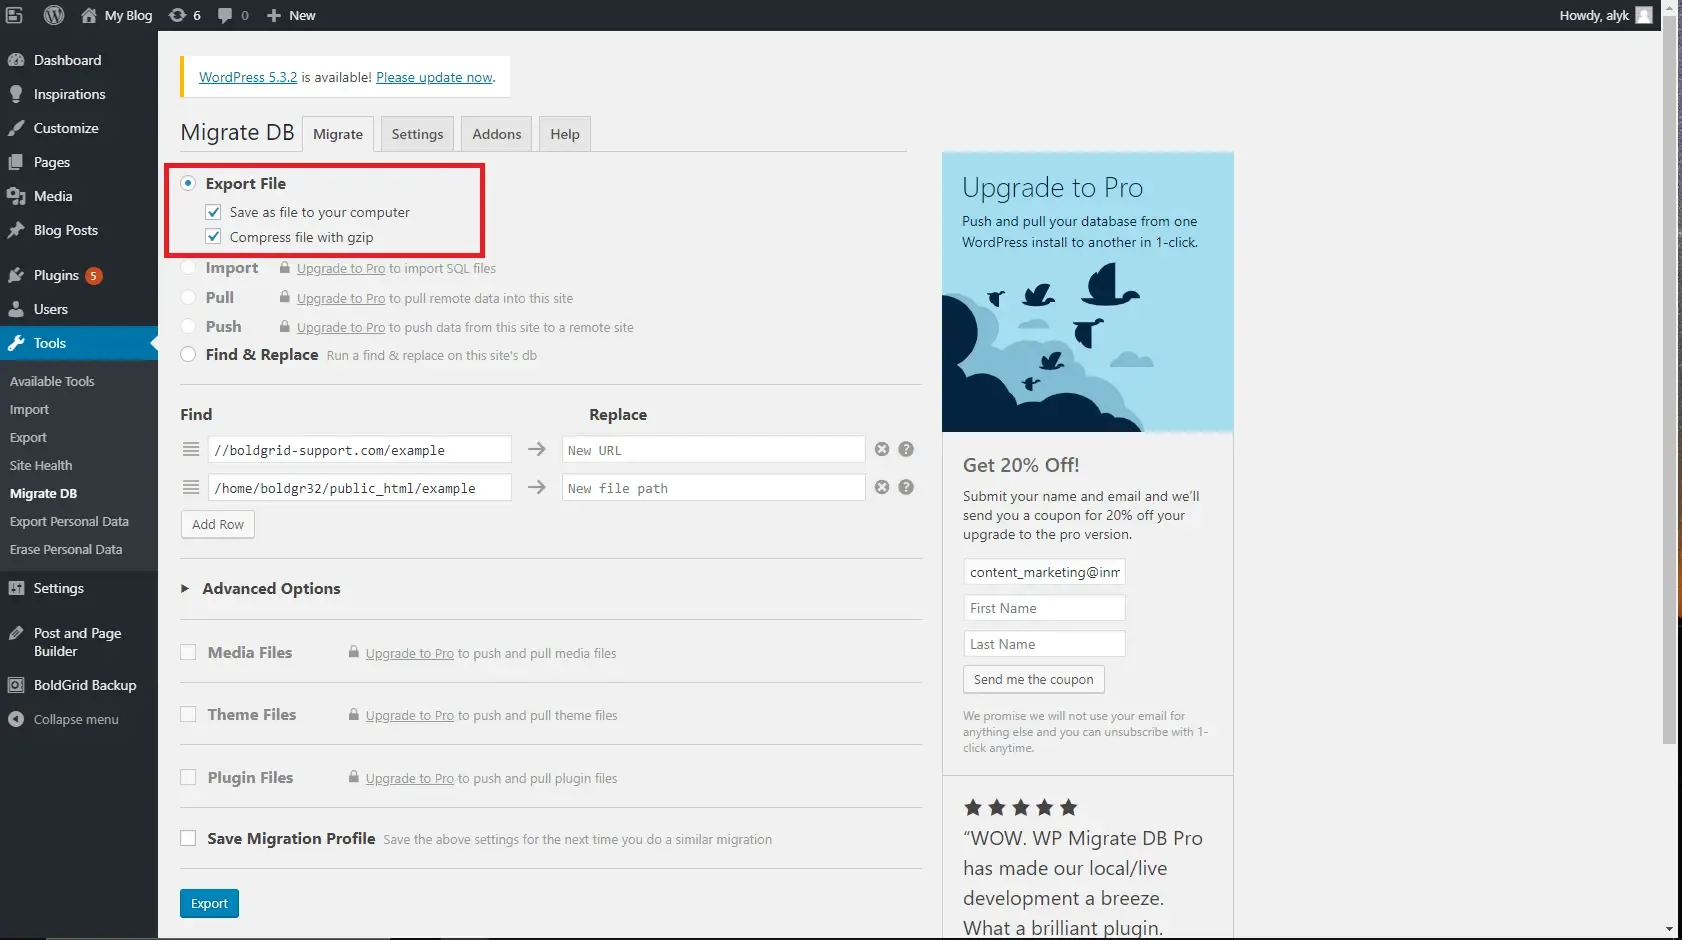
Next, in the “Replace file path” section, enter the new file path where the site will be stored on the new server. Remember to replace your original URL as well since you're going to transfer WordPress site to a new URL.
Step 2. Export WordPress database
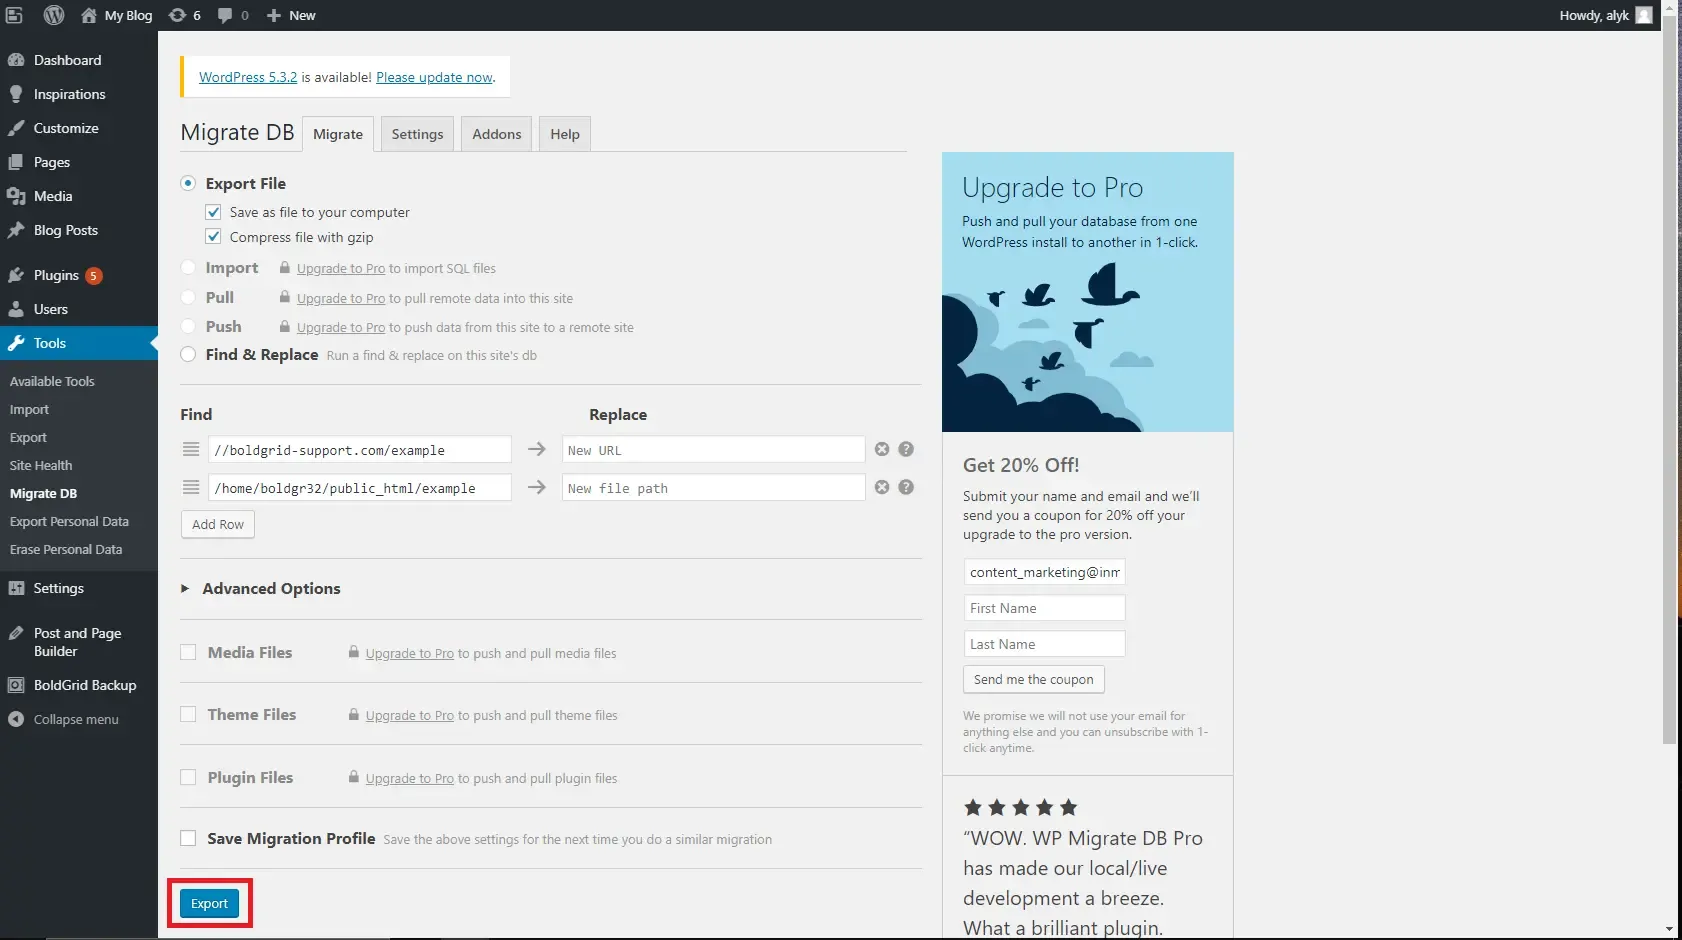
Finally, click “Export.” Once the export finishes, the file will automatically download to your computer. Now, you can upload the downloaded .sql or .sql.gz file to your new server using Command Line or phpMyAdmin!
To contact LitExtension (Advanced)
As you can see, the WordPress export database plugin above is very beginner-friendly. But that's exactly why you can only use this plugin for simple, basic migrations, preferably to a platform fairly similar to WordPress in core features! Otherwise, more complex requirements will likely cause you frustrating roadblocks along the way.
So, let us suggest a much smarter alternative: contact the LitExtension team. With over 12 years of experience and expertise across 140 eCommerce platforms and website builders, we can handle even the most challenging migrations effortlessly!
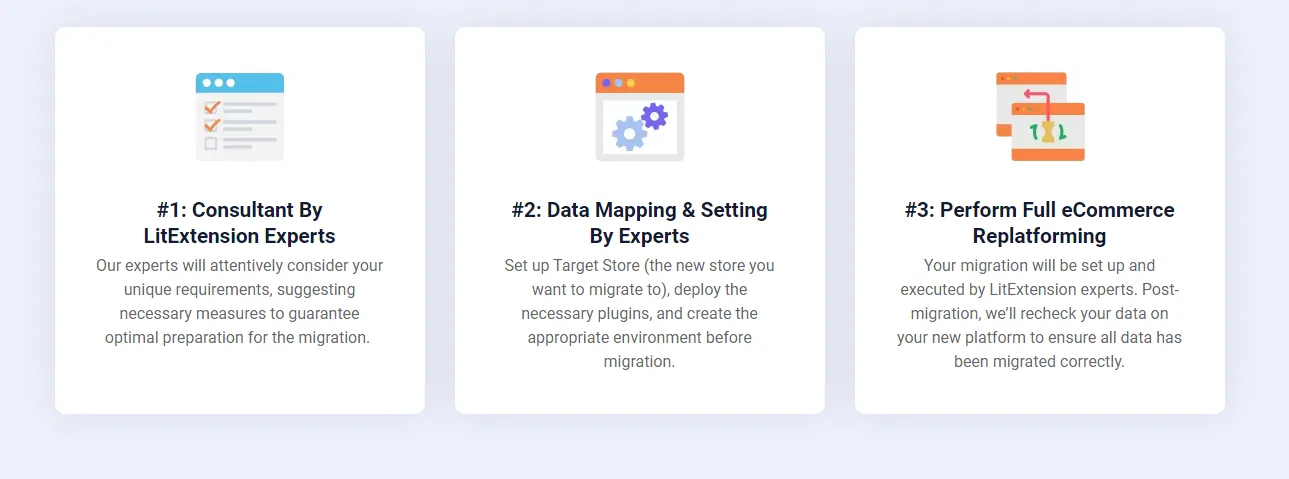
Overall, there are only three steps to keep in mind:
Step 1. Consultation by LitExtension experts
The first thing to do is to reach out to our LitExtension team; our primary goal at this stage is to fully understand your migration needs. For example, do you want to export WordPress media library, blog posts, orders, products, or other data types?
We will provide a clear outline of the services and pricing after reviewing your requirements. Once payments are confirmed, we will take over the migration process from here!
Step 2. Data mapping and setup by experts
Now that your needs have been clearly defined, our LitExtension team will start the technical groundwork, which involves:
- Setting up your new store's platform
- Installing the necessary plugins
- Removing placeholder content (if any)
- Creating 301 redirects to keep your SEO intact
Interested in seeing how it works before committing? No problem; we can offer you a free LitExtension demo migration.
Step 3. Perform full eCommerce replatforming
The setup in Step 2 is finalized; now, it's time for us to carry out the full migration process for you! You'll receive regular updates from our team throughout the entire process.
After the data transfer, we will carefully review everything again to ensure nothing is out of place. At this point, your site will be fully operational and ready to launch on its new platform.
And the benefits just keep coming even after that! Our team will cover any additional options that come up during or after the migration process at no extra cost to you. Plus, for the next three months, you can rest easy knowing that we’ve got you covered with services like Remigrations, Smart Updates, and Free/Unlimited Recent Migrations to ensure no data is missing.
Ready to unlock your next big win? Reach out to our team today!
How to Restore A WordPress Database from An Exported Database File
We have already walked you through ways to export your WordPress database and even provided two solid methods on how to migrate WordPress site.
Now, before we wrap things up, let's tackle one last issue: restoring your WordPress database from a backup! The process is straightforward, nothing complicated:
First, go to the database tables and click “Check All” to select all tables, then find the drop-down menu labeled “With Selected.”. Click it and choose “Drop” from the menu.
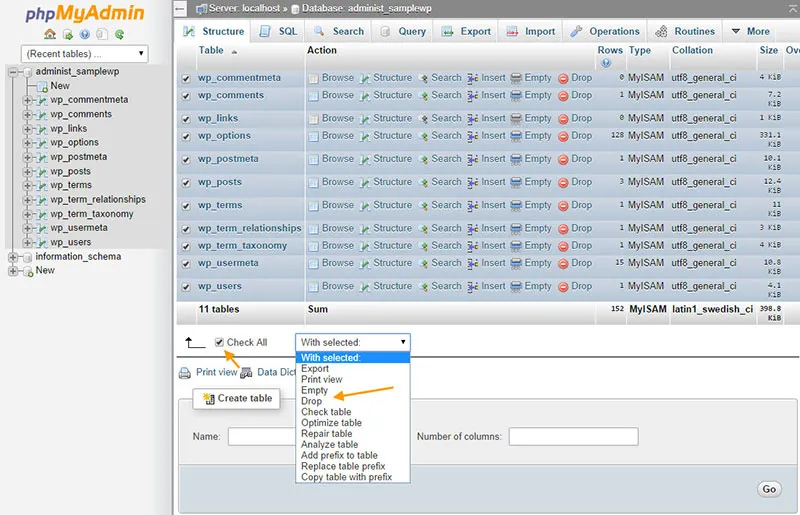
When prompted, click “Yes” to confirm the operation. Once this operation is done, click on the “Import” tab. Click “Choose File” and select the backup file you want to import. Finally, to finish, click the “Go” button.

Export WordPress Database: FAQs
Can you export a WordPress database?
Yes. You can export WordPress blog posts, products, orders, comments, etc., via phpMyAdmin, SSH, WP-CLI, or even a third-party plugin. Still, for a comprehensive store migration, your best option is to contact the LitExtension team.
How do I export a WordPress database to Excel?
Most export plugins will do since they usually support multiple file formats like Excel, CSV, Google Sheets, or even XML.
How do I backup my WordPress database?
Simply follow the methods outlined above to download the export files to your computer, then save them in a secure location. That's how you create a reliable backup for your database!
Final Words
This article has explored various methods to export WordPress database. We have also covered methods for WordPress import database here; check it out!
Neverthless, note that basic methods (like phpMyAdmin or plugins) mostly work for simple tasks. More complex WordPress migrations or WordPress Update, on the other hand, usually require a more robust solution. And that's where LitExtension comes in!
With over 12 years of experience and over 300,000 successful store migrations across 100 countries, our team understands clearly what it takes to perform a smooth, hassle-free transfer. We can't wait to bring that same success to your store; let's make your next migration a roaring success together!
For more information, check out our eCommerce guides and join our Facebook Community.

