
How to Import a WordPress Database: 3 Methods
If you have a WordPress SQL backup, you can import it into a destination database using phpMyAdmin, Adminer, or WP-CLI. This guide walks through each method and the checks to make before replacing any existing tables. If you are moving WordPress to a new site or host, importing the database is only one part of the process: your site files, database configuration, and stored URLs may also need attention.
Without further ado, let’s get started!
Planning a Move to WordPress?
Let LitExtension assess your website and help you migrate the content your new WordPress site needs.

How to Import a WordPress Database
Before choosing an import method, confirm that you have a WordPress SQL backup and access to the destination database. Importing this file can replace existing tables; it does not safely merge two WordPress websites. Complete these checks before proceeding:
- Back up the destination: If it contains existing data, save a separate database backup and confirm how you would restore it before making changes.
- Confirm the target database: Check the database name against DB_NAME in the destination site’s wp-config.php file. For a new site, prepare an empty database and a database user with the required permissions.
- Check your backup file: Use an SQL backup from a WordPress database. A WordPress XML export, CSV file, or database from another platform requires a different import process.
- Choose a suitable method: Use phpMyAdmin or Adminer when available through your hosting setup. If the file exceeds browser upload limits and your environment supports SSH and WP-CLI, use the command-line method below.
Method 1. Import a WordPress Database with phpMyAdmin
phpMyAdmin lets you import an SQL backup through a browser interface. If your hosting provider offers it, open the tool from your hosting control panel and follow the steps below. The location of phpMyAdmin and the database name will vary by host.
Step 1. Select the destination database
In phpMyAdmin, select the database intended for your destination WordPress site from the left-hand panel. Check its name against DB_NAME in the destination site’s wp-config.php file before proceeding.
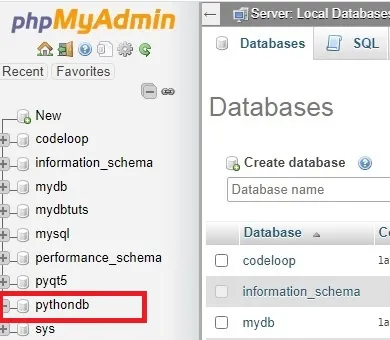
For a new site, use the empty database prepared in the previous checklist. If you are replacing an existing database, keep a separate backup and confirm which tables belong to that site. Do not delete unrelated tables from a shared database.
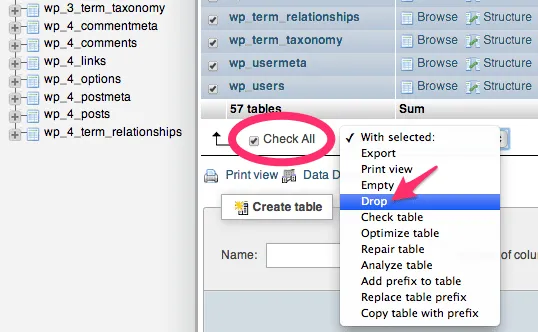
If the agreed replacement requires clearing the existing WordPress tables, select only those tables and choose Drop from the actions menu. Confirm the deletion only after checking the database name, table selection, and backup. Skip this step when the destination database is already empty.
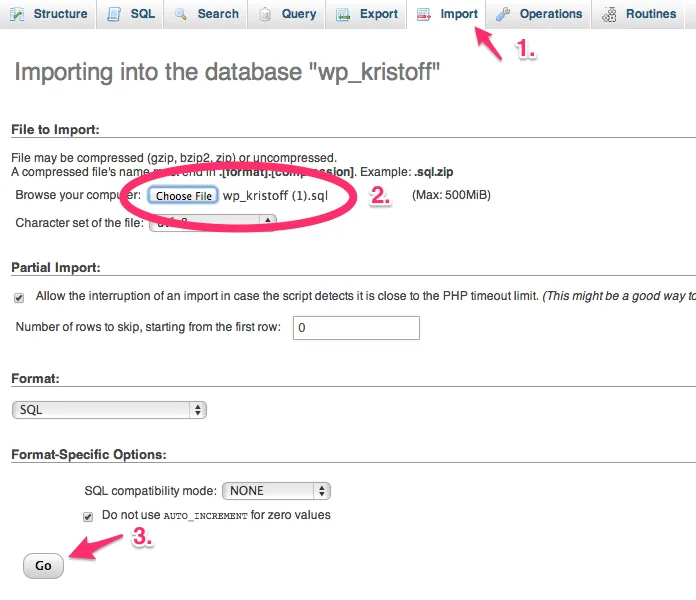
Step 2. Import the SQL backup
- With the destination database selected, open the Import tab.
- Click Choose File and select your WordPress SQL backup.
- Confirm that the import format is SQL. For a standard SQL dump, the default import settings are usually sufficient.
- Click Import or Go, depending on your phpMyAdmin version, and wait for the operation to finish.
Check the completion message for errors. If the import stops partway through, do not assume the database is ready or repeatedly import into the partially populated database without reviewing the error.
The upload limit shown on the Import screen depends on your hosting and PHP settings. If your file exceeds it or the import times out, ask your host about a supported import method or use WP-CLI when available.
Step 3. Check the imported database and WordPress connection
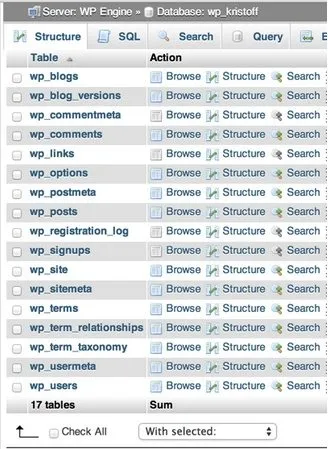
Confirm that the expected WordPress tables appear in phpMyAdmin. Their prefix may be wp_ or a custom value; the $table_prefix setting in wp-config.php must match the imported tables. Do not rename tables simply because they use a different prefix.
If the database connection details have changed, update DB_NAME, DB_USER, DB_PASSWORD, and DB_HOST in the destination site’s wp-config.php file.
Once the corresponding WordPress files are in place, test the destination site and administrator login. Check representative posts, pages, settings, and any important plugin data. If the site’s address has changed, review stored URLs using a WordPress-aware replacement method before considering the move complete.
Method 2. Via Adminer
If phpMyAdmin is unavailable, Adminer provides another way to import your WordPress database. The plugin method below requires a working WordPress installation and administrator access on the destination site. If you are importing into an empty database or cannot access WordPress, use your host’s Adminer interface instead.
Step 1. Install the Adminer plugin
In the destination WordPress dashboard, go to Plugins > Add New Plugin and search for Database Manager – WP Adminer. Install and activate it.
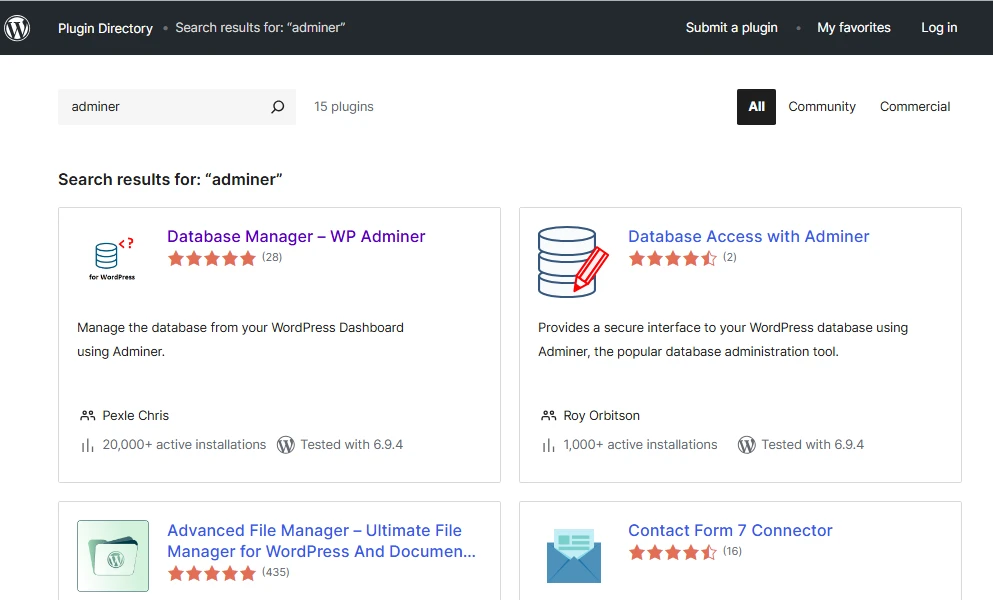
Open Tools > WP Adminer, or use the Open WP Adminer link in the plugin list when available. Confirm that the database belongs to your destination site. Keep access through your hosting account available if the import will replace existing WordPress users or settings.
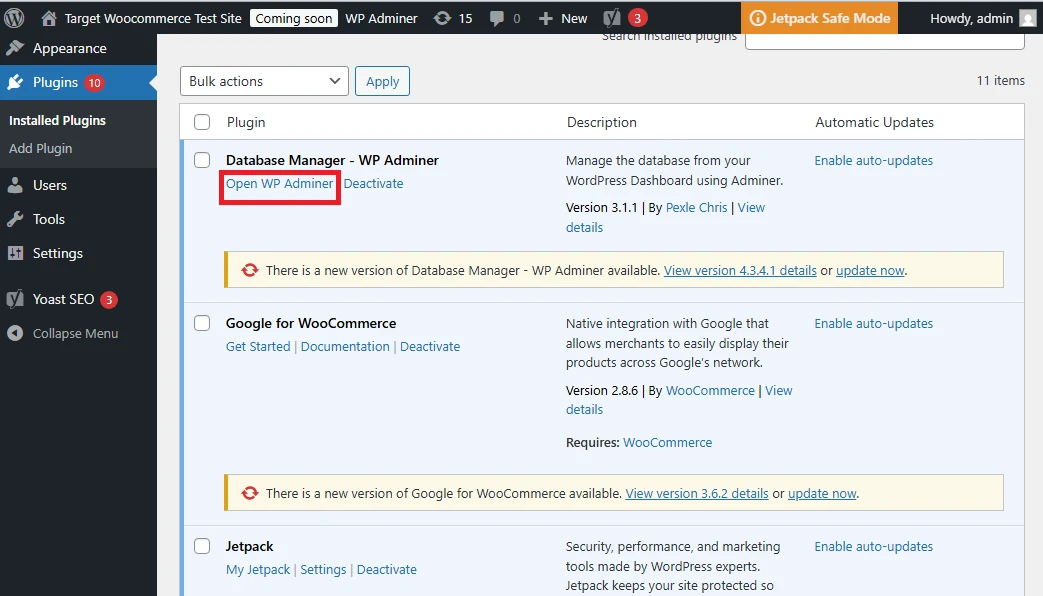
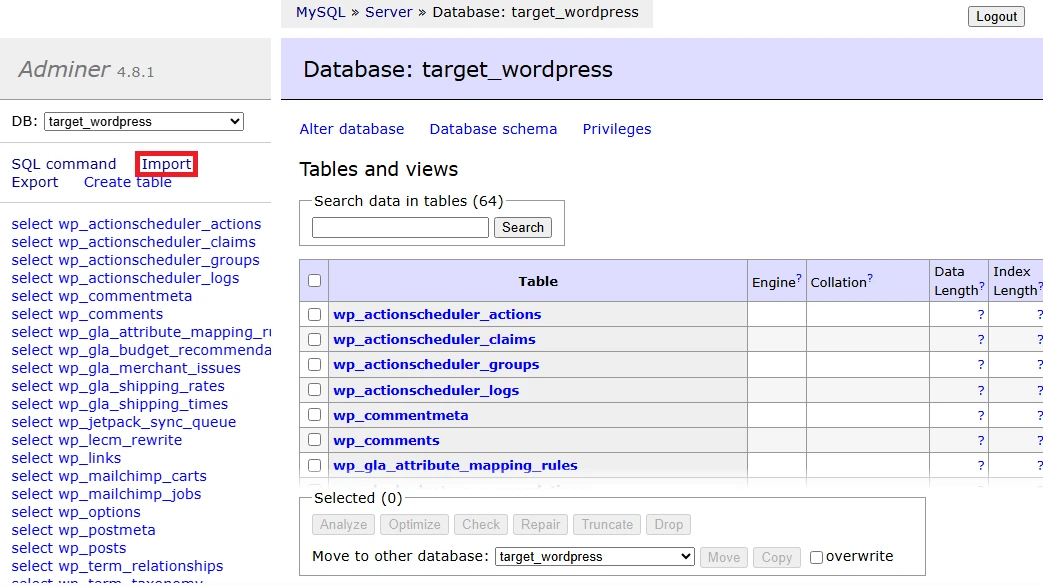
Step 2. Upload your database file
Open Import to select your WordPress SQL backup.
Choose your .sql file, or a compressed SQL backup supported by your Adminer installation. Check the upload limit displayed on the screen: the 2,048 MB shown in this example is specific to that environment.
Review the two import options:
- Stop on error: Stops execution when a query fails. It does not undo queries that have already completed.
- Show only errors: Hides successful query messages so you can focus on reported failures.
Enable Stop on error to identify a failed import before further queries are executed.
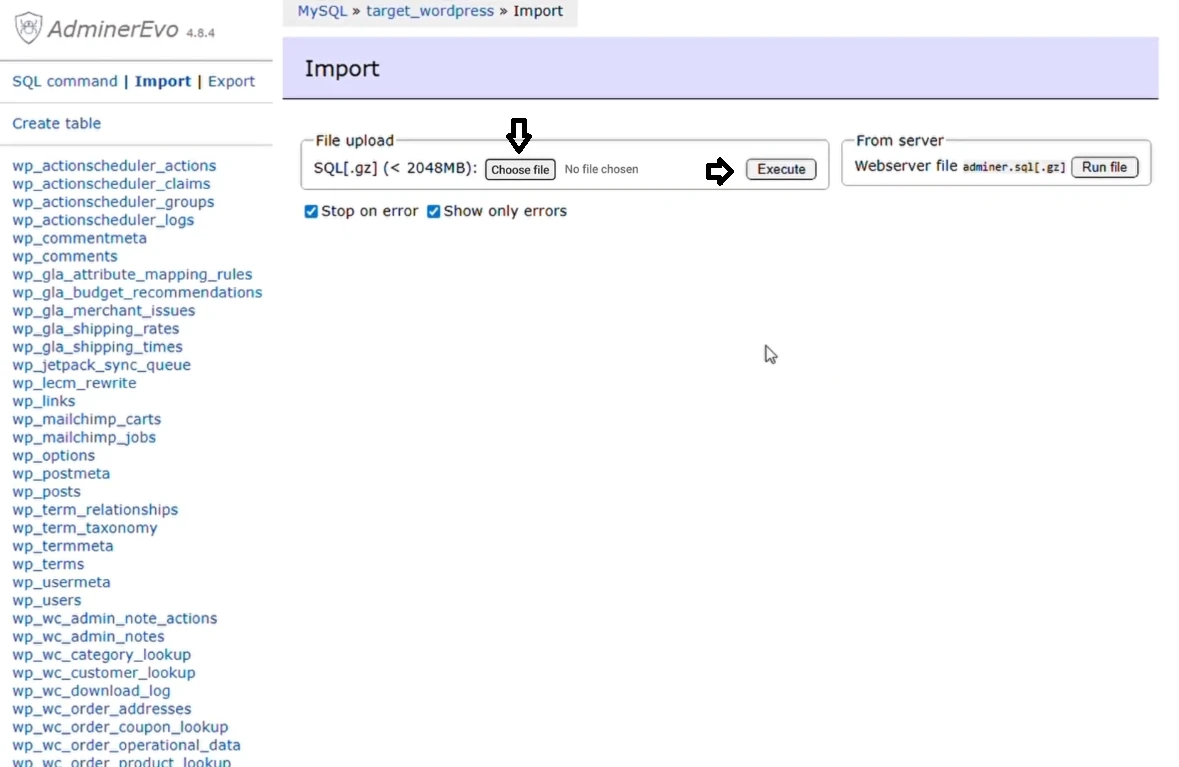
Step 3. Execute the import
Click Execute to run the import, then review the completion message and any errors. If it stops partway through, investigate the error before retrying against the partially imported database.
Confirm that the expected tables are present and that $table_prefix in wp-config.php matches their prefix. Test the website and administrator login, then check representative content before considering the import complete.
Method 3. Via WP-CLI
If you prefer working from the command line or need to import a large SQL file without relying on a browser-based database interface, WP-CLI provides a straightforward way to import a WordPress database. The wp db import command imports SQL from a file or standard input and uses the database credentials configured in your WordPress wp-config.php file.
Step 1. Locate your SQL file
First, make sure you have a valid .sql database backup and know its location on your server or local computer.
For example:
- Windows: C:\Users\example-user\file.sql
- macOS: /Users/example-user/file.sql
- Ubuntu: /home/example-user/file.sql
The SQL file must be accessible on the machine where WP-CLI runs. If you connect to your hosting server through SSH, upload the backup to that server first and use its server-side path. A path on your personal computer will not work in the remote SSH session.
You’ll also need access to the WordPress installation through a command-line interface and have WP-CLI installed on your environment.
Step 2. Navigate to your WordPress installation
If you run WP-CLI from another directory, specify the WordPress installation directory with --path=/path/to/your/wordpress.
Make sure this is the WordPress installation whose database you want to import. WP-CLI reads the database connection details, including DB_NAME, DB_USER, DB_PASSWORD, and DB_HOST, from wp-config.php.
You can also specify the WordPress installation path directly with the –path parameter if you are running the command from another directory.
Step 3. Import the SQL database
Once you are in the correct WordPress directory, run:
wp db import /path/to/your/file.sql
For example:
wp db import wordpress_database.sql
WP-CLI will execute the SQL statements in the file against the database configured in wp-config.php. If the import is successful, you’ll see a confirmation message such as:
Success: Imported from ‘wordpress_database.sql’.
Important:
wp db import does not create the database itself. Before running the command, make sure the target database already exists and that the database credentials in wp-config.php are correct. Also, be aware that the SQL file determines what happens to the existing tables; for example, a dump containing DROP TABLE statements can replace existing tables.
After importing, confirm that the expected tables are present and that their prefix matches $table_prefix in wp-config.php. With the corresponding WordPress files in place, test the destination site and administrator login, then check representative content. If the site address has changed, review stored URLs before considering the move complete.
Troubleshooting Common WordPress Database Import Errors
As with any standard import process, a few technical hiccups might occur to your WordPress import database. While it’s not possible to address every type of issue in this guide, we’ll walk you through the most common ones to help you stay on track:
| Problem | Solution |
|---|---|
| MySQL server has gone away | This error can occur when the connection to MySQL times out or when a query or SQL packet is too large. For large imports, check the MySQL max_allowed_packet setting and consider increasing it on both the client and server if necessary. For oversized SQL statements, consider re-exporting with fewer rows per INSERT statement. WP-CLI can avoid browser-based import limits, but MySQL packet-size and connection limits still apply. |
| The SQL file is too large to upload | phpMyAdmin imports are subject to PHP and server limits such as upload_max_filesize, post_max_size, memory_limit, and max_execution_time. Check these settings with your hosting provider or server administrator. For large database files, you can also use a server-side import method such as WP-CLI to avoid browser upload limitations. |
| WordPress cannot find the imported tables | Check the table prefix after importing the database. The $table_prefix value in wp-config.php must correspond to the prefix used by the imported WordPress tables. For example, if the imported tables use wp_, WordPress must be configured to use the same prefix. |
| Special characters are displayed incorrectly | Check the character set and collation of the imported database and the values configured in wp-config.php. WordPress supports database character sets such as utf8 and utf8mb4; mismatched encoding or collation settings can cause characters to be displayed incorrectly or produce import errors. |
| Import fails because of an SQL or MySQL error | Check the exact MySQL error message and the line reported in the SQL file. Common errors include syntax errors (ERROR 1064), an existing table (ERROR 1050), an unknown database (ERROR 1049), or an unknown collation (ERROR 1273). These errors may indicate an incompatible SQL dump, an incorrect target database, or differences between the source and target MySQL environments. |
| URLs or other data break after import | Avoid manually running a basic search-and-replace across the SQL file when migrating a WordPress site. WordPress stores some values as serialized PHP data, and changing the length of serialized strings incorrectly can corrupt them. Use a WordPress-aware search-and-replace tool, such as WP-CLI’s wp search-replace, which handles serialized data correctly. |
Advanced WordPress Website Migration with LitExtension
The methods above let you import a WordPress SQL backup. If you need to move selected content or store records between websites or platforms, the task may require matching source fields to the destination rather than replacing its entire database.
LitExtension can assess your source website, destination, and the data you want to keep, then recommend a suitable migration approach. Discuss custom fields, database dumps, and any additional setup with our team when planning your WordPress migration, so you know what the project includes before proceeding.
Here is how our experts plan, set up, and complete your WordPress data migration:
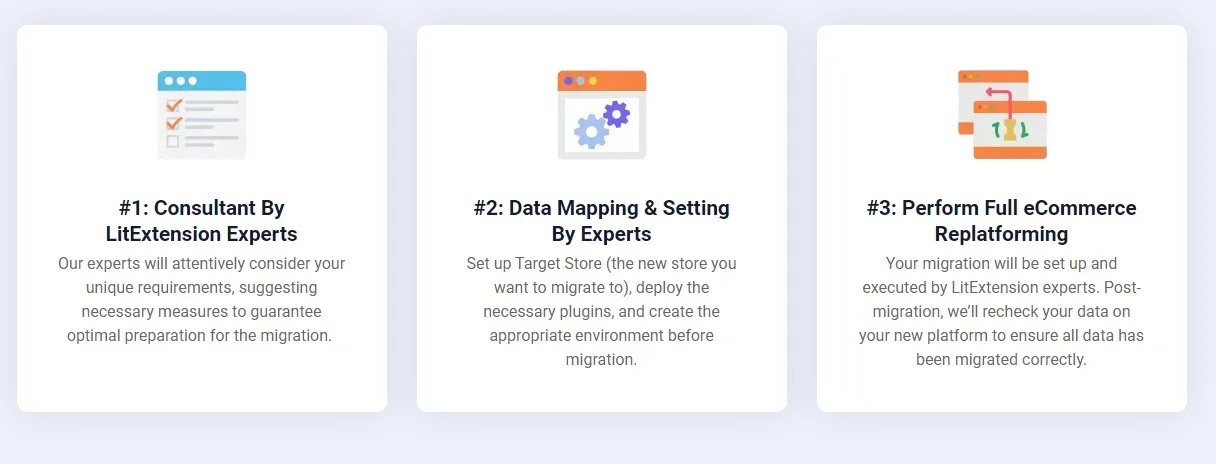
Step 1. Consultation by LitExtension experts
Your WordPress data migration journey starts with a personalized consultation. Our team reviews your source website, destination, and the content or store data you need to move. Products, customers, and orders require a suitable WooCommerce destination.
We assess your requirements and provide a breakdown of the agreed services and pricing. Any work involving hosting, website design, or rebuilding features should be confirmed separately before the project starts.
Step 2. Data mapping and setup by experts
Our team maps the supported source fields to the destination and prepares the migration setup. Depending on your route and agreed requirements, this can include:
- Configuring the connections and tools required for data transfer.
- Assessing custom fields and the destination extensions needed to receive them.
- Clearing selected destination data when agreed, after a backup.
- Configuring supported URL and redirect options.
Where Demo Migration is available, review a sample transfer before the Full Migration. Our team can confirm the preview options for your project.
Step 3. Complete the data migration and check the results
LitExtension performs the Full Migration and keeps you informed throughout the process. Afterward, our team checks the transferred data against the agreed scope for accuracy and completeness.
Your team can then complete the remaining website setup and launch checks, including forms, integrations, and checkout where applicable. Confirm any additional launch assistance as part of your project plan.
WordPress Import Database: FAQs
How do I import a WordPress database from an SQL file?
Select the destination database in phpMyAdmin or Adminer, open Import, and choose your WordPress SQL backup. Alternatively, run wp db import /path/to/backup.sql from the destination WordPress installation. Back up existing destination data first. The WordPress dashboard’s Tools > Import screen is for content imports, not restoring a complete SQL database.
Can I import a database into an existing WordPress site without losing data?
A full SQL import is not a safe way to merge two websites. Depending on the statements in the backup, it can overwrite matching tables or fail because they already exist. Back up the destination and test separately first. If you need to add selected content while keeping existing data, use a content import or a migration method designed for that scope.
Is importing the database enough to move WordPress to a new site?
No. You also need the corresponding WordPress files, including themes, plugins, and uploads, plus the correct database connection settings in wp-config.php. Keep the table prefix consistent with the imported tables. If the domain or site address changes, update stored URLs with a WordPress-aware tool and test the destination before launch.
How do I import a large WordPress database?
If the SQL file exceeds your browser upload limit or the import times out, use WP-CLI when your hosting environment supports it, or ask your host to perform the import. WP-CLI avoids browser upload limits, but MySQL connection and packet-size limits still apply. Check any errors and confirm the import completed before using the database.
Final Words
You can import a WordPress database using phpMyAdmin, Adminer, or WP-CLI, depending on your hosting access and file size. Back up the destination, confirm the database settings, and check the imported data before using the site. If you still need an SQL backup, follow our guide to exporting a WordPress database before starting.
If your project involves moving selected content, store records, or custom fields to WordPress, LitExtension can help assess the transfer requirements and plan the data migration. Schedule a call to discuss what you need to move and confirm the scope before proceeding.

