
The safest way to update WordPress is to back up your site, confirm that your plugins, theme, and PHP version support the new release, and then install the update from Dashboard > Updates. The process usually takes a few minutes, and WordPress installs minor security releases automatically by default.
Here’s how to update WordPress through the dashboard:
- Step 1: Back up your website files and database.
- Step 2: Log in to your WordPress admin and go to Dashboard > Updates.
- Step 3: Click Update to version [number].
- Step 4: Wait for WordPress to download and install the update. Your site enters maintenance mode for a few seconds during the process.
- Step 5: Check your key pages, forms, and checkout when the “What’s New” screen appears.
Without further ado, let’s get the ball rolling!
Why You Need A WordPress Update?
WordPress releases updates regularly to improve security, performance, and functionality. To understand why these updates matter, here is the difference between minor vs major WordPress updates:
- Major updates introduce new features and changes to the editing experience. WordPress ships a few major releases each year – in 2026, WordPress 7.0 was released on May 20, and WordPress 7.1 followed on August 19 as the second major release of the year.
- Minor updates focus on security patches, bug fixes, and smaller performance improvements.
Although they serve different purposes, both types of updates help keep your website running properly. By updating WordPress regularly, you can:
- Stronger security: Updates patches known vulnerabilities that hackers could exploit.
- Better performance: New versions may improve your site’s speed, stability, and overall efficiency.
- Fewer technical issues: Bug fixes help prevent errors and unexpected behaviour.
- Improved compatibility: An updated WordPress version is more likely to work smoothly with the latest themes and plugins.
- Access to new features: Major releases often introduce tools that improve website management and the visitor experience.
In short, WordPress updates help your website remain secure, compatible, and reliable. Now that you understand why they matter, let’s move on to how to update WordPress safely.
WordPress Migration Made Easy With LitExtension!
LitExtension offers great migration solutions that help you transfer your data from the current eCommerce platform to WordPress accurately, painlessly with utmost security.

Before You Update: A Quick Checklist
Now that you understand why WordPress updates matter, some preparation is necessary before installing the latest version. The following checks can reduce the risk of data loss, compatibility conflicts, and unexpected errors. Before moving on to how to update WordPress, you should complete these three steps.
1. Back up your WordPress website
A complete website backup gives you a safe restore point in case the update causes an error. Your backup should include both the WordPress database and website files, including themes, plugins, uploaded media, and configuration files.
The backup should also be stored separately from your hosting server, such as on your local device or in cloud storage. If the update affects your website’s layout or functionality, you can restore the previous version without losing important data.
2. Check your current WordPress version
Your current WordPress version is available under Dashboard > Updates. This page also shows whether new updates are available for WordPress core, themes, or plugins.
Next, check your server. WordPress 7.0 raised the minimum PHP version to 7.4, and sites still running PHP 7.2 or 7.3 aren’t offered the update and remain on the 6.9 branch. For the best performance and security, WordPress.org recommends PHP 8.3 or higher and MariaDB 10.11+ or MySQL 8.0+.
You can find your PHP version under Tools > Site Health > Info > Server. If you’re below the minimum, ask your host to upgrade PHP first, then check your site before updating WordPress.
3. Review plugin and theme changelogs
Outdated plugins and themes cause most update problems. Before updating:
- Free plugins and themes: Open their WordPress.org pages and check the “Last updated” date and the WordPress version they’re tested up to.
- Premium plugins and themes: Read the developer’s changelog or support forum for known issues.
- Site Health: Visit Tools > Site Health to spot critical issues before you start.
Pay extra attention to plugins that handle checkout, payments, forms, memberships, or page building. If a critical plugin hasn’t confirmed support for the new version, wait for its next release or test on staging first. Plugins that haven’t been updated in over a year may be abandoned and worth replacing.
How to Update WordPress Website Manually?
There are three common methods for anyone learning how to update WordPress manually: using the admin dashboard, FTP, or WP-CLI. Overall, the dashboard offers the simplest option for most users, whereas FTP and WP-CLI provide greater control when dashboard updates are unavailable.
Watch our step-by-step video below to see exactly how to update WordPress safely:
Method 1: Via dashboard
For sites using WordPress 3.7 or later, minor and security updates usually run automatically in the background. However, if you want to know how to update WordPress to a major release, you may still need to start the process manually:
- From your WordPress dashboard, go to Dashboard > Updates.
- Under the latest available version, select Update to version [number].
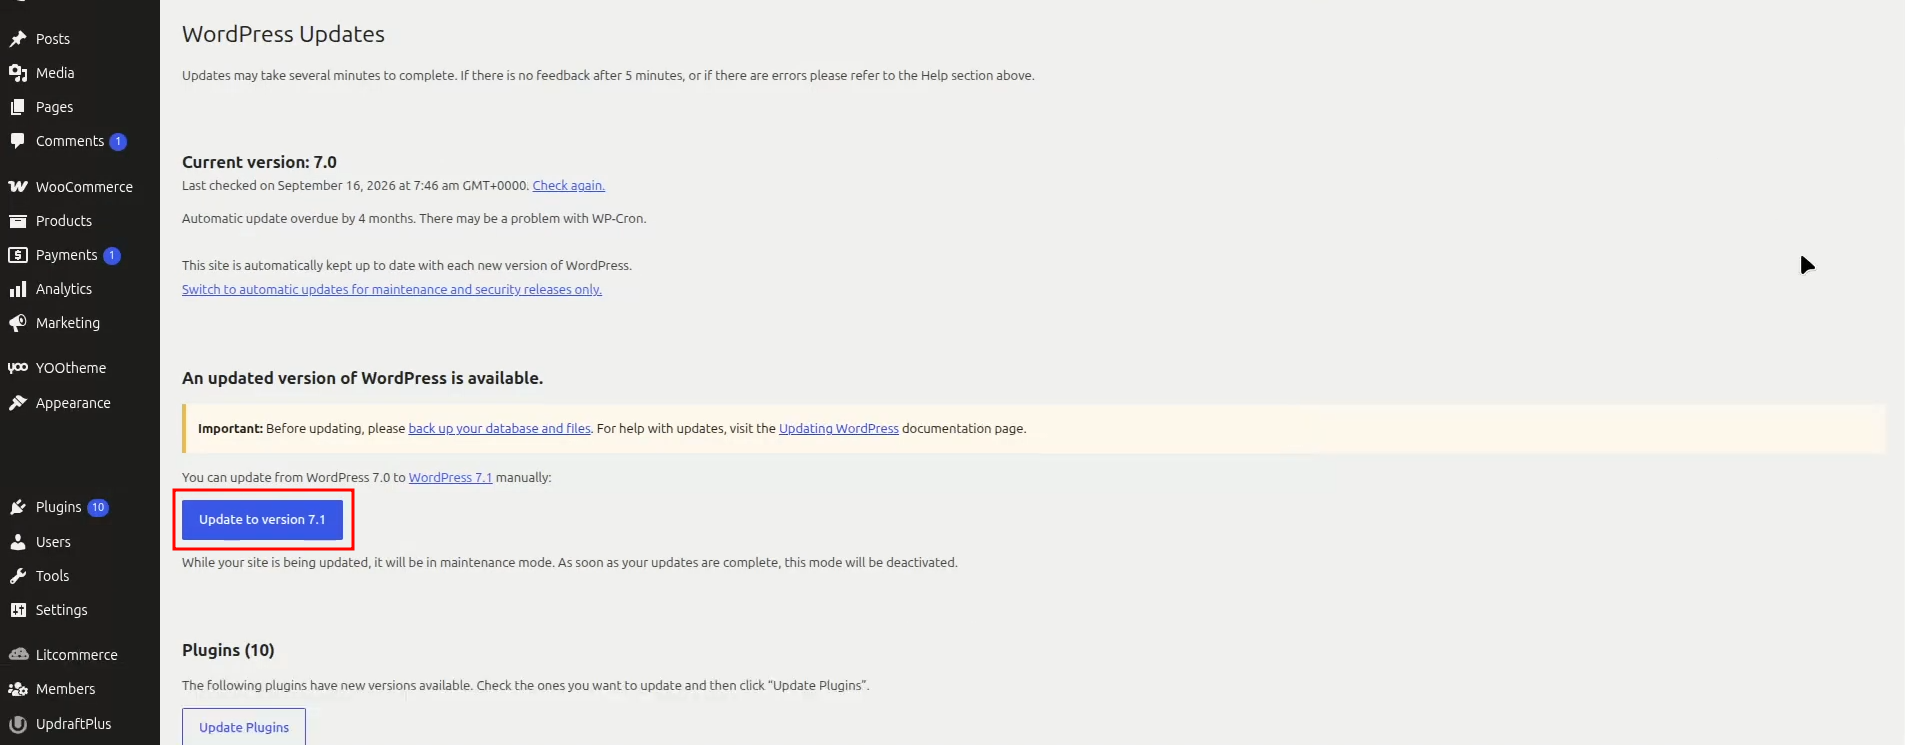
- WordPress will then download and install the update automatically.
Sometimes, you might encounter a request for FTP credentials when trying to update WordPress automatically. For WordPress sites hosted on IIS, you can fix this issue with the following steps:
- In IIS Manager, find the application pool connected to your WordPress site.
- Under Advanced Settings > Process Model, change Identity to LocalSystem.
- Under Sites, right-click your WordPress site and select Edit Permissions.
- From the Security tab, add Authenticated Users.
Once the permissions are updated, WordPress should be able to complete the update without requesting FTP credentials.
Method 2: Via FTP FileZilla
If the dashboard update is unavailable or fails, FTP FileZilla provides another way to replace the WordPress core files manually. This method is helpful when learning how to update WordPress without relying on the admin dashboard.
To start with, you will need an FTP client such as FileZilla and access to your server credentials.
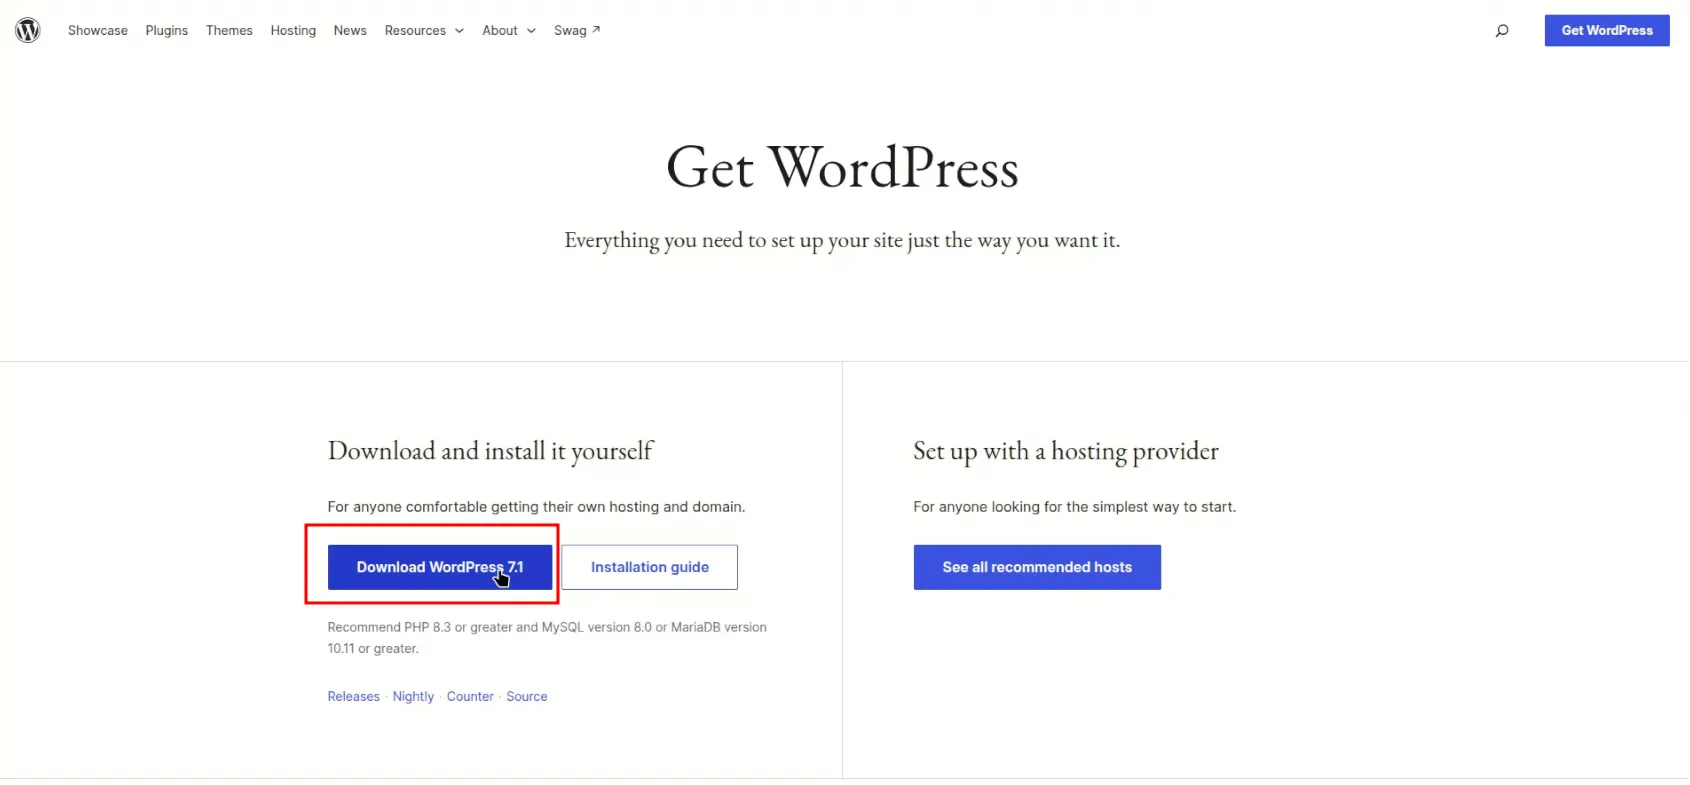
- From the official WordPress download page, download the latest version and extract the ZIP file.
- In your WordPress dashboard, temporarily deactivate all plugins to reduce compatibility risks.
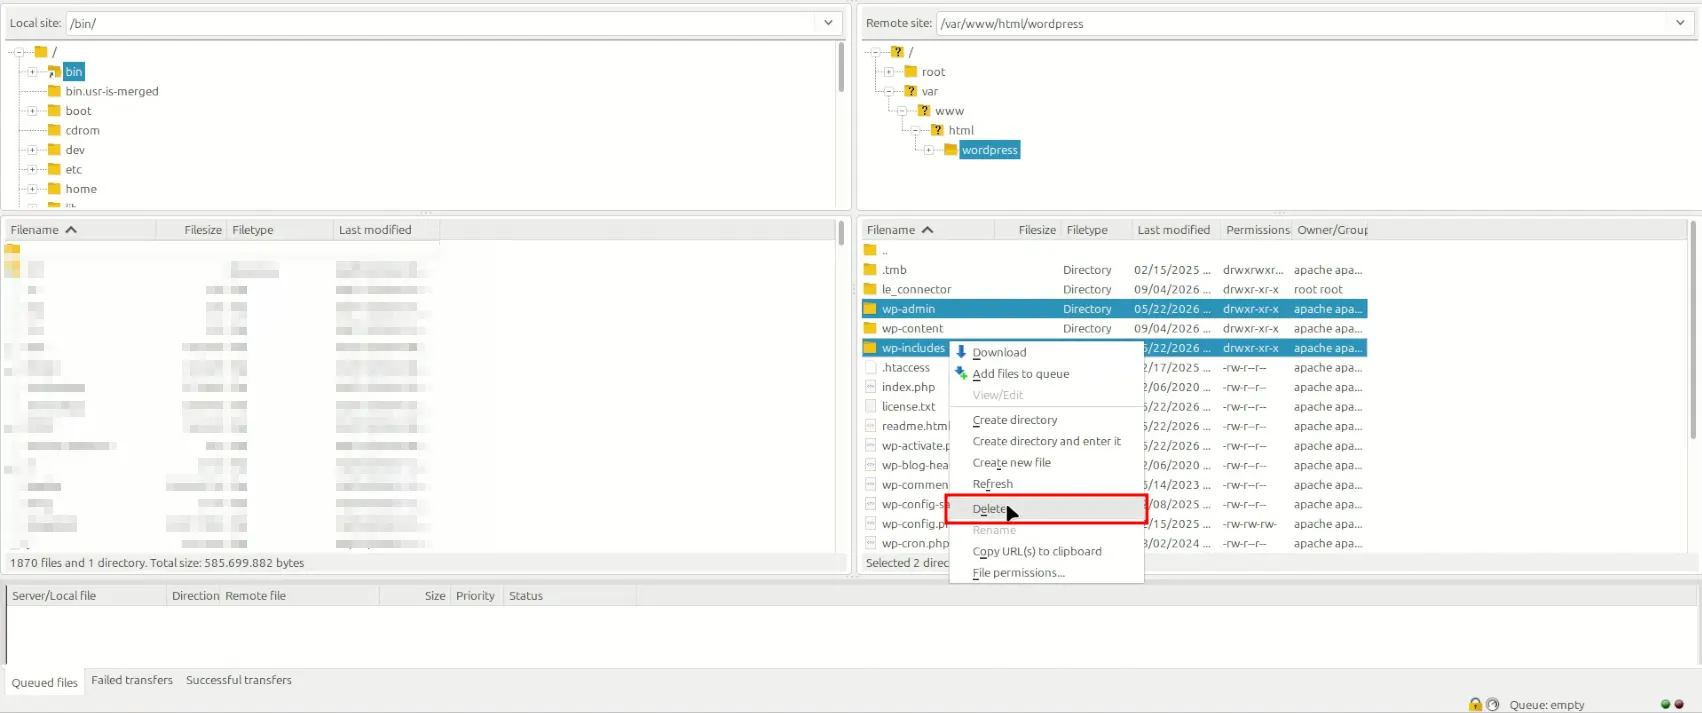
- Through your FTP client, connect to the website and delete the existing wp-admin and wp-includes folders.
- From the extracted package, upload the new wp-admin and wp-includes folders. You should then upload the contents of the new wp-content folder into the existing one without deleting it.
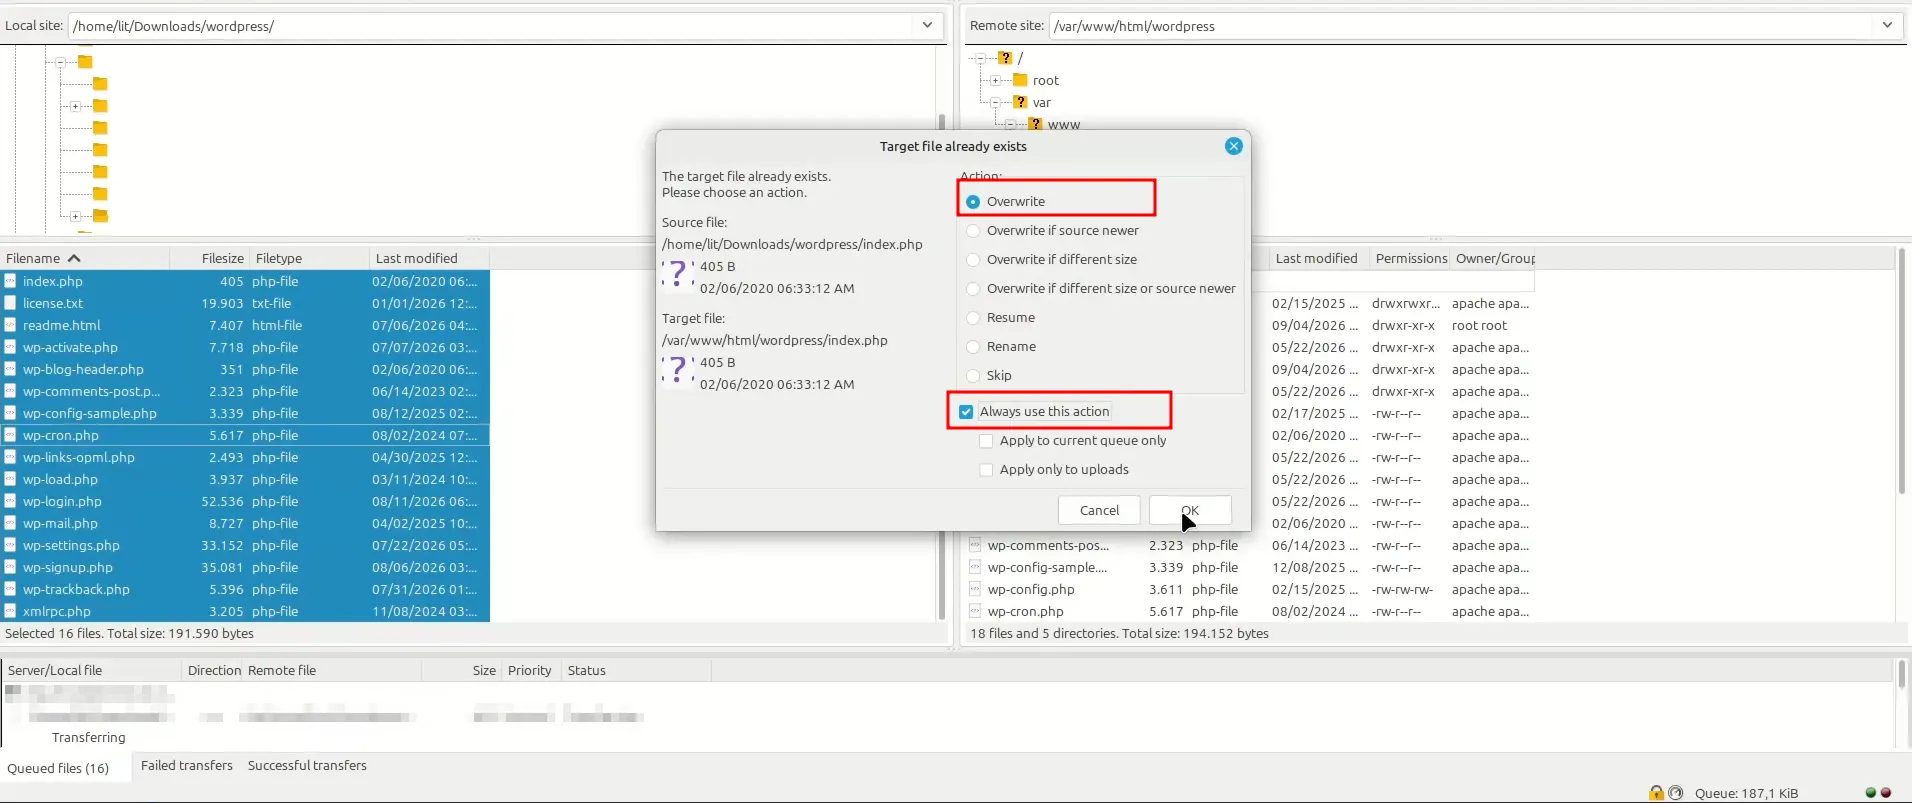
- The remaining WordPress core files, such as index.php and wp-login.php, should also be uploaded to the root directory.
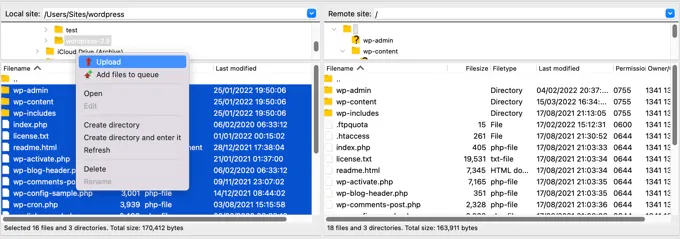
- Existing files can be overwritten when prompted. Select Overwrite and Always use this action to continue.
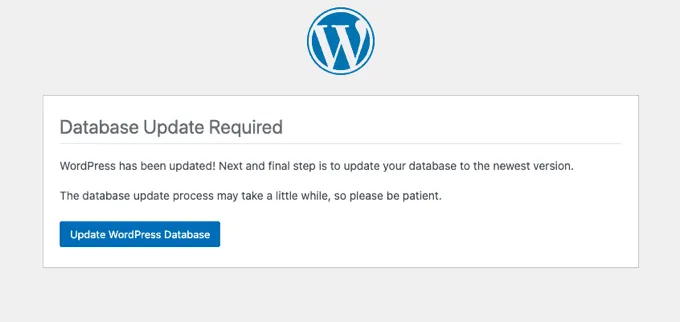
Once the upload is complete, visit /wp-admin. If WordPress requests a database update, select Update WordPress Database and follow the instructions.
Afterward, you can reactivate your plugins, clear the website cache, and check that the updated site works properly. If the website remains in maintenance mode, the .maintenance file should be deleted from the WordPress root directory.
Method 3: Via WP-CLI (advanced)
WP-CLI allows you to manage WordPress through the command line, making it useful for advanced users, multiple websites, or updates affected by browser timeouts.
- Your server must have WP-CLI installed. Many hosting providers include it by default, but you can check with your provider or follow the official WP-CLI installation guide.
- From a terminal, connect to your server via SSH and navigate to the WordPress installation directory:
ssh [email protected]

cd /path/to/wordpress
- The latest WordPress core version can be installed with:
wp core update
For minor releases only, add the –minor flag. You can also install a specific version with –version:
wp core update --minor

wp core update --version=6.3.1
- Once the update is complete, the following command will verify the installed WordPress version:
wp core version
- Your plugins and themes can also be updated through WP-CLI:
wp plugin update --all

wp theme update --all
After running these commands, you should check the website’s pages and key functions to confirm that everything works properly.
How to Update WordPress Websites Automatically?
Automatic updates are the easiest way to keep WordPress secure with minimal effort. WordPress can install core releases, plugin updates, and theme updates in the background. You’ll still need regular backups in case an update causes a conflict.
Enable automatic WordPress core updates
WordPress installs minor maintenance and security releases automatically by default. To enable auto-updates for major releases too:
- Go to Dashboard > Updates.
- Click Enable automatic updates for all new versions of WordPress.
WordPress will email the site administrator after each automatic update. If you’d rather stay cautious, keep auto-updates limited to maintenance and security releases.
Developers can also control core auto-updates with this line in wp-config.php:
define( 'WP_AUTO_UPDATE_CORE', 'minor' ); // Use true for all updates, false to disable
For serious vulnerabilities, WordPress.org can push updates to affected sites regardless of these settings. For the 7.0.2 security release, for example, the WordPress.org team enabled forced updates through the auto-update system because of the severity.
Enable automatic plugin updates
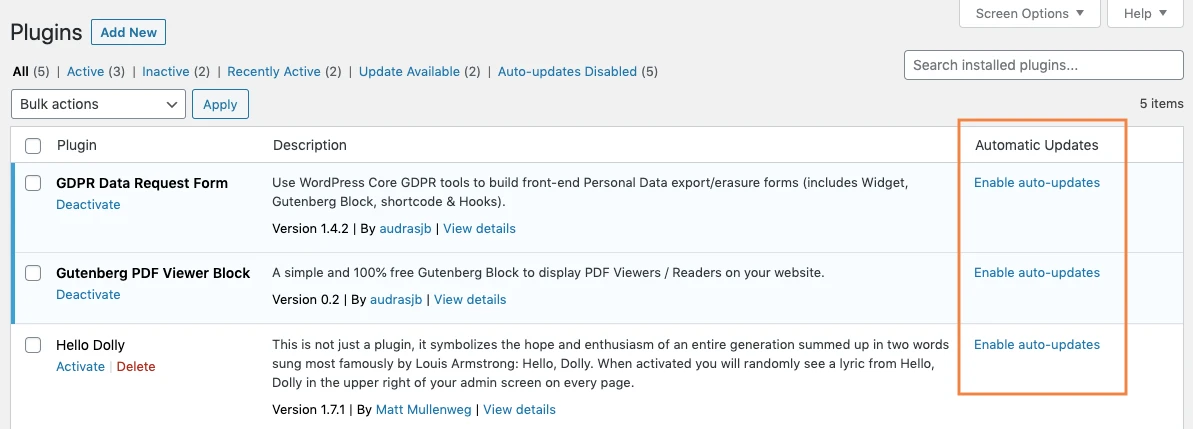
From Plugins > Installed Plugins, find the plugins you want WordPress to update automatically.
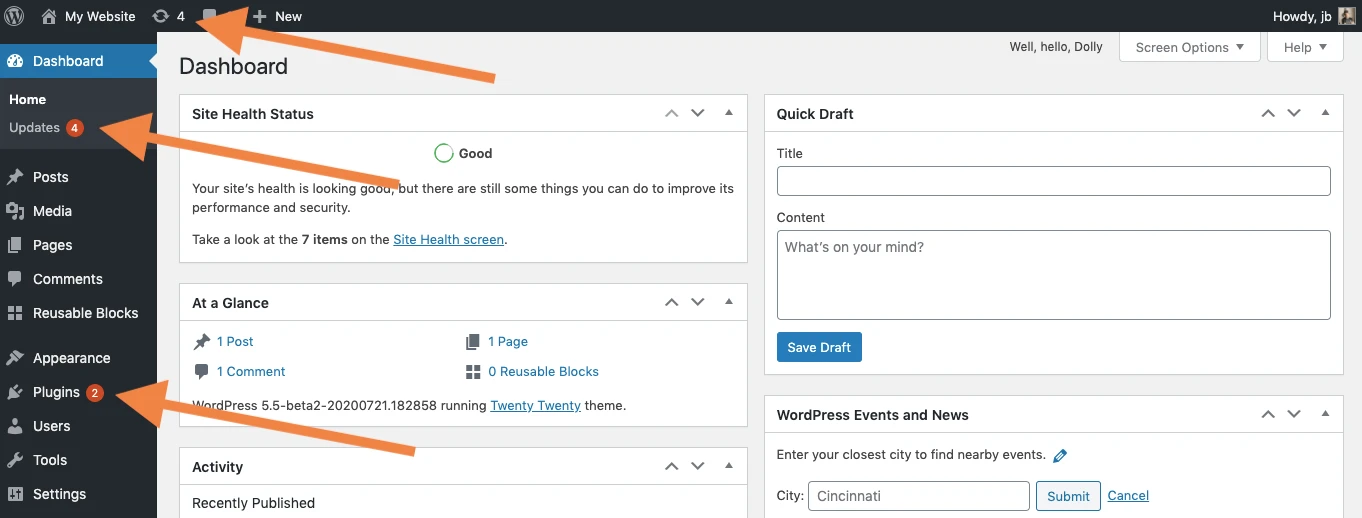
The Enable auto-updates option appears next to each supported plugin. You can activate it for individual plugins instead of enabling it across the entire website.
We recommend enabling auto-updates for simple, well-maintained plugins and updating business-critical plugins (checkout, payments, page builders) manually after testing. As a safety net, since WordPress 6.6, if a plugin or theme auto-update triggers an error, WordPress reverts it to the previous version and emails the site owner.
Enable automatic theme updates
From Appearance > Themes, select an installed theme and choose Enable auto-updates from its details panel. WordPress will automatically install future versions of that theme when they become available.
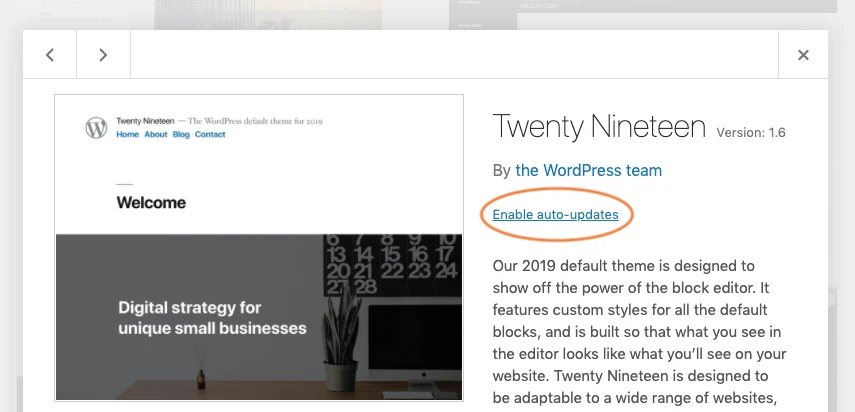
If you’ve edited your theme’s files directly, don’t enable auto-updates – your changes will be overwritten. Use a child theme for customizations instead.
How to Upgrade WordPress with LitExtension Experts
Updating in place works well for most sites. But if your store is several major versions behind, running on outdated PHP, or heavily customized, a direct update can break themes, plugins, and custom code all at once.
In these cases, it’s often safer to set up a fresh, up-to-date WordPress installation and move your data across. With our WordPress upgrade service, LitExtension’s experts transfer your products, customers, orders, and other essential data from your old store to the new one.
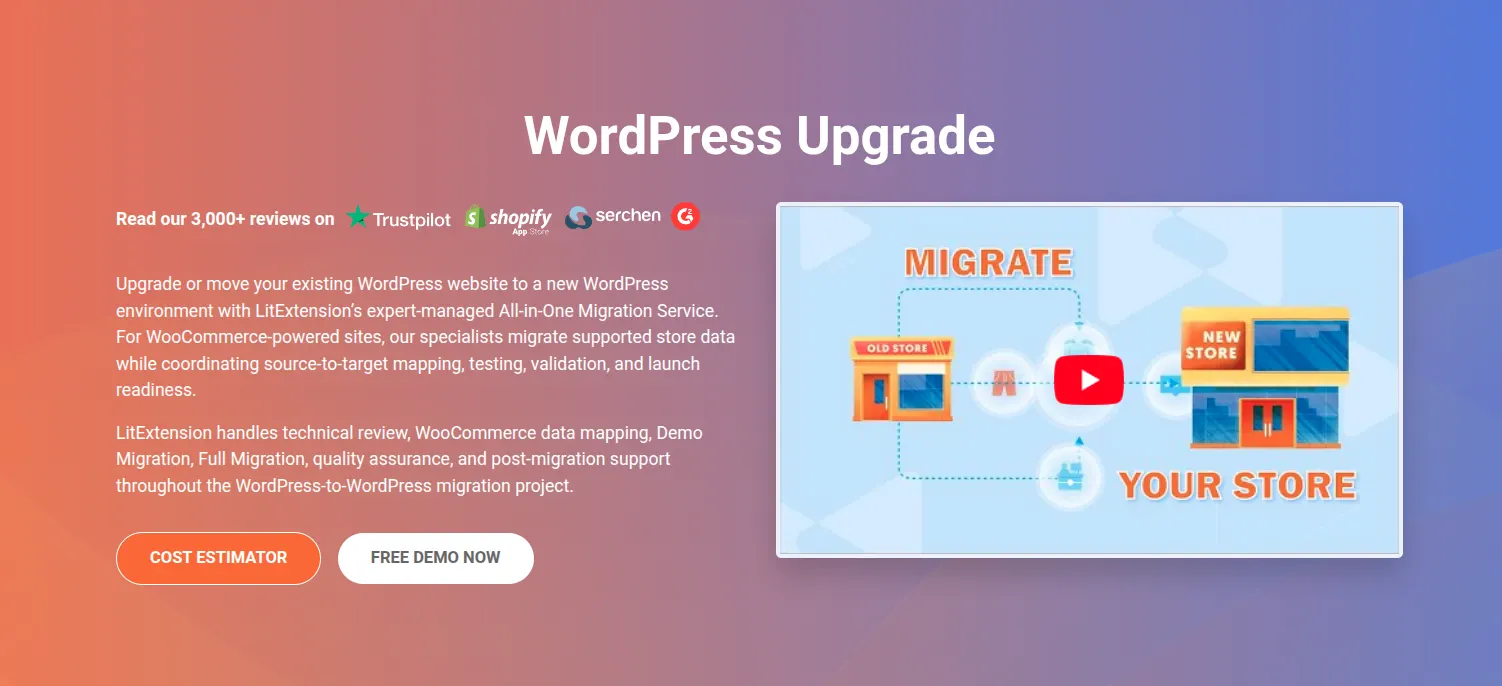
Here’s how the process works:
- Free consultation: We review your data volume, WordPress version, plugins, and custom fields, then recommend a plan with a clear quote.
- Migrate your essential store data: We transfer products, customers, orders, and other selected data from the outdated store while preserving their relationships.
- Test and complete the upgrade: Our team checks the migrated data and store functions, resolves any issues, and transfers newly generated data before launch.
- Support your store after migration: Within up to 60 days after the full migration, we can help migrate recent data, update migrated records, or rerun the migration when needed.
Troubleshooting Errors When Updating WordPress
Most WordPress updates finish without any issues. However, if something goes wrong, it’s usually caused by incomplete file replacement, plugin or theme conflicts, or server caching. Let’s discuss what causes these errors and how to fix them:
Stuck in maintenance mode
After updating WordPress, some users see the message “Briefly unavailable for scheduled maintenance. Check back in a minute.” even though the update has already finished. This issue is likely to happen when an automatic update is interrupted before WordPress can remove its temporary maintenance file.
To fix it, you can:
- Connect to your website using FTP or your hosting File Manager
- Delete the .maintenance file located in your WordPress root directory
- Refresh your website.
Also, if the update was interrupted before completion, verify that all WordPress core files have been uploaded successfully before putting your site back into production.
White screen or critical error after updating
If your site suddenly displays a blank white page or a “There has been a critical error on this website” message after an update, the most likely cause is a compatibility issue between the new WordPress version and an outdated plugin, theme, or custom code.
To fix this, you need to disable all plugins:
- If your website becomes accessible again, reactivate each plugin one at a time until you identify the incompatible one.
- If the problem persists, temporarily switch to a default WordPress theme to determine whether the issue comes from your theme instead.
Note: Updating your plugins and themes before upgrading WordPress can significantly reduce the chance of encountering this error.
Changes don’t appear after updating
Even though WordPress reports that the update completed successfully, your website still looks exactly the same. In most cases, the update itself was successful; the old version is simply being served from your browser, WordPress caching plugin, server cache, or CDN cache.
To fix this:
- Clear your browser cache and refresh the page.
- Purge any caching plugin you’re using
- Clear your hosting server cache and CDN cache if applicable.
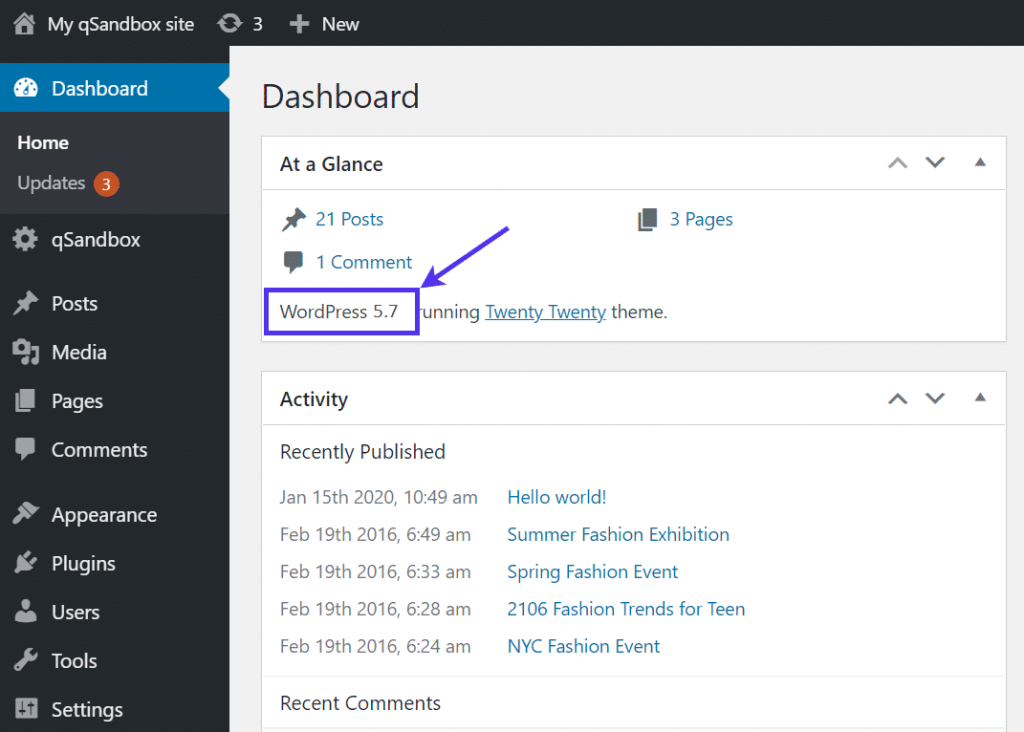
After all caches have been cleared, revisit your WordPress dashboard and confirm that the new version number is displayed under Dashboard > Updates or in the At a Glance section.
What to Do After the WordPress Update Process?
Updating is only half the job. Take 10 minutes to confirm everything works:
First things first, go back to the Admin Dashboard and look under the At A Glance module. Your site is now supposed to be running on the latest version of WordPress.
Remember you disabled the caching before updating? It’s time to reactivate it! Also, you might want to take a look at your posts, media, and pages to make sure everything is well displayed.
How to Update WordPress Website: FAQs
How do I update my WordPress site?
You should first back up your website files and database. Then, go to Dashboard > Updates, select Update to version [number], and wait for WordPress to complete the installation. FTP and WP-CLI are alternative methods if the dashboard update fails or you need more control.
What is the latest version of WordPress?
As of September 2026, the latest version is WordPress 7.1.2. It shipped on September 22 with a fix for a critical flaw affecting every version from 4.7.0 through 7.1.1, so update as soon as possible.
Sites still on the 7.0 branch can update to 7.0.6, released the same day. You can always confirm the newest version on the official WordPress release archive.
Is it necessary to update WordPress?
Yes. Regular WordPress updates patch security vulnerabilities, fix bugs, improve performance, and maintain compatibility with newer plugins and themes. An outdated installation may become less secure and more likely to experience technical issues.
Does WordPress update automatically?
WordPress usually installs minor maintenance and security updates automatically. Major core updates require automatic updates to be enabled, while plugins and themes have separate auto-update settings. You should still maintain regular backups and check your website after each update.
How difficult is it to update WordPress?
Updating WordPress through the dashboard is generally straightforward and only takes a few clicks. FTP and WP-CLI require more technical knowledge, particularly when you need to manage server files, permissions, or command-line operations.
Final Words
Now you know how to update WordPress safely, whether you prefer a few clicks in the dashboard, full control with FTP or WP-CLI, or hands-off automatic updates. Whichever method you choose, back up first, test major releases on staging, and check your key pages after every update.
If your store is several versions behind or running on outdated server software, updating in place can be risky. LitExtension can move your products, customers, and orders to a fresh, up-to-date WordPress installation for you. With over 15 years of experience, we’re confident we can make your WordPress update just as smooth and pleasant.

