With Drupal 8 already unsupported and Drupal 7 support ending in January 2025, backing up and migrating to a new version is essential. This necessity is why we've prepared a straightforward tutorial for Drupal backup and migrate.
We've laid out everything in simple, easy-to-follow steps designed to be accessible even if you're not technically savvy.
- Step 1: Enable the module;
- Step 2: Create the private directory;
- Step 3: Update the settings file;
- Step 4: Clear Drupal cache;
- Step 5: Confirm the settings;
- Step 6: Set up Drupal backup and migrate;
- Step 7: Download the backup Drupal file;
- Step 8: Schedule and restore backups.
Keep reading for more details!
How to Backup and Migrate with Drupal Module?
The Drupal Backup and Migrate module is designed for backing up or moving your data from one Drupal site to another. It supports compression with gzip, bzip, and zip, and allows automatic backups to be scheduled to save you time.
Please note that with the end of support for Drupal 8 and Drupal 7, the purpose of the article will mainly focus on guiding you through using the Backup and Migrate module on Drupal 9.
Step 1: Enable the module
Before going further, you need to enable the Drupal backup and migrate module in your current site:
- Go to Extend (or Administration > Extend).
- Find Backup and Migrate under the Other block.
- Click “Install” at the bottom of the page.
Step 2: Create a directory
The Drupal Backup and Migrate module stores backups in Drupal's default private directory on the server. To keep your backups secure and inaccessible to the public, you must configure your private directory if it isn't already set up.
First, create a directory writable by the server, located outside of the Drupal installation and not web-accessible.
For instance, if Drupal is located at /root/sitename/public_html or /root/username/public_html/drupal, you should place the private directory at /root/sitename/private or /root/username/private.
Alternatively, if Drupal is installed at /var/www/html/example.org/web, the private directory should be set up at /var/www/html/example.org/private.
Note: Do not place your Drupal backup migrate files directory in /sites/default/files as it will not remain private.
Step 3: Update the settings file
In the Drupal settings file, specify the absolute path to your newly created backup directory by updating the file_private_path variable:
For a private directory at /root/sitename/private, add the following line to the settings.php file:
$settings['file_private_path'] = '/root/sitename/private';
If the private directory is located at /var/www/html/example.org/private, use:
$settings['file_private_path'] = '/var/www/html/example.org/private';
Note: If you have a settings.local.php file, consider making these additions there, especially if settings.php is configured to load settings.local.php. This can help maintain clarity and organization in your configuration files.
Step 4: Clear Drupal cache
Now, proceed to clear the Drupal cache to ensure all changes are properly implemented:
- Navigate to Configuration > Performance. If your menu is more detailed, go through Administration > Configuration > Development > Performance instead.
- Click on “Clear all caches” to ensure that any changes to file configurations are applied immediately.
Step 5: Confirm the settings
To ensure your backup migrate Drupal settings are correctly applied, navigate to Configuration > File system and verify that the directory paths are correctly listed.
Step 6: Set up Drupal backup and migrate
Now, let’s set up how and where your Drupal backup database files will be saved.
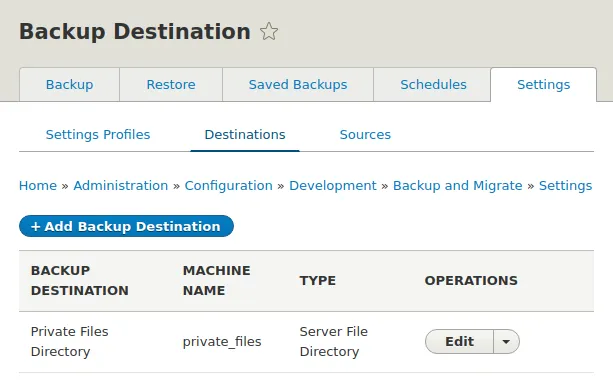
- Navigate to Configuration > Development > Backup and Migrate > Settings > Destinations.
- Click Edit next to the Private Files Directory destination to modify its settings.

- Update the Directory Path with one of the following options:
- Use private://backup_migrate: Select this option to store your backup files in a backup_migrate subdirectory within Drupal's private file system. This keeps your backups organized and separate from files used by other modules.
- Use the full path to your backup directory: For example, /root/sitename/private/backup. This allows you to specify a custom location outside the standard private file system path.
- Click “Save” to apply your changes and finalize the backup destination settings.
Step 7: Download the backup to your server
Once you've set up your Drupal migrate module configurations, you can download the backup to ensure its availability locally:
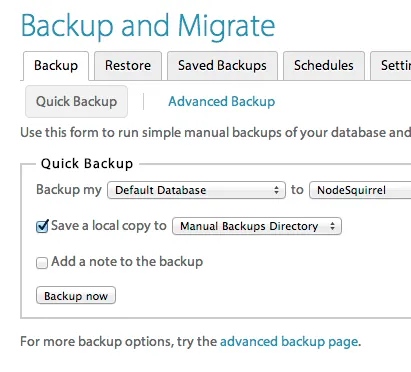
- Navigate to Configuration > Backup and Migrate (or Administration > Configuration > Development > Backup and Migrate).
- In the “Backup Source” drop-down menu, select Entire Site to capture all site data.
- From the “Backup Destination” drop-down menu, choose “Download” to save the backup to your local system.
- Click “Backup now” to initiate the backup process.

The backup file will be saved to the private directory you configured earlier. If no private directory is specified, it will default to the standard Drupal private directory. This ensures your backup is stored securely, whether on your server or locally.
Step 8: Schedule and restore backups (optional)
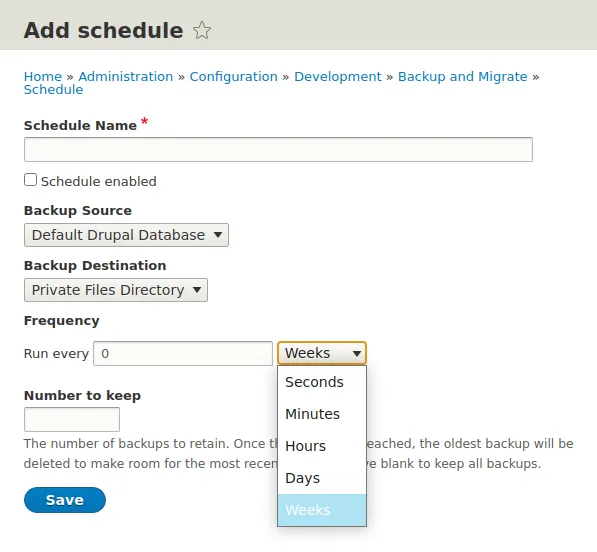
Right after you've saved your first backup, it's a good idea to set up automatic backups. Just turn on the daily schedule that's already there, or make your own to fit when and how often you think it’s best. This way, your site automatically keeps itself safe without you having to do a thing.

Sometimes things go wrong—like a website crash or a security issue—and that's when your backups become super important. They're your safety net, allowing you to return your site to how it was before the trouble started. Before you start, it’s really helpful to chat with someone who's done this before. A Drupal expert can guide you through the steps and help you avoid common pitfalls.
How to Perform Drupal Backup and Migrate with LitExtension?
The Drupal Backup and Migrate module effectively handles basic data transfers between Drupal sites. However, it lacks support for migrating to different eCommerce platforms and may struggle with complex databases that have large volumes or extensive customizations.
For these more intricate migration needs, you can rely on LitExtension's professional services. Our experts will assist you in migrating from/to Drupal and even upgrade your Drupal version. With our Drupal migration service, your project will be delivered by a Personal Assistant (PA) to ensure that all data are transferred accurately with utmost security.

Step 1: Consultant by LitExtension experts
Begin your migration by scheduling a free, personalized consultation with us—your dedicated shopping cart migration experts. During this one-on-one session via Google Meet, we’ll delve into your website's unique needs and migration goals. To make the most of our meeting, please schedule at least 2 hours in advance and come prepared with any specific questions or details about your Drupal migration.
Upon understanding your requirements, we will develop a comprehensive technical assessment that includes:
- An optimal migration strategy tailored to the specific data being transferred (pages, posts, categories, products, etc.).
- Techniques to preserve your SEO rankings during the transition.
- Customizations needed to align perfectly with your requirements.
Once you’re satisfied with the plan, we’ll proceed with payment and SLA signing.
Step 2: Data mapping & setting by experts
Next up, our experts take charge to ensure every aspect of your new store is set up perfectly. This critical preparation phase includes:
- Setting up essential redirects for platforms like Drupal.
- Installing any necessary plugins and extensions.
- Conducting a clean-up for both of the stores.
- Adjusting additional settings for a seamless transition.
During this stage, you can request as many demo migrations as needed to check on progress and ensure everything meets your expectations.
Step 3: Perform full Drupal migration
With all preparations complete, our team will then initiate the full migration. We manage the entire process, keeping you updated in real-time and responding promptly (typically within 12 hours). This service includes several additional benefits at no extra cost, such as implementing 301 redirects.
After migration, we perform a thorough review to ensure seamless operation of your new store. Testing occurs in two phases: automated verification of default data and manual testing of custom requirements by our QA team. A detailed testing report will be provided upon completion.
A perk of our All-in-One Migration package is that you’ll get the chance to enjoy our post-migration services for FREE and UNLIMITED within these conditions:
- Recent Data Migration: You can transfer any new entities (like orders and customers) that amount to less than 5% of the initial migration total within 30 days after the migration is complete.
- Re-migration: If you need to transfer your data again for any reason, you can do so within 30 days after the initial migration.
- Smart Update: Update modified data within the first 90 days after your migration.
Drupal Backup and Migrate: FAQs
What is the difference between migrating and feeds in Drupal?
“Migrating” in Drupal means moving lots of data from one system, like an old Drupal site, to a new one, often needing some custom setup. Meanwhile, “Feeds” is a module for easily importing content from sources like CSV files or RSS feeds into Drupal, usually without complex coding.
How to take a backup of a Drupal website?
You can easily backup your site using the Drupal backup and migrate module, following these steps:
- Navigate to Configuration and then select Backup and Migrate.
- From the Backup Source drop-down menu, choose Entire Site.
- In the Backup Destination drop-down menu, select Download.
- Click on Backup now to initiate the process.
- Once the backup is completed, the file will be available for you to download to your Drupal default server.
What is Drupal migration?
A "Drupal migration" involves moving data such as content, users, and configurations between systems, which could mean transferring from another website or CMS to Drupal and vice versa. If you need a Drupal migration, consider LitExtension. With 12+ years of experience and support for over 140 platforms, LitExtension guarantees secure and accurate migration services.
How to migrate Drupal 8 to Drupal 9?
To migrate Drupal 8 to 9, here’s a step-by-step guide to help you upgrade smoothly from Drupal 8 to Drupal 9:
- Update to the latest minor version of Drupal 8.
- Ensure all modules and themes are up to date and compatible with Drupal 9.
- Remove any deprecated code and APIs.
- Use the core Upgrade Status module to check readiness.
- Perform the update via Composer or Drush, following Drupal's official upgrade guide.
How do I export a Drupal site?
To export a Drupal site, you need to handle both the database and the site files. Here's how you can do it:
- Log into your hosting control panel and open phpMyAdmin.
- Locate and select the database used by your Drupal site.
- Click on the “Export” button in phpMyAdmin and choose SQL as the export format. Follow the prompts to export and save the database file to your computer.
- Use an FTP client to connect to your server and navigate to your Drupal site directory. Download all files from this directory to your computer.
How do I import and export in Drupal?
To import and export content and configurations in Drupal, follow these steps:
- From your Drupal admin panel, go to the Development > Configuration section.
- Export: Select "Export" to download configurations such as content types, menus, or user roles. Choose the configuration you want to export and download it as a file.
- Import: To load previously exported configurations onto another Drupal site, click "Import". Select the file you exported earlier and upload it to apply these configurations to the new site.
Conclusion
This article has provided all the steps all the steps you need to perform Drupal backup and migrate! Hopefully, you will find it helpful and complete the task successfully!
If you still find the process challenging due to your complicated database or need to migrate to Drupal, LitExtension is here to help. Feel free to contact us anytime, and we'll ensure your migration needs are met with precision and care.
For more insights and guidance, check out our other eCommerce tutorial blog posts or join the community group!

