Migrating a WordPress website can feel overwhelming, especially if you have never done it before. There are many steps to take, and missing just one can lead to broken pages, lost data, or even downtime. That’s why using a WordPress migration checklist is so important since it gives you a clear path to follow and helps you avoid costly mistakes.
In this guide, you will find every step you need to move your WordPress site safely and smoothly. Keep on reading for:
- Step 1. Prepare for your WordPress migration
- Step 2. Set up the new WordPress environment
- Step 3. Perform post-migration checklist
- Step 4. Set up WordPress SEO and analytics post-migration
- Step 5. Troubleshoot common WordPress migration issues
Whether you are moving to a new host, a new domain, or upgrading your environment, this checklist will help you stay in control from start to finish.
Stage 1. Prepare for Your WordPress Migration
Before you begin the actual migration, you need to prepare your website and hosting environment carefully. Proper preparation ensures that your data stays safe, your website remains functional, and the process runs smoothly. This stage of the WordPress migration checklist focuses on setting up the foundation for success.
Step 1. Choose a reliable web host
The foundation of a successful migration begins with selecting the right hosting provider. A reliable host ensures better site performance, faster load times, and responsive technical support.
What to consider when choosing a host? You should:
- Look for providers offering high-speed servers and scalable resources.
- Ensure 24/7 support via multiple channels (live chat, email, phone).
- Look for features like automatic backups, SSL certificates, and one-click WordPress installation.
- Compare pricing plans and choose one that fits your budget without compromising quality.
Some popular WordPress hosting providers are SiteGround, Bluehost, Kinsta, and Cloudways.
Step 2. Plan your migration carefully
A solid plan helps reduce the chances of unexpected downtime or errors during the migration, and here are the key considerations for planning:
- Schedule the migration during off-peak hours to minimize disruptions for users.
- If applicable, coordinate with your team to ensure everyone is aligned on responsibilities.
- Break down the migration into smaller tasks and set clear deadlines for each stage.
As you plan ahead, you’ll not only avoid technical hiccups but also ensure that the entire process runs smoothly.
Step 3. Perform a pre-migration audit
Before migrating your WordPress site, you must perform a thorough audit to identify potential issues and understand the scope of the migration. Here are some key steps I believe are essential for conducting an effective audit:
- Identify outdated or unnecessary content that can be cleaned up.
- Check compatibility with your new hosting environment and remove unused or incompatible plugins.
- Use tools like Screaming Frog to identify broken links, redirect chains, and orphaned pages.
This audit ensures that you’re only migrating what’s necessary and reduces the risk of errors during the process.
Step 4. Backup your WordPress website
You shouldn’t ignore the importance of backup. If anything goes wrong, a backup allows you to restore your website to its original state.
Here are the methods to backup your website:
- Use plugins like UpdraftPlus or BackupBuddy to make the backup process simple and efficient.
- Access your hosting account’s cPanel or FileZilla to download your files and database manually.
- Store your backups in secure locations like Google Drive or Dropbox.
But let’s remember to ensure your backup includes both your WordPress files (themes, plugins, uploads) and your database (posts, users, settings).
Relevant reading: How to backup WordPress site | 3 methods.
Step 5. Enable maintenance mode
Switching your website to maintenance mode prevents users from accessing it during the migration process. This ensures a seamless experience for visitors and avoids exposing them to incomplete or broken content.
You can use plugins like SeedProd to activate a custom maintenance page. After that, notify your audience with a message about the expected downtime and when the site will be back online.
Step 6. Disable caching, security, and redirect plugins
Caching, security, and redirect plugins can interfere with the migration process by adding unnecessary complexity to the transfer.
But why is this important?
- Caching plugins may save outdated versions of your site that conflict with the new environment.
- Security plugins can block legitimate attempts to access files or databases during migration.
- Redirect plugins are used if existing redirects may conflict with new URLs or structures.
You should disable these plugins temporarily and remember to reactivate them after the migration is complete.
Stage 2. Set Up the New WordPress Environment
Once your old website is prepared, the next step in the WordPress migration checklist is to set up the new environment where your site will live. This stage ensures that your new hosting space, database, and WordPress installation are properly configured before moving any data.
Step 7. Install WordPress on the new domain
Before migrating your site, you’ll need to install WordPress on your new hosting account or domain. Many hosting providers, such as SiteGround or Bluehost, offer one-click WordPress installation through their dashboards.
If your host doesn’t provide one-click tools, download the WordPress package from wordpress.org, upload it to your server via FTP, and run the installation script.
You may want to read: WordPress tutorial | Learning how to set up WordPress.
Step 8. Create a new database
Your WordPress site’s content and configuration are stored in its database. That’s why setting up a new database on your new hosting account is essential for the migration process.
Here are the steps to create a new database:
- Log in to your hosting account’s control panel (e.g., cPanel or Plesk).
- Navigate to the MySQL Databases or Database Manager section.
- Create a new database and note down its name.
- Add a new database user, assign a strong password, and grant the user full privileges to the database.
Note: Keep the database credentials handy, as you’ll need them when importing your old database later in the process.
Step 9. Export your existing WordPress database
Exporting your current database will ensure all your content, settings, and configurations are transferred to the new hosting environment.
Here are the steps to export your database:
- Access your hosting account’s control panel and open phpMyAdmin.
- Select your WordPress database from the list on the left-hand side.
- Click on the Export tab.
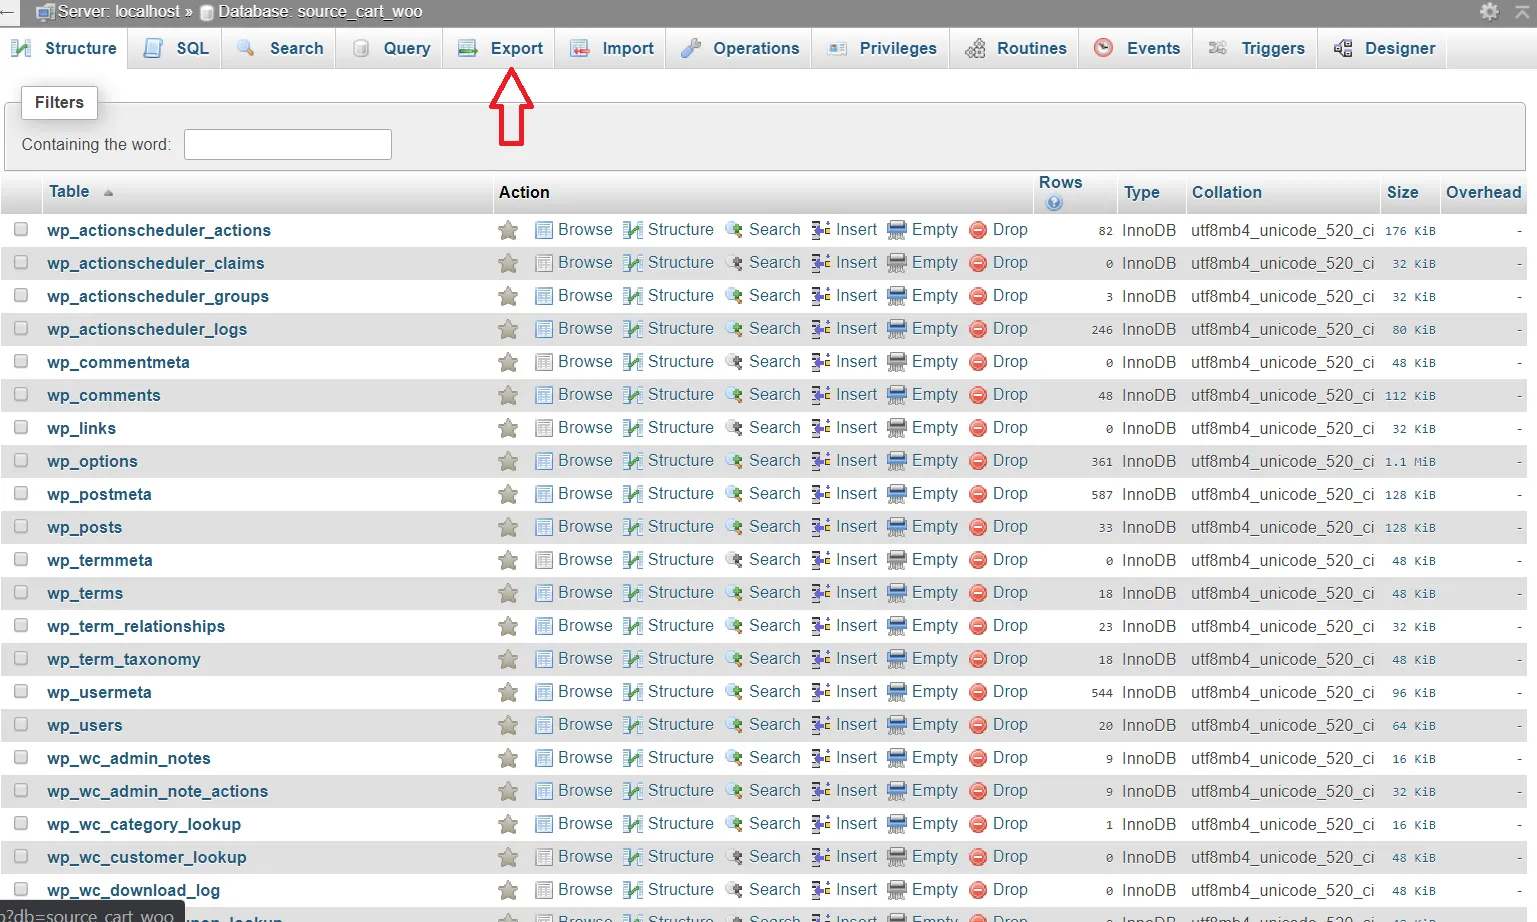
- Choose the Quick Export option and select the SQL format.
- Download the database file and store it in a secure location.
Read more: How to export WordPress database | 4 methods.
Step 10. Migrate website files and database
With your new database ready and your old database exported, it’s time to transfer your website files and data to the new environment.
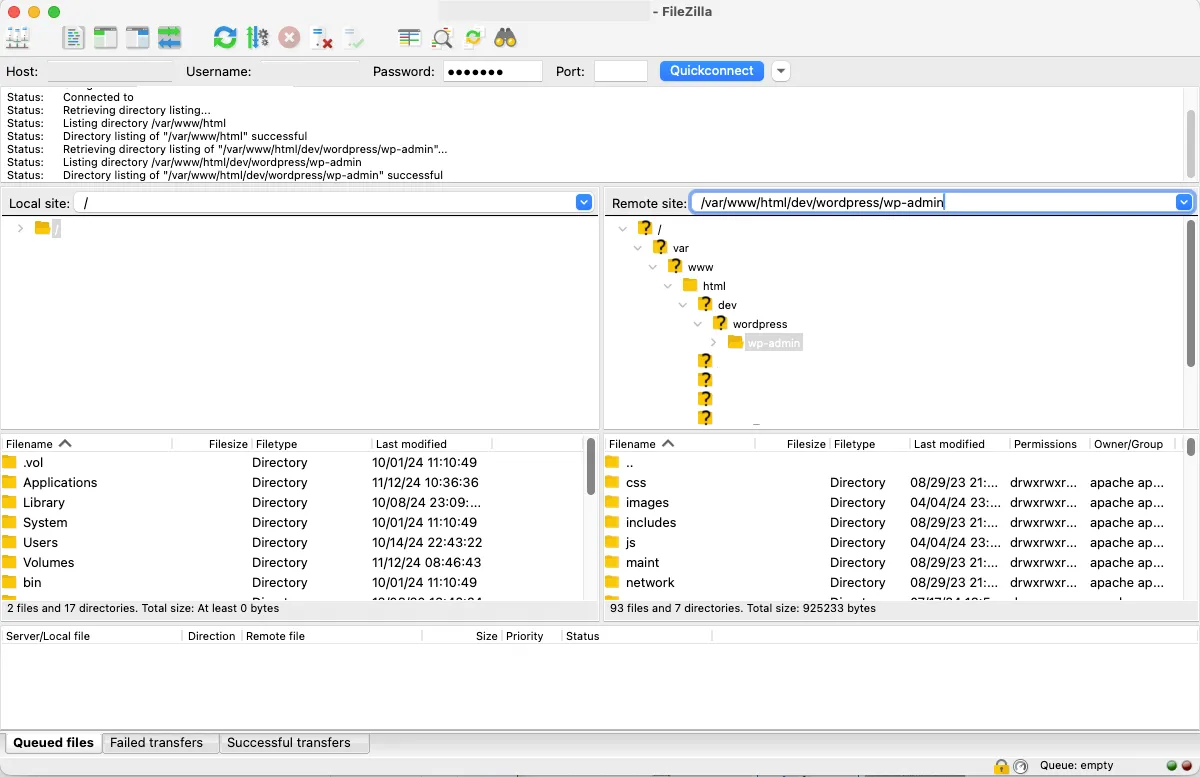
To transfer website files:
- Use an FTP client like FileZilla to connect to your old server and download your WordPress files (wp-content, themes, plugins, etc.).
- Upload these files to the root directory of your new hosting account.
To import the database:
- Open phpMyAdmin on your new host.
- Select your new database and click on the Import tab.
- Upload the SQL file you exported earlier and click Go to import it.
To update the WordPress configuration file:
- Open the wp-config.php file on your new hosting account.
- Update the database name, username, and password to match your new database credentials.
Hey there! Migrating your files and database is a crucial step that requires precision. If you’re looking for an easier way to handle this process, we at LitExtension offer tools and services to automate and simplify your WordPress migration.
Stage 3. Perform Post-Migration Checklist
After you’ve moved your WordPress files and database to the new environment, it’s time to go through the post-migration. This is one of the most important stages in the WordPress migration checklist, as it helps ensure that everything works correctly after the transfer.
Step 11. Update permalinks and URLs
After migrating, you’ll need to update your site’s permalinks and URLs to match the new environment. Here are the steps to update permalinks:
- Log in to your WordPress dashboard on the new host.
- Go to Settings > Permalinks and click Save Changes to regenerate the .htaccess file and ensure proper URL structures.
You may need to update hardcoded URLs on your site. Tools like Better Search Replace can scan your database for old URLs and replace them with your new domain name. This will help prevent broken links and ensure that your media files display correctly.
Step 12. Assign SSL certificates
An SSL certificate ensures your site is secure and displays the HTTPS prefix in the browser. Here is how to assign an SSL certificate:
- Check if your hosting provider offers free SSL certificates (e.g., Let’s Encrypt).
- Install the SSL certificate through your hosting dashboard.
- Use plugins like Really Simple SSL to automatically configure your WordPress site to use HTTPS.
Step 13. Test redirects and URL structure
Maintaining a consistent URL structure is vital to preserve your site’s SEO and ensure users can access your content without encountering broken links. But how to test and configure redirects?
- Use a tool like Redirection to set up 301 redirects for old URLs pointing to new ones.
- Test redirects using your browser.
- Ensure that all internal links are updated to reflect the new URL structure.
Step 14. Crawl your new website
Crawling your new website helps identify any issues that might have occurred during migration, such as broken links, missing images, or unindexed pages.
There are many tools that can help you with that but I will recommend Screaming Frog, Ahrefs, or SEMRush to perform a site crawl. When using those tools, you can check for:
- Broken links (404 errors).
- Missing metadata (titles and descriptions).
- Orphaned pages (pages with no internal links pointing to them).
Then, fix any issues identified during the crawl to ensure your site’s functionality and SEO health.
Step 15. Test website functionality
When testing your website, it's essential to focus on two key areas: frontend and backend functionality.
For frontend functionality:
- Forms, buttons, and navigation menus.
- Embedded media like videos and images.
For backend functionality:
- Plugins and theme settings.
- Admin dashboard features, such as post and page creation.
If you encounter any issues during your testing, it's advisable to troubleshoot by examining plugin settings or reaching out to your hosting provider for assistance.
Step 16. Verify site speed and performance
Site speed is a truly critical factor for user experience and SEO. After migration, it’s a must to test and optimize your site’s performance.
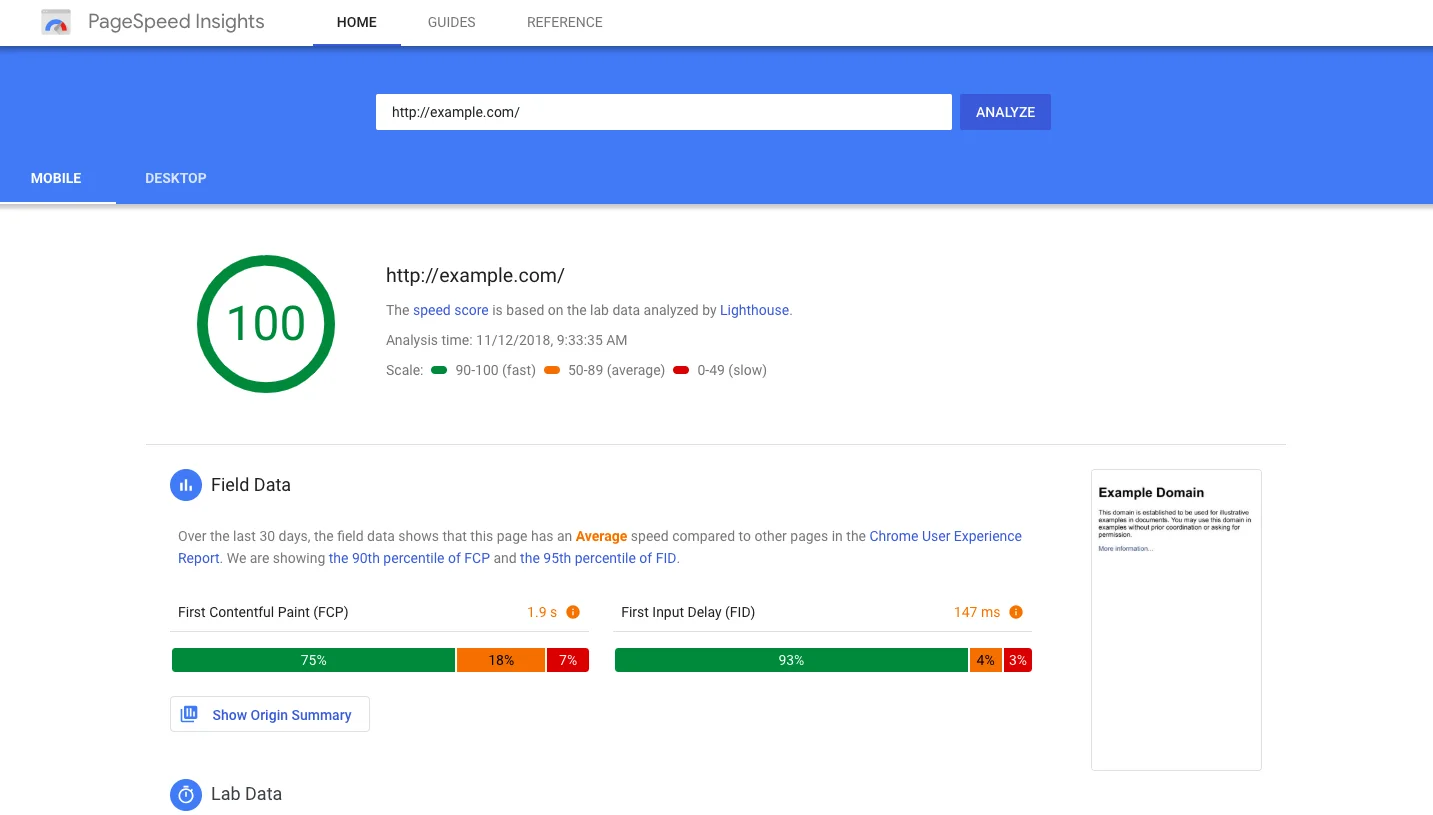
You ca use tools like Google PageSpeed Insights, GTmetrix, or Pingdom to measure load times. With those tools, you can identify and fix performance bottlenecks such as large images, unnecessary plugins, or unoptimized code.
Step 17. Update DNS records
Your site won’t go live on the new host until you update your DNS records to point to the new server. Here are the steps to update DNS:
- Log in to your domain registrar account (e.g., GoDaddy, Namecheap).
- Navigate to the DNS Management section.
- To point your domain name to the new host, replace the existing nameservers with the ones provided by your new hosting provider (e.g., ns1.newhost.com and ns2.newhost.com).
- Save the changes and allow up to 24 – 48 hours for DNS propagation.
Tip: Use tools like WhatsMyDNS.net to monitor propagation progress.
Stage 4. Set Up WordPress SEO and Analytics Post-Migration
Now that your website is live on the new environment, it's time to focus on SEO and analytics. This stage of the WordPress migration checklist ensures that your search rankings, traffic data, and user tracking remain intact after the move.
Step 18. Benchmark Google Analytics and Search Console
Reconfiguring Google Analytics and Search Console is essential to monitor your site’s performance on the new host or domain.
Steps to update Google Analytics:
- Log in to your Google Analytics account.
- Update the property settings to reflect your new domain (if applicable).
- Verify that tracking scripts are correctly installed on your migrated site using the Tag Assistant browser extension.
Steps to update Google Search Console:
- Log in to your Search Console account.
- Add the new domain as a separate property.
- Submit your updated sitemap under Sitemaps.
- Use the URL Inspection Tool to request indexing for key pages.
These updates ensure Google recognizes your site’s new setup and continues tracking traffic and performance accurately.
Step 19. Add 301 redirects to preserve SEO
Setting up 301 redirects is a critical step during a WordPress migration. Redirects ensure that both users and search engines are seamlessly directed to the correct pages on your new site. This not only prevents broken links but also helps preserve your SEO rankings by transferring link equity from your old URLs to new ones.
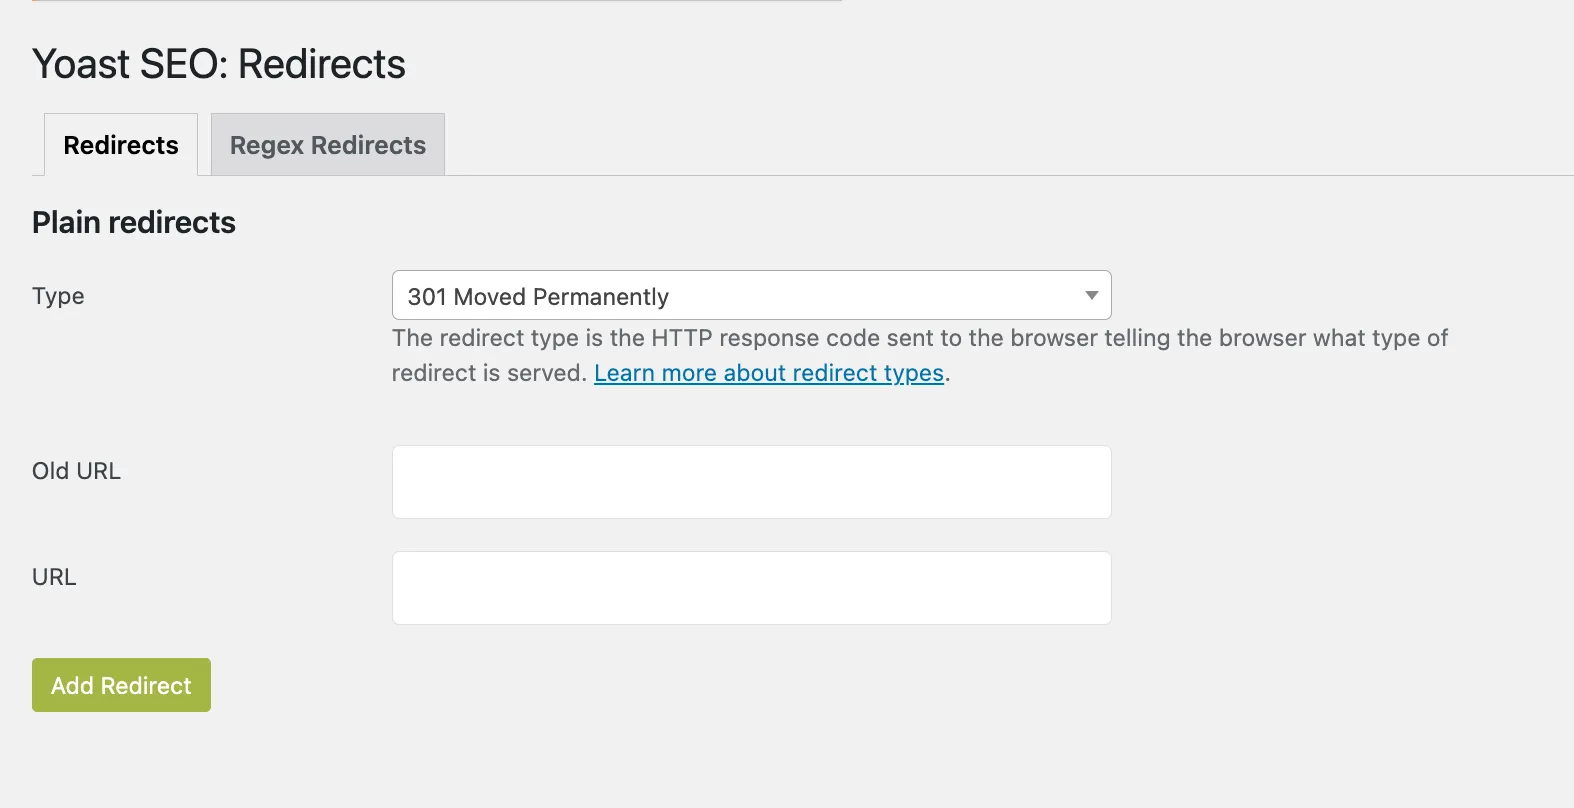
Let’s break down how to set up 301 redirects effectively:
- Create a redirect map by listing all old URLs and their corresponding new URLs.
- Use a plugin like Redirection or manually add redirects to your .htaccess file if you’re comfortable with the code. Example syntax: Redirect 301 /old-page-url /new-page-url
- Test the redirects using tools like Redirect Checker or manually visiting old URLs in your browser.
Tip: Avoid redirect chains (multiple redirects leading to the final URL) as they can slow down your site and harm SEO.
Step 20. Monitor search rankings and traffic
It’s normal to see slight fluctuations in your rankings immediately after migration, but you should monitor these metrics to ensure stability over time. Since this is inevitable, let's go through the steps to monitor rankings and traffic:
- Use tools like Ahrefs, SEMRush, or Google Search Console to monitor changes in keyword positions.
- Compare pre- and post-migration traffic data in Google Analytics to identify any significant drops.
- Ensure that key conversion metrics, such as form submissions or purchases, remain consistent.
If you notice significant drops in traffic or rankings, review your redirects, sitemap, and on-page SEO to identify potential issues.
Step 21. Resubmit your sitemap
To ensure search engines index your migrated site correctly, you’ll need to submit your sitemap. Here are to core steps to submit your sitemap:
- Generate a new sitemap using an SEO plugin like Yoast SEO or Rank Math.
- Log in to Google Search Console and navigate to the Sitemaps section.
- Enter the URL of your sitemap (e.g., https://yourdomain.com/sitemap_index.xml) and click Submit.
This step helps Google and other search engines discover your pages faster, improving your site’s visibility.
Step 22. Run an SEO audit
Once your website is live on the new server or domain, it’s important to run a full SEO audit. This step in the WordPress migration checklist helps you catch any SEO-related issues that may have been introduced during the migration process.
Here's what you need to do on the post-migration SEO audit:
- Check title tags and meta descriptions on key pages.
- Review canonical tags and ensure they point to the correct URLs.
- Look for duplicate content or missing pages.
- Fix broken internal and external links.
- Make sure your robots.txt and sitemap files are correctly configured.
- Test your site’s mobile-friendliness and loading speed.
Stage 5. Troubleshoot Common WordPress Migration Issues
Even with careful planning, some issues may still appear after migration. That’s why this final stage of the WordPress migration checklist focuses on identifying and fixing common problems that can affect your website’s performance, usability, or security.
Step 23. Scan for broken links and orphan pages
Broken links and orphan pages can negatively impact user experience and SEO. After migration, it’s crucial to identify and fix these issues.
You can use tools like Screaming Frog, Ahrefs, or Broken Link Checker to scan your site for 404 errors. For each broken link, either:
- Update the link to point to the correct URL.
- Create a 301 redirect to the appropriate page.
For orphan pages, you can identify orphan pages (pages not linked to from anywhere on your site) using crawling tools. After that, let’s add internal links from relevant pages to connect orphan pages back into your site’s structure.
Step 24. Re-enable caching and security plugins
Once you’ve completed the migration and verified your site’s functionality, it’s time to re-enable caching and security plugins. Let’s reactivate caching plugins to improve site speed and reconfigure security plugins to protect your site from potential threats.
After re-enabling these plugins, remember to test your site to ensure they don’t interfere with any functionalities. This will help keep your WordPress site performing well and secure in the new environment.
Step 25. Close your old hosting account
Once you’ve verified that your migrated site is functioning perfectly, you can safely close your old hosting account.
But before you close your account, remember to:
- Double-check that all files and databases have been successfully transferred to the new host.
- Keep a final backup of your old site for safekeeping.
- Test the old site’s URL to confirm that all traffic is being redirected to the new host.
When everything is in place, you can now contact your old hosting provider to cancel your account and avoid unnecessary charges.
Step 26. Monitor your website post-migration
Even after completing all the steps, your work doesn’t end immediately. Monitoring your website post-migration is essential to ensure everything continues to run smoothly. This step in the WordPress migration checklist helps you detect small issues early before they affect visitors or search performance.
Here's a quick checklist to guide you:
- Set up uptime monitoring (e.g., UptimeRobot or Jetpack Monitor).
- Track Google Analytics and Search Console for traffic changes.
- Review error logs and fix any PHP or database warnings.
- Check site speed using tools like GTmetrix or PageSpeed Insights.
- Confirm that all redirects and internal links still work correctly.
By following this simple checklist, you can maintain full control over your site’s performance and ensure that your WordPress migration checklist ends on a strong note.
What Is WordPress Migration?
A WordPress migration is the process of moving your entire website from one location to another, whether that’s to a new hosting provider, a new domain, or from another platform to WordPress. A successful WordPress migration involves transferring all your site content, including pages, posts, media files, themes, plugins, and settings, without breaking functionality or losing data.
Common types of WordPress migrations include:
- Hosting provider migration: Moving your site to a faster, more reliable host.
- Domain change: Changing your website’s URL for branding or business purposes.
- Website restructuring: Consolidating multiple WordPress installations into one unified site.
In many cases, the process also includes SEO settings, user information, custom code, and even eCommerce data for more complex websites. That’s why following a clear WordPress migration checklist is essential; it helps you manage each step with confidence and prevents issues during and after the move.
If you want to improve your website’s performance, upgrade your hosting, or gain more control over your site, a well-planned WordPress migration can be the right solution.
When Should You Migrate to WordPress?
Knowing when to start using a WordPress migration checklist can save you from costly mistakes and lost traffic. If your current platform no longer meets your needs or you’re planning big changes, it might be the perfect time to make the move.
Below are the most common signs that it’s time to begin a WordPress migration checklist, each with a clear reason to take action.

1. You need more customization and freedom
Many platforms restrict what you can build or charge extra for advanced features. With WordPress, you can use thousands of plugins and themes to customize your site without limitations, making it easier to create the experience you want.
2. You want full ownership of your site
Closed platforms often limit access to your content and settings. With WordPress, you have complete ownership of your files, data, and domain, giving you the freedom to manage your site your way.
3. You want stronger SEO performance
Some platforms don’t offer enough control over SEO settings. WordPress supports SEO plugins, customizable URLs, and detailed metadata options, giving you the tools to improve your rankings and increase organic traffic.
4. You're paying too much for too little
High monthly fees and upgrade costs can add up fast. WordPress allows you to build a professional website while keeping expenses low, since many tools and features are available for free or at a one-time cost.
If any of these situations sound familiar, it’s a clear sign that you should begin using a WordPress migration checklist. With a structured plan in place, you can make the switch smoothly and set your site up for long-term success.
Streamline Your WordPress Migration with LitExtension
If you're looking for a safe, efficient, and hassle-free way to move your site, LitExtension offers two powerful solutions that can make your migration smooth from start to finish. Both services are built to work seamlessly with the steps in this WordPress migration checklist, helping you avoid technical errors, lost data, or unnecessary downtime.
First, the Automated Migration tool is ideal if you want to take control of your migration without manually mapping data. With this tool, you can transfer all your essential website data, including products, customers, and orders, from your current platform to WordPress, no technical skills required. The best thing is that we ensure all your data is transferred accurately and securely with no downtime to your store operation.
On the other hand, if you prefer to let experts handle everything, we also have a tailored solution for you. The All-in-One Migration Service gives you access to a personal LitExtension expert who will manage the entire migration for you, from planning and setup to post-migration checks. This service is perfect for complex websites, store owners with limited technical skills, or anyone who simply wants a fully hands-off experience.
Let Our Experts Handle Your Store Migration!
With the All-in-One Migration Service, our experts take care of everything, ensuring a seamless and stress-free migration.

By combining your own preparation with LitExtension’s expert tools and services, you can complete your WordPress migration checklist faster and with total peace of mind.
WordPress Migration Checklist: FAQs
What is a migration checklist?
A migration checklist is a detailed, step-by-step guide designed to ensure the successful transfer of a website from one environment to another. For WordPress, it includes:
- Back up your site, disable caching plugins, and audit your content.
- Transfer files, export/import the database, and update configuration files.
- Test functionality, update DNS records, set up proper redirects, and monitor SEO performance.
How long does it take to migrate a WordPress site?
The time required to migrate a WordPress site depends on several factors, including the size of your site and the tools you use. Here’s the estimated timeframes:
- Small sites: 1–3 hours if using an automated migration plugin.
- Medium to large sites: 3–6 hours due to larger file sizes and databases.
- Custom setups or manual migrations: May take an entire day or longer, depending on the complexity.
How do I transfer my entire WordPress site?
To transfer your WordPress site, follow these steps:
- Back up your website
- Set up your new hosting environment
- Export your site
- Import your site
- Update configuration files
- Update DNS records
- Test your site
What is the checklist before publishing in WordPress?
Before publishing a WordPress site, ensure the following checklist is completed:
- Content review
- SEO optimization
- Responsive design check
- Permalinks
- Site speed
- Plugins and themes
- Security
- Backup
- Analytics and tracking
- Testing
Final Words
Migrating a website can seem complex, but with the right approach, it becomes a smooth and manageable process. A well-structured WordPress migration checklist helps you stay organized, avoid common mistakes, and ensure that your website performs just as well, or even better, after the move.
From preparation and setup to SEO and post-migration checks, every step matters. Whether you're switching platforms, changing hosts, or upgrading your site, following this WordPress migration checklist will guide you toward a successful transition.
We hope you found this article insightful and now understand the WordPress migration checklist clearly. For more content like this, be sure to visit the LitExtension WordPress section and join our eCommerce community to gain further insights and connect with fellow business owners.

