WooCommerce coupons let you create discounts to boost sales and reward customers. You can set fixed or percentage-based offers, usage limits, product restrictions, and expiry dates, etc. Manual setup is fine for small promos, but WooCommerce import coupons becomes essential when you're managing larger campaigns or bulk coupon codes.
In this guide, we’ll show you the easiest ways to import coupons into WooCommerce:
- Use LitExtension migration service;
- Use import coupons WooCommerce plugins.
Keep reading for more details!
Why Import Your WooCommerce Coupons in Bulk?
In WooCommerce, you can always create coupons one by one through the dashboard. That works for small stores or simple promotions, but it quickly becomes inefficient once you run regular campaigns.
Unlike products or orders, coupons aren’t permanent store data. They are marketing tools that change often, expire quickly, and usually exist in large sets for events, loyalty programs, or influencer campaigns. In some cases, there are only some available WooCommerce coupon for specific user base. That’s why many store owners prefer importing coupons in bulk.
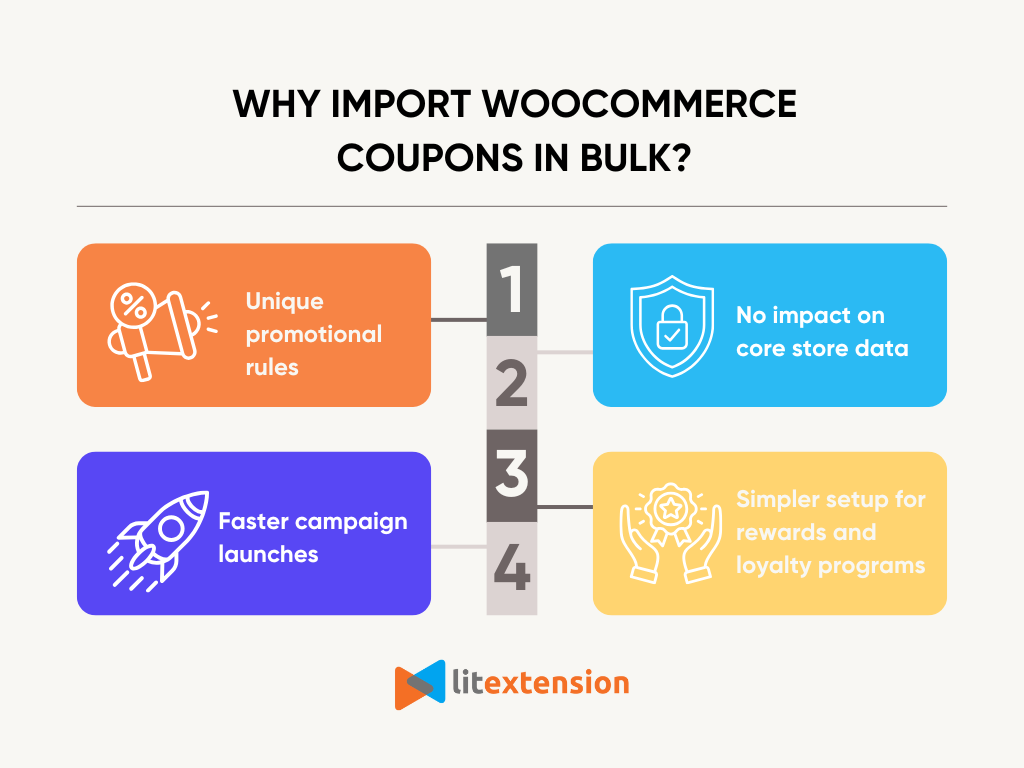
Here’s why it makes sense:
1. Unique promotional rules
Every coupon carries its own discount type, usage restrictions, and expiry date. Importing ensures these conditions remain intact without needing to rebuild campaigns manually.
2. No impact on core store data
Coupons can be imported independently, meaning your products, customers, and orders stay untouched. This reduces risk and keeps your main store setup stable.
3. Faster campaign launches
Seasonal sales, flash promotions, or affiliate codes often move on a faster timeline than inventory updates. Importing coupons lets you roll them out quickly and at scale.
4. Simpler setup for rewards and loyalty programs
When your catalog and customer base are already in place, importing just coupons saves time and effort. You can deploy loyalty rewards or partner discounts without extra admin work.
As you can see, WooCommerce import coupons helps you roll out promotions quickly and keep them well organized. At the same time, your core store data stays safe and unaffected.
How to Perform WooCommerce Import Coupons with LitExtension?
If you're migrating from another eCommerce platform or working with a large set of coupon data, especially with complex discount rules or custom setups, LitExtension is the most reliable way to import them into WooCommerce.
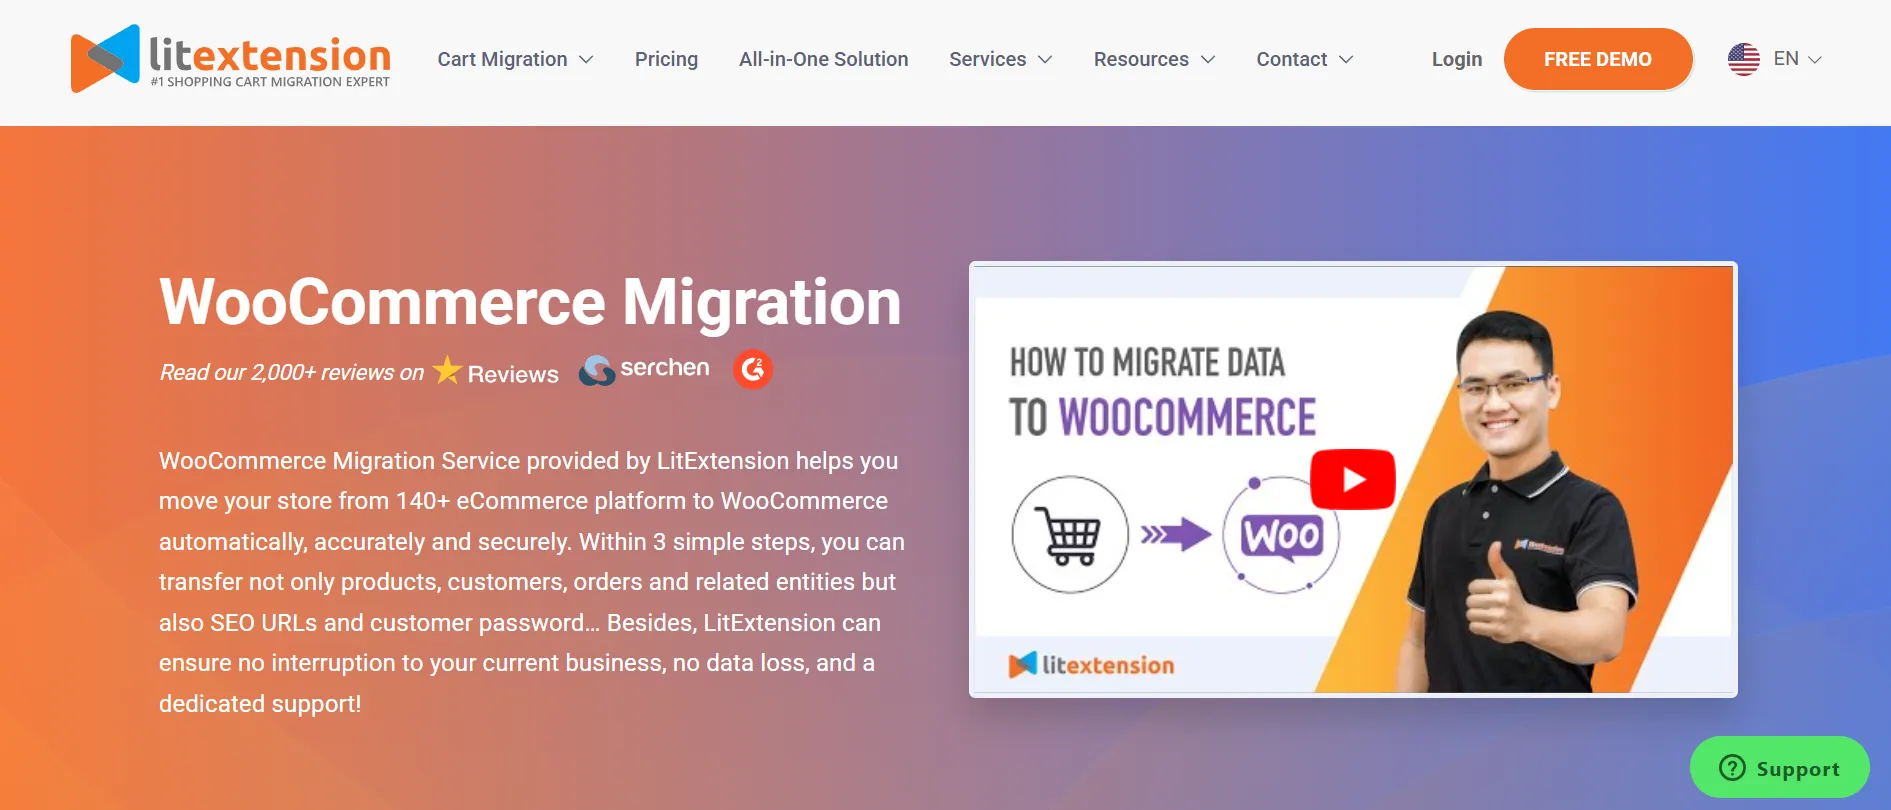
With our migration service, you won’t have to worry about formatting issues or data loss – everything is transferred smoothly, and your store stays up and running throughout the process. Let’s walk through how to import WooCommerce coupons using LitExtension step by step!
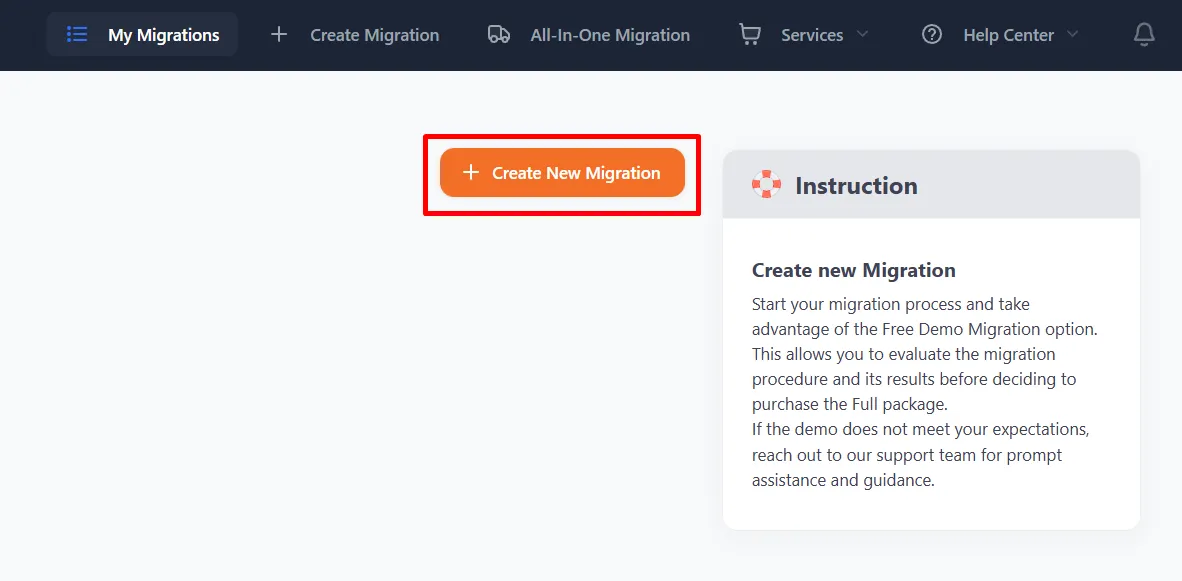
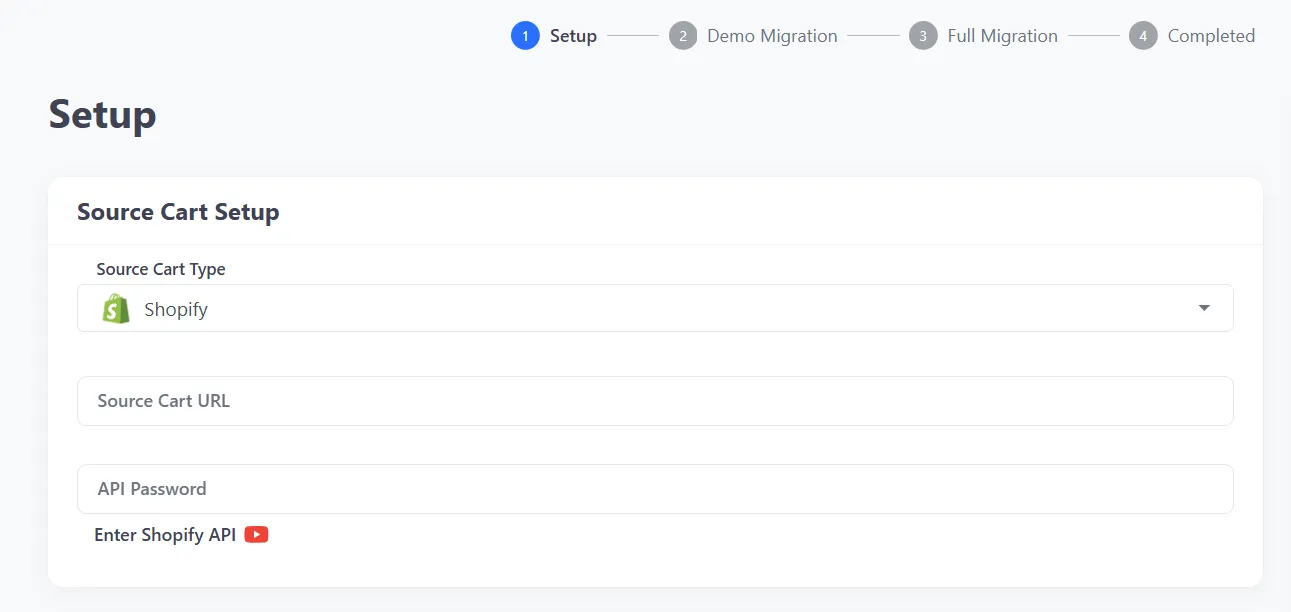
Step 1: Set up Source & Target Cart
To begin, sign up or log in to the LitExtension website using your existing Google or Facebook account. Then click the “Create New Migration” button at the top right of the screen to get started.
On the next page, you’ll enter the details of your Source Cart (where your coupons currently exist) and your Target Cart (WooCommerce).
From the drop-down menu, choose your Source Cart and enter the store URL. Depending on the platform, you may also need to provide additional details. For example, Shopify requires both the store URL and an API password.
Next, set WooCommerce as your Target Cart. Since we're performing a WooCommerce import coupons task, this is where your coupon data will be migrated to. To establish the connection, download the LitExtension Connector – a small script that links your WooCommerce store with the LitExtension App.

Once installed, you’ll see a message that says “Connection was successfully installed”. That means you're ready to move on to the next step.
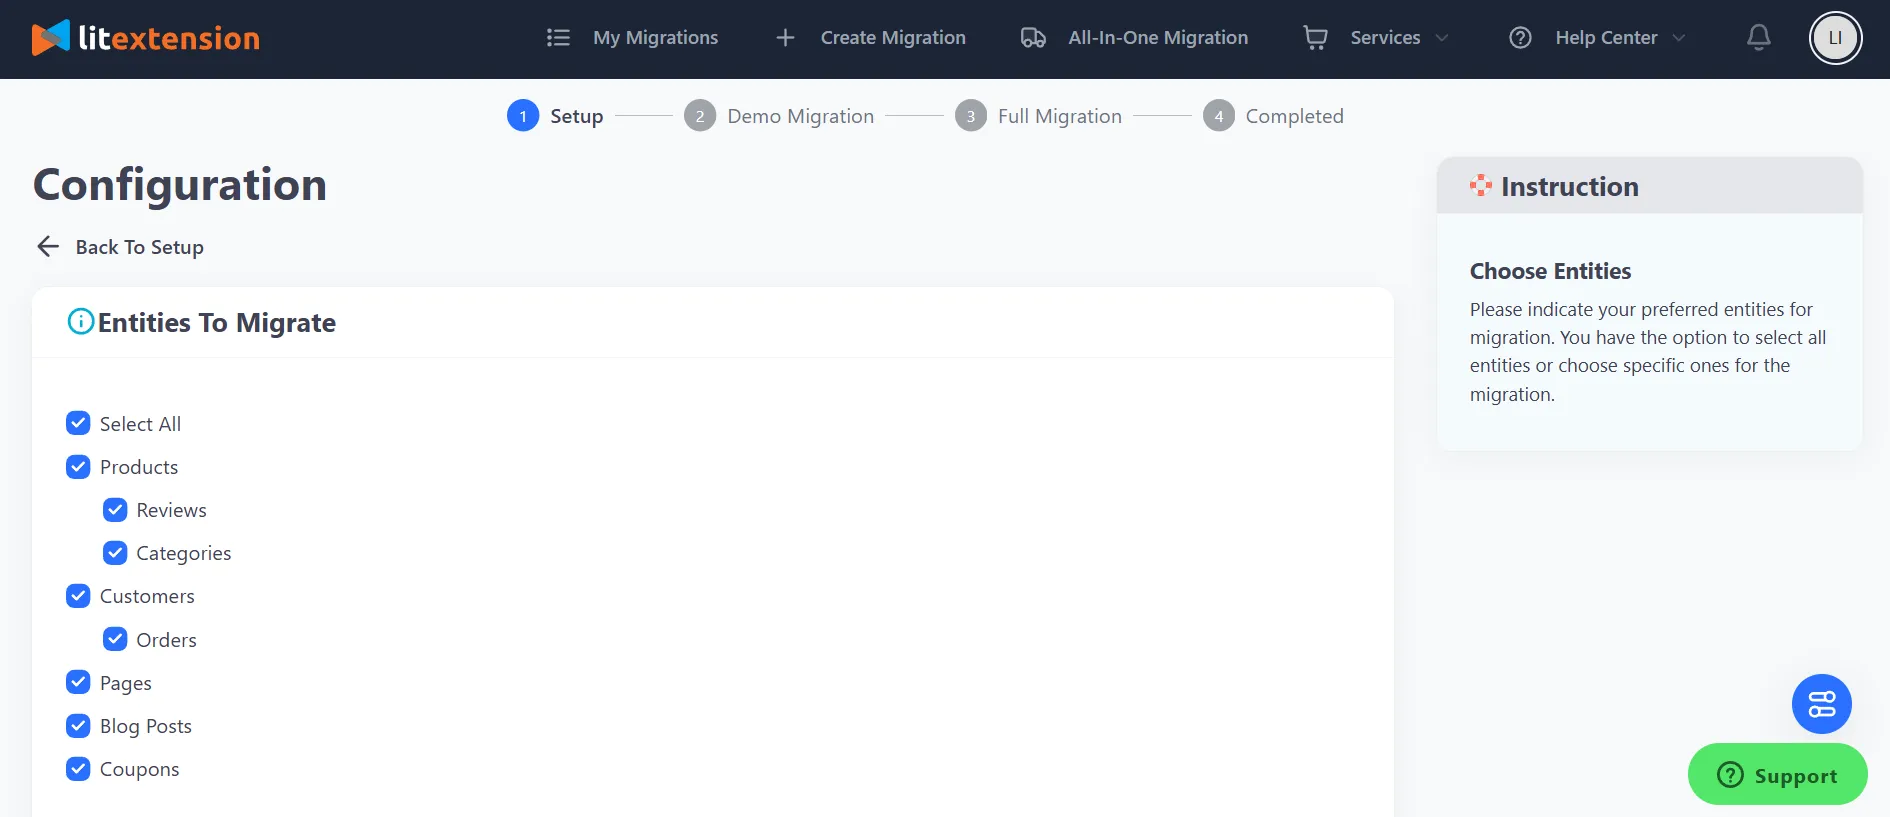
Step 2: Select coupons options to migrate
Next, choose Coupons as the specific data entity you want to migrate. At LitExtension, we support importing all essential coupon fields into your WooCommerce store, including:
- Name.
- Description.
- Coupon Code.
- Coupon Date.
- Customer Groups.
- Uses Per Coupon, Uses Per Customer.
- Discount Amount/Percent.
- Coupon from date, Coupon to date.
All of these details will be preserved during the WooCommerce import coupons process, so your discounts remain accurate and campaign-ready.
Besides coupons, we also support migrating a wide range of other data entities to your WooCommerce store. You can click “Select All” to include everything, or manually choose what you need, such as products, customers, or orders.
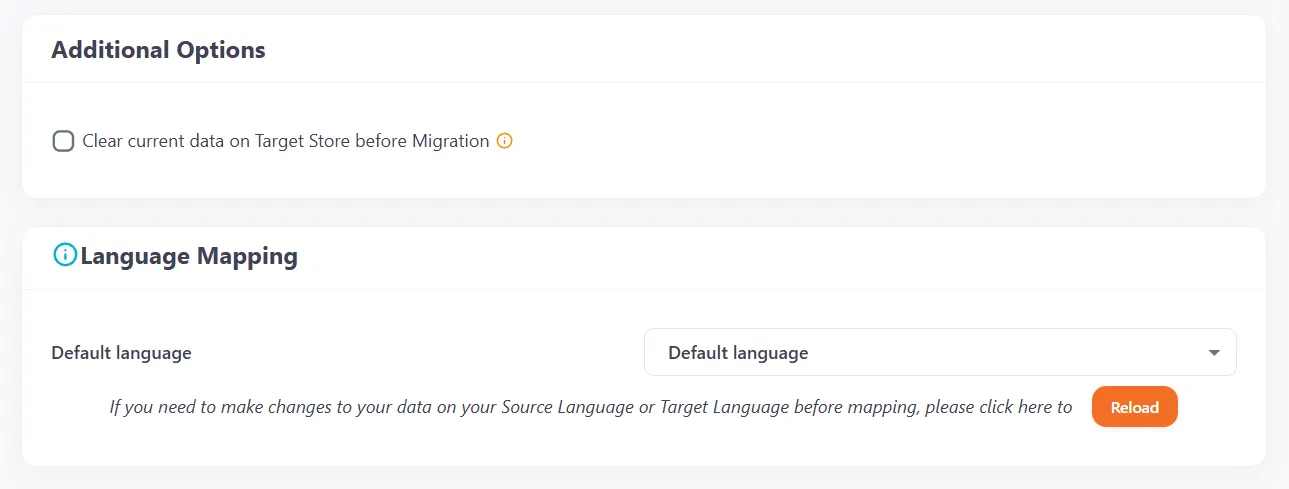
After selecting your data, you’ll see a list of Additional Options you can enable to further customize the migration process. These options depend on the type of data you selected – for example, if you're only migrating coupons, you'll typically see the “Clear existing data on the target store” settings. Then map the language so that your coupons appear accurately on the WooCommerce store.
When your setup is complete, you can click “Next: Start Free Demo Migration” to preview how the migration works. If you’d rather skip the demo and begin the full process immediately, just toggle the “Skip Demo Migration” option.
Step 3: Run Full Migration
At this stage, LitExtension will start transferring all your selected entities – from coupons to any additional data – directly from your source store to WooCommerce. The entire WooCommerce import coupons process is handled with high accuracy and security, and everything runs seamlessly in the background.
Your current store will remain fully active during the migration, so you can continue selling without any interruptions. There’s no downtime, no risk to your live site, and no impact on daily operations.
Once the migration is complete, we’ll send you an email notification. At that point, we recommend reviewing your results to ensure all data has been transferred correctly into WooCommerce.
If you’d prefer a completely hands-off experience, the All-in-One Migration Service is also available – our experts will handle the entire process for you, from setup to quality assurance.
Seamlessly migrate your store to WooCommerce!
LitExtension can safely transfer your data to unlock more growth on WooCommerce.

How to Import Coupons to WooCommerce with Plugins?
You can also import coupons using a WooCommerce plugin, which is ideal if you’re working entirely within WooCommerce and already have a CSV file ready. This method lets you upload coupons directly from your dashboard.
It’s best for smaller stores or simple campaigns, but plugins often lack flexibility and offer limited support. If you're dealing with complex coupon rules or migrating from another platform, we recommend using the first method.
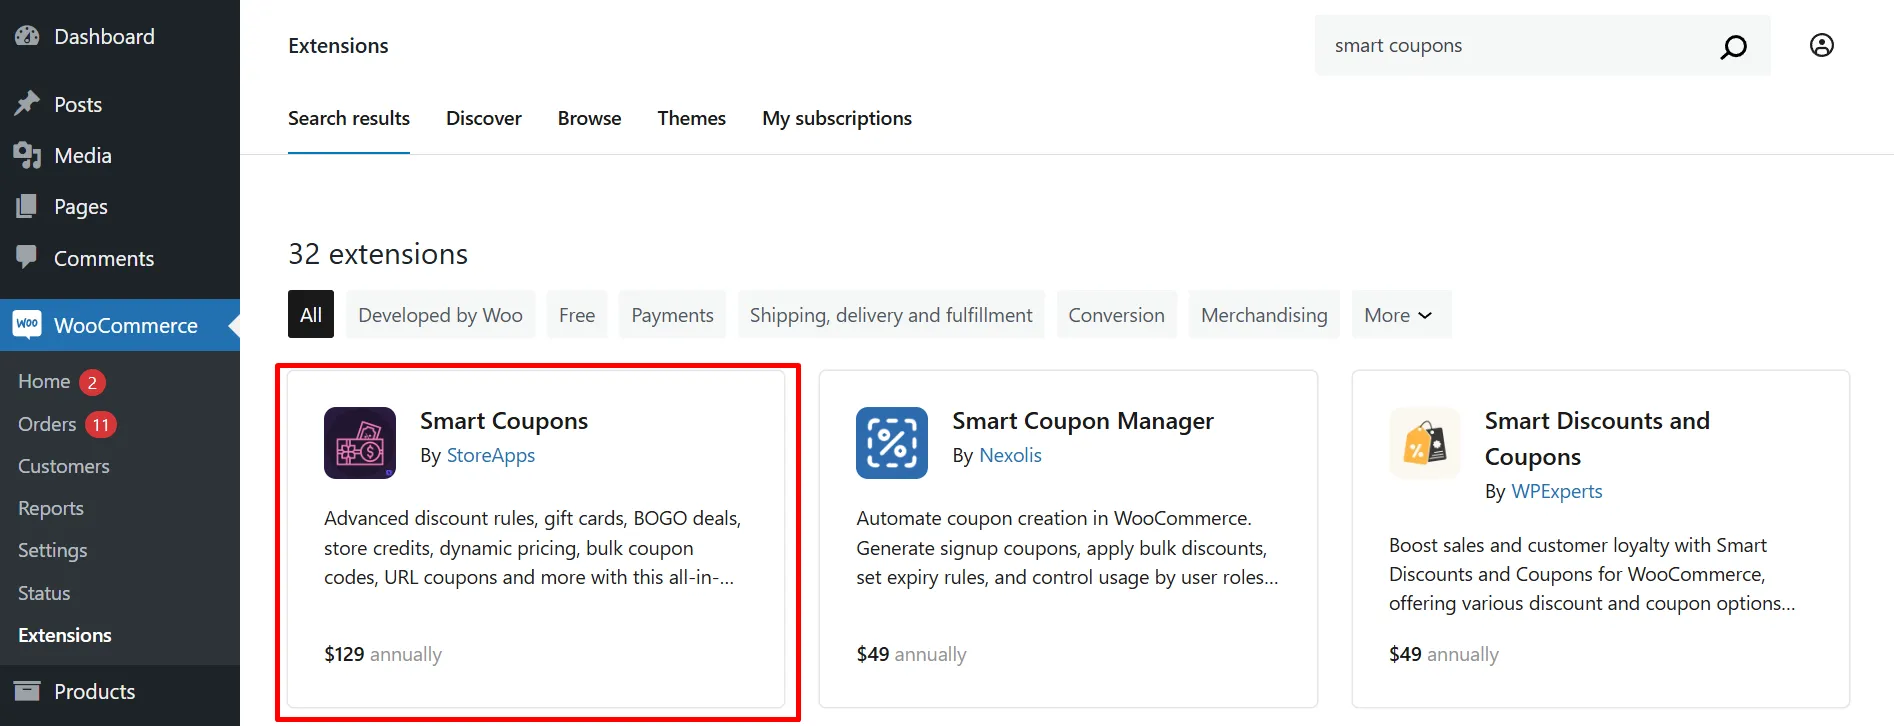
There are several popular plugins that support WooCommerce import coupons. In this section, we’ll walk you through the process using Smart Coupons, a highly rated plugin known for its positive customer reviews.

Step 1: Install the plugin
From your WordPress dashboard, go to WooCommerce > Extensions, then search for Smart Coupons. Click Install Now, and once the installation is complete, hit Activate to enable the plugin on your WooCommerce store.
This will add coupon management and import features directly into your admin panel.
Step 2: Format your CSV file
Inside the Smart Coupons plugin folder (within your WordPress install), you’ll find a file named sample.csv. This serves as a helpful template for creating your own import file. Simply open it, review the structure, and start filling in your coupon data based on the supported fields.
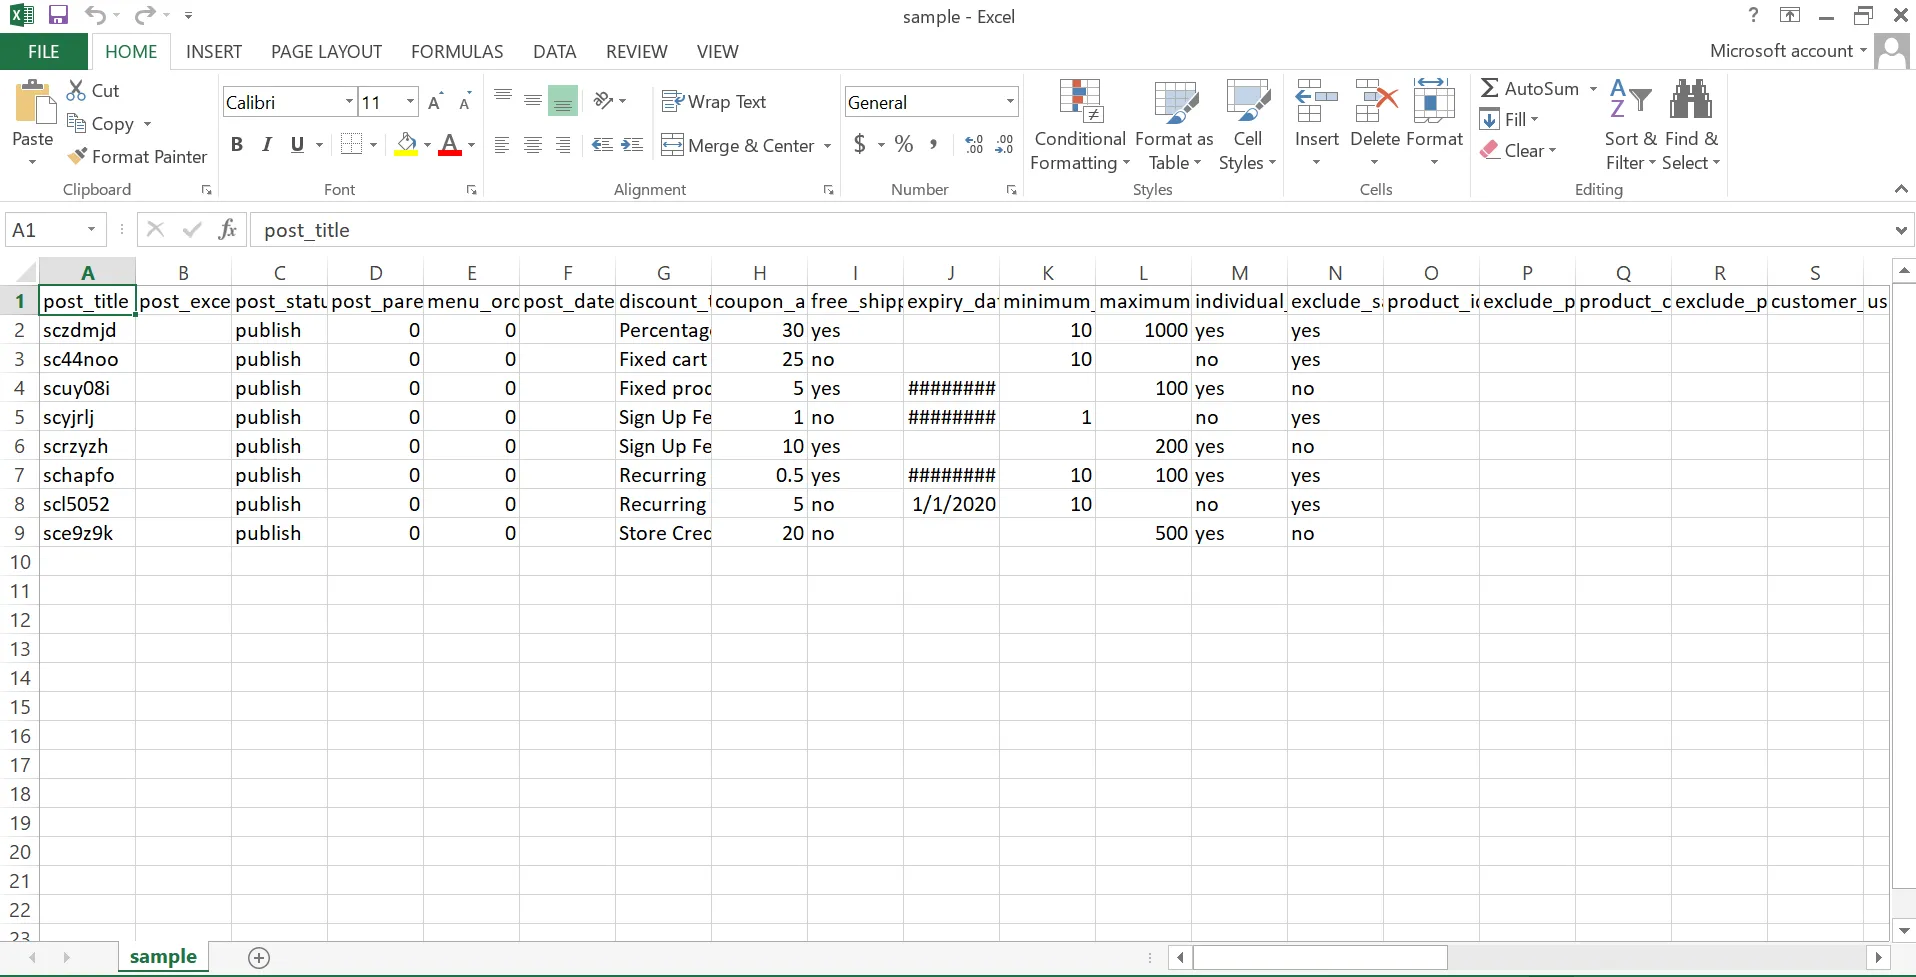
- post_title: The name of the coupon, usually the coupon code itself (e.g., SUMMER10). This is what customers enter at checkout.
- post_excerpt: A short internal description of the coupon. Not shown to customers by default, but useful for store admins to describe what the coupon is for.
- post_status: Defines whether the coupon is active or not. Use publish to make the coupon live. Other possible values include draft or trash.
- menu_order: Determines the sort order of coupons in the admin panel. Can usually be left as 0 unless you want to organize coupon display order manually.
- post_date: The date and time when the coupon was created or published.
- discount_type: Defines the type of discount the coupon applies, such as percent, fixed cart, fixed product, etc.
- coupon_amount: The value of the discount. If discount_type is percent, enter a number like 10 for 10%. If it’s a fixed discount, enter the amount (e.g., 15 for $15 off).
- free_shipping: Enables free shipping when the coupon is used. Use yes to enable or leave blank for no.
- expiry_date: The date the coupon expires.
- minimum_amount: The minimum order total required for the coupon to be valid.
- maximum_amount: The maximum order total for which the coupon can be applied. Leave blank if there’s no maximum limit.
Important: If your WooCommerce site is using a non-English language, make sure the WooCommerce coupon settings values in the discount_type column are written in the translated terms used by your site. Otherwise, the import may fail or apply incorrect discount logic.
Once your CSV is ready, you're all set for the next step: uploading the file.
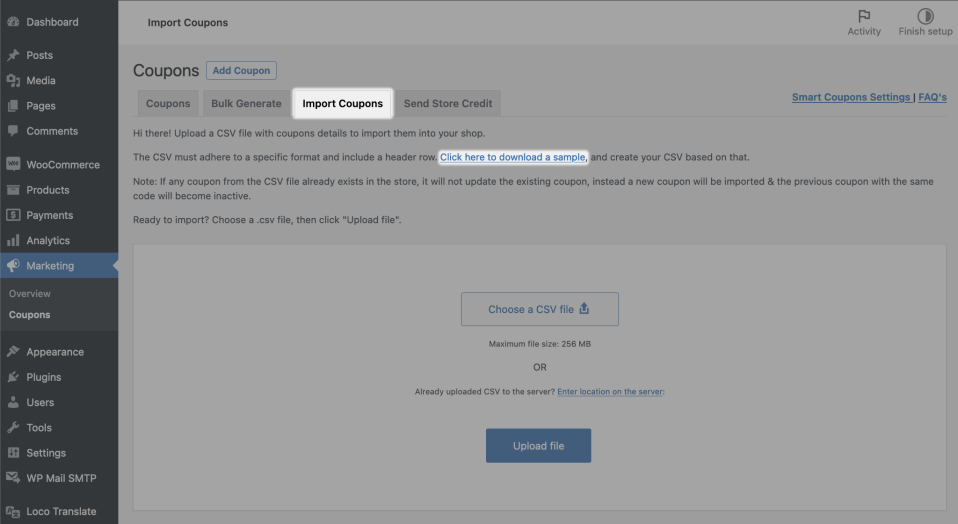
Step 3: Upload the file
In your WordPress dashboard, go to Marketing > Coupons, then click on the Import Coupons tab added by the Smart Coupons plugin.
Click “Choose a CSV file” and upload the file you prepared earlier. Once selected, hit the “Upload file” button to proceed.
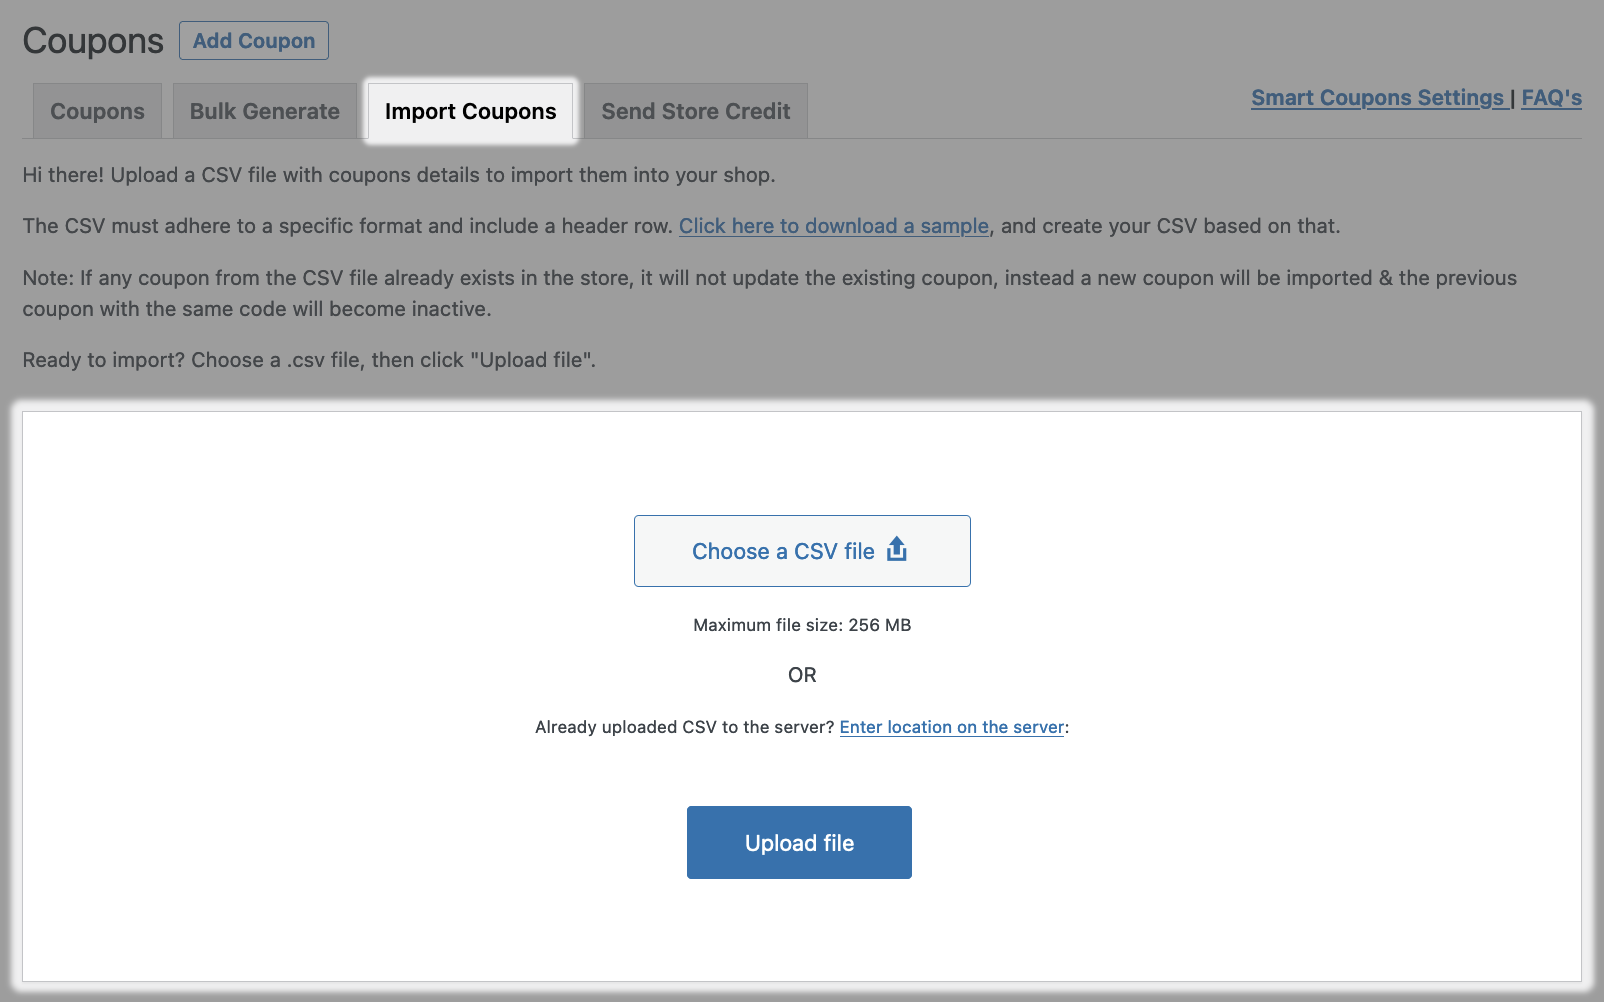
If you've included customer emails under Usage restrictions > Allowed emails, Smart Coupons can automatically send the coupon codes to those customers during import, making it easy to run personalized campaigns.
Finally, click “Import” and wait for the confirmation message. Your coupons will now be added to your WooCommerce store.

Step 4: Import with categories (optional)
Smart Coupons allows you to assign categories to your coupons during the import process. This feature helps you organize and filter coupons based on campaigns or usage – for example, holiday sales, influencer promotions, or partner deals.
Here’s how to include coupon categories in your import:
1. Go to Marketing > Coupons > Import Coupons and download the sample.csv file for reference.
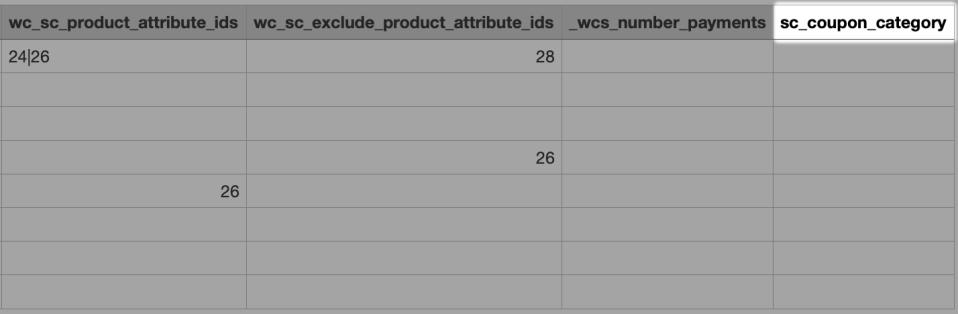
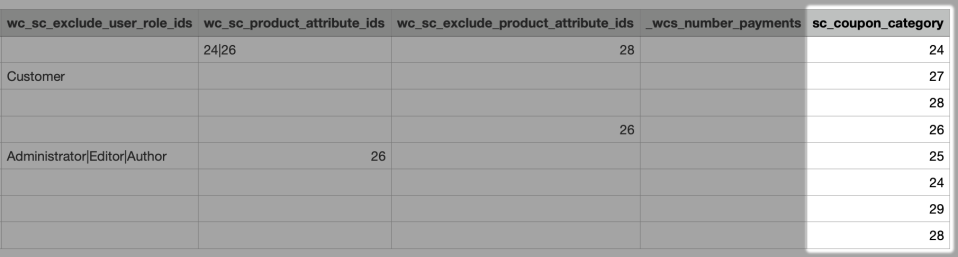
2. In your CSV file, make sure to include a column titled sc_coupon_category.
3. Then, go to Marketing > Coupons and click Manage Coupon Categories. From there, you can create, edit, or delete categories.
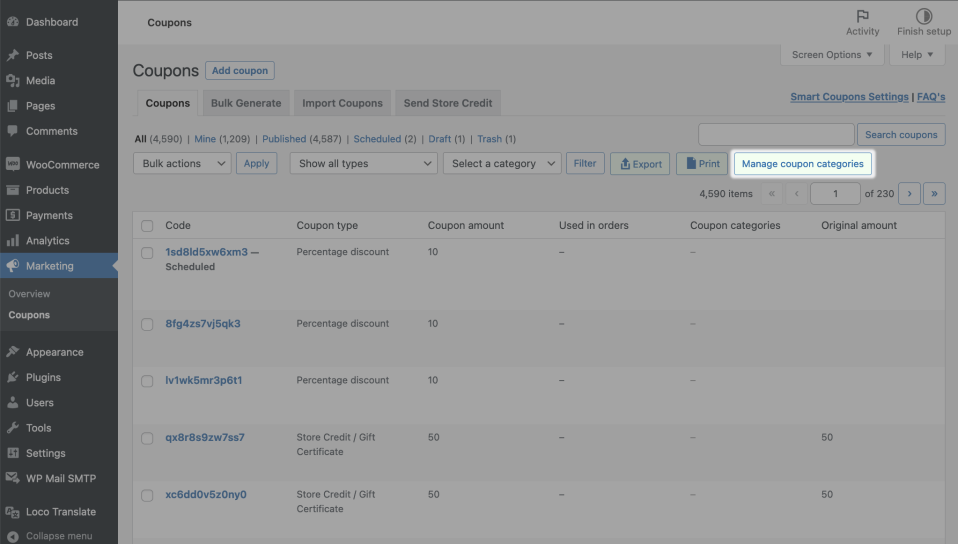
4. After creating your preferred categories, note down their category IDs.
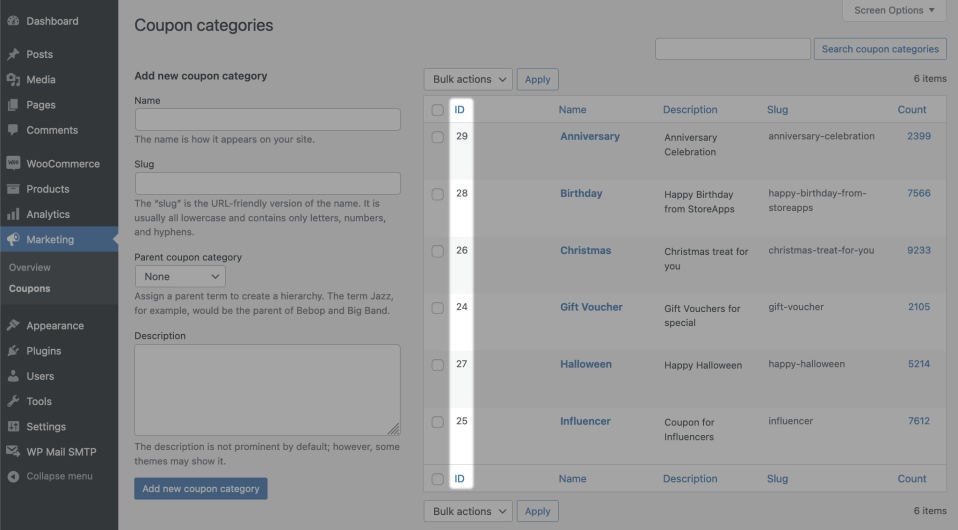
5. In your CSV file, under the sc_coupon_category column, add the corresponding category ID(s) for each coupon.
- If you want to assign multiple categories to a coupon, separate the IDs with a pipe symbol (|).
- Example: 38|37|36
Once your file is updated, return to the Import Coupons tab and upload it using the same process from Step 3. Your coupons will now be imported with category tags attached, making them easier to manage later on.
Importing coupons with a plugin like Smart Coupons is a quick and effective option if you're working entirely within WooCommerce and already have your data prepared. Just make sure your CSV file is formatted correctly, and you’ll have your coupons live in just a few clicks.
WooCommerce Import Coupons: FAQs
How can I import bulk coupon to WooCommerce from CSV?
There are two common ways to import coupons in bulk:
- Use a WooCommerce plugin: Plugins like Smart Coupons let you upload a CSV file directly from your WordPress dashboard. This method works well for small stores or quick, one-time imports.
- Use a migration service like LitExtension: If you're switching from another platform or working with complex coupon data, LitExtension allows you to import coupons from a CSV file with full support for discount types, usage limits, expiration dates, and more. It's ideal for larger stores or when you want a reliable, automated process with no manual setup.
How do I add coupons to WooCommerce?
You can easily create coupons in WooCommerce right from your WordPress dashboard. Here’s how:
- Go to Marketing > Coupons in your WordPress admin panel.
- Click the “Add Coupon” button.
- Enter your coupon code (or click “Generate coupon code” for a random one).
- Fill in the description (optional, for internal reference).
- Under General, choose the discount type (e.g., fixed cart discount, percentage discount, or fixed product discount).
- Set the coupon amount, expiry date, and choose whether to allow free shipping.
- Use the Usage restriction and Usage limits tabs to define rules (e.g., minimum spend, product/category restrictions, usage limits per user).
- Click Publish to activate the coupon.
Your coupon is now live and ready to be used at checkout.
What is the best coupon plugin for WooCommerce?
Smart Coupons is one of the most feature-rich plugins for managing WooCommerce coupons. It supports bulk import/export, coupon scheduling, category tagging, and more. You can also consider other popular options like Advanced Coupons, Discount Rules for WooCommerce, or Coupon Creator, depending on your specific needs and campaign setup.
How do I automatically apply coupons in WooCommerce?
By default, WooCommerce doesn’t apply coupons automatically. But with plugins like Advanced Coupons or Smart Coupons, you can create rules that trigger discounts based on cart contents, user roles, or purchase behavior.
Conclusion
As you can see, WooCommerce import coupons is a simple but powerful way to streamline your promotions, save time, and avoid manual errors. In this guide, we’ve shown you two of the most efficient methods available. Depending on your store setup and goals, you can choose the one that best fits your needs.
For more tutorials or insight, feel free to check out our WooCommerce blog posts and join the Facebook community group!

