Checkout is the final — and arguably most critical — step in any online shopping journey. For WooCommerce store owners, having the right WooCommerce checkout fields can make the difference between a completed purchase and an abandoned cart. These fields collect essential customer details like billing information, shipping addresses, and order notes, and they also offer a great opportunity to tailor the checkout experience to your specific business needs.
In this guide, you’ll learn:
- What WooCommerce checkout fields are and why they matter
- How to modify checkout fields using code, plugins, or the new Checkout Block
- Tips for customizing specific areas like billing, shipping, and payment
Let’s explore how to take control of your checkout form and build a smoother, smarter path to purchase.
WooCommerce Checkout Fields 101
What are WooCommerce checkout fields?
WooCommerce checkout fields are the input fields displayed to customers during the checkout process. These fields collect vital information such as the customer’s name, billing address, shipping address, email, phone number, and payment details.
By default, WooCommerce includes three types of checkout fields:
- Billing fields: Required to process payments and verify customer identity.
- Shipping fields: Collected when the delivery address differs from the billing address.
- Additional fields: Optional inputs like order notes used for special instructions.
These fields ensure accurate order fulfillment and smooth communication between the store and the customer. However, in many cases, the default structure may not fully align with a store’s operational or data requirements — which is why customization becomes necessary.
Why are checkout fields important for eCommerce stores?
Checkout fields directly influence the user experience and overall conversion rate of an online store. Their importance can be summarized as follows:
- Efficiency: A simplified and well-organized checkout form helps customers complete purchases faster.
- Clarity: Clear field labels and logical field order reduce errors and hesitation.
- Data relevance: Custom fields enable store owners to gather additional details (e.g., VAT ID, delivery preferences) that are specific to their business.
- Professionalism: A clean, customized checkout experience helps reinforce brand trust at the final step of the buying process.
In short, well-structured checkout fields support both operational needs and customer satisfaction. The next sections will explore how you can tailor these fields to suit your specific use case.
Types of checkout field customizations
Customizing WooCommerce checkout fields gives you the flexibility to design a checkout experience tailored to your store’s needs. Below, we’ll explore the primary types of customizations you can make to optimize the checkout process for your customers.
Type | Description | Examples |
Add new fields | Add custom fields that collect additional customer info during checkout. | - Gift message for personalized orders |
Edit existing fields | Modify default fields to better fit your store’s needs. | - Rename “Company Name” to “Organization” |
Remove unnecessary fields | Remove fields that are not relevant to your business or products. | - Remove shipping fields for digital products |
Conditional fields | Show or hide fields dynamically based on user selections or input. | - Show “Gift Message” if “Gift wrap” is selected |
Note: If you're using the new Checkout Block (introduced as default in WooCommerce 8.3+), you’ll still see these same billing, shipping, and additional fields—but they’re displayed using a block-based layout instead of shortcodes. Customizing them requires a slightly different approach, which we’ll cover in the next section.
How to Customize WooCommerce Checkout Fields Using Code
For users with technical expertise or those who want complete control over their checkout customization, using custom code in WooCommerce is a powerful method. Below is a step-by-step guide to achieving this.
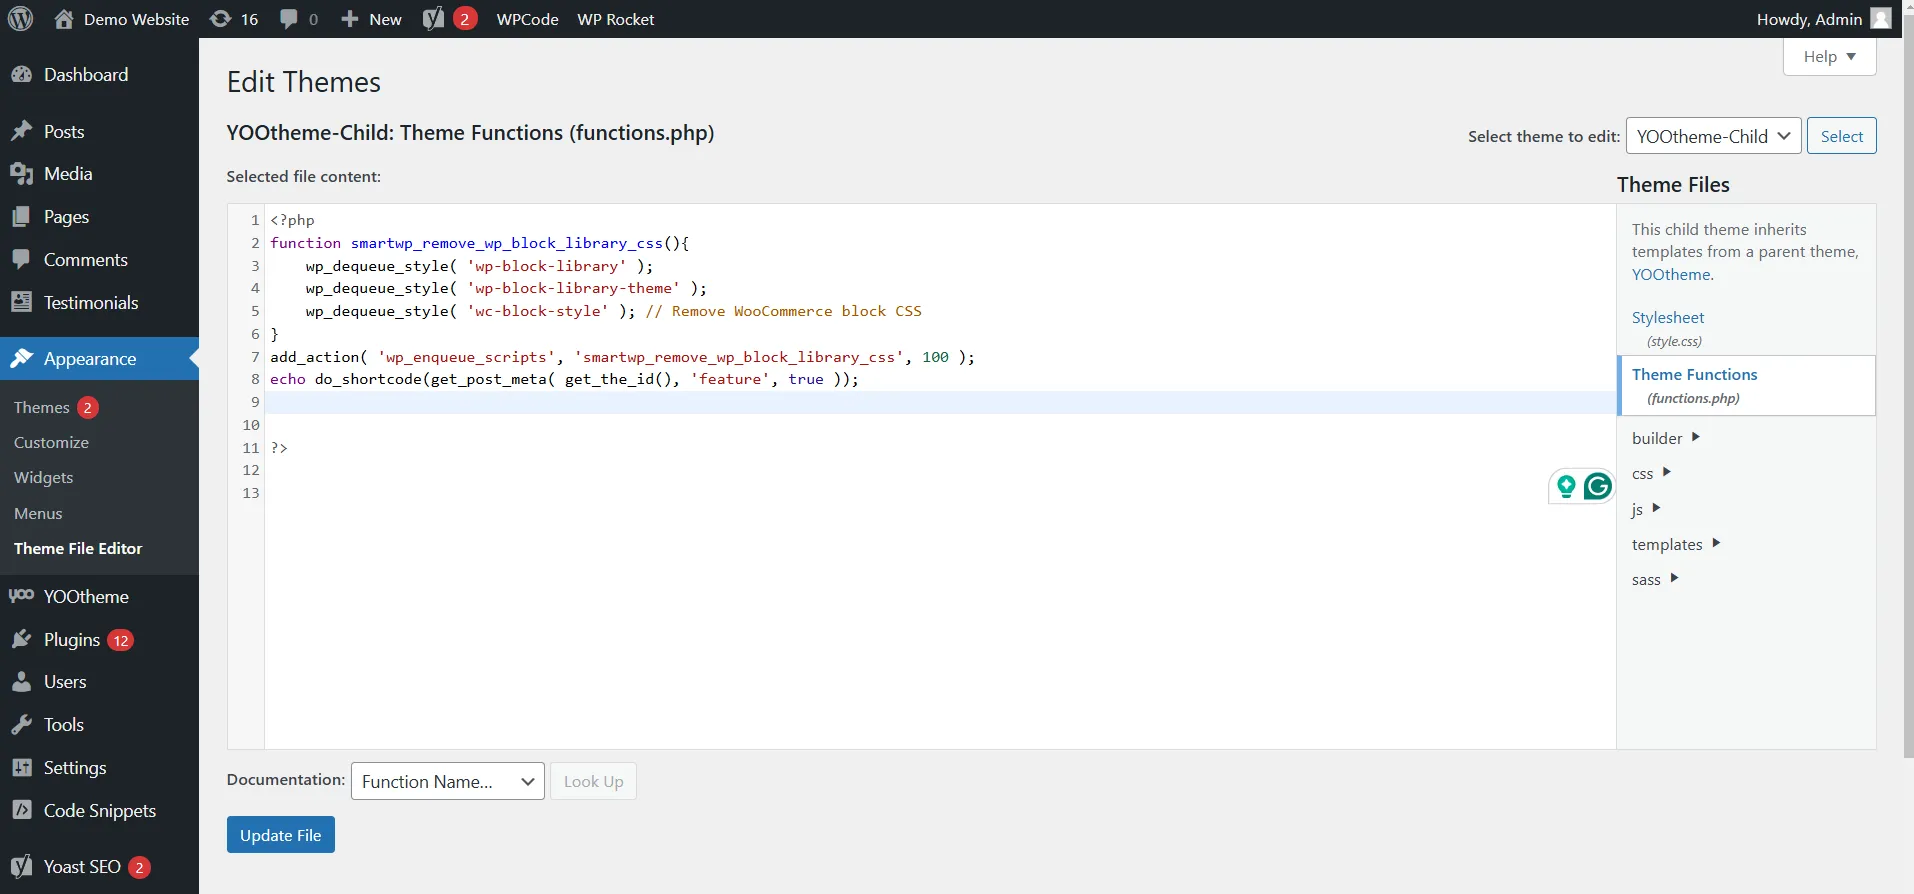
Step 1: Access the functions.php file
To access the functions.php file, follow this:
- Navigate to your WordPress Dashboard.
- Go to Appearance > Theme Editor and locate the
functions.phpfile in your active theme. - Always create a child theme or backup your site before editing this file to prevent losing customizations during theme updates.
Step 2: Add code to create or modify fields
You can use WooCommerce hooks like woocommerce_checkout_fields to add, modify, or remove fields. Here’s an example of adding a custom field:
add_filter('woocommerce_checkout_fields', 'add_custom_checkout_field');

function add_custom_checkout_field($fields) {

$fields['billing']['billing_custom_field'] = array(

'type'        => 'text',

'label'       => __('Custom Field'),

'placeholder' => __('Enter custom data'),

'required'    => false,

);

return $fields;

}
Explanation:
- The
typedefines the input type (e.g., text, number, select). - The
labelsets the field's display name. - The
placeholderoffers a hint to users about what to enter. - The
requiredparameter determines if the field is mandatory.
Step 3: Validate and save field data
To ensure the data entered in custom fields is valid, you can use the woocommerce_checkout_process hook.
For instance:
add_action('woocommerce_checkout_process', 'validate_custom_field');

function validate_custom_field() {

if (empty($_POST['billing_custom_field'])) {

wc_add_notice(__('Please fill in the custom field.'), 'error');

}

}
Then save the field using the woocommerce_checkout_update_order_meta hook:
add_action('woocommerce_checkout_update_order_meta', 'save_custom_field');

function save_custom_field($order_id) {

if (!empty($_POST['billing_custom_field'])) {

update_post_meta($order_id, 'Billing Custom Field', sanitize_text_field($_POST['billing_custom_field']));

}

}
Step 4: Display custom field data on order pages
To make the custom field data visible in the admin order page or confirmation emails, you can use the following code:
add_action('woocommerce_admin_order_data_after_billing_address', 'display_custom_field_admin', 10, 1);

function display_custom_field_admin($order) {

echo '<p><strong>' . __('Custom Field') . ':</strong> ' . get_post_meta($order->get_id(), 'Billing Custom Field', true) . '</p>';

}
(Optional) Edit or remove WooCommerce checkout fields with code snippets
If you don’t need to add entirely new fields but just want to adjust, rename, or remove existing ones, you can use lightweight code snippets. These changes are quick to apply and help you streamline the checkout experience without installing a plugin.
1. Remove checkout fields
To remove specific fields from the checkout form, use the woocommerce_checkout_fields filter. Only remove fields that are unnecessary—do not remove required fields like billing_country.
add_filter( 'woocommerce_checkout_fields', 'wc_remove_checkout_fields' );
function wc_remove_checkout_fields( $fields ) {
// Remove billing fields
unset( $fields['billing']['billing_company'] );
unset( $fields['billing']['billing_email'] );
unset( $fields['billing']['billing_phone'] );
unset( $fields['billing']['billing_state'] );
unset( $fields['billing']['billing_first_name'] );
unset( $fields['billing']['billing_last_name'] );
unset( $fields['billing']['billing_address_1'] );
unset( $fields['billing']['billing_address_2'] );
unset( $fields['billing']['billing_city'] );
unset( $fields['billing']['billing_postcode'] );

// Remove shipping fields
unset( $fields['shipping']['shipping_company'] );
unset( $fields['shipping']['shipping_phone'] );
unset( $fields['shipping']['shipping_state'] );
unset( $fields['shipping']['shipping_first_name'] );
unset( $fields['shipping']['shipping_last_name'] );
unset( $fields['shipping']['shipping_address_1'] );
unset( $fields['shipping']['shipping_address_2'] );
unset( $fields['shipping']['shipping_city'] );
unset( $fields['shipping']['shipping_postcode'] );

// Remove order notes
unset( $fields['order']['order_comments'] );

return $fields;
}
Note: Removing the Country field will break the checkout process. WooCommerce requires it to complete the order.
2. Make a field optional
To make a field like the billing phone number optional (instead of required), use this snippet:
add_filter( 'woocommerce_billing_fields', 'wc_unrequire_wc_phone_field' );
function wc_unrequire_wc_phone_field( $fields ) {
$fields['billing_phone']['required'] = false;
return $fields;
}
To make a field required again, simply change false to true.
3. Change field labels and placeholders
You can rename the field labels or change the placeholder text to better match your brand tone or clarify form inputs:
add_filter('woocommerce_checkout_fields', 'custom_override_checkout_fields');
function custom_override_checkout_fields($fields) {
unset($fields['billing']['billing_address_2']); // Remove Address Line 2

$fields['billing']['billing_company']['label'] = 'Business Name';
$fields['billing']['billing_company']['placeholder'] = 'Enter your business name';

$fields['billing']['billing_first_name']['placeholder'] = 'First Name';
$fields['billing']['billing_last_name']['placeholder'] = 'Last Name';
$fields['billing']['billing_email']['placeholder'] = 'Email Address';
$fields['billing']['billing_phone']['placeholder'] = 'Phone Number';

$fields['shipping']['shipping_first_name']['placeholder'] = 'First Name';
$fields['shipping']['shipping_last_name']['placeholder'] = 'Last Name';
$fields['shipping']['shipping_company']['placeholder'] = 'Company Name';

return $fields;
}
4. Style checkout fields with CSS
To update the visual appearance of checkout fields (e.g., background color or border radius), use custom CSS.
Here's a classic checkout (shortcode-based):
.woocommerce-checkout input[type="text"] {
border-radius: 10px;
background-color: #222;
}
Block-based checkout (WooCommerce Blocks):

.wc-block-checkout input[type="text"] {
border-radius: 10px;
background-color: #222;
}
Tip: Use your browser’s inspect tool to find specific class or ID selectors on your checkout page.
These code snippets are ideal for store owners or developers looking for direct control without adding extra plugins. For more advanced logic (like conditional fields), you should consider using JavaScript or specialized plugins.
How to Customize WooCommerce Checkout Fields Using Plugins
If you’re looking for a user-friendly and efficient way to customize WooCommerce checkout fields, plugins are your best bet. They offer user-friendly interfaces that allow you to adjust your checkout fields in just a few clicks. Plus, many plugins come with advanced features like conditional fields (showing or hiding fields based on customer input) and field validation, so you can create a checkout experience that feels smooth and professional.
Step 1: Pick a WooCommerce checkout field plugin
First, you’ll need a plugin that suits your needs. Some of the most popular ones include:
- Checkout Field Editor for WooCommerce: Perfect for straightforward edits like adding, removing, or rearranging fields.
- WooCommerce Checkout Manager: A great choice if you want more advanced features like file uploads or conditional logic.
- YITH WooCommerce Checkout Manager: Best for branding and styling your checkout form.
Step 2: Install and activate the plugin
Installing a plugin is super simple:
- Go to your WordPress dashboard and navigate to Plugins > Add New.
- Search for the desired plugin by name (e.g., “Checkout Field Editor for WooCommerce”)
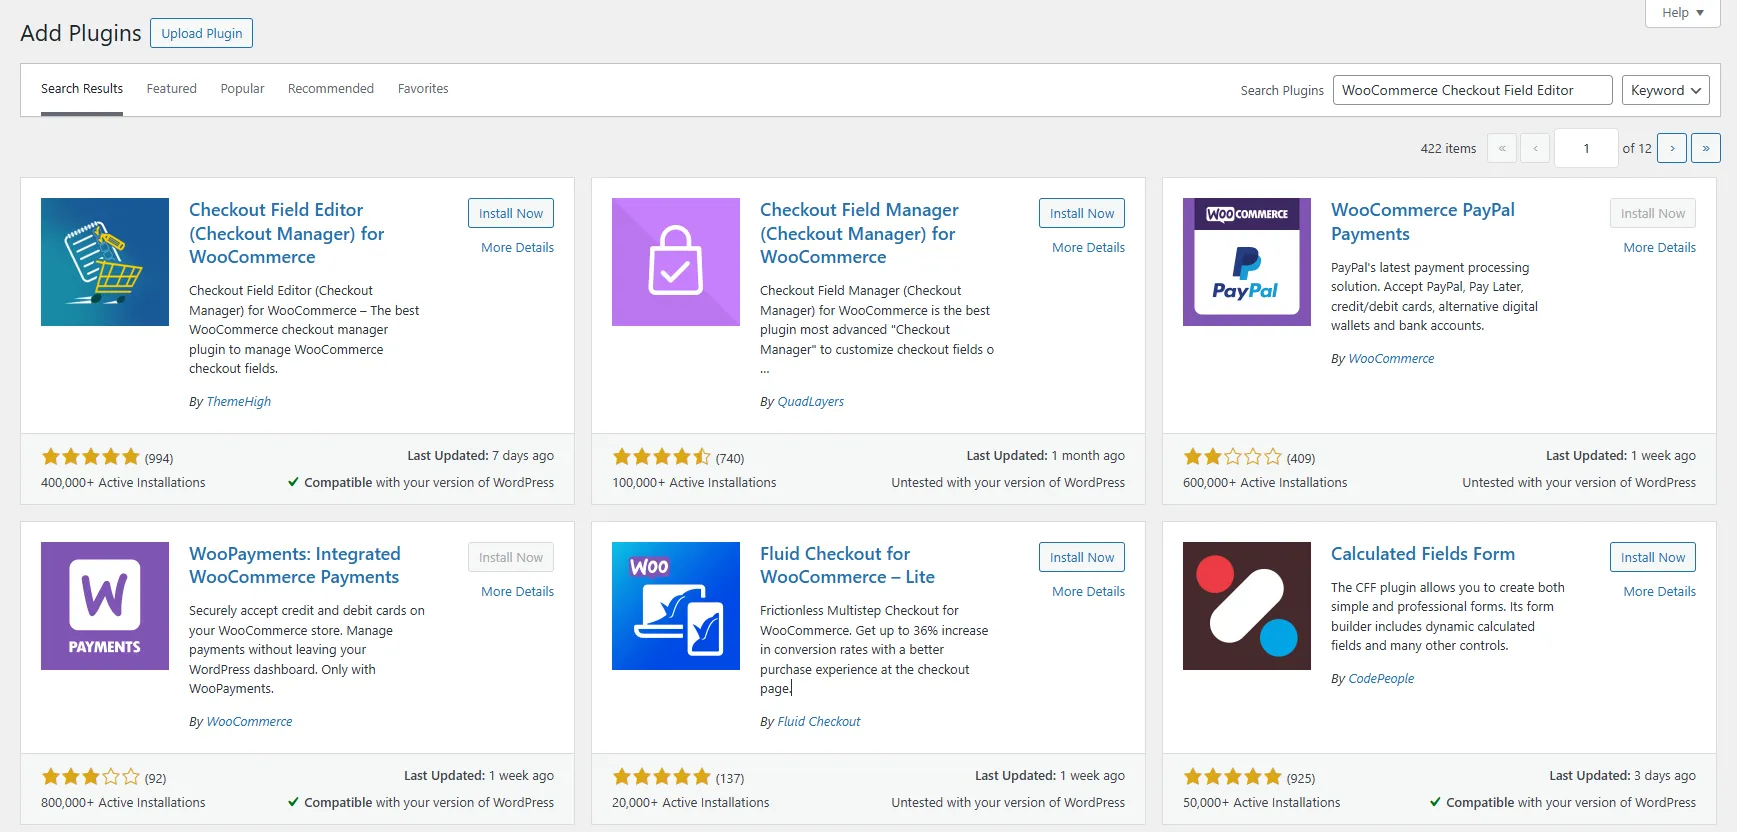
- Click Install and then Activate.
Once activated, most plugins can be accessed under WooCommerce > Settings or have their own dedicated section in the WordPress menu.
Step 3: Customize the checkout fields
You can now use the plugin to:
- Add new fields, such as gift messages or delivery preferences.
- Edit existing fields, like renaming “Company Name” to “Business Name” or making the “Phone Number” field optional.
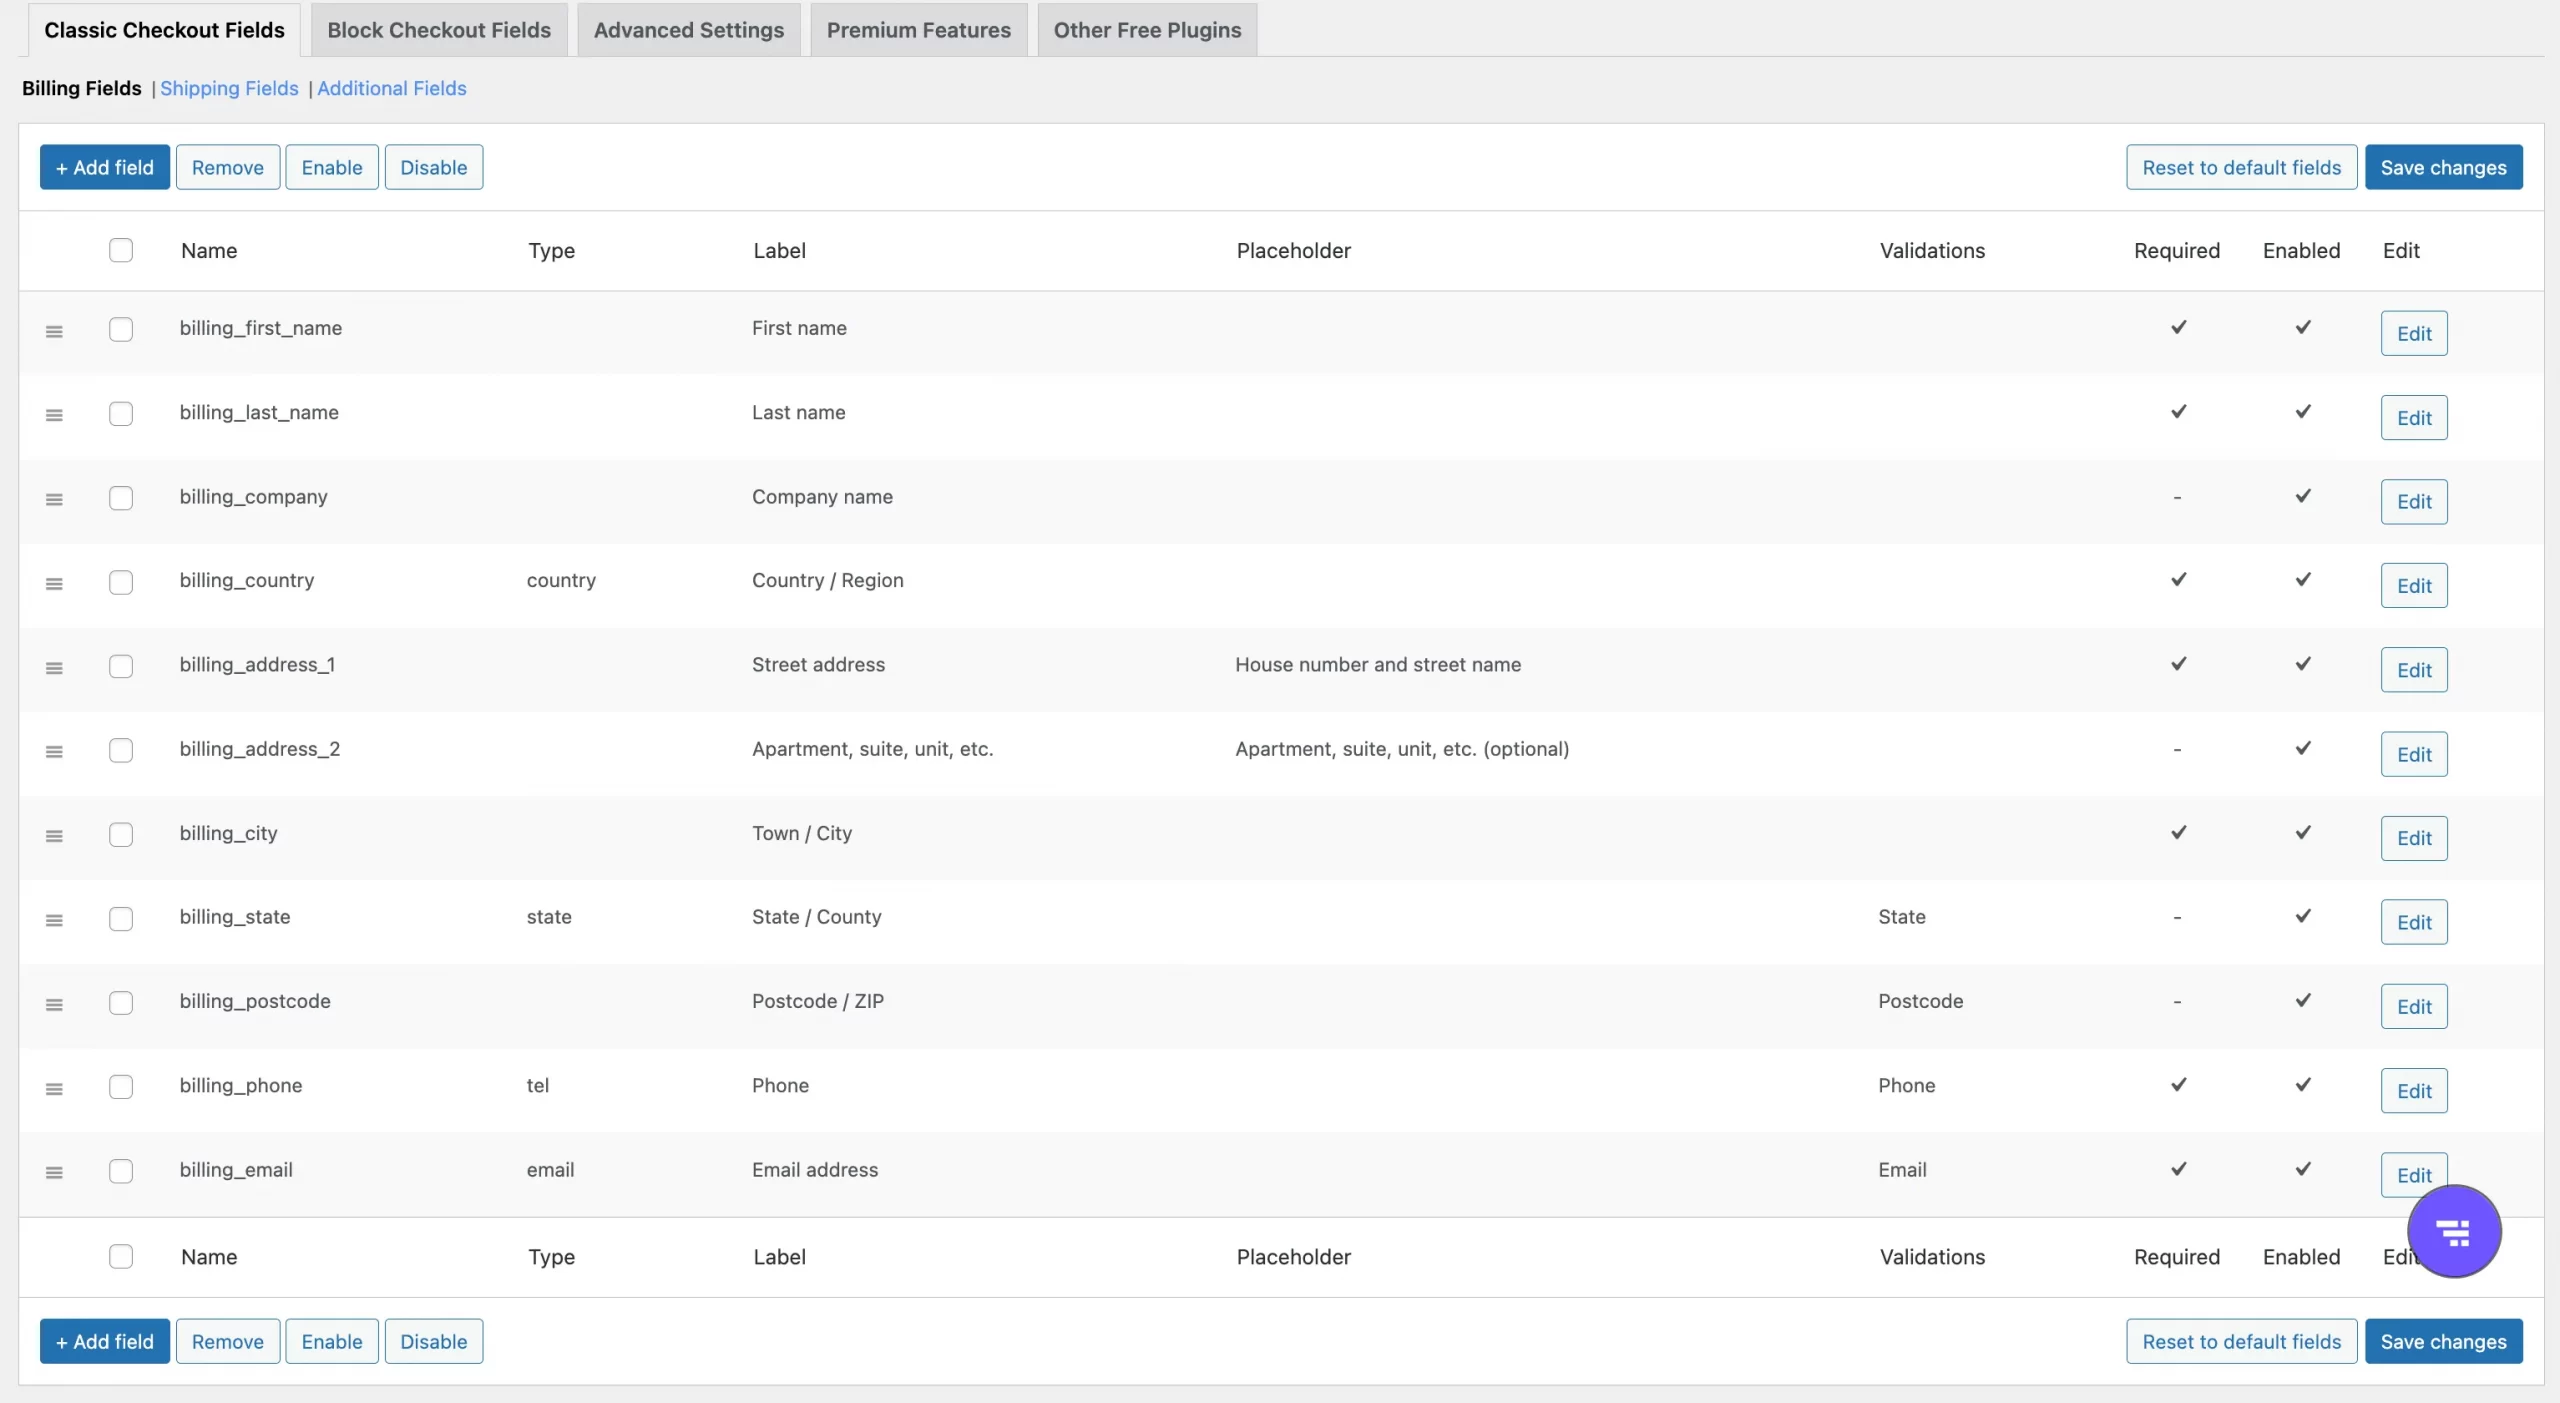
- Rearrange fields to improve the flow of the checkout process.
- Remove unnecessary fields, such as “Shipping Address” for digital products.
This is optional, but do you want to make your WooCommerce checkout page more fancy? Many plugins let you set up conditional logic, which means certain fields will only appear based on what the customer selects.
For example:
- If a customer chooses “Yes” for gift wrapping, a “Gift Message” field could appear.
- Delivery instructions might pop up only if a specific shipping method is selected. These options are usually found in a “Conditions” tab, and they’re super intuitive to set up.
Before making your changes live, preview your checkout page. This ensures everything looks great and works as expected. If you’ve added conditional fields, test different scenarios to make sure they behave as planned.
Step 4: Save and display on the checkout page
Once you’re satisfied with your changes, save your settings. The updated checkout form will now be live on your store.
Seamlessly migrate to WooCommerce!
LitExtension can safely transfer your products, customers, and orders to unlock more growth on WooCommerce.

How to Customize WooCommerce Checkout Fields Using the Checkout Block
Since WooCommerce 8.3 (released in November 2023), the WooCommerce Checkout Block has become the default checkout experience for all new stores using block-based themes. It offers a modern, conversion-focused layout, better mobile responsiveness, and easier visual customization — without touching PHP.

In this section, we’ll walk you through how to set up, configure, and customize the Checkout Block step by step.
Step 1: Insert or replace the Checkout Block
If you’re starting a new store, the Checkout Block is likely already in place. But if you’re upgrading from an older WooCommerce site, here’s how to make the switch:
- Go to Pages > Checkout in your WordPress admin.
- If the page contains the shortcode
[woocommerce_checkout], delete it. - Click the + (Add Block) button and search for “Checkout”.
- Insert the Checkout Block into the page and click Update.
- Go to WooCommerce > Settings > Advanced and confirm this page is selected as your Checkout page.
Tip: If your site is using a block theme (like Storefront or Twenty Twenty-Four), the Checkout Block will automatically inherit the site’s visual styles.
Step 2: Customize Checkout Fields in the Block Editor
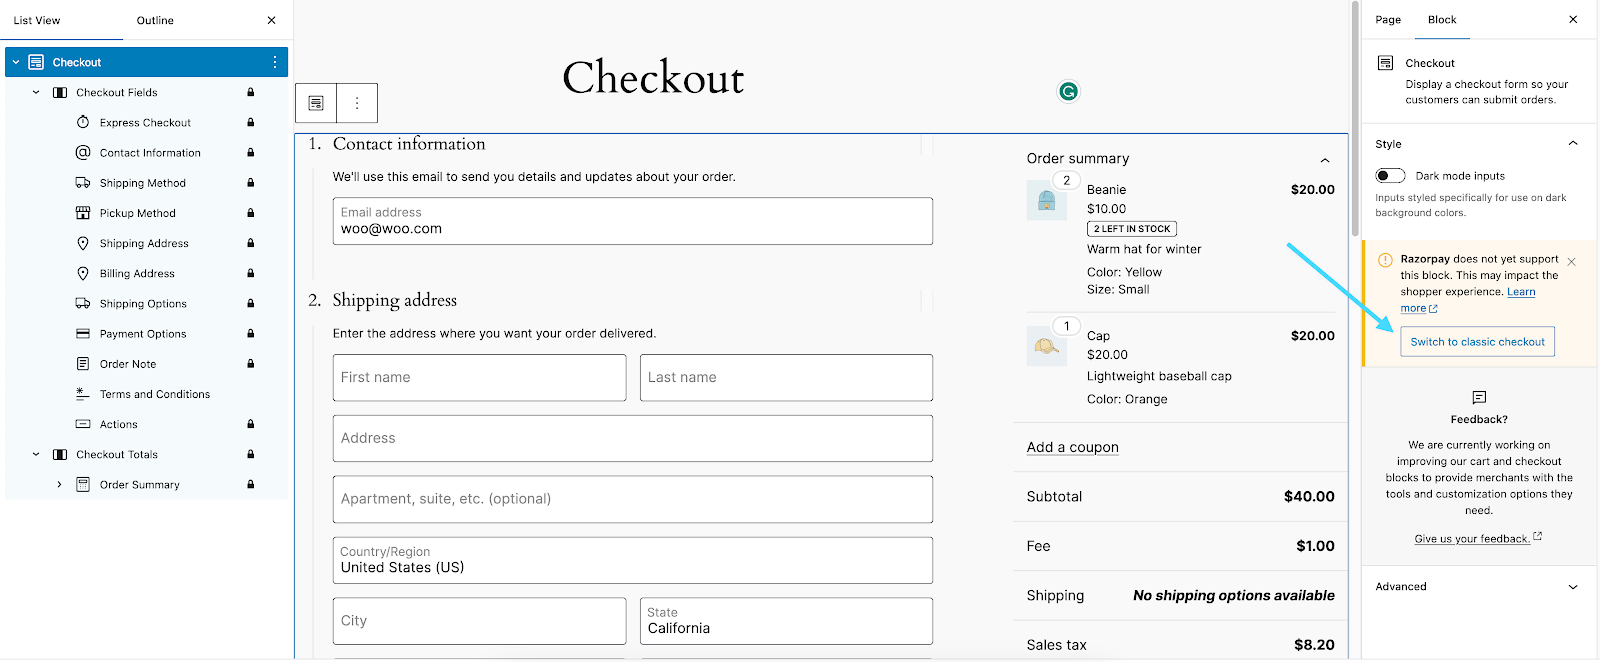
Once the Checkout Block is active, click into it to view its internal structure. You’ll see two main parts:
- Checkout Fields block – where users enter billing and shipping details
- Checkout Totals block – where the order summary and payment total appear
To begin customizing:
- Open the List View (top-left corner of the editor) to view the inner blocks clearly.
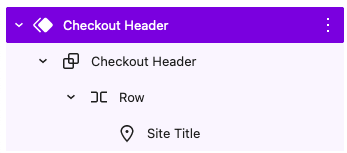
- Select the Checkout Fields block. In the block settings sidebar, you can:
- Show or hide fields like Company Name, Address Line 2, and Phone Number
- Toggle required fields for Address and Phone inputs
- Enable Form Step Numbers to label each section (e.g., Step 1: Billing, Step 2: Shipping)
- Any changes made here will also reflect in the Shipping Address block — they share field logic.
You can also reposition, rename, or visually separate sections using block layout tools like Group, Spacer, or Columns blocks — though inner checkout blocks (like payment options) are mostly locked for structural consistency.
Step 3: Add related blocks to enhance checkout flow
WooCommerce includes several optional blocks that integrate tightly with the Checkout Block. These help create a more complete and user-friendly checkout page.
- Express Checkout block: Displays payment buttons like Apple Pay, Google Pay, and WooPay — shown automatically if supported gateways (e.g., WooPayments) are active.
- Delivery block: Allows users to select between shipping and local pickup. Can be styled to show icons and delivery cost per method.
- Terms and Conditions block: Adds a checkbox for users to accept your store policies before placing an order.
- Actions block: Displays a “Return to Cart” link with a dropdown to choose where users are redirected.
Each of these blocks can be dragged into the checkout flow and configured through the block sidebar.
Step 4: Customize the appearance with CSS
The Checkout Block uses a modern class structure separate from the classic .woocommerce-checkout. If you want to customize field visuals like spacing, background color, or border radius, you’ll need to target:
.wc-block-checkout input[type="text"] {
border-radius: 8px;
background-color: #f9f9f9;
}
Add your custom CSS under Appearance > Customize > Additional CSS or through a child theme stylesheet. You can also adjust layout spacing using padding/margin controls in the block editor if supported by your theme.
Note: The Checkout Block only has one native style toggle — Dark Mode Inputs, which ensures readability if the checkout page is placed on a dark background.
Step 5: Understand compatibility and extension limitations
Not all WooCommerce extensions are compatible with the block-based checkout. If you add a plugin that depends on the classic checkout’s PHP hooks (like woocommerce_checkout_fields), WooCommerce may detect it and automatically display a “Switch to Classic Checkout” option in the sidebar.
Common issues caused by incompatibility include:
- Missing payment methods (“There are no payment methods available”)
- Hidden or broken fields
- Checkout form failing to submit
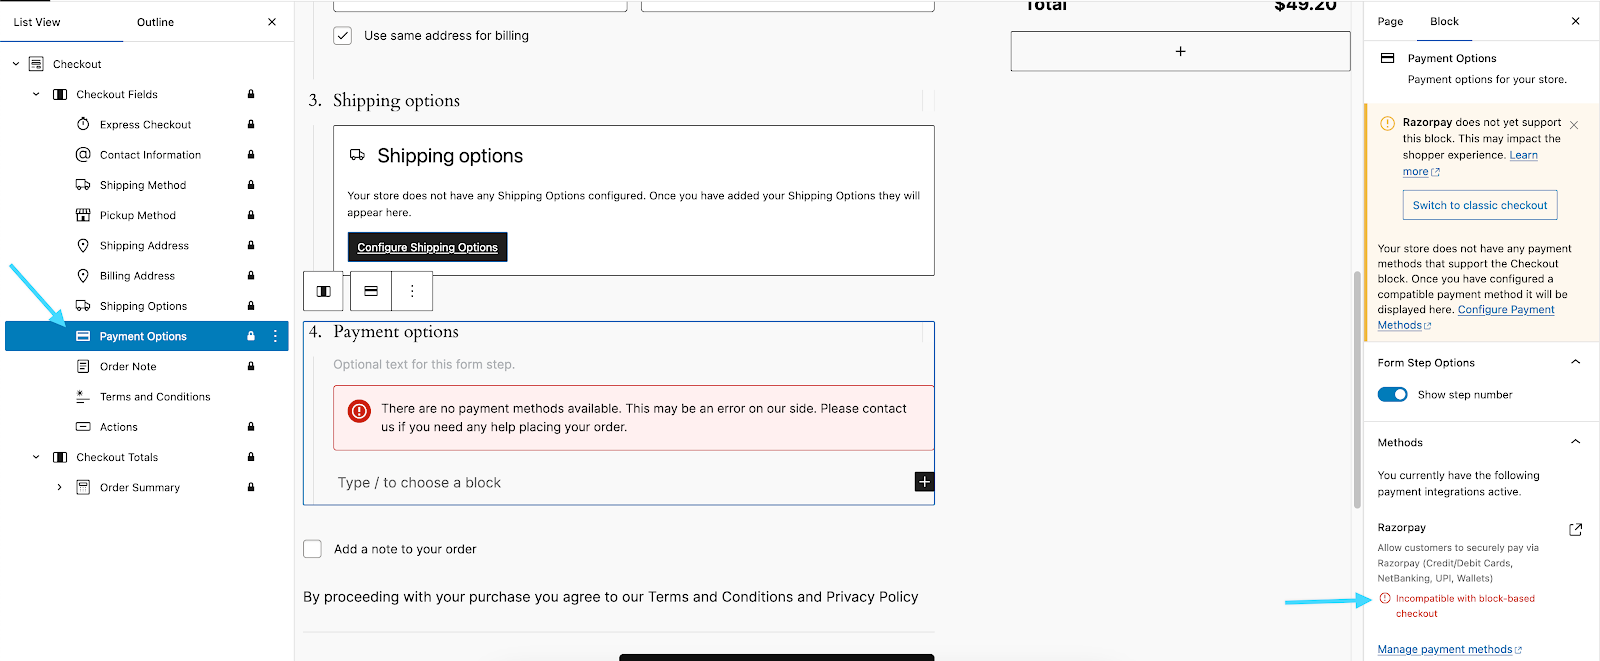
WooCommerce recommends checking the Compatibility section on each plugin’s product page. If a plugin is not marked as compatible, reach out to the plugin developer and ask for support with the Checkout Block.
(Optional) Advanced customization for developers
Unlike the classic checkout form, which is controlled by PHP templates and filters, the Checkout Block is built in React and integrated with the Store API. To extend it (e.g., to add custom fields, custom logic, or third-party integrations), developers must use JavaScript-based extensibility interfaces.
These interfaces are still evolving and require working knowledge of React, components, and WordPress blocks.
How to Customize Specific Areas of the WooCommerce Checkout
Customizing specific areas of the WooCommerce checkout page allows you to focus on improving the experience where it matters most, whether that’s the billing section, shipping details, or payment and review areas. Below, we break down how to tailor each section to your business needs and enhance usability for your customers.
1. Customize billing fields
Billing fields are essential for collecting customer information required for payment and invoicing. However, not all billing fields may be relevant to your store’s specific workflow.
1.1. Add, edit, or remove billing fields
Adding fields:
If you need additional billing details, such as a tax ID for B2B transactions, you can add new fields using plugins or custom code. For example, you can add a “VAT Number” field:
add_filter('woocommerce_billing_fields', 'add_vat_number_field');

function add_vat_number_field($fields) {

$fields['billing_vat_number'] = array(

'label'       => __('VAT Number'),

'placeholder' => __('Enter your VAT number'),

'required'    => false,

);

return $fields;

}
Editing fields:
You can rename or rearrange billing fields to make them clearer or better suited to your needs. For example:
- Change “Billing Address Line 1” to “Street Address.”
- Move the “Email Address” field to the top for better visibility.
Removing fields:
To simplify the checkout process, remove unnecessary fields such as “Company Name” for stores that don’t target businesses. For example:
add_filter('woocommerce_billing_fields', 'remove_billing_fields');

function remove_billing_fields($fields) {

unset($fields['billing_company']);

return $fields;

}
1.2. Display billing field data on order pages
Ensure that new billing fields are visible in the admin order details and customer-facing invoices by using the appropriate WooCommerce hooks (e.g., woocommerce_admin_order_data_after_billing_address).
2. Customize shipping fields
Shipping fields are critical for businesses dealing with physical products, but they can be unnecessary for digital goods or services.
2.1. Add or remove shipping address fields
To adjust shipping address fields:
- Adding fields: Add custom shipping fields like “Preferred Delivery Time” to accommodate customer requests.
- Removing fields: For digital products, disable the entire shipping section to streamline checkout.
In case you’re using a plugin, you can use the WooCommerce Checkout Field Editor plugin to toggle shipping fields on or off based on product types.
2.2. Enable or disabling shipping at checkout
You can enable or disable shipping fields dynamically:
- For all digital products: Automatically hide shipping fields when the cart contains only downloadable products.
- Conditional shipping fields: Show shipping options like “Gift Wrap” or “Pickup Address” only when applicable.
3. Customize payment and review fields
The payment and review section is the final step where customers confirm their order, so it’s crucial to keep things clear and easy to navigate. A confusing or cluttered setup here can lead to abandoned carts, but a well-designed one can build trust and boost conversions.
3.1. Add custom options in payment fields
If you offer multiple payment methods, you can make the experience more tailored by adding specific instructions or preferences. For example, let’s say you offer “Bank Transfer” as a payment option. You could add a custom field like “Payment Notes” where customers can provide any additional details, such as a reference number or special instructions for the transfer.
Here is an example code for payment notes:
add_filter('woocommerce_checkout_fields', 'add_payment_notes_field');

function add_payment_notes_field($fields) {

$fields['order']['payment_notes'] = array(

'type'        => 'textarea',

'label'       => __('Payment Notes'),

'placeholder' => __('Enter any special instructions related to payment'),

'required'    => false,

);

return $fields;

}
3.2. Optimize the review section
The review section is where your customers take a final glance at their order before clicking “Place Order.” It’s your last chance to make sure everything is crystal clear, easy to understand, and free of confusion.
Here’s how you can do it:
- Ensure the basics, like product names, quantities, and prices, are displayed clearly.
- Draw attention to the things that matter most, like discounts, shipping fees, or taxes.
- Include a checkbox for customers to confirm terms and conditions to keep things professional and ensure compliance.
WooCommerce Checkout Fields: FAQs
Where are WooCommerce checkout fields?
WooCommerce organizes checkout fields into the woocommerce_checkout_fields array, which is divided into:
'billing'– fields related to billing information'shipping'– fields related to shipping details'order'– custom notes or extra instructions
When editing via code, you interact with these arrays to add, remove, or edit fields. If you're using a plugin or the Checkout Block, these fields are managed visually via plugin settings or block editor panels.
How do I customize my WooCommerce checkout field?
There are two main ways:
- Using Code – Add filters and actions in your functions.php file (or a snippet plugin). This gives full control, including adding, removing, or modifying fields using hooks like
woocommerce_checkout_fields. - Using a Plugin – Tools like Checkout Field Editor for WooCommerce allow you to visually manage checkout fields without writing code. You can drag and drop fields, change labels, make fields required or optional, and even set conditional logic.
If you're using the Checkout Block (WooCommerce 8.3+), field visibility and requirements are handled via the block editor sidebar.
Can I create conditional fields in WooCommerce checkout?
Yes, but the method depends on how you're customizing:
- Using code: You’ll need to use PHP and JavaScript. PHP adds the field, and JavaScript shows/hides it based on other field values (e.g., display “Gift Message” only if “Gift wrap” is selected).
- Using a plugin: Many plugins like Checkout Field Editor Pro or WooCommerce Checkout Manager include built-in conditional logic for showing/hiding fields.
Block-based Checkout currently has limited support for conditional logic unless handled by a compatible plugin or custom block extension.
Do WooCommerce checkout field changes affect email receipts or admin orders?
They can — but only if the custom field is properly saved and hooked into order metadata. To display custom fields in:
- Emails: Use
woocommerce_email_customer_detailsor similar filters
Admin order page: Use woocommerce_admin_order_data_after_billing_address
Most field editor plugins allow you to toggle visibility for admin, customer emails, and order exports.
Is the Checkout Block required in WooCommerce now?
No, it's only for new sites using block-based themes (from version 8.3+). Older stores using classic themes can continue using the shortcode-based checkout form. WooCommerce provides the option to switch back to classic checkout if needed — especially when a plugin is incompatible.
Final Words
Customizing WooCommerce checkout fields plays a critical role in shaping the checkout experience and improving conversion performance. A cluttered or confusing form can create friction, while a streamlined, relevant layout builds trust and drives more completed orders.
WooCommerce gives you the tools to take control—through code, plugins, or the block-based Checkout. Each method has its own strengths:
- Code offers complete flexibility for developers.
- Plugins make it easy to add, edit, or reorder fields visually.
- Checkout Blocks introduce a modern structure, optimized for mobile and guided flows.
Before going live, always test changes thoroughly, check for extension compatibility, and keep your checkout experience focused and distraction-free.
We hope you found this article insightful and now have a clear understanding of WooCommerce checkout fields. For more content like this, be sure to visit the WooCommerce blog section and join our eCommerce community to gain further insights and connect with fellow business owners.

