If you've made it to this Squarespace tutorial, there's a high chance that you take an interest in Squarespace or you're about to build up a website on Squarespace. Whatever the reason has brought you here, congratulations as you've landed on the right place! Believe us, you're not going to find this comprehensive Squarespace tutorial elsewhere on the Internet.
In this article, LitExtension – #1 Shopping Cart Migration Expert will give you a detailed setup guide with the following steps:
- Step 1: Getting Started
- Step 2: Choose A Squarespace Template
- Step 3: Set Up A Domain
- Step 4: Adjust Design & Branding For Squarespace Website
- Step 5: Edit Squarespace Website
- Step 6: Optimize Squarespace Website
- Step 7: Publish To Make Your Squarespace Website Live
Without further ado, let’s get this show on the road!
Squarespace Tutorial: Getting to Know Squarespace
All in all, Squarespace provides a fairly intuitive and user-friendly dashboard that allows you to manage your website efficiently. Below are some top features you should know; keep scrolling through our Squarespace tutorial:
1. Switching between websites and domains

Managing multiple websites and domains can get confusing; fortunately, Squarespace makes it easy to switch between them seamlessly. To switch between your websites and domains:
- Log into your Squarespace Account Dashboard.
- Then, click on the “Dashboard” tab to manage websites or the “Domains” tab to access your Squarespace-purchased domains.
- After that, select the website you want to work on from the list.
2. Managing your website's pages
Your website's pages are fundamental to its structure, and keeping them organized and up-to-date is crucial for smooth navigation and user experience. With Squarespace, you have full control over adding, editing, and reorganizing pages to ensure your content is always well-structured:
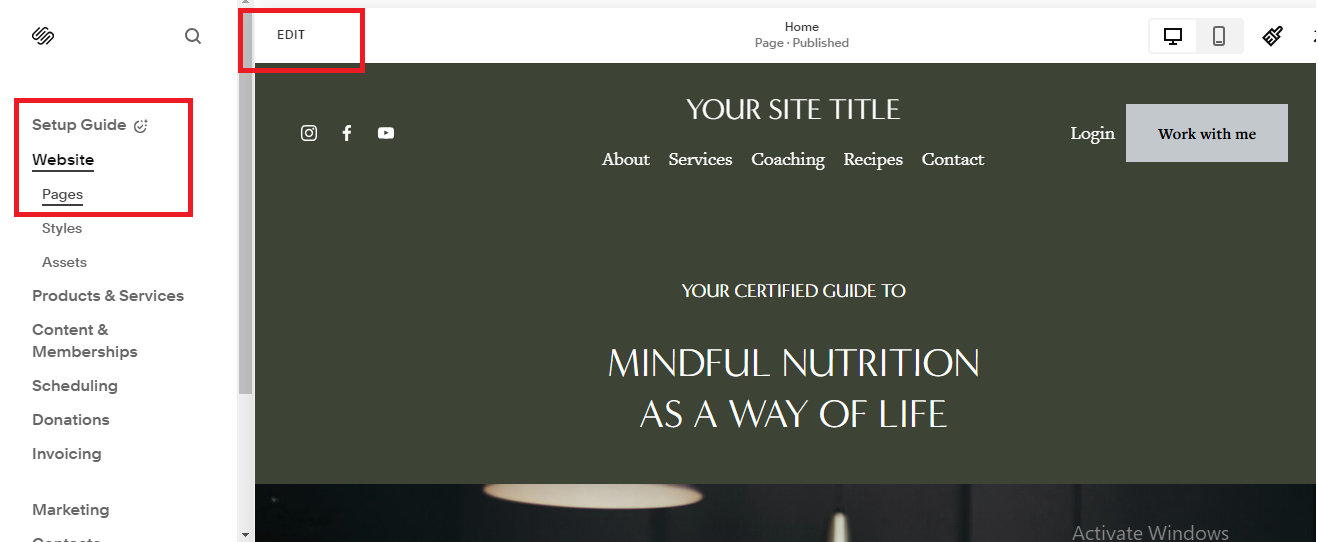
- First, navigate to “Website” > “Pages” from the left sidebar.
- Once done, hover over a page name and click the gear icon to access its settings.
- Next, click the “Edit” button to make content changes directly.
- After that, drag and drop pages to rearrange them in your site's navigation.
3. Customizing its styles
We all know a beautiful website design will likely make a strong impression on visitors. As of this writing, Squarespace allows you to align your website with your brand identity, from colors and fonts to buttons and overall layouts:
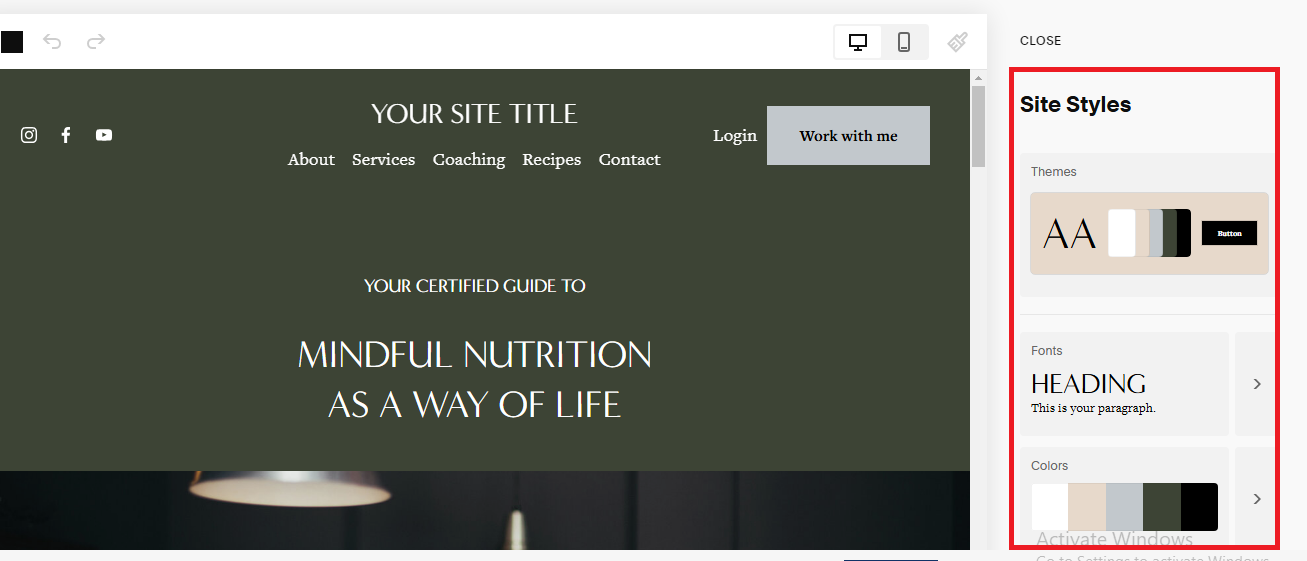
- Click on “Website” > “Styles” from the left sidebar.
- Next, use the paintbrush icon in the top-right corner to quickly adjust fonts, colors, buttons, and more.
- Then, preview changes in real-time and ensure consistency across your site.
4. Adding and editing sections
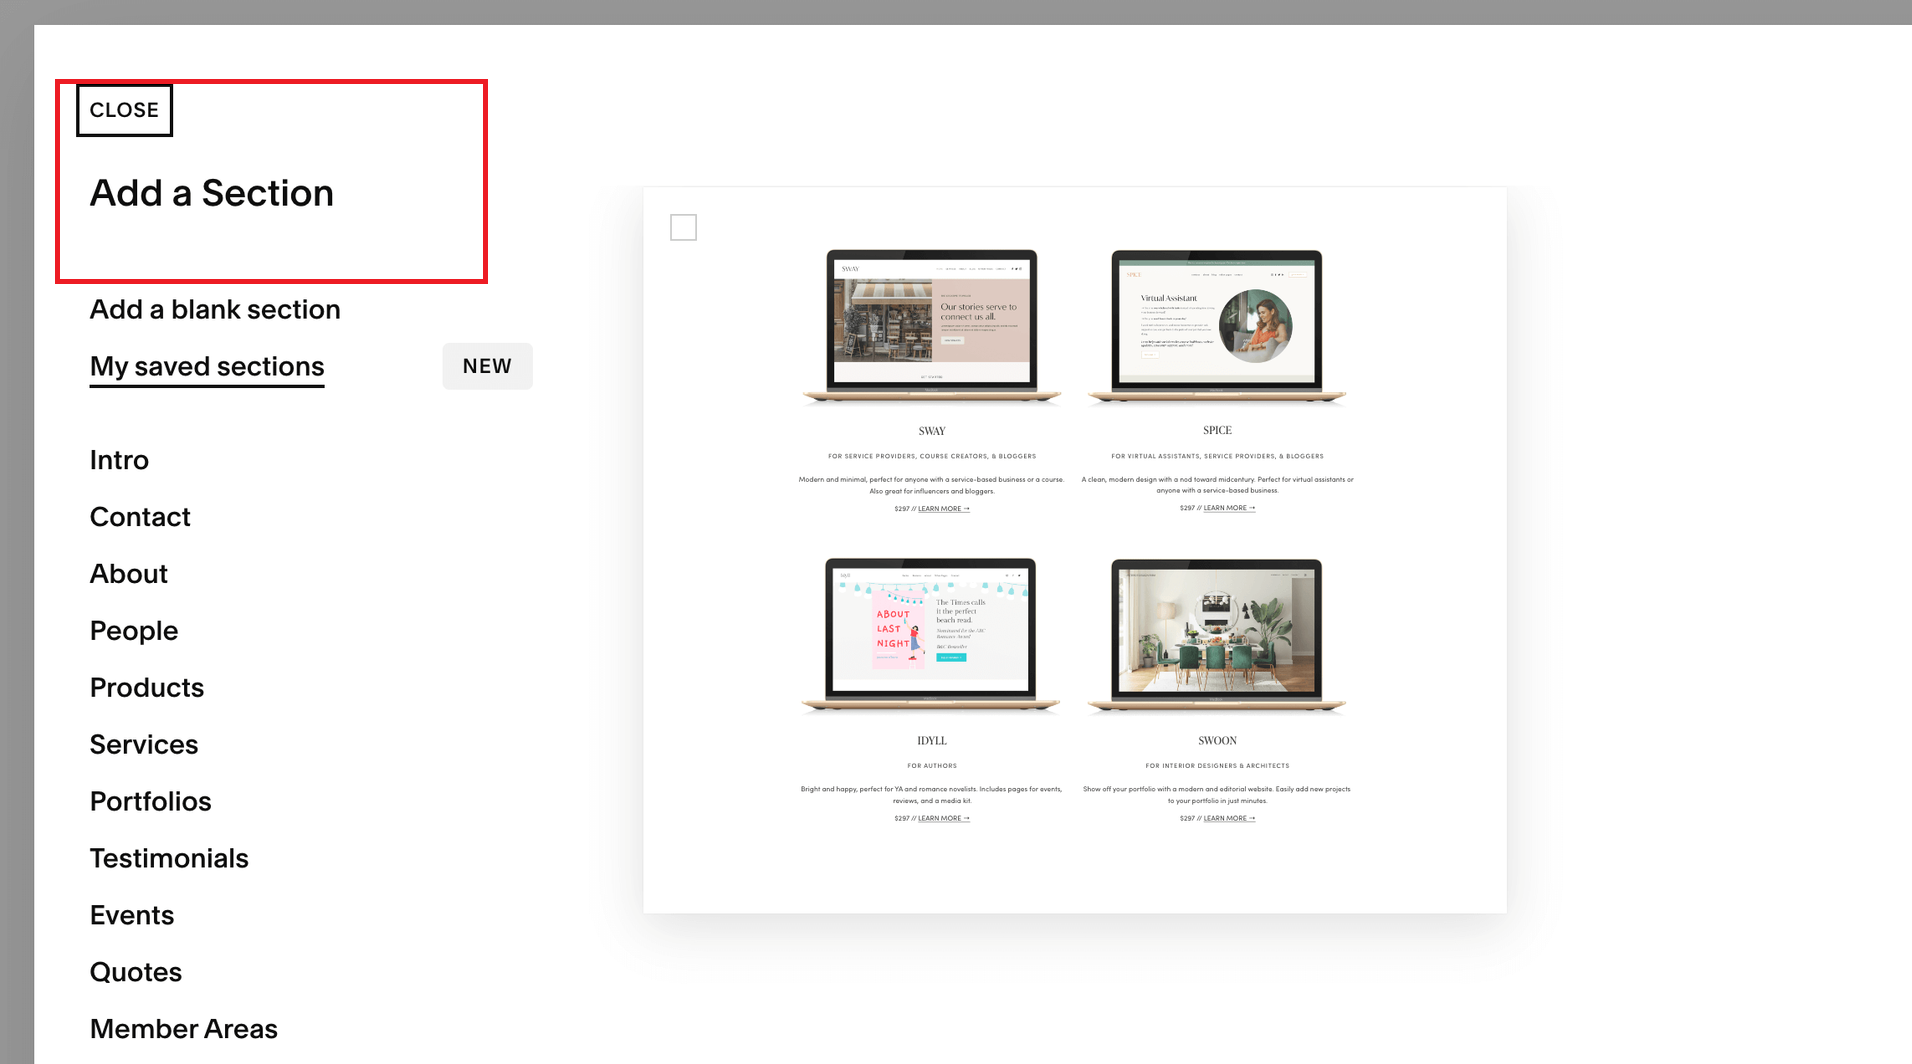
With website sections and a clean layout, you can structure your content in a visually more appealing and functional way. After clicking “Edit” in the top-left corner of the page, you can:
- Look for the blue “Add Section” button to insert a new section.
- Choose from blank sections or pre-designed layouts.
- Click the pencil icon on a section to adjust the size, background, alignment, and spacing.
5. Using the fluid engine grid for layout adjustments
As the name “Fluid Engine” suggests, the grid-based system lets you easily drag and position content blocks for a better and more balanced design, even if you have no coding experience.
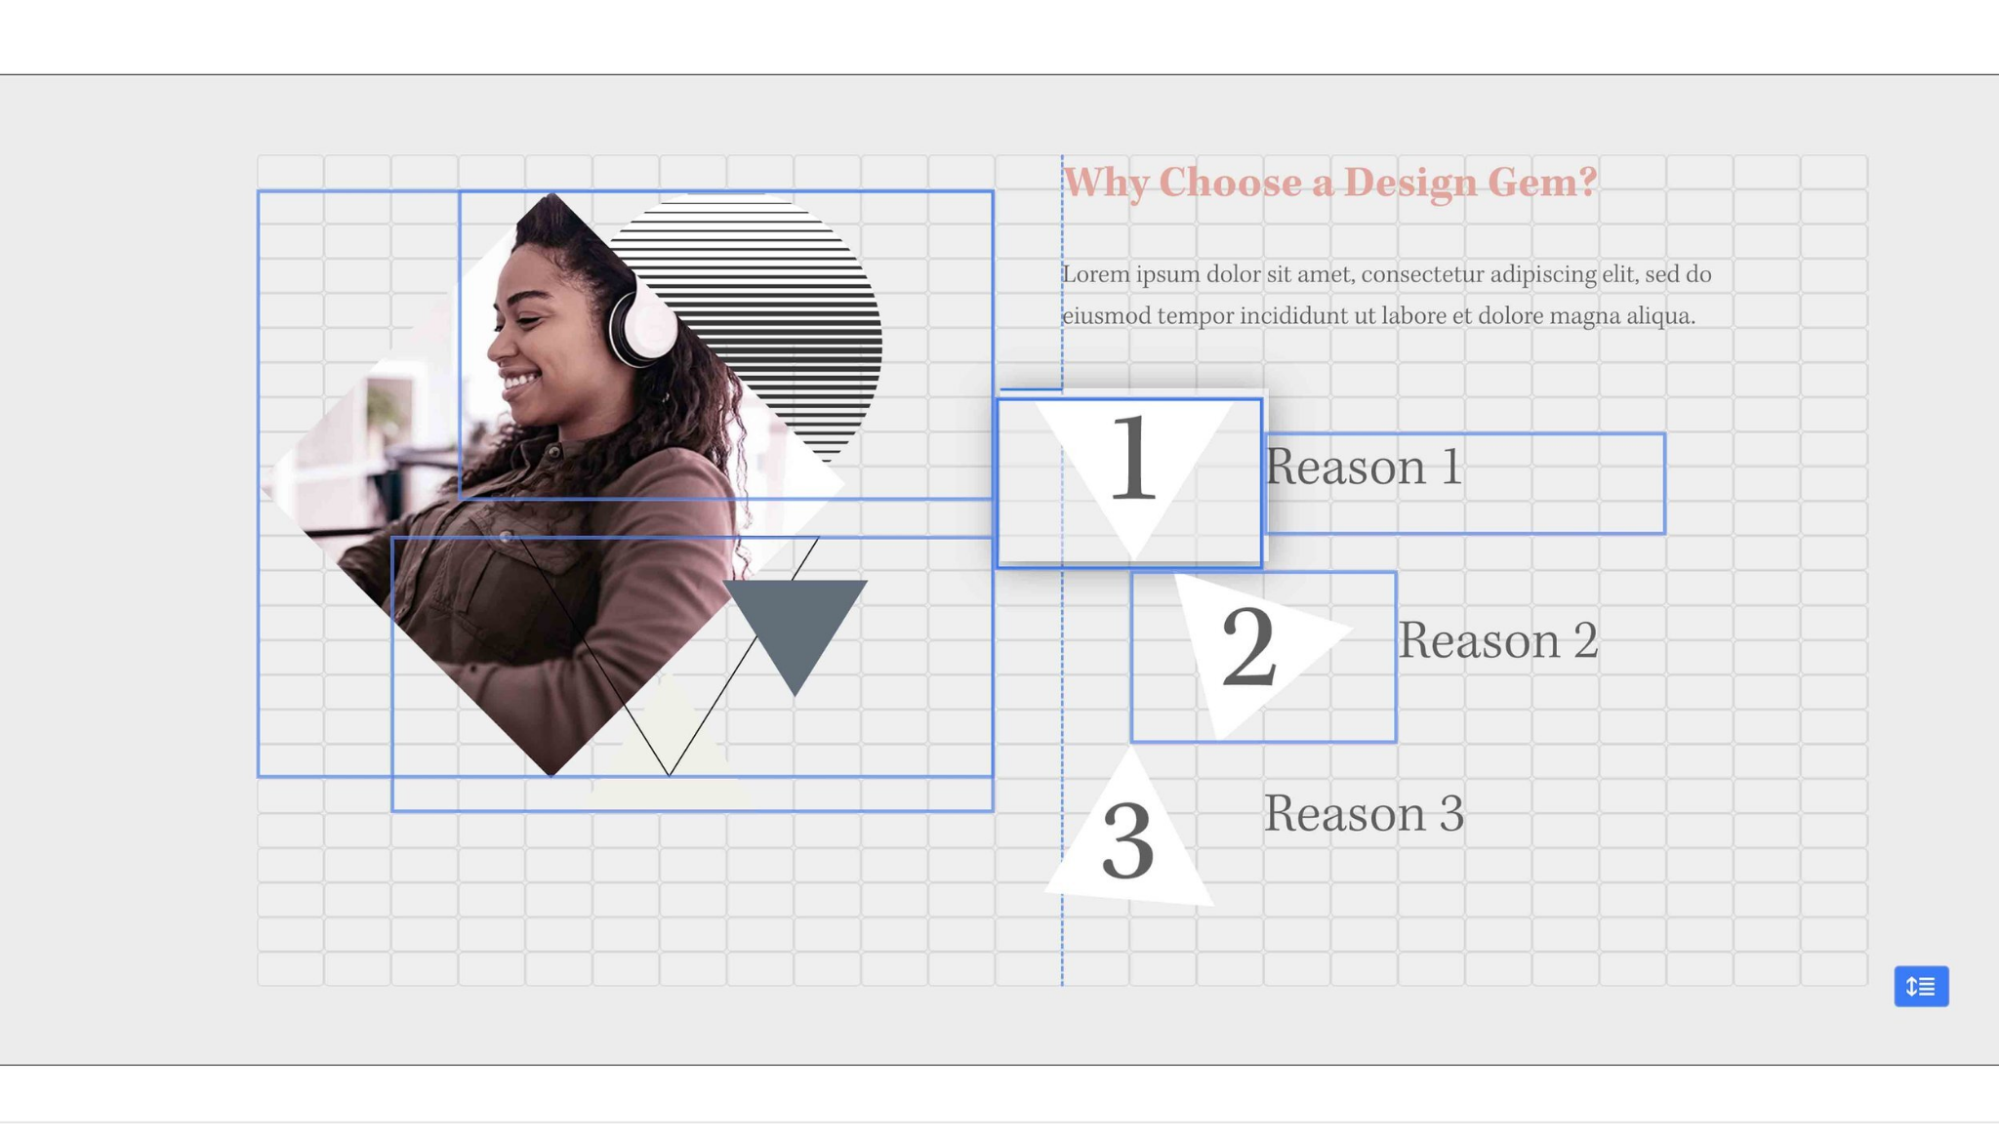
Simply press the ‘G' key to reveal the grid system, then:
- Drag and drop blocks (text, images, buttons) along the grid to adjust placement.
- Adjust grid settings in “Edit Section” > “Content Tab”
- Customize row count and spacing for a tailored layout.
6. Managing SEO settings for pages
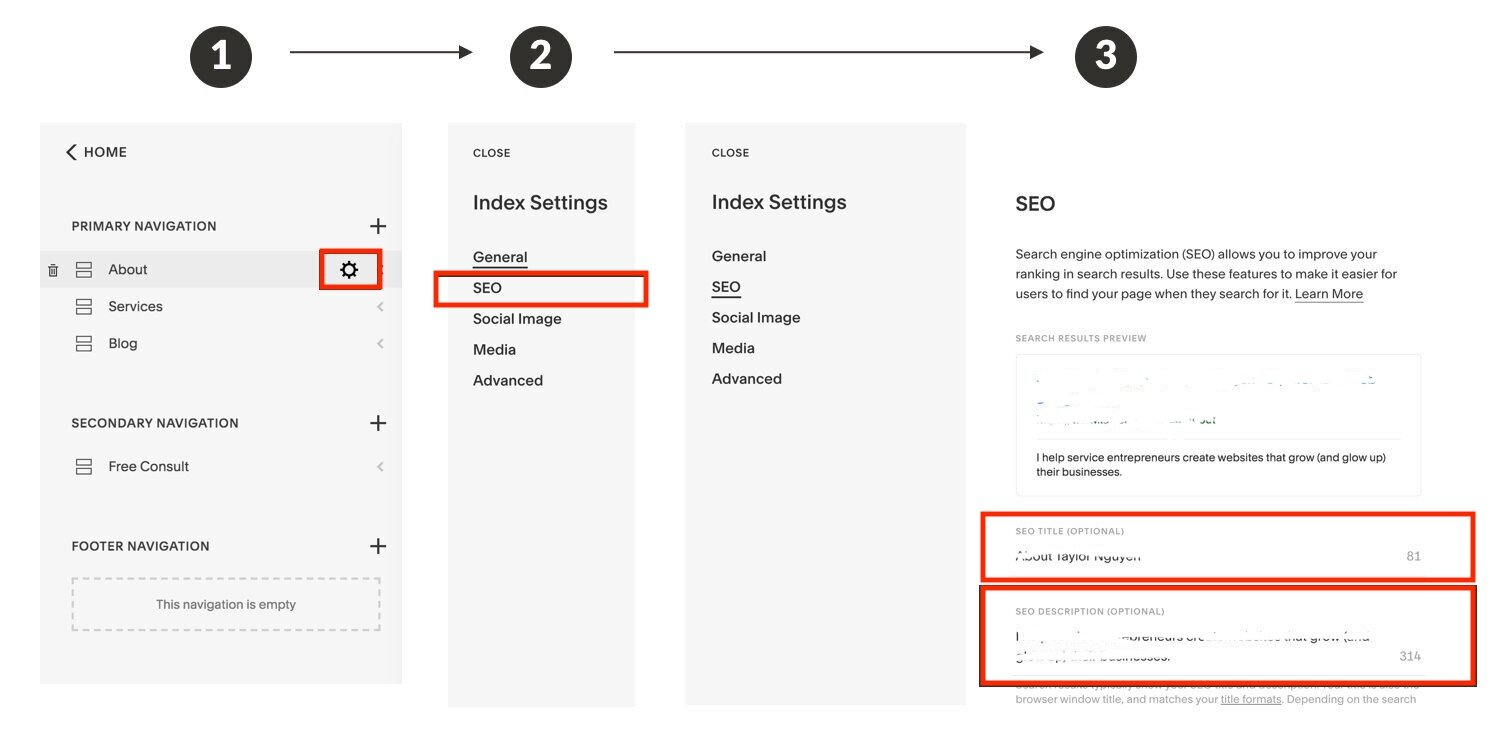
Want more people to find your website on search engines? Squarespace has built-in SEO tools that help improve your visibility without requiring technical knowledge! Let us tell you how to utilize it:
- First, go to “Website”> “Pages”.
- Next, click the “gear icon” next to the page you want to optimize.
- Then, open the “SEO” tab and enter a meta description and custom SEO title to better define your page for search engines.
- Finally, upload a social image under the “Social” tab to make your page visually appealing when shared online.
7. Adding a blog page and publishing posts
A blog is a great way to share updates and educate your audience (not to mention improve your website's SEO along the way). The great news is that Squarespace makes it very simple to set up and publish blog posts.
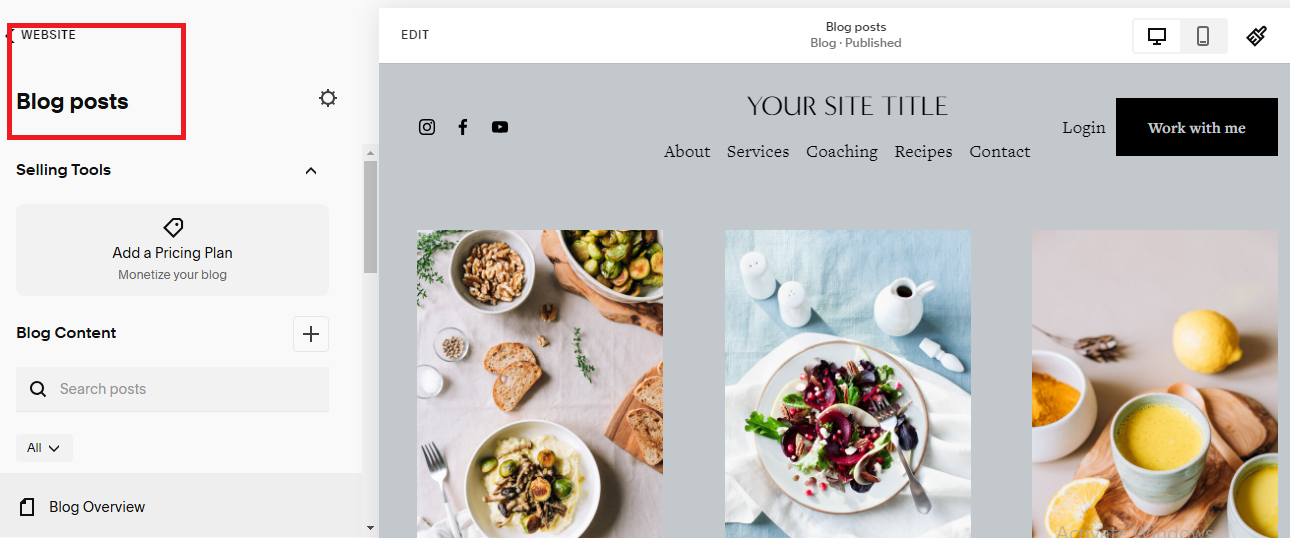
You only need to:
- Navigate to “Website” > “Pages.”
- Next, click the “+” button and select “Blog” to add a new blog section.
- Then, open the “Blog” page and click the “+” button to create your first post.
- Once done, use the editor to write your content, insert images, and format everything before publishing.
8. Integrating email marketing and pop-ups
No matter your business size, don't forget to engage with your audience beyond your website, particularly using Squarespace's built-in marketing tools to capture leads and stay connected with visitors. To set up email marketing and pop-ups:
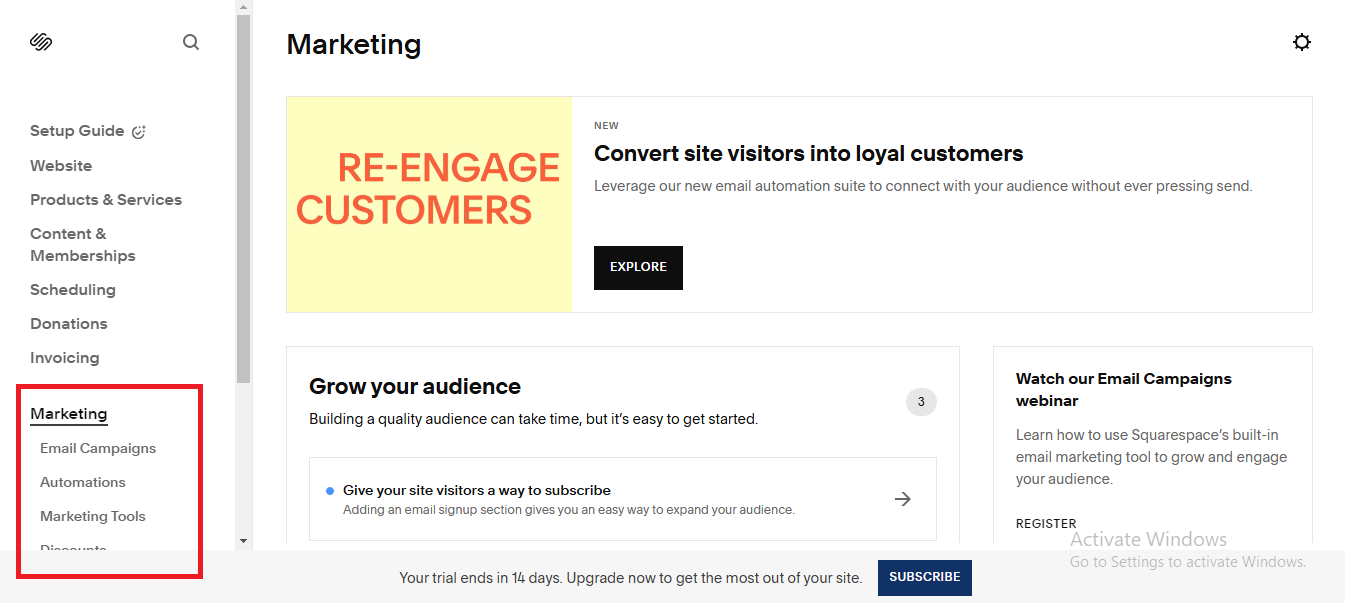
- First, go to “Marketing” from the sidebar.
- Next, configure “Email Campaigns” to start sending newsletters.
- Then, create “Promo Pop-Ups” and “Announcement Bars” to display important messages or promotions on your site.
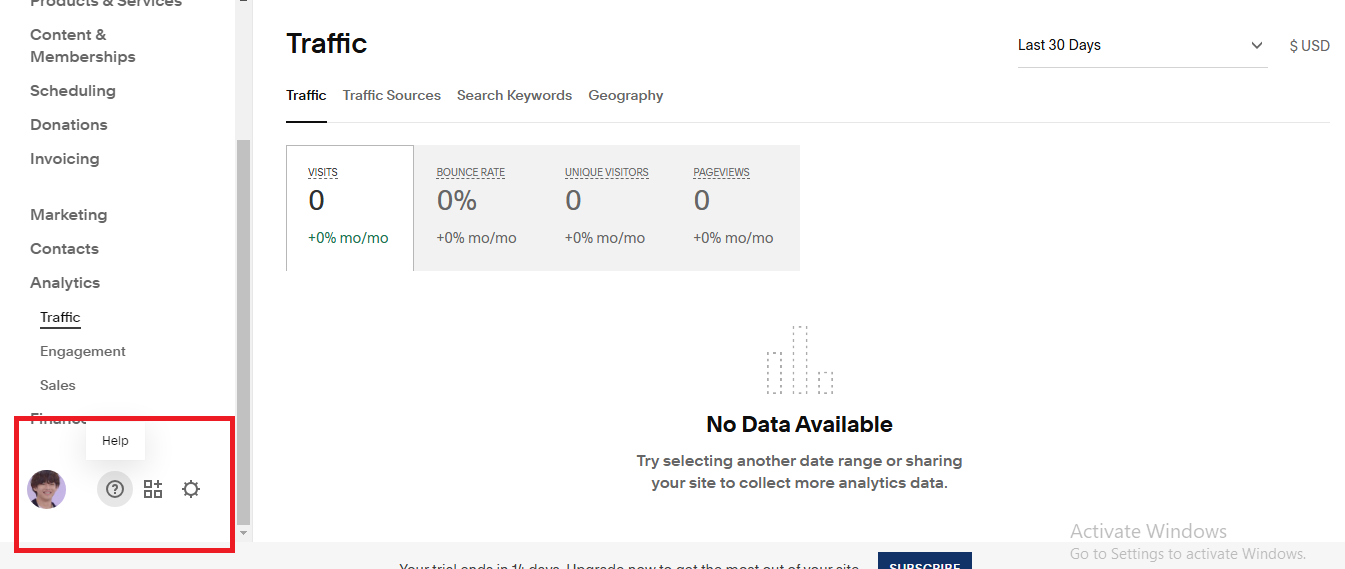
9. Tracking website analytics

Making smart, informed decisions is virtually impossible if you don't even have a clue about how visitors interact with your site. We highly recommend you leverage Squarespace's detailed analytics dashboard for this by completing the following:
- First, click “Analytics” in the sidebar.
- Next, explore insights such as traffic sources, conversion rates, and visitor engagement.
- Then, use the reports to refine your content, marketing strategy, and site performance.
10. Accessing help and tutorials
Obviously, even the most experienced users need guidance from time to time. But there is no need to worry too much; Squarespace does offer various support options to help you navigate challenges and learn new features:
- Click the “?” icon at the bottom of the sidebar.
- After that, press the “/” key to quickly search for any setting or feature.
- Finally, browse Squarespace's Help Center, where you'll find guides, FAQs, step-by-step tutorials, and more.
Squarespace Tutorial: How to Set up your Squarespace Website
Step 1: Getting Started
1. Signing Up & Tips
First, get access to Squarespace. To register as a Squarespace user, you simply click on the Get started button on the upper-right corner as follows. Then, create your Squarespace account by connecting to your Google or Gmail on desktop and PC.

After that, you will be redirected to the Squarespace theme page. Select a theme to continue.

You’d better not arrange and add content to the storefront right at this step. Instead, please navigate to your Dashboard by hitting the Squarespace logo on the upper left-hand side of the editing page. Then, hover your mouse over the template thumbnail and select Go to Website to continue.

Squarespace will ask you some questions to understand more about your business including your experience, your product category and the number of items you want to display.
There is a list of tasks you need to complete before publishing your store. In this step, we suggest that you should select a subscription plan under your budget. Then, please provide credit card and billing address information to finish the payment.

✨ Here are some tips for signing up for Squarespace:
- You should design your storefront right after choosing one from 4 Squarespace plans
- Squarespace trial allows you to experience the operation of an online store within 14 days. So don’t miss this chance!
- It is more beneficial to opt for an annual subscription because you can save up to 30% each month
2. Defining Site Goal
Determining what goals that your Squarespace website needs to achieve lays a foundation for the success of your online business afterward.
Hence, in this Squarespace beginner guide, we provide you with some crucial questions that will help you define the development orientation of your site:
- What are your target customers and target markets?
- Which type of product does your Squarespace website provide?
- How can marketing campaigns be applied?
- What apps should be installed?
Try to make your goals as specific as possible if you incline towards a long-term business. For instance, when defining your target customer, you can figure out their gender, age, tastes and preferences and what may affect their buying decisions.
In addition, it is of importance to review your plans to make sure that you are in the right direction or whether you should change anything to increase the effectiveness of your business.
Step 2: Choose A Squarespace Template
Dazzling Squarespace website design gives you a chance to build brand awareness and reach more potential customers.
Fortunately, this platform possesses an impressive number of templates, each of which has different look and feel and they serve separate purposes. (check out 12+ best Squarespace templates here). However, you should use the filter function (Type and Topic) to narrow down the selections. Below is an example:

You can preview the template to see how it would look and select Start with this design button once you are satisfied with that theme. More importantly, you can add more than one theme and they all appear in your Squarespace dashboard.
Don’t forget to stick to your goals defined previously when choosing templates. If you are in confusion among several themes, click the heart icon right below to save them into the favorite list. This will help you to arrange your top theme choices for better comparison.
Opting for Squarespace is truly a beneficial decision if you want to create a content-driven website with the support of stunning themes.
Contrary to its direct competitor WIX, Squarespace even allows you to switch the theme after using it for a while (available in version 7.0).
Step 3: Set Up A Domain
Navigate to Home Menu > Settings > Domains > Get a domain and then you will see the Squarespace domain page.

You can customize your domain and check its availability by typing your Squarespace domain name into the search bar. Also, it gives you some catchy suggestions depending on the topic of your store.
In case you already have a domain, in the Settings section, click on Use the domain I own button to transfer or connect it to Squarespace.
Step 4: Adjust Design & Branding For Squarespace Website
The next section of our Squarespace tutorial is design and branding. There is an interactive relationship between these two factors because the way you display your storefront greatly influences the way customers perceive your brand.
Basically, you need to make changes to your store style, header & footer and font & text.
Style
In the editing page, navigate to Design > Site Styles. Here you will see a list of style settings that appear across your entire Squarespace website.

Also, there are undo and redo buttons to preserve your last actions or your last Undo correspondingly. Once you finish, select Done > Save to keep these changes or click on Discard changes if you want to adjust the style differently.
Header & Footer
The Header section of your Squarespace website contains the site title, logo and other elements (social links, social icon size, cart icon size,…). To edit this section, you need to hover over the header of your site preview and click Edit Site Header.

Likewise, scroll down to the bottom section of your site below the page content to edit the Footer. Customers can look for your store’s contact address, social icons, FAQ, subscription and other links to other important information in this section.

Font & Text
Squarespace allows you to change font style, size, colour and spacing in the Site Styles section. Also, it offers more than 600 Google fonts and 1000 Adobe fonts for you to choose from. More importantly, you are able to add a custom font with CSS to Squarespace as well.
Please keep in mind that most changes to a font category like Headings and Paragraphs apply site-wide. This means, when you adjust the font of Heading 1, other text set as Heading 1 across your site will be changed.

To format the text while setting header/paragraph, creating lists or adding indents, you need to expand the Format drop-down menu in the Text Block Editor. All you need to do is to highlight the text you want to format and then use the icons in the toolbar to format the text.

✨ Tips on website design and branding:
- It is advisable to have a specific brand guideline when designing your Squarespace website. A brand guideline may figure out your business title, logo, memo, color tone and the like. This helps you save a lot of time and at the same time ensures consistency across all the pages.
- Another trick for time-saving is uploading all the images into the media library in advance so that they are all ready when you need to use them. For high-quality images, you may be interested in the partnership of Squarespace and Unsplash and Getty Images. So don’t hesitate to take full advantage of these freemium sources!
Step 5: Edit Squarespace Website
1. Add Pages
Being a Squarespace user, you are able to add Layout pages, Collection pages, and Demo pages.
To add these types of pages into your storefront, navigate to Home Menu > Pages. Then click the icon “+” in the Main Navigation section and select Add Page as below.
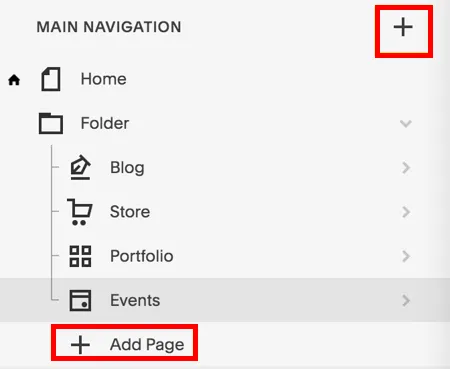
You can either add a Blank Page or one of the other options (Layout, Collection or Demo page) into your site. Next, enter the page title into the text field and press Enter and you’re done.
2. Edit Pages
To edit Pages, hover your mouse over the page title you want to edit and click on the icon to open the Page settings section. Here you can make changes to URL slugs, SEO description and other key elements that directly impact your site ranking.
Beside editing pages’ settings, Squarespace also enables you to rearrange or delete pages.
- To rearrange your site navigation, you just need to drag and drop the pages around your Pages panel.
- If you want to delete unnecessary pages, hover over the page title and click the trash can icon. Notably, you can restore this action within 30 days after deleting them.
Step 6: Optimize Squarespace Website
1. Set Up Squarespace SEO
If you are about to sell something online, you must have been aware of the importance of optimizing your Squarespace website. Understanding the need for better ranking on SERPs, Squarespace ensures all sites are built for clean indexing by search engines. Plus, it provides a comprehensive SEO checklist for its users that help you increase impression and improve conversion rate.
Below is your Squarespace tutorial to set up your site’s SEO:
First, in the editing page, select Marketing > SEO, then you will see some quick links to SEO Checklist, Google Search Keywords, and Hire an SEO Expert as follows. Please note that the Google Search Keyword section allows you to connect with Google or other Search Engines to get the most relevant keywords.

The section right below is where you enter SEO title and SEO site description.
You need to take notice of the character count, which is not too short or too long. The most optimal length should be between 50 and 300 characters only, or else the text will be cut off and not fully displayed on the search result pages.
2. Using Analytics for Squarespace
With Squarespace, you will have the opportunity to avail of built-in integration that connects your site to Google Analytics.
To use analytics for Squarespace, you need to sign up for a Google Analytics account first. Next, add your Google Analytics tracking ID by following the steps below:
- Navigate to Home Menu > Settings > Advanced.
- Select External API Keys.
- Provide your tracking ID in the Google Analytics Accounts Number
- Select Save to finish.
By linking your Squarespace website with Google Analytics, you are able to see reports on Sales, Traffic, Purchase Funnel, Abandoned Cart and more. It may take you up to 24 hours to collect information and show the report results depending on the scale of your eCommerce store. So be patient!

More importantly, Squarespace suggests that you should hide your activity to ensure the accuracy of the data. The reason lies in the fact that Google Analytics considers each time you preview your own pages without hiding your IP address as organic traffic. Therefore, the data from your visits may be mixed with data from your site visitors.
Step 7: Publish To Make Your Squarespace Website Live
To publish your Squarespace website, you need to make it public and allow every visitor to see the site when getting access. All you need to do is to change your site’s availability in the Site Availability settings:
- Navigate to Home Menu > Settings
- Select Site Availability
- Tick on Public > Save
Please keep in mind that only when you purchase a Squarespace plan can you publish your eStore. After that, you can request a reindex from Google or Bing because the automatic index of search engines may last longer than you expect. Also, you need to connect a payment processor to receive payment from your customer orders.
Squarespace Tutorial: How to Edit Squarespace Website
Now, your Squarespace website is ready to enter the eCommerce market quickly and get more sales with powerful built-in features. To continue our Squarespace tutorial, we would like to highlight some tips on using Squarespace seamlessly:
1. Optimize Content
First, put effort into the content you add to your site and how you display them. Besides optimizing SEO title, tags, meta descriptions, and the like, eye-catching heading and text are what keep your customers returning to your store. Also, the way you convey messages to your customers via posts, blogs,…is the signature that differentiates your store from other competitors.
2. Update Squarespace on a Regular Basis
Second, schedule a plan to update your Squarespace storefront and upload daily weekly or monthly blogs. This helps you to keep your site up-to-date and increase brand authority. So don’t forget to stick to it!
3. Don't Underestimate The Power of Social Media
Connecting your site to other social media is another tip to boost your store revenue. By doing this, you can introduce your products to a wider range of audiences domestically and even internationally. Simply use the social icon and link it to Facebook, Instagram, Twitter, and more.
4. Take Advantage of Squarespace's Built-in Tools
Try to ease the workload of running an online store by using analytics and other time-saving tools to automate the process of managing your store. Especially, little do these tools operate mistakenly, thus, you can rest assured that everything is well-organized as you wish.
Other Squarespace Tutorials for Further Learning
Aside from our Squarespace tutorial above, you can check out other must-read guides provided by Squarespace itself, such as:
- Getting started with your Squarespace website: A step-by-step introduction to Squarespace, walking you through choosing a template, adding pages, and customizing your site's design. Perfect for beginners who want a smooth setup experience.
- Choosing the right Squarespace plan: Not sure which plan fits your needs? This guide breaks down the features of each plan to help you decide whether a personal site, business page, or online store is the best fit.
- The Home menu: Here's your chance to learn how to navigate Squarespace's dashboard, manage settings, and access essential tools for building and optimizing your website.
- Publishing or hiding your site: Not ready to go live yet? No worries; this guide explains how to keep your site private, restrict access, or confidently hit “publish” when the time is right.
And what if you are still looking for a Squarespace tutorial that can take your skills to the next level? In that case, Squarespace Circle (designed for designers, developers, and agencies) is the place to be. It offers exclusive learning resources, live webinars, extended trial periods, and early access to new features. Plus, you'll join a thriving community of professionals who are willing to collaborate to stay ahead of industry trends.
FAQs about Squarespace Tutorial
Is Squarespace easy for beginners?
Yes, Squarespace is beginner-friendly with its drag-and-drop editor, pre-designed templates, and built-in features. However, it may have a learning curve compared to more basic website builders.
What is the disadvantage of Squarespace?
So far, Squarespace still has limited design flexibility and fewer third-party integrations compared to more popular platforms like WordPress.
Does Squarespace have a tutorial?
Yes, Squarespace offers official tutorials through its Help Center and Squarespace Learning, covering everything from setup to advanced features.
Which is better, Wix or Squarespace?
Wix is better for flexibility and ease of use, while Squarespace is ideal for sleek, design-focused websites with built-in tools and structured layouts. All in all, the best choice depends on your needs; check out our Wix vs Squarespace comparison here.
Squarespace Tutorial: Final Words
Among all the factors discussed above, it is quite easy to start your business with Squarespace. We also hope that this Squarespace tutorial has helped you have a better view of “How to use Squarespace”.
As your business grows, you need to delve deeper into different sources to explore another optimal way to rocket your store with Squarespace, which hasn't been covered in this article. So keep following the LitExtension blog to enlighten you about platform reviews, technical tutorials, eCommerce tips, and more.
Besides, you can join our social community where we share the latest trends and news you need to know about the eCommerce industry dynamically.
We wish you best luck on your eCommerce journey!
✨ Other Articles You May Love:
- Squarespace Pricing: Plans, Deals and Additional Cost
- Squarespace Review: Is It Worth Your Money?
- 12+ Best Squarespace Templates for Your Website

