Since Shopify metafields were introduced to Shopify merchants together with Online Store 2.0 back in 2021, they have been around for over 2 years now. However, from our observation, not many store owners on the platform can understand the core nature of metafields Shopify and make the most of them yet.
Therefore, we decided to curate this article to show you all you need to know about this robust yet underrated Shopify feature:
- How to create Shopify metafields
- How to add value to metafields on Shopify
- How to display Shopify metafields on your storefront
- All you need to know about metafields
Let’s dive right in!
How to Create Shopify Metafields
On your Shopify admin dashboard, go to “Settings” > “Click Custom data”. Herein, you will see a list of Shopify metafield types, from products, variants, customers, blogs, etc.
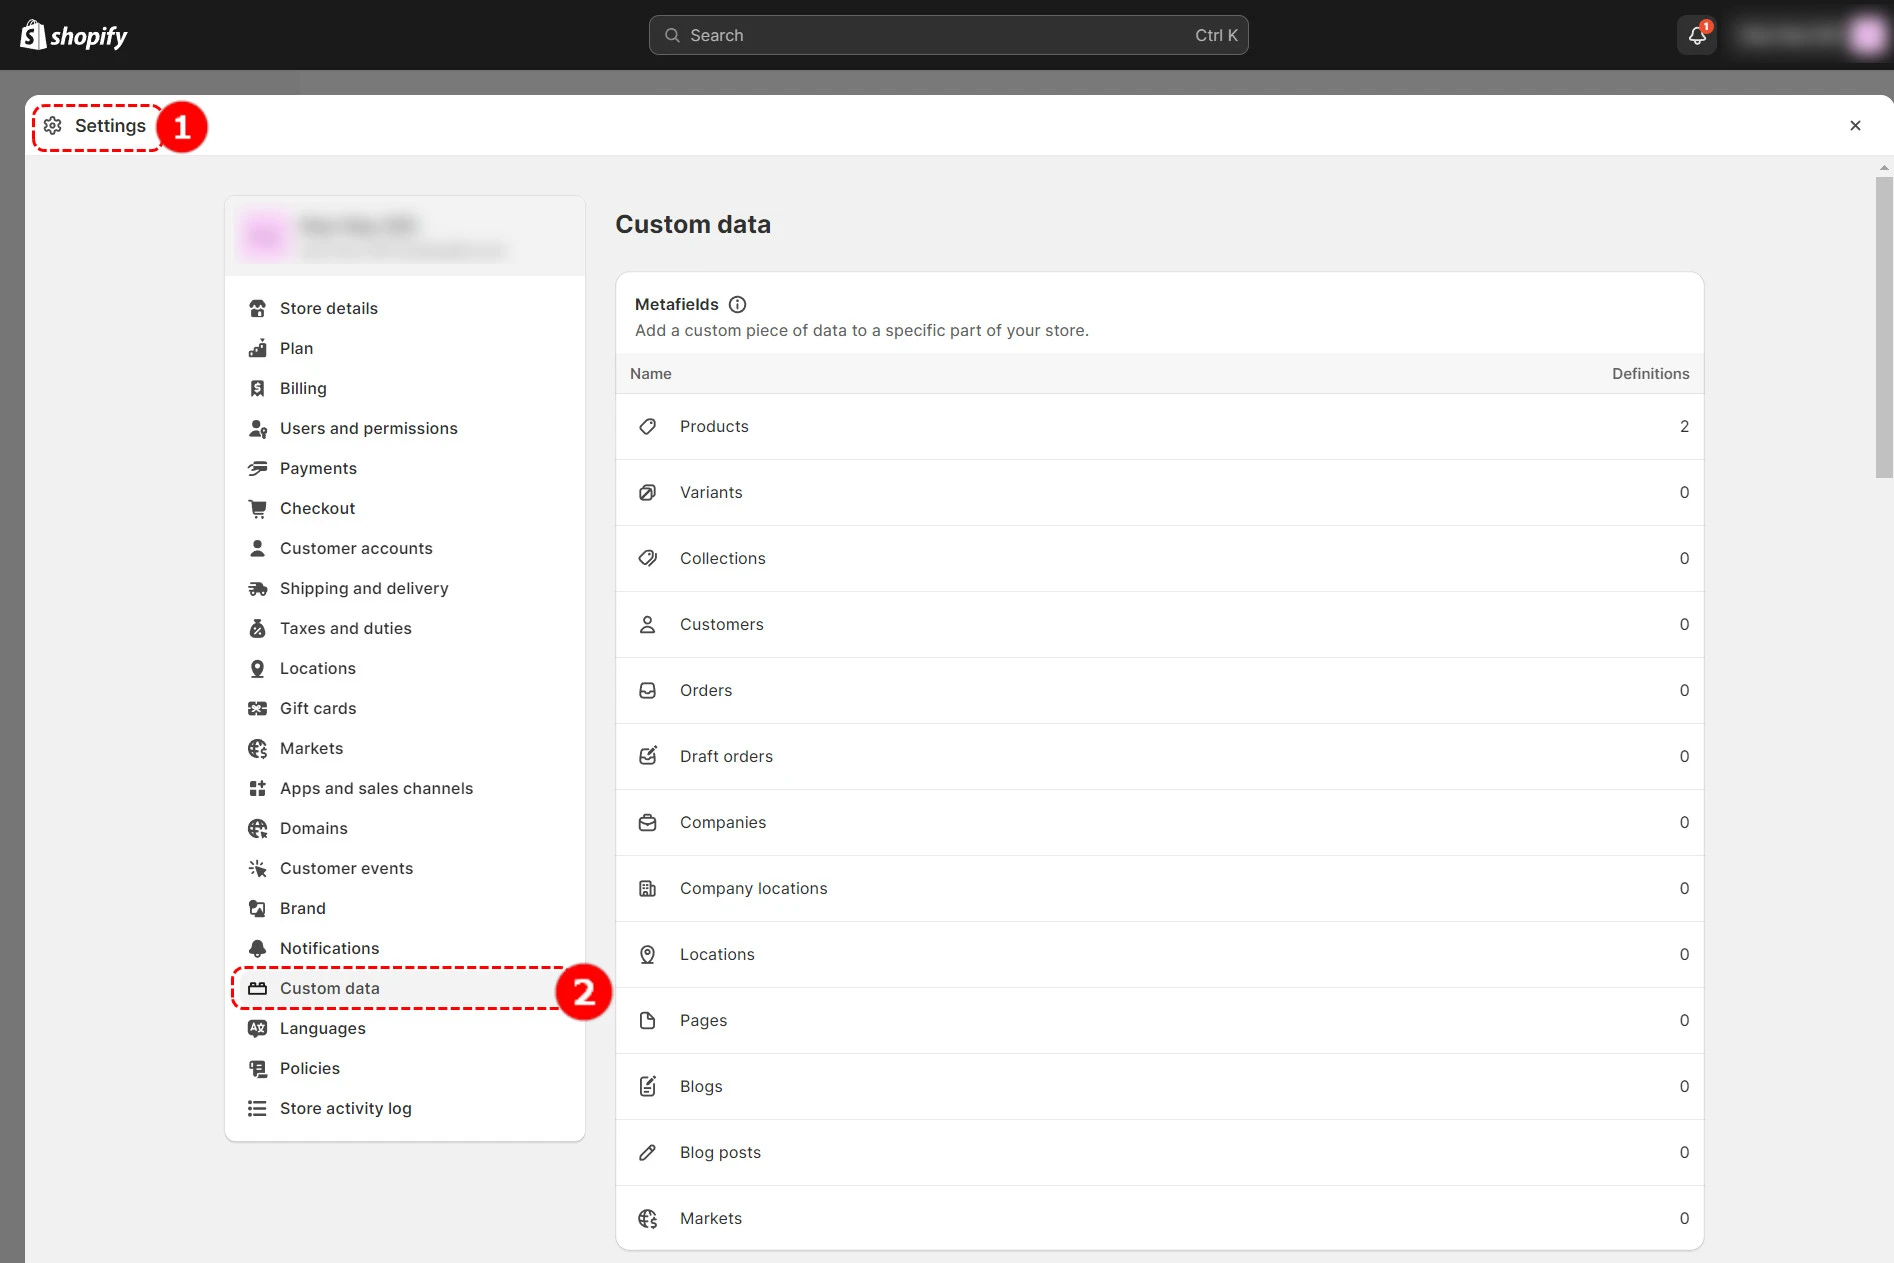
Afterward, select the metafield type you want. In this example, we will use Products, the most popular place to use Shopify metafields.
Click “Products” > Hit the “Add definition” button to get started.
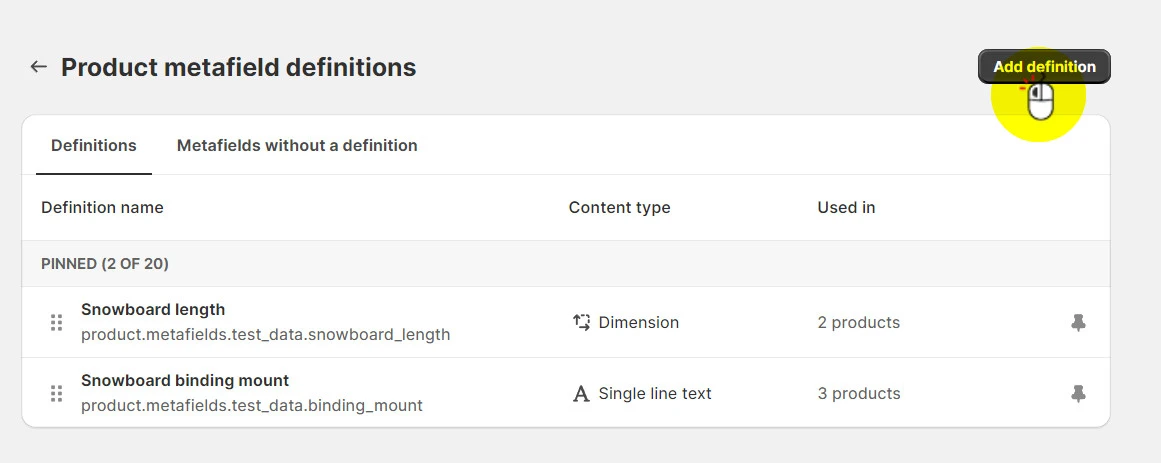
Afterward, you’ll have two options: create a standard or custom metafield definition.
Option #1: Create a standard metafield definition
Standard definitions are set up for you by default and are engineered to be compatible with various components across the Shopify platform. This means standard definitions are supported by apps, themes, and other parts of your online store.
That’s why we highly recommend you create a standard definition where possible, as it can get a bit more complicated to create a custom definition that works (we’ll discuss this later).
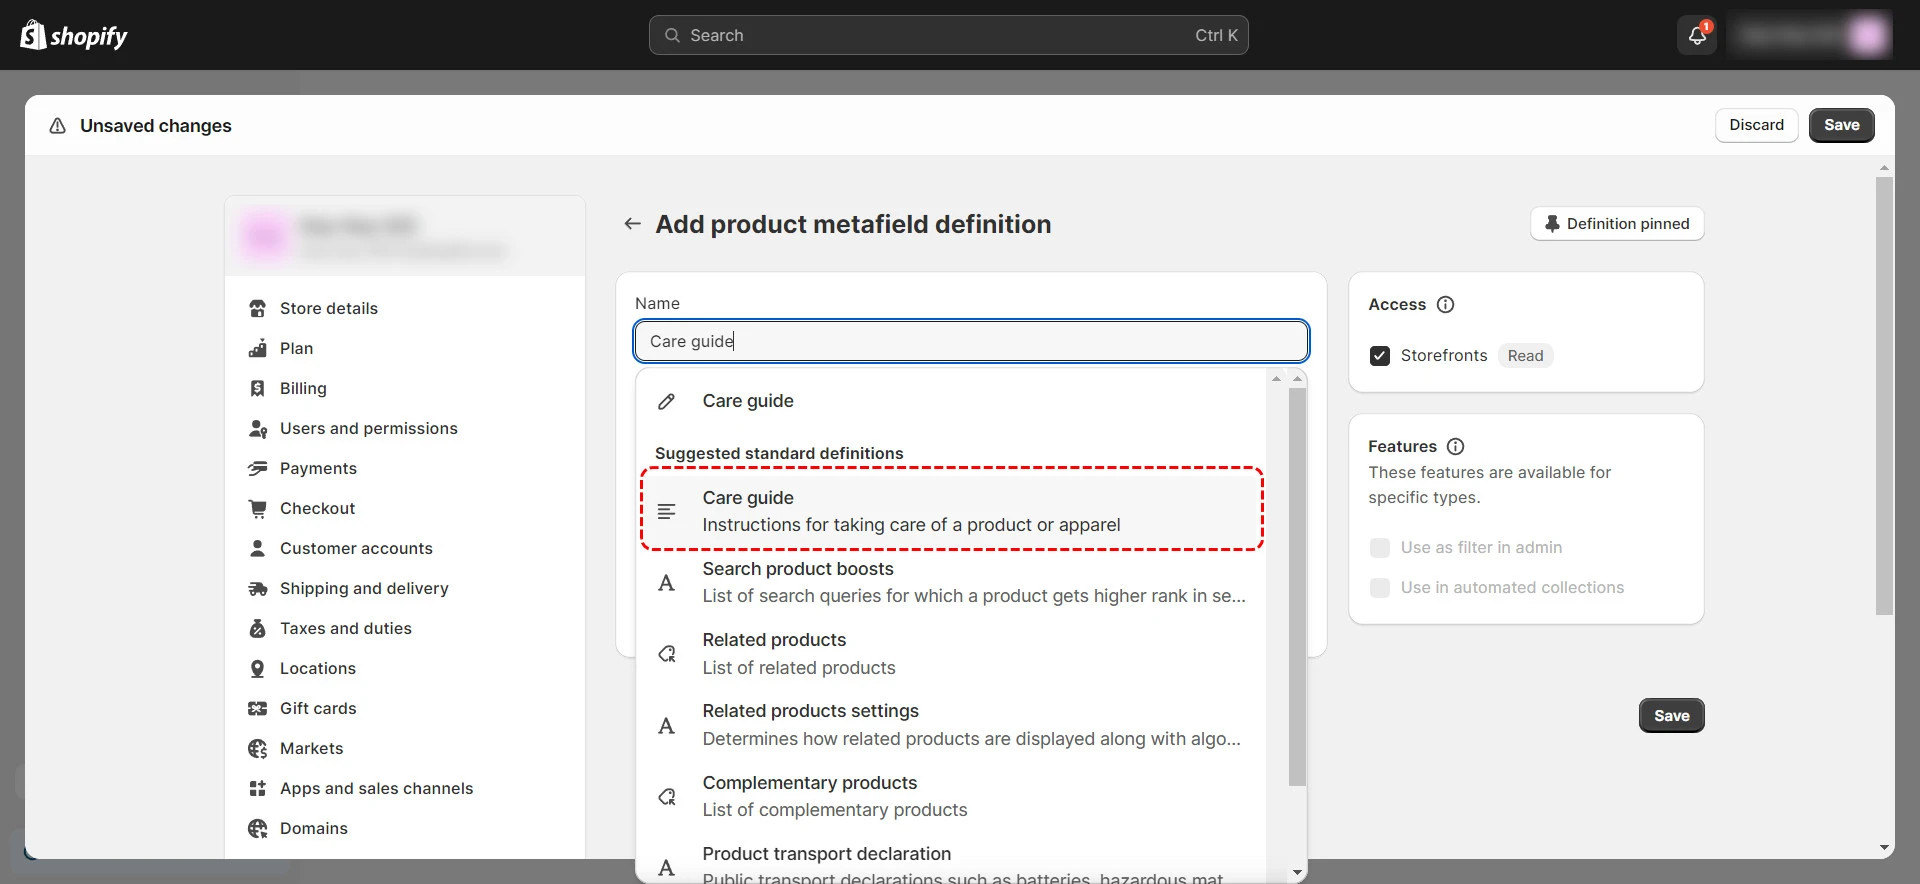
To create a standard metafield definition, simply name your metafield definition. Based on what you type, Shopify will give you a list of suggested standard definitions, choose the one you wish.
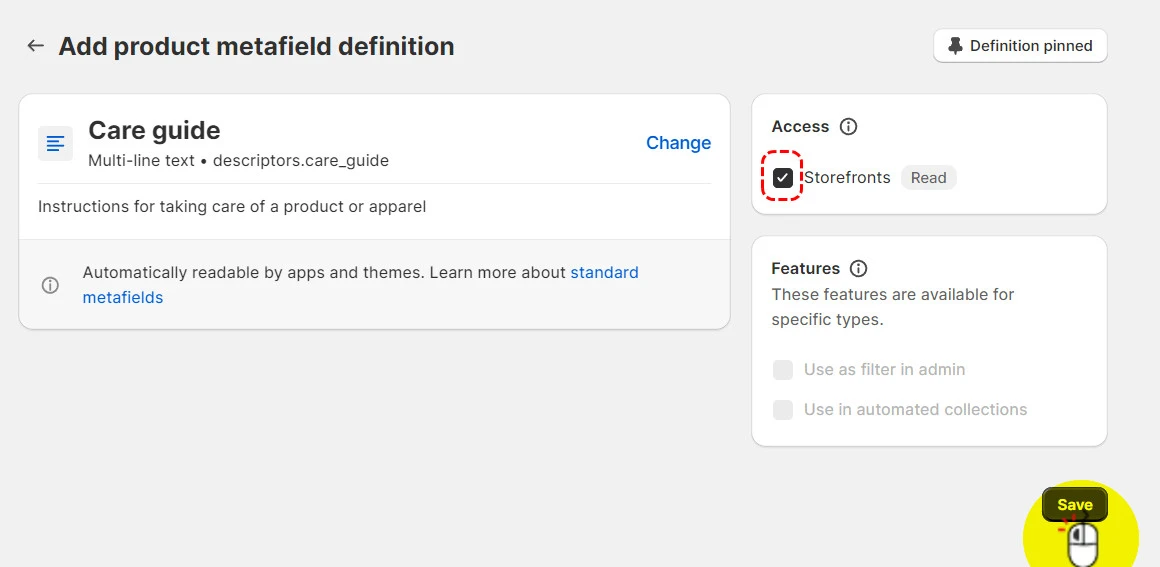
Don’t forget to navigate to the Access section and ensure the Storefront is checked if you want the metafield to be visible on your storefront. Then, click “Save”.
Option #2: Create a custom Shopify product metafield definition
In case there is no standard definition for the additional information you want to add, you can create custom Shopify product metafields definition instead.
To create a custom metafield definition, you’ll need to specify three required components:
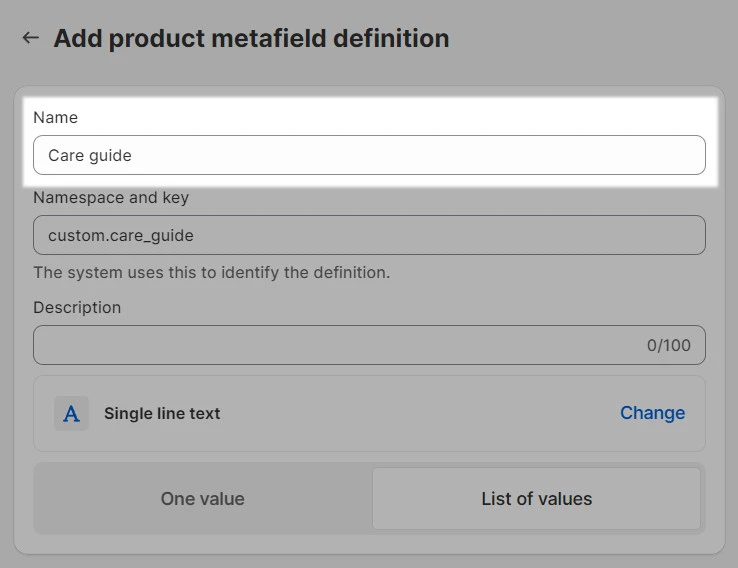
- Name: Start typing the name you want to give to the metafield. For example, care guide.
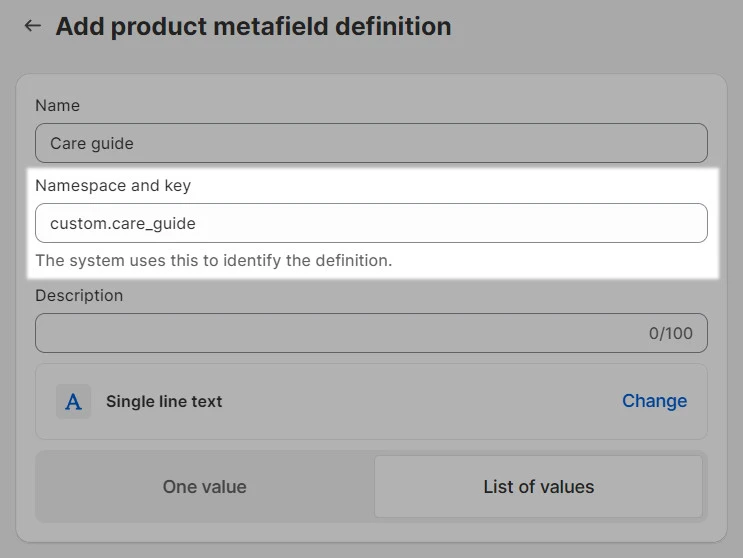
- Namespace and key: This is your metafield’s unique identifier, which you can use to group similar metafields. Note that each namespace and key must be unique.
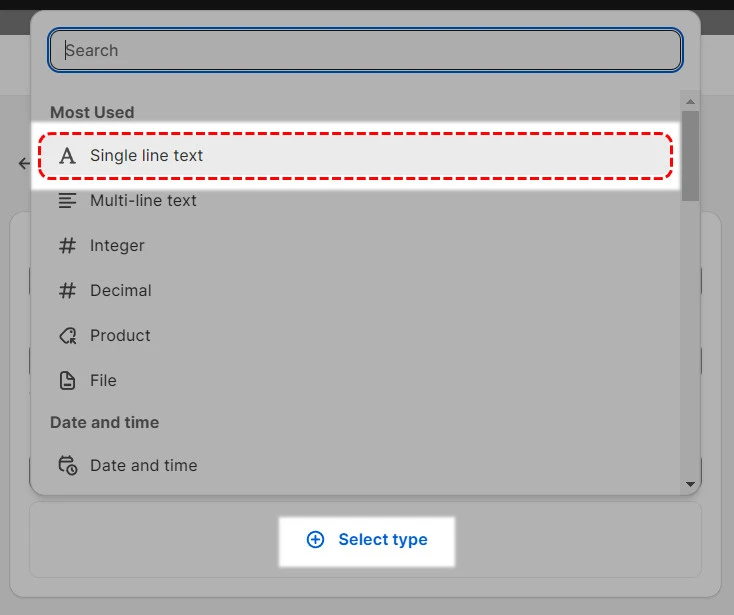
- Type: Choose the content type for your metafield definition. For instance, it could be a single line of text, products, or files as you wish.
Optional configurations:
Besides the three compulsory fields above, you can enrich your custom metafield definition with some optional configurations:
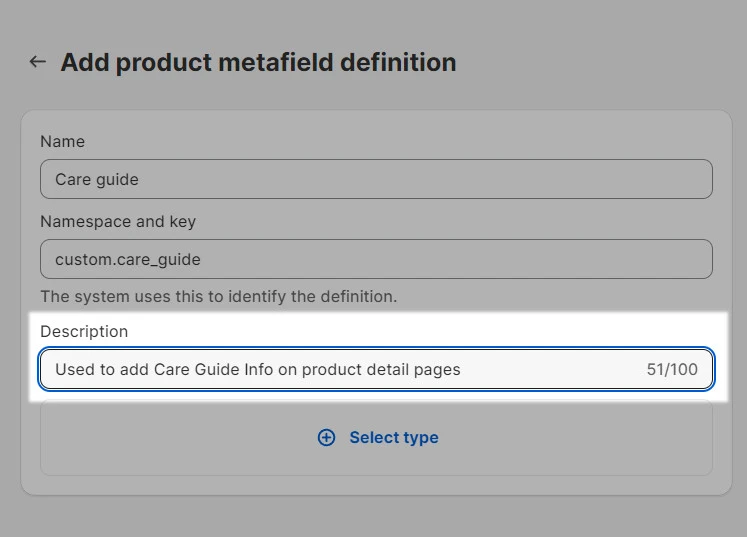
- Description: Give a short description of what the metafield is about to help you and your team identify the metafield purposes and usages for the next log-ins.
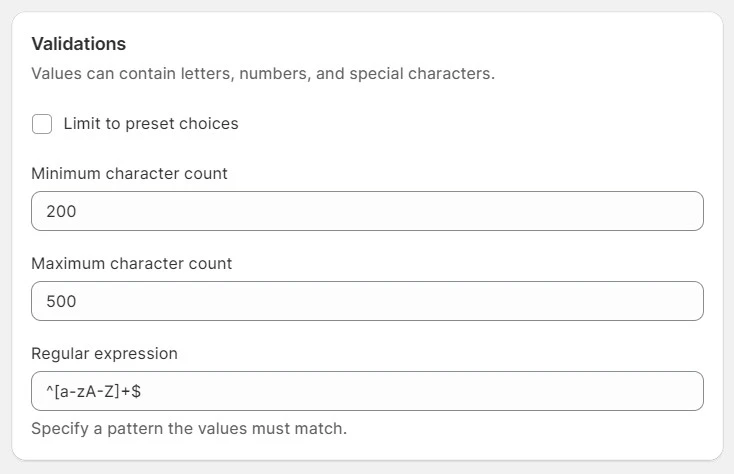
- Validation (important): With custom definition, you can set validation rules for your metafield. This means only certain values that meet the rules will be accepted in your metafield.
For instance, you can set validation rules for a care guide that must be at least 200 characters in length and not exceed the 500-character limit.
How to Add Value to Metafields on Shopify
Now that you’ve created your metafield definitions, let’s add values to your metafields. Go to “Products”.
Click on the specific product you want to add metafield values to. Scroll down to the bottom of your product-editing page, where you can see a list of metafields created for products.
Simply edit the metafield’s value how you want it. Don’t forget to click “Save”.

Pro tip: Add metafield values for your products in bulk
If you have a metafield you want to apply to multiple products of the same type, don’t manually edit them one by one. Instead, let’s assign metafield values to these products all at once. Here’s how:
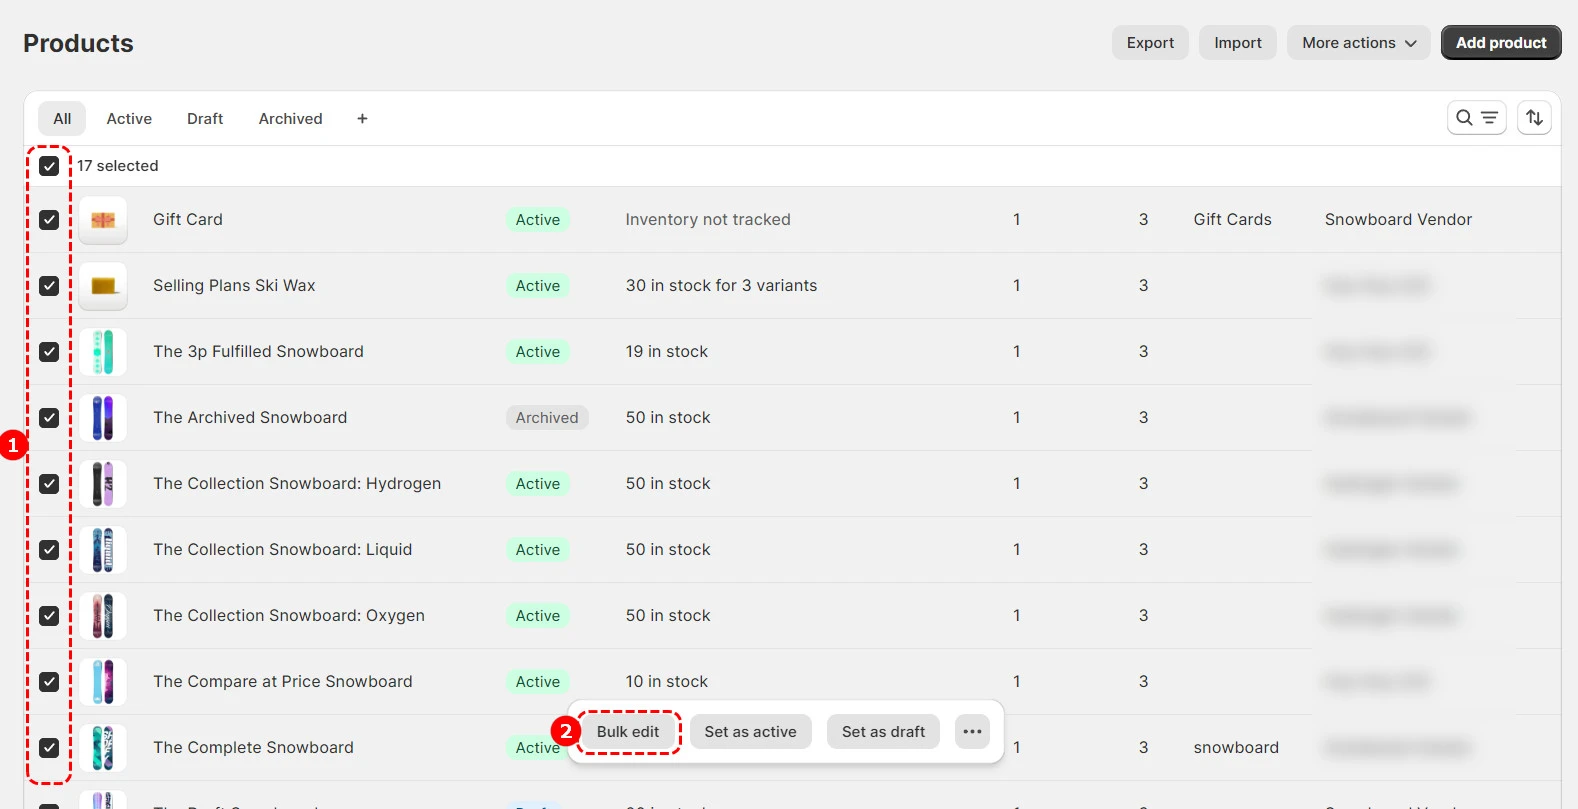
- Select the products you want to add metafields. Click “Bulk edit”.
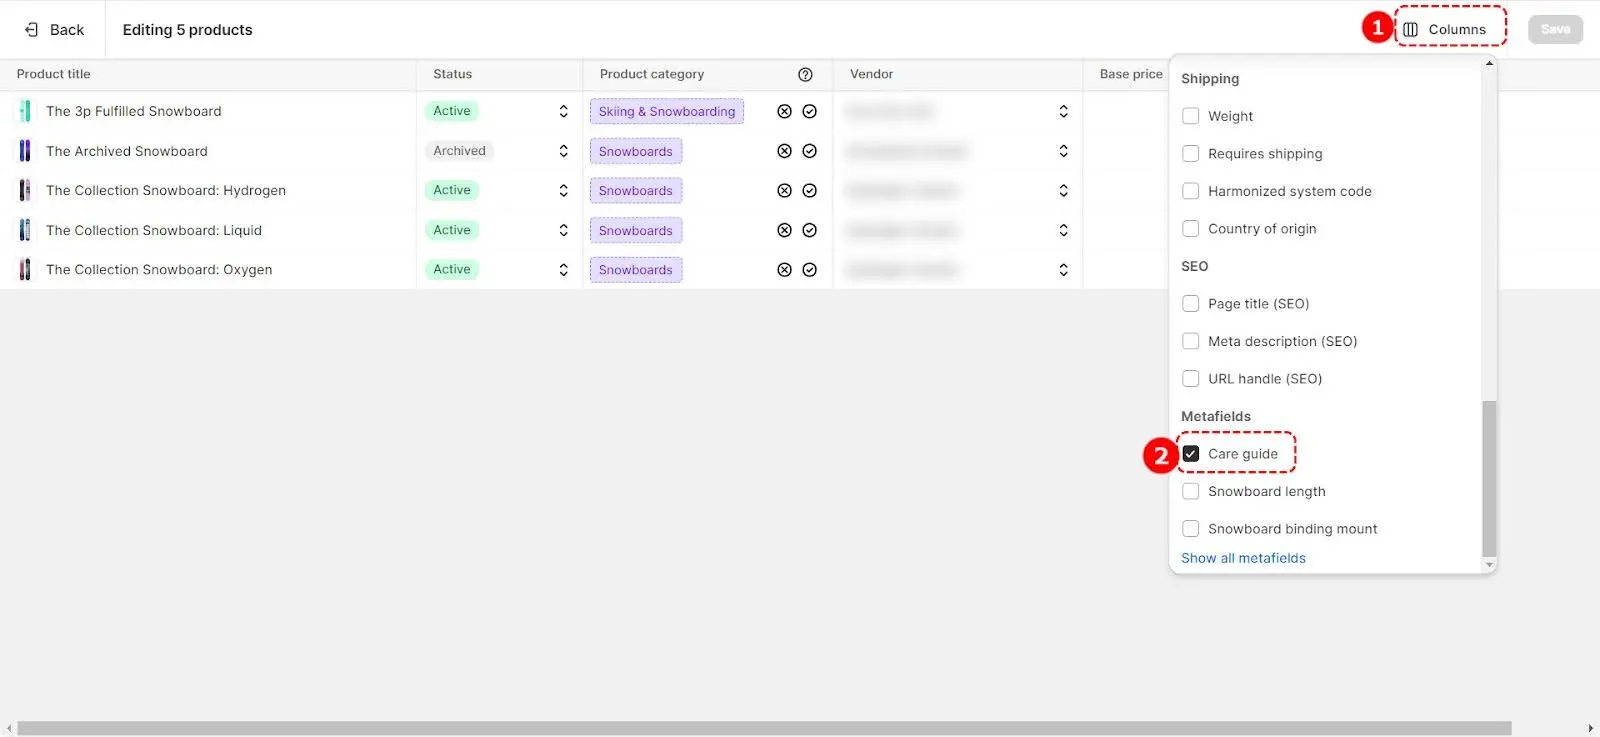
- Click “Columns” on the top right corner > Choose the metafield you want to add values to.
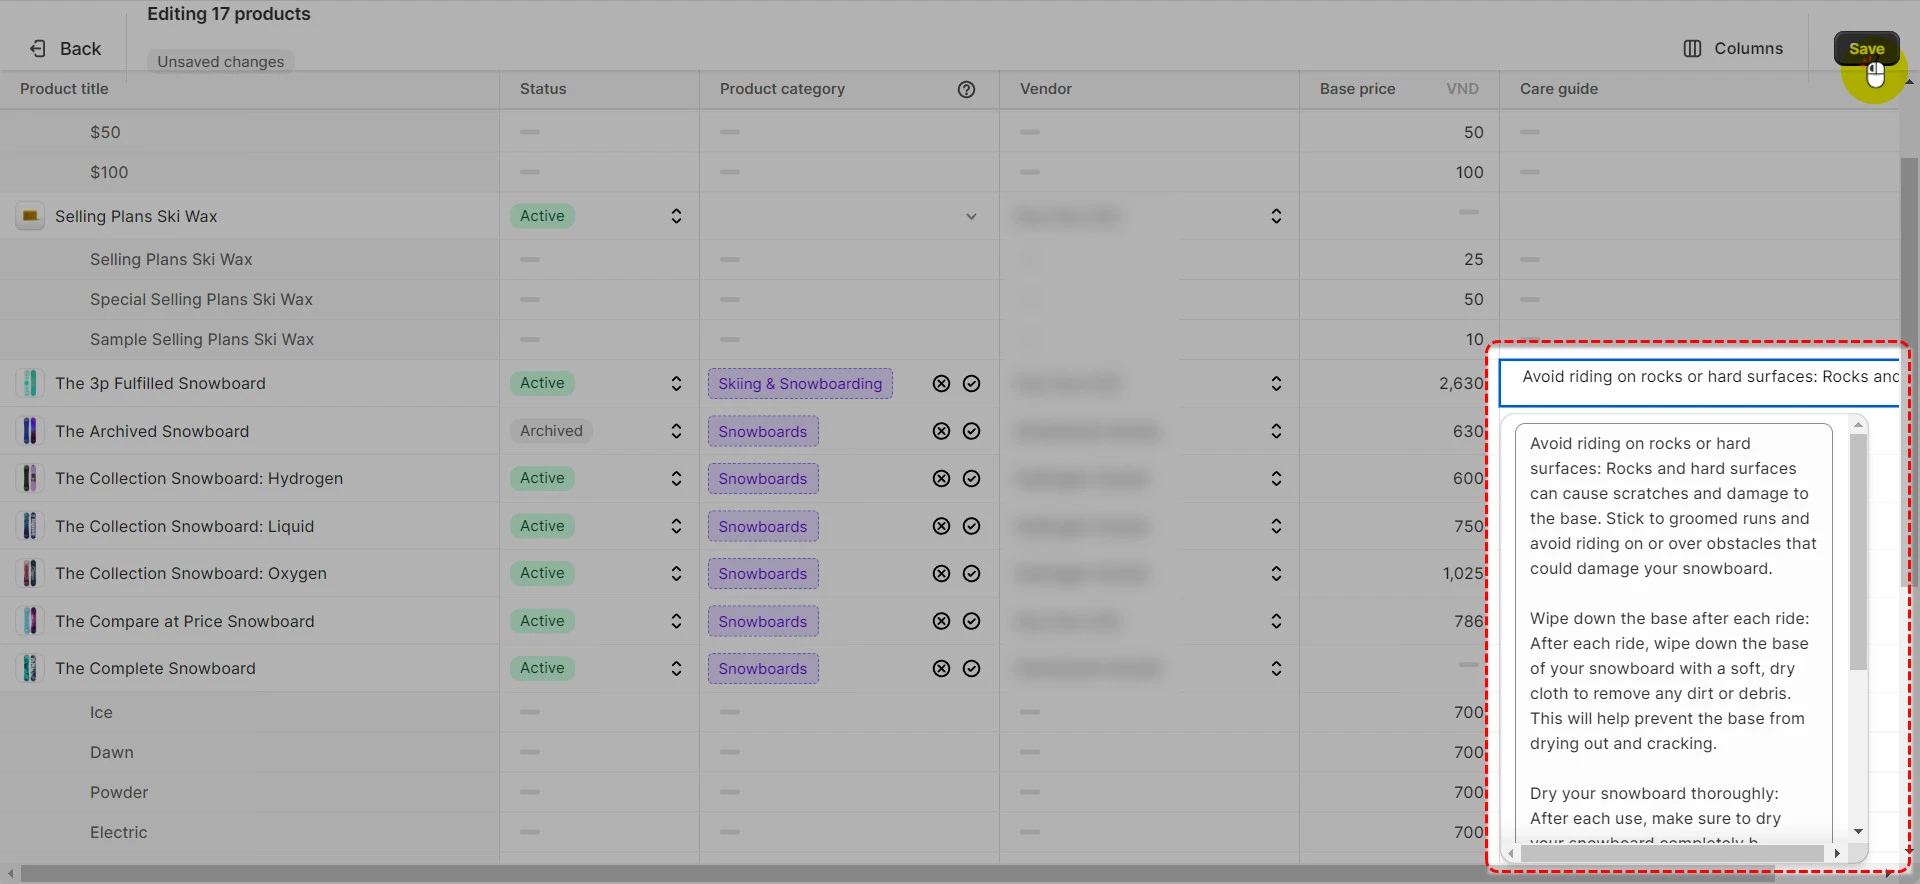
- Afterward, simply enter the information you’ve prepared and drag the information to all your selected products. After you’ve done, don’t forget to click “Save”.
Display Shopify Metafields to Your Online Store
Now that you’ve created Shopify metafield definition and values for your metafield, let us show you how to display Shopify product metafields on your storefront.
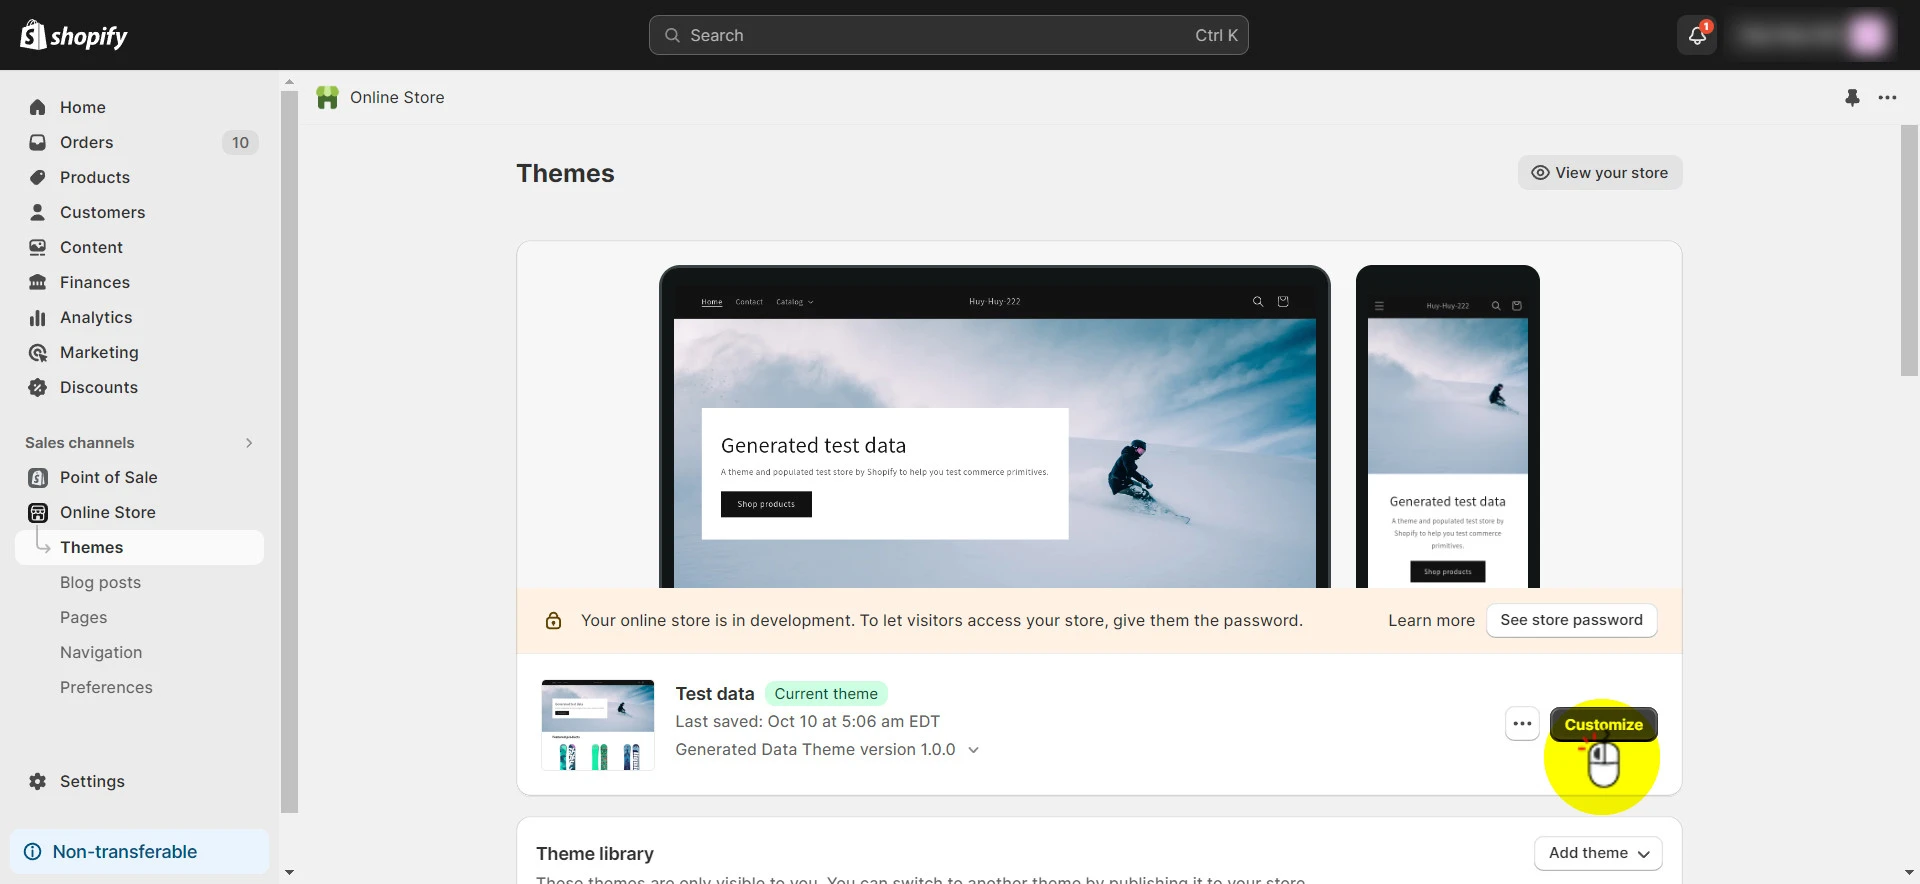
Click Online store > Navigate to your theme and click Customize.
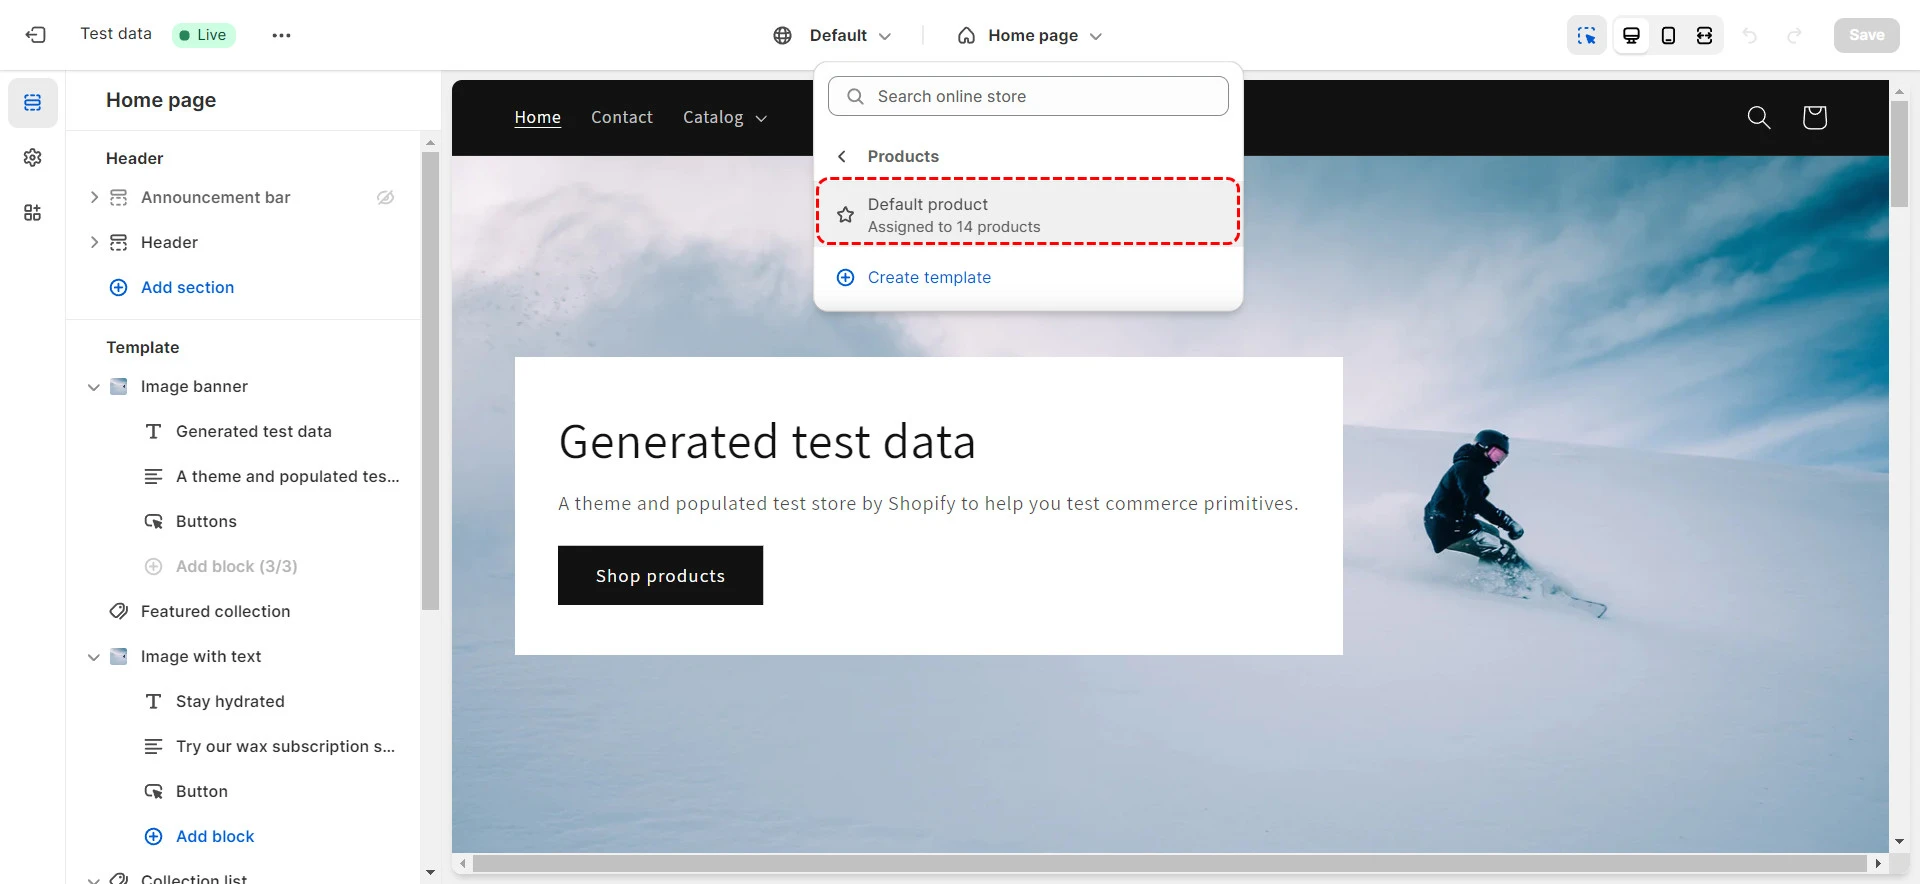
Click Products > Choose Default product.
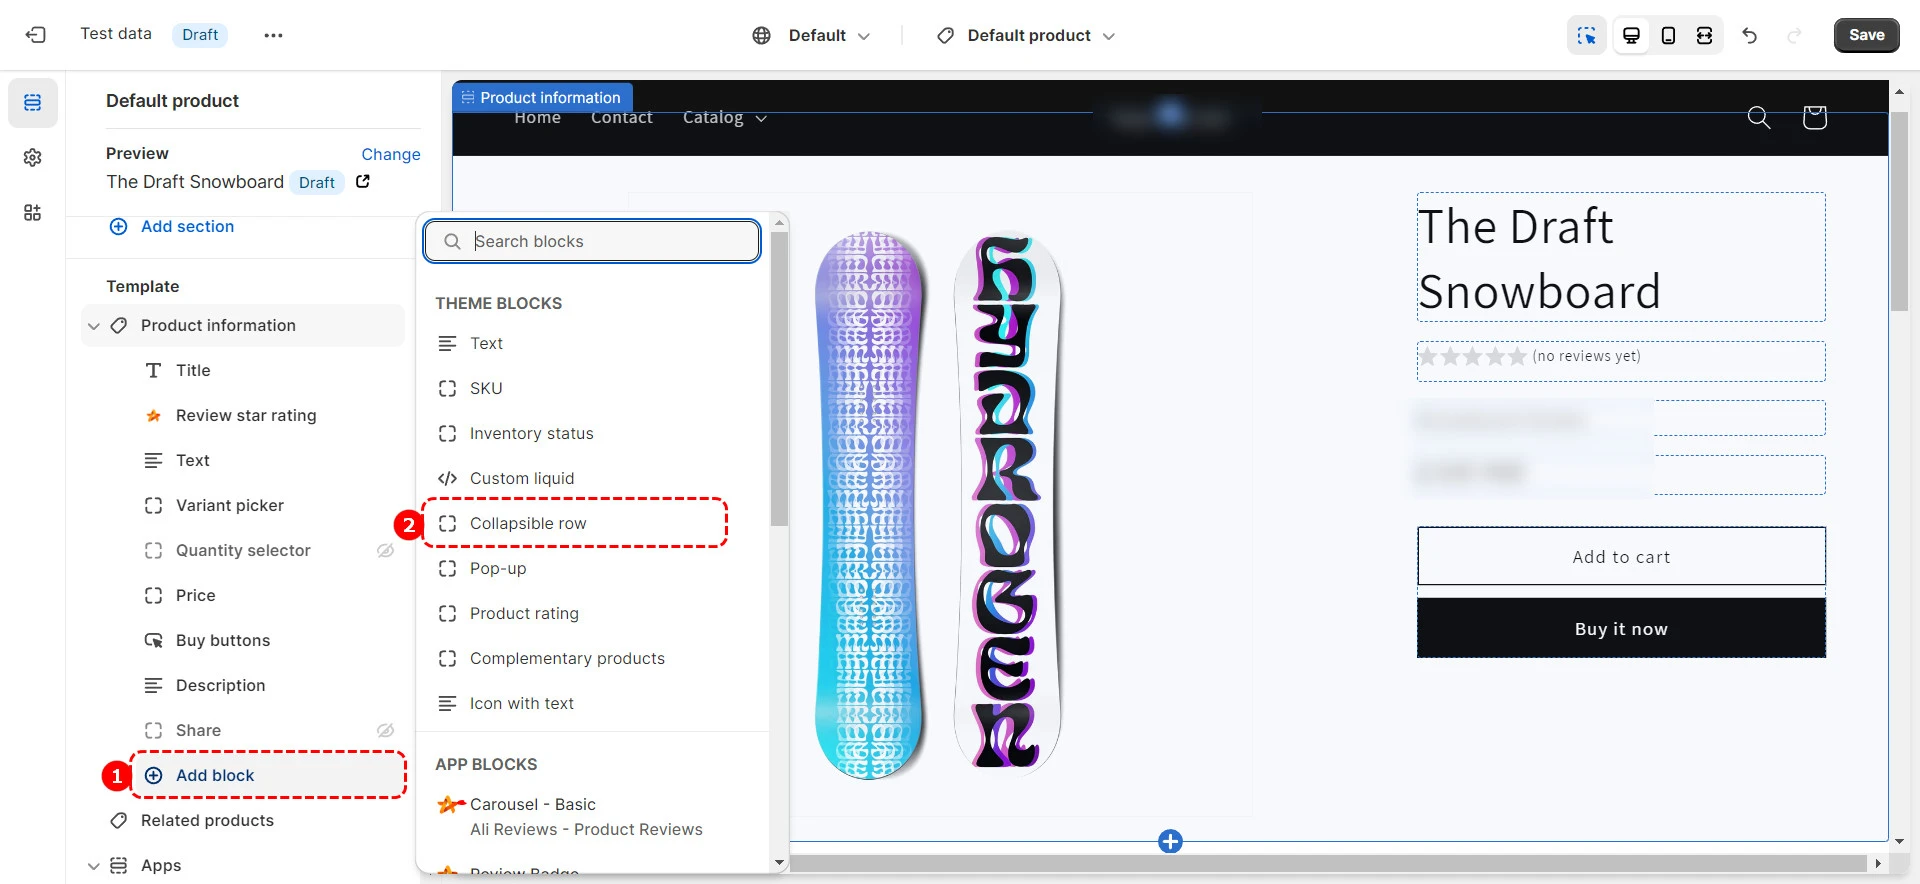
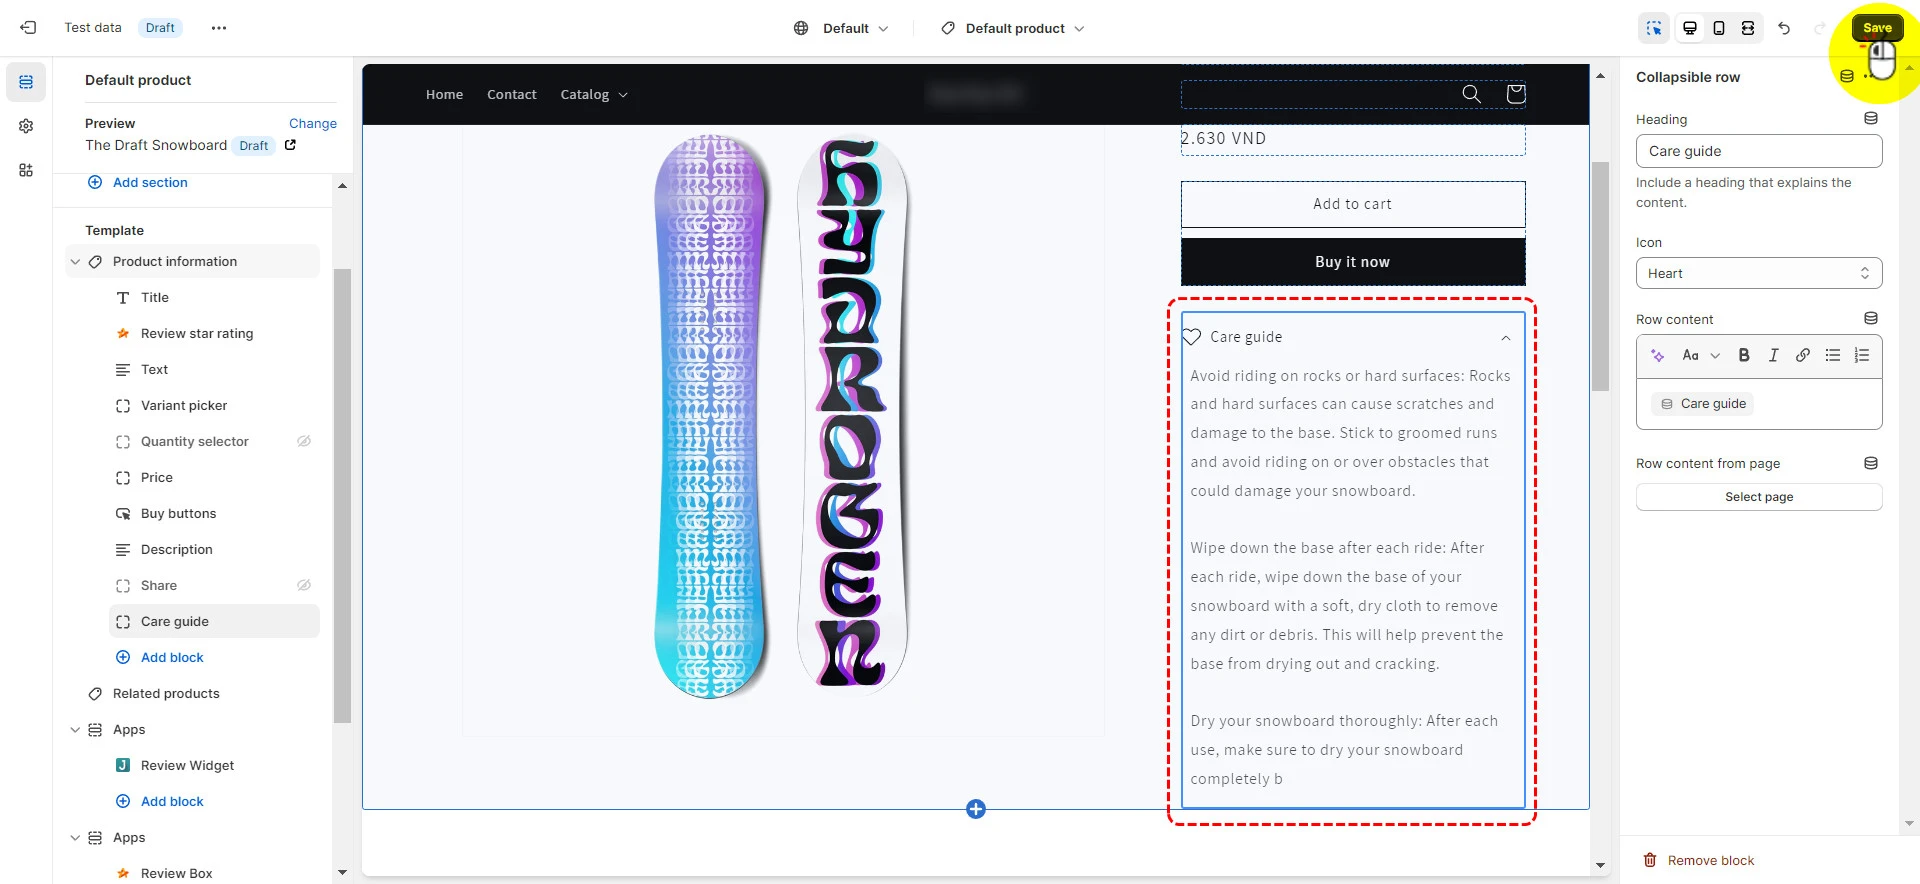
Navigate to the Product information section > Scroll down and choose + Add block. Then choose the type of information you want to add.
Since the metafield used in our example is text-based, you can be flexible between Text or Collapsible row, etc.
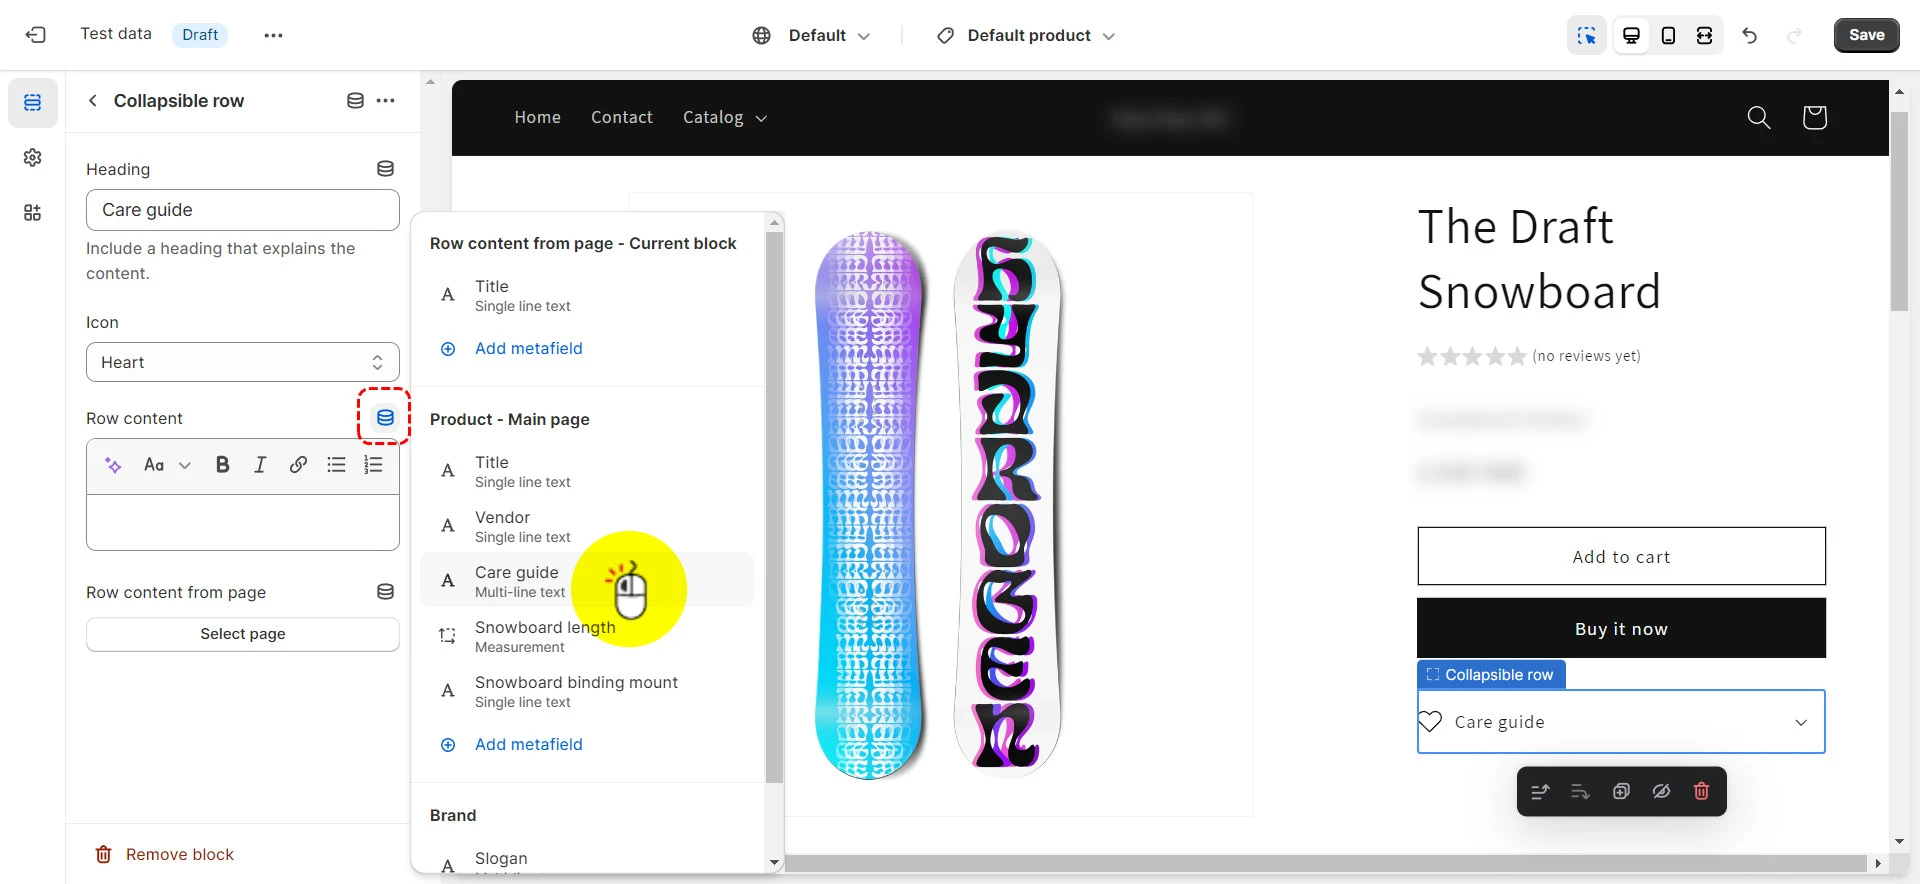
Give your heading a name. For instance, in this case, it would be ‘Care guide’ or something like that. Then, choose the icon you see fit.
And most importantly, click on the dynamic source icon and choose Care guide.
Don’t forget to preview your metafield to make sure nothing goes wrong. And finally, click Save to publish the metafield on your products.
And that’s how easy it is to create, add, and publish Shopify metafields on your storefront.
A Quick Glance At Shopify Metafields
Before digging deeper into how to use metafields in Shopify, we think it’s better if you could have a better understanding of this Shopify feature first.
Let us help clarify what are Shopify metafields, their “variables,” and some practical examples of metafields in Shopify.
What are Shopify metafields?
Shopify metafields are the custom fields that empower you to store extra information for your products, customers, and orders that the normal Shopify settings don't support.
You can keep these additional pieces of information to yourself for tracking or display them to your customers in different ways on your web store.
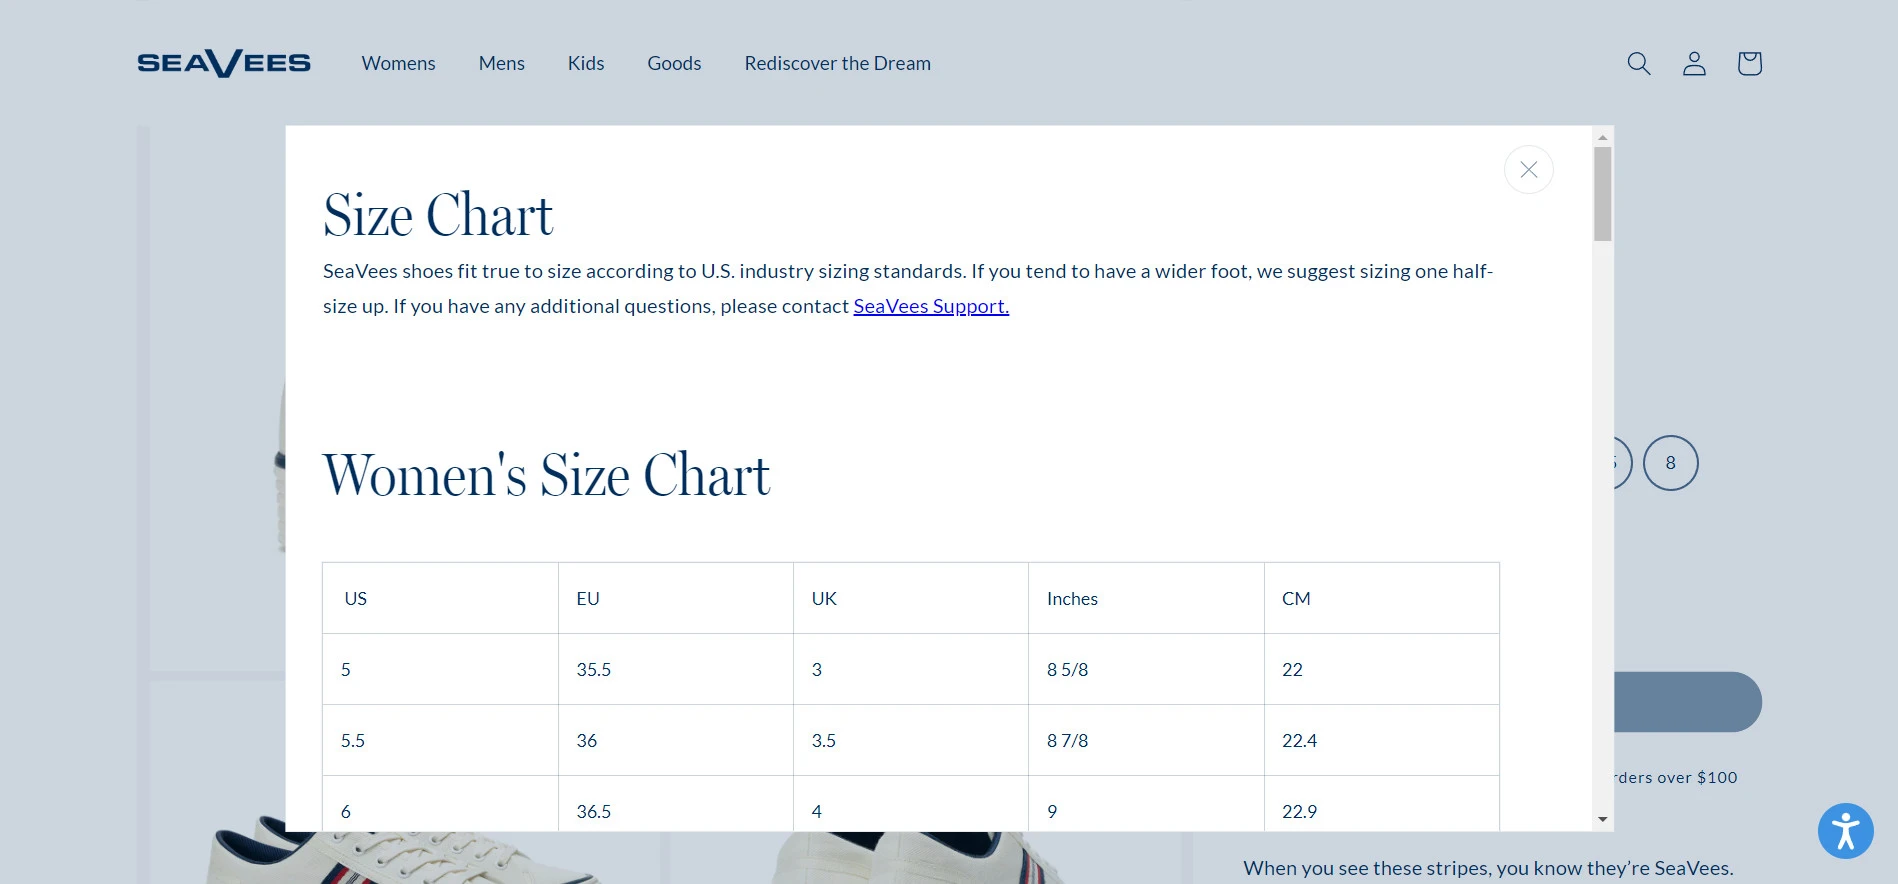
For instance, if you sell apparel or footwear items, Shopify metafield will allow you to add a size guide or care instruction to your product detail pages. (we’ll discuss more real-life examples below)
Did you know Shopify metafields are true life savers in Shopify migration projects? If you migrate to Shopify and your current platform has custom data types that don’t correspond with any field in Shopify, you can map them to Shopify metafield.
However, manually mapping these data types isn’t easy, especially if you don’t have technical resources. Hence, if you want to migrate your store to Shopify, let LitExtension handle your migration with our All-in-One Migration Service.
Seamlessly migrate your metafields to Shopify!
LitExtension can safely transfer your custom data to Shopify with no technical skill required.

Different types of Shopify metafields
Shopify metafields come in a wide range of types. Particularly, there are 10 places on your Shopify store where you can add them:
- Products: A common spot for using metafields to give your products more detailed descriptions.
- Variants: Here, you can add details to different versions of a product, like if picture frame sizes come with different prices or ship times.
- Collections: Add special fields to group pages, which are helpful for sharing info about short-term deals or sales.
- Customers: Use metafields to make shopping more personal by keeping track of things like what your customers have bought before.
- Orders: Put metafields in the orders section to track a range of details, like customer feedback or the latest shipping updates.
- Locations: Set up metafields for details that might differ between your shop's locations, such as operation hours.
- Pages: You can attach metafields to specific shop pages.
- Blogs: Use metafields to customize your blog, like by adding timers counting down to sales events.
- Blog posts: Insert special fields into your blog entries to draw customers closer to making a purchase.
- Markets: For shops serving multiple countries, metafields offer a way to add custom details that can be filled in differently for each market, which is super handy.
Accepted value for Shopify metafields
Content value | Description | Use in list | Example / Use case |
Date and time | Stores both date and time information using the ISO 8601 format and UTC timezone. | Yes | 2025-05-26 12:00:00.000 |
Date | Captures only the date using the ISO 8601 format and UTC timezone. | Yes | 2025-05-26 |
Dimension | Allows whole or decimal values for measurements using metric or imperial units. | Yes | Metric unit: 35 cm Imperial unit: 13.5 in |
Volume | Accepts whole or decimal numbers for volume, with support for metric or imperial units. | Yes | Metric unit: 500 ml Imperial unit: 0.5 gal |
Weight | Lets you input weight using either whole or decimal numbers, in metric or imperial units. | Yes | Metric unit: 50 g Imperial unit: 15 lb |
Decimal number | Supports decimal numbers with up to 13 digits before and 9 digits after the decimal point. | Yes | 28.3592 |
Integer number | Accepts whole numbers in the range of -4,611,686,018,427,387,904 to 4,611,686,018,427,387,903. | Yes | 641,997 |
Multi-line text | Allows plain text input with line breaks. You can set specific character limits and apply validation using regular expressions. | No | Notice: |
Rich text | Supports formatted text including headings, bold, italics, and underlining, along with line breaks. Only works with compatible theme sections. Styling may vary based on your theme, so check theme documentation for accurate behavior. | No | Notice: |
Single line text | Accepts plain text without line breaks. You can restrict input to predefined choices when setting up the metafield. | Yes | Notice: Your product will be shipped within 3-5 business days. |
Company | Lets you connect one or more company records through a metafield. | Yes | Link related companies in the Shopify admin using the Companies metafield. |
Customer | Enables linking to one or more customer profiles through a metafield. | Yes | Add a customer reference in the Customers section to show related accounts. |
Product | Allows you to associate one or more products using a metafield. | Yes | Highlight specific items on product or collection pages. |
Collection | Lets you reference existing collections, either singly or as a list. | Yes | Display a suggested collection, like “Complete the look,” for related items. |
Product variant | Enables referencing a single specific variant of a product. | Yes | Show similar items, like different colors of the same product. |
File | Supports uploading one file, which can be an image, video, or document, with format and size restrictions. | Yes | Upload a PDF for manuals or instructions. |
Metaobject | Allows connections to one or more metaobject entries; useful for linking structured content dynamically. | Yes | Link to an influencer profile or variant-specific options. |
Page | Lets you link to one or more existing Shopify pages. | Yes | Attach a policy, guide, or care instructions page to a product. |
True or false | Adds a simple checkbox to indicate whether something is true or false. | Yes | Specify if an item feature is available, like engraving. |
Color | Stores color values using the RGB hex format #RRGGBB. | Yes | Save a product's color and match it to the page's design theme. |
Rating | Allows decimal input on a scale you define, such as from 1 to 5. | Yes | Add product ratings or audience scores. |
ID | Accepts unique plain text values for identifiers. | No | Use for referencing items from other systems with a unique ID. |
URL | Accepts clickable links using formats like http, https, mailto, tel, or sms. | Yes | Add a link to external content like reviews or video tutorials. |
Money | Stores monetary values with whole or decimal numbers. Currency must match the store’s settings. | No | Use for pricing data, such as shipping or supplier costs. |
Link | Takes plain text links (single line) and supports formats such as http, https, tel, etc. | Yes | Link to external content like product videos or blog posts. |
JSON | Allows you to input raw JSON data for advanced, structured content needs. | No | Useful for complex product data like custom specification tables. |
Mixed reference | Lets you reference any type of object dynamically. Developer setup is required to use this in themes. | Yes | Build flexible pages like dynamic landing pages with multiple content types. |
Shopify Metafields – FAQs
What are metafields in Shopify?
Metafields in Shopify let you store and display custom information that isn't included in the default fields. You can use them to add extra product details, specifications, ingredient lists, or any other type of custom content to various parts of your store such as products, collections, customers, and orders.
What is the difference between Metaobjects and Metafields in Shopify?
Metafields are custom fields attached to existing Shopify resources (like a product or a collection), while Metaobjects are standalone data objects you create with a defined structure (like a custom content block). Metaobjects can be reused across the store and referenced in metafields, making them ideal for structured, reusable content such as FAQs, banners, or team member bios.
How to enable metafield in Shopify?
To enable metafields in Shopify, go to your Shopify admin panel, click on Settings > Custom data, and select the resource you want to customize (e.g., Products). Then, create a new definition by choosing a name, content type (like text, number, file), and validation rules. Once defined, the metafield becomes available for editing directly on the relevant resource page.
What is the maximum Metafields in Shopify?
Shopify allows up to 200 metafields per resource type. Each metafield has its own data type and storage limit (e.g., string length, file size). The limits may vary depending on your Shopify plan and whether you're using the Storefront API or Admin API. It's designed to provide flexibility while maintaining performance.
Conclusion
Though it might sound technical, Shopify metafields are actually easy to leverage as long as you know the right steps. That’s why we hope after reading this article, you can know how to leverage metafields in Shopify properly to extend your eCommerce store’s capacity,
Remember to dive into LitExtension’s blog and join our engaging Facebook Community to gain the insider scoop on the latest eCommerce news & tips.

