Importing products to Shopify in bulk with a CSV file is faster than any other native method, but getting it right requires more than just uploading a spreadsheet. Whether you're launching a new store, migrating from another platform, or refreshing a large catalog, this guide walks you through every step: preparing your product CSV, importing products with variants, updating inventory, fixing common errors, and knowing when a managed migration is the smarter move.
At LitExtension, a listed Shopify Partner for migration services with a 4.9/5 rating on Trustpilot. We've worked through thousands of store migrations. The CSV errors we flag in this guide are the ones we see break imports most often in practice.
Here's what we cover:
- Importing products with a CSV file (manual, 4 steps)
- How to import products with variants
- How to import inventory to Shopify via CSV
- How to import to Shopify with LitExtension (4 steps)
And now, without further ado, let's get the show rolling!
What is a Shopify CSV file?
A Shopify CSV (comma-separated values) file is a plain-text spreadsheet that Shopify uses to import and export store data in bulk. Each row represents one product, variant, customer, or inventory record; each column maps to a specific data field. Upload a correctly formatted CSV and Shopify reads it, creates or updates the matching records, and processes everything in one pass.
Shopify accepts CSV files for three data types:
- Products: title, variants, pricing, images, SEO fields, tags
- Customers: contact details, addresses, marketing preferences
- Inventory: stock quantities per location, handled via a separate flow from products
Note: Orders cannot be imported to Shopify via native CSV. If you need to move order history, you'll need a third-party migration tool.
Importing Products with a CSV File: Manual Method
Shopify's built-in importer accepts a specifically formatted product spreadsheet and processes everything in one go. Follow the four steps below to do it correctly.
Step 1: Download and prepare your product CSV template
Download Shopify's official product CSV template and use it as your starting point. The template shows every accepted column header in exactly the format Shopify expects. A single typo in a header name blocks the entire column. Before filling in your own data, delete the two sample products included in the file so they don't mix with your actual inventory.
For customers, the template includes two default profiles. For products, it includes one product with variants. Both serve as column-structure references only. Remove them before import.
Step 2: Format your CSV file for Shopify
Before you add any data, confirm your file meets these requirements:
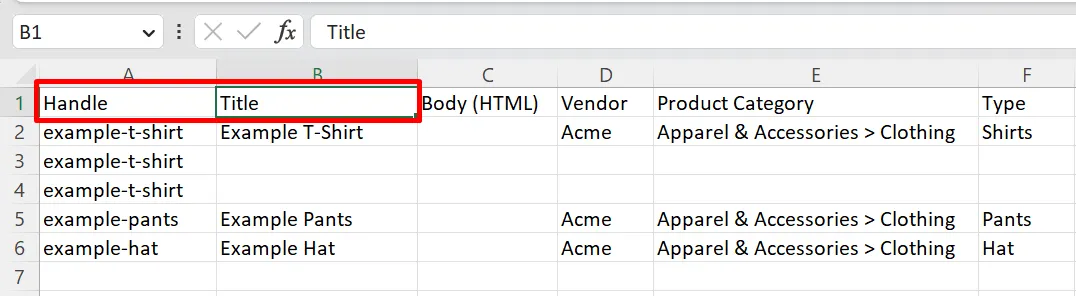
- Column headers go on the first line, exactly matching Shopify's template. Headers are case-sensitive (
Handleandhandleare treated differently by Shopify) - Each column is separated by a comma
- The file is saved in UTF-8 encoding. This is the single most common silent failure point
On UTF-8 encoding: If you edit your CSV in Microsoft Excel and export it, Excel often defaults to a different encoding. The import will show “successful” but special characters (accented letters, currency symbols, quotes) will be corrupted or missing. Use Google Sheets instead. Export via File → Download → Comma-separated values (.csv) and Google Sheets handles UTF-8 automatically.
For the Customers file specifically: the Email column must be present even if the value is blank. If it's missing entirely, the import fails. Unlike product CSV headers, customer CSV headers are not case-sensitive.
Step 3: Fill in the required columns
Not every column is required, but some combinations are interdependent. If you include a column that relies on another column's data, both must be present or the import will error. The table below covers the key required fields for products and customers.
Import type | Required columns |
Products |
|
Customers & Orders |
|
For the full column reference, see Shopify's official docs: importing products and importing customers.
Step 4: Upload and review your CSV file
File size limits before you upload:
- Product CSV: maximum 15 MB. Split larger catalogs into multiple files and import sequentially.
- Customer CSV: maximum 15 MB
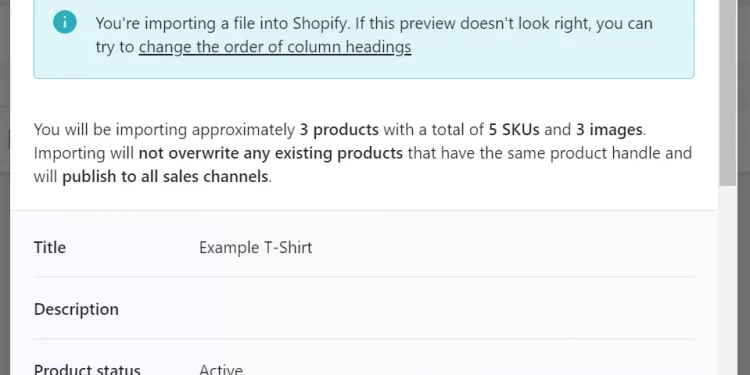
From your Shopify admin, go to Products → Import (or Customers → Import). Click Add file, select your CSV, then click Upload and continue. Shopify shows a preview with the total product count and any warnings. Review this before proceeding.
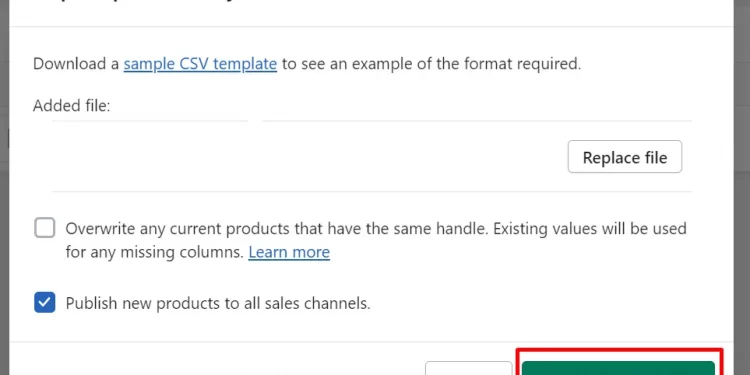
If you're updating existing products, check Overwrite products with matching handles. For customers, check Overwrite existing customers that have the same email or phone number. By default, duplicate emails and phone numbers are skipped rather than overwritten. Any customer with a duplicate email or phone is omitted from the import unless this option is enabled.
⚠ Blank-column overwrite warning: If a non-required column is included in the CSV but left blank, Shopify overwrites the existing value with blank. It does not skip it. For example, if your CSV includes the Vendor column with no values, every existing vendor name in your store will be erased. Only include columns you intend to populate.
Once the import finishes, Shopify sends a confirmation email. Head to your Products page and spot-check titles, prices, images, and variant structure before making the store live.
Related: How to import customers and orders to Shopify
Importing Products with Variants using a CSV File
Variant imports are where most CSV mistakes happen, and where the consequences are hardest to reverse. Here's how the structure works and what to avoid.
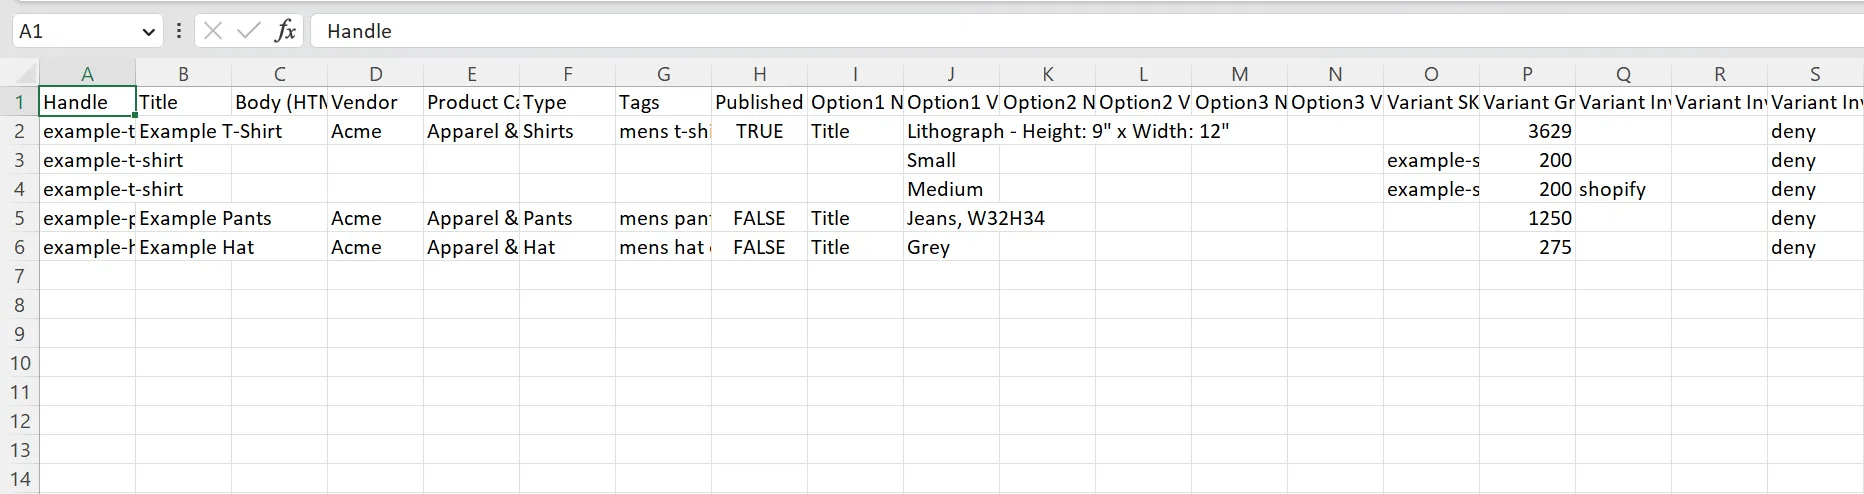
Each product variant occupies its own row in the CSV. Rows belonging to the same product share the same Handle value. The first row for a product contains all the shared data (title, description, tags, vendor, images). Subsequent rows only need the Handle, Title, and the variant-specific fields: Option1 Value, Variant SKU, Variant Price, and Variant Inventory Qty.
Example structure for a T-shirt with two sizes:
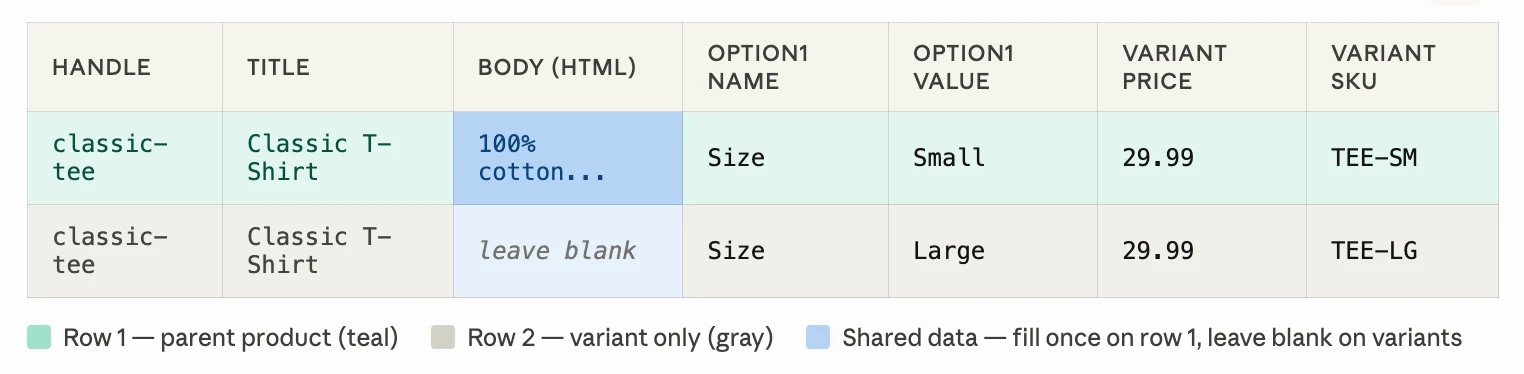
Three things that will silently break your variant structure:
- Renaming an option name deletes variant IDs. If you change
Option1 Namefrom “Size” to “Dimension,” Shopify deletes the existing variant IDs and creates new ones. This silently breaks any apps, subscriptions, or wishlists tied to those variants, with no error message to warn you. - Including SKU or price columns without Option columns will delete your variant structure. If your CSV contains
Variant SKUbut omitsOption1 NameandOption1 Value, Shopify may remove the existing variant options entirely. - Duplicate option values under the same handle cause import failure. Each combination of option values must be unique per product. Two rows with Handle
classic-teeandOption1 Value“Small” will error.
When working with complex variant structures, test with a small batch (two or three products) before running the full import.
How to Bulk Update Inventory in Shopify using a CSV File
Inventory CSV import is a separate flow from product import. Use it to update stock quantities in bulk without touching product data. It's especially useful for stores managing large catalogs across multiple locations.
To access it: go to Products → Inventory → Export to get the current inventory CSV as your template, make your quantity changes, then re-import via Products → Inventory → Import.
When exporting, Shopify offers two formats:
- All states (recommended): includes separate columns for on-hand, committed, unavailable, and incoming quantities. Safer for bulk updates because it gives you a complete picture before you overwrite anything.
- Available only: simpler format, but gives no visibility into other inventory states. A mis-entered value can silently overwrite committed stock.
The key column to update is On hand (new). Leave it blank for any product where you don't want to change the quantity. A blank cell is skipped, not zeroed out. Use only whole numbers; decimal values like 1.5 will cause an import error.
Note: The inventory CSV uses Handle to map quantities back to the correct product. Make sure your handles match exactly, including case, or updates will fail to apply.
Common Shopify CSV Import Errors and How to Fix Them
Most errors when importing products to Shopify fall into a small number of categories. The table below covers the ones we see most frequently, plus the ones the error message alone doesn't make obvious.
Issue | What It Means | How to Fix It |
Missing Required Fields | Essential columns like Title, Handle, or Variant Price are blank or removed. | Double-check your CSV to ensure all required fields are included and filled out. |
Incorrect Data Format | Values like prices, options, or inventory numbers don’t follow Shopify’s format. | Refer to Shopify’s CSV template to match the correct format for each field. |
Duplicate Handles | The Handle field (used to create product URLs) appears more than once. | Make sure each product has a unique handle, especially if you're importing new ones. |
Invalid Characters | Special characters or symbols can break the upload. | Avoid using unsupported characters in fields like handles or tags. |
Two errors worth calling out separately because Shopify's error message doesn't explain them clearly:
- “Line is invalid (No details)”: usually caused by a variant option conflict. This happens when you try to reassign an existing option value to a different option position (for example, moving a value from
Option1toOption2). Shopify can't resolve the conflict and rejects the line silently. Fix: recreate the variants from scratch rather than trying to remap them. - Import shows “successful” but no products appear: almost always a UTF-8 encoding issue or Excel's default comma/encoding export settings. Re-export from Google Sheets and re-import.
When Uploading Products to Shopify via CSV File isn't Enough
Uploading products via a CSV file works well for straightforward catalogs. It hits real limits quickly once the data gets complex. These are the scenarios where we consistently see merchants switch to a managed migration:
- File exceeds 15 MB: you'll need to split into batches and manage the import sequence manually, with no progress tracking between files.
- You need to move order history: Shopify's native CSV cannot import orders, so this requires API-level migration.
- You're on a dropshipping app: manual CSV imports are blocked when a dropshipping app manages inventory. Attempting it causes missing supplier links, outdated pricing, and undelivered orders.
- You sorted the file in Excel before uploading: Excel reorders rows and breaks the image URL links attached to products, so images disappear from imported listings.
- You can't cancel mid-import: once a CSV import starts, it can't be stopped and there's no import history to roll back to. A corrupted file means manual cleanup.
- You need customer passwords migrated: Shopify cannot import encrypted passwords via CSV, so customers must reset their passwords after import.
If any of the above applies to your situation, a managed CSV migration is a faster and lower-risk path. LitExtension's CSV Files Migration Service handles the formatting, mapping, and verification. You review the results before anything goes live.
How to Bulk Upload Products to Shopify with LitExtension in 4 Steps
When you bulk import products manually, every formatting decision and error falls on you. A single misplaced column or wrong encoding can undo hours of work. LitExtension's CSV Files Migration Service handles the technical work for you: formatting, mapping, demo verification, and post-migration support.
Step 1: Send your CSV file to our team
Upload your CSV file to Google Drive or Dropbox and share access with LitExtension. We'll schedule a consultation to confirm the scope: what data needs to migrate, any custom field mappings required, and what the final result should look like.
Step 2: Our team formats and maps your data
No need to reformat the file yourself. Our technical team maps your columns to Shopify's required structure, handles encoding, and runs a Free Demo Migration on a subset of your data so you can verify the results before anything is committed to your live store.
Step 3: Approve the demo and run Full Migration
Once you approve the demo results, we run the Full Migration. LitExtension's Smart Controller monitors the process in real time and flags any issues as they occur. Our team resolves them without stopping the migration. Your existing store keeps running normally throughout.
Step 4: Review results and go live
Before handover, our QA team verifies the migration results against your original data. Once you confirm everything is correct, the store is ready.
Because your source store stays live during migration, new orders and data changes can accumulate. For the first 3 months after migration, CSV Files Migration customers get free access to:
- Recent Data Migration: syncs new data created during the migration window
- Re-migration: full re-run if you're not satisfied with the result
- Smart Update: syncs only new data added after the last migration
Shopify CSV import made easy with LitExtension
Let our team handle the formatting, mapping, and verification so you can focus on your store, not your spreadsheet.

Shopify CSV Import: FAQs
From your Shopify admin, go to Products → Import. Click Add file, select your CSV (formatted to Shopify's template, UTF-8 encoded, under 15 MB), then click Upload and continue. Review the preview Shopify shows you, then click Import products to confirm. Shopify will email you when the import is complete.
The limit is 15 MB for product CSVs and 15 MB for customer CSVs. If your file is larger, split it into smaller batches and import them sequentially. There's no limit on the number of batches you can import.
Each variant gets its own row in the CSV. Rows for the same product share the same Handle value. The first row includes all shared product data; subsequent rows only need the Handle, Title, option values, and variant-specific fields like SKU and price. Do not rename option names on existing products, as this deletes the variant IDs and can break connected apps.
This is almost always a UTF-8 encoding issue. Excel's default export does not use UTF-8, which causes the file to appear to upload correctly but fail to create records. Re-open your file in Google Sheets, make no changes, and re-export as a CSV. Google Sheets exports in UTF-8 by default. Then re-import.
No, Shopify's native CSV import does not support orders. You can export orders from Shopify to CSV, but importing order history requires a third-party tool or migration service. LitExtension's CSV Files Migration Service includes order history migration where the source platform allows it.
A product CSV creates or updates product listings: titles, descriptions, pricing, images, and variants. An inventory CSV updates only the stock quantities for existing products at specific locations, accessed via Products → Inventory → Import. You need the product to exist in your store before you can update its inventory via CSV.
Final Thoughts
Importing products to Shopify via a CSV file is the right approach for straightforward bulk uploads, but it has real limits: order history, variant complexity, file size, and encoding issues that catch merchants off guard. For stores migrating from another platform or dealing with a large or complex catalog, a managed migration removes the risk of data loss and hours of troubleshooting.
If you hit any of those limits, LitExtension is built for exactly that situation. For more Shopify guidance, browse the LitExtension Shopify hub or check out our migration resources.

