As the most popular eCommerce platform, Shopify makes it easy to run and manage an online store. Still, the Shopify import metafields via CSV process does make some beginners scratch their heads.
No worries; in this article, we'll guide you step-by-step through some popular methods, including:
- Shopify import metafields via CSV files
- Advanced import to Shopify from another platform
- Shopify export metafields guide and tools
- Common issues with Shopify import metafields
- Best practices for successful import process
Let's get started!
Shopify Import Metafields: How to Do It with CSV
As of this writing, using a CSV file is one of the most common methods for Shopify import metafields. It's not hard to see why, given the flexibility and cost-saving benefits of this method.
That said, keep in mind that the entire process is quite manual, not to mention error-prone when you do not pay close attention. If that drawback does not discourage you from giving it a try, then let us walk you through the steps:
Step 1. Download the CSV template
To start the Shopify import metafields, you need to download a sample product CSV file from your Shopify admin. This file only acts as a reference template that shows you what the required columns look like, so delete any sample products inside before using the CSV as your base.
Also, if you manage inventory at multiple locations or use special price rules for international markets, be sure you're using the correct version of the CSV. Otherwise, unexpected errors or omissions may occur when importing.
Step 2. Fill in product, metafield, and image information
Now open the CSV file in a spreadsheet editor like Google Sheets or Excel. In this step of the Shopify import metafields, we will focus on the product-related fields, metafield columns, and image URLs.
Specifically, to include metafields, you must first define them in “Settings” > “Custom data” > “Products” > “Metafields” inside your Shopify admin. Once set, Shopify allows you to add metafields to the CSV in this format:
product.metafields.[namespace].[key]
For example, a metafield for fabric might look like:
Fabric (product.metafields.shopify.fabric)
You can leave out the display name and use the raw format if you prefer. Note that only product metafields are supported via CSV import; variant metafields, on the other hand, must be edited using the bulk editor inside your Shopify admin.
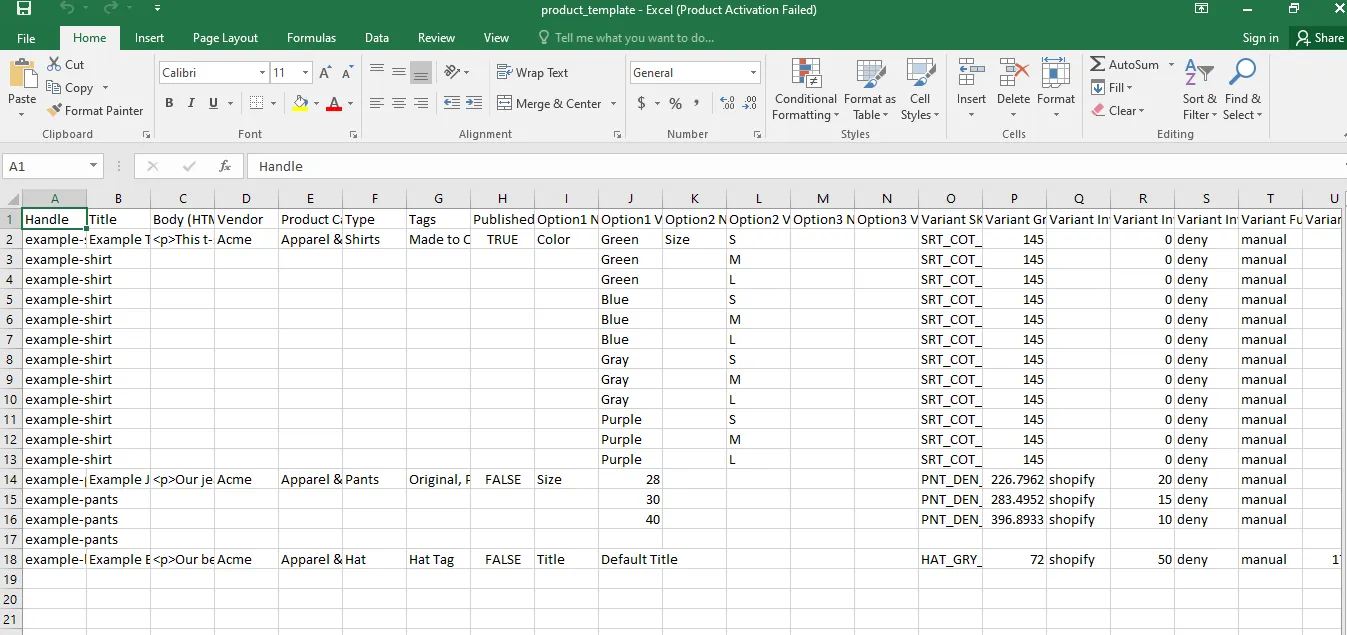
Also, Shopify requires specific columns like Handle, Title, Option1 Name, and Option1 Value to maintain proper variant structure. So, if you're adding metafield-related options (such as a metaobject for color or size), use the Option LinkedTo columns to map that connection.
How about product images? You need to insert the URLs into the Image Src column. Each product image must have its own row, with the Handle repeated and the corresponding image URL added. Shopify will download and re-host these images on your store during import.
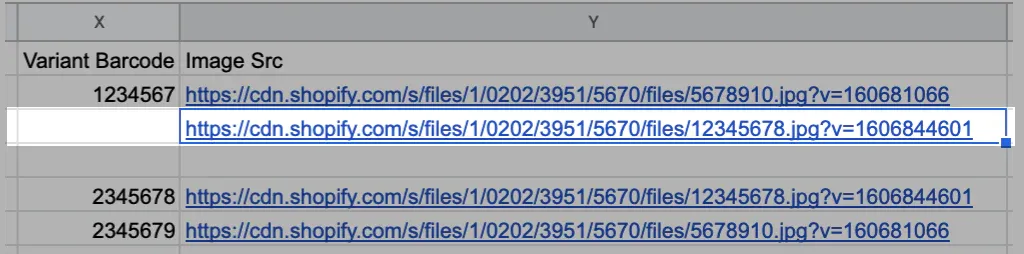
For best results, upload your image files in advance to “Content” > “Files” in your admin to get proper URLs. Only public, direct-access image links (e.g., from Dropbox or your Shopify Files library) are supported. You can add up to 250 images per product, and optional Image Alt Text is supported for SEO purposes.
For further and more detailed instructions, Shopify's help docs will give you the most up-to-date field references.
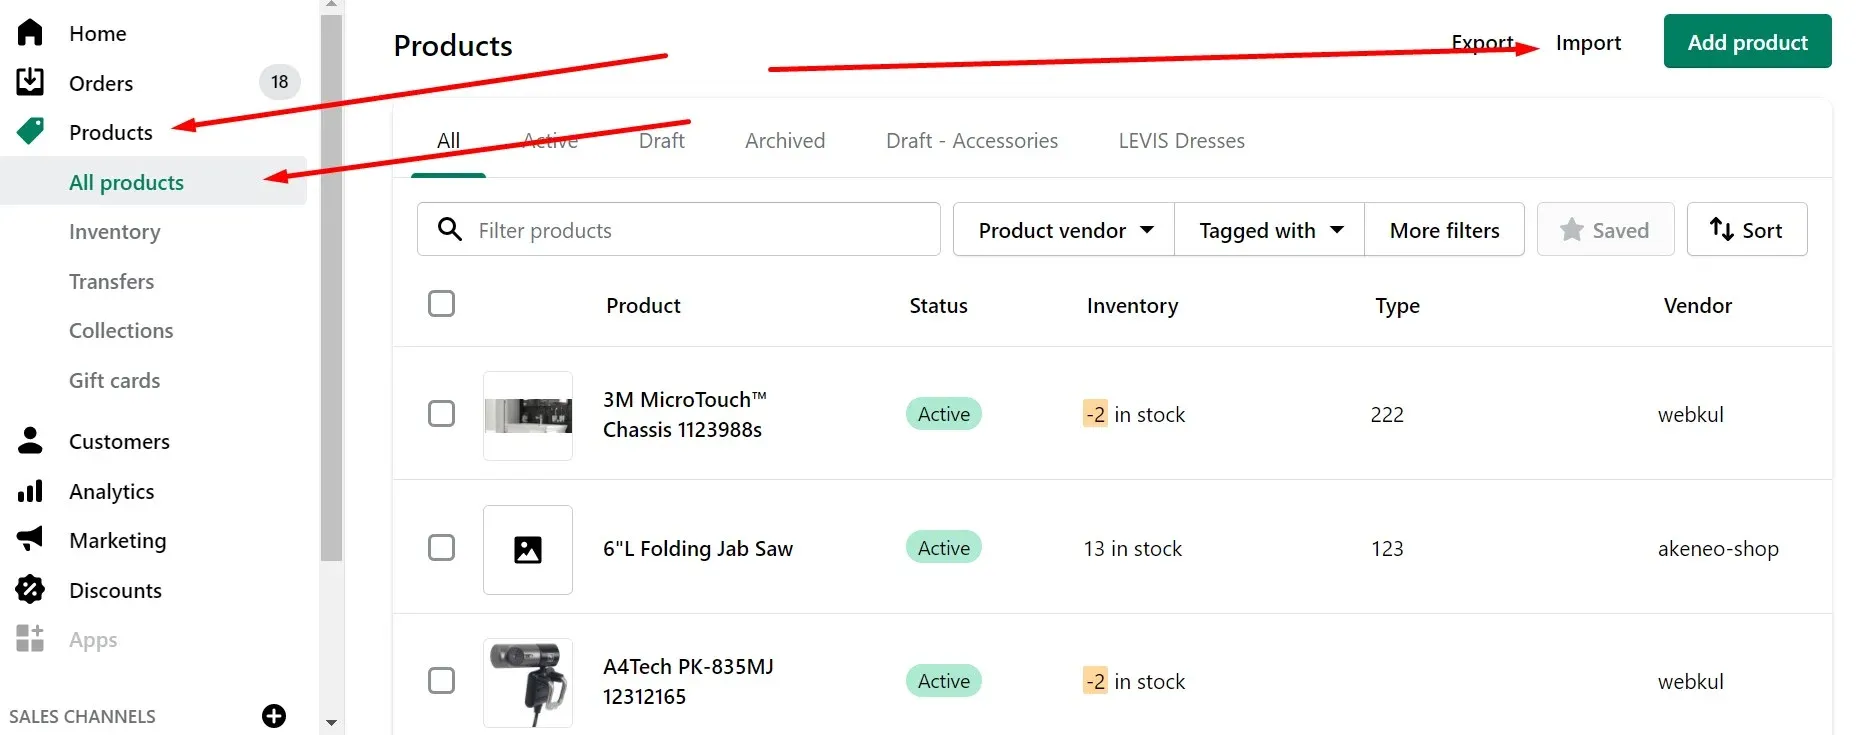
Step 3. Import the CSV into Shopify
Once your CSV is filled in and saved in UTF-8 format with comma delimiters, go back to the Shopify admin and head to “Products” > “Import.”
You'll have the option to “Overwrite products with matching handles.” This option is crucial if you're updating existing products, as Shopify will replace the current data with what's in your CSV. Also, remember that leaving a non-required column blank in your import will erase that data from your store; meanwhile, omitting the column entirely will preserve the existing info.
With that in mind, click “Upload and Continue,” and Shopify will process the file and perform the Shopify import metafields for you. That's it!
Advance Shopify Import Metafields with LitExtension
The native CSV method works well for straightforward, single-store updates. But when it comes to Shopify import metafields from another platform, this process might be complicated due to different data structures and complex field mapping. For store owners migrating from platforms like WooCommerce, Magento, and other solutions, a more robust solution is needed.
That's where LitExtension comes in. As a leading eCommerce migration service, we guarantee to import your essential data, including metafields, from another eCommerce platform to Shopify accurately and with utmost security. Unlike DIY CSV imports, LitExtension pairs you with migration experts who handle the entire Shopify import metafields process on your behalf, so you focus on growing your business.
Let Our Experts Handle Your Store Migration!
With the All-in-One Migration Service, our experts take care of everything, ensuring a seamless and stress-free migration.

Step 1. Technical consultation with LitExtension experts
To start with, LitExtension's team conducts a detailed technical consultation to fully understand your store's data structure. Our experts analyze your source platform's custom field schema, identify the migration approach, and scope the full complexity of the migration. This ensures every metafield namespace, key, and data type is accounted for before the migration begins.
Step 2. Pre-migration customization
Once the consultation is complete, LitExtension configures the migration to match your exact requirements. This includes:
- Collect the essential credentials, such as store's URL and API if needed.
- Setting up metafield definitions in your destination Shopify store (namespace, key, type).
- Mapping source custom fields to their correct Shopify equivalents.
Step 3. Run demo import
Before committing to a full migration, LitExtension runs a demo migration on a limited sample of your data. This gives you a real preview of how your data will look inside Shopify, with zero risk to your live store. Review the results carefully in Shopify Admin, confirm that metafield values appear correctly under the right products, and submit any feedback to the LitExtension team before moving forward.
Step 4. Perform the full migration
With the demo approved and configurations locked in, LitExtension executes the full migration. The process runs automatically in the background; your live store remains fully operational throughout, with no downtime for your customers. Depending on the size of your catalog, full migrations typically complete within a few hours. All product data, variants, images, and metafields are transferred simultaneously, maintaining the relationships between entities.
Step 5. Migration results testing
Once the full migration is complete, it's critical to verify the results before considering the process done. During this phase, our team of experts will conduct several rounds of testing to ensure your metafields are transferred successfully and accurately as per your requirements. When everything is in place, we’ll send you the confirmation of the project outcome.
Step 6. Post-migration tasks
After the successful Shopify import metafields process, there are several housekeeping tasks to complete before your new store is fully updated and operational.
- Free and unlimited Recent Data Migration if your new data is less than 5% of the initial migration.
- Free & unlimited Re-migration.
- Free & unlimited Smart Update.
Step 7. Customer support post-migration
Even after your Shopify import metafields process is fully complete, LitExtension's support doesn't stop there. Our dedicated Customer Support team will stay by your side well after the final data transfer, ensuring your new store continues to operate exactly as expected.
Bonus Reading: Shopify Export Metafields
While Shopify has introduced native CSV support for importing metafields, it does not offer a built-in export feature for this specialized data. Store owners who need to back up, audit, or migrate their metafield values from Shopify must rely on a third-party app to handle this. Fortunately, several well-established tools make Shopify export metafields straightforward, even for large catalogs.
Here are the top five apps for your consideration:
App name | Pricing | Key features |
BulkFlow (4.9/5) | $0 to $9.99 per month | - Exports metafields alongside full product, variant, and order data - Supports CSV and Excel output formats - Ideal for store owners who need regular scheduled exports without any technical setup |
Metafields Guru | $0 to $59 per month | - Dedicated metafield management tool built specifically for Shopify custom data - Allows granular export by resource type: products, variants, customers, and orders - Outputs data into a clean, structured CSV ready for editing or backup |
DataChamp Order Export (5/5) | $7 to $99 per month | - Specializes in exporting order and customer metafields - Offers highly customizable field selection and formatting rules - Supports automated delivery to email or FTP on a set schedule |
Matrixify | $0 to $200 per month | - Enterprise-grade tool supporting metafield export across all resource types - Handles extremely large catalogs with high reliability - Integrates with Google Sheets for live editing and two-way sync |
Firebear Import & Export (4.3/5) | $0 to $100 per month | - Supports multiple export formats: CSV, XML, and XLSX - Advanced filtering by metafield namespace or key for precise data extraction - Automates transfers via FTP/SFTP for hands-off, recurring exports |
For most store owners managing standard product metafields, Metafields Guru or BulkFlow offer the quickest path to a clean export. For larger stores with complex data structures or automation needs, Matrixify and Firebear provide the depth and flexibility required to handle metafield exports at scale.
5 Common Issues for Shopify Import Metafields
Even though Shopify import metafields via CSV sounds straightforward, many store owners run into avoidable issues that cause the process to fail or lead to incorrect data display:
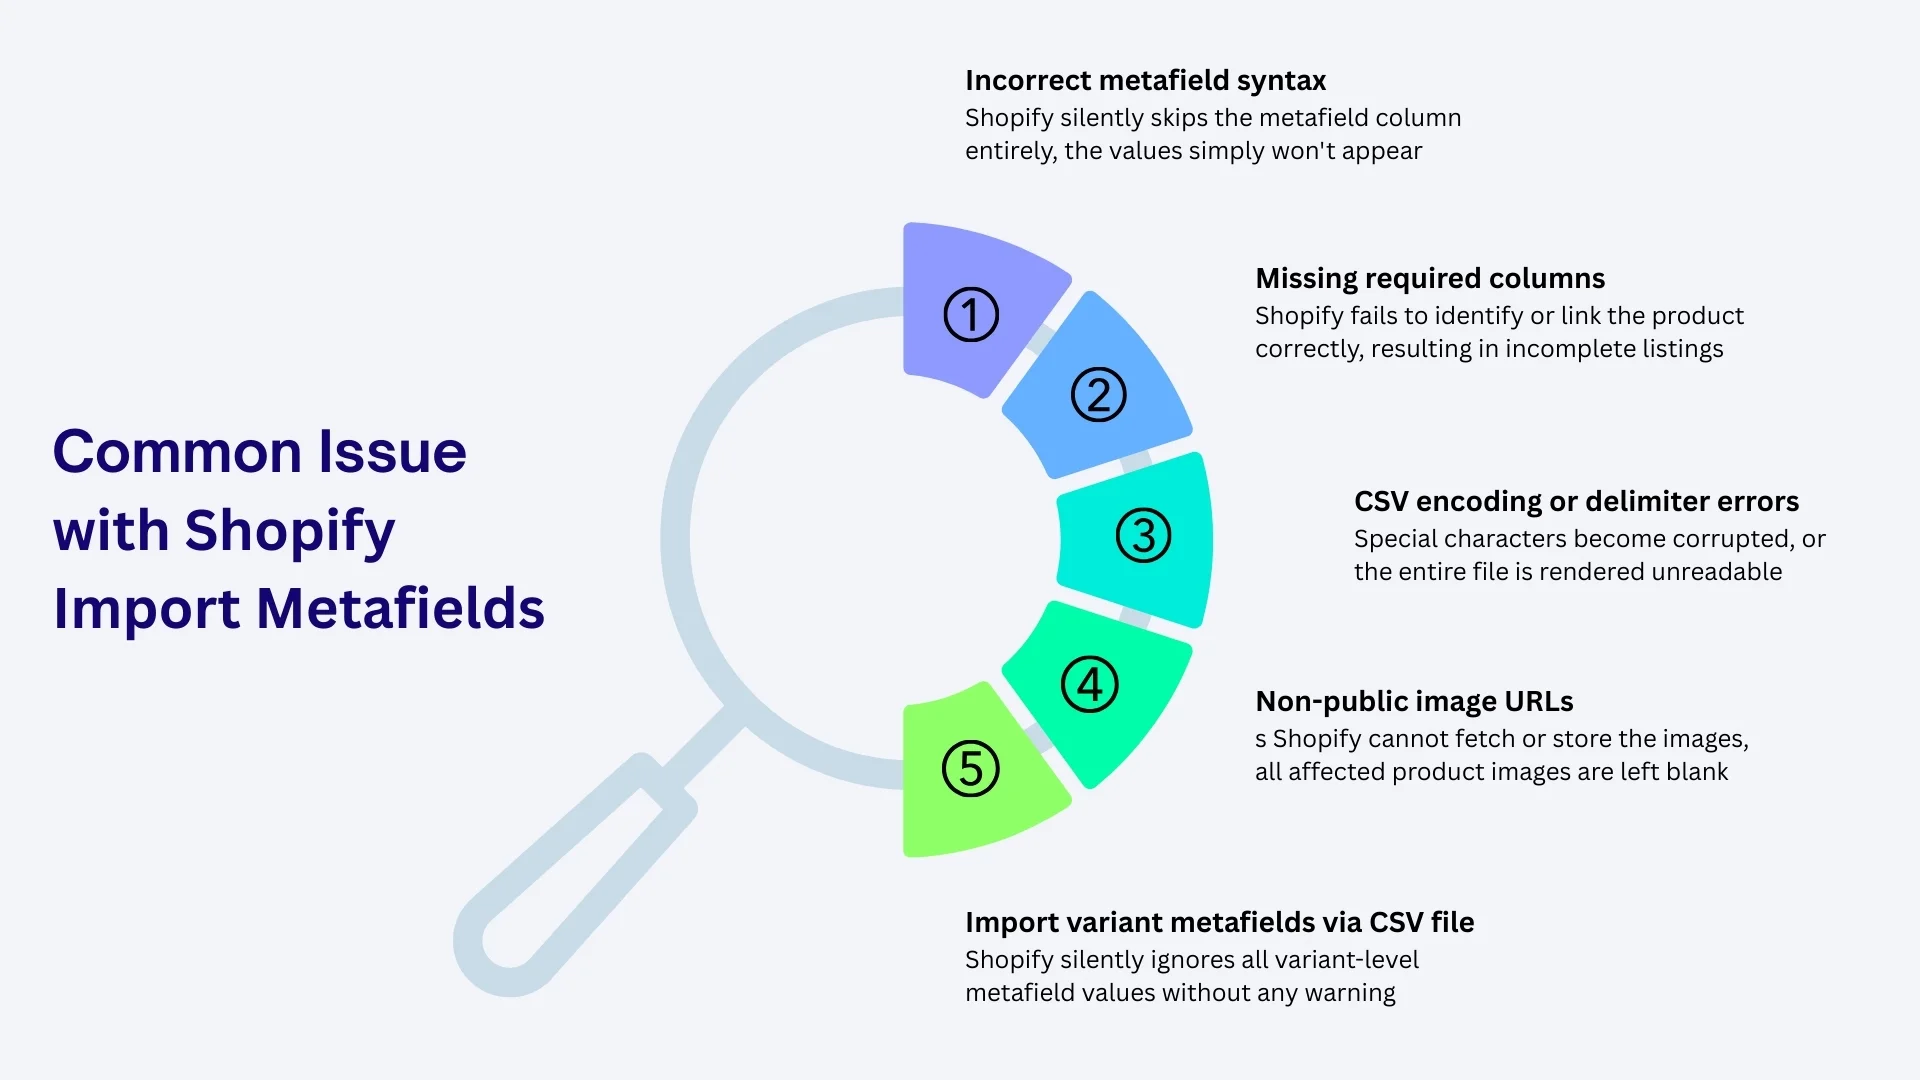
1. Incorrect metafield syntax
One of the most frequent causes of failed metafield imports is using the wrong column format in the CSV file. Shopify expects each metafield column to follow a strict structure like product.metafields.namespace.key, and even a small typo (such as missing the “product.metafields.” prefix or mismatching the namespace and key) will result in the metafield being skipped during import. Always double-check spelling and formatting before uploading.
2. Missing required columns
In every Shopify import, core columns like Handle, Title, Option1 Name, and Option1 Value are essential for defining product structure and variations. If any of these fields are omitted or incorrectly filled, Shopify may not recognize the product correctly or may fail to link metafields to the right variants. This can result in incomplete product listings or even the accidental creation of duplicate entries.
3. CSV encoding or delimiter errors
Shopify only accepts CSV files that are saved in UTF-8 encoding and use comma delimiters. If you're using spreadsheet software like Excel, which defaults to different encodings depending on your system locale, this can lead to corrupted text (especially with special characters) or a completely unreadable file. To avoid this, always export your CSV from a trusted editor and confirm encoding settings before uploading.
4. Non-public image URLs
When importing product images along with metafields, the image URLs in your Image Src column must be publicly accessible and direct-linkable. If your images are stored in private folders, behind login screens, or generated with expiring URLs, Shopify won’t be able to access or store them. Ideally, upload your images to Shopify’s Content > Files section or use static links from Dropbox, Google Drive (with proper permissions), or other image hosting tools.
5. Attempt to import variant metafields via CSV file
It’s important to note that Shopify’s CSV import feature only supports product-level metafields, not variant-level ones. If you include variant metafields in your CSV file, Shopify will simply ignore them without any warning. To manage metafields for individual product variants, you’ll need to use Shopify’s bulk editor manually or rely on apps like Matrixify for more advanced import functionality.
Best Practices for Successful Shopify Metafields Import and Export
Performing Shopify import metafields and export doesn't have to be complicated, but skipping a few key steps is the fastest way to end up with missing data, type errors, or a broken storefront. Therefore, following these best practices will save you significant time and frustration.
- Create metafield definitions before importing: Always set these values first before importing to avoid any missing keys.
- Use a consistent namespace and key naming convention: Decide on a clear structure and apply it uniformly across your entire store.
- Always test with a small batch first: Before running a full Shopify import metafields, test with 5–10 products. Verify that values appear correctly in the Admin and on the live storefront before scaling up.
- Export a full backup before making bulk changes: Before overwriting or updating existing metafield values, export your current metafield data. This gives you a clean restore point if anything goes wrong.
- Save your CSV with UTF-8 encoding: Always confirm the encoding in Excel or Google Sheets before uploading to avoid unexpected corruption of your special characters.
- Document your metafield schema: Maintain a spreadsheet that records every metafield's namespace, key, data type, and purpose for future reference.
Shopify Import Metafields: FAQs
How do I add metafields to Shopify?
To add metafields in Shopify, go to your "Shopify admin" > "Settings" > "Custom data." From there, you can create a new metafield definition by specifying its name, namespace, and content type (text, number, file, etc.). Once saved, this metafield will become available across your admin and can also be used in CSV imports or dynamic themes.
Can you import metafields into Shopify?
Yes, you absolutely can. Shopify allows you to bulk import product metafields using a CSV file. Or, if you're aiming for a full-scale migration, choosing a migration service like LitExtension is your best bet.
How do I bulk edit metafields in Shopify?
There are two main ways:
1. Using the bulk editor in your Shopify admin: Go to Products, select multiple items, then click "Bulk Edit". You can add metafield columns to the editor and enter values directly.
2. Via CSV import: Export your product data, ensure metafield columns are included (with correct formatting), then edit them in a spreadsheet and re-import the file.
Conclusion
So there you have it: two different ways for Shopify import metafields.
And though both approaches have their strengths, LitExtension offers a far superior experience when you're dealing with a large dataset or complex store structure. With over 12 years of expertise and 300,000+ stores successfully migrated, we ensure that everything is transferred correctly, securely, and without disrupting your store's operations. Reach out to us now for the smoothest Shopify migration!
For more information, check out our Shopify guide and join our Facebook Community.

