
Looking for a way to import or export product reviews in Magento 2? Although Magento 2 offers extensive customization options, managing product review data isn’t a built-in feature, making the process more challenging than expected.
In this guide, we’ll walk you through the most practical methods for Magento 2 import product reviews and export, including:
- How to perform Magento 2 import product reviews;
- How to export product reviews from Magento 2;
- Advanced import export Magento 2 product reviews with LitExtension.
Let’s explore each method to help you choose the right one for your needs!
Magento 2 Import Product Reviews: How to Do It via A CSV File
Regarding Magento 2 import product reviews, the most common method store owners turn to is via CSV files.
Though we do agree that this approach offers flexibility and detailed customization, it won’t take long before you realize that it’s far from beginner-friendly! In fact, the entire process can be time-consuming and extremely prone to errors and, therefore, demands very careful attention to formatting.
Still comfortable working with CSV files and want full control over the review import process? In that case, let us show you how you can do it safely and correctly.
Step 1. Make sure product reviews are enabled in Magento 2
Before the Magento 2 import product reviews, you should double-check that your Magento 2 store allows product reviews in the first place!
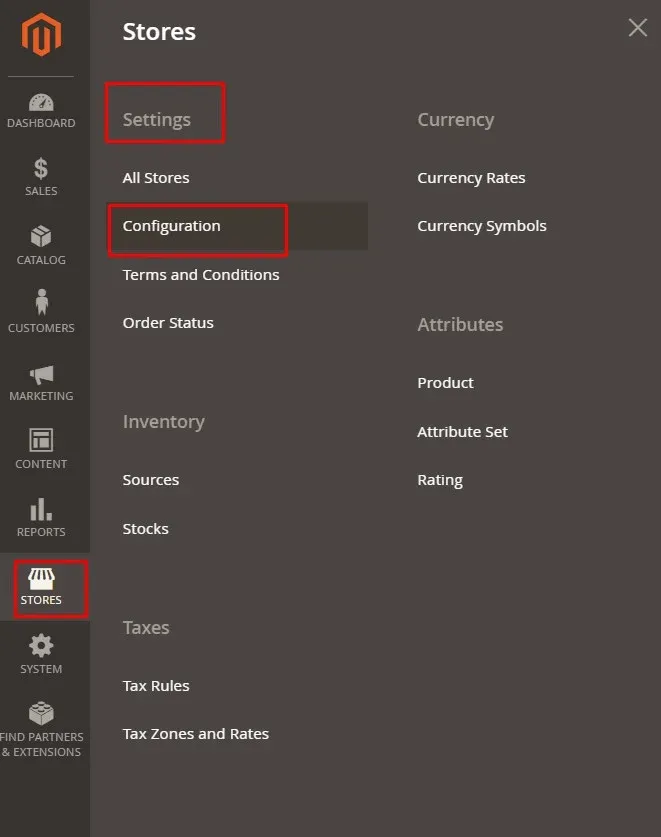
To enable this feature, in the Admin panel, go to Stores > Settings > Configuration.
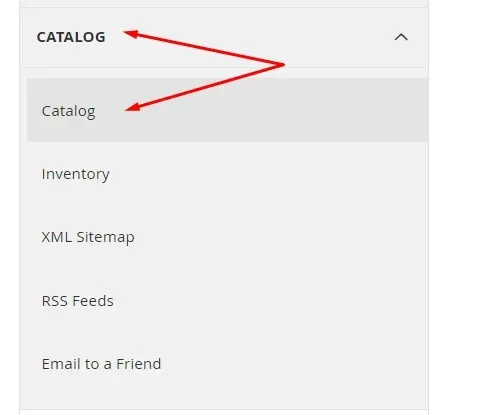
Next, expand the “Catalog” section and choose “Catalog” again from the sub-menu.
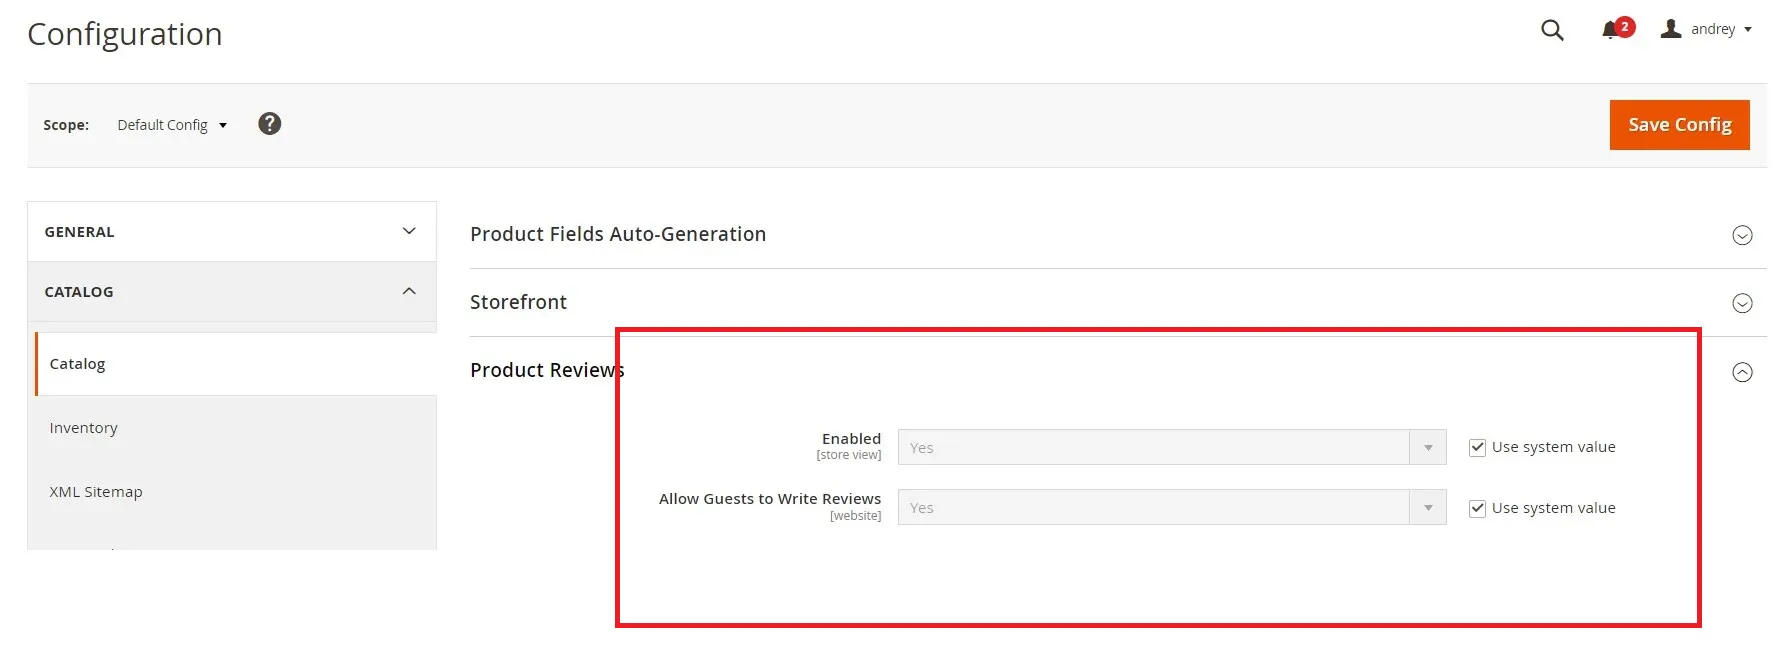
After that, scroll to Product Reviews and set Enabled to Yes. Remember to click Save Config to apply the changes!
Step 2. Understand the required CSV structure
Since Magento 2 doesn’t allow native product review imports, you’ll need an extra extension (e.g., the Improved Import & Export extension by Firebear Studio). These extensions usually accept a specific CSV format with key fields such as:
- sku: the product identifier the review is for
- nickname: reviewer name or alias
- title: short title of the review
- detail: the actual review content
- review status: one of: Approved, Pending, or Not Approved
- created_at: timestamp in Magento format
- Optional fields like “vote:Price,” “vote:Value,” and “vote:Quality” allow rating-specific details
- Leave review_id empty for new reviews, or include it to update an existing review.

If possible, get pre-built sample files from these extensions to avoid formatting issues.
Step 3. Set up an import job in Magento 2
Now, once your CSV is ready, it’s time to configure your product reviews!
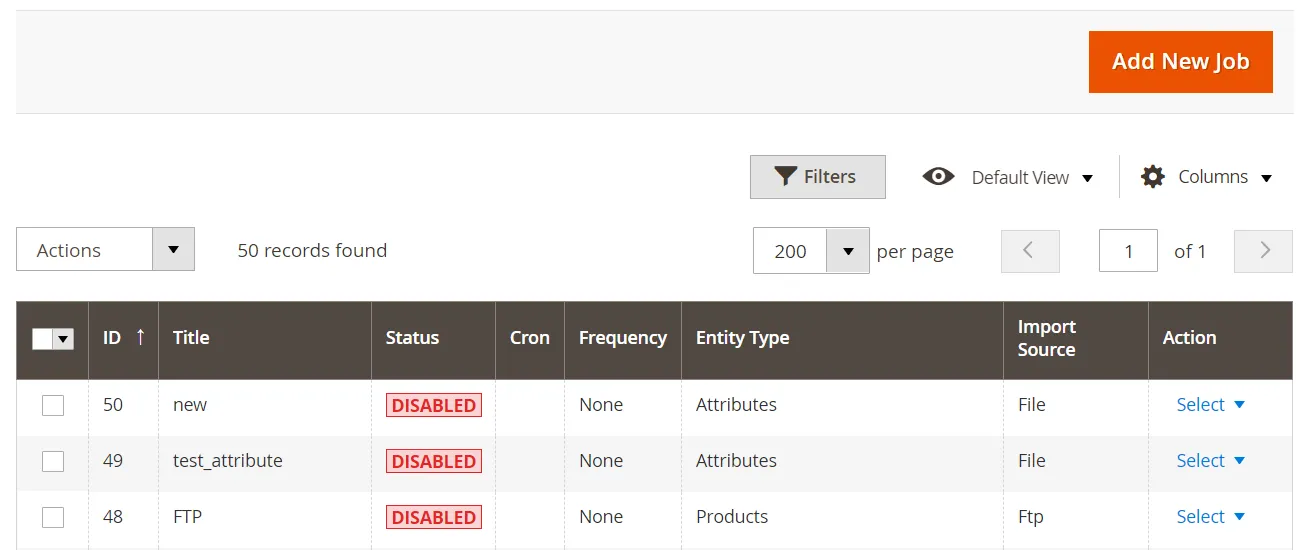
In your admin panel, go to System > Improved Import / Export > Import Jobs; then, click “Add New Job” and name your import job.
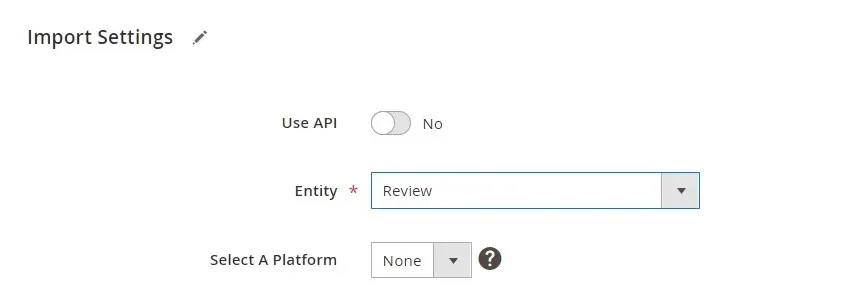
Next, under “Import Settings,” choose “Product Reviews” as your entity type.
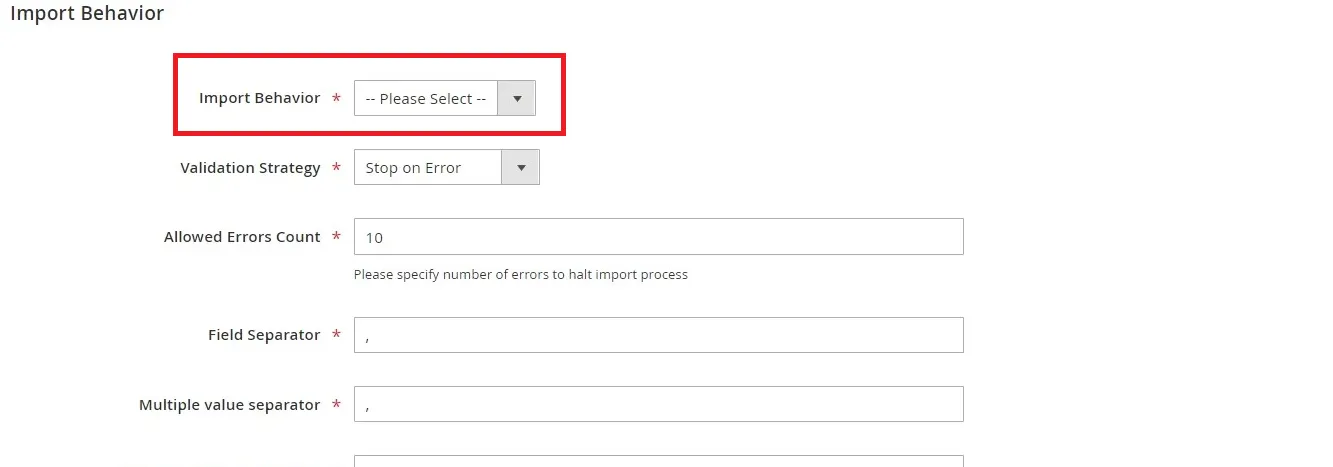
After that, set “Import Behavior” to “Add/Update” to ensure both new and existing reviews are handled. If needed, define separators and validation rules (e.g., comma as field separator).
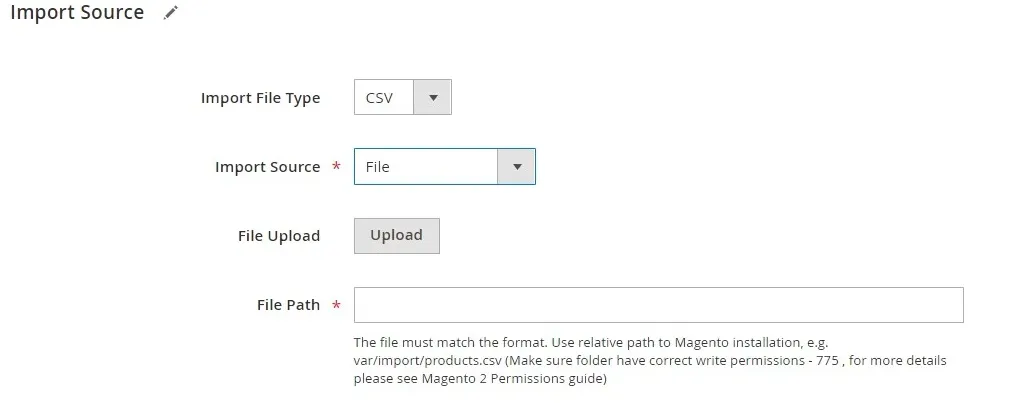
Once done, upload your CSV and select the correct source (local file, FTP, URL, etc.). We’re almost there!
Step 4. Run the Magento 2 import product reviews
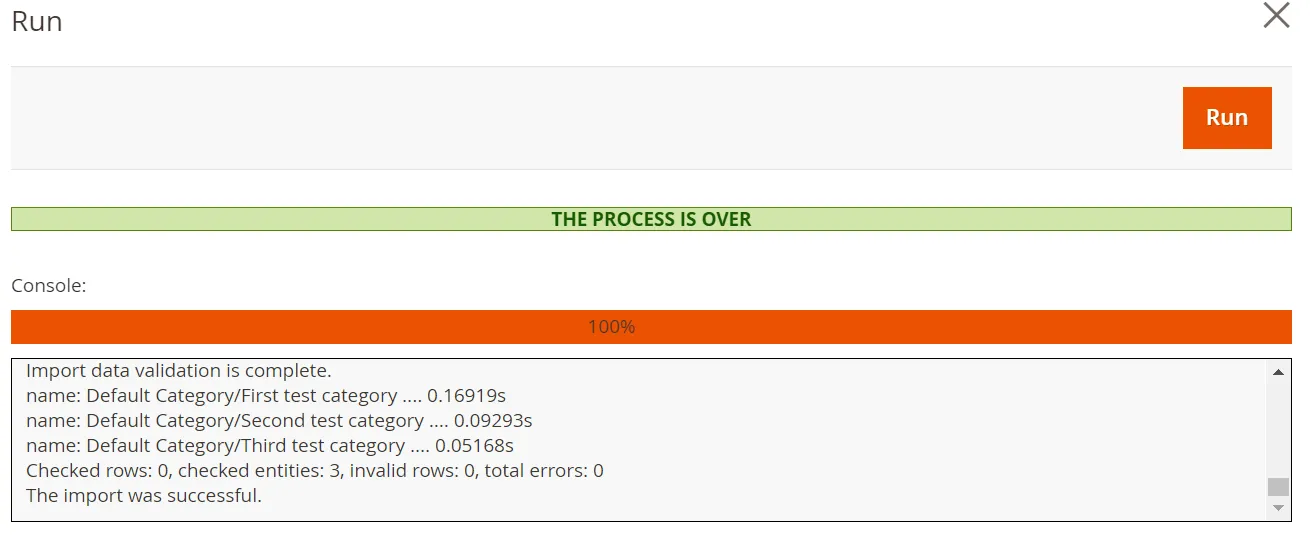
After saving your import job, click “Run” to start the process and monitor the logs for any formatting or review data issues. Errors will usually point to line numbers in the CSV for easier troubleshooting; go fix them accordingly when prompted to!
Step 5. Review, approve, and finish
Keep in mind that newly imported reviews might not be live right away, especially if they were imported as “Pending” or “Not Approved.” Therefore, you should head over to Marketing > All Reviews and manually approve them if needed. You can also bulk-edit status from this section.
And that’s it! You have successfully performed the Magento 2 import product reviews, albeit the process is admittedly tedious. If you want to find a less risky or technical alternative, our LitExtension experts can help.
Magento Migration Made Easy With LitExtension!
LitExtension offers great migration solutions that help you transfer your data from the current eCommerce platform to a new one accurately and painlessly with utmost security.

How to Export Magento 2 Product Reviews Easily
Magento 2 doesn’t include a built-in feature for exporting product reviews. If you need to back up reviews or analyze customer feedback, you’ll need a third-party extension.
Step 1. Install an extension
There are several Magento 2 import export product reviews for you to choose from, including MageBees, Meetanshi, MageAnts, FMEextensions, and Dolphin.
For this guide, we’ll use Firebear Improved Import & Export. It supports more than just product reviews. You can export multiple Magento entities, apply advanced filters, schedule export jobs, and work with different file formats.
To install the extension, download it from Firebear and install it via Composer or by uploading the package. Then, run the required Magento CLI commands to complete the installation.
Step 2. Go to the export admin
From your Magento Admin, navigate to System > Improved Import / Export > Export Jobs and click Add New Job.
Enter a job name under General Settings. If you plan to export reviews regularly, you can also configure a schedule to automate the process.
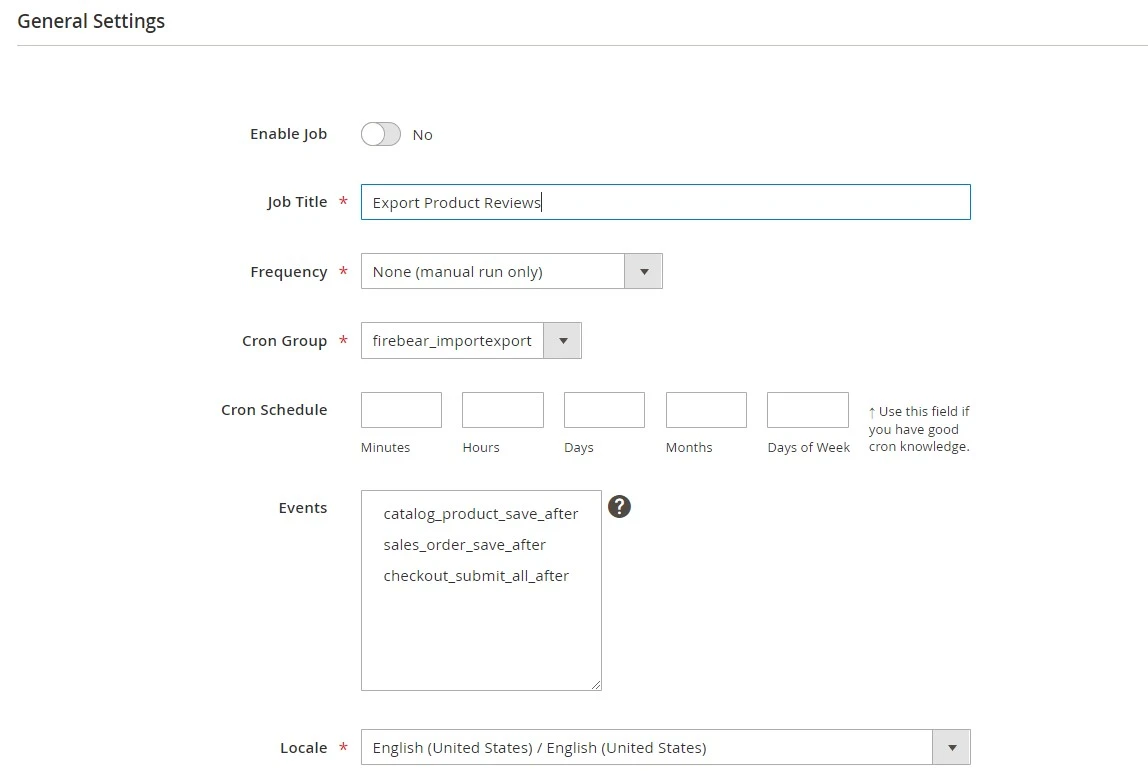
Step 3. Configure export settings
In the Export Settings section, select Review as the export entity. This tells Firebear to export only product review data.
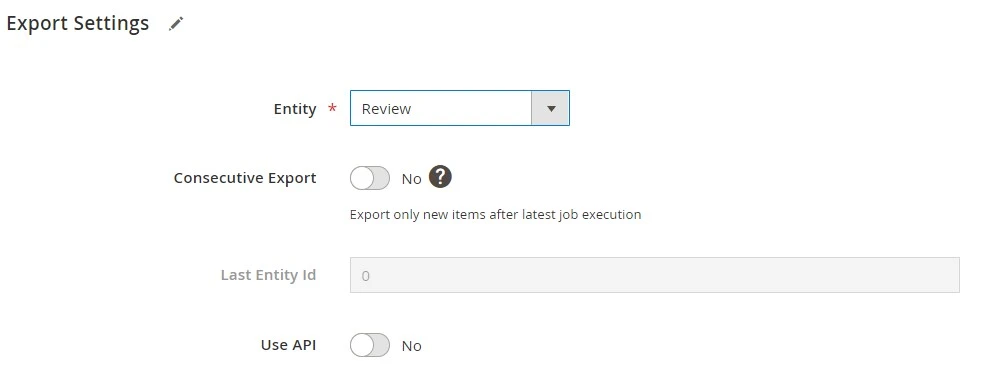
Next, choose your preferred export format, such as CSV, XML, JSON, or XLSX. If you want each scheduled export to include only newly submitted reviews, enable Consecutive Export.
Step 4. Choose the export destination
At this step, specify where the exported file should be saved. Firebear supports multiple destinations, including local storage, FTP/SFTP, Dropbox, Google Drive, and direct URLs.
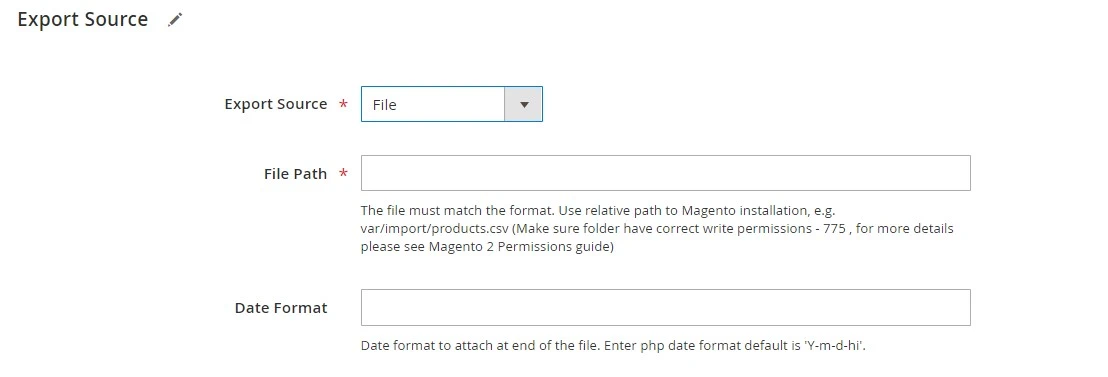
You can also apply filters or attribute mapping to export only specific reviews, such as those from a particular store view or with an Approved status.
Step 5. Run the export
Once you’ve finished the configuration, save the job and click Run. Firebear will generate the export file based on your settings, and you can download it from the job page or access it from your configured destination.
The exported file can then be used for backups, reporting, or importing product reviews into another eCommerce platform.
Advanced Migration Solution with LitExtension
By now, you’ve learned how to import and export Magento 2 product reviews using CSV files and third-party extensions. These methods work well for backups, small data updates, or one-time review transfers.
However, if you’re migrating an entire Magento store, product reviews are only one part of the process. You’ll also need to transfer products, customers, orders, categories, SEO URLs, and other related data while keeping everything properly mapped. Managing all of this manually can quickly become time-consuming and error-prone.
That’s why LitExtension offers a smarter, more efficient way to migrate your Magento store with ease and reliability. At the moment, we provide two migration solutions to fit different needs:
- Automated Migration for merchants who prefer a self-service approach.
- All-in-One Migration for businesses that want our migration specialists to handle the entire process.
Automated migration tool
With a few simple steps, you can move your Magento data (review title, product, export customer data, order, and more) without touching a single line of code:
Step 1. Set up your Source and Target carts
First, create a LitExtension account or sign in to your existing one. From the dashboard, click Create New Migration, select your Source Cart, enter its URL, and follow the on-screen instructions to install the connector.
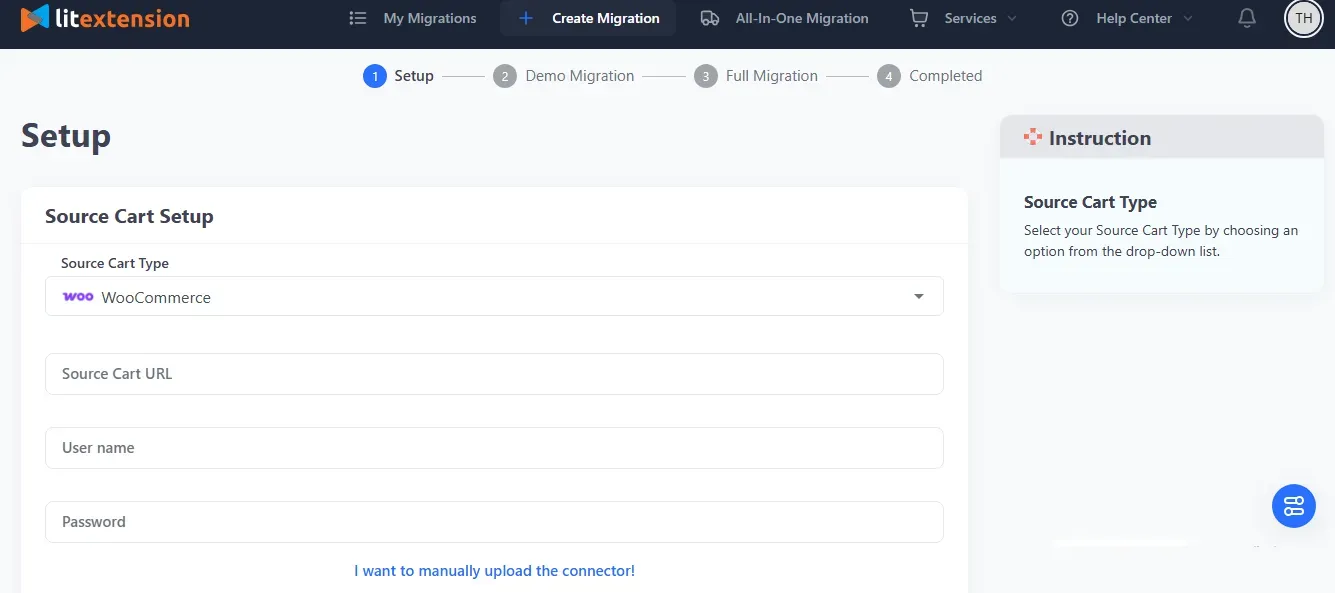
Next, choose Magento as your Target Cart. Enter your Magento store URL and complete the connector setup by following the same steps.
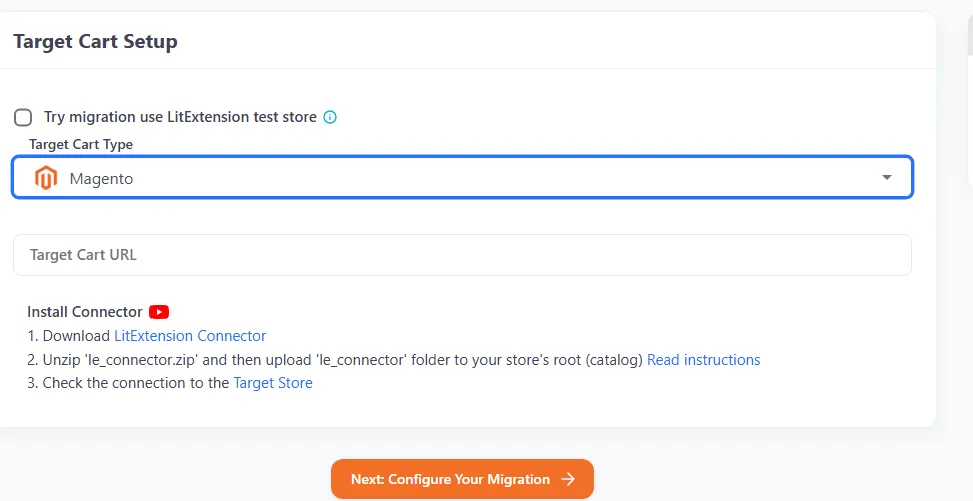
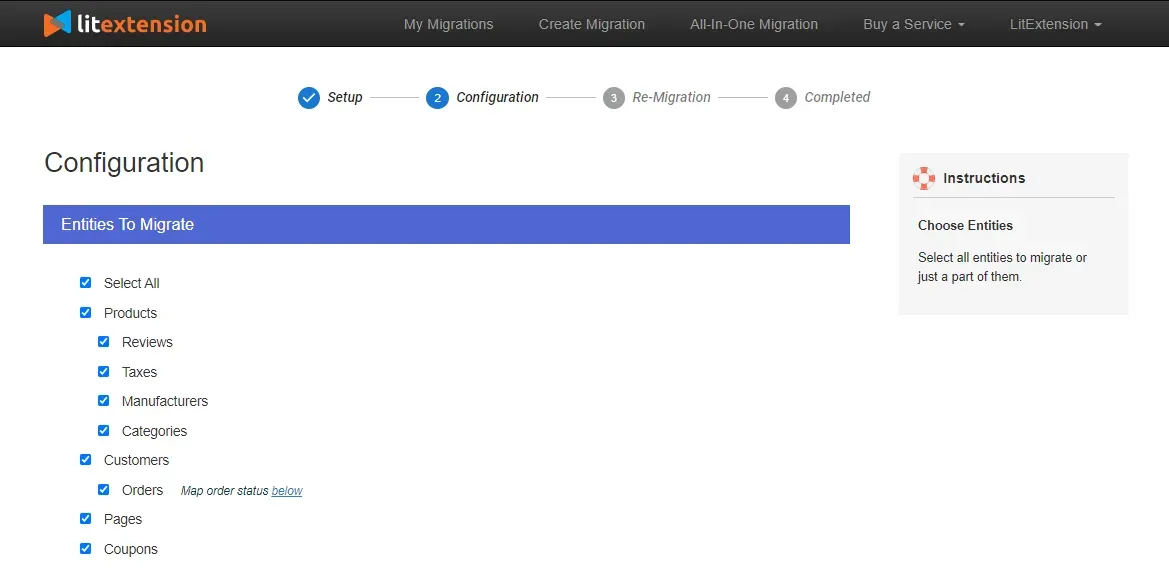
Step 2. Choose the data to migrate
Now, you’ll be prompted to select which types of data to transfer (products, categories, customers, orders, coupons, CMS pages, product reviews, metafields, and more). You can either check Select All or choose only what you need.
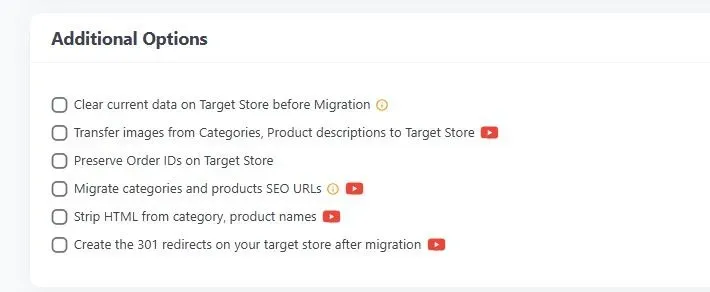
Scroll down to the Additional Options section, where you can enable them to customize the migration. Each option includes its pricing and a short explainer video. Then, map your languages and order statuses before moving to the next step.
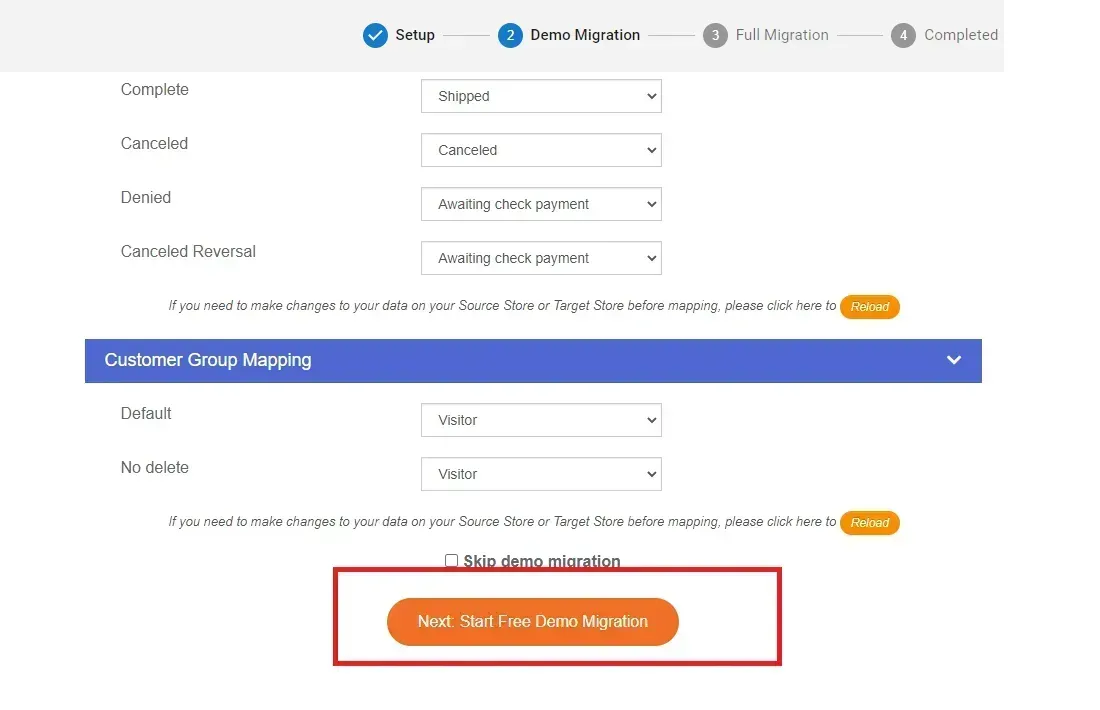
Step 3. Test and run your migration
Before running the full migration, LitExtension lets you perform a free demo migration with up to 20 entities of each data type. If you’re satisfied with the results, you can launch the full migration.
The migration runs on LitExtension’s servers, so you don’t need to keep your browser open. Once the process is complete, you’ll receive an email notification.
And let’s not forget about the post-migration perks after the full migration starts. Within 60 days from the date your payment is made, you will get:
- Unlimited & free Re-migration;
- Unlimited Recent data migration (if the data is less than 5% of the initial migration);
- Unlimited Smart update.
Thanks to these built-in services, you can keep your Magento store up to date even if new data is created during the migration process.
All-in-One migration service
For most standard Magento stores, the automated migration is more than enough. However, if your store contains extensive customizations or complex data structures, our All-in-One Migration Service is the better choice.

Step 1. Consultant by LitExtension experts
The very moment you reach out, a migration consultant from our team will review your Magento store and requirements thoroughly, whether you’re moving product variants, custom reviews, customer accounts, blog content, or something unique. After confirming the scope and pricing, just sign the agreement and leave the rest to us!
Step 2. Data mapping and setting by experts
Next, our team will proceed to install the needed extensions on the new store and fine-tune settings for accurate data mapping
Better yet, during this step, you’ll also get unlimited demo migrations to validate progress and ensure everything aligns with your expectations! Throughout the process, we’ll stay in close contact with you, gathering feedback and making adjustments as needed to ensure everything goes exactly the way you want.
Step 3. Full migration execution
Once approved, LitExtension will begin the complete data transfer. You’ll receive regular updates throughout, and any concerns will be addressed promptly. No detail is too “small” for us; everything is thoroughly checked before your new store goes live!
Additionally, the All-in-One package also offers thorough, comprehensive post-migration support up to 60 days from the date that your migration is completed:
- Unlimited Recent data migration (up to 5% of total data);
- Unlimited Smart updates;
- 02 Re-migrations.
In short, this is the ultimate peace-of-mind package for Magento store owners or anyone who wants zero disruption and maximum precision!
Magento 2 Import Product Reviews: FAQs
How do I add product reviews in Magento 2?
Manually, go to Marketing > User Content > Reviews, click Add New Review, select the product and customer, then enter the review details. You can also enable customer-submitted reviews via the storefront.
How do I import reviews to Stamped?
To import product reviews into Stamped.io for your Magento store, you’ll need to first export your reviews from your existing review platform (if applicable) and then upload them as a CSV file into Stamped.io. You’ll then need to configure the Stamped.io plugin in your Magento store to display the imported reviews.
How do I import product images in Magento 2 using CSV?
Include image paths in the CSV (e.g., /media/import/image.jpg) under the relevant columns like base_image, small_image, thumbnail, etc. Make sure the images are uploaded to the correct /pub/media/import/ directory. Then, use Magento’s built-in import tool under System > Import.
Does Magento 2 support exporting product reviews?
Not natively. To export product reviews from Magento 2, you’ll need an extension like Firebear, MageBees, or Meetanshi. These modules can export review data to CSV for backups, reporting, or migration.
What’s the easiest way to migrate product reviews to Magento 2?
If you’re only transferring a small number of reviews, you can perform Magento 2 import product reviews with the built-in tool on the admin dashboard.
However, if you’re migrating an entire store, we recommend using LitExtension. Our migration solution transfers product reviews together with products, customers, orders, and other store data in one process, saving time and minimizing manual work.
Conclusion
So, that’s a wrap on the methods for Magento 2 import product reviews and export!
Though the CSV method can be a good starting point, it often falls short in terms of speed and accuracy at scale. That’s where LitExtension comes in as the most reliable and professional Magento migration partner. With 15+ years of experience, we always have tailored solutions to meet all your specific needs!
For more tips on import export product reviews and ways to improve customer experience, check out our Magento guide and join our Facebook Community.


