If you’re using the QuickBooks Migration Tool, there’s a high chance you’ve run into a problem where your QuickBooks migration failed unexpectedly. This frustrating scenario is all too common for many users, leaving them unsure of how to fix the problem while safeguarding their valuable data.
Fortunately, you’ve come to the right place! To fix your problem, we will show you eight ways to fix QuickBooks migration failed unexpectedly:
- Recover your backup data;
- Relocate your files;
- Move the QuickBooks data folder;
- Update your QuickBooks version;
- Use Data Protection Service;
- Run the migration in compatibility mode;
- Update your device system;
- Reach out to the support team.
Let’s start now, shall we?
Common Causes of QuickBooks Migration Failures
QuickBooks Online Migration Tool is an in-house tool provided by Intuit to help users transfer their data from QuickBooks Desktop to QuickBooks Online and vice versa. On paper, this QuickBooks data transfer utility sounds like a convenient solution, but in practice, many users have encountered the frustrating “QuickBooks migration failed unexpectedly” error.
From our experience, these failures usually stem from 5 common causes. Understanding them helps you better prepare for a successful migration – or at least know what to look out for.
1. Data incompatibility
One of the biggest challenges with QuickBooks migration is data compatibility. QuickBooks Online has strict requirements for the type and format of data it can accept, and even small discrepancies can cause the QuickBooks migration failed unexpectedly error. For instance:
- Payroll data: Paychecks and tax records require manual input and cannot be transferred directly into QuickBooks Online.
- Bank statement data: Must follow specific formats such as CSV, QFX, QBO, or OFX to be accepted by QuickBooks Online.
- Other data (e.g., Customer or Vendor Lists): Needs to be in CSV format for successful migration.
That’s why it’s so important to make sure your data is formatted correctly before starting the migration. Otherwise, overlooking even a small detail can throw off the entire process and leave you with time-consuming manual fixes later.
2. Data corruption
Another common issue causing QuickBooks migration failed unexpectedly is the integrity of your company file. The file can become damaged for various reasons, such as unexpected system crashes, power outages, or improper shutdowns of QuickBooks.
This problem tends to be even worse with larger company files, as they are more complex. These files often contain more links between different pieces of data, like transactions and accounts. So, if any of these links are broken, it can lead to major errors when moving data among QuickBooks versions.
3. File size limitations
If your business has been growing steadily over the years, there’s a good chance your QuickBooks data has expanded along with it. While this is great for tracking your success, it might lead to challenges during migration.
Specifically, the QuickBooks Desktop Migration Tool has a cap of only 750,000 targets or files up to 5 GB, including customers, vendors, accounts, and transactions. To avoid complications, be sure to double-check your file size before migrating them. Otherwise, you will have to break the migration into smaller batches, which can be both time-consuming and frustrating.
4. Connectivity issues
Smooth communication between your QuickBooks data and the migration tool is crucial. Unfortunately, it doesn’t always go as planned!
A slow or unstable internet connection can sometimes interrupt the process, leaving your QuickBooks migration failed unexpectedly. Other times, the issue isn’t the internet at all – firewalls or antivirus software might block the tool from accessing the necessary files or servers.
Whether caused by network issues or security settings, these disruptions can quickly turn an already delicate process into a frustrating experience.
5. Outdated systems
If your software isn’t up-to-date, the QuickBooks migrator tool might not even get off the ground. To make it work, you’ll need QuickBooks Desktop Accountant versions 2021 R17, 2022 R15, 2023 R12, or 2024 R6 – or any newer release.
Additionally, your source files must come from supported editions, such as QuickBooks Desktop Pro, Premier, or even Desktop for Mac.
And it’s not just QuickBooks that needs updating. Your Windows operating system must also be current (Windows 10 or later) in order to run properly. If either your QuickBooks or Windows version is out of date, your migration may not even start.
Seamlessly migrate your store to a more robust place!
LitExtension can safely transfer your data to unlock more growth on the new platform.

8 Ways to Fix QuickBooks Migration Failed Unexpectedly
Of course, no one wants to bump into the above-mentioned QuickBooks migration errors. Nevertheless, the good news is that there are practical solutions to help you get back on track. Below are eight effective ways to recover your business from QuickBooks migration failed unexpectedly. Join us and follow the steps carefully!
1. Recover data from a backup
Having a reliable backup of your QuickBooks company file can be a lifesaver when migration issues arise. Let us show you how to create one:
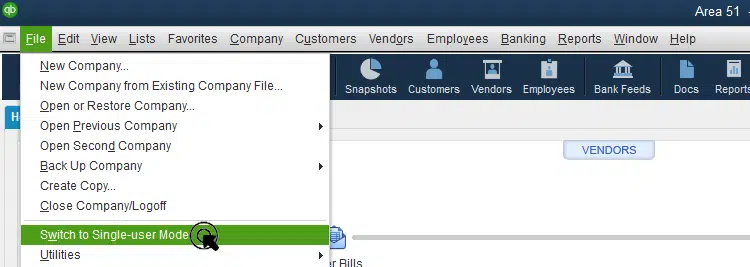
Step 1: Go to the File menu in QuickBooks and select “Switch to Single-user Mode”.
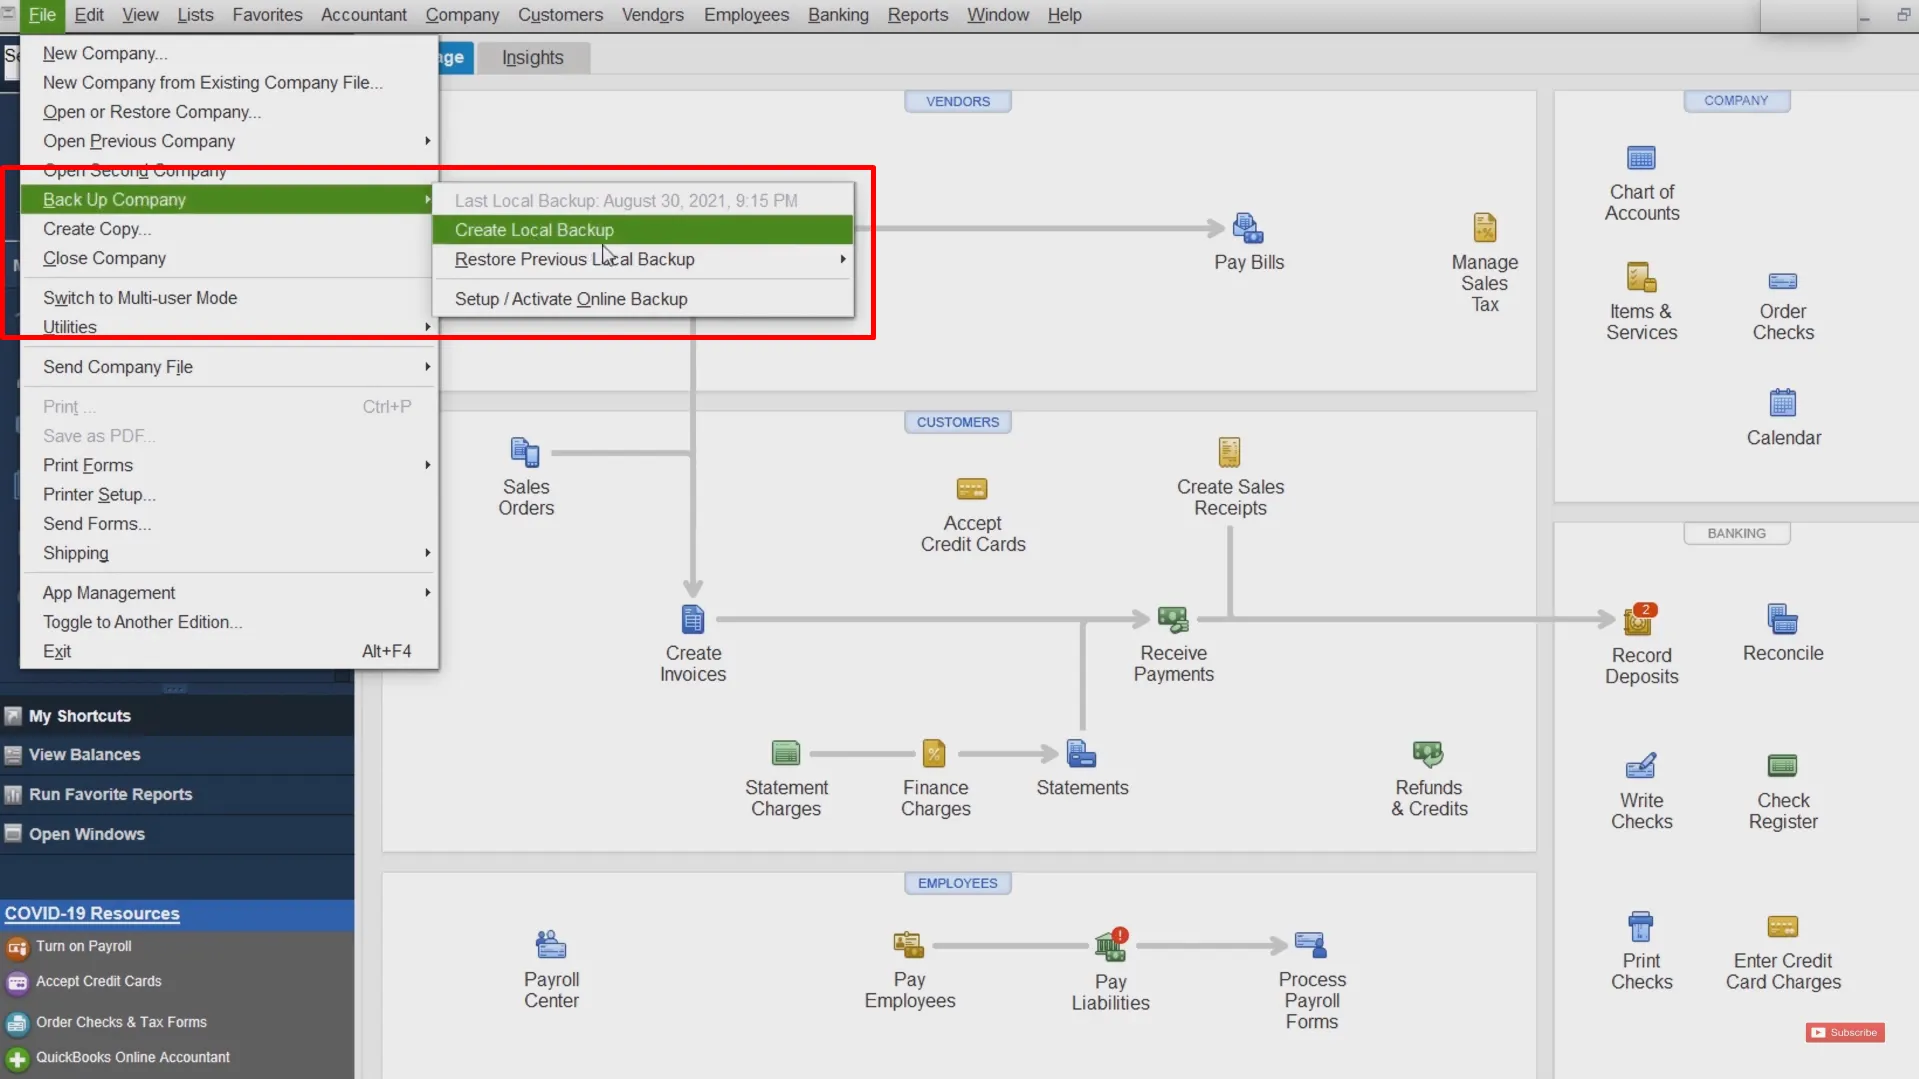
Step 2: Next, in the File menu, hover over “Back Up Company” and select “Create Local Backup”.
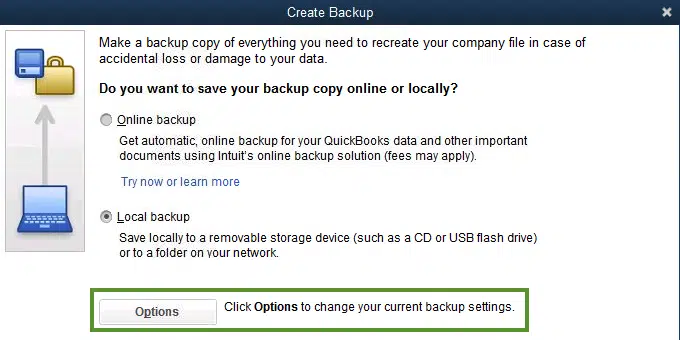
Step 3: Select “Local Backup”, then click “Options” to set your backup references.
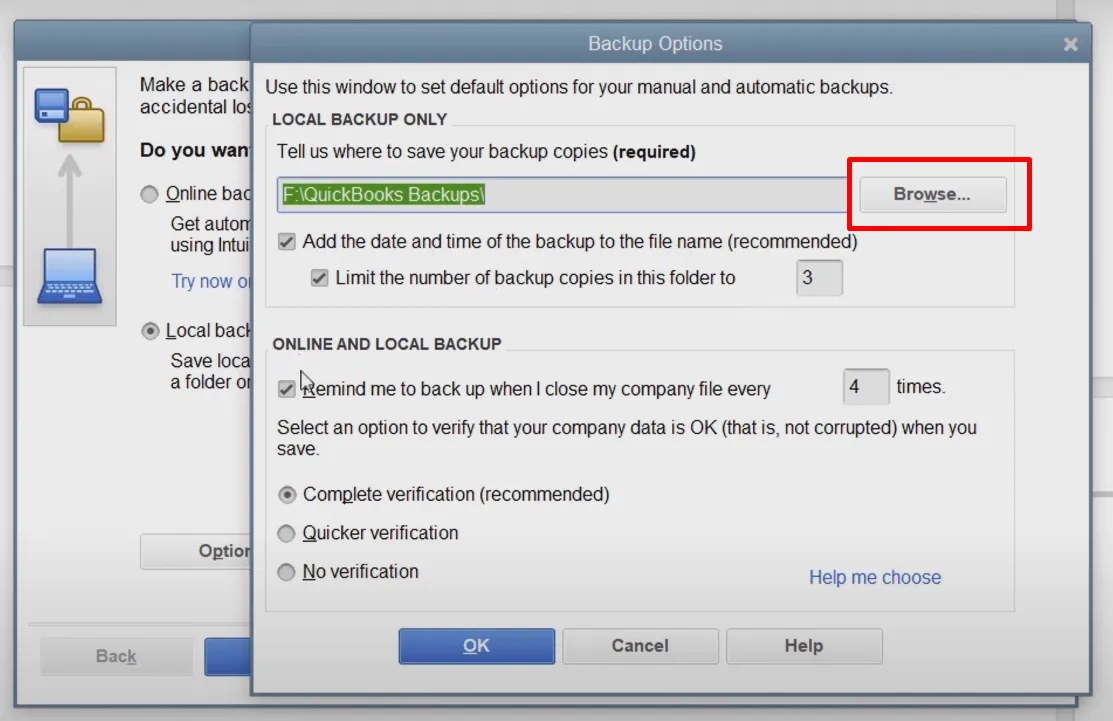
Step 4: Once done, use “Browse” to choose where to save your backup file and (optionally) set the number of backups to keep.
Step 5: Run a test to ensure the backup is good, hit “Save it now,” then click “Next” > “Finish.”

Tip: You can set backup reminders in the Online and Local Backup section to automate the process.
With the backup file created, you can now restore it at any time to deal with the QuickBooks migration failed unexpectedly error.
Before we start, please note that if your backup is on a USB or cloud storage, you should transfer it to your local hard drive. After that, follow these steps to continue:
Step 1: In QuickBooks, go to the File menu, and select “Open or Restore Company”.
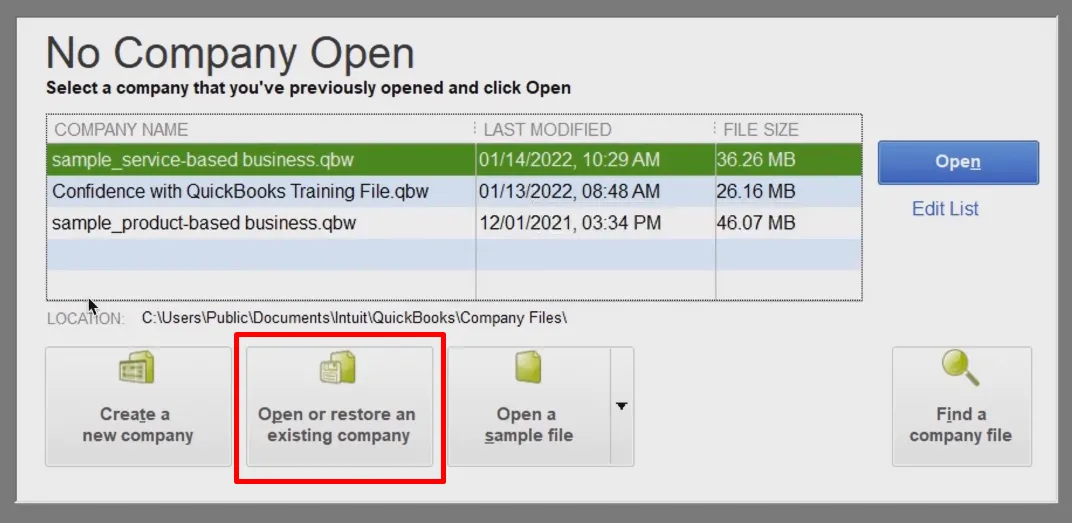
Step 2: Then click “Restore a backup copy”.
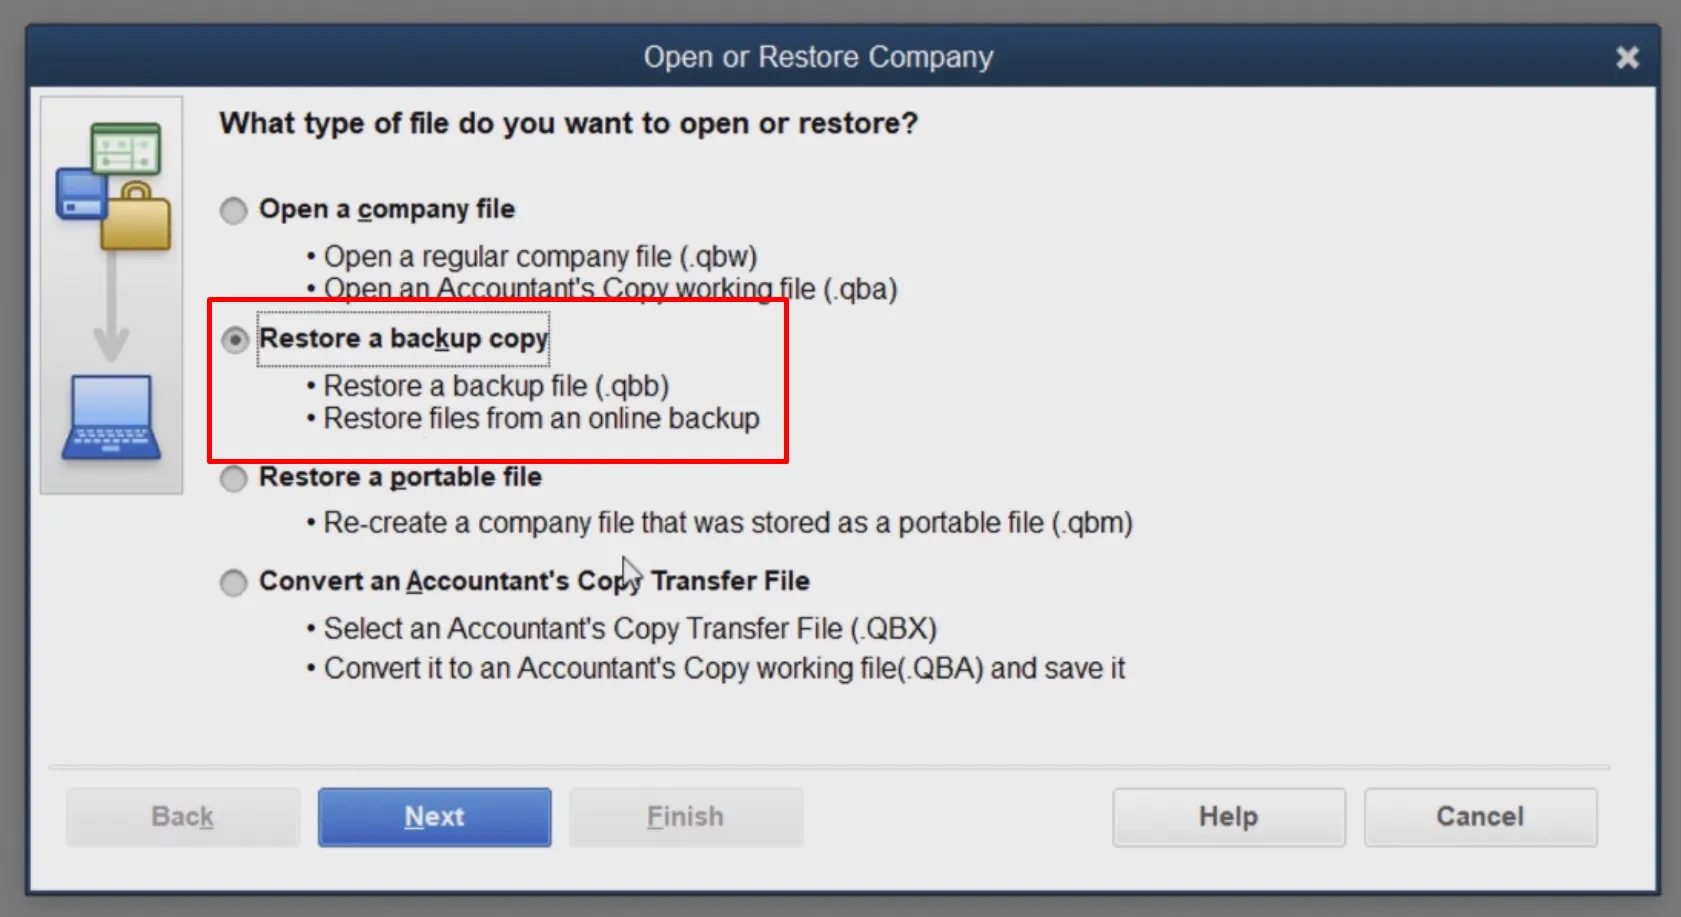
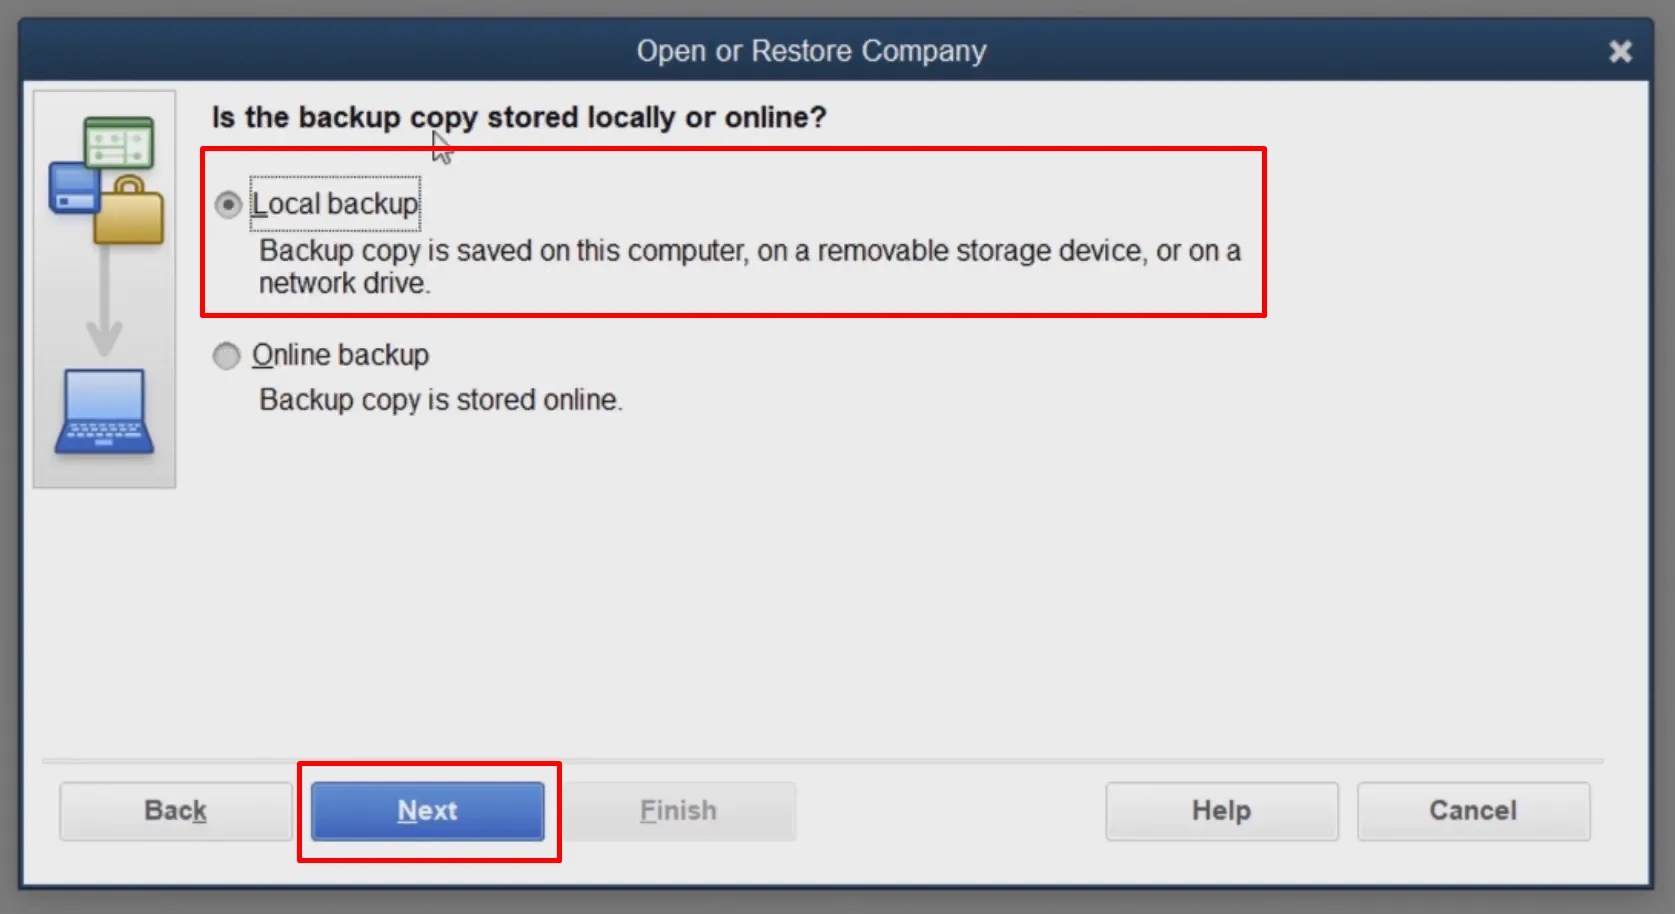
Step 3: Next, choose “Local Backup > Next”, and locate your backup file (it will have a .qbb extension).
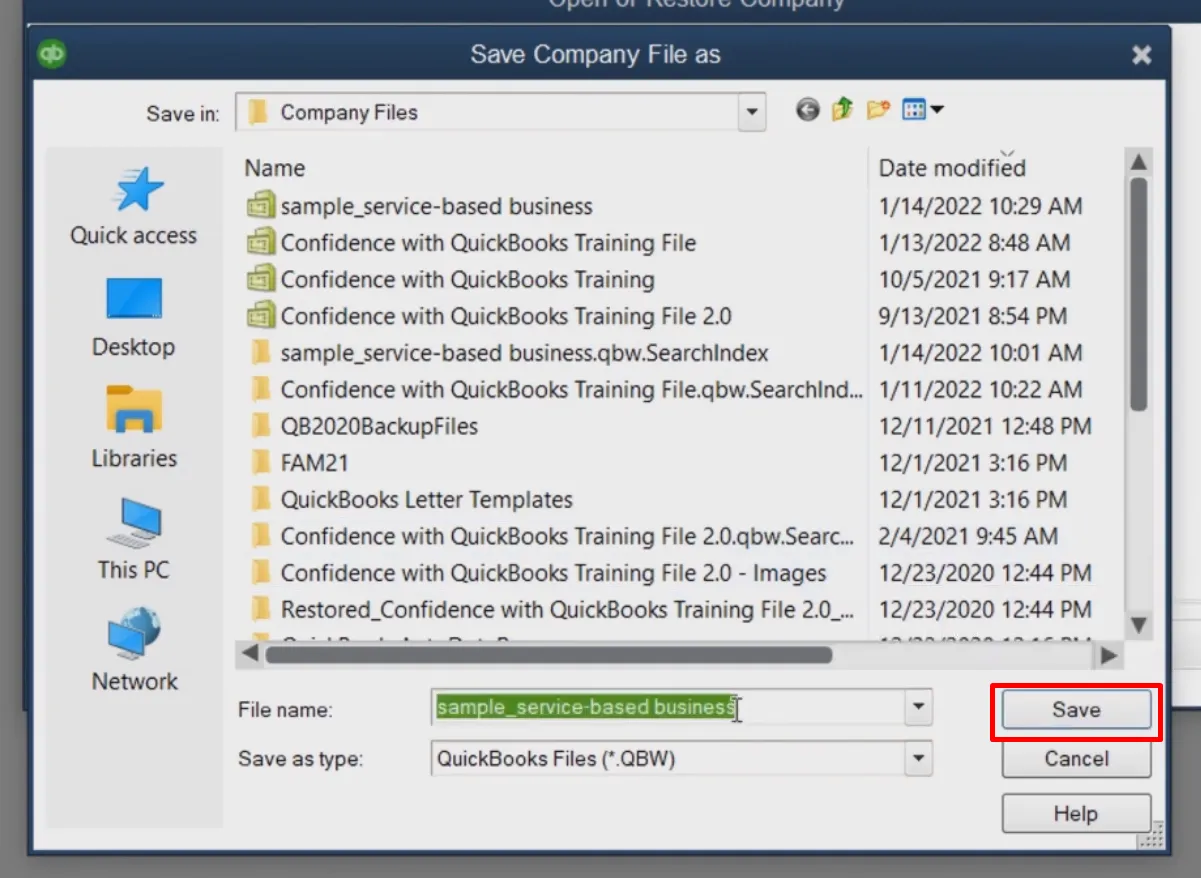
Step 4: Pick a folder to save the restored file. You must rename your existing file or the backup version to avoid overwriting.
Step 5: Hit “Save” and you are done!
2. Relocate specific files to a new directory
Sometimes, QuickBooks migration failed unexpectedly errors occur because the tool can’t properly access certain QuickBooks files. This might be due to file path restrictions or permissions issues. Moving these key files to a new, easily accessible directory can often solve the problem and give the migration process a smoother start.
Here are the steps to relocate your files:
Step 1: To start with, find the folder containing your QuickBooks backup files in the QuickBooks directory.
Step 2: After that, open the folder, then right-click and “Copy” the following files:
- Cash Flow Projector;
- Printer Settings;
- QB Letters;
- Financial Statement Designer;
- QB Templates.
Step 3: Finally, “Paste” these files into a different location on your local drive, ensuring they’re secure and easy to access.
3. Move the entire QuickBooks data folder
If creating a backup isn’t your preferred option, you can learn how to transfer QuickBooks to a new computer. This alternative helps resolve file path or access issues that may be causing migration errors.
Follow these steps to move your QuickBooks folder to a new location safely:
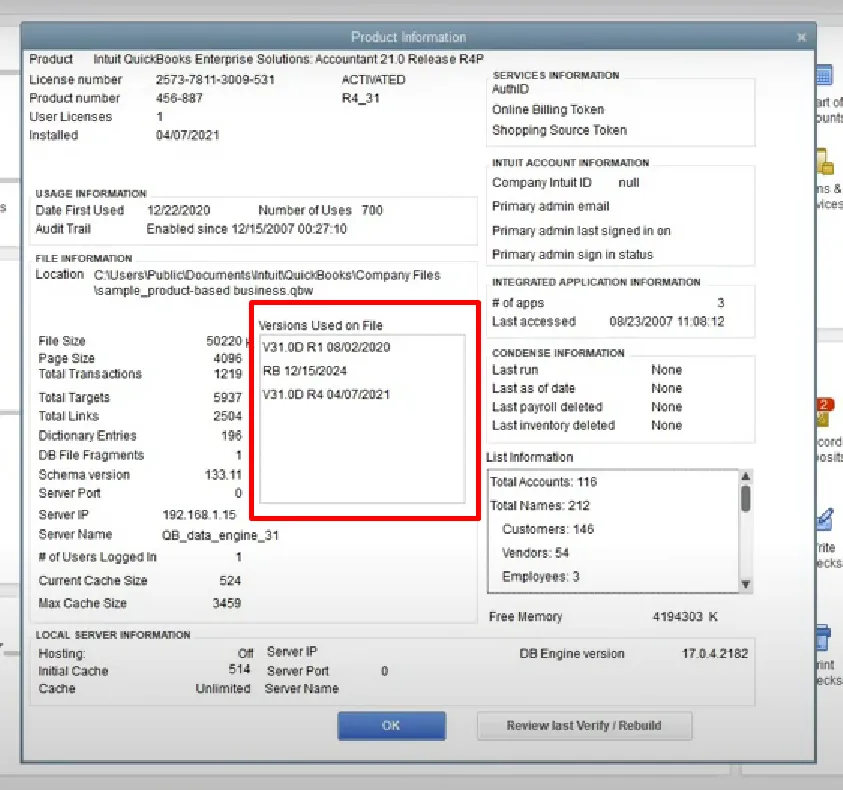
Step 1: First, open QuickBooks and the company file you want to move.
Step 2: Press F2 (or Ctrl+1) to open the Product Info window. Once done, check the “File Information” section to see where your company file is saved.
Step 3: Following that, open the “Windows Start” menu and then open “File Explorer”.
Step 4: Then, find the folder containing your company file, right-click it, and select “Copy”.
Step 5: Afterward, open the new location on your hard drive or an external device and select “Paste” to move the folder.
Step 6: At this point, open QuickBooks, select “Open or Restore an Existing Company,” then browse to the folder you just copied. You can now open the company file from its new location.
4. Update your QuickBooks version
As mentioned earlier, your QuickBooks Desktop must meet specific version requirements to use the QuickBooks Migration Tool. To start with, let’s check your current QuickBooks Desktop version:
- Open QuickBooks Desktop.
- Press F2 (or Ctrl+1) to open the “Product Information” window.
- Look for your current version and release to see if it meets the requirements.
If your version is outdated, follow these steps to update:
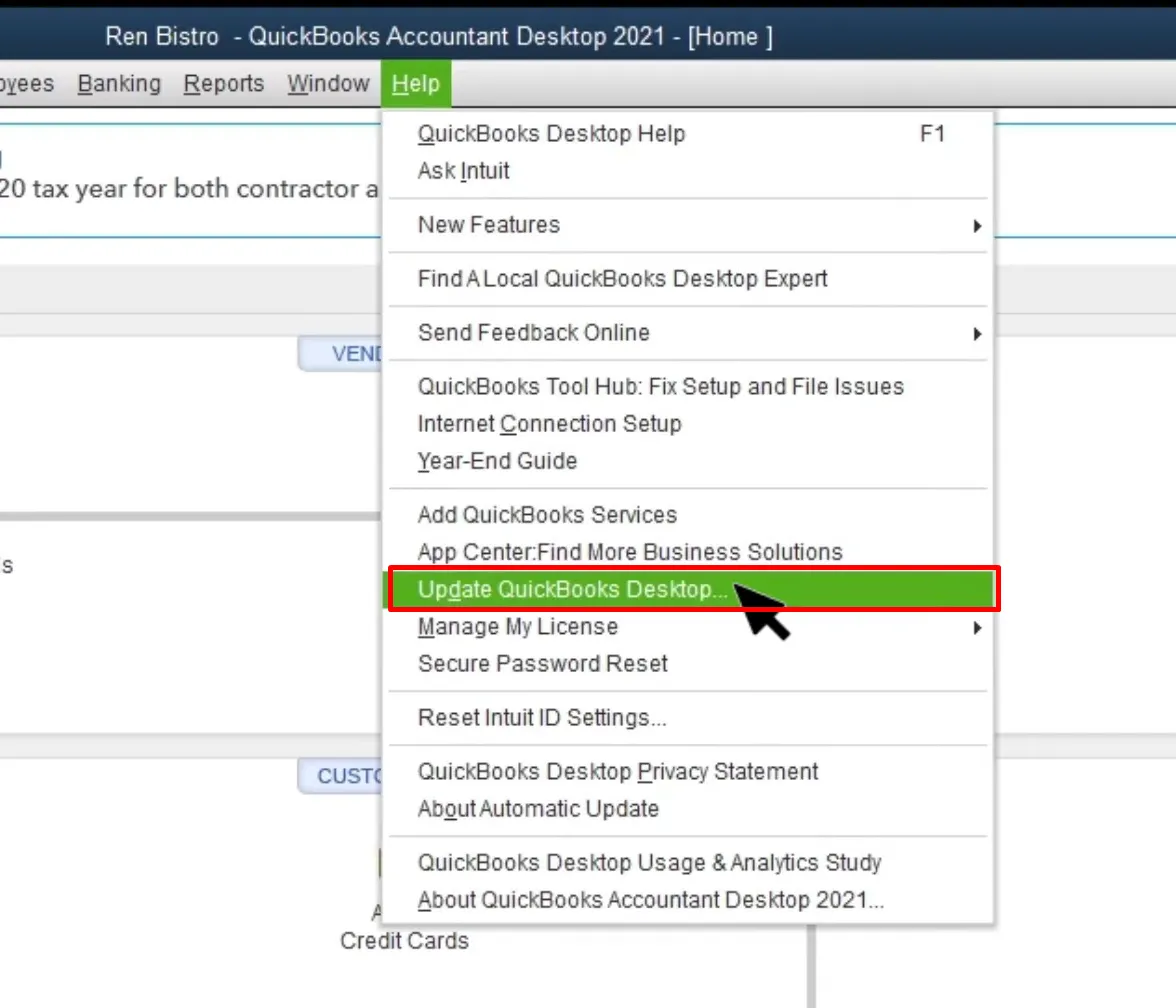
Step 1: First of all, go to the “Help” menu and select “Update QuickBooks Desktop”.
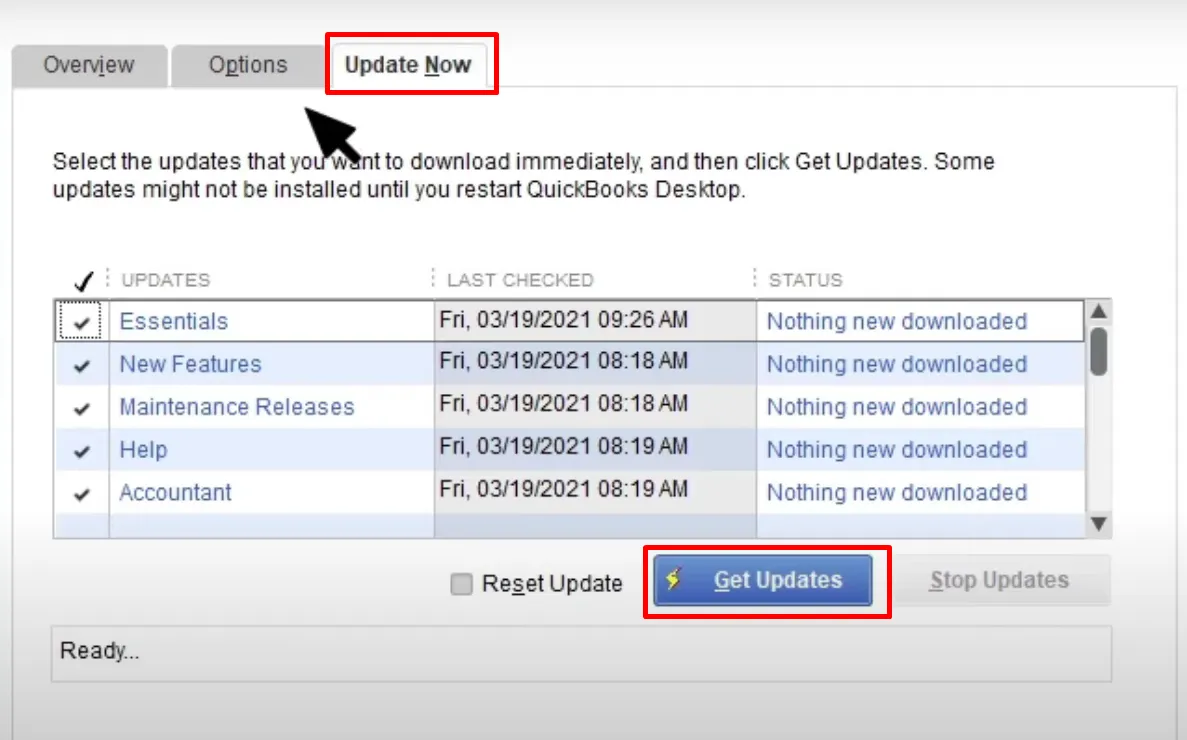
Step 2: After that, in the “Update Now” tab, click “Get Updates”.
Step 3: When the updates are downloaded, a pop-up will ask you to restart QuickBooks – click “OK” to finish the update process.
5. Use Intuit’s Data Protection Service
As one of the most reliable backup services, Intuit Data Project performs automatic daily backups to give you quick recovery options when Quickbooks migration failed unexpectedly. To configure this feature, keep the guide below in mind:
Step 1: For this, right-click the “Intuit Data Protect” icon (a green padlock) on the Windows toolbar and select “Open Intuit Data Protect”.
Step 2: Then, you click “Back up now” to start the process.
Step 3: Thereafter, select the files and folders you want to back up and click “Continue”.
Step 4: Now, click “Backup now”, and wait for the confirmation message stating the backup was successful.
Step 5: To complete the process, please select “OK”.
6. Run the migration tool in Compatibility Mode
If you encounter the QuickBooks migration failed unexpectedly error, it might be due to compatibility issues between the migration tool and your operating system. Fortunately, running the tools in Compatibility Mode can often resolve these conflicts:
Step 1: Find the .exe file for the QuickBooks Migration Tool and right-click on it.
Step 2: Next, choose “Properties” from the menu that appears.
Step 3: In the Properties window, go to the “Compatibility” tab.
Step 4: Then, check the box labeled “Run This Program in Compatibility Mode” and select the operating system that works best with the tool.
Step 5: Lastly, click “Apply” to confirm the changes and then hit “OK”.
7. Update your operating system
Still using an older version of Windows? That might be the reason your migration isn’t working. The QuickBooks Migration Tool needs Windows 10 or later, so keeping your operating system updated can make all the difference:
Step 1: To begin, open the “Start” menu on your computer and type “update” into the search bar.
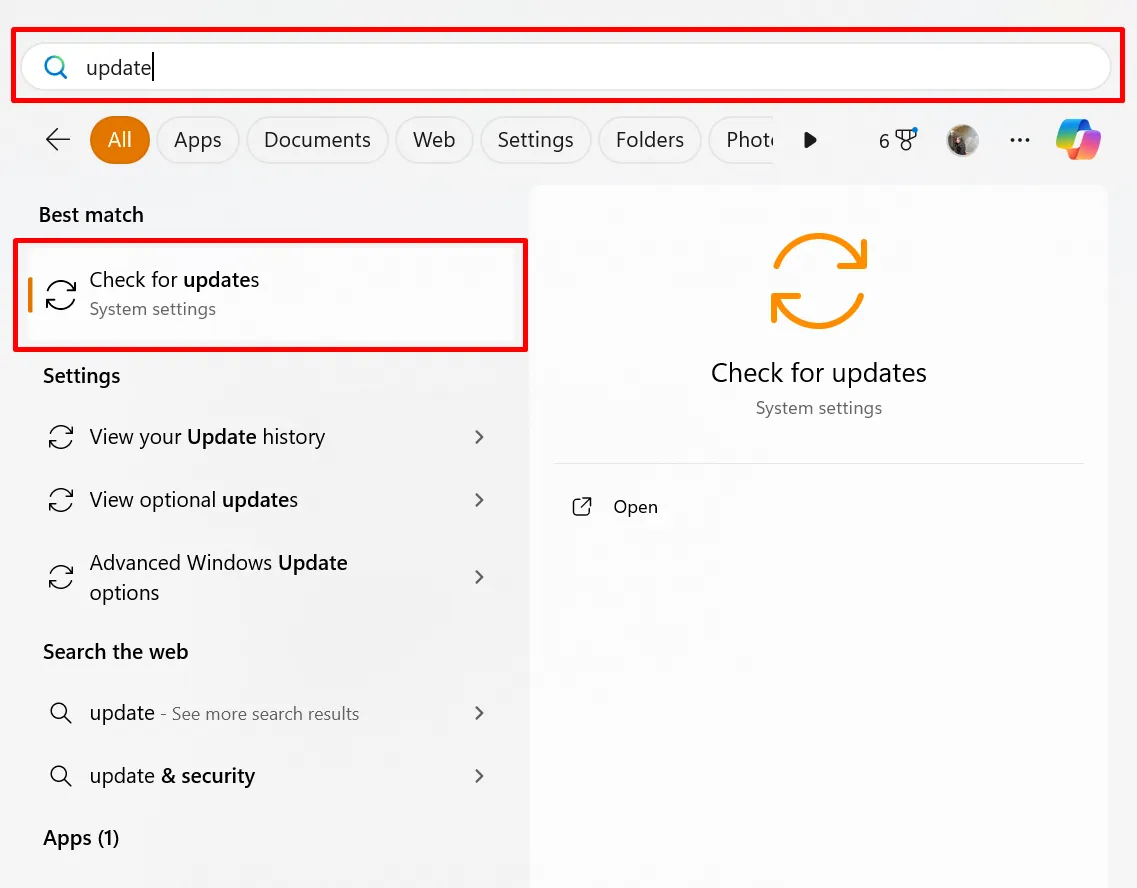
Step 2: Select “Check for updates” to see if any updates are available for your device.
Step 3: If updates are listed, click “Download and Install” to start the process.
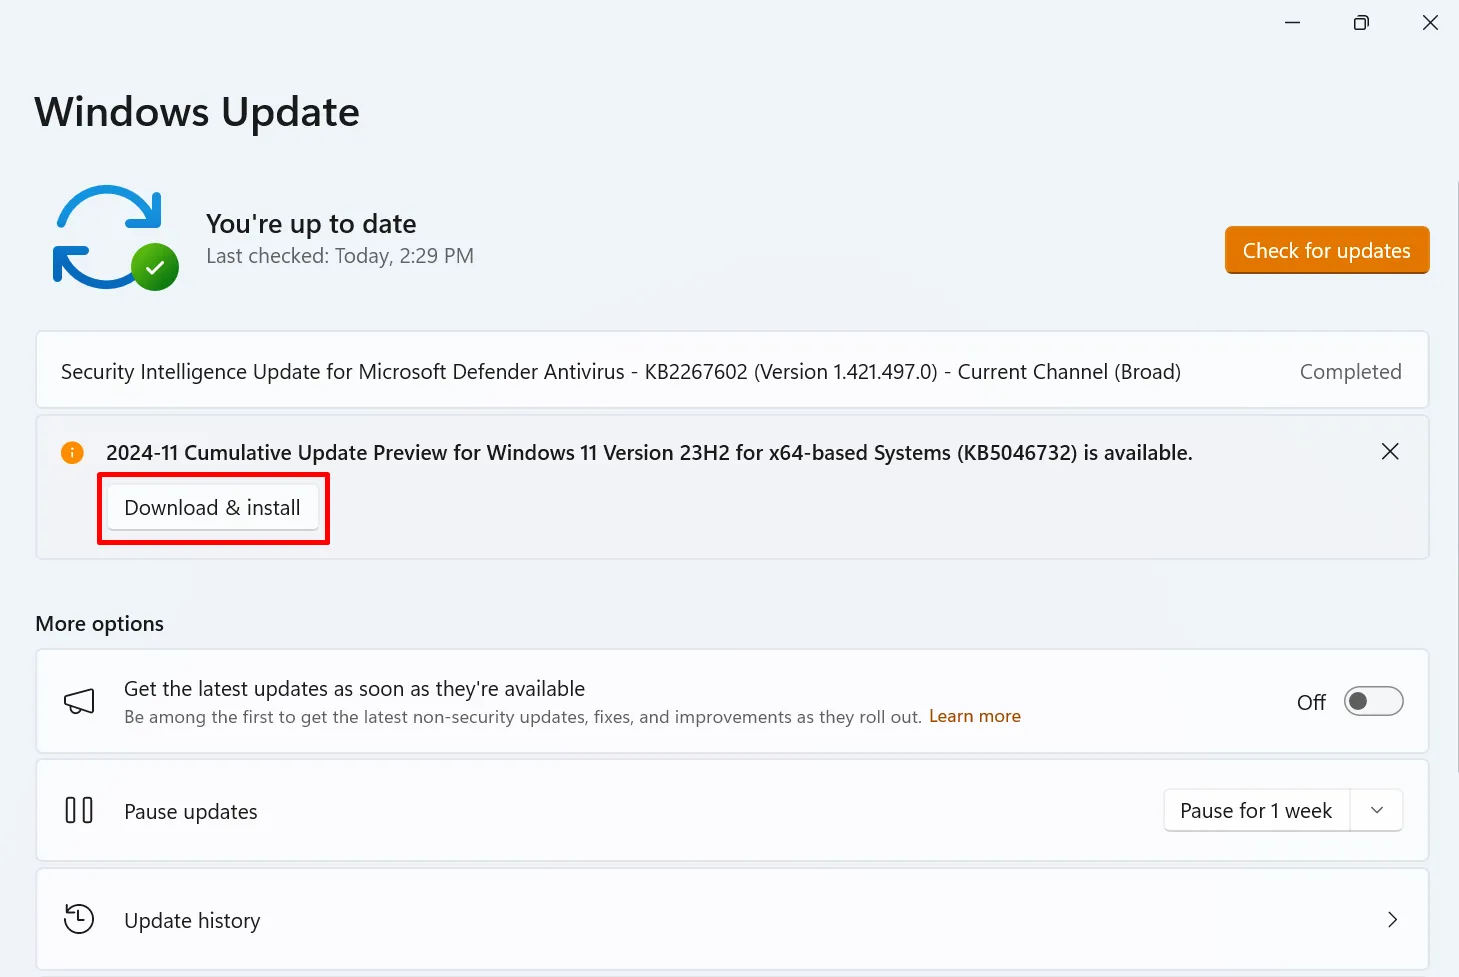
Step 4: Finally, restart your computer once the updates are complete to apply the changes.
8. Reach out to the QuickBooks Desktop Support team
And what if you've tried the previous solutions and still encounter QuickBooks migration issues, such as QuickBooks migration failed unexpectedly in Windows 11? It's high time to seek assistance from the experts.
The QuickBooks Desktop Support Team is equipped to help you navigate complex problems and ensure a smooth migration process. They are available 24/7 (Quickbooks Desktop Enterprise) and Monday to Friday, 6 AM to 6 PM PT (Quickbooks Desktop Pro and Premier).
Follow these steps to get in touch with them:
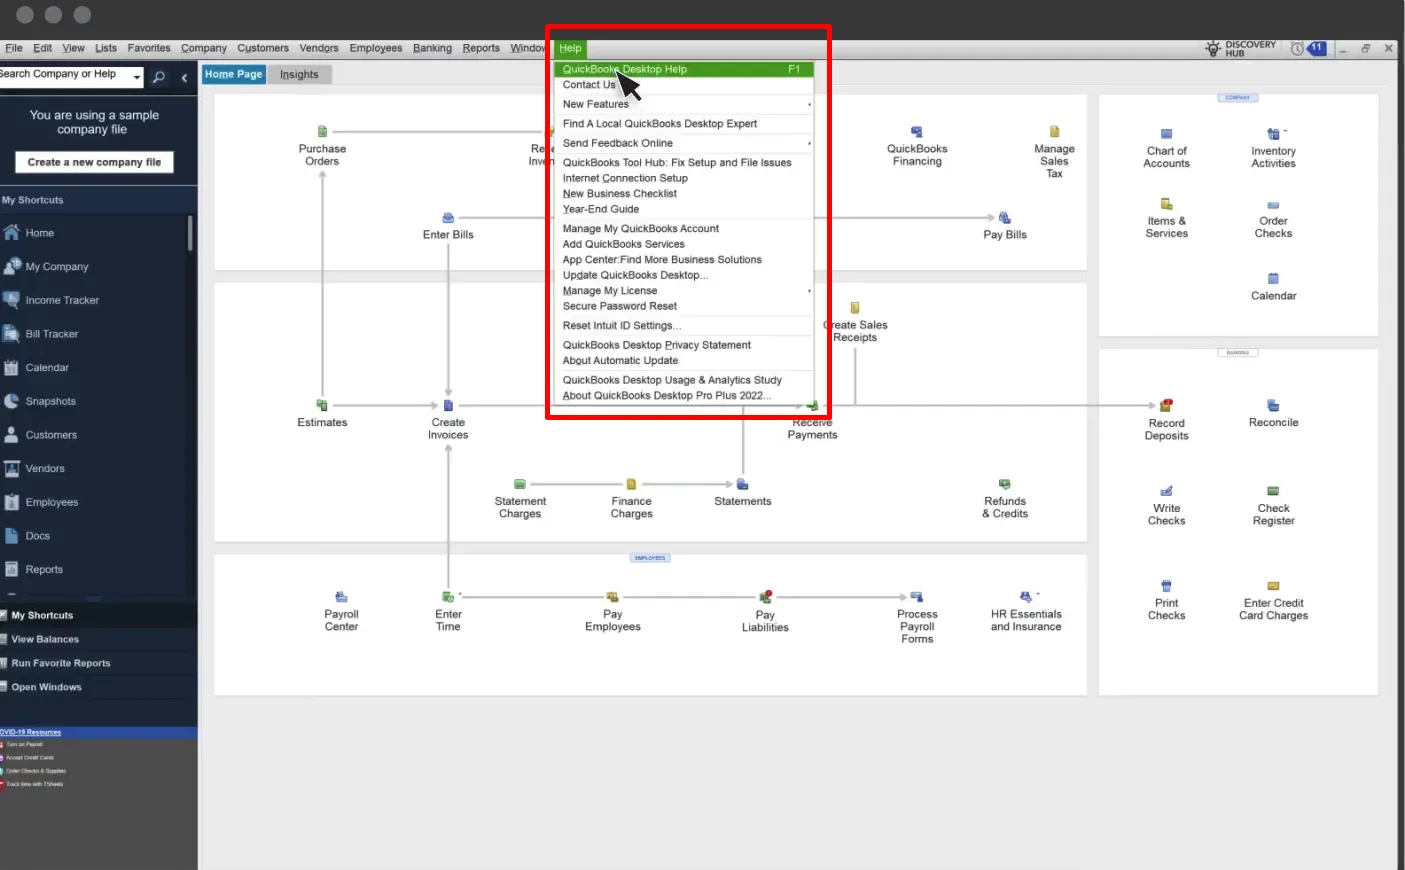
Step 1: Starting with open QuickBooks Desktop and go to the “Help” menu.
Step 2: To proceed, select “QuickBooks Desktop Help” from the dropdown.
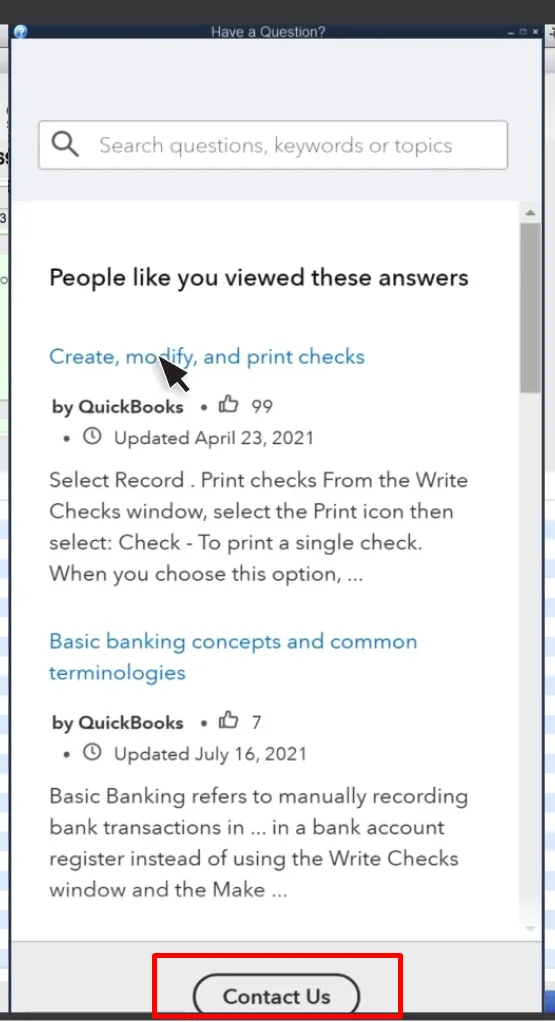
Step 3: In the pop-up window, click “Contact Us”.
Step 4: After that, please enter a brief description of your issue and click “Continue”.
Step 5: Choose your preferred method to contact support, either a chat or a callback.

Step 6: Finally, follow the on-screen instructions to connect with a support representative.
Stress-Free QuickBooks Migration with LitExtension Experts
Given the Quickbooks migration failed unexpectedly errors, file size limits, and compatibility issues, the QuickBooks Migration Tool is bound to give you headaches.
So, instead of battling these problems alone, why not let the experts handle them? That’s where LitExtension's Quickbook migration service comes in. Our QuickBooks migration utilizes the Files Migration service, meaning you don’t even have to lift a finger. Your Personal Assistant (PA) takes care of the entire process, from start to finish!
What’s more, we don’t just provide QuickBooks data migration between the Desktop and Online versions. With LitExtension, you can freely migrate from QuickBooks to Shopify, WooCommerce, or any other platform that best fits your business needs.
Here is how our migration service is done in 3 simple steps:
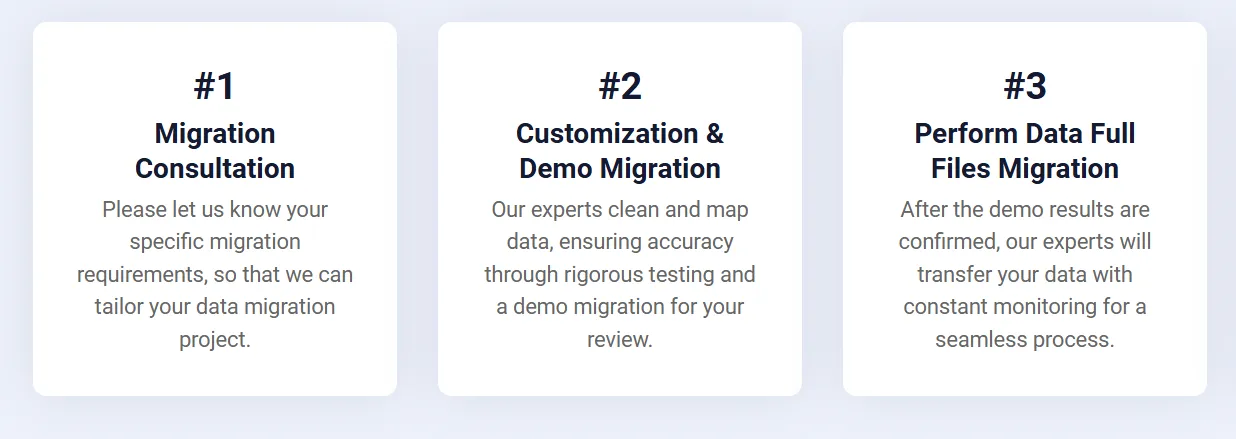
Step 1: Consultant by LitExtension migration experts
To begin, schedule a meeting with our migration experts. We recommend booking at least 2 hours in advance and providing details about your requirements upfront. This helps our team prepare effectively and tailor the session to your specific business goals.
During the consultation, we’ll discuss your specific needs and recommend the best migration solution. Our experts will walk you through service options and pricing, making it easy to choose what works for your business goals.
Once we are aligned, you’ll process the payment and sign the Service Level Agreement (SLA). Then, we’ll ask you to send us your exported QuickBooks files to begin the migration process. Our team will take it from there and handle the rest.
Step 2: Data mapping & setting by experts
In this stage, our team takes care of all the preparation to ensure your QuickBooks migration goes smoothly.
We start by carefully mapping your data, ensuring every piece of information is transferred accurately to its corresponding fields in the new platform.
Once the data mapping is done, here’s what we’ll handle next:
- Set up your new store so it’s ready to receive migrated data.
- Clean up your data to remove any duplicates or clutter, leaving everything neat and organized.
- Install the necessary plugins to enhance your platform’s functionality.
- Create 301 redirects to maintain link continuity and avoid disruptions for users.
Step 3: Perform full Quickbooks migration
You’ve reached the final and most important step – running the full QuickBooks migration. At this stage, we’ll transfer all your critical data, including customer details, transactions, and custom fields, to your new platform.
While the migration is in progress, our team will keep you in the loop and ensure all your questions are answered within 12 hours. We’ll also perform regular checks to make sure everything is formatted correctly and functions smoothly in your new system. The best part? You won’t need to worry about paying extras for additional options like 301 redirects.
Even after the migration is completed, you still have access to unlimited Re-migration, Recent Data Migration (extra data less than 5% of total), and Smart Update for free. The duration of free support varies depending on the service, please refer to this document for detailed information.
QuickBooks Migration Failed Unexpectedly: FAQs
Can I transfer QuickBooks from one computer to another?
Yes, you can transfer QuickBooks from one computer to another. To do this, use the Move QuickBooks Tool available in QuickBooks Desktop. Alternatively, you can manually copy the QuickBooks installation files and data to an external device and move them to the new computer.
What is the easiest way to migrate data to QuickBooks Online?
The easiest way to migrate your data to QuickBooks Online is by using a professional service like LitExtension. With our QuickBooks Migration Service, you don’t have to worry about QuickBooks issues when migrating. Our experts handle the entire process for you—from analyzing your data and mapping it correctly to transferring everything securely and verifying the results.
What to do when QuickBooks migration failed unexpectedly?
To resolve a failed QuickBooks migration, check compatibility, relocate files to a new directory, or run the Migration Tool in Compatibility Mode.
For detailed instructions on each solution, refer to this section of the article for step-by-step guidance tailored to address migration errors effectively.
How long does QuickBooks Online migration take?
For smaller company files, the process can take anywhere from 30 minutes to 72 hours. Larger or more complex files may require additional time, especially if there’s a need for data cleanup or verification.
Key Takeaways
Fixing a “QuickBooks migration failed unexpectedly” error doesn’t have to be overwhelming. Throughout this guide, we’ve shown you all the solutions to resolve the issues causing migration failures. With clear steps and practical advice, you’re now equipped to troubleshoot and ensure a successful migration.
However, if you want to avoid these headaches altogether, LitExtension is here to help. With our QuickBooks Migration Service, we handle everything for you – securely transferring your data, ensuring accuracy, and providing dedicated support throughout the process. Contact us today to schedule your meeting!
For more migration guides, we have a list of blog posts waiting for you to explore. Also, join our community group to gain eCommerce insights!

