Looking for a guide to PrestaShop import CSV? You’re in the right place! In this article, we will walk you through all the essential steps to import products, categories, and combinations to PrestaShop using CSV.
Keep reading to learn more about:
- Tips to build an import file that works like a charm
- 4 steps to perform PrestaShop import CSV
- Import products into PrestaShop
- Import categories into PrestaShop
- Import combinations into PrestaShop
PrestaShop CSV Import Made Easy!
Let our experts handle the migration while you focus on growing your business.

How to Build an Import File that Works?
At this point, PrestaShop only supports importing files in CSV format. If you aren’t familiar with this type of file, my advice is to modify your data in a spreadsheet first, then save your work in CSV format later. This approach allows you to work more efficiently by simplifying the data display.

There’s no limitation to which spreadsheet program you must use to customize your PrestaShop import CSV file. Therefore, feel free to choose the solution that you are most comfortable to work with. It could be Microsoft Excel, Google Sheets, Apple Numbers, and many more.
Now that you have a better way to deal with your data, here’s what you need to pay attention to during the PrestaShop import CSV process:
- The price column uses your store's default currency.
- Categories are indicated by their existing identifier (so you need to import them first), and are separated by commas.
- The web address of the images must be an absolute link (For example https://yourstore.com/image.jpg)
- PrestaShop provides support for UTF-8 and ISO-8859-1 encoding system. Hence, if your CSV file is encoded in a different format type, the importing process might not work as expected.
How to Import CSV File into PrestaShop?
Though there are different templates for different types of data, overall, the PrestaShop import CSV follows these simple steps:
#1. Step 1. From the PrestaShop dashboard, navigate to “Advanced Parameters > Import”.
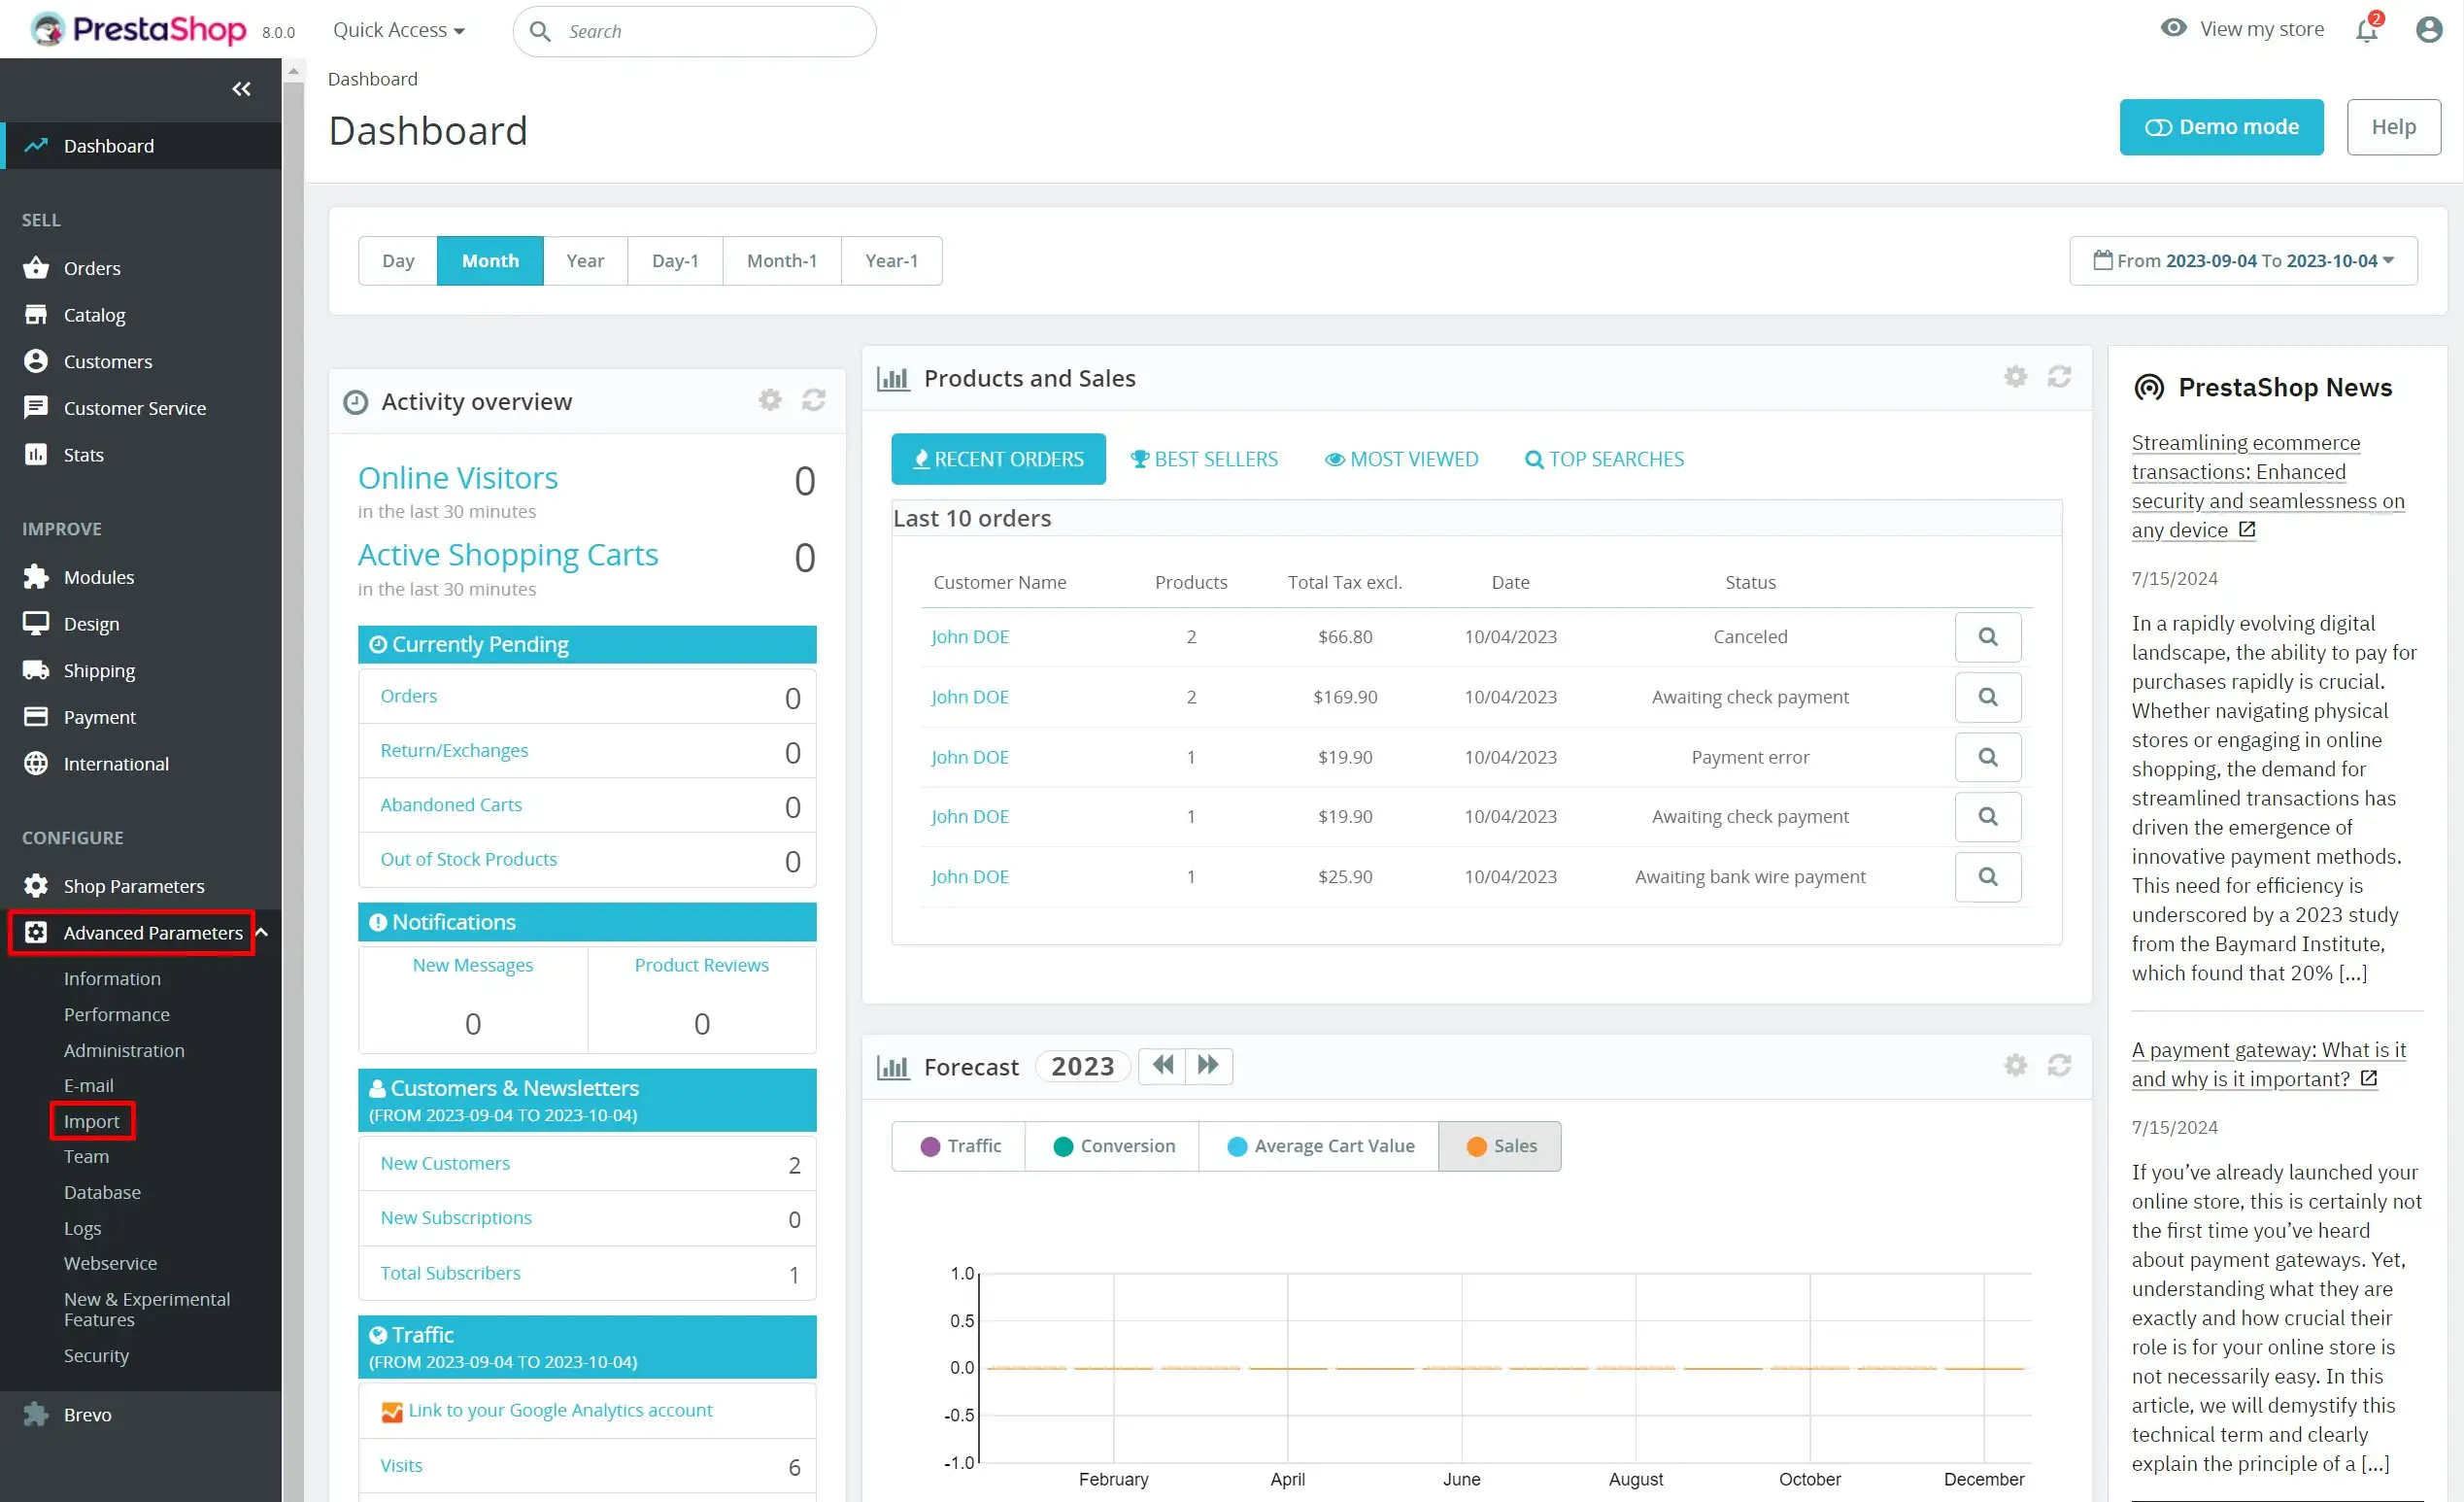
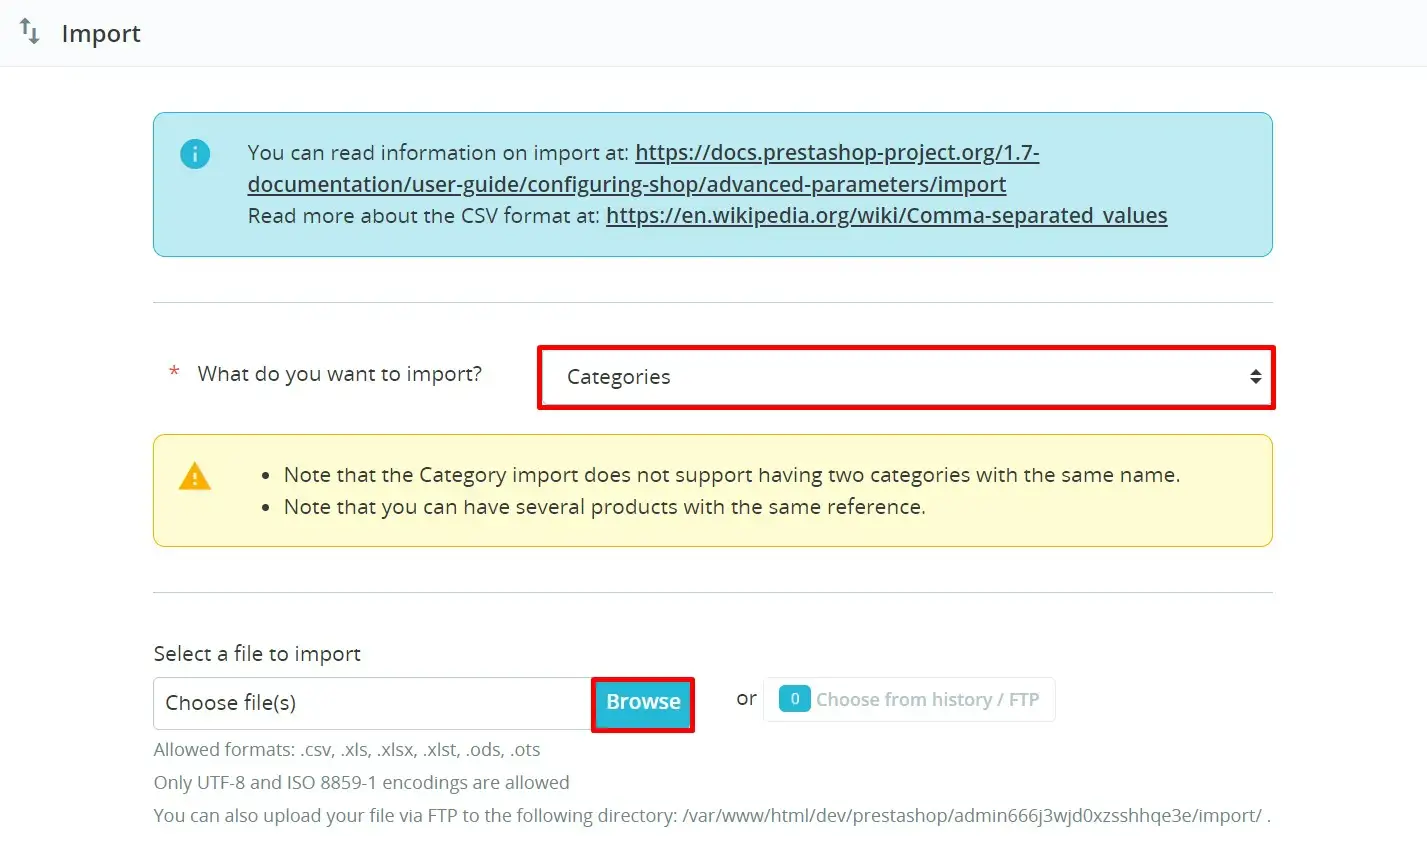
#2. Step 2. Choose what you want to import from the drop-down list, then click “Browse” to select the corresponding file to upload.
Here, you can upload 9 different data types, including:
- Categories
- Products
- Combinations
- Customers
- Addresses
- Brands
- Suppliers
- Alias
- Store contact
#3. Step 3. Configure the PrestaShop import CSV settings, then click “Next step” when finished.
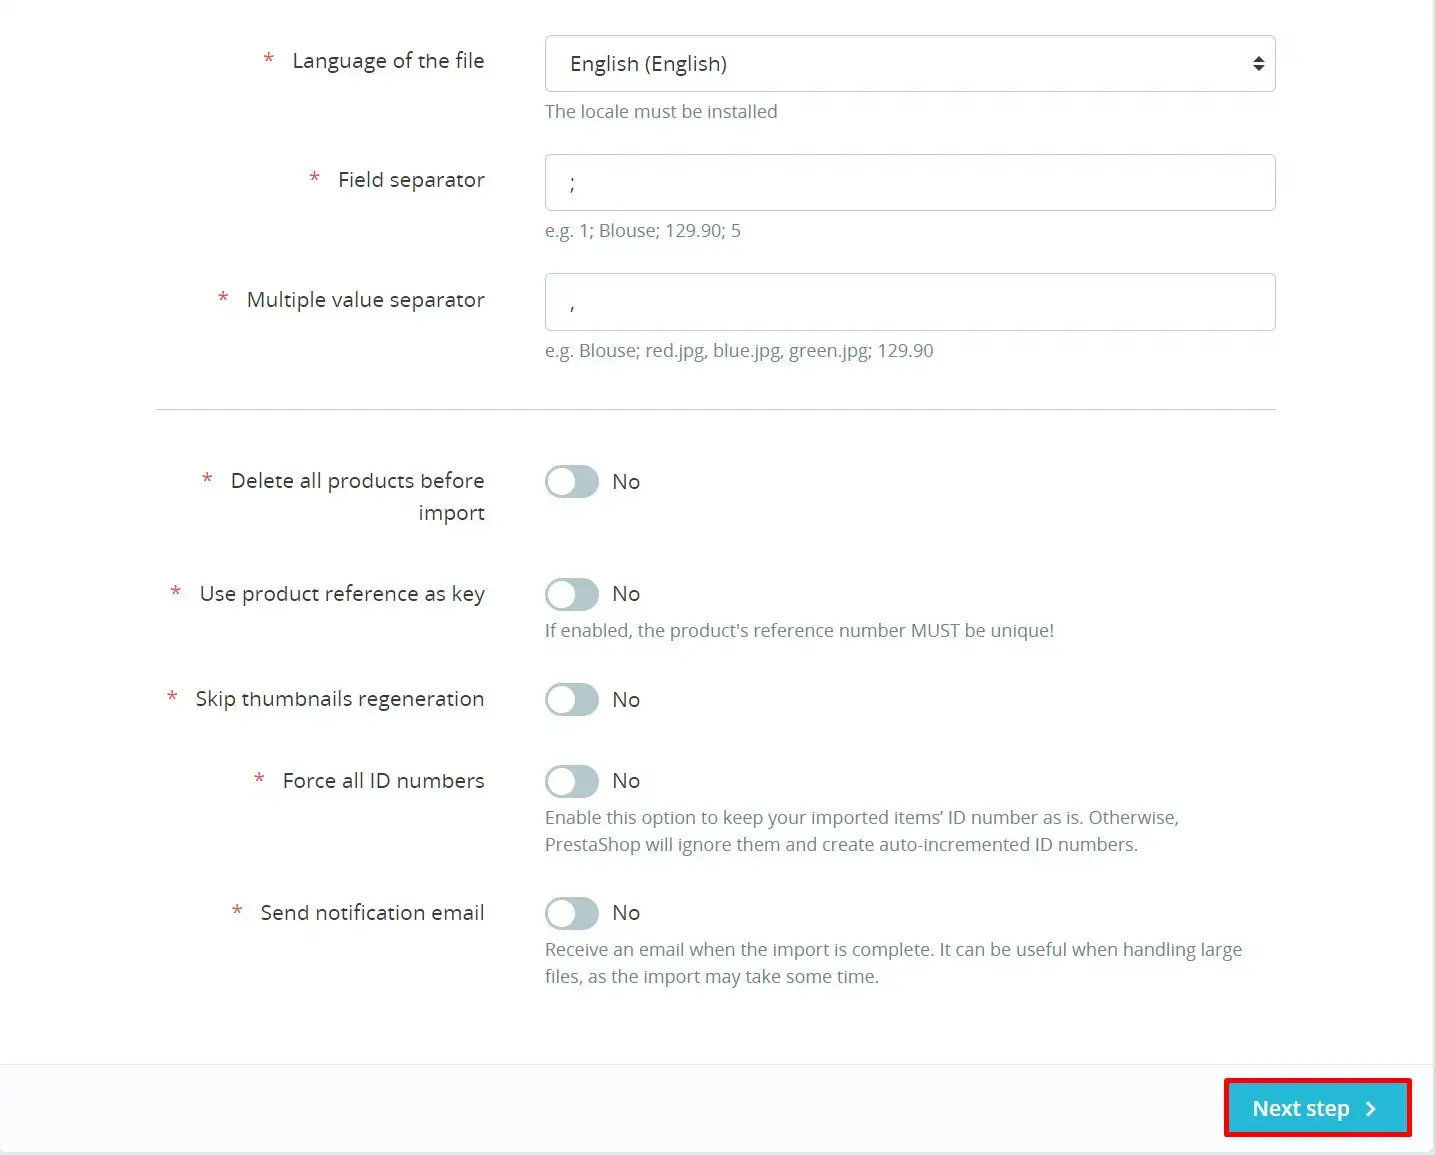
Here’s a breakdown for each configuration so you’ll know what to choose to best fit your specific requirements:
- File language: Select the language of your data. If you want to import more than one language, please kindly split them into different files.
- Field separator: Indicate what type of field separator (colon, semicolon, tab,…) you used in your PrestaShop CSV file.
- Multiple-value field separator: Indicate what type of separator you used to isolate different values in one attribute.
- Delete all (products, categories,…) before import: Wipe out existing entities in your inventory before importing to avoid duplicated content.
- Use product reference as key: Enable this option to use the product reference as ID.
- Force all ID numbers: Enable this option if you want to use your imported ID, or disable to let PrestaShop generate your ID numbers.
#4. Step 4. Map your data to the corresponding field and select “Import”.
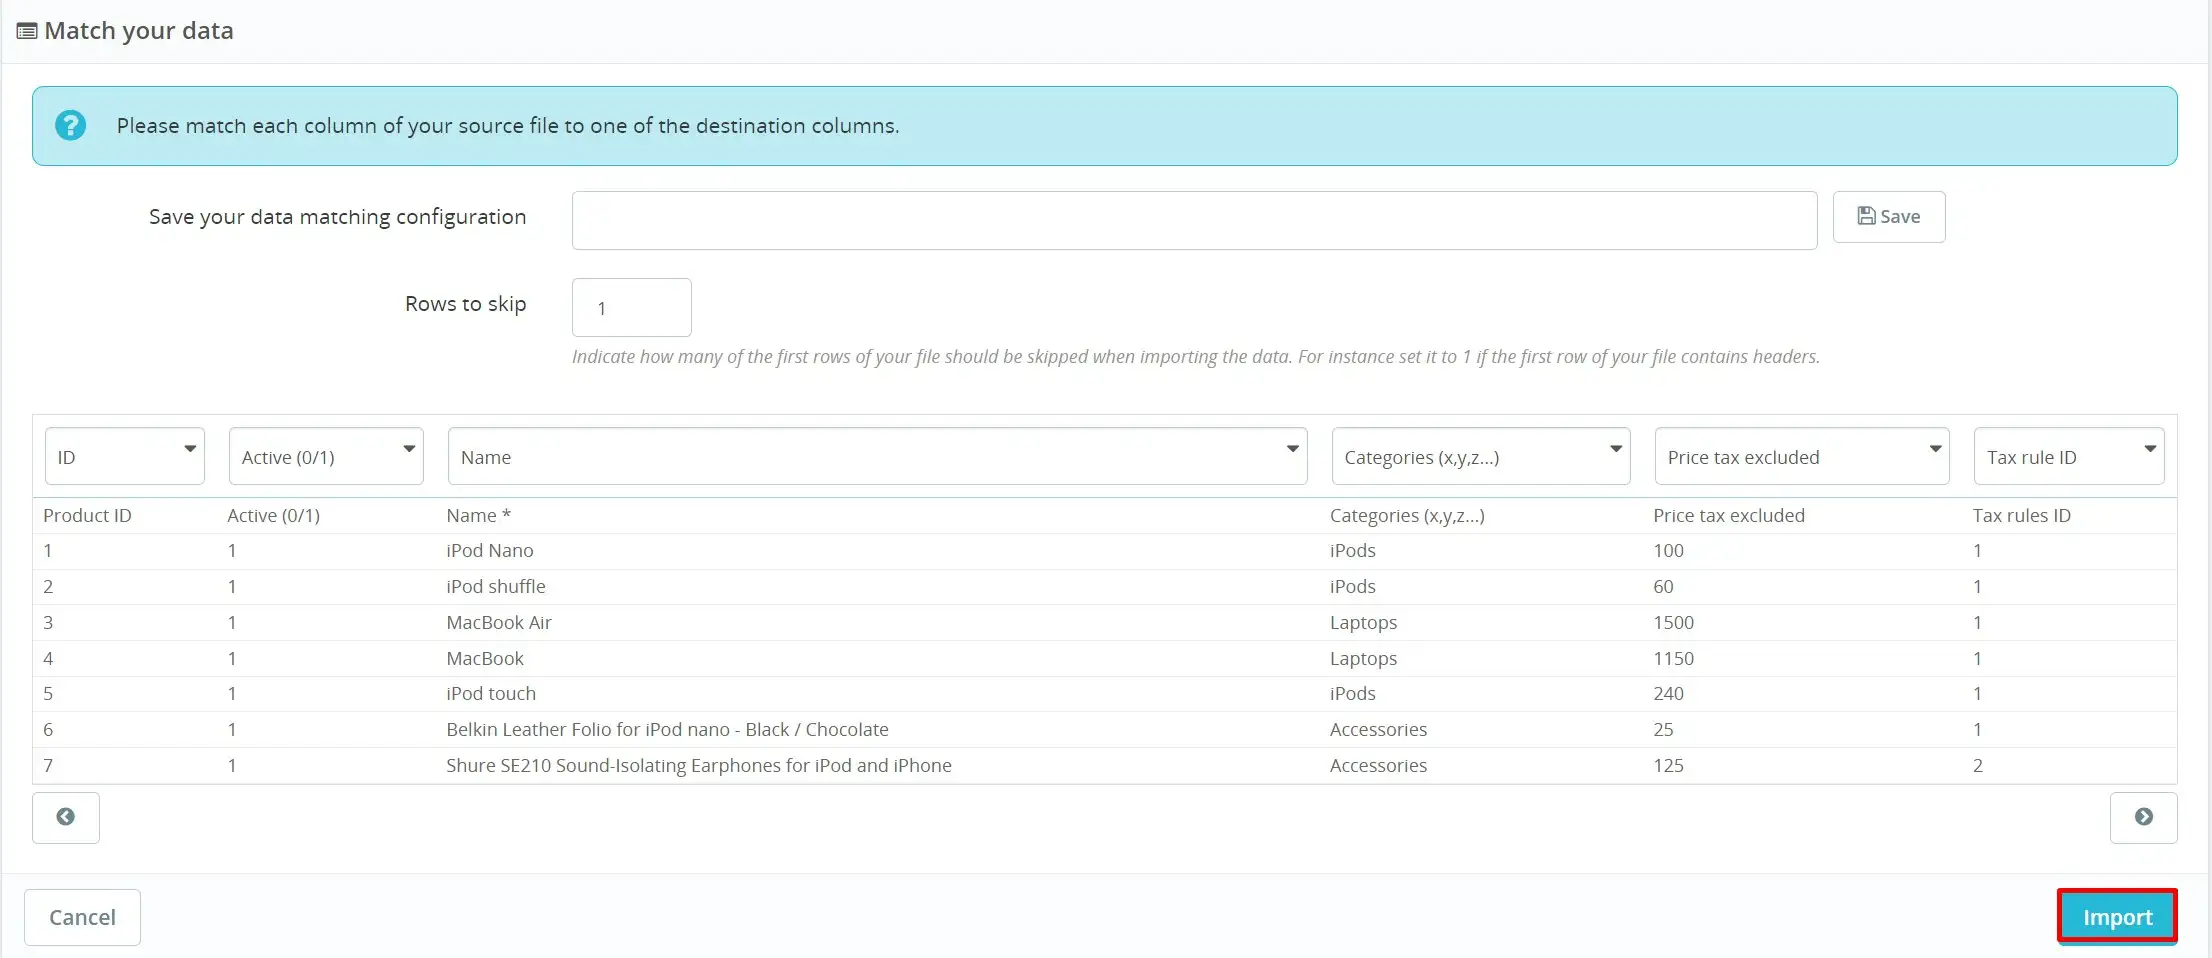
And that’s it. Within four simple steps, you can successfully perform the PrestaShop import CSV process with ease.
Import Products to PrestaShop Using CSV
From my experience, it would be easier to modify your data based on the Prestashop product import CSV sample. This prototype can be easily found and downloaded under the Import section.

The product importing process is straight-forward. Simply follow the previously mentioned steps, and you will be ready to go. Nonetheless, you’ll need to pay close attention to the available fields in your import file. Since one single mistake can lead to inaccuracy in your product display after the PrestaShop import CSV process, it’s crucial to understand each field to avoid any confusion and mix-up.
CSV column | Product property | Example | Note (if any) |
ID | Your product ID | 001, 002, 003 | This ID will be granted to your products if you enable the "Force all ID numbers" option |
Active | The current state of your product | 1 | 1: Active 0: Inactive |
Name | Product's name | Graphic T-Shirt | This field is required |
Price tax excluded | The price of your product not including tax | 50 | The currency here will be automatdically filled by your default currency |
Price tag included | The price of your product including tax | 58 | The currency here will be automatdically filled by your default currency |
Tax rule ID | The specific set of tax rule you want to apply | 1 | If you want to apply a specific tax rate for a set of countries, set up a new tax rule and fill its ID here. |
Wholesale price | Your product price when buying in bulk | 45 | The currency here will be automatdically filled by your default currency |
On sale | The state of your sale program | 0 | 1: Yes 0: No |
Discount amount | The amount of discount you want to set | 10 | The unit here is your default currency |
Discount percentage | The percentage of discount you want to set | 5 | The unit here is percentage |
Discount from Discount to | Your promotion period | 2024-01-08 2024-08-31 | The date must follow this format: yyyy-mm-dd |
Supplier Manufacturer | The name of your supplier and manufacturer | Shure Online | |
EAN13 | Your barcode digit | 1234567890123 | |
Quantity | Your stock number for each product | 170 | |
URL rewritten | The product's URL that you want to display | graphic-tee-shirt | Must not contain space |
Image URL | The URL that associates with your image | https://yourstore.com/image1.jpeg | Must be an absolute URL |
Available for order | Indicating if you want that product to be available for purchase | 1 | 1: Yes 0: No |
How to Perform PrestaShop Import CSV for Categories
Similar to PrestaShop import products CSV, you can easily download and modify the sample CSV file from their website. Then, follow this instruction to perform PrestaShop import CSV for categories.
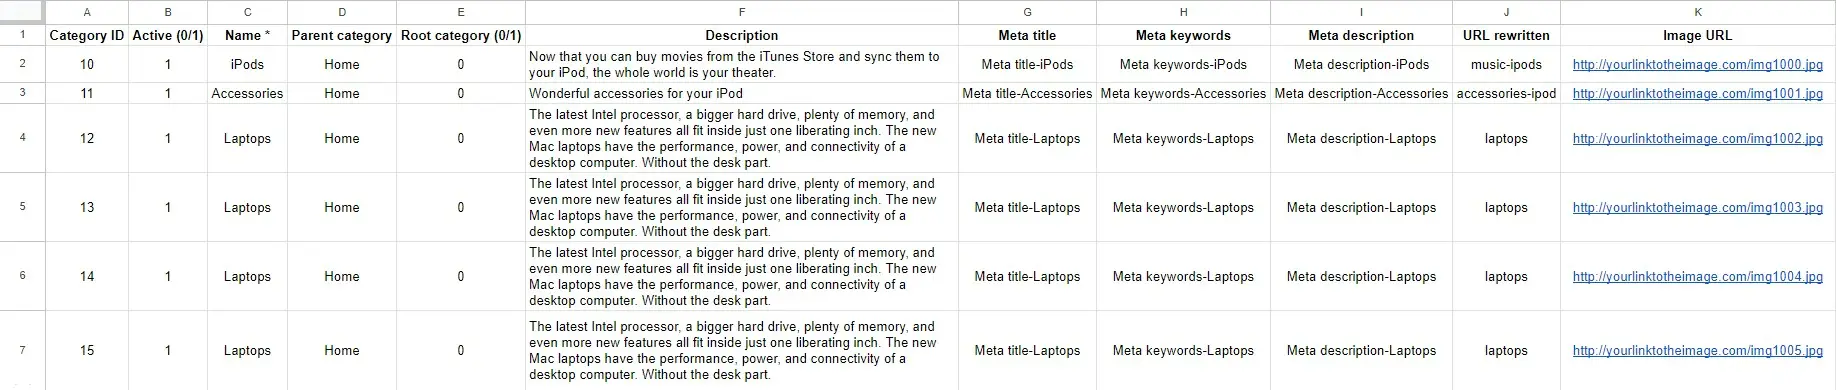
Here’s what you need to fill in before importing categories into PrestaShop.
CSV column | Product property | Example | Note (if any) |
ID | Your product ID | 001, 002, 003 | This ID will be granted to your products if you enable the "Force all ID numbers" option |
Active | The current state of your product | 1 | 1: Active 0: Inactive |
Name | Category's name | Everyday Sneakers | This field is required |
Parent category | The parent category if you have any | Shoes | Only fill in this form if you have subcategory under it |
Root category | This is where the category tree can begin | 1 | This option is used with multistore |
Description | Your product's description | Light, airy tree fiber blend in the upper material delivers effortless fit and feel for life in motion | |
Meta title | How your product's title appear on search engine | Men's Tree Gliders | |
Meta keywords | The focus keywords that you want search engine to regconized | men shoes | |
Meta description | How your product's description appear on search engine | Light, airy tree fiber blend in the upper material delivers effortless fit and feel for life in motion | |
URL rewritten | The product's URL that you want to display | graphic-tee-shirt | Must not contain space |
Image URL | The URL that associates with your image | https://yourstore.com/image1.jpeg | Must be an absolute URL |
ID / Name of shop | Assign your category to a specific store | Ignore this field if you don't use the multistore tool. If leaved empty, the default shop will be used |
Generating the Combination PrestaShop CSV Import File
PrestaShop allows store owners to link multiple normal products together instead of using attributes, and this option is called “combination”.
To import combination, simply download the sample file, and follow this instruction to perform the PrestaShop import CSV for combination.
CSV column | Product property | Example | Note (if any) |
Product ID | Your product ID | 001, 002, 003 | This ID will be granted to your products if you enable the "Force all ID numbers" option |
Product reference | The current state of your product | 1 | 1: Active 0: Inactive |
Attribute | Category's name | Everyday Sneakers | This field is required |
Value | The parent category if you have any | Shoes | Only fill in this form if you have subcategory under it |
EAN13 | Your barcode number | 80446392 | |
Wholesale price | The price when buying in bulk | 100 | The currency here will be set as your store's currency |
Quantity | The number of products | 100 | |
Default | Choose if you want to set the combination as default or not | 1 | 1: Yes 0: No |
Image URL | The URL that associates with your image | https://yourstore.com/image1.jpeg | Must be an absolute URL |
ID / Name of shop | Assign your category to a specific store | Ignore this field if you don't use the multistore tool. If leaved empty, the default shop will be used | |
Advanced stock management | Enable advanced stock management | 1 | 1: Yes 0: No |
Depends on stock | 0 | 0: Use quantity set in product 1: Use quantity from warehouse | |
Warehouse | ID of the warehouse to set as storage | 1 |
Advanced PrestaShop Import with LitExtension
We have just covered the basics of the PrestaShop import CSV method, which, as you can see, only supports the CSV format and nine types of data. Although this lack of options might not be a huge problem for small businesses, it can still feel pretty limiting if you are managing a large dataset or have custom requirements.
Fortunately, there's a better option for you: LitExtension! As the #1 eCommerce Migration Expert, we can help you transfer many data type you need, from the basics (e.g., customers and orders) to more specialized data like passwords, tax rates, shipping info, coupons, and beyond.
As of this writing, LitExtension offers two migration solutions for PrestaShop Migration and PrestaShop Upgrade. Specifically, the Automated Migration package guides you through a simple, self-managed migration; meanwhile, the All-in-One option allows you to sit back while our team handles everything. Keep reading to decide which package best meets your needs:
LitExtension automated migration
As mentioned earlier, our Automated package is a great choice for you if you prefer to control every step of the migration. To get started, simply register with your name, email, and password on the sign-up page (or choose “Sign in with Google” to save time). Once registered, you can now move on with the next steps:
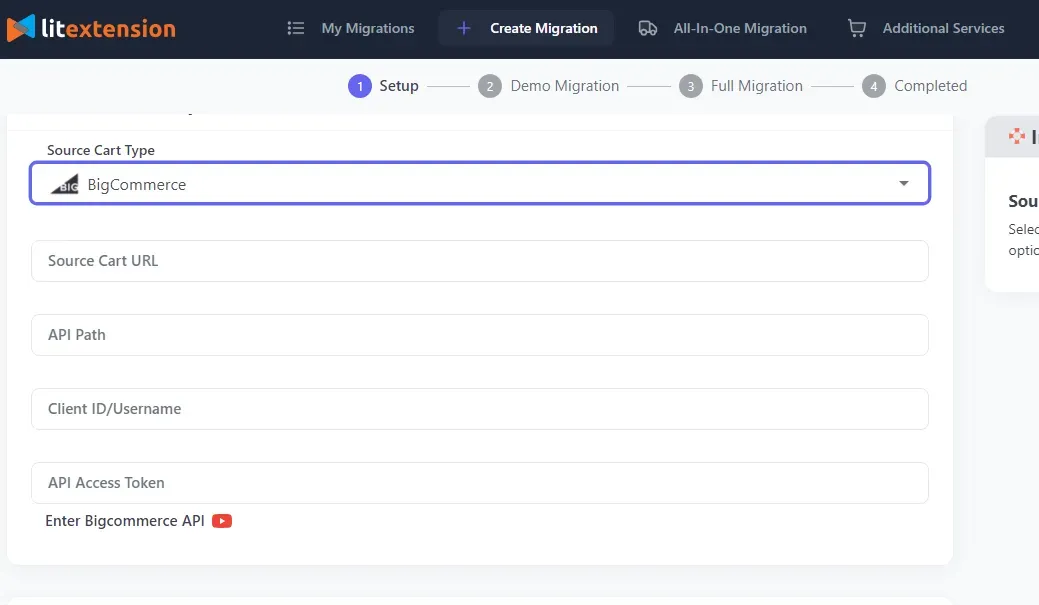
Step 1. Set up your Source Cart
First, head over to the Migration page and click on “Create new migration,” then select your current platform (e.g., BigCommerce) as your Source Cart from the dropdown menu. Once done, enter your store's URL and follow the simple on-screen prompts to connect LitExtension to your store.
Step 2. Set up your PrestaShop Cart
Now, let's set up your Target Cart. Select PrestaShop from the dropdown menu, enter the store's URL, and install the connector to link it to LitExtension. Again, there will be clear guided instructions on the screen to ensure a smooth experience for you!

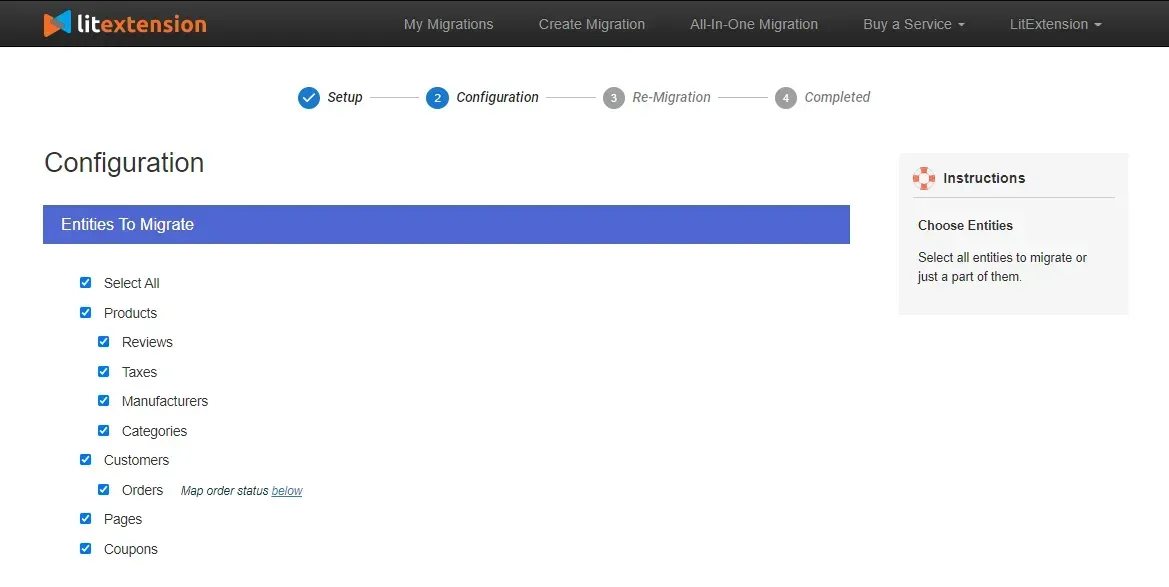
Step 3. Customize your migration
Now, it's time to tailor your migration requirements! From the menu, tick all the data types you'd like to transfer (e.g., customers, store settings, orders) or simply choose “Select All” to move everything at once.
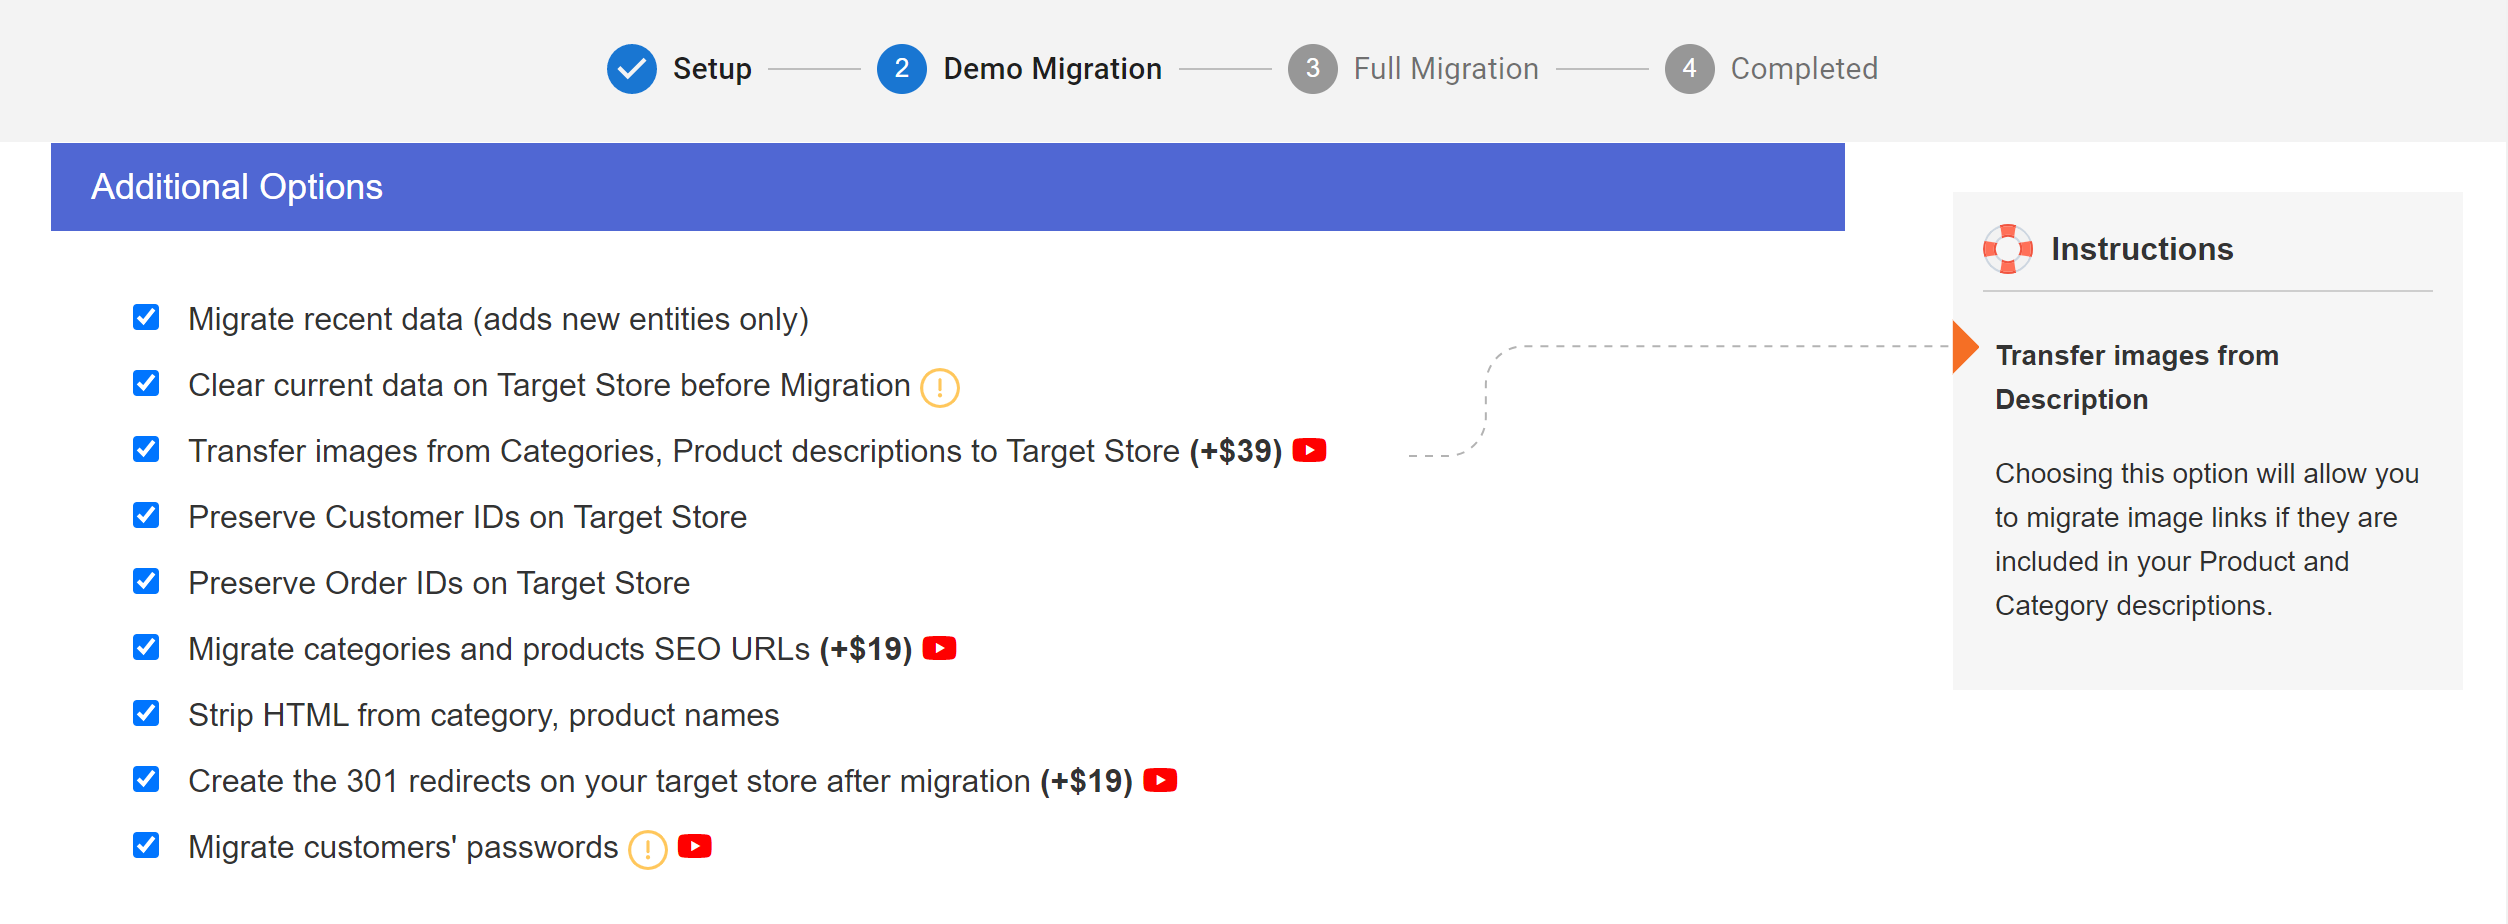
For even more advanced needs, feel free to explore additional options to fine-tune your migration (check the image below). Note that some of them do require a small fee.
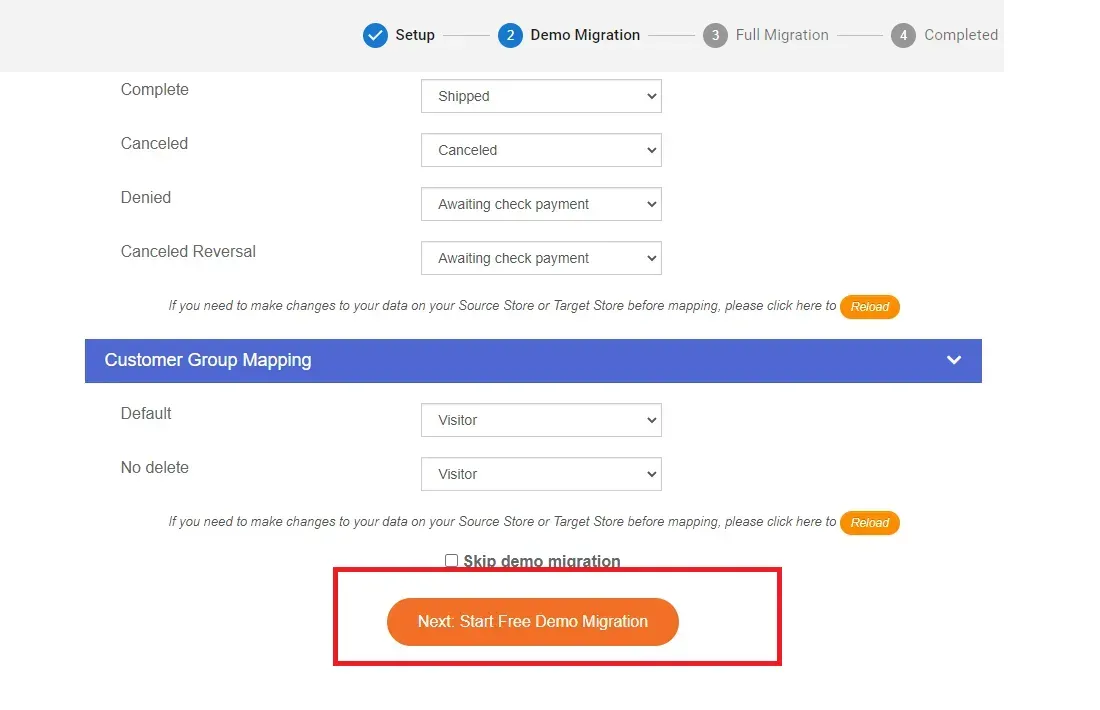
Step 4. Launch your migration
Next, click “Start free demo migration” at the bottom of the setup page to transfer up to 20 items per data type for FREE. Don't forget to review the results carefully when your demo migration is completed.
Once you are satisfied with the demo and ready to go live, it's time for the actual migration! There's no need to keep your browser open all the time since the entire process takes place in the cloud. All you have to do is wait for LitExtension's confirmation email.
And the best part is that our support doesn't stop there. For 60 days after the migration starts, you will receive one free re-migration and LIMITLESS recent data migrations (provided that the extra data accounts for less than 5% of the total). Plus, any updates to your migrated data are free for 90 days — zero strings attached!
All-in-One migration
Although the Automated package above provides all the basics, keep in mind that you're still the one in the driver's seat. Sure, managing the migration on your own might be easy if PrestaShop and your current store are relatively similar. However, if there are major differences or compatibility issues between the two platforms, it's only a matter of time before you run into significant obstacles.
To avoid all these headaches, consider opting for the All-in-One package instead so our dedicated team will handle everything for you! Let us show you the entire process step by step:
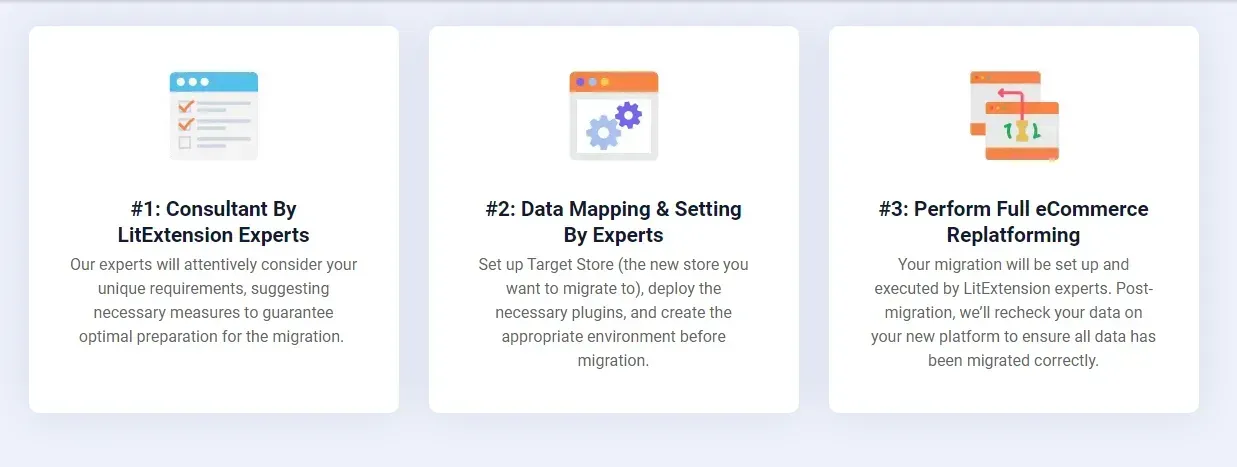
Step 1. Consultant by LitExtension experts
First, you can schedule a consultation session with our expert consultants. We will go into all the specifics of your migration requirements, whether it's customer records, orders, products, or any other custom features in your current store. Once we finalize our Service Level Agreement (SLA) and receive your payment, you can sit back and let us manage everything.
Step 2. Data mapping and setting by experts
Next, we will carry out in-depth prep work to ensure your new PrestaShop store is fully ready for migration. Specifically, our team will:
- Set up necessary redirects to maintain SEO on Squarespace
- Install essential plugins or extensions
- Clean up data and create secure backups
- Fine-tune the store settings
And if you want to check on our progress, no problem; we are more than happy to perform limitless demo migrations for you!
Step 3. Perform full eCommerce re-platforming
Finally, our LitExtension team will carry out the actual migration process for you from start to finish while keeping you updated along the way with punctual responses (typically in less than 12 hours). Plus, unlike the Automated package, additional options will be included at no extra fees!
Once wrapping up the entire migration, we will thoroughly review your new PrestaShop store to confirm everything is working as it should. Even better, for the next 30 days, you will enjoy unlimited re-migrations (free) and recent data updates (free if new data is under 5% of your total). Plus, we also offer LIMITLESS, free updates to your migrated data for 90 days post-migration!
Your PrestaShop CSV Import, Done Right!
With LitExtension’s experts by your side, you can migrate safely and keep your business running flawlessly.
Bonus: How to Export Data from PrestaShop
After learning about PrestaShop import CSV, you might be equally curious about how to export your store's data as well.
Fortunately, PrestaShop does provide a simple, native export option in the back office for this task. Let's see the steps for PrestaShop export products!
Step 1. Log in and go to the right section
First, you obviously need to sign into your PrestaShop back office. Once inside, navigate to the area that contains the type of data you want to export.
For example, go to “Catalog” > “Products” if you need PrestaShop export products, “Customers” > “Customers” for customer lists, or “Orders” > “Orders” if you’re working with sales data. Each section displays all the records available for export.
Step 2. Find and open the export option
At the top right of the list page, you’ll usually see a gear icon or an “Exporter” button above the table or toolbar. Clicking it either begins the export immediately or presents further options, depending on your PrestaShop version.
Step 3. Configure filters and fields (optional)
In some versions of PrestaShop, if you choose the “Export to SQL Manager” button, you can refine the export before generating the file. That means you might limit the data to products in a certain category, or customers that match specific criteria. You may also be able to choose which columns are included in the file. Adjust these settings carefully if you don’t want to export the full dataset.
Step 4. Generate and download the file
Once you’ve chosen your options, click the “Export” button to create the file. PrestaShop will produce a .csv file and prompt your browser to download it automatically. Save the file on your computer and open it in a spreadsheet program like Excel to check the exported data.
PrestaShop Import CSV – FAQs
If you want to perform PrestaShop import CSV, please follow these steps:
- From the PrestaShop dashboard, navigate to Advanced Parameters > Import.
- Choose what you want to import from the drop-down list, then click Browse to select the corresponding file to upload.
- Configure the PrestaShop import CSV settings, then click Next step when finished.
- Map your data to the corresponding field and select Import.
PrestaShop comes with a built-in import tool that you can find under the Advanced Parameters section. With that being said, if you have a large amount of data that needs to be imported, please consider using a third-party service, like LitExtension, to have your data customized and imported with easy.
Here are 5 simple steps to import a product into PrestaShop
- From the PrestaShop dashboard, navigate to Advanced Parameters > Import.
- Download the product importing sample and customize it to your liking.
- Get back to the Import section, choose Products from the drop-down list, then click Browse to select the product file.
- Configure the PrestaShop import CSV settings, then click Next step when finished.
- Map your data to the corresponding field and select Import.
Absolutely, PrestaShop is still actively used and remains a popular choice for businesses of all sizes. It's a robust and versatile platform known for its flexibility and extensive customization options. It is favored by merchants seeking greater control over their online store's design and functionality.
Conclusion
And that's how easy it is to perform PrestaShop import CSV for products, categories, and combinations.
If you have any question regarding this matter or you want to import to PrestaShop from another platform, please don't hesitate to reach out! With over 10 years of experience working with PrestaShop, LitExtension can certainly answer your questions and cater to all your needs.

