If you’re running a Magento store, you’ve likely seen customers add items to their cart, then disappear. A poorly configured Magento shopping cart can be one of the biggest reasons behind cart abandonment, slow checkouts, or lost sales.
In this tutorial, we’ll show you everything you need to know to maximize your Magento shopping cart. Here’s what we will cover:
- What is Magento shopping cart?
- How to configure the Magento 2 shopping cart?
- How to set up Magento 2 persistent shopping cart?
Let’s get started!
What is Magento Shopping Cart?
The Magento shopping cart is a core feature that allows customers to collect products as they browse your store and proceed to checkout when ready. It functions just like a physical cart: storing selected items, calculating totals, applying discounts or taxes, and managing shipping options.
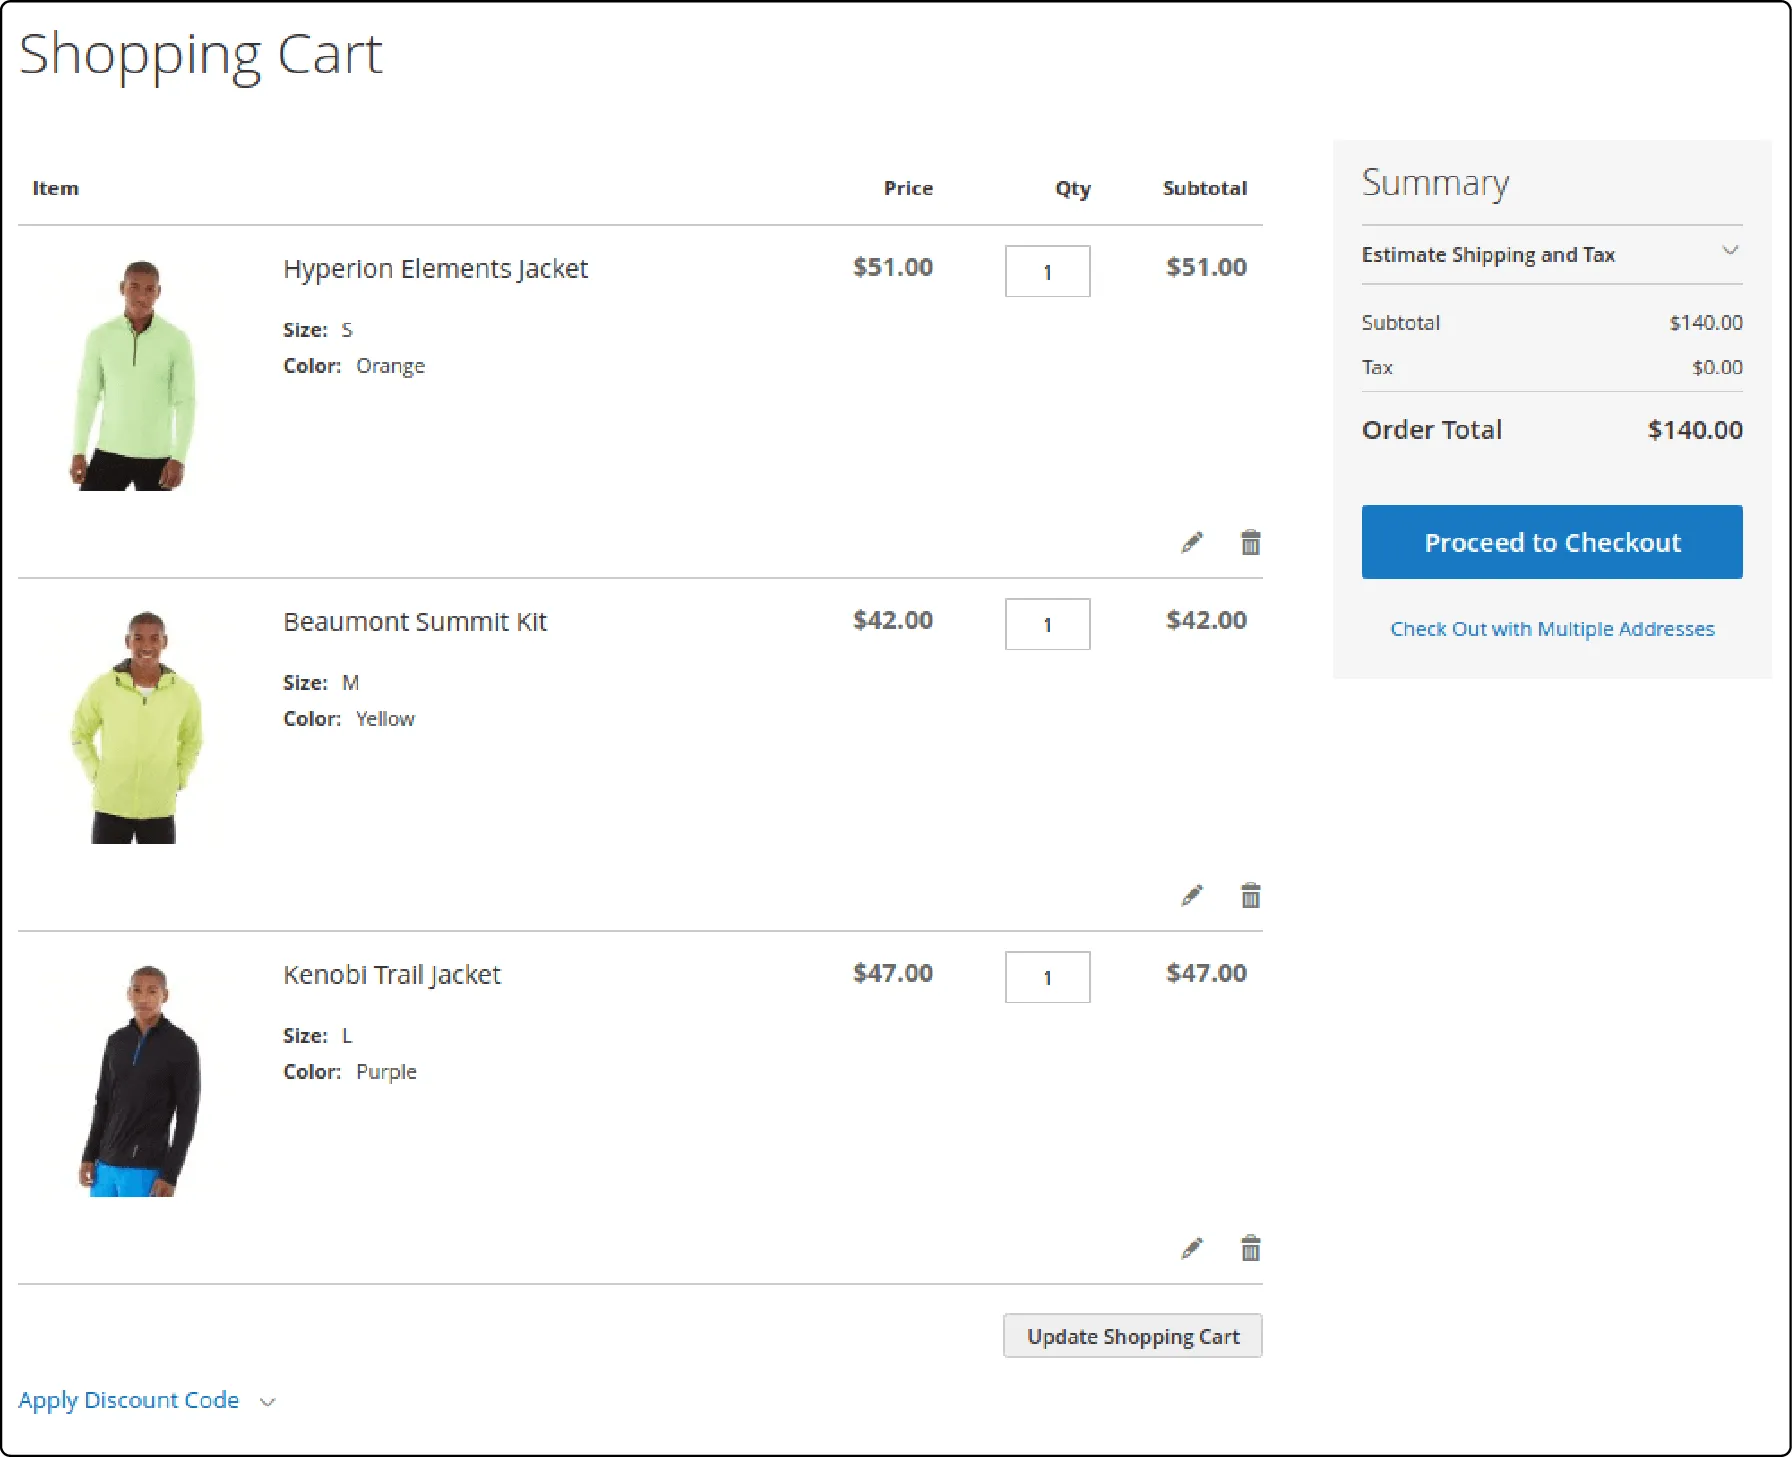
When set up the right way, the Magento shopping cart does more than just hold products; it actively supports your sales strategy and improves the shopping experience. Here’s what you can expect:
- Higher conversion rates: A clean, user-friendly cart makes it easier for customers to complete their purchases without friction.
- Increased order value: You can use built-in tools to promote related products, upsells, and personalized offers directly in the cart.
- Improved customer retention: Features like persistent carts and saved preferences encourage shoppers to return and finish what they started.
- Better marketing performance: Cart activity reveals valuable insights you can use for remarketing, email campaigns, and ad targeting.
- Scalable customization: Whether you're B2C or B2B, Magento gives you full control to tailor the cart to your store’s needs.
Now that you know the benefits, let’s look at how to set up your Magento shopping cart.
How to Configure Magento 2 Shopping Cart?
Magento gives you full control over how the cart works and looks. Here’s a step-by-step guide to each key setting, where to find it, and how it impacts the shopping experience.
1. Set up “My Cart” link
The “My Cart” link appears in the top-right corner of your store’s header and serves as a constant reminder for customers to complete their purchase. It shows how many items are currently in the cart and helps users navigate quickly to the checkout process.
To configure how this link behaves, go to Stores (1) > Configuration > Sales (2) > Checkout > My Cart Link (3):
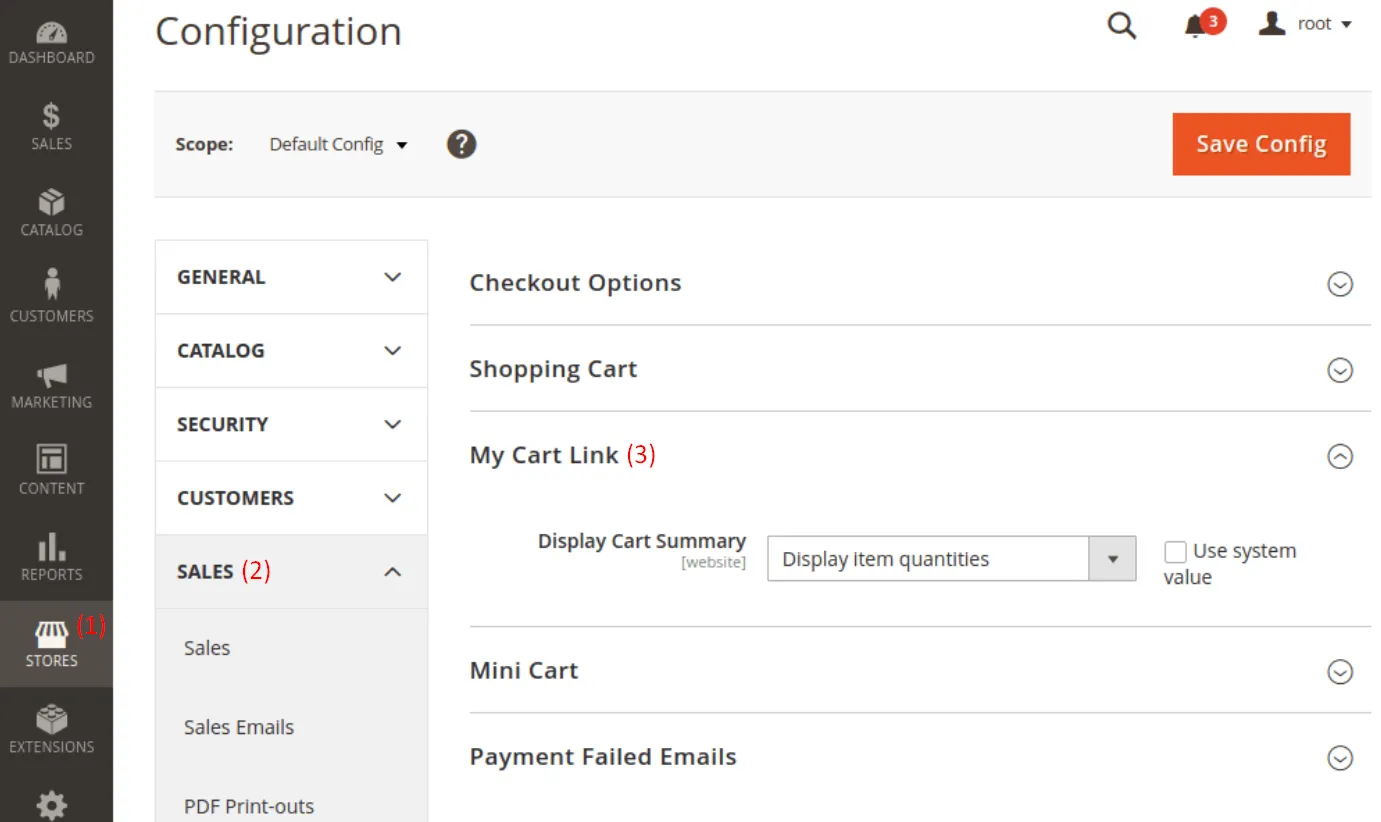
As shown in the image above, you can control how the cart summary appears in the header – either by displaying total item quantities or just the number of distinct products. If you want to change this behavior, simply uncheck the Use system value box to unlock the dropdown.
In the Display Cart Summary setting, you’ll find two options:
- Display item quantities: This shows the total quantity of all products in the cart. It’s ideal for stores where customers buy multiple units of the same item, such as wholesale or bulk-purchase stores.
- Display number of items in car: This displays only the number of distinct products, regardless of quantity. It’s more common for standard retail shops where customers usually buy one of each product.
Let’s choose the option that best fits your store’s buying behavior. For example, if you offer quantity-based discounts, showing item quantities can help encourage larger purchases.
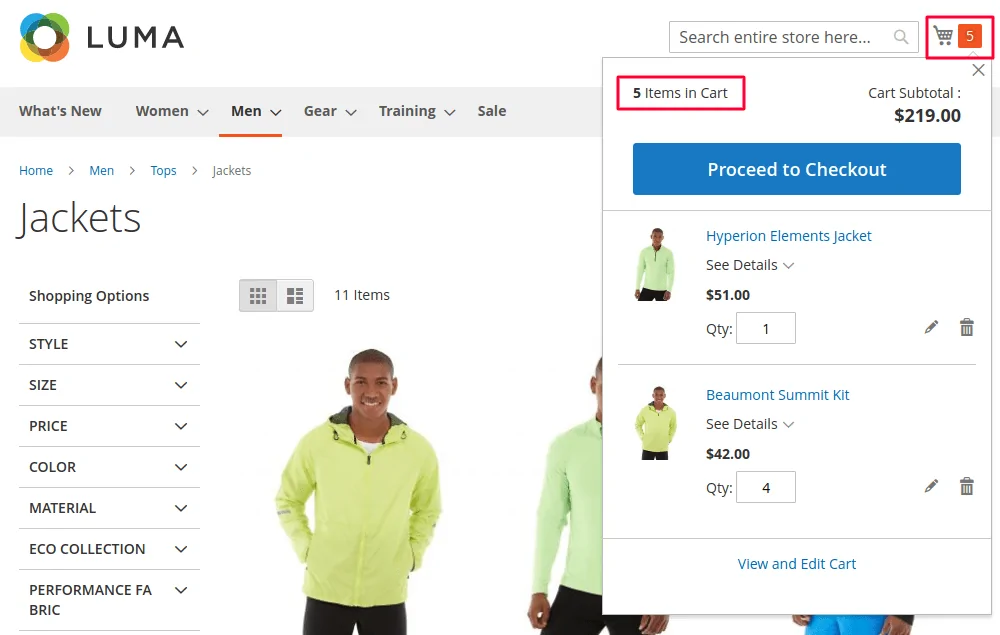
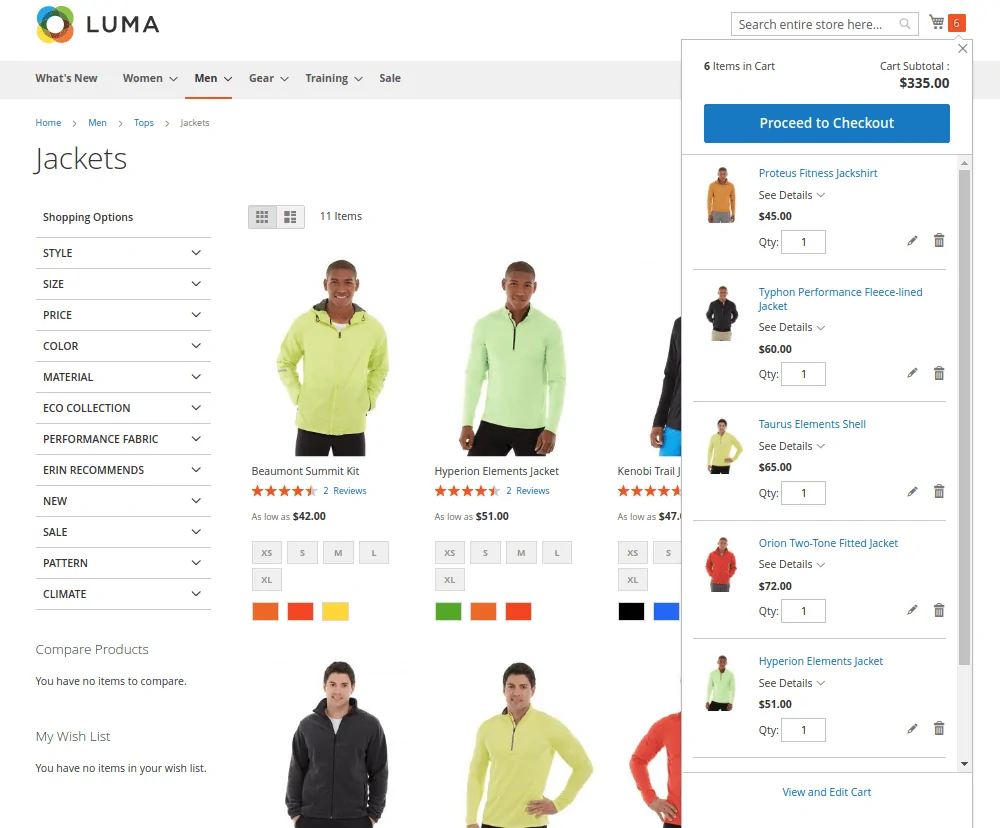
2. Customize the mini cart
The mini cart is a quick-access dropdown that appears when customers click the cart icon, usually at the top right of your store. It’s visible across all catalog pages and gives shoppers a fast way to review their selected items, adjust quantities, or remove products without leaving the current page.
To customize the mini cart, go to Stores (1) > Configuration > Sales (2) > Checkout (3) > Mini Cart (4):
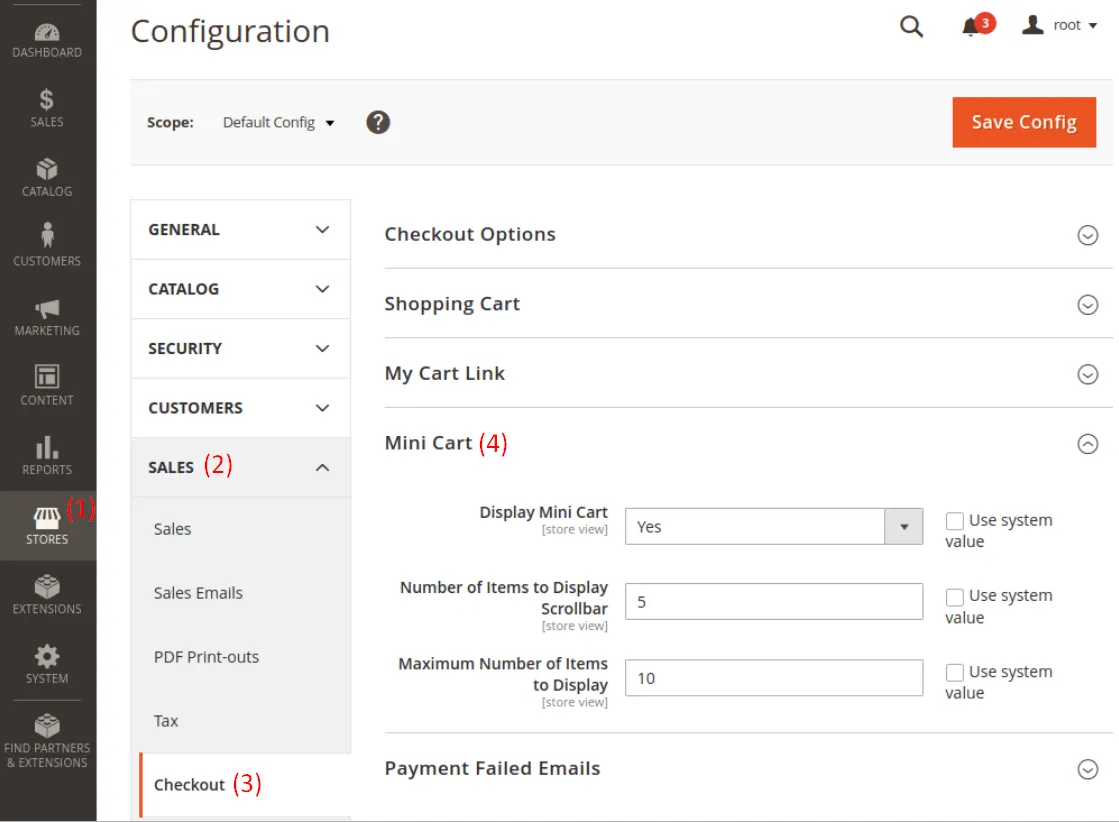
Here, you’ll find three key settings:
- Display Mini Cart: Set this to Yes to enable the mini cart on your storefront. It will appear as a slide-out panel showing the current cart contents.
- Number of Items to Display Scrollbar: Defines how many items a customer can add before the mini cart activates a scroll bar. This keeps the layout tidy when carts get larger.
- Maximum Number of Recently Added Items to Display: Controls how many of the most recently added products are shown in the mini cart.
Don't forget to click “Save Config” once your changes are complete.
3. Configure redirects to cart
By default, Magento doesn't redirect customers to the full shopping cart page after they add a product. Since all cart details are already visible in the mini cart, forcing a redirect can interrupt the browsing flow and feel pushy.
Instead, Magento lets you control whether to keep shoppers on the same page or send them to the cart after adding a product. To manage this setting, you can go to Stores (1) > Configuration > Sales (2) > Checkout (3) > Shopping Cart (4).
After that, find the “After Adding a Product Redirect to Shopping Cart” option.
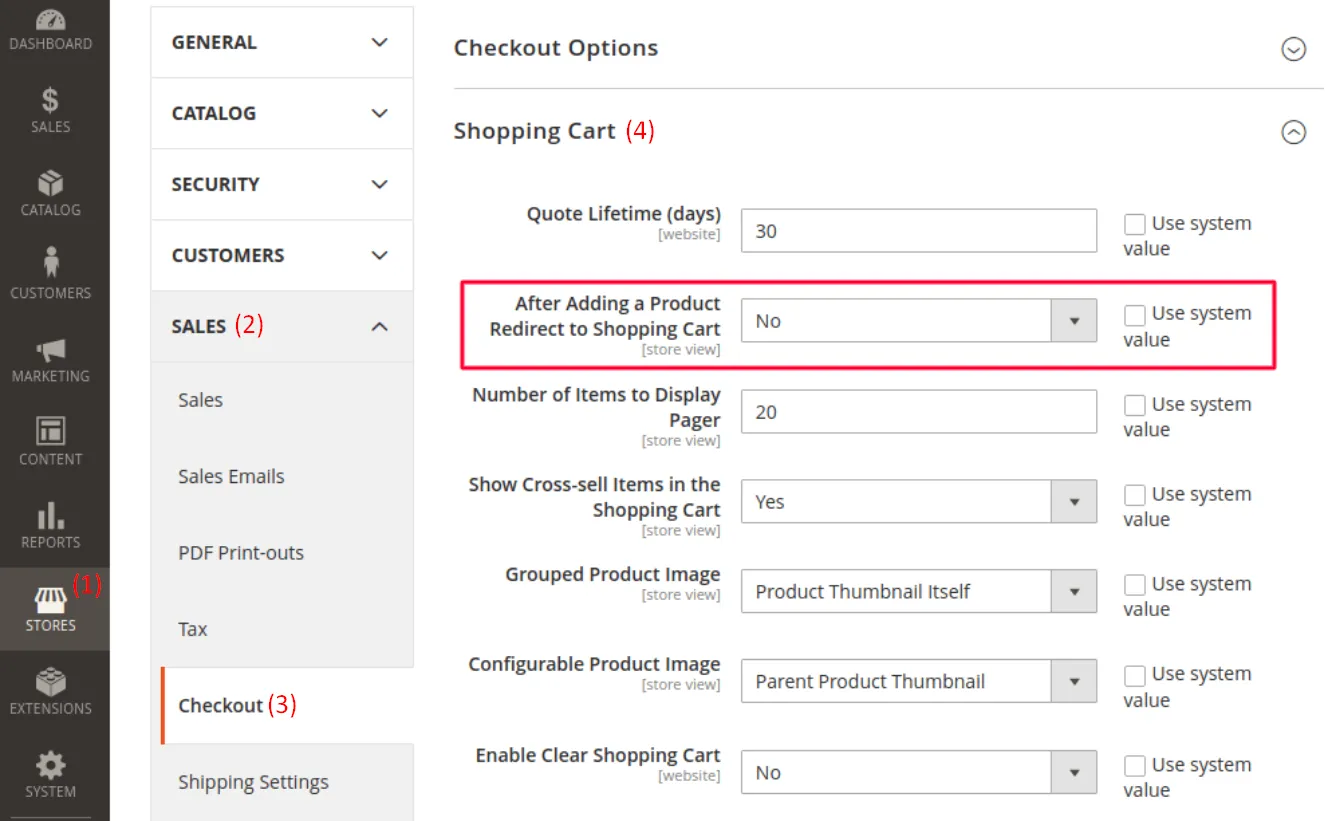
You need to decide between:
- Set to Yes if you want to redirect customers right after they add a product.
- Set to No to let them stay on the same page and view the updated cart via the mini cart.
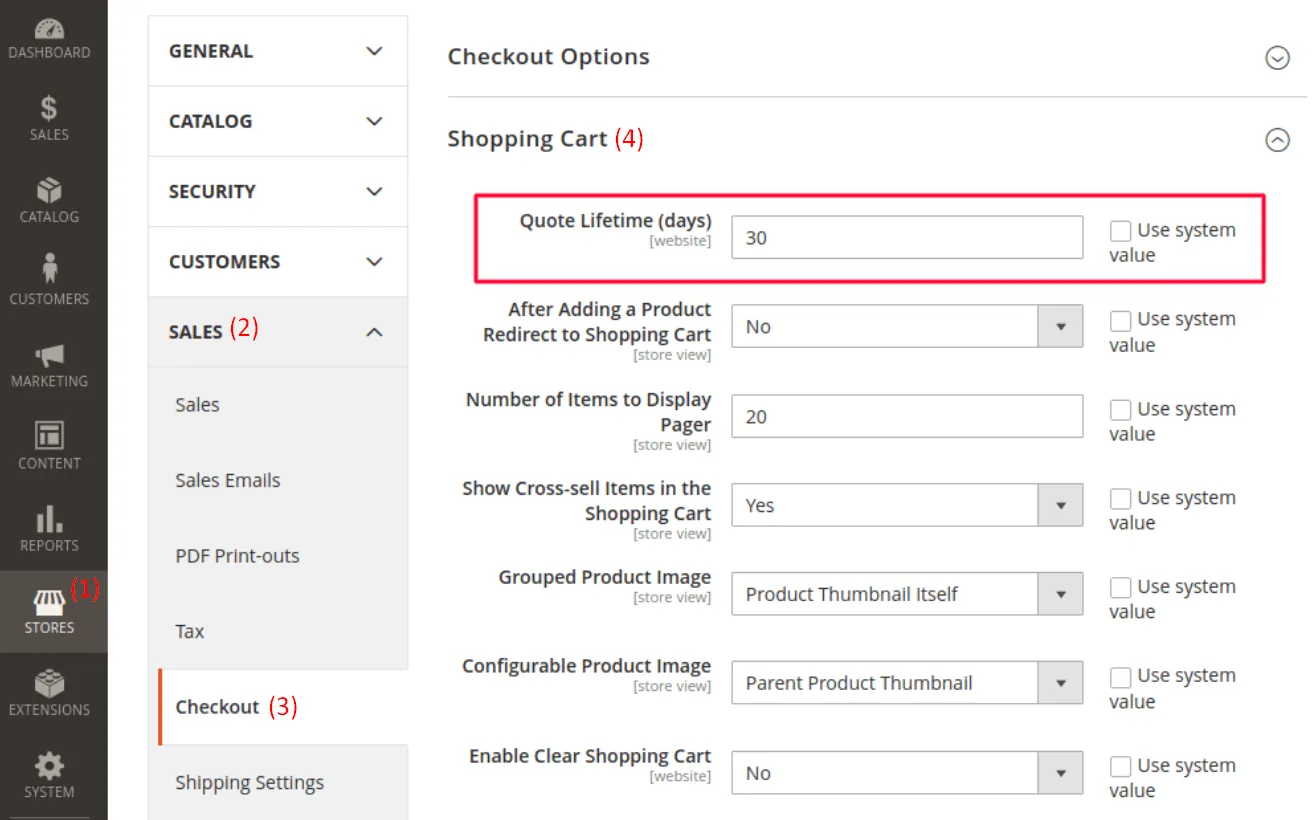
4. Adjust the quote lifetime
Not every customer checks out right away. Some take time to compare options, get distracted, or simply return later to complete their purchase. But in the meantime, your product prices might change, and that’s where quote lifetime comes in.
Magento gives you control over how long a cart’s pricing and product information should remain valid. This setting is called Quote Lifetime, and it defines the number of days a customer’s cart stays active before it expires.
To configure this, you also go to the same Shopping Cart page as of the previous step. Then, specify any number of days into the field:
5. Define the minimum order quantity
In some cases, you may want customers to buy a minimum number of items before checking out. This can help meet supplier requirements, increase order value, or limit small purchases for wholesale buyers.
To set this up for your Magento shopping cart, go to Stores (1) > Catalog (2) > Inventory (3) > Product Stock Options (4) in the admin panel. Here, you'll find the Minimum Qty Allowed in Shopping Cart setting.
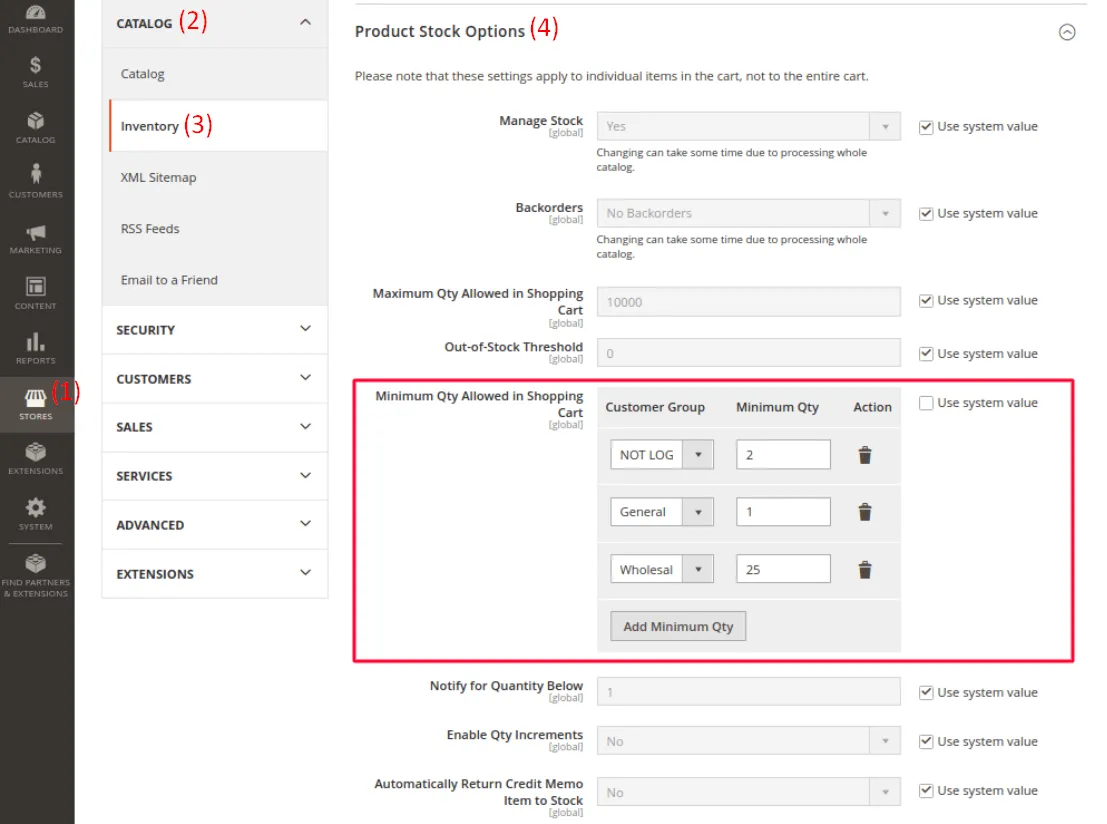
In this setting, you can define different minimum quantities for each customer group. For example, guest users (Not Logged In) might be required to buy at least 2 units of a product, while wholesale customers may have a higher threshold, such as 25 units. These rules apply to individual products, not the entire cart.
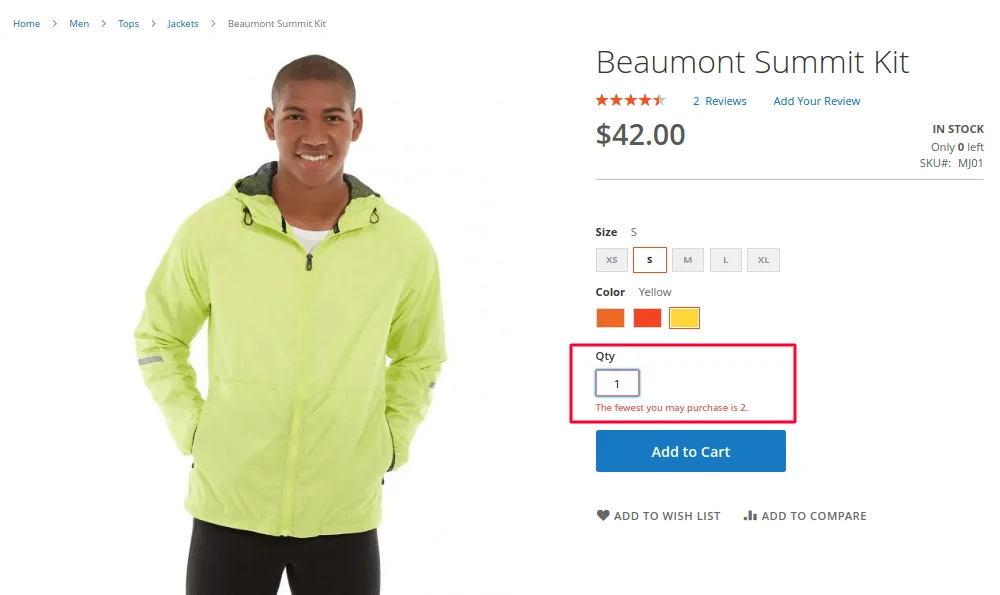
Once configured, the cart will prevent users from checking out unless their selected quantity meets the requirement. Just be sure to use this feature thoughtfully since overly strict rules can create friction for casual shoppers.
6. Specify the minimum order amount
Magento allows you to set a minimum order subtotal that customers must reach before they can proceed to checkout. This feature is often used to ensure profitability on low-margin items or to discourage small orders that may not be worth fulfilling.
The setting can be found under Stores > Configuration > Sales > Sales > Minimum Order Amount. You can define a fixed minimum subtotal and customize the error message that appears if the requirement isn’t met.
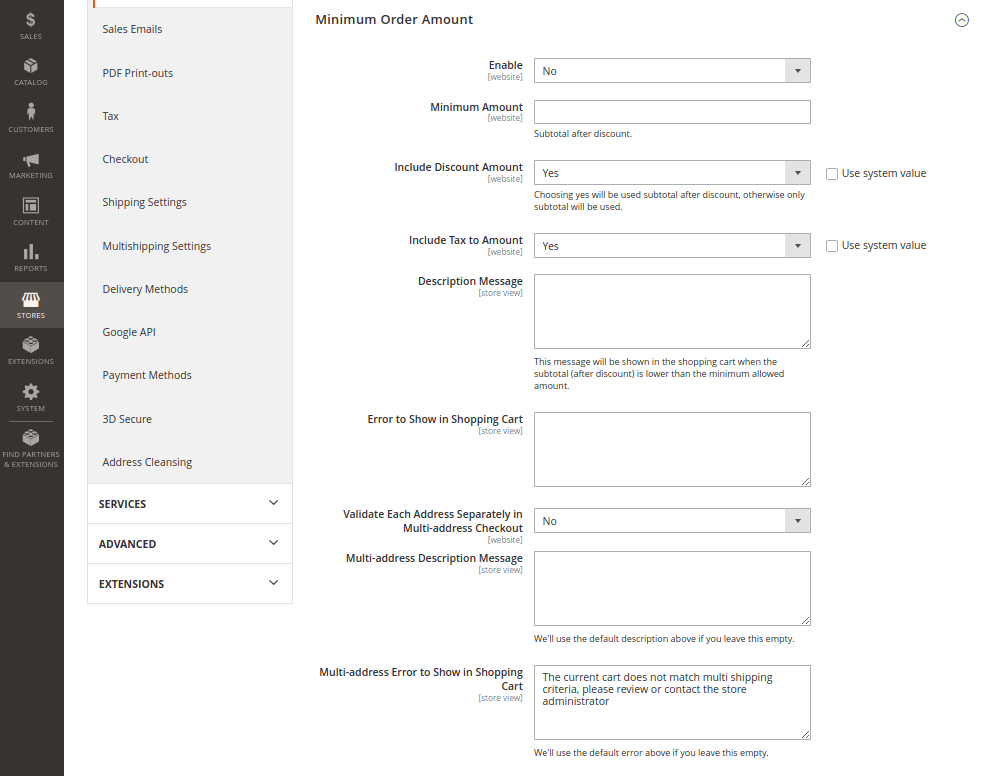
Here’s a quick overview of the key fields:
- Enable: Turns the feature on or off.
- Amount: Set the minimum order subtotal required (after discount, if applicable).
- Include Discount Amount: Choose Yes if the discount should be counted in the subtotal calculation.
- Include Tax to Amount: Choose Yes to calculate the minimum based on the total, including tax.
- Description Message: Custom message shown in the cart when the subtotal doesn’t meet the requirement.
- Error to Show in Shopping Cart: The error displayed if customers try to check out below the minimum.
- Validate Each Address Separately in Multi-address Checkout: Applies the minimum to each shipping address individually.
- Multi-address Description Message: Optional message shown for multi-address orders.
- Multi-address Error to Show in Shopping Cart: Error shown when the multi-address subtotal doesn't meet the minimum.
7. Manage product thumbnails
Thumbnails in the shopping cart help customers quickly recognize which products they’ve added, especially when the cart contains multiple items. By default, Magento uses product images to display these thumbnails, but this behavior can vary for configurable or grouped products.
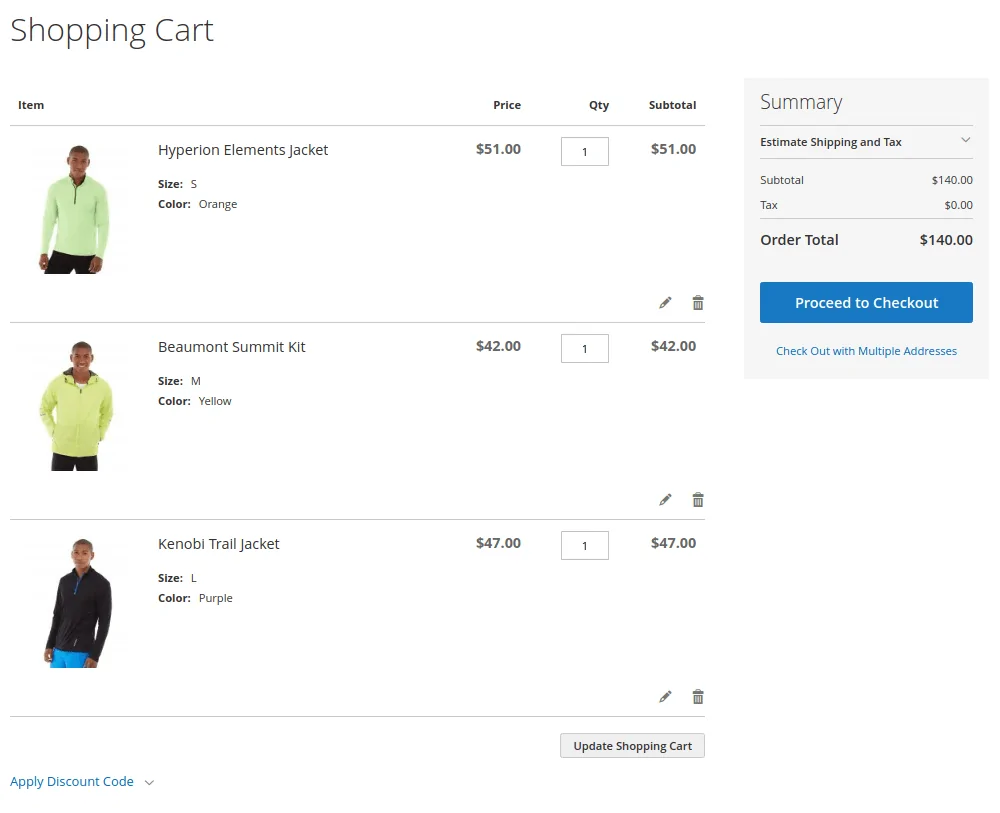
In Stores (1) > Configuration > Sales (2) > Checkout (3) > Shopping Cart (4), you can choose how product images appear in the cart for configurable and grouped products:
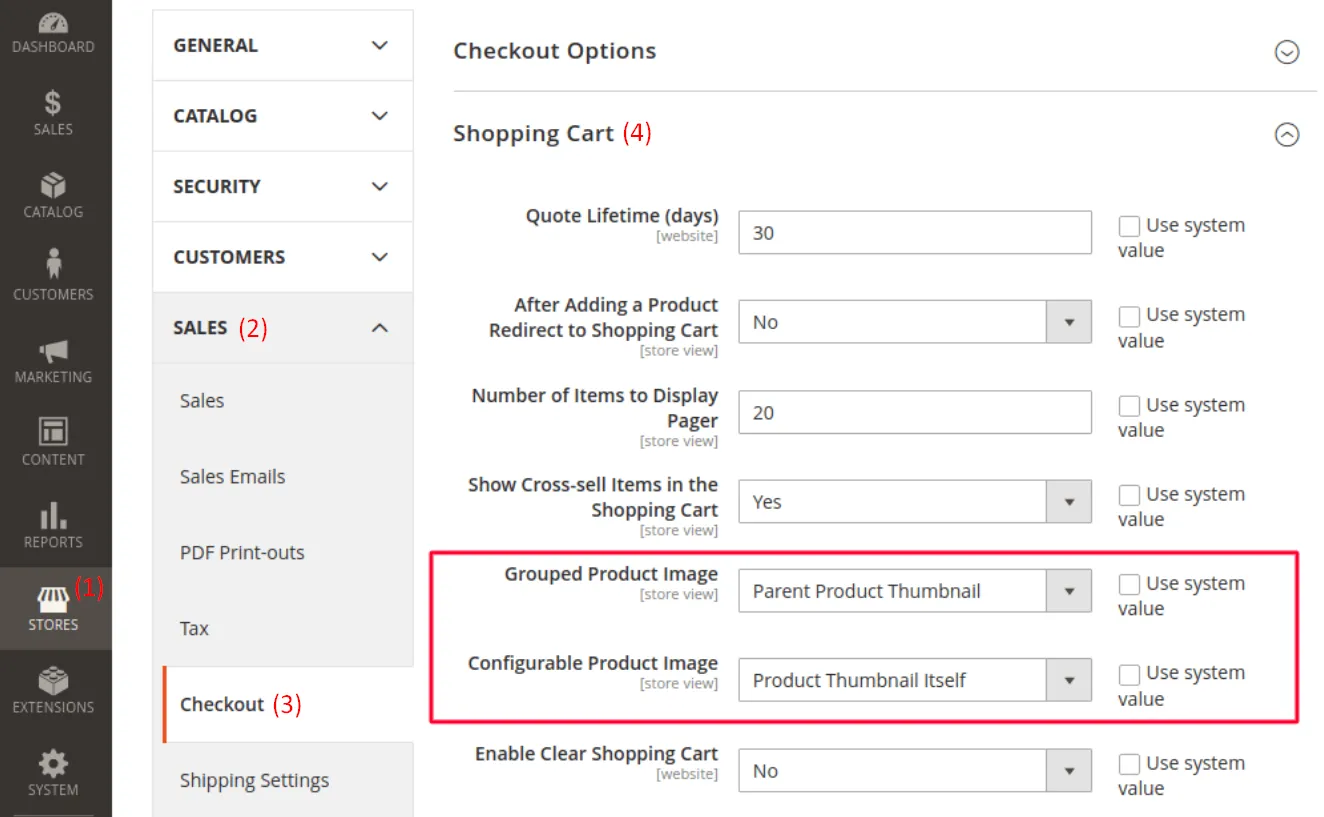
- Product Thumbnail Itself: Displays the image of the exact variation the customer selected (e.g., red shirt, size M). Best for products with visual differences between variants.
- Parent Product Thumbnail: Displays the main image of the base product, regardless of the selected variation. Suitable when all variations share a similar look.
8. Enable gift options
The shopping cart is often the final place for customers to personalize their order before heading to checkout. Magento supports gift messages by default, allowing customers to leave notes for individual items or the entire order.
To enable this feature, go to Stores (1) > Configuration > Sales (2) > Sales (3) > Gift Options (4). There, you’ll find two settings:
- Allow Gift Messages on Order Level: Enables customers to leave one message for the entire order.
- Allow Gift Messages for Order Items: Lets customers include a different message for each item in their cart.
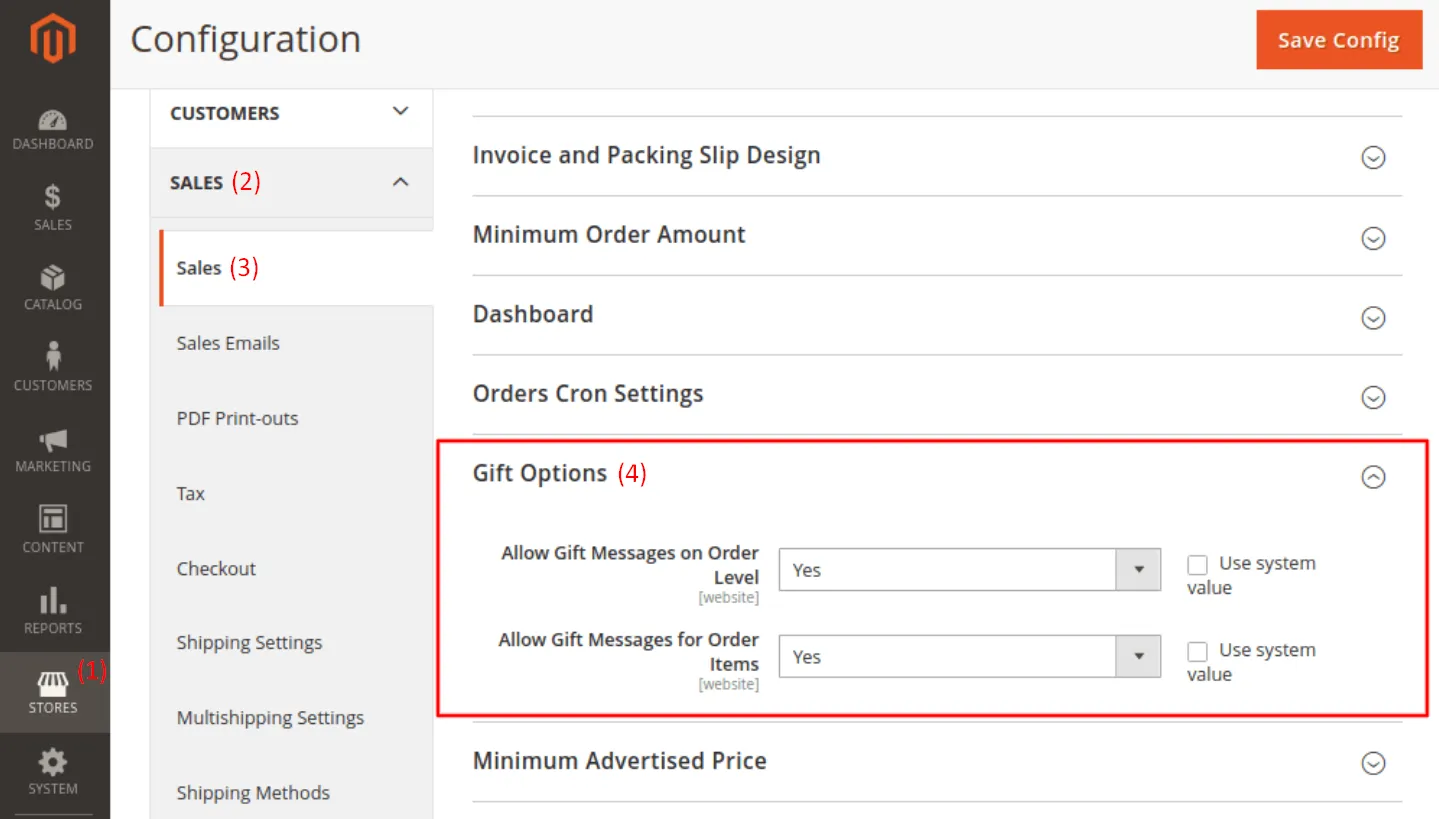
Once enabled, gift message fields will appear during checkout, allowing customers to personalize their purchase before completing it.
9. Set up tax calculation rules
No one likes surprise costs at checkout. When taxes aren’t visible early on, it can cause confusion or hesitation. Magento’s cart settings give you the flexibility to show tax details exactly how your customers expect.
To access this section, simply navigate to Stores (1) > Configuration > Sales > Tax (2) > Shopping Cart Display Settings (3). Here’s what you can control:
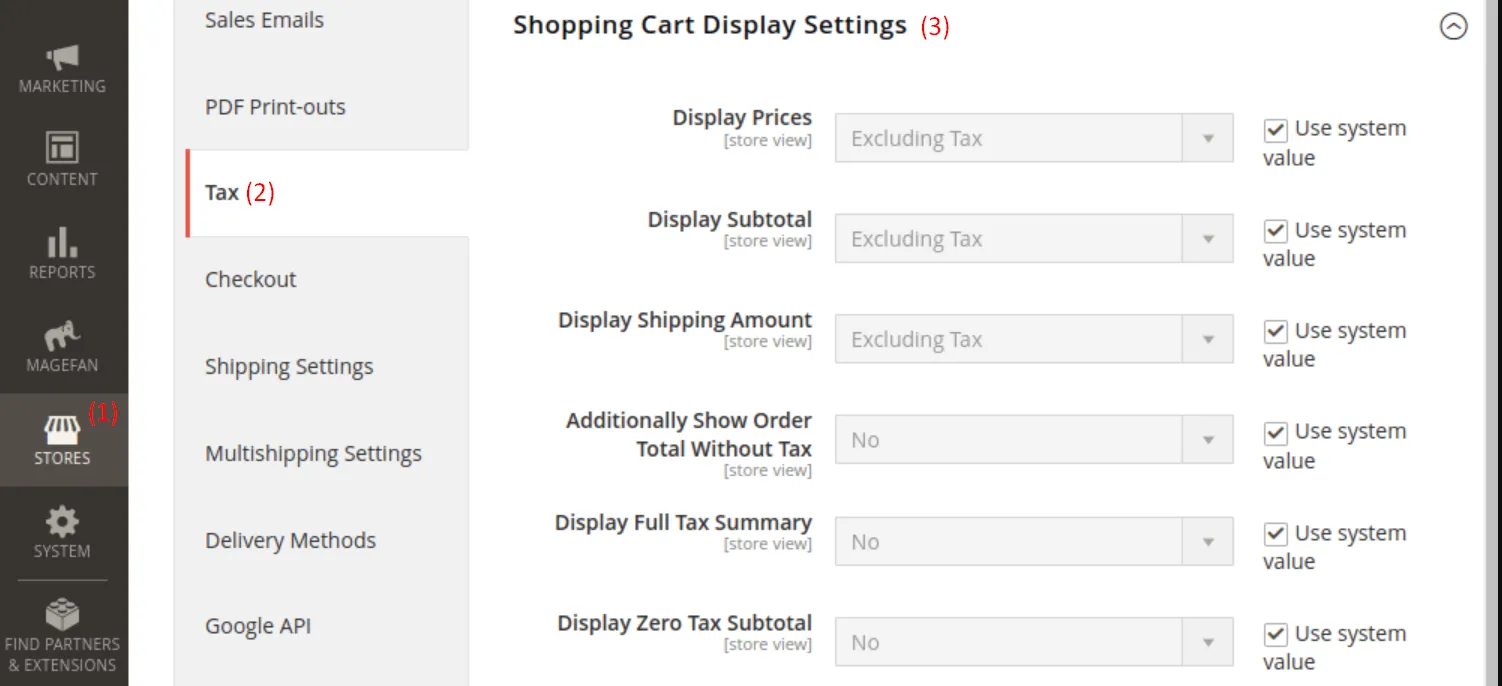
- Display Prices: Choose whether product prices appear including or excluding tax.
- Display Subtotal: Decide how the cart subtotal is calculated and displayed (with or without tax).
- Display Shipping Amount: Control whether shipping fees are shown with tax included.
- Additionally Show Order Total Without Tax: Enable this if you want to display both the taxed and untaxed total side by side.
- Display Full Tax Summary: Breaks down the tax components for full transparency.
- Display Zero Tax Subtotal: Lets you show a subtotal line even when no tax is applied (e.g. for tax-exempt orders).
By configuring these settings based on your region’s tax regulations and customer expectations, you can reduce confusion and make the checkout process much more transparent.
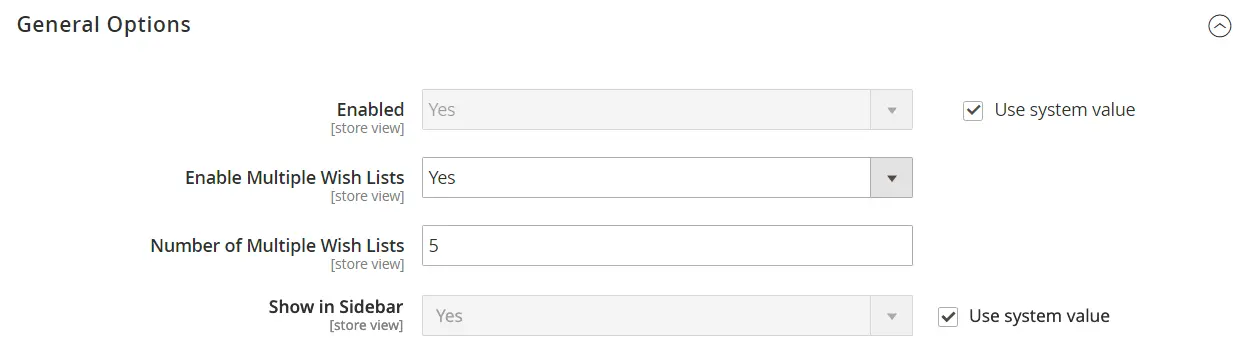
10. Activate wish list
Not every visitor is ready to buy on the spot. A wish list gives them a way to save products they’re interested in and return later to complete the purchase. To enable and customize this feature on your Magento shopping cart, go to Stores > Configuration > Customers > Wish List.
Under the General Options, set Enable to Yes to activate the wish list across your store. If you'd like customers to see their wish list summary in the storefront sidebar, toggle Show in Sidebar to Yes as well.
Magento also allows customers to share their wish lists via email. In the Share Options section:
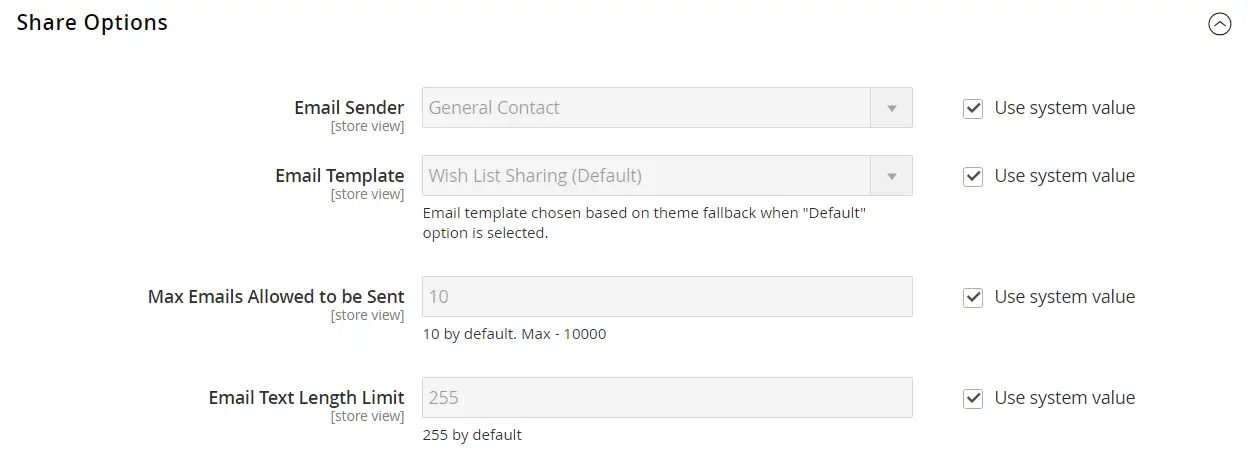
- Choose the Email Sender, which controls the name shown in the “From” field of the email.
- Select an Email Template for wish list sharing.
- Define the Maximum Number of Emails Allowed to be Sent. The default is 10, but you can increase this up to 10,000.
- Set the Email Text Length Limit, which controls how many characters a customer can write when sharing. You can allow anywhere between 250 and 10,000 characters.
Finally, scroll to the My Wish List Link section. Here, you can decide whether to show the number of items saved or the total quantity of products in the wish list.

Once you’ve configured everything, don’t forget to click Save Config in the top-right corner. The “Add to Wish List” button will now appear on product pages, and your customers can start building and sharing their favorites.
11. Review and test price rules
Before going live, always test your rules to make sure they apply correctly and don’t conflict with other promotions. A well-set rule can encourage larger orders and reward customer loyalty, but a broken one might confuse buyers or hurt your margins.

The image above is a clear example of how a properly configured cart price rule appears in the Magento shopping cart. A customer has entered the “BlackFriday” coupon code, and the discount has been applied successfully, showing both the reduced amount and the updated total in the summary section. This kind of visual feedback builds trust and helps customers feel confident about the promotion.
We’ve walked you through all the essential steps to configure and optimize your Magento shopping cart. With the right setup in place, you're now better equipped to turn casual visitors into confident buyers.
For more information to set up your Magento from scratch, feel free to check out our Magento tutorial.
How to Set Up Magento 2 Persistent Shopping Cart?
From the previous section, we know that the regular shopping cart only keeps items during one session. If the customer closes their browser or logs out, the cart is cleared.
In contrast, a persistent shopping cart keeps the cart data even after logout or across devices. Magento stores this information using a persistent cookie, which can last up to one year.
This means that, with this feature enabled, you can improve the shopping experience. It's especially helpful for returning shoppers or those who browse across multiple devices, and it can significantly reduce cart abandonment.
To enable it, log in to your Magento 2 Admin Panel and go to Stores > Configuration > Customers (1) > Persistent Shopping Cart (2). Now configure the following settings:
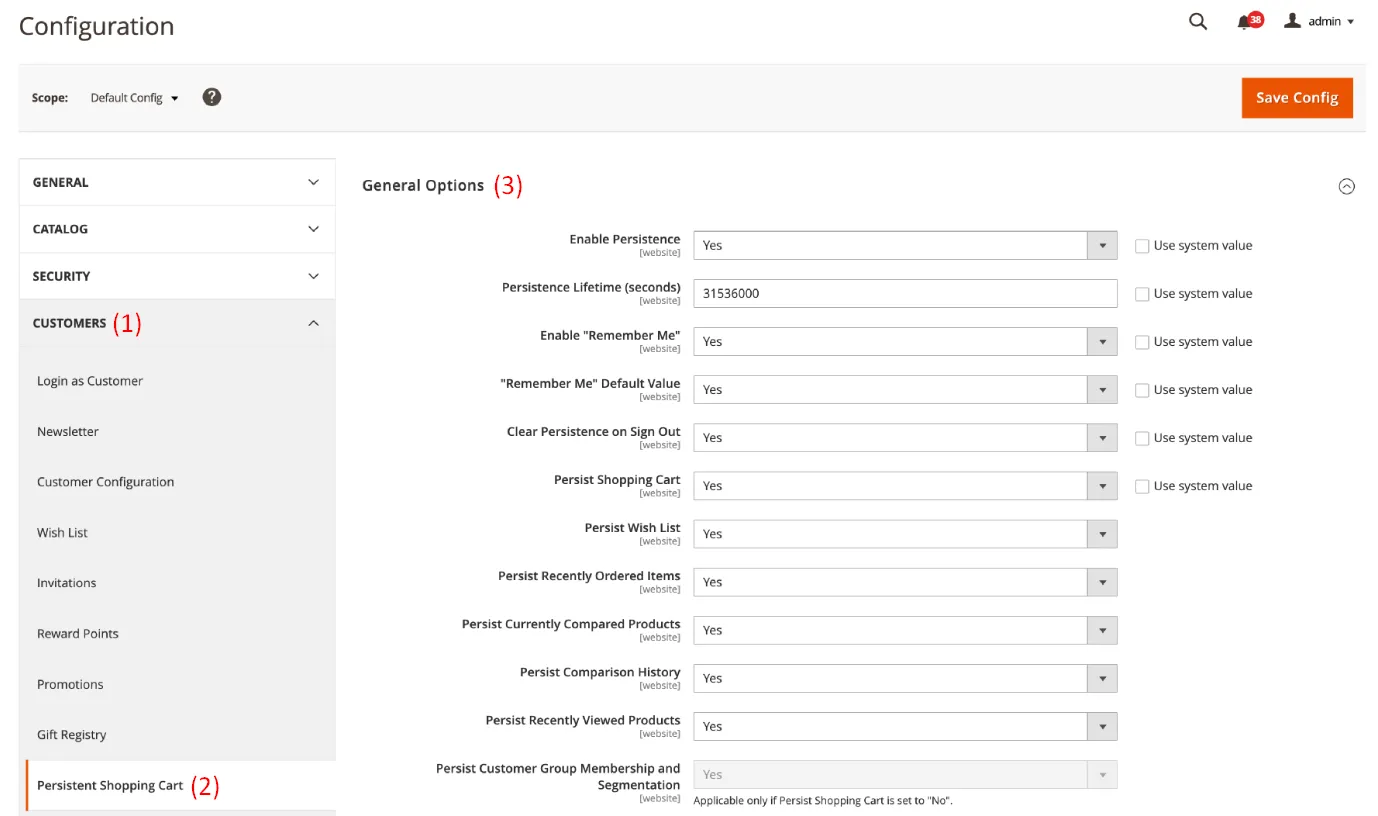
- Enable Persistence: Set this to Yes to activate the feature.
- Persistence Lifetime (seconds): Define how long the cookie should last. The default value (31536000) equals one year.
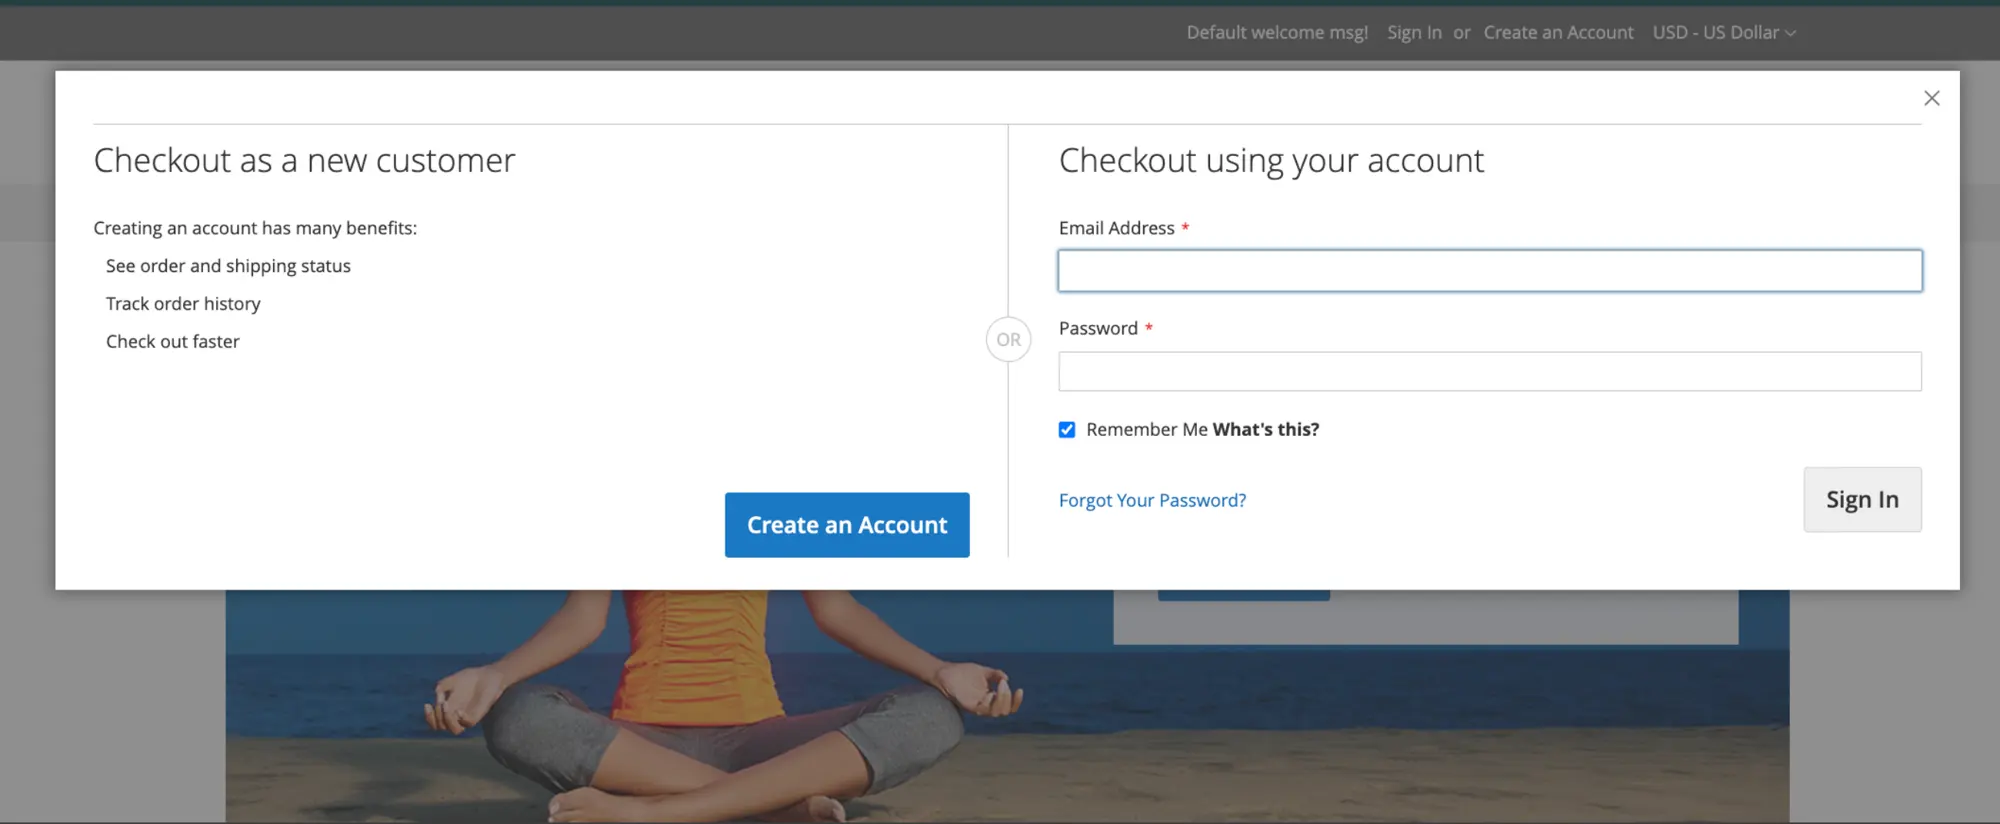
- “Remember Me” options: Choose whether to display a “Remember Me” checkbox on login and set its default value. You can also choose whether persistence should be cleared when users sign out.
- Persist Shopping Cart: Set this to Yes to make sure the cart is saved beyond the session.
Once configured, click “Save Config” in the top right. Your Magento store will now remember customers' carts over time, making it easier for them to complete purchases even after stepping away.
Magento Shopping Cart: FAQs
Is Magento a shopping cart?
Yes, Magento includes a powerful shopping cart system as part of its eCommerce platform. It allows customers to add products, review their selections, apply coupons, and proceed to checkout. Merchants can customize every aspect of the cart and checkout process to fit their business needs.
What is a persistent shopping cart in Magento 2?
A persistent shopping cart in Magento 2 saves a customer’s cart information even after they leave the store, log out, or switch devices. The system uses a persistent cookie to remember items added to the cart for a set period (up to one year), allowing shoppers to pick up where they left off when they return.
Is Magento a good choice for eCommerce?
Yes, Magento is an excellent choice for medium to large-scale eCommerce businesses. It offers advanced customization, scalability, multi-store management, and robust integrations. Its flexibility allows merchants to build complex storefronts and manage everything from catalog to checkout in one platform.
How do I add a shopping cart in Magento 2?
Magento 2 has a shopping cart built in by default. To manage or customize it, go to Stores > Configuration > Sales > Checkout in the admin panel. From there, you can enable features such as mini cart display, persistent cart, and cart sidebar. You can also modify cart templates or use extensions for advanced customization.
Conclusion
That’s everything! We’ve walked you through all the steps to configure your Magento shopping cart – from customizing checkout settings to enabling the persistent cart. With these configurations in place, your customers can enjoy a smoother shopping experience and fewer abandoned carts.
If you’re planning to migrate to Magento, LitExtension is here to make the process simple and secure:
- Automated Migration Tool: This DIY solution lets you move your store data with just a few clicks. The system runs automatically in the background, so you can keep selling while your data safely transfers to Magento.
- All-in-One Migration Service: Our personal assistant (PA) will take care of everything: from setup to full migration execution and post-migration testing. You’ll receive regular updates and direct support until your new store is live and fully functional.
For more insights and Magento tips, check out our Magento blog or join our Facebook community group!

