Whether you run a small shop or manage a large catalog on Magento, setting up the right shipping methods can help you reduce cart abandonment and increase customer satisfaction. Fortunately, Magento shipping offers a flexible system that allows you to configure various delivery options based on your business needs.
However, the configuration process can be a bit complex, especially if you are new to the platform. That's why we created this comprehensive guide to walk you through everything you need to know about Magento shipping. Opt right in for:
- The shipping methods that Magento offers
- Step-by-step guide to configure Magento shipping
- How to set up Magento shipping carriers
- Best Magento shipping integration for your consideration
- Best practices to manage shipping effectively on Magento
Let's get started!
All About Magento 2 Shipping Methods
Magento (or now Adobe Commerce) provides a range of built-in shipping methods to help you manage deliveries efficiently. Each method is designed to suit different business types, order values, and shipping strategies. Whether you want to offer free shipping to boost sales or use table rates to handle complex pricing, Magento shipping gives you the flexibility to tailor the experience to your needs.
Below, we’ll explore the four main shipping methods that come with Magento 2 and explain how each one works.
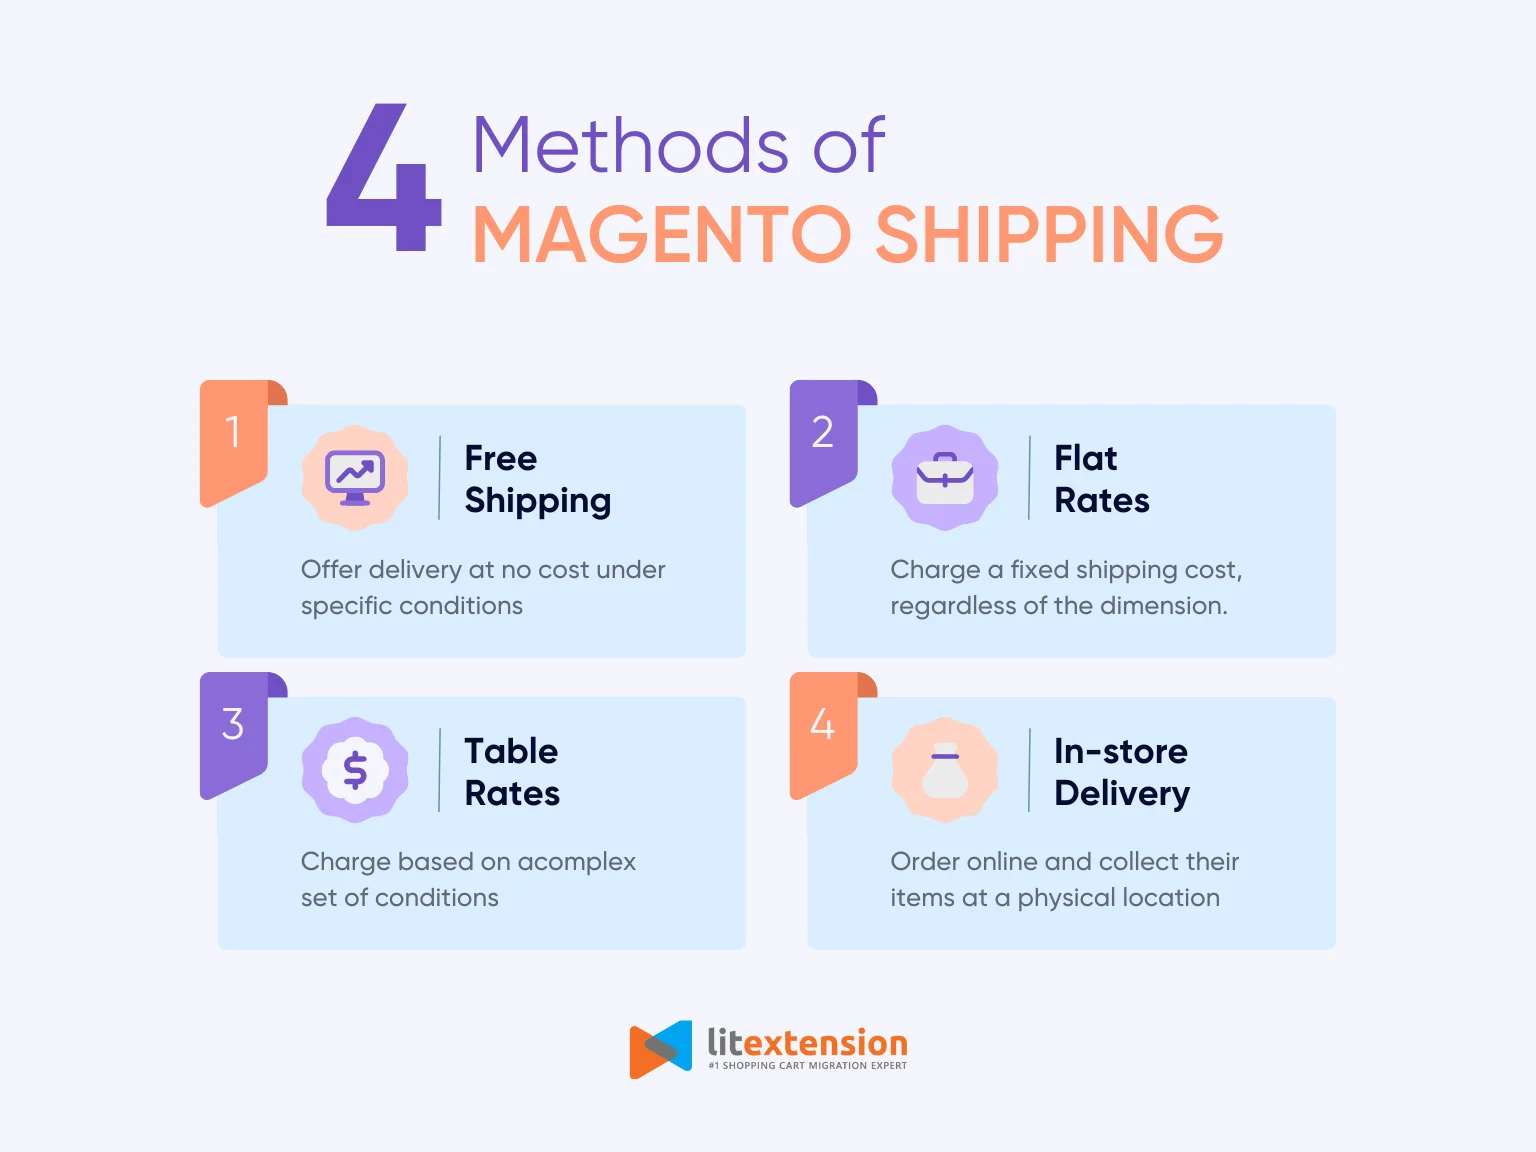
1. Free shipping
Free shipping is a popular method used to attract customers and increase conversion rates. It allows you to offer delivery at no cost under specific conditions, such as reaching a minimum order amount or applying a discount code.
Free shipping works well during promotions or as a reward for high-value purchases. It’s also effective when combined with marketing strategies like bundled deals or first-time customer incentives.
2. Flat rate
Flat rate shipping allows you to charge a fixed shipping cost, regardless of the order's size, weight, or destination. This method is simple to manage and easy for customers to understand.
Flat rate is ideal for stores with consistent product sizes or for businesses that want to keep shipping costs predictable. However, it might not work well if your product range varies widely in weight or dimension.
3. Table rates
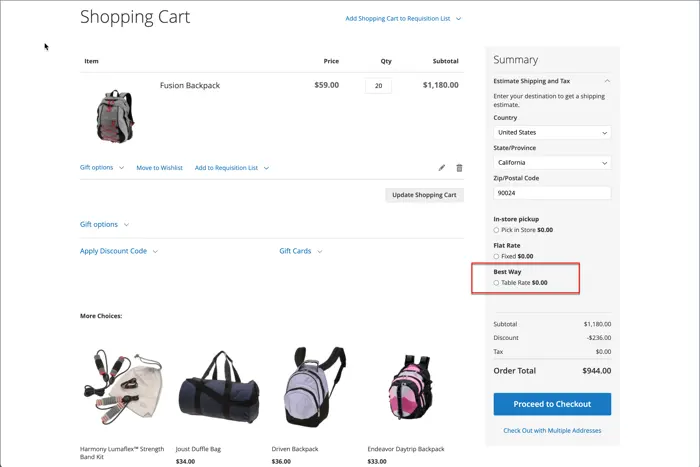
Table rate shipping lets you charge based on complex conditions, such as destination, cart weight, order subtotal, or item count. It’s a flexible method for stores with more detailed shipping rules.
Table rates are useful for businesses shipping to multiple regions or managing wholesale orders. You can also use it to set tiered rates that reward larger purchases with cheaper shipping.
4. In-store delivery

In-store delivery, also known as in-store pickup, allows customers to order online and collect their purchases at a physical location. This is especially helpful for brick-and-mortar stores that also sell online.
Customers will see available pickup locations during checkout. This method reduces shipping costs and offers convenience to local buyers who prefer same-day collection or want to avoid delivery delays.
How to Configure Magento Shipping
Once you’ve chosen the right shipping methods for your store, the next step is setting them up correctly in your Magento 2 backend. Fortunately, this platform gives you full control over your Magento shipping configuration, no matter what shipping options you choose.
In the sections below, we'll guide you through how to configure each built-in shipping method step by step.
Free shipping
Free shipping is one of the most effective ways to encourage customers to complete their purchases. In Magento 2, you can enable free shipping as a standalone method or use it in combination with cart price rules to reward qualifying orders.
To configure the free Magento shipping method, follow these steps:
Step 1. Configure free shipping
- Go to your Admin dashboard and navigate to Stores > Settings > Configuration.
- Then, in the left panel, choose Delivery Methods under Sales and expand the Free Shipping section.
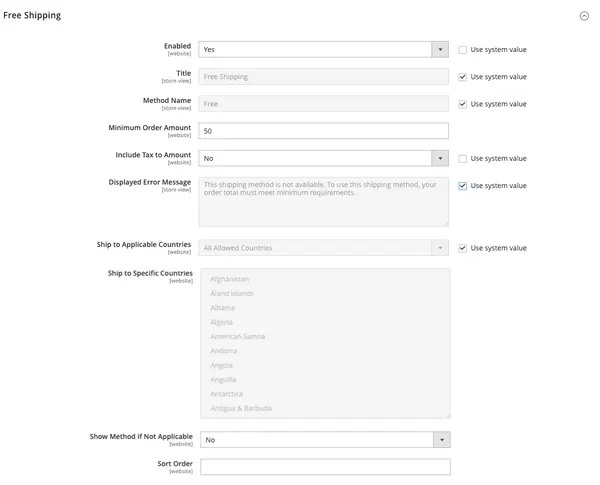
- Set the Enabled value to Yes, and type in the Title and Method Name to describe the Free Shipping method during checkout.
- For Minimum Order Amount, enter the minimum total value that qualifies for free shipping.
- In the Include Tax to Amount setting, choose either:
- Yes, if you want to include tax when calculating the Minimum Order amount (Subtotal + Tax – Discount).
- No, if you want to exclude tax when calculating the Minimum Order amount (Subtotal – Discount).
- For Displayed Error Message, enter the message to appear if free shipping becomes unavailable.
- In the Shipping Applicable Countries, choose either:
- “All Allowed Countries” to allow customers from all countries specified in your store configuration to use free shipping.
- Specific Countries to select where you want to apply this Magento shipping option.
- Move on to the Show Method if Not Applicable setting, choose:
- Yes, if you want to show the Free Shipping option automatically, even when it is not applicable.
- No, if you want to show this option only when applicable.
- For Sort Order, enter the number that determines the position of free shipping in the list of delivery methods during checkout.
- When everything is fully set, click Save Config to apply.
Step 2. Enable free shipping in the carrier configuration
Before continuing with this step, make sure to complete any required configuration for each carrier you want to use for free shipping. Then, update the following settings to enable this method.
- In the Delivery Methods setting, expand the UPS section to configure free shipping for this carrier, then set the Free Method option.
- If you want to require a minimum order for free shipping, set Enable Free Shipping Threshold to Enable and enter the required amount.
- Finally, select Save Config to finish.
Flat rates
Flat rate shipping is a straightforward method that allows you to charge a fixed delivery fee, either per order or per item, regardless of the customer’s location or the weight of the package. It’s a great choice if your shipping costs are predictable or if you want to offer a simple checkout experience.
To configure flat rate for your Magento shipping option, follow these steps:
- In the Admin sidebar, go to Stores > Settings > Configuration.
- Under Sales, click on Delivery Methods, then expand the Flat Rate section.
- Set Enabled to Yes to activate the method.
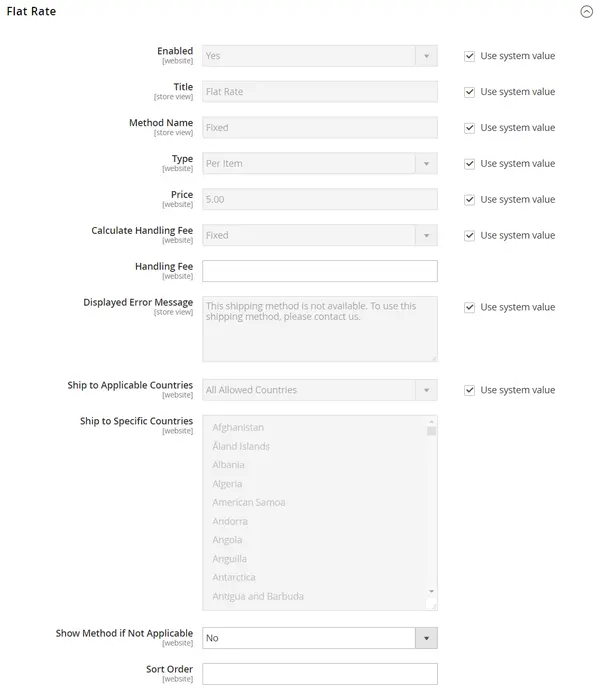
- Enter a Title and a Method Name that will appear on the frontend. For example, you can change the default name “Fixed” to something like “Standard Shipping” or “Plus Handling.”
- Choose the Type of flat rate:
- None: Disables the fee but still shows the method (works like free shipping).
- Per Order: Charges one flat fee for the whole cart.
- Per Item: Charges a fixed fee for each product in the cart.
- Set the Price that you want to charge for flat rate shipping.
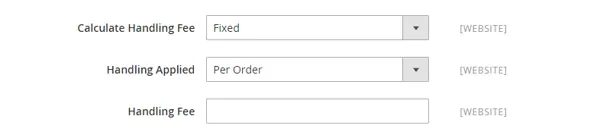
- Configure the optional handling fee:
- Choose Fixed or Percent under “Calculate Handling Fee”
- Then, set the Handling Fee amount.
- Customize the Displayed Error Message, if needed. This message will appear when the flat rate option is unavailable.
- Set Ship to Applicable Countries:
- Choose All Allowed Countries to offer flat rate shipping globally.
- Or select Specific Countries and choose the countries from the list.
- Decide whether to Show Method if Not Applicable:
- Yes: Always displays the option at checkout.
- No: Only shows it when the order qualifies.
- In the Sort Order field, enter a number to define the method’s display position during checkout.
- Click Save Config to apply the changes.
Table rates
The table rate method allows you to calculate Magento shipping costs based on a combination of factors such as destination, cart weight, item count, or price. It’s a flexible and scalable option that helps you offer more accurate rates, especially if your warehouse serves customers across multiple regions.
For example, if your store is based in Los Angeles, you can charge lower shipping fees for customers in California and higher rates for those in Vermont. This setup not only saves money for nearby customers but also gives you full control over how shipping prices are applied.
Step 1. Enable and configure table rates
- In the Admin panel, go to Stores > Settings > Configuration.
- Under Sales, choose Delivery Methods and expand the Table Rates section. Then, set Enabled to Yes.
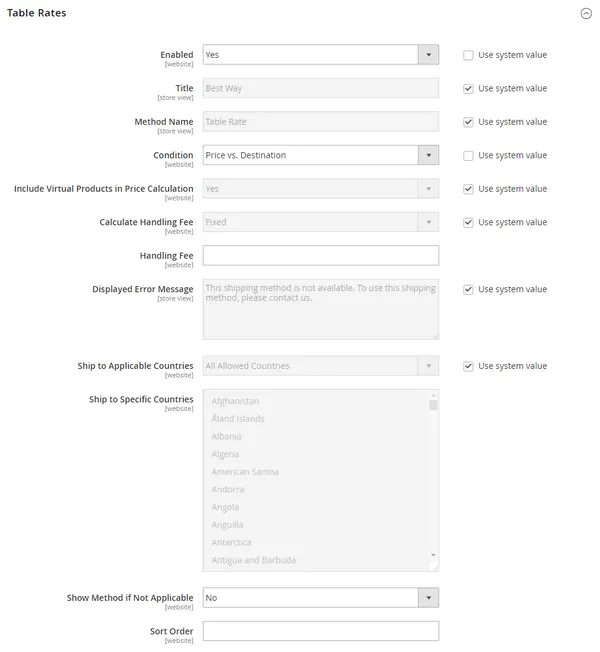
- Enter a custom Title and Method Name that will appear during checkout. The default title is “Best Way”.
- Choose a Condition between “Weight v. Destination”, “Price v. Destination”, and “Number of Items v. Destination”.
- Set Include Virtual Products in Price Calculation to Yes if you want to count virtual products.
- Next, configure optional handling fees:
- Calculate Handling Fee: choose Fixed or Percent.
- Handling Fee: set the fee you want to charge.
- Update the Displayed Error Message as needed.
- Choose Ship to Applicable Countries: All Allowed Countries or Specific Countries.
- Set Show Method if Not Applicable to Yes or No.
- In Sort Order, define the display order of this method.
- Finally, click Save Config before moving to the next step.
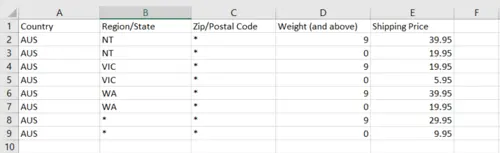
Step 2. Prepare the table rate data file
- Switch Store View to Main Website (or applicable website).
- Click Export CSV to download the sample table rate file.

- Open the tablerates.csv file in a spreadsheet editor.
- Fill in the values based on your chosen condition. Follow these guidelines to properly set up your table rate CSV file:
- Use * as a wildcard to apply to all entries in a column.
- Use valid 3-letter country codes (e.g., USA, CAN).
- Sort rows from most specific to most general (wildcards at the bottom).
- Use exact values only; ZIP ranges are not supported.
- Use up to 4 decimal places for weight values (e.g., 2.2068).
- Save the edited tablerates.csv file to keep your changes.
Step 3. Import the table rate file
- Return to the Table Rates section in the Magento dashboard.
- Set the Store View to match the one used for exporting.
- Under Import, click Choose File and upload your completed tablerates.csv.

Step 4. Verify the rates
After setting up, go through the checkout process using different shipping addresses to make sure the table rate logic is working correctly. Magento will display the calculated shipping fee based on your uploaded table data.
In-store delivery
In-store delivery, also known as in-store pickup, allows your customers to place orders online and collect their purchases at a physical location. This method is ideal for businesses with both online and offline operations, helping reduce shipping costs and improve convenience for local buyers.
To enable and configure in-store delivery in your Magento shipping options, follow these steps:
- In the Admin panel, go to Stores > Settings > Configuration.
- Under the Sales section, select Delivery Methods, then expand the In-Store Delivery section.
- Set Enabled to Yes.
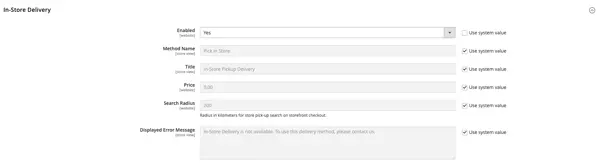
- Set a Title that will display in the In-Store Delivery section during checkout. The default title is In-Store Pickup Delivery, but you can customize it to match your brand's tone of voice and style.
- If you want to charge a fee for the in-store pickup service, enter the amount in the Price field.
- Define the Search Radius in kilometers to help customers find nearby pickup locations during checkout.
- Customize the Displayed Error Message that appears if in-store delivery becomes unavailable. The default message is: “In-Store Delivery is not available. To use this delivery method, please contact us.”
- Lastly, click “Save Config” to finish setting.
How to Set Up Magento Shipping Carriers
In addition to its built-in shipping methods, Magento 2 supports direct integration with major shipping carriers such as UPS, USPS, FedEx, and DHL. These carrier options allow your store to provide real-time shipping rates, tracking numbers, and automated label printing, making the fulfillment process smoother and more professional.
In the sections below, we’ll walk you through how to configure each Magento shipping carrier so you can offer more flexible and accurate delivery options to your customers.
#1. UPS
UPS (United Parcel Service) provides domestic and international shipping to over 220 countries, making it a reliable choice for many Magento merchants. To enable UPS shipping in Magento 2, you need to create a UPS account, configure API credentials, and properly set up the integration within your store settings, following these steps:
Step 1. Open a UPS shipping account
- Create a UPS account to get a Shipper Number.
- You can sign up for free via the official UPS registration page.
Step 2. Obtain OAuth credentials
- Go to the UPS Developer Platform.
- Create an application and generate your Client ID and Client Secret.
- These will be used as the User ID and Password in Magento's UPS settings.
Step 3. Enable UPS in Magento
- In the Admin sidebar, go to Stores > Settings > Configuration.
- Under Sales, choose Delivery Methods, then expand the UPS section.
- Set Enabled for Checkout to Yes.

- Then, continue with the configuration for UPS REST integration:
- User ID / Password: Enter your API credentials.
- Mode: Set to Live for production or Development for testing.
- Gateway & Tracking URLs: Use correct sandbox or production URLs.
- Origin of the Shipment: Define the region your shipments are sent from.
- Negotiated Rates: Set to Yes if you have special rates from UPS and enter your Shipper Number.
- Live Account: Choose Yes for production mode, or No for test mode. Make sure to use the correct Endpoints under Gateway URL and Tracking URL.
- Lastly, fill in the name of this shipping option in the Title field. The default will be “United Parcel Service”.
Step 4. Configure container and packaging settings
Scroll down to the container and packaging settings and configure the following options:
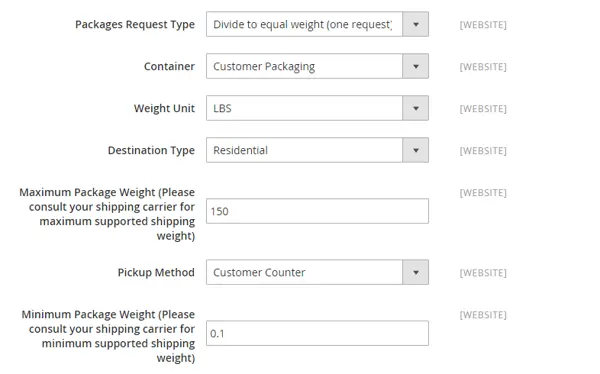
- In the Packages Request Type, choose either:
- Use origin weight
- Divide to equal weight
- In the Container field, specify the typical packaging type that is used for shipment, including:
- Customer Packaging
- UPS Letter Envelope
- Customer Supplied Package
- UPS Tube
- PAK
- UPS Express Box
- UPS Worldwide 25 kilo
- UPS Worldwide 10 kilo
- Pallet
- Small Express Box
- Medium Express Box
- Large Express Box
- Set the Weight Unit to either LBS (pounds) or KGS (kilograms) based on your store's region.
- Set Destination Type to either:
- Residential if most of your shipments are B2C
- Commercial if most of your shipments are B2B
- Set Pickup Method to one of the following:
- Regular Daily Pickup
- On Call Air
- One Time Pickup
- Letter Center
- Customer Counter
- Enter the Minimum Package Weight allowed by the carrier.
Step 5. Set up handling fees
This setting is optional and appears as an extra charge that is added to the UPS shipping cost.
- Set the Calculate Handling Fee to either Fixed or Percent.
- To determine how the handling fee is applied, choose one option below for the Handling Applied:
- Per Order
- Per Package
- Finally, enter the amount you want to charge.
Step 6. Specify allowed methods and shipping zones
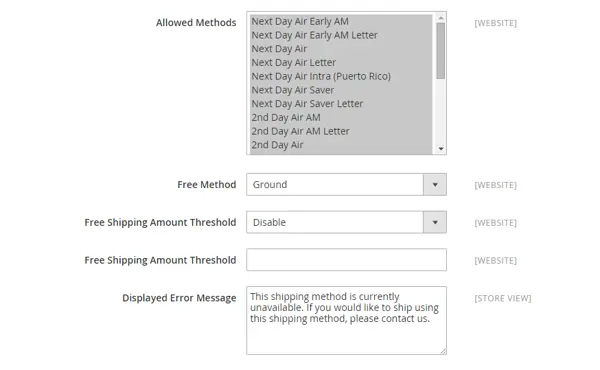
- Under the Allowed Methods section, select the specific UPS services you want to offer (such as 2nd Day Air, Next Day Air)
- To offer free shipping via UPS, you can:
- Set Free Method to a UPS service.
- Enable and define the Free Shipping Amount Threshold if you want to offer free shipping only if the customer reaches a certain purchase amount.
- Customize the Displayed Error Message as needed.
- Set Ship to Applicable Countries to either All Allowed Countries or Specific Countries.
- Set the Show Method if Not Applicable to:
- Yes, if you want to list all UPS shipping methods during checkout.
- No, if you only want to display the available UPS services.
- Enable Debug for logging shipments.
- Set the Sort Order to control its position at checkout.
Step 7. Set the shipping origin address
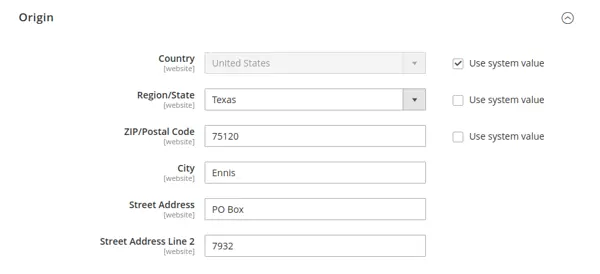
- Go to Stores > Settings > Configuration > Shipping Settings.
- Expand the Origin section and enter your warehouse location, including ZIP, country, and state.
- Finally, click Save Config.
#2. USPS
The United States Postal Service (USPS) is a trusted shipping carrier that offers both domestic and international delivery options. Magento shipping supports direct USPS integration, allowing you to display real-time rates and streamline your order fulfillment process. To start using USPS in your Magento store, follow the steps below.
Step 1. Open a USPS shipping account
- Go to the USPS Web Tools account page
- Complete the registration form to receive your User ID and access to the USPS test server.
- Once registered, you’ll also receive a test URL for validating your integration before going live.
- You can refer to the USPS Technical Documentation for more information about setup and testing.
Step 2. Enable USPS in Magento
- In the Admin sidebar, go to Stores > Settings > Configuration.
- Under Sales, select Delivery Methods, then expand the USPS section.
- Set Enabled for Checkout to Yes.
- If required, verify the Gateway URL (default values typically don’t need to be changed).
- Enter a Title to display this shipping option during checkout.
- Input your USPS User ID and Password.
- Set Mode to either Development or Live to deploy USPS to your desired environment.
Step 3. Complete the packaging description
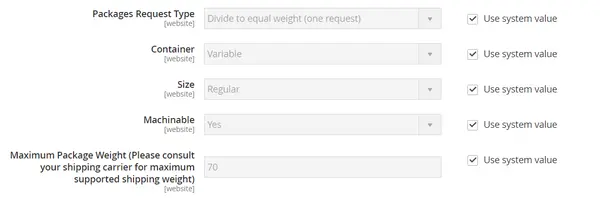
- To determine how the order is managed if sent as multiple packages, set the Packages Request Type to one of the following:
- Divide to equal weight.
- Use origin weight.
- Select a Container type.
- Define the Size of your typical shipment.
- Set Machinable to either:
- Yes, if the package can be processed by USPS machines.
- No, if manual handling is required.
- Enter the Maximum Package Weight allowed by USPS.
Step 4. Set up handling fees
The handling fee is optional but can help you cover extra costs related to packaging or logistics.
- Choose Calculate Handling Fee as either Fixed or Percent.
- Define Handling Applied as Per Order or Per Package.
- Then, enter the handling fee amount.
Step 5. Specify allowed methods and applicable countries
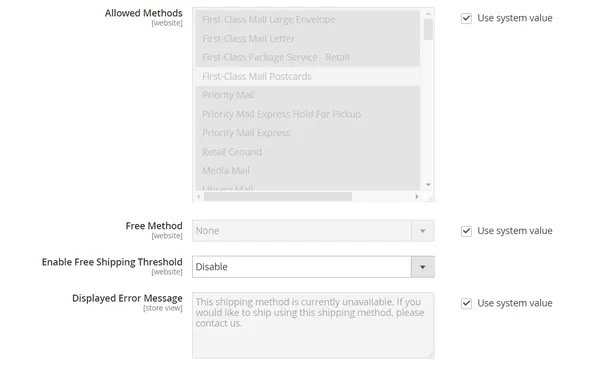
- Under Allowed Methods, select which USPS shipping services you want to offer (e.g., Priority Mail, First-Class Mail, or Express Mail).
- To offer free shipping through USPS:
- Set Free Method to your preferred USPS service.
- Enable Free Shipping Amount Threshold and define the minimum order value.
- Customize the Displayed Error Message shown when USPS shipping is unavailable.
- Set Ship to Applicable Countries to either:
- All Allowed Countries: Available for all configured regions.
- Specific Countries: Select individual countries from the list.
- Set Show Method if Not Applicable to:
- Yes to show all USPS options, even if unavailable.
- No to hide unavailable methods.
- Set Debug to Yes to create a shipment log.
- Adjust the Sort Order to control where USPS appears among other Magento shipping methods.
- Lastly, click Save Config to finalize your setup.
#3. FedEx
FedEx offers a wide range of domestic and international services, and you can integrate those services into your store to provide real-time rates and tracking. The following steps describe how to register for FedEx Web Services and configure FedEx in your Magento admin so that Magento shipping shows accurate FedEx options at checkout.
Step 1. Register for FedEx web service
- Create a FedEx merchant account and request Web Services production access. Your account must include an Account ID, an API Key, and a Secret Key (production credentials).
- Complete any FedEx production registration steps and save the credentials for later use in Magento.
Step 2. Enable FedEx in the Admin
- In Admin, open Stores > Settings > Configuration.
- In the left panel, under Sales, choose Delivery Methods and expand the FedEx section.
- Set Enabled for Checkout to Yes.
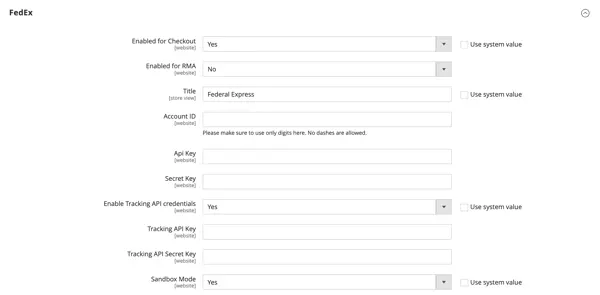
- Enter a Title to identify the FedEx shipping option during checkout.
- Enter your Account ID, API Key, and Secret Key in the corresponding fields.
- If you use separate tracking credentials, enable Tracking API credentials, and fill in the Tracking API Key and Tracking API Secret Key.
- Use Sandbox Mode = Yes when testing; switch to Live for production.
Step 3. Configure package description and handling
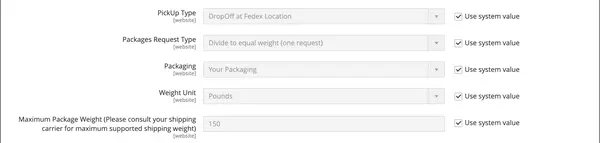
- Set Pickup Type to reflect how you hand parcels to FedEx (for example, Dropoff at FedEx Location, Contact FedEx to Schedule, or One Time Pickup).
- Choose Packages Request Type to either Divide to equal weight or Use origin weight, depending on how you split orders.
- Select the Packaging type that you typically use for shipments.
- Set the Weight Unit (Pounds or Kilograms) used in your store.
- Enter the Maximum Package Weight allowed for FedEx shipments (Magento default is 150 lbs).
- Configure handling fee options if needed:
- Set Calculate Handling Fee to Fixed Fee or Percentage.
- Set Handling Applied to Per Order or Per Package.
- Enter the Handling Fee amount.
- Configure Residential Delivery to either:
- Yes, if you ship mainly to consumers (B2C).
- No, if you ship mostly to businesses (B2B).
Step 4. Configure allowed methods and applicable countries
- Choose Allowed Methods to list which FedEx services you want to offer (for example, Ground, Express Saver, International Economy, Priority Overnight, Freight options).
- To offer free shipping via FedEx, set Free Method to the FedEx service you want to use and enable Free Shipping Amount Threshold with the minimum order value.
- Set Ship to Applicable Countries to All Allowed Countries or Specific Countries.
- If needed, customize the Displayed Error Message shown when FedEx is unavailable.
- Enable Debug = Yes to keep logs of communications between Magento and FedEx for troubleshooting.
- Choose Show Method if Not Applicable:
- Yes shows all FedEx methods even when not applicable.
- No shows only applicable methods.
- Set Sort Order to control FedEx position among other Magento shipping methods.
- Click Save Config to apply changes.
#4. DHL
DHL is a trusted global logistics provider that offers both domestic and international delivery services. Integrating DHL with your Magento store allows you to display real-time shipping rates, manage tracking information, and streamline your fulfillment process. Follow the steps below to enable DHL in Magento shipping.
Step 1. Enable DHL in Magento Shopping
- In the Admin sidebar, go to Stores > Settings > Configuration.
- Under Sales, select Delivery Methods, then expand the DHL section.
- If needed, uncheck Use system value to edit fields, then set Enabled for Checkout to Yes.
- Accept the default Gateway URL, unless DHL provides an alternate one.
- Enter the credentials provided by DHL to authenticate the DHL system to retrieve Magento shipping rates and enable live transactions.
Step 2. Enter package description and handling fee
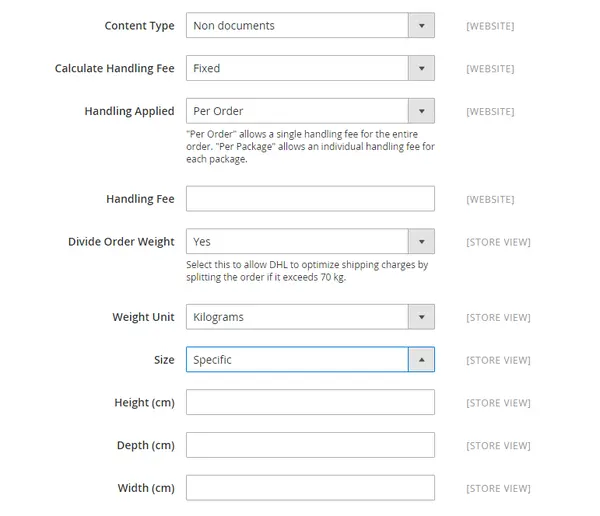
- Under Content Type, choose the type of package you’re shipping: Documents or Non-documents
- Configure optional handling fees:
- Calculate Handling Fee: Choose Fixed or Percentage.
- Handling Applied: Apply the fee Per Order or Per Package.
- Handling Fee: Enter the amount as a fixed value or a percentage
- To improve rate accuracy, set Divide Order Weight to Yes, so Magento can split the total weight among multiple packages.
- Choose the Weight Unit as either Pounds or Kilograms.
- Define the Size of your standard package:
- Regular for default sizing
- Specific to enter custom Height, Depth, and Width in centimeters.
Step 3. Specify allowed delivery methods
- Under Allowed Methods, select the DHL shipping services you want to offer to customers.
- In Ready Time, specify how many hours after an order is placed the shipment will be ready.
- Update the Displayed Error Message if you want a custom message shown when DHL is unavailable.
- To offer free shipping through DHL:
- Set Free Method to your preferred DHL service.
- Enable Free Shipping Amount Threshold, then enter the minimum order value required for free DHL shipping.
Step 4. Specify applicable countries
- Choose Ship to Applicable Countries:
- All Allowed Countries: DHL is available for all countries in the Magento shipping settings
- Specific Countries: Choose which countries can use DHL shipping.
- Set Show Method if Not Applicable:
- Yes: Always display DHL at checkout.
- No: Show only when applicable.
- Enable Debug to log DHL shipment activity for troubleshooting.
- Adjust Sort Order to determine where DHL appears among other Magento shipping options
- Click Save Config to apply all changes.
Once you've completed the setup, UPS, USPS, FedEx, and DHL will be active as live Magento shipping carriers. You can now offer accurate rates, faster delivery options, and international shipping directly through your Magento store.
Best Magento Shipping Extensions for Your Consideration
Choosing the right shipping extension can significantly improve your Magento store’s efficiency, customer satisfaction, and order accuracy. Whether you need advanced rate calculations, label printing, or better tracking features, Magento offers a wide range of shipping extensions to meet your needs.
Below are some of the best Magento shipping extensions worth considering, each designed to streamline fulfillment and enhance the overall shopping experience.
#1. Custom Shipping Method by BSS Commerce
The Custom Shipping Method by BSS Commerce is a flexible Magento shipping extension designed to help you create and manage multiple custom shipping methods with ease. It’s ideal for stores that need to define their own delivery rules, rates, or service names instead of relying solely on built-in Magento shipping options. This extension gives store owners complete control over how shipping costs are calculated and displayed at checkout.

Key features:
- Create unlimited custom shipping methods based on your business needs.
- Set unique shipping names, titles, and delivery notes for each method.
- Define flat-rate or percentage-based shipping costs with easy configuration.
- Restrict specific shipping methods by store view, customer group, or location.
- Enable or disable individual methods without affecting others.
Pricing: $35
#2. Table Rate Shipping Marketplace Add-On by Webkul
The Table Rate Shipping Marketplace Add-On is a powerful Magento extension that allows sellers in a multi-vendor marketplace to set flexible shipping rates based on various conditions. It’s especially useful for marketplaces where different vendors need to define their own delivery rules, helping create a fair and transparent shipping structure for all parties involved.

Key features:
- Enable individual sellers to configure their own shipping rates.
- Calculate shipping costs based on weight, price, or destination.
- Import and export shipping rules easily through CSV files.
- Allow vendors to set country- or region-specific rates for better cost control.
- Fully compatible with the Magento 2 Multi-Vendor Marketplace module.
Pricing: $199
#3. Multi Carrier Shipping Label & Rates with Tracking
The Multi Carrier Shipping Label & Rates with Tracking extension is designed to simplify and centralize Magento shipping management for store owners who use multiple carriers. It integrates real-time rates, label generation, and tracking details into one seamless solution, ideal for businesses looking to automate and scale their fulfillment process.
Key features:
- Display live shipping rates during checkout based on product weight, dimensions, and destination.
- Generate shipping labels directly from the Magento admin panel.
- Provide automated tracking information to customers via email and order status.
- Enable multi-package shipping and print labels in bulk.
- Customize shipping rules based on store-specific requirements.
Pricing: Custom
Best Practices to Manage Magento Shipping Effectively
Managing Magento shipping effectively requires more than just enabling delivery methods. It’s about creating a seamless and reliable experience for your customers while optimizing operations on the backend. By following the best practices below, you can reduce shipping errors, increase customer satisfaction, and streamline your order fulfillment process.
- Regularly review shipping rates and methods to ensure they remain competitive and aligned with your business goals.
- Test your checkout process frequently to confirm that shipping options display correctly and calculate accurate costs.
- Offer multiple shipping options (e.g., standard, express, in-store pickup) to give customers flexibility and encourage conversions.
- Use shipping extensions or carrier integrations to automate label printing, rate calculation, and tracking updates.
- Set clear shipping policies on your website to manage customer expectations about delivery times, fees, and return conditions.
- Segment shipping rules by location, weight, or product type to control costs and maintain accuracy.
- Segment shipping rules by location, weight, or product type to control costs and maintain accuracy.
By applying these practices, you can turn Magento shipping into a strategic advantage that boosts operational efficiency and enhances the overall shopping experience.
Magento Shipping – FAQs
What are the types of shipping that Magento offers?
Magento offers several built-in shipping methods, including:
- Free Shipping: Allows customers to check out without paying for delivery if certain conditions are met.
- Flat Rate: Charges a fixed fee per item or per order.
- Table Rates: Calculates shipping costs based on price, weight, or number of items and destination.
- In-Store Delivery: Lets customers pick up their orders at a physical store location.
Additionally, Magento also supports live rates from carriers like UPS, USPS, FedEx, and DHL.
What is the default shipping method in Magento 2?
By default, Magento 2 includes Flat Rate shipping as the standard enabled method. However, you can enable or disable other methods (like Free Shipping or Table Rates) in the admin panel based on your business needs.
How do I add shipping methods to Magento?
To add a shipping method:
1. Go to Stores > Configuration > Sales > Delivery Methods in the Magento Admin.
2. Expand the shipping method you want to enable (e.g., Free Shipping, Table Rates).
3. Set it to Enabled, configure the settings, and click Save Config.
How to add USPS shipping to Magento?
To add USPS as a shipping carrier in Magento:
1. Register for a USPS Web Tools account to get your User ID.
2. In the Magento Admin, go to Stores > Configuration > Sales > Delivery Methods.
3. Expand the USPS section, enter your User ID, and configure the shipping options.
4. Enable the method, save the configuration, and test it at checkout to confirm USPS rates display properly.
Final Words
To conclude, setting up and managing Magento shipping doesn’t have to be complicated. With the right configuration and tools, you can create a reliable, flexible shipping system that meets both your business needs and customer expectations. From built-in methods like flat rate and free shipping to advanced carrier integrations and powerful extensions, Magento gives you the freedom to tailor your shipping strategy your way.
If you found this guide helpful, be sure to explore more expert tutorials and platform tips on the LitExtension Blog and LitExtension Resources page. We’re here to help you succeed, whether you’re managing Magento shipping or planning your next store upgrade.

