Magento multi store is a powerful feature that lets businesses manage multiple online stores from one Magento single dashboard. With Magento multiple stores, you can run separate websites for different brands, languages, and several parts of the world.
In today’s article, we’ll give you an overview of Magento multi stores, including:
- An overview of Magento multi-store.
- Benefits of Magento multiple store.
- How to set up Magento 2 multi store.
- How to migrate to Magento multi store.
Now, let’s get into it!
Understanding Magento Multi Store

Before discovering other aspects, we’ll provide you with an overall picture of Magento multiple stores. This includes the definition of Magento 2 multi store and the differences between Magento multistore and Magento multisite.
What is Magento multi store?
Magento multi store is a feature within the Magento eCommerce platform that allows businesses to manage multiple online stores from a single dashboard. When you create a Magento multiple store, they will stay under the same main domain (www.yoursite.com), but different stores have different URLs and act as subdomains (www.store1.yoursite.com).
Adding to that, each store can still have its own unique settings, products, and configurations while sharing the same customer data. This feature is useful for businesses with multiple brands, product lines, or localized offerings that want to maintain a cohesive online presence while accommodating diverse target groups.
Magento multistores vs Magento multisites
If you search for the term “Magento multi stores” on Google, you might notice that there is another term also appears on your screen, which is “Magento multisites”. So, are they the same?
Magento multi stores and Magento multi sites are both features within the Magento eCommerce platform, but they serve different purposes and offer distinct functionalities. The table below is a breakdown of the differences between these two features:
Magento multi store | Magento multi site | |
Purpose | Designed to manage multiple storefronts within a single Magento installation. | Designed to manage multiple websites under a single Magento installation. |
Configuration | Operate under subdomains or subdirectories of a single main domain. | Operate under entirely separate domains. |
Databases | Share a product catalog and customer base across stores. | Have completely separate product catalogs and customer bases. |
Ideal for | Experienced eCommerce users/Small business | Established Enterprises |
Now, you have had a better grasp of Magento 2 multistore. Let’s dive into why you should set it up and how to do it.
Benefits of Magento Multi Stores

Magento multi store is particularly beneficial for businesses with multiple separate stores, as it allows centralized management from a single backend.
1. Expand your business
Magento multi store is a powerful feature that enables businesses to expand into new markets effortlessly. By allowing you to create and manage multiple storefronts from a single backend, Magento multi store simplifies the customization of each store to cater to specific regional, linguistic, and customer segment needs.
Whether you're targeting different geographic regions, launching new product lines, or appealing to diverse customer demographics, Magento multi shop provides the flexibility and efficiency needed to grow your business globally.
2. Manage multiple stores easily
With Magento multi store, it's easy to manage multiple stores from a single admin panel. You can quickly switch between Magento stores to make updates without logging into separate systems. This saves time and ensures all your stores stay consistent.
Magento multi store also helps keep track of customers, orders, and inventory for all your stores in one location. This way, you can manage stock levels and fulfill orders quickly. The simplicity of having everything centralized means you can focus more on growing your business and less on managing separate systems.

3. Improve customer experiences
Furthermore, Magento multi store can improve customer experiences by offering personalized shopping for different markets. With unique products, prices, and promotions tailored to specific customer groups, you can meet the needs and preferences of various audiences and provide enjoyable shopping experience.
Additionally, the centralized management system allows you to keep inventory and orders up-to-date, reducing errors and ensuring customers get what they ordered quickly. This efficient handling of inventory and orders minimizes delays and improves overall customer satisfaction.
4. Improve SEO potential
Magento multi store can improve your SEO potential by allowing each store to have its own unique URL. This helps you target different keywords and market segments more effectively. Each store can be optimized for specific search terms, making it easier for customers to find your products through search engines.
Moreover, Magento multistore supports the creation of localized content for different regions. This means you can customize titles, meta tags, descriptions, and other SEO elements for each store to match the local language and preferences, enhancing search engine rankings and visibility.
5. Cost-effective expansion
Last but not least, Magento multi store allows for cost-effective expansion of your business. Managing many stores from a single backend reduces the need for separate installs and administrative overhead. In this manner, you may save money on hosting, maintenance, and staffing, making it an affordable option for expanding your business.
Addtionally, each store can be tailored to target certain markets, customer segments, or product lines without incurring major additional costs. You can also share product information, inventory, and customer data across all stores. You can also transfer product information, inventory, and customer data between stores. With this shared infrastructure, you may grow your firm efficiently and affordably.
Eager yet? Now, let us show you how to set up multiple stores with Magento.
How to Set Up Magento Multi Store
To set up Magento multistore, there are 7 steps for you to follow, including:
- Step 1. Create a new Magento website
- Step 2. Create new stores
- Step 3. Create store views
- Step 4. Create custom URL for each store
- Step 5. Add the store code to the base website URL
- Step 6. Update the default store view for the base URL
- Step 7. Flush Magento cache
Now, let's get to the detailed instructions to set up and configure your Magento multi store.
Step 1. Create a new website
First, log into your Magento admin account.

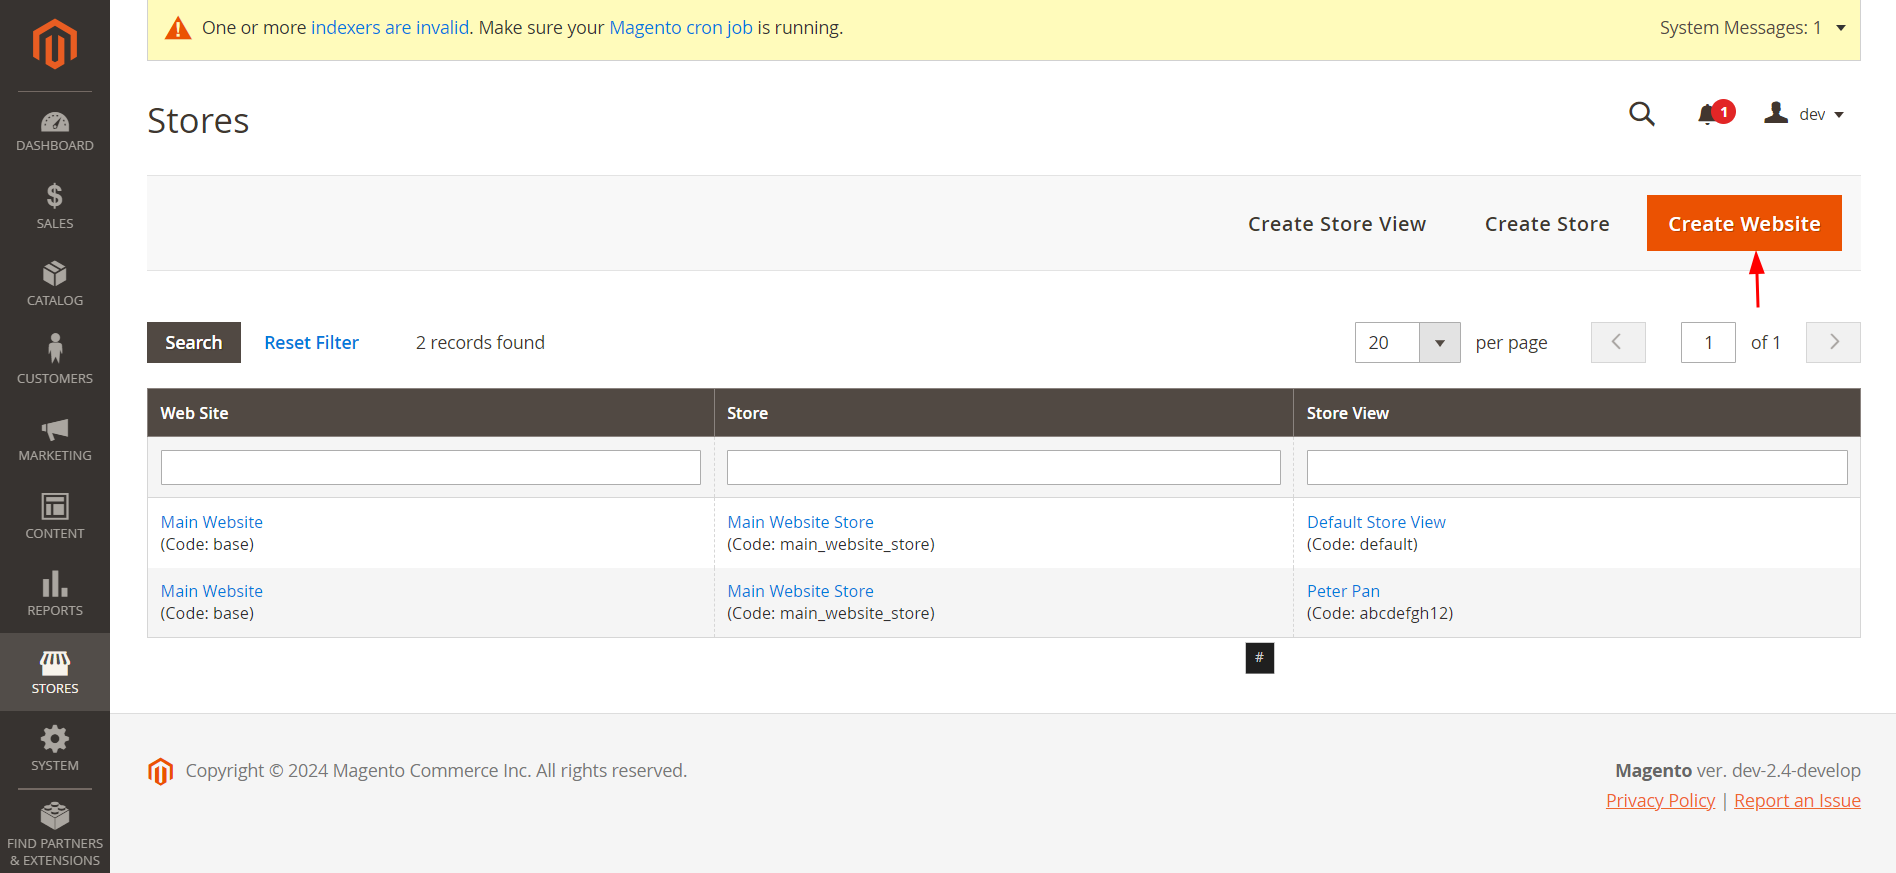
Then, go to the “Stores“ section on the dashboard on the left screen and select “All Stores”.

After that, click “Create Website”.
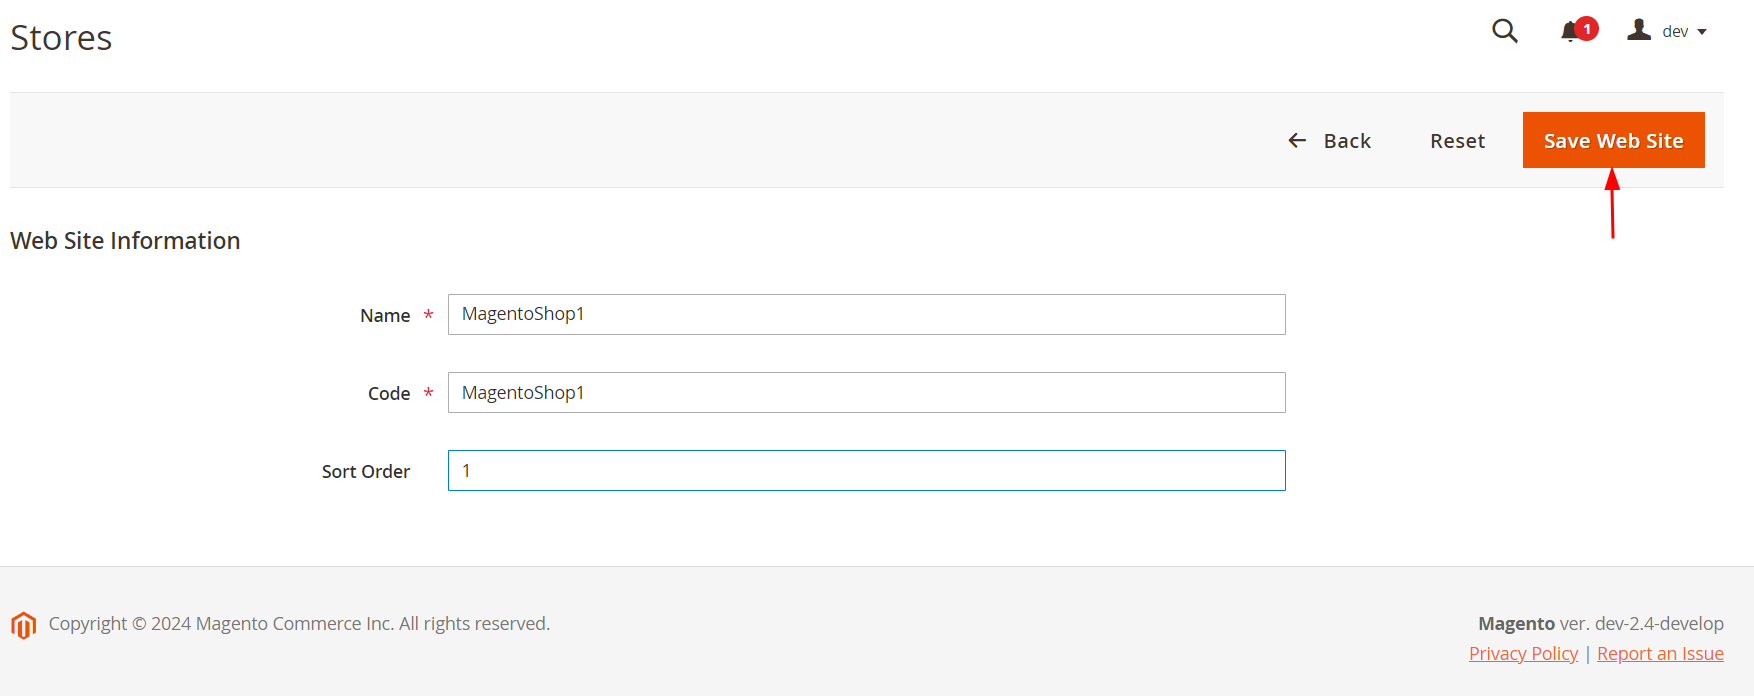
And, fill in the information including:
- Name: Choose a name for your website.
- Code: Enter a unique code for your website.
- Sort Order: Enter a number to set the display chronology.
Finally, click “Save Web Site”.
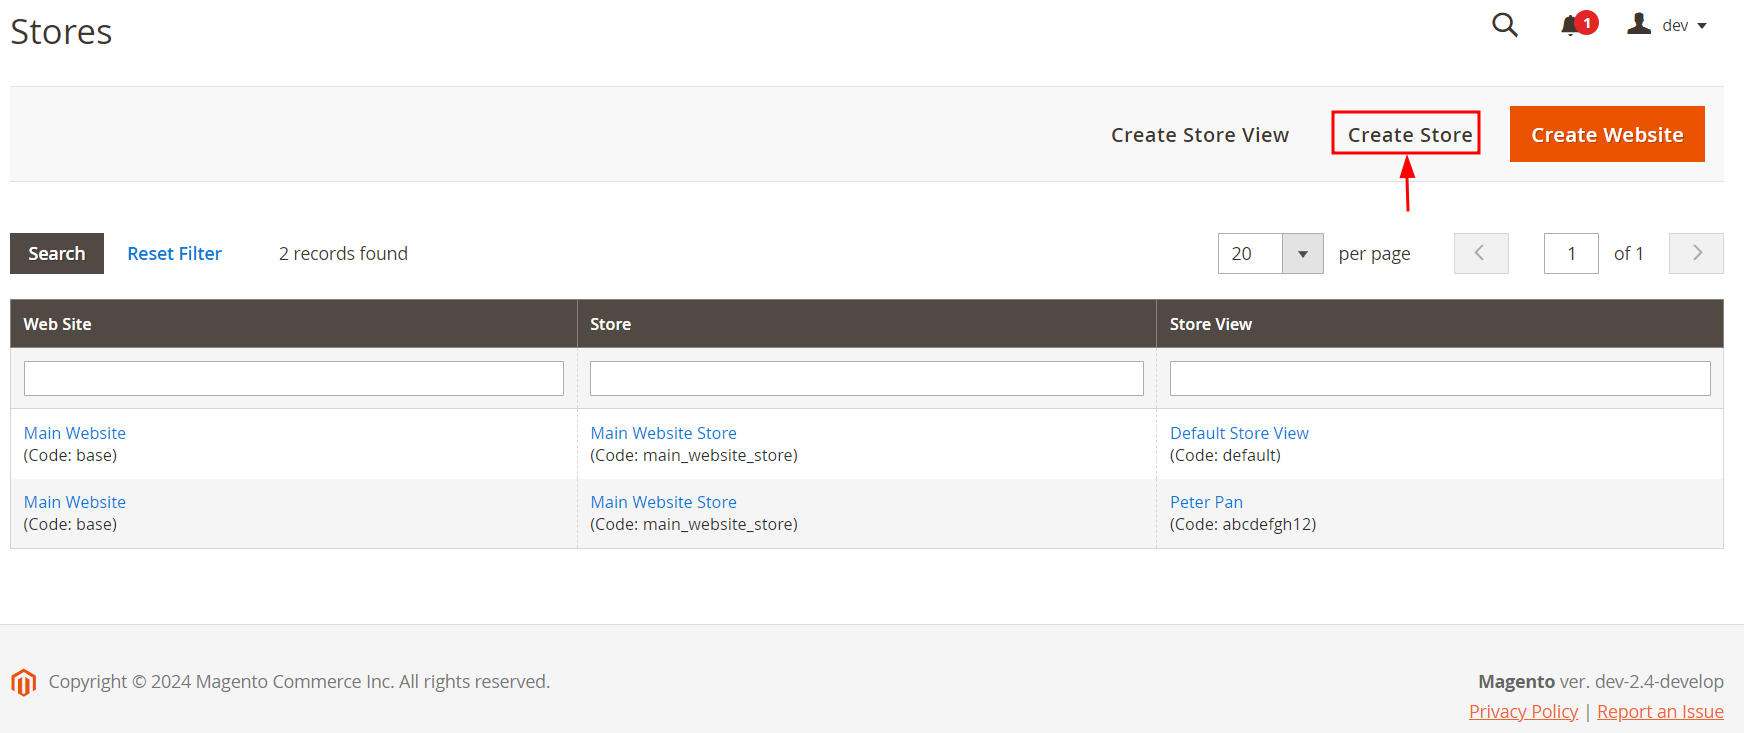
Step 2. Create new stores
Return to the “All Stores” page and click “Create Store”.
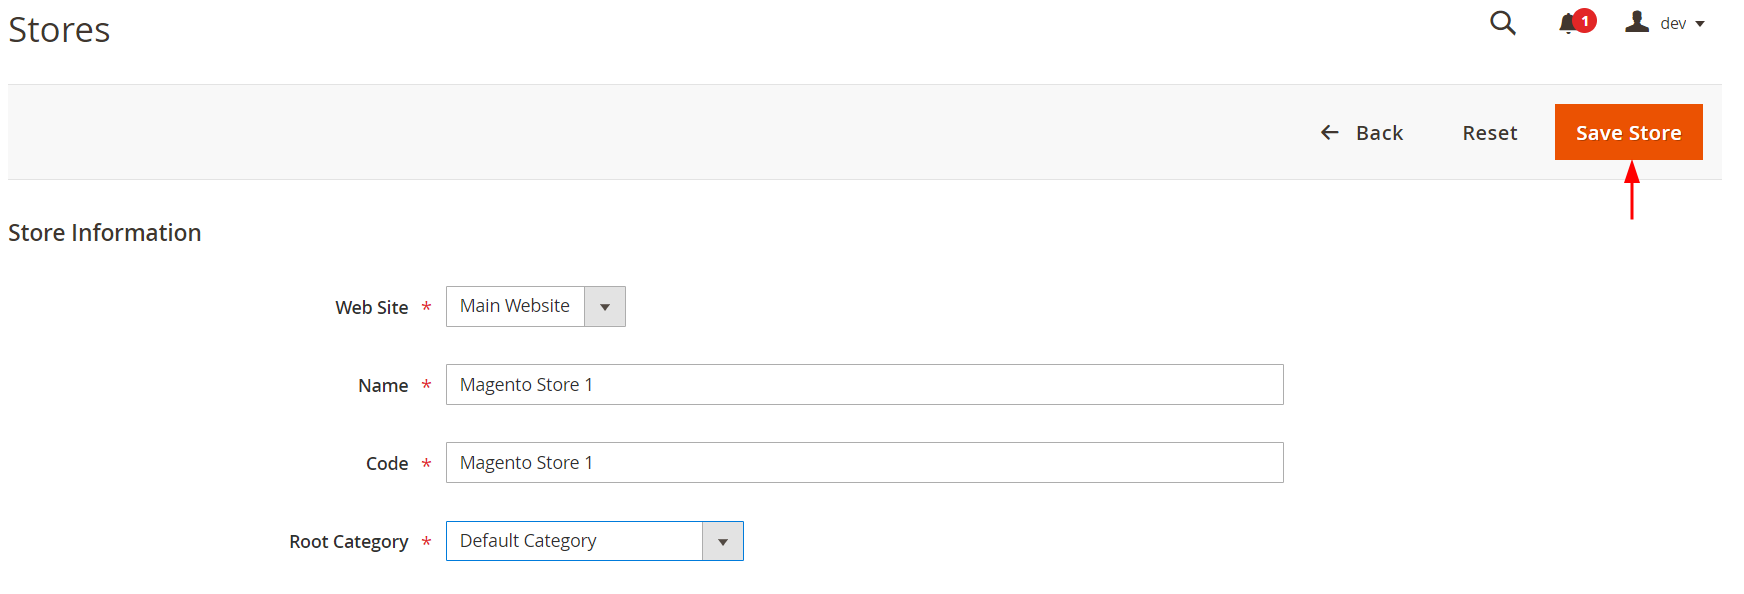
Next, fill in the required details
- Web Site: Choose the website to which the store belongs. Select Main website if you only have one.
- Name: Enter the store name.
- Code: Set a unique code for your store.
- Root Category: Select a root category for the store from the dropdown list. Select Default Category if you haven’t created it yet.
Then click Save Store.
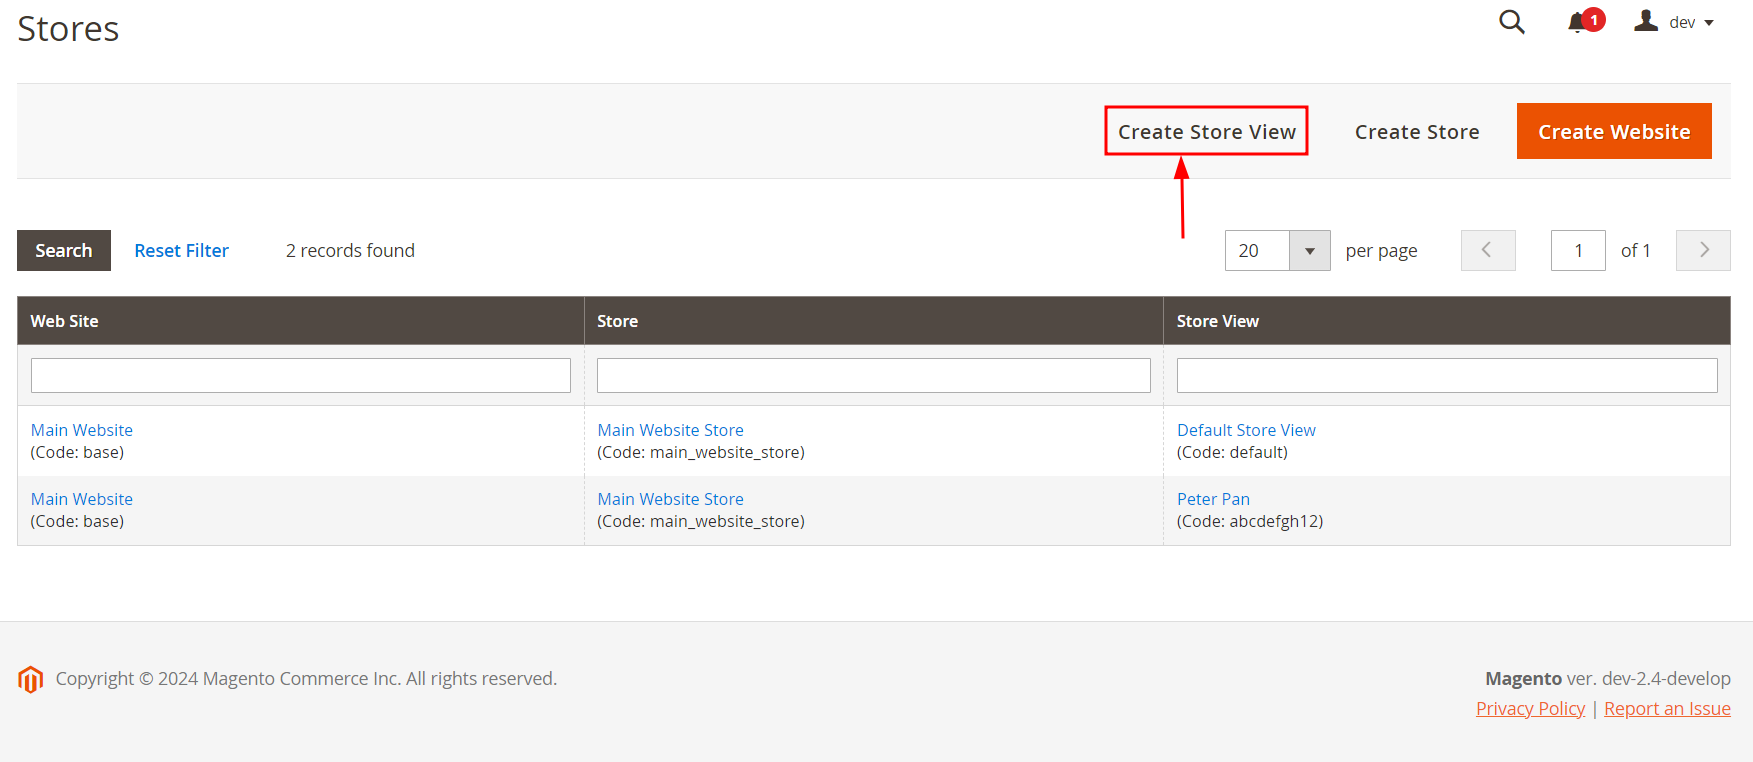
Step 3. Create store views
At this stage, return to the All Stores page and click Create Store View.
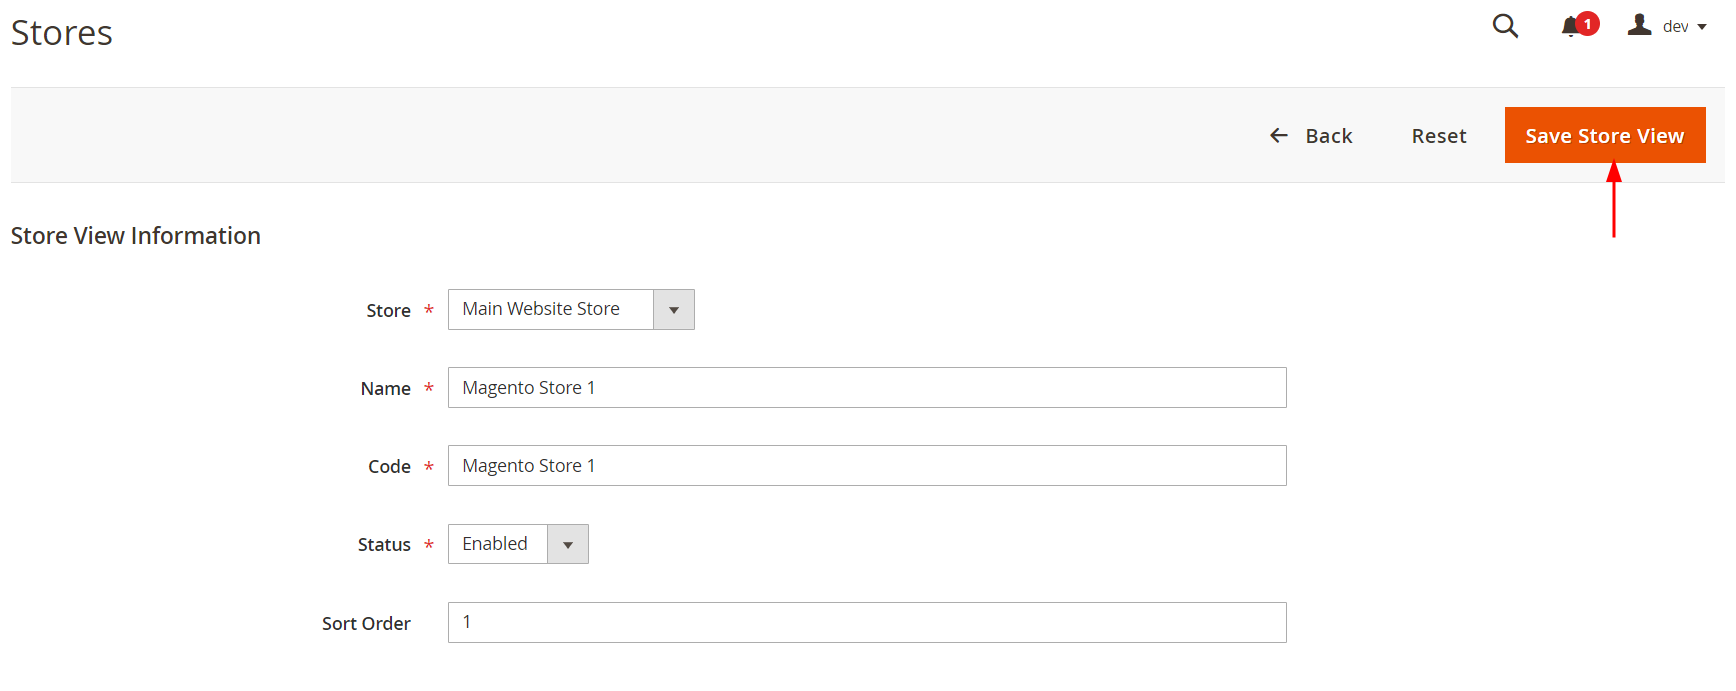
The, fill in sections
- Store: Choose a store from the dropdown to associate with this store view.
- Name: Enter the store view name.
- Code: Enter a unique code for the store view.
- Status: Set to Enabled.
- Sort Order: Assign a numerical order for the store view when in a list.
After that, click Save Store View.
Step 4. Create custom URL for each store
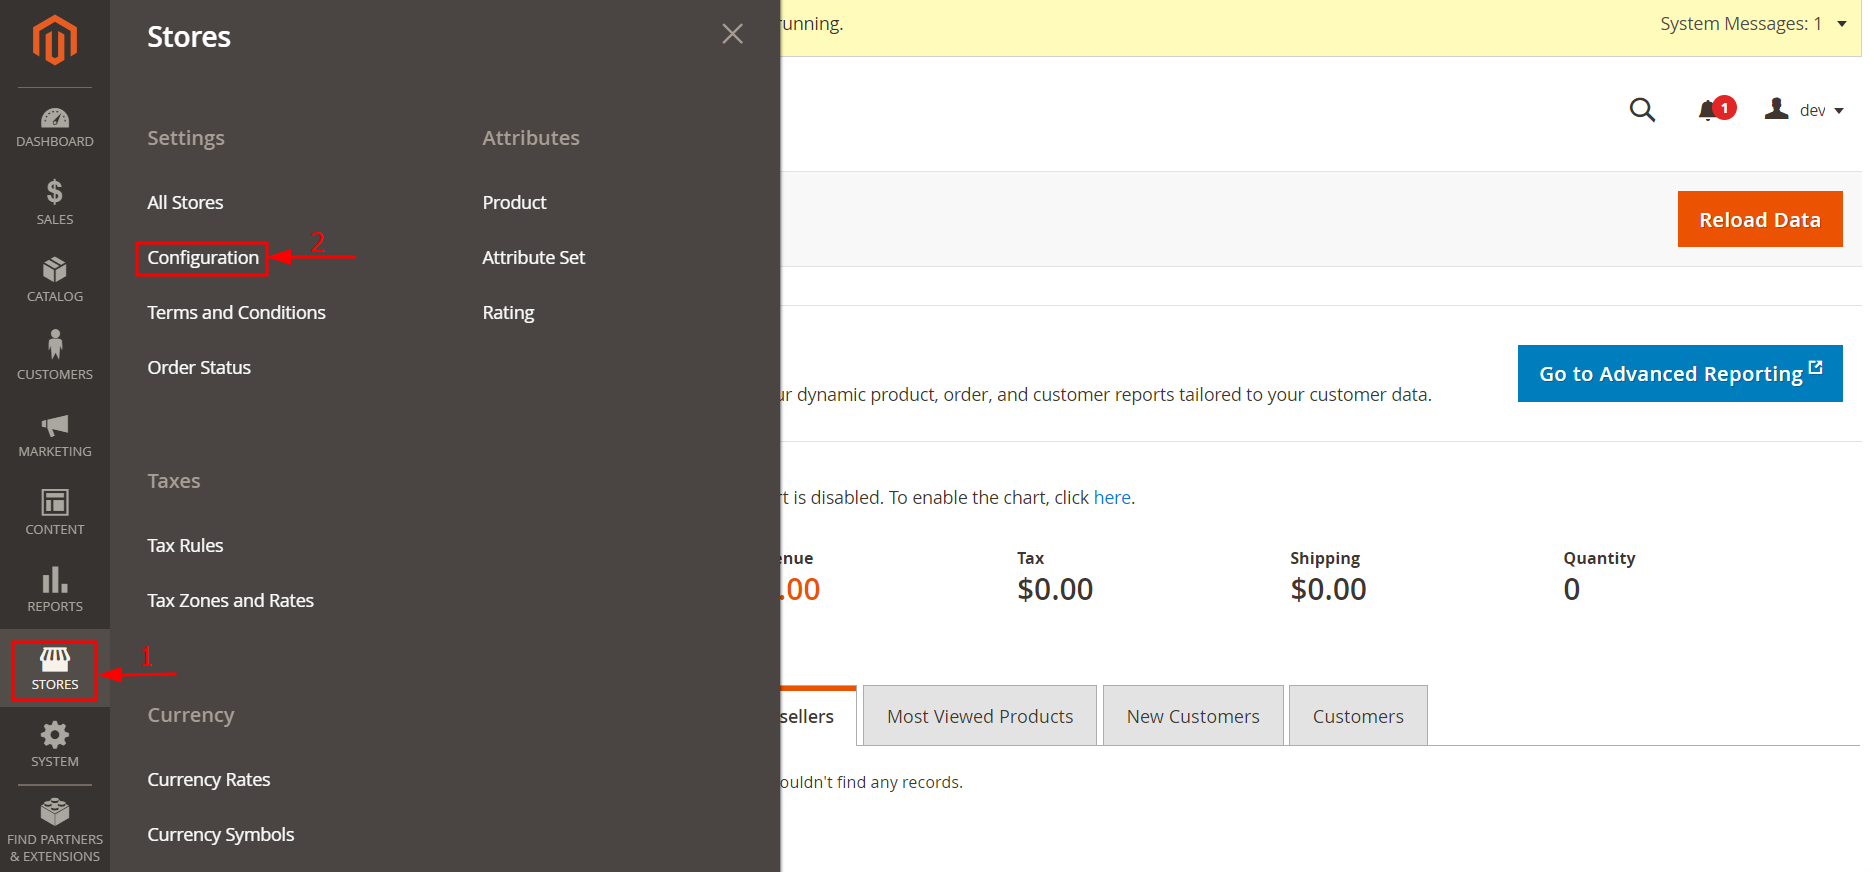
Come back to the Stores section on the dashboard and select Configuration.
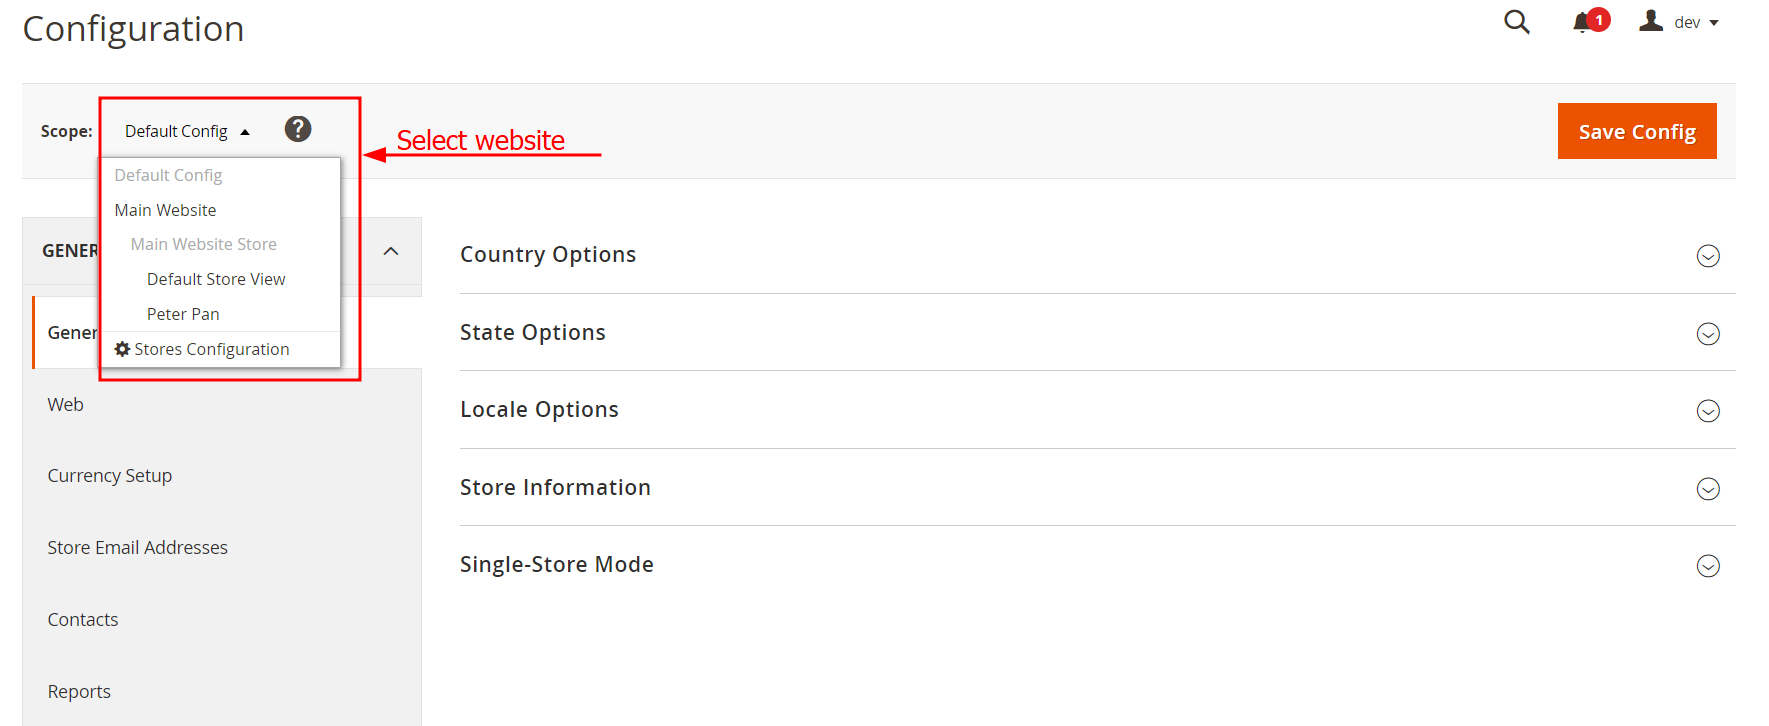
Following this, select a website from the Scope dropdown in the upper left corner.
Then, click Web on the left of your screen under the General drop-down.
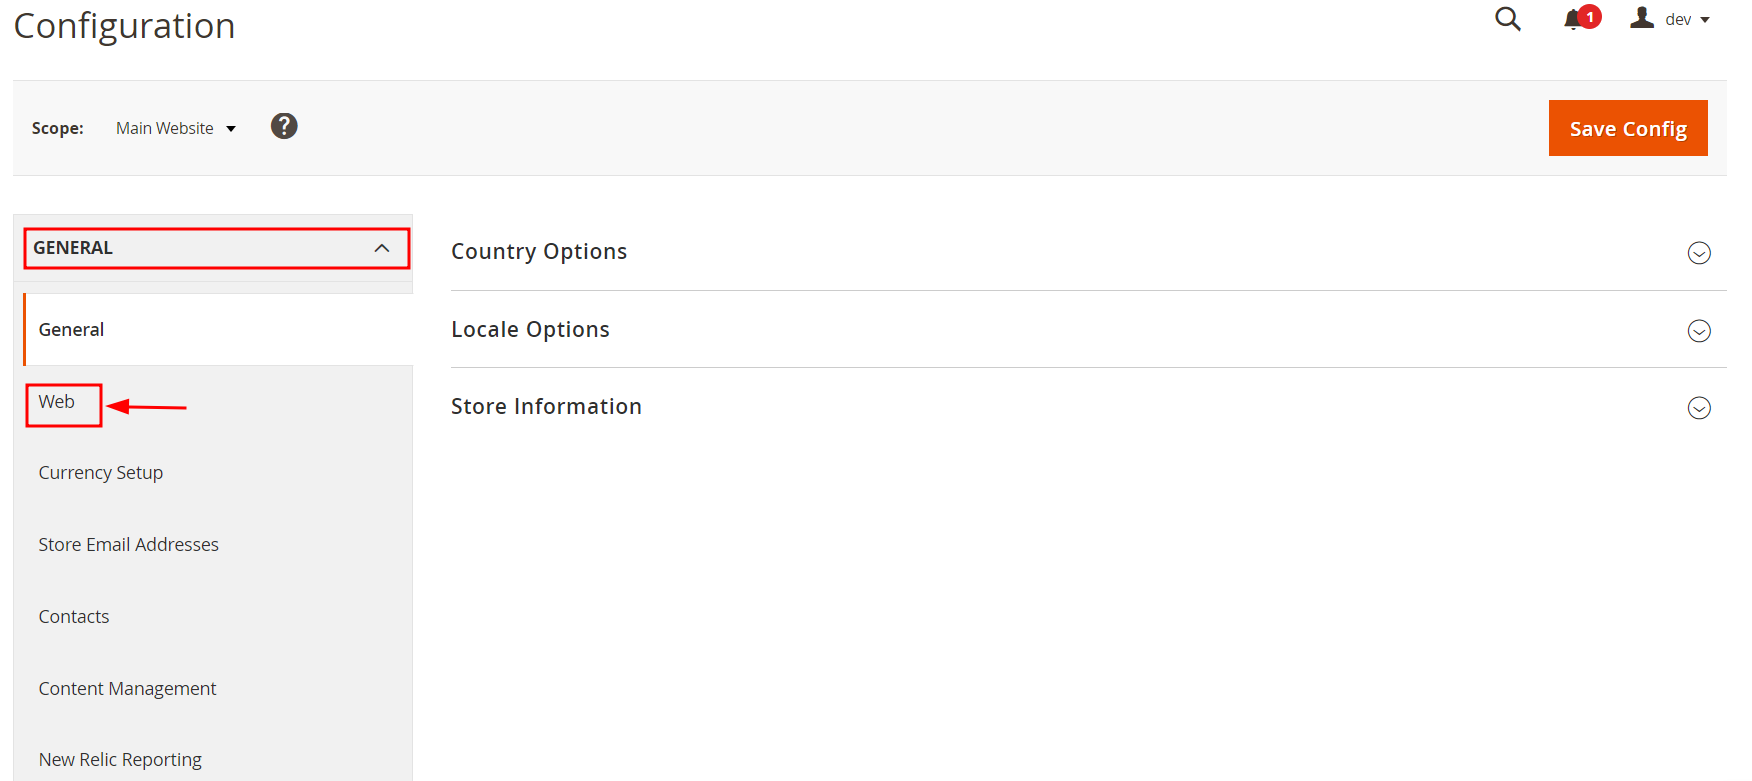
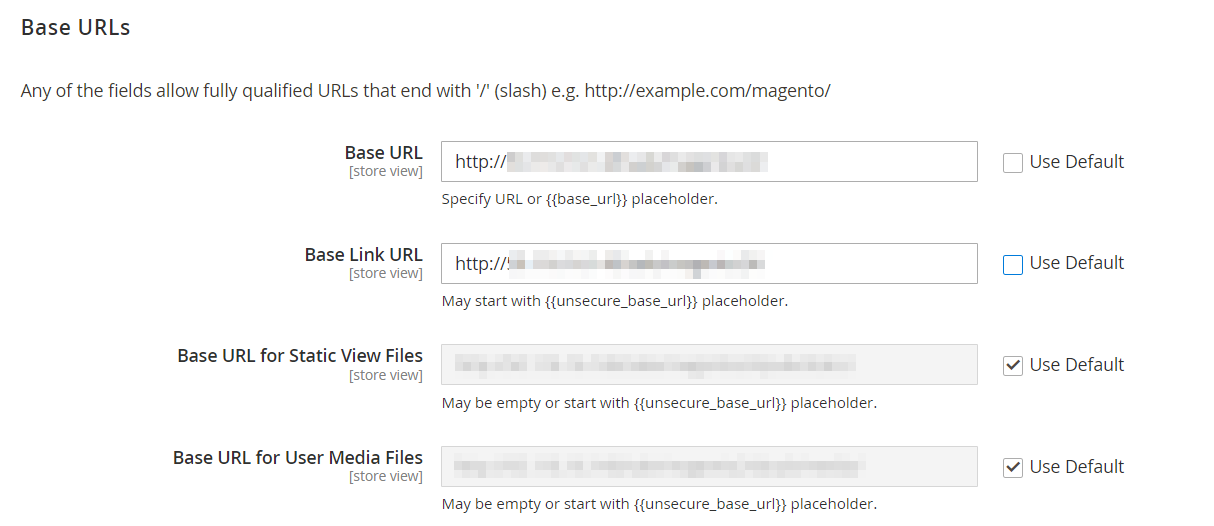
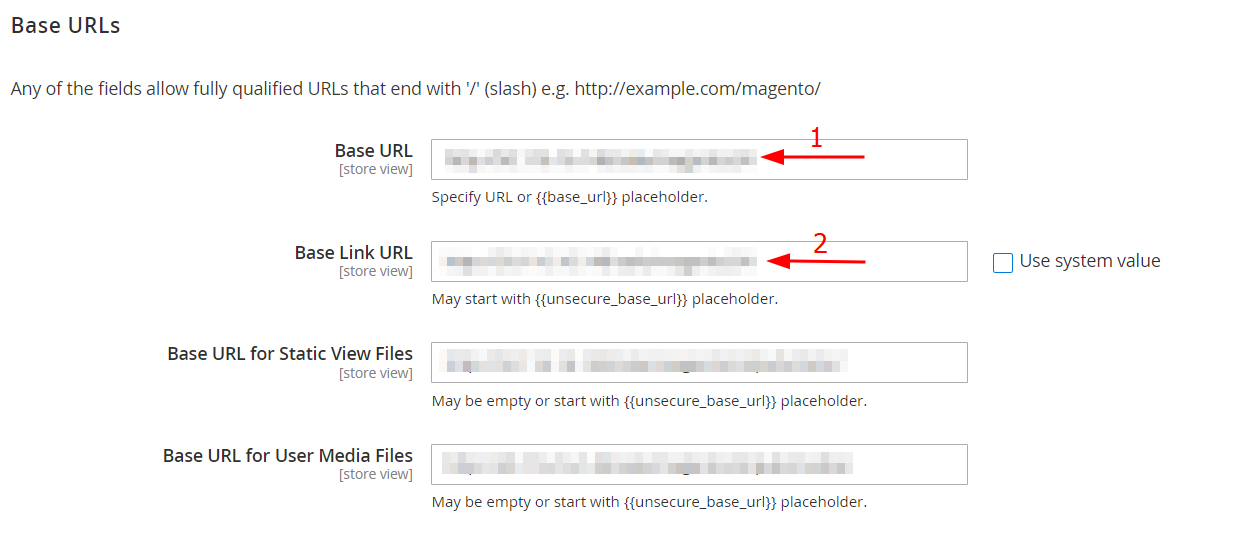
Next, expand the Base URLs section, and uncheck Base URL and Base Link URL.

After that, add your store’s URL to the two above unchecked fields.
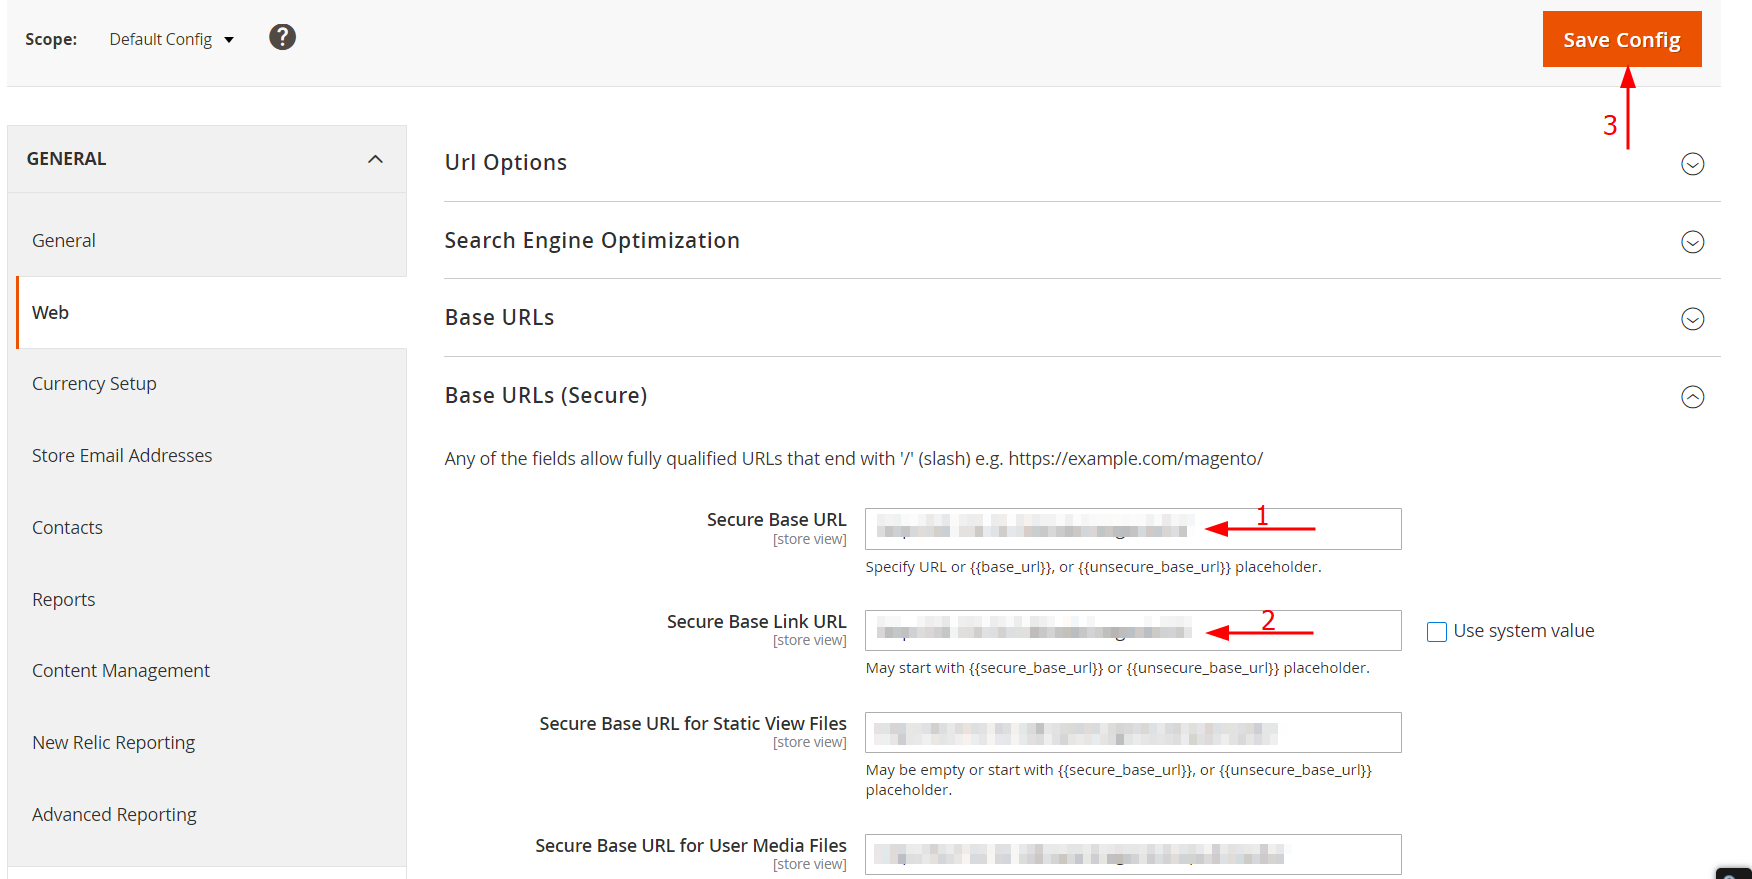
Continue expand the Base URLs (Secure) section and repeat.
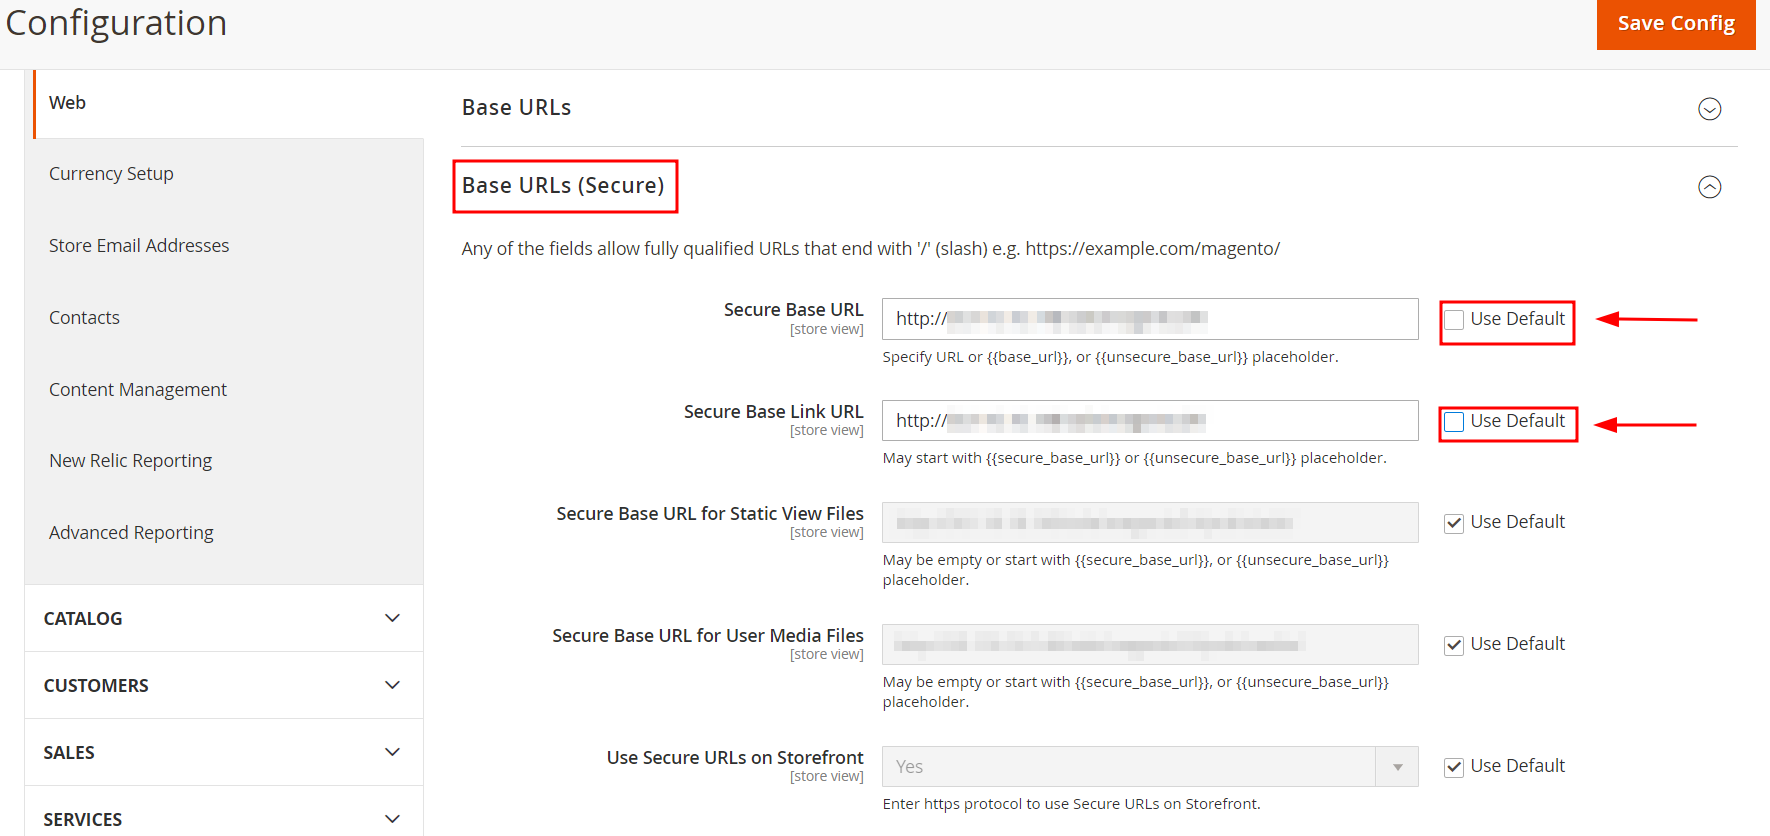
Finally, click Save Config.
Step 5. Add the store code to the base website URL
As of now, return to Configuration and set the scope to Default config.
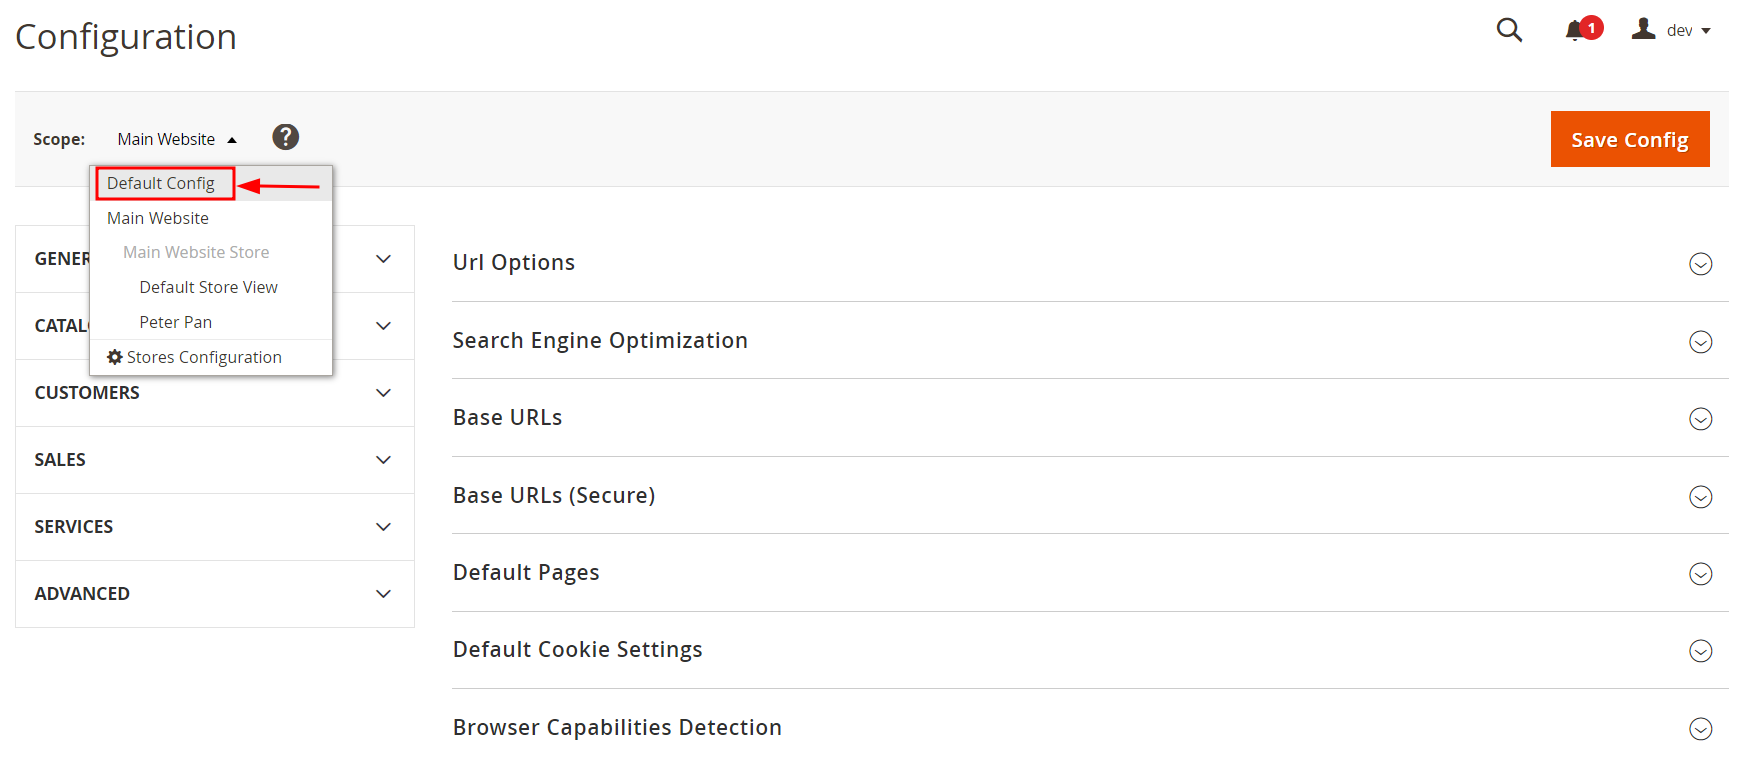
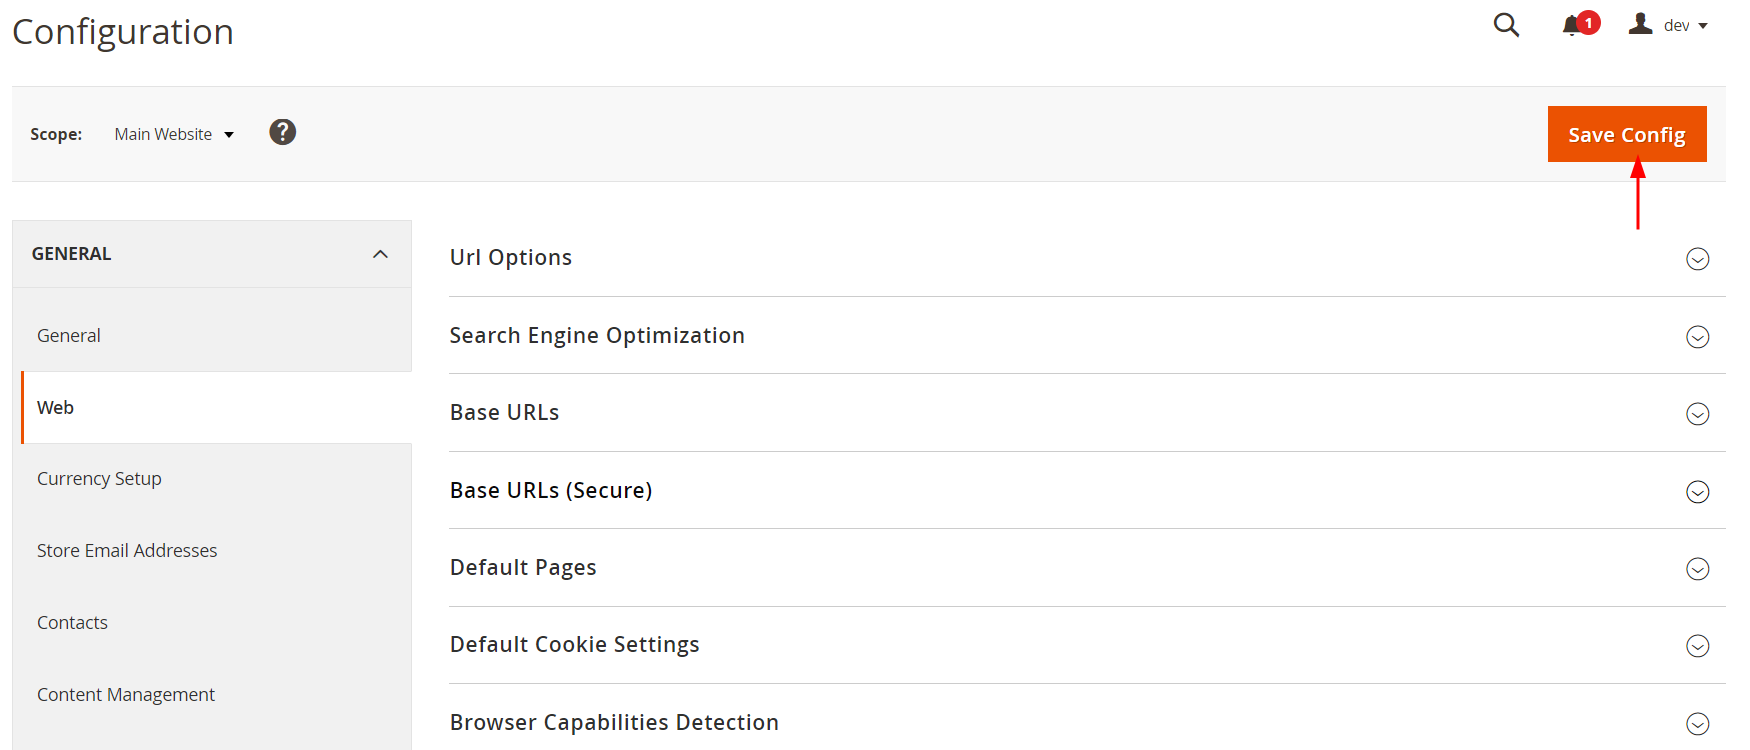
Next, click Web on the left of your screen under the General drop-down.
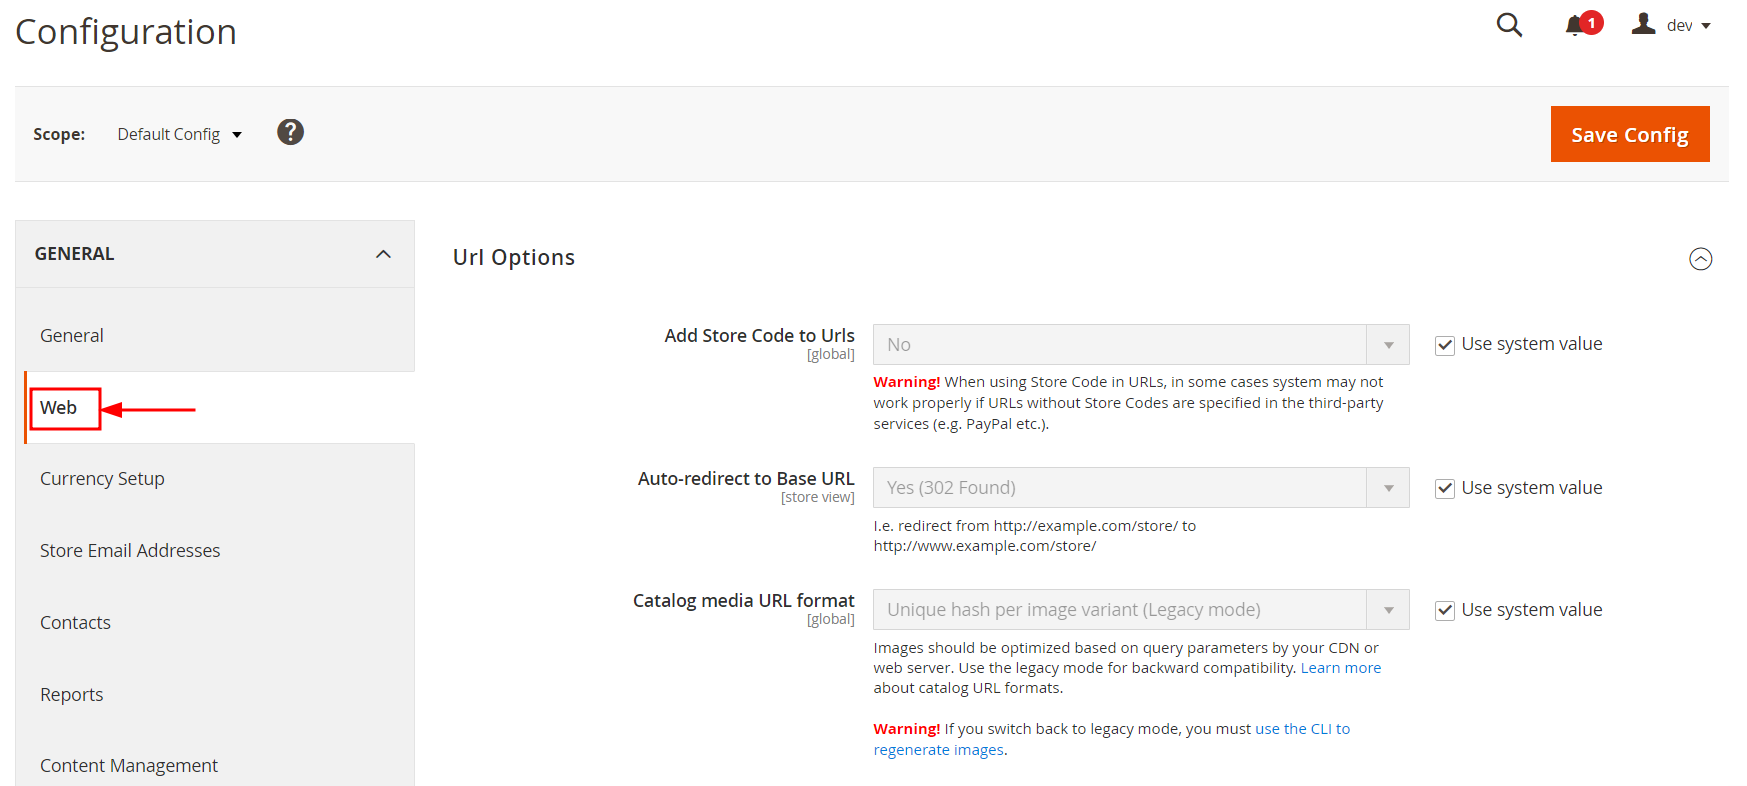
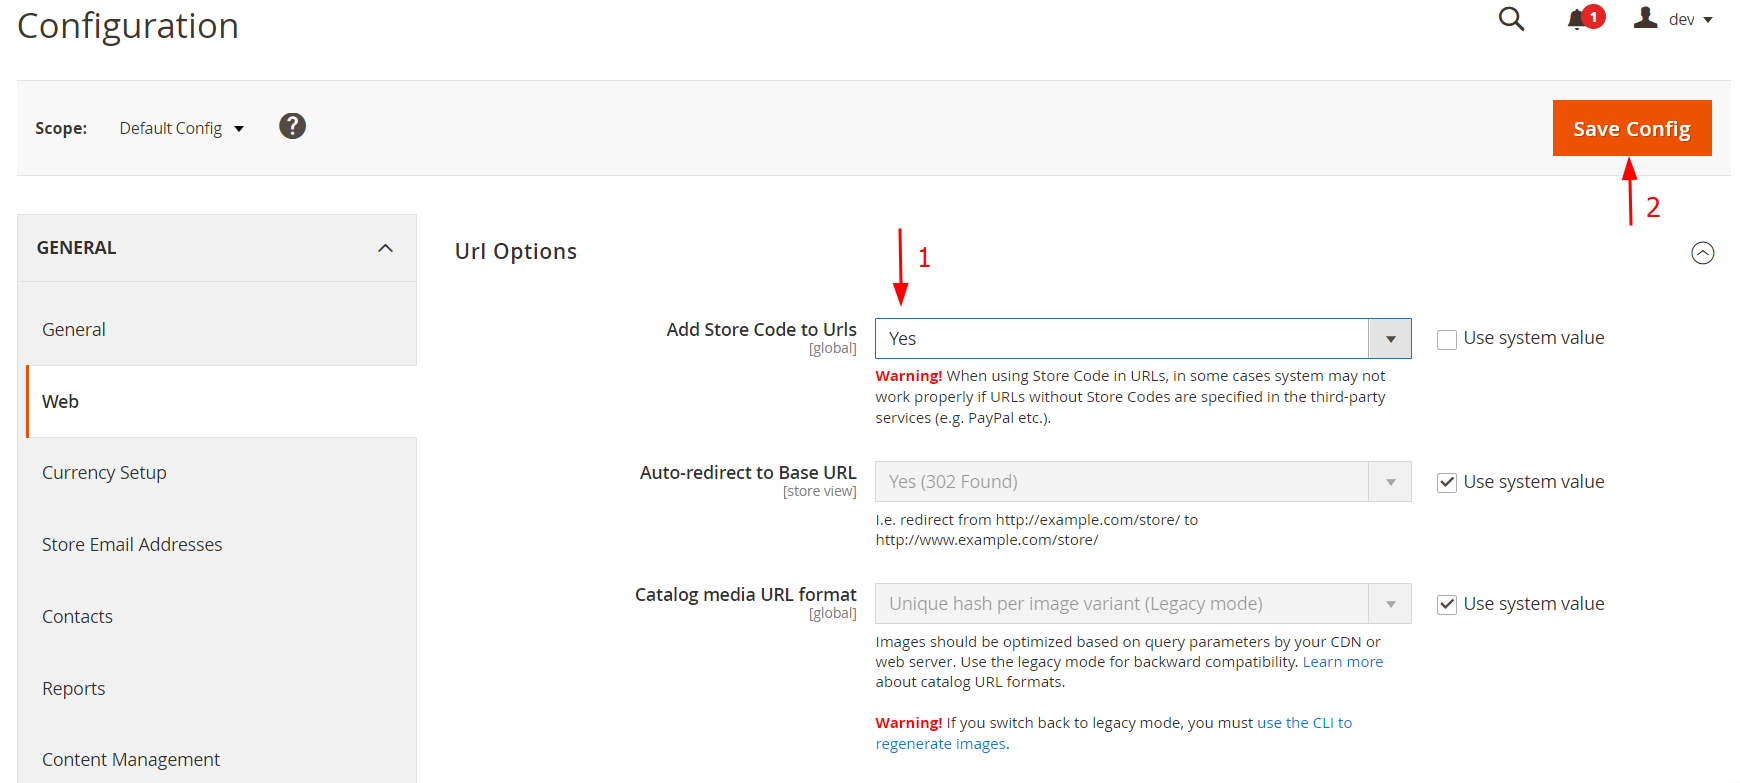
Then, expand the URL Options section and uncheck Use system value next to the Add Store Code to Urls setting.
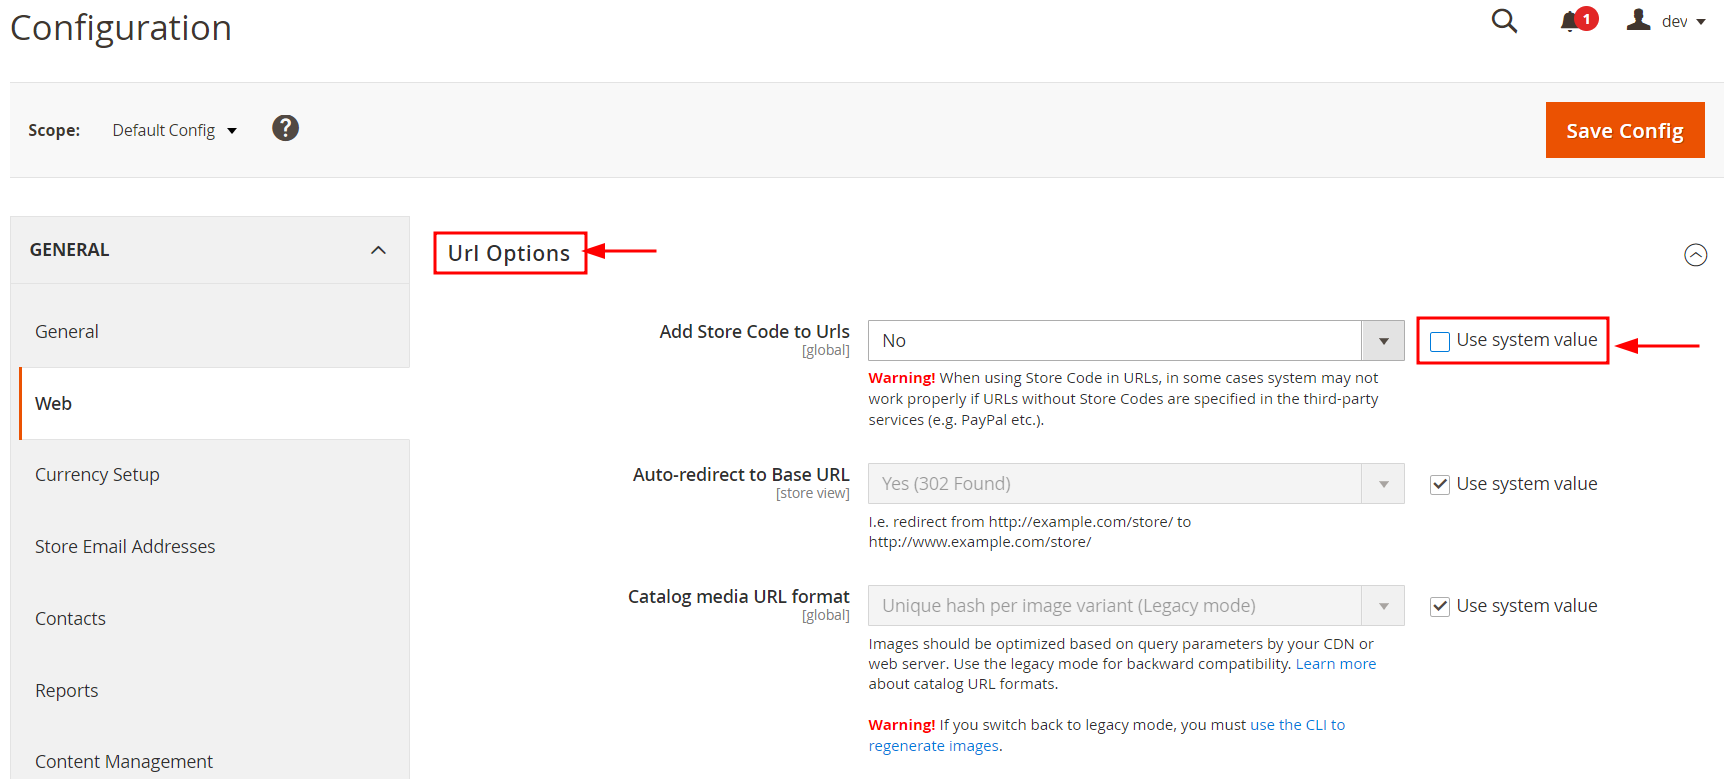
Finally, set the value for Add Store Code to Urls to Yes, and click Save Config.
Step 7. Update the default store view for the base URL
Return to Configuration and set the scope to Default config.

Secondly, expand the Base URLs section and uncheck Use system value.

Thirdly, enter your website’s base URL in the Base URL and Base Link URL fields.
Lastly, expand the Base URLs (Secure) section, repeat, and click Save Config.
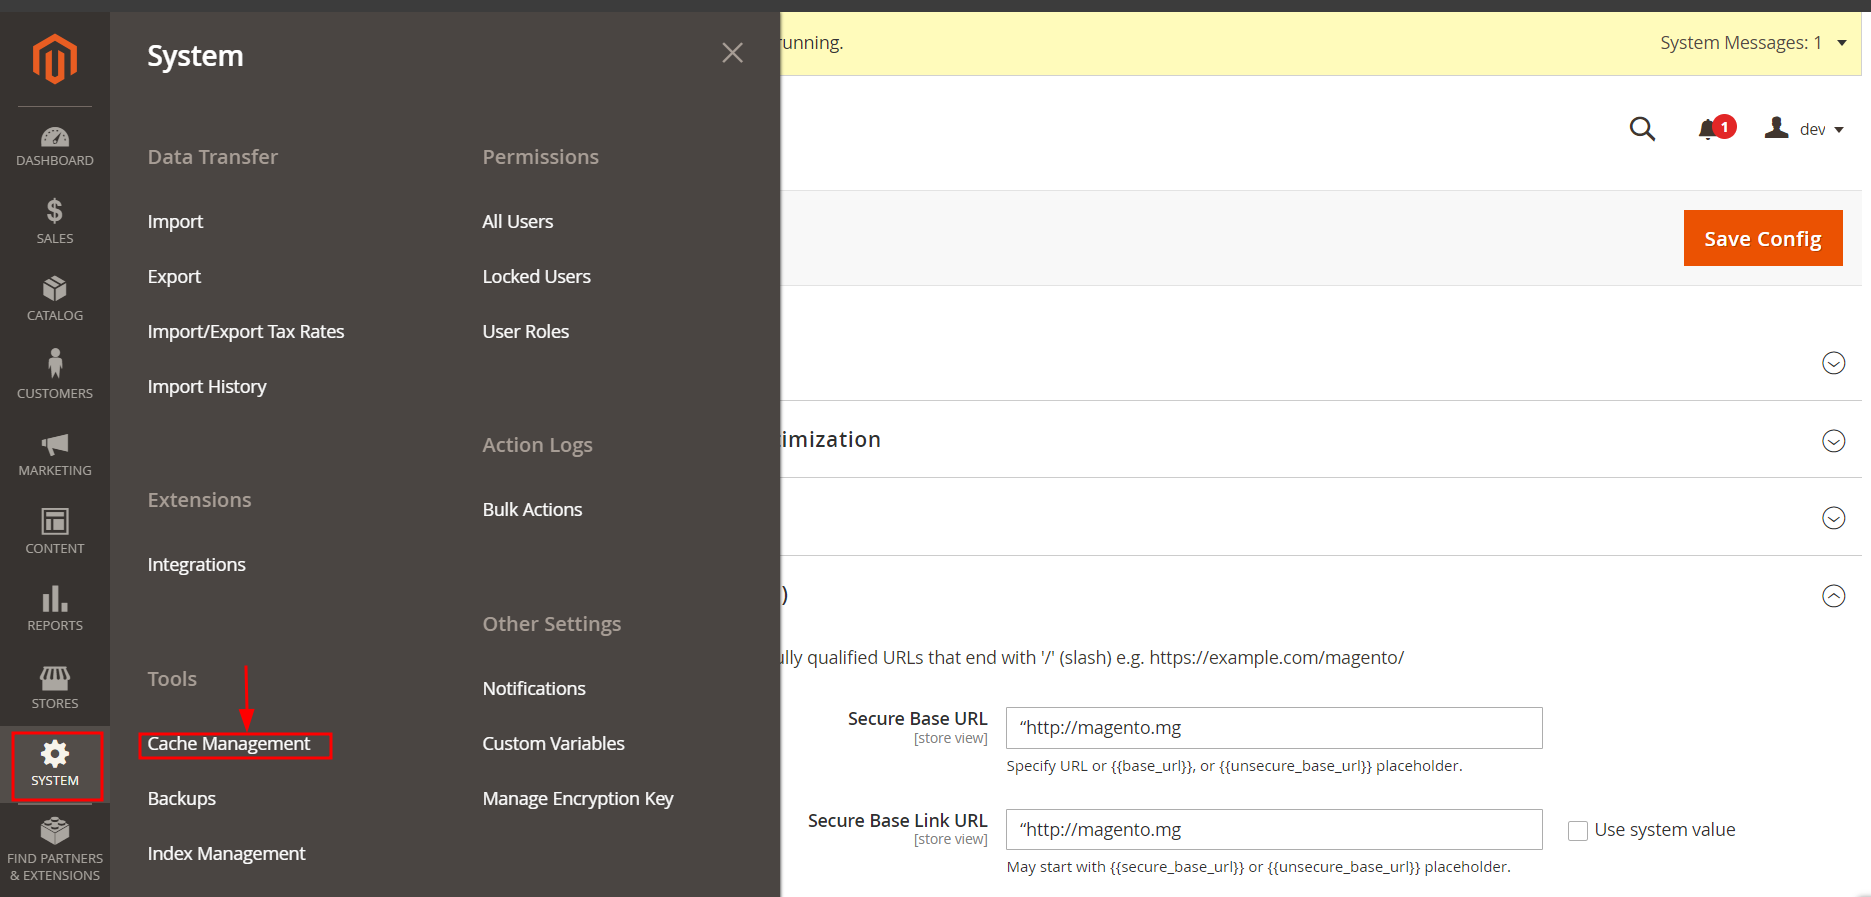
Step 7. Flush Magento cache
To begin with, go to the System section on the dashboard and select Cache Management.
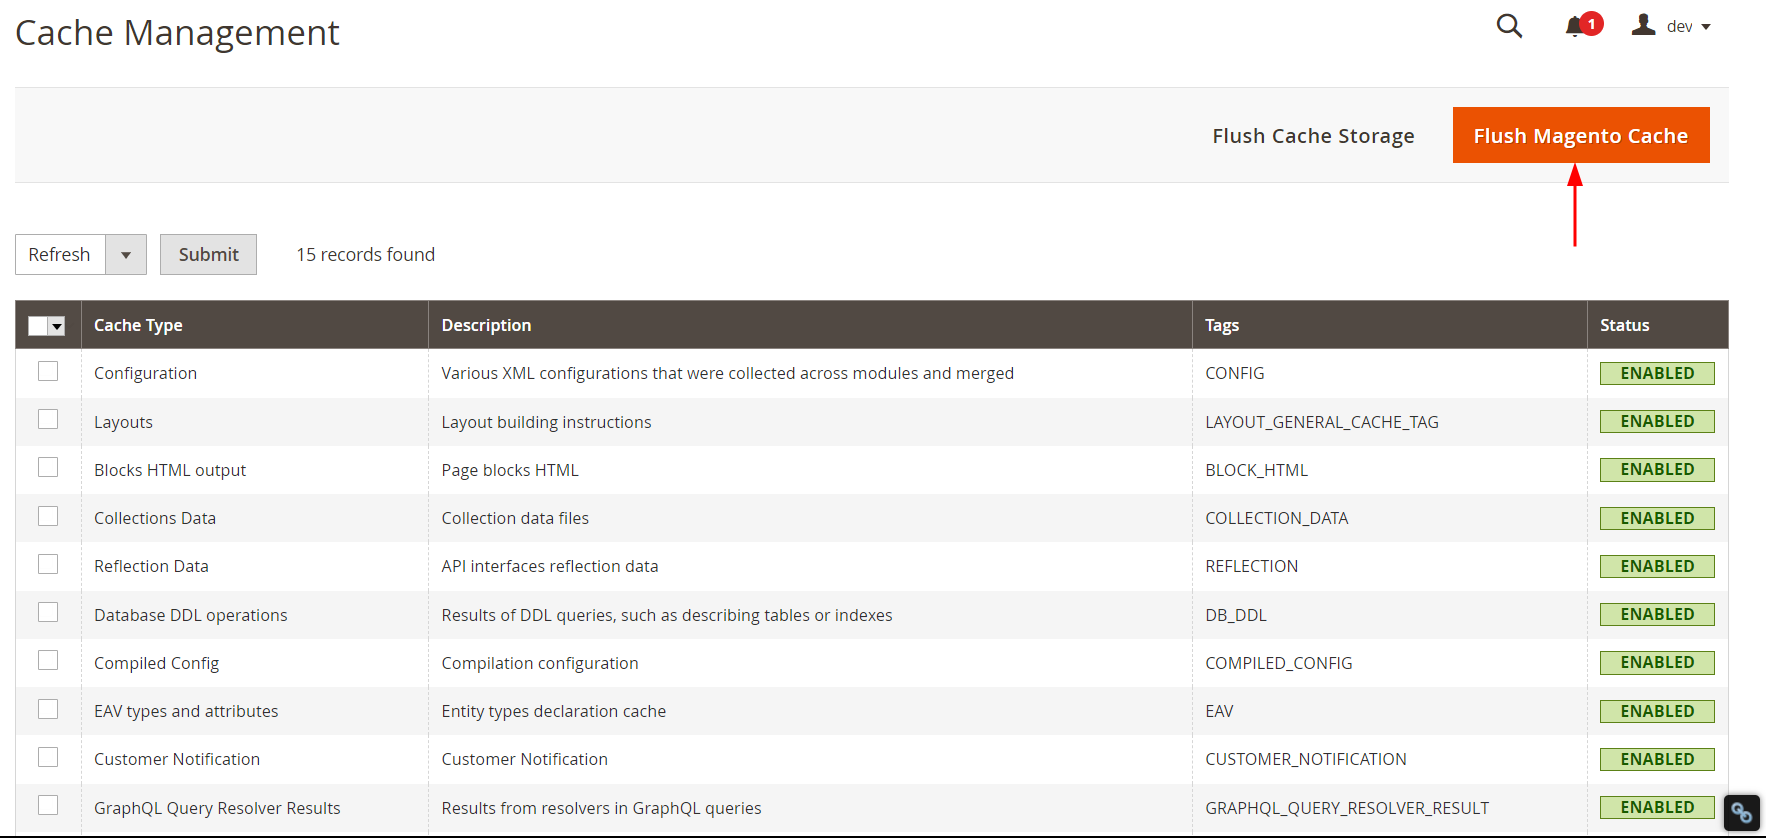
After that, click the Flush Magento Cache button and wait until the process is complete.
Migrate to Magento Multistores
In case you already have multiple stores and want to migrate to Magento, there are two main ways for you to do that. You can either transfer all your data manually or hire an eCommerce migration expert.
Manual migration
It's possible to manually migrate to Magento, however, it involves several steps. These include exporting and importing data, reconfiguring settings, and ensuring that all elements of your store function correctly in the new environment.
While manually transferring your store might save on upfront expenses, it might cost you a lot of time. The process can take hours or even days to complete, diverting your focus from other critical aspects of your business.
Additionally, you may encounter various challenges and risks without technical expertise during the migration. Technical issues like data loss or compatibility problems can occur, leading to business disruptions and downtime. These interruptions can negatively impact customer experience and sales, potentially resulting in more significant losses in productivity and revenue.
Due to the mentioned challenges, we recommend hiring a data migration profession such as LitExtension.
Migrating with LitExtension
If you don’t have time and technical knowledge to perform your Magento multi store migration on your own, we highly recommend hiring an eCommerce migration expert. LitExtension – the #1 eCommerce Migration Service, with over 10 years of experience & 300,000 successful migration, can help you transfer all your data quickly, accurately, and securely.
With LitExtension’s service, you can transfer most of the data, such as products, customers, etc., from your online stores to Magento multi stores. Besides, our additional options, such as SEO URLs migration, 301 redirects, or Preserve order IDs can help you expand your migration possibilities.
LitExtension’s service can help you easily migrate your stores to Magento in 6 simple stages.
- Back up your current website
- Set up a new Magento account
- Set up Source Cart & Target Cart
- Select entities you want to migrate
- Migrate to Magento multi store
- Perform essential post-migration activities.
Furthermore, with our All-in-One package, you will be assigned a dedicated personal assistant (PA) to take care of your migration from start to finish. All you have to do is simply let us know your requirements, your PA will configure your migration and guarantee the finest results.
If you are interested in our service, please contact our support team to get more advice.
Seamlessly migrate your store to Magento!
LitExtension can safely transfer your data to unlock more growth on the new Magento platform.

Magento Multi Store – FAQs
What is the difference between Magento multi store and multi website?
Magento Multi Store allows multiple storefronts to share a single backend and database, each with unique products and settings. Magento Multi Website, on the other hand, enables completely separate websites with distinct domains, products, and customer bases, all managed from one Magento installation.
Can I create multiple stores under a single website in Magento 2?
Yes, Magento 2 allows you to create multiple stores under a single website. You can manage different catalogs, pricing, customer groups, and settings while maintaining a centralized admin panel for easy management.
How to set up Magento multi store?
Setting up Magento multi store includes 7 steps:
- Step 1: Create a new website
- Step 2: Create new stores
- Step 3: Create store views
- Step 4: Create a custom URL for each store
- Step 5: Add the store code to the base website URL
- Step 6: Update the default store view for the base URL
- Step 7: Flush Magento cache
Does Magento have an inventory management system?
Yes, Magento comes with a built-in inventory management system that helps track stock levels, manage multiple warehouses, and streamline order fulfillment. It also includes features like backorders, low-stock alerts, and multi-source inventory management for better efficiency.
Final Words
To summarize, this article provides an overview of Magento multi-store. We hope that you have gained a comprehensive understanding of it, including its benefits and how to set it up.
If you like this blog, don’t forget to check out other Magento articles on our LitExtension website for more expert tips and insights.

