Managing orders is key to a successful eCommerce store, even more so when you have to handle a growing volume of sales data. And yet, many Magento users find it daunting to download Magento export orders for accounting, reporting, or integration with other systems.
If you're one of them, no worries; this task doesn't have to be a headache now that we're here to help! Our article will discuss the following:
- How to export Magento orders from Magento’s backend
- Steps to export orders using Observer
- How to export orders using extensions
- Two Magento migration packages using LitExtension
Ready to go? Let’s get started!
Magento Export Orders: At A Glance
Overall, Magento export orders mean you transfer order data from your Magento store into external files. As a result, you can manage your orders in formats widely compatible with other platforms for migration, backup, or data analysis purposes.
As of our writing, Magento 2 provides two export formats for orders, namely CSV (Comma-Separated Values) and XML (eXtensible Markup Language):
- CSV represents data as plain text, where each value is separated by a comma. It's most suitable for smaller data sets and can be opened with any basic text editor or spreadsheet software like Excel.
- XML stores data in a more complex, structured format with tags defining the content. We recommend this format for larger or more detailed exports, as it supports not just text data but also graphs, images, and other rich data types.
Both these formats transfer order information efficiently, so the ultimate choice boils down to your specific preferences! Once you've picked the best export format for your needs, let's explore the export methods we laid out for you below.
Ready to migrate your Magento store?

How to Perform Magento Export Orders from Magento Backend
Are you a small store owner looking for a very quick and simple solution to export orders from Magento? Then, Magento's built-in export feature has got you covered! Here's how it works:
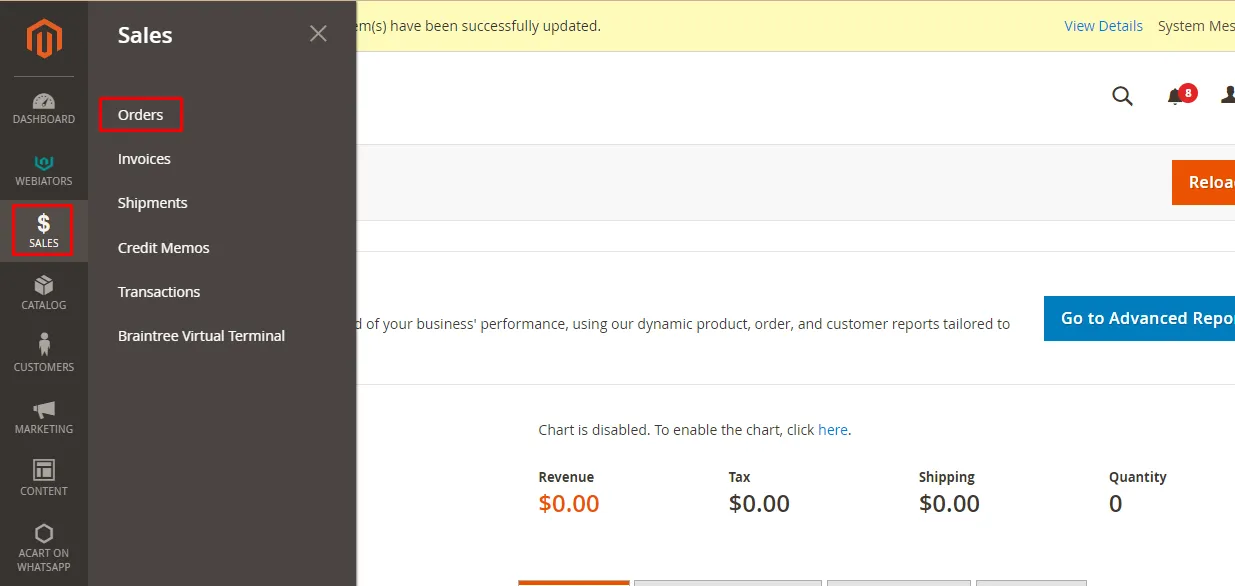
First, log into your Magento dashboard and head over to “Sales” > “Orders.”
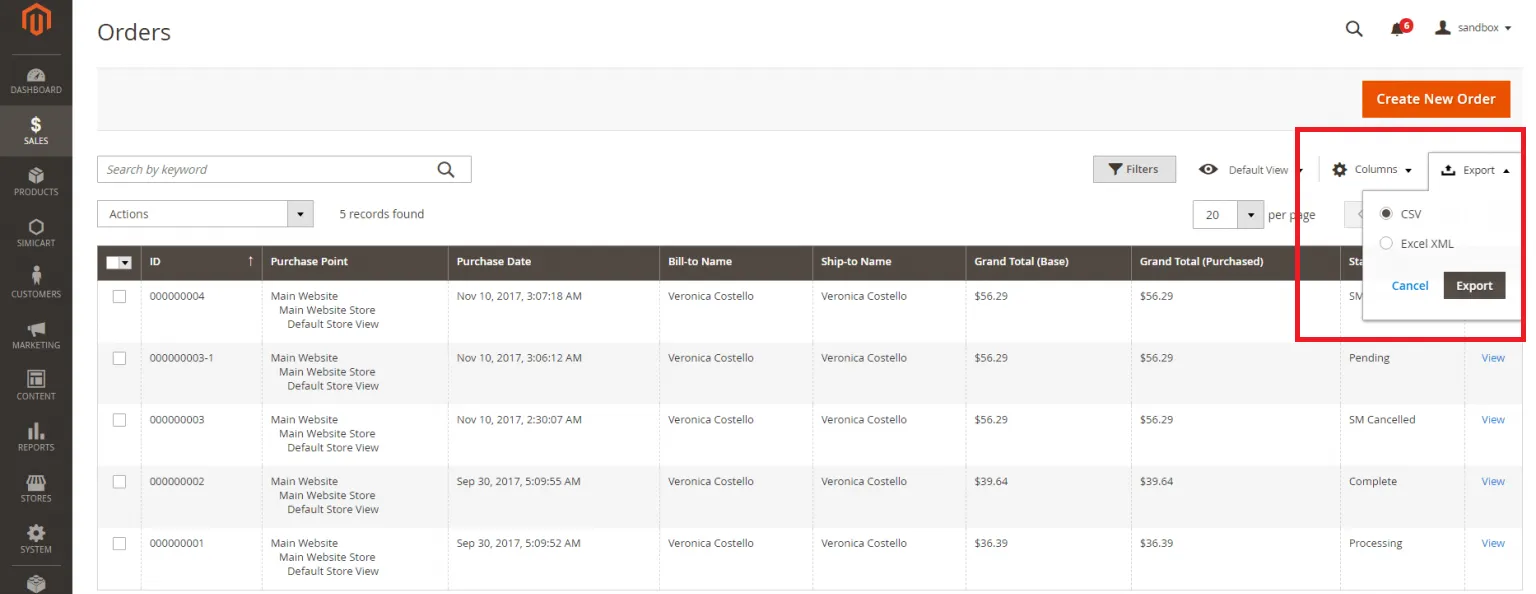
You'll be greeted by the Orders panel, which neatly displays key information like ID, Purchase Point, Bill-to Name, Ship-to Name, Status, Action, and more.
Now, click the “Export” drop-down, choose the CSV or XML format, and hit “Export.” That's it!
Note:
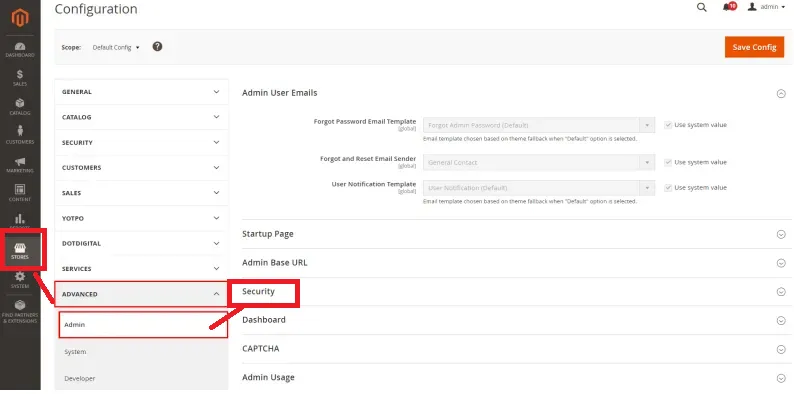
After clicking “Export,” the Magento export orders CSV or XML file should appear in the grid within a few minutes. If it's missing, we suggest turning off the “Add Secret Key to URLs” setting. Here's what you need to do:
First, in the Admin dashboard, go to “Stores” > “Configuration,” followed by “Advanced” > “Admin” “Security.”
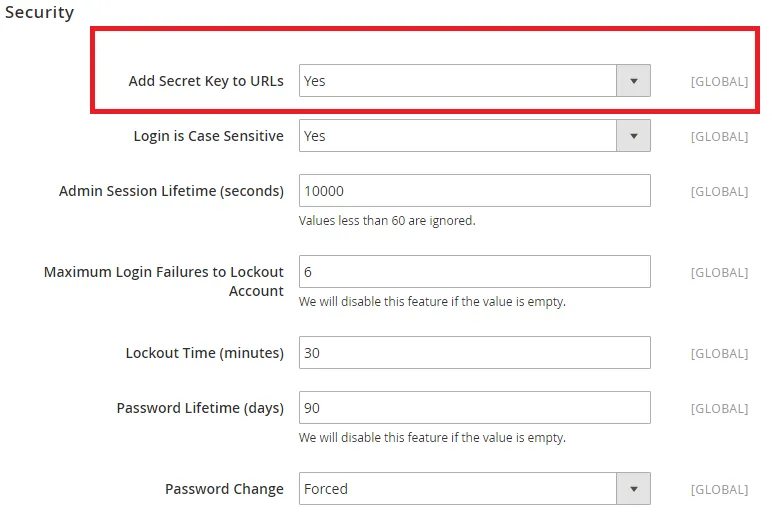
Next, look for the “Add secret key to URLs” option and change it to “No.” Don't forget to save this setting!
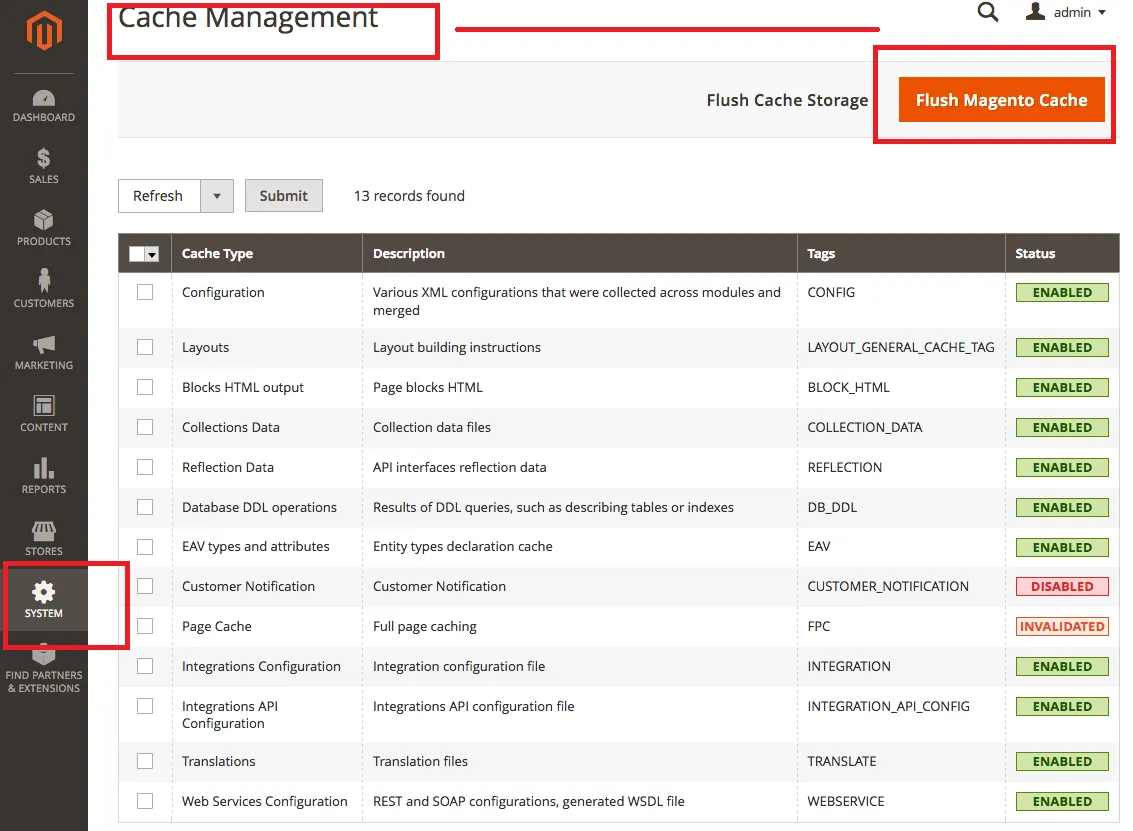
Finally, go to “System” > “Tools” > “Cache Management” to clear the cache. You can also do this by running the command bash bin/magento cache:clean in the Admin panel.
Now, the rest of your Magento data export should occur smoothly!
How to Export Order Magento with Observer
We have just discussed how to download Magento export orders with products using Magento's backend.
But what if your Magento 2 export orders CSV/XML file somehow doesn't show up (even after our troubleshooting steps)? No worries! Observer is another quick, simple alternative for smaller lists of orders, though this approach does require basic command-line skills to get it up and running:
Step 1. Add a custom column to the Order grid
First, go to this file: vendor/magento/module-sales/view/adminhtml/ui_component/sales_order_grid.xml. Next, add the following code to define a new column for “Custom Product Name”:
<column name=”custom_product_name” class=”Magento\Sales\Ui\Component\Listing\Column\Price”>
<argument name=”data” xsi:type=”array”>
<item name=”config” xsi:type=”array”>
<item name=”filter” xsi:type=”string”>textRange</item>
<item name=”visible” xsi:type=”boolean”>false</item>
<item name=”label” xsi:type=”string” translate=”true”>Custom Product Name</item>
</item>
</argument>
</column>
Step 2. Modify the Order grid table
Now, you need to use an upgrade schema to add the new column for custom product name:
ALTER TABLE `sales_order_grid` ADD `custom_product_name` VARCHAR( 255 ) NOT NULL ;
Step 3. Create and run the Observer
After submitting the order, you need to define an Observer to listen to the order submission event. How to do so? In the events.xml file, add the following code to trigger your Observer after checkout:
<config xmlns:xsi=”http://www.w3.org/2001/XMLSchema-instance” xsi:noNamespaceSchemaLocation=”urn:magento:framework:Event/etc/events.xsd”>
<event name=”checkout_submit_all_after”>
<observer name=”yourcompany_yourmodule_checkout_submit_all_after” instance=”YourCompany\YourModule\Observer\ProcessOrder” />
</event>
</config>
After that, in your observer class (ProcessOrder.php), add the code to handle the Magento 2 export database:
public function execute(\Magento\Framework\Event\Observer $observer)
{
$order = $observer->getOrder();
$quote = $observer->getQuote();
// Do whatever you want here
return $this;
}
Step 4. Export data from Magento
Finally, click “Export” to create your Magento export orders. If necessary, you can refresh the Magento cache to ensure all changes are applied.
How to Perform Magento 2 Order Export with An Extension
Though both methods we have discussed are easy to follow, there's a huge trade-off: their simplicity comes at the cost of flexibility! You are left with basically no customization options or filtering to narrow your export list.
Fortunately, the Meetanshii Order Import Export extension addresses this issue by offering two date selection options you can configure along the way. Of course, they are still quite limited for growing or large-scale stores, but at least that's an improvement over Magento's default backend or Observer!
After purchasing the Meetanshii extension (just a one-time fee of $149), you can now follow the steps provided below for Magento export orders:
Step 1. Enable the extension
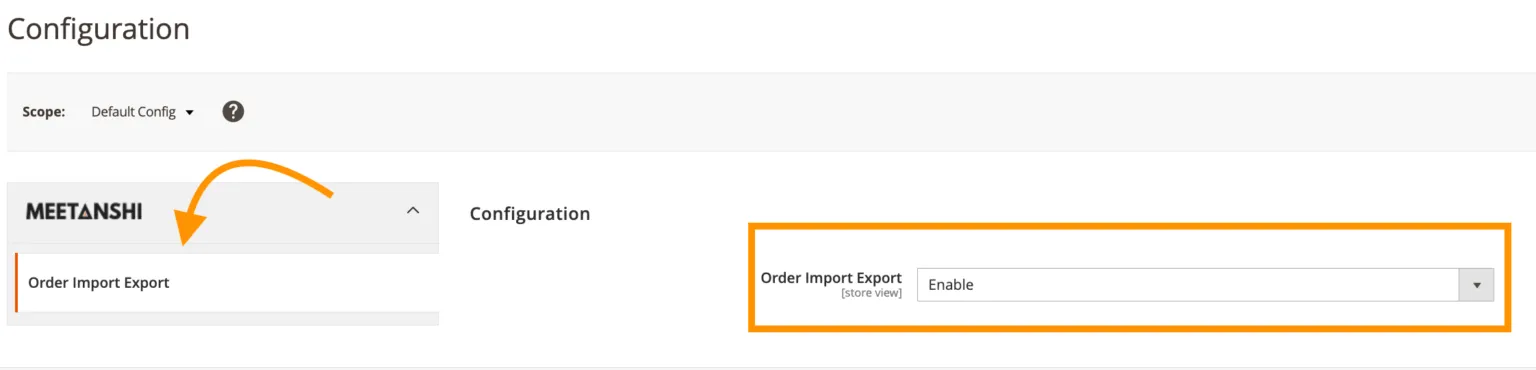
First things first, you must ensure the Meetanshi extension is configured correctly before the import! Go to “Store”> “Configuration,” then find “Meetanshi” > “Order Import Export.” Switch the option to “Enable” to activate the extension.
Step 2. Set up your Magento export orders
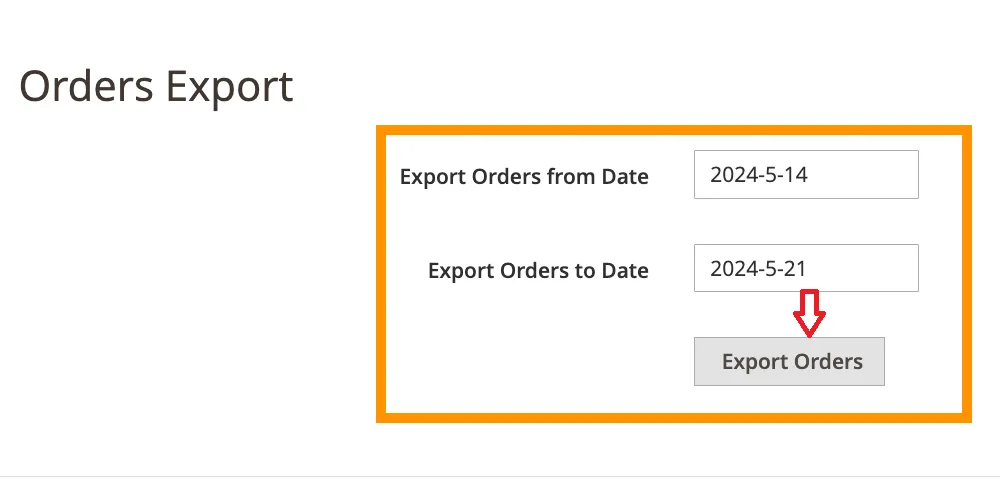
Now, go to the Admin Panel and navigate to “Sales” > “Meetanshi Order Import Export” > “Orders Export.” Here, you can set the data range for the orders you want to export:
- Export Orders from Date: Select the starting date for the export.
- Export Orders to Date: Select the ending date.
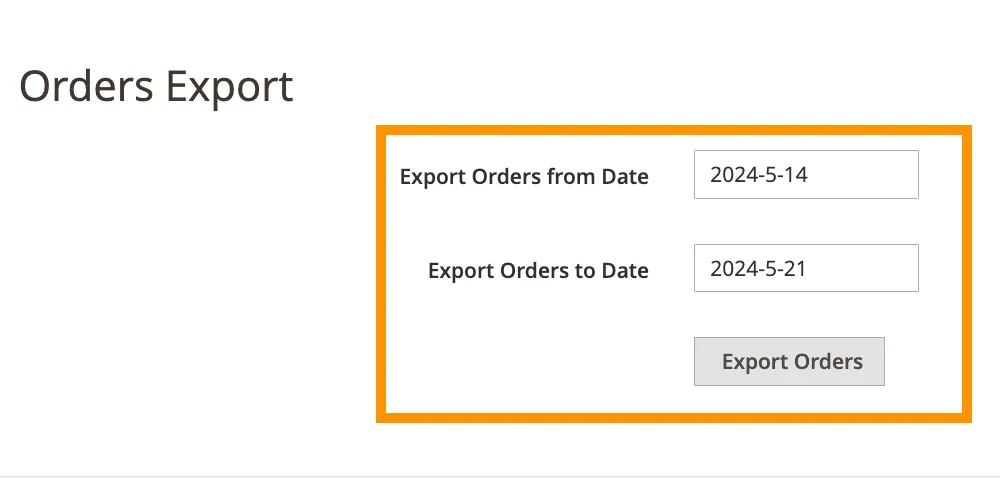
Step 3. Download Magento 2 export orders with products
After setting the dates, click “Export orders” to start your export process. Once it's complete, a download link for the CSV file will appear; click the link to download it to your device!
Advanced Magento Order Export with LitExtension
Though the Meetanshii plugin offers a small step up from the built-in method, it still falls short when it comes to larger stores with complex needs. Plus, migrating from Magento involves more than just moving Magento export orders; you must transfer all kinds of essential data available.
And here's where LitExtension truly shines as the go-to solution for thorough store migration! Specifically, you can choose between the Basic Migration package (where you handle the migration yourself) or All-in-One (where our team manages everything for you — 100% stress-free). Below, you'll find a clear, step-by-step breakdown of each package to help you decide what works best for your needs.
Basic Migration
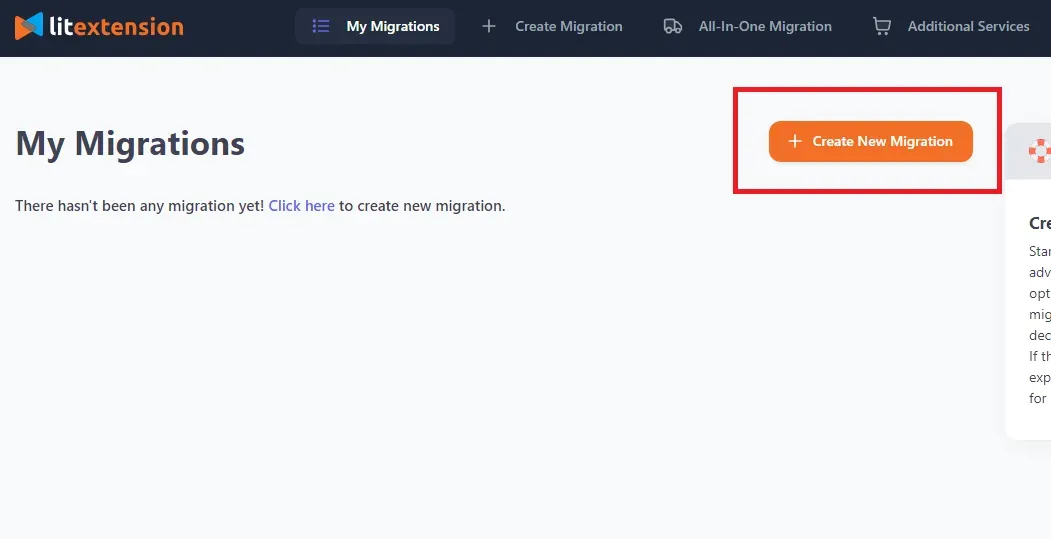
Before getting started, you'll need to create an account. Just click this link, fill in your name, email, and password, and hit “Register.” (Already using Google? You can simply click “Sign in with Google.”)
Once you're all set up, follow these steps to carry out the migration:
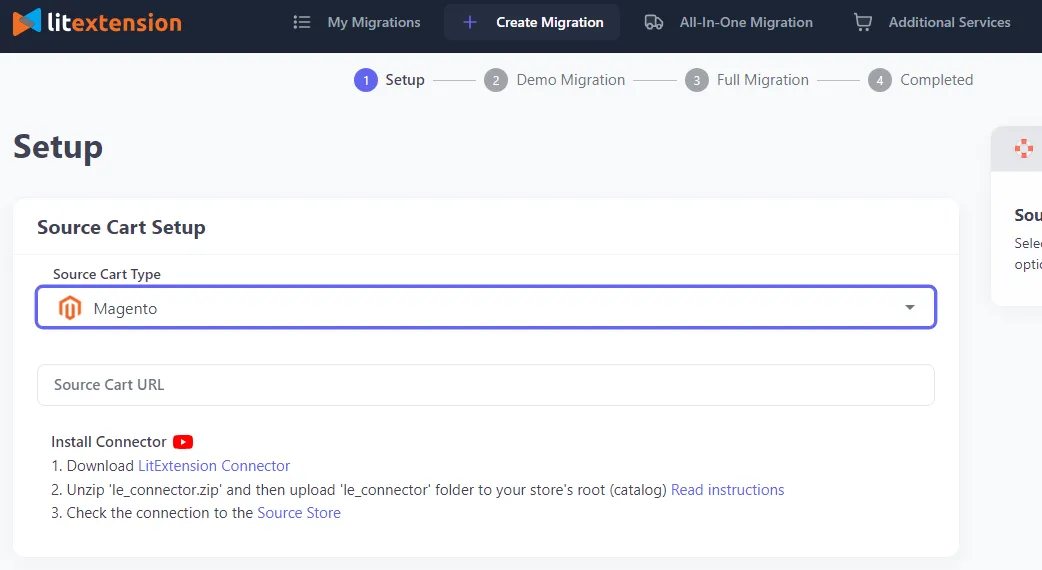
Step 1. Connect your Source Cart (Magento)
To begin, go to the Migration page and select “Create new migration.” You'll need to specify the type of store you're migrating from (in this case, Magento) and provide its URL.
After that, install the connector to connect LitExtension to your store.
There's no need to worry here; detailed instructions will be displayed on the right side of the screen so you can follow along with ease. We've also uploaded a super easy-to-follow YouTube guide right here; be sure to check it out for an even smoother experience!
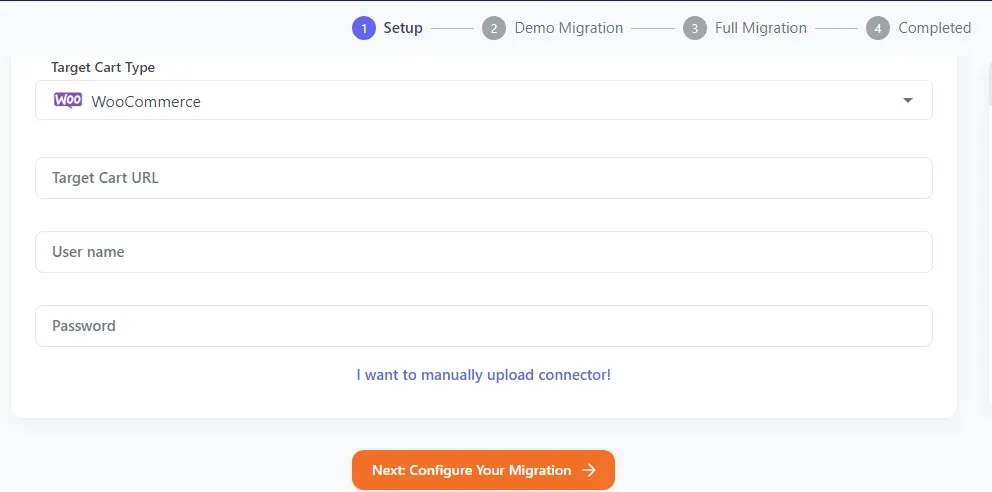
Step 2. Connect your Target Cart
Once your Magento Cart is ready, let's move on to your Target Cart (the store you're migrating to). Select a platform from the dropdown menu and provide the URL, then connect LitExtension using one of the two methods below:
- Install the LitExtension connector (for open-source stores)
- Provide API credentials (for hosted carts)
Like with the Magento Source Cart, clear instructions will be available on the screen to guide you through this part. Once done, click “Next: Configure your migration” to move to Step 3.
Step 3. Customize your migration settings
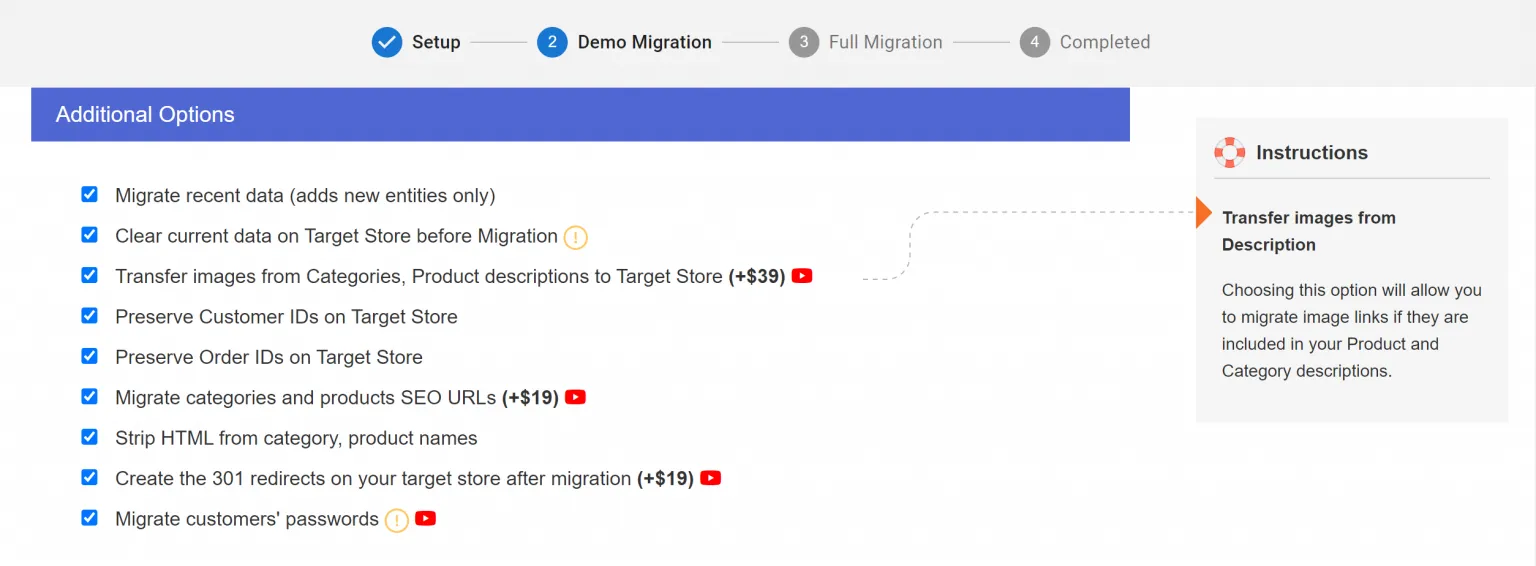
Here's where you choose what to transfer. You'll be able to select specific data such as “Customers,” “Orders,” “Products,” etc. (or just click “Select All” to move everything over). You also have the option to configure mappings for store locations, languages, order statuses, and customer groups.
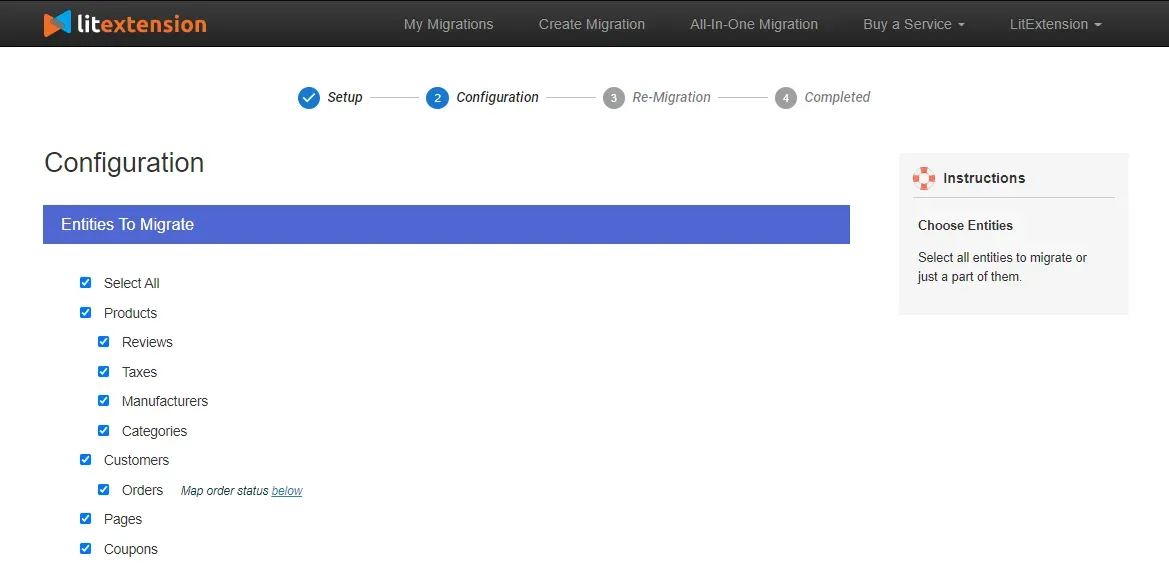
Still need more? LitExtension offers additional migration options like recent data migration or creating 301 redirects, which you can see in the image below:
Step 4. Run your demo and complete the migration
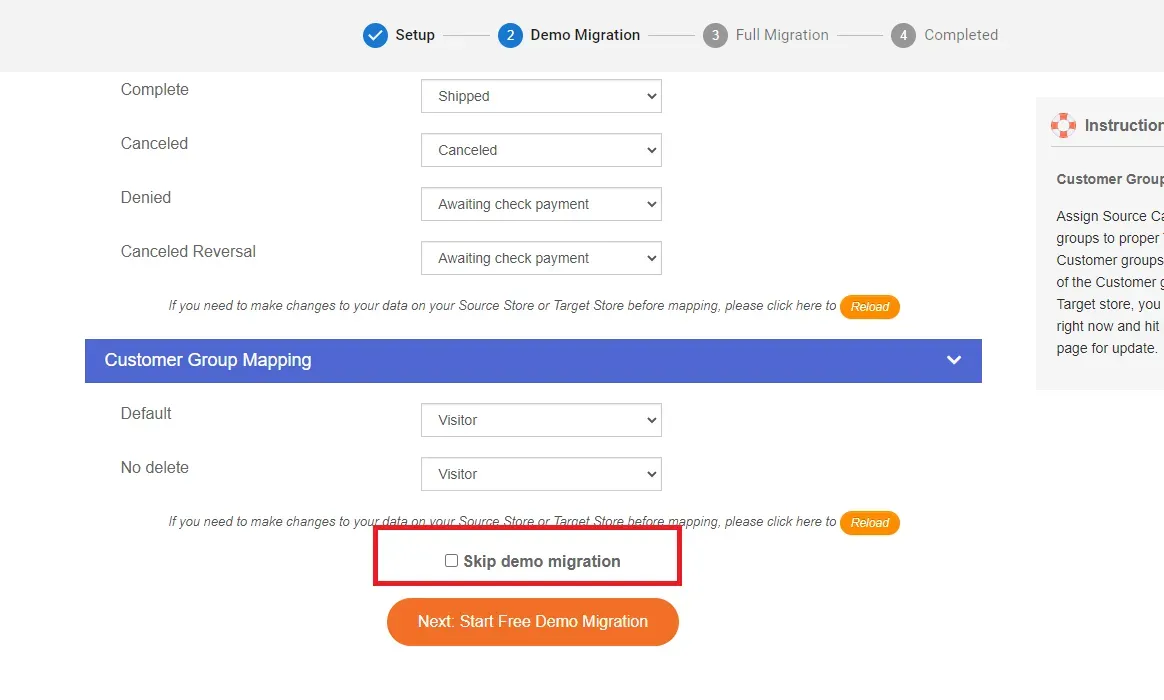
Scroll to the bottom of the page and click “Next: Start Free Demo Migration”; this free demo will let you transfer up to 20 entities and check how things work! If you are pleased with the demo results, return to the configuration page to make your payment, then hit “Start Full Migration.” That's basically it!
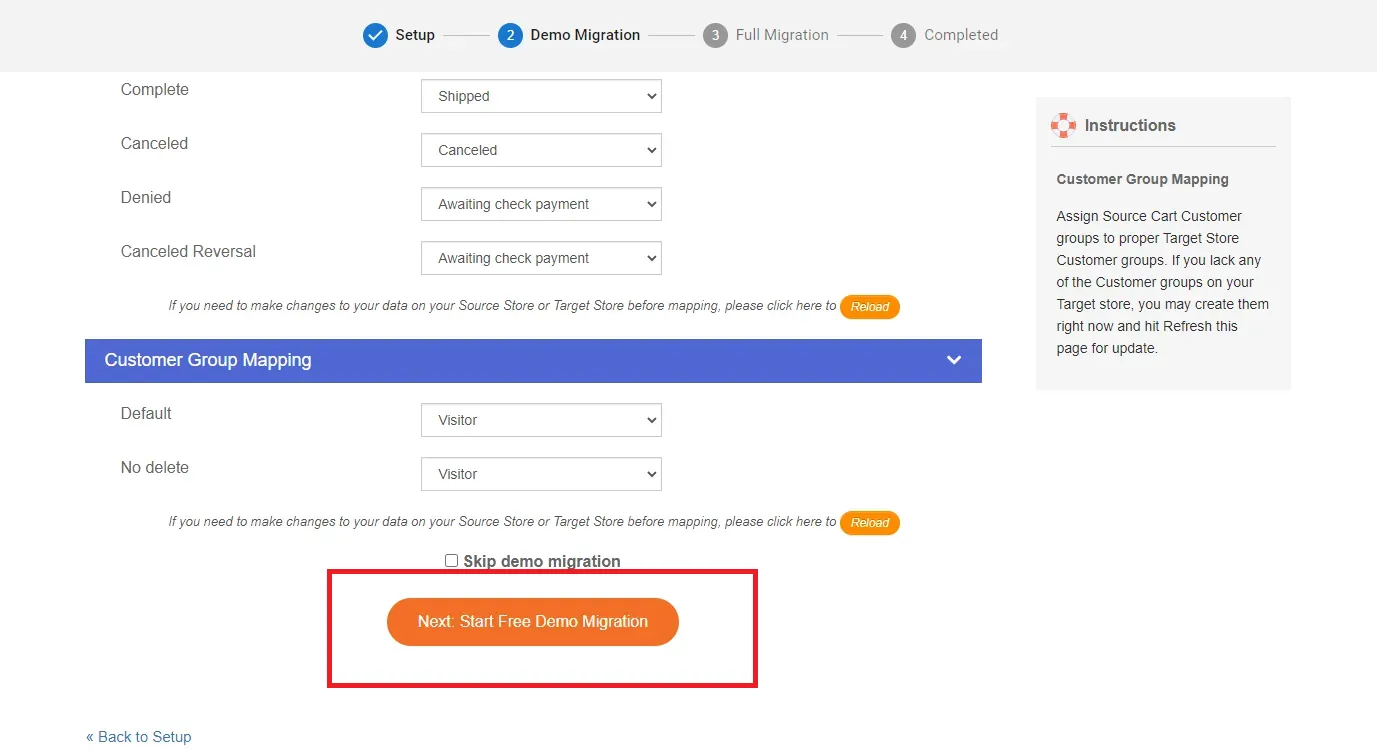
(Prefer to skip the demo and go straight to the full migration? Just check the “Skip Demo Migration” box, and you're good to go.)
All-in-One Migration (Highly recommended)
The Basic Migration package can easily cover all your fundamental migration needs, but it requires you to manage every step on your own. Not to mention, for more complex requirements, opting for just the basics will leave you wanting more!
That's why the All-in-One remains our most popular package, as it offers you a fully personalized approach with expert guidance from us at every turn. Let's see how it works:
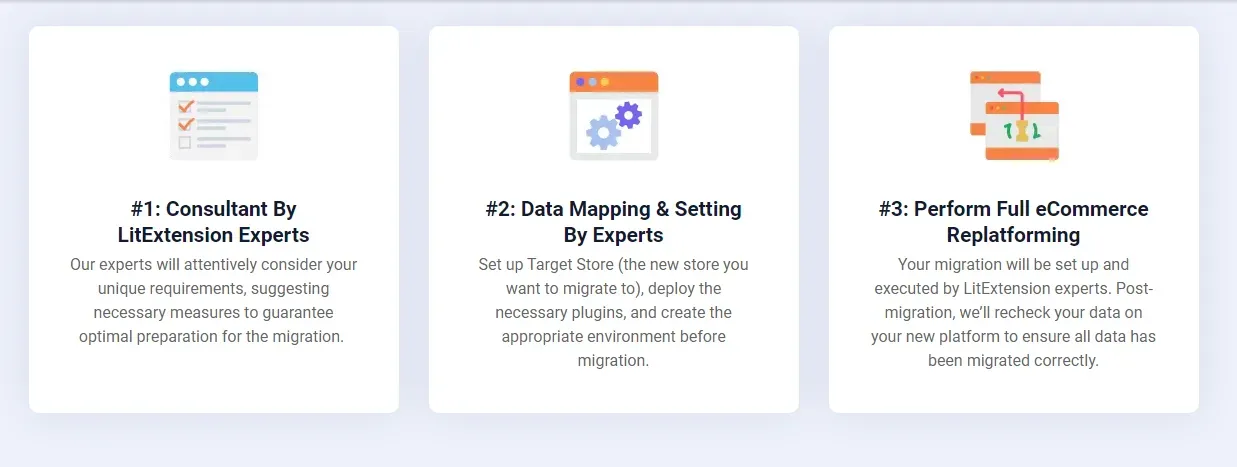
Step 1. Consultant by LitExtension experts
First thing first, once you reach out to us, our experts at LitExtension will sit down with you to understand your exact needs. Are you transferring Magento export orders, custom fields, blog posts, or anything else? Just tell us!
We'll explain the entire process and pricing in clear terms to let you know what you can expect from our services. Once payments are settled, just relax — we'll do the rest for you.
Step 2. Data mapping and setting by experts
At this stage, our team will jump into action to ensure everything is perfectly aligned for the upcoming migration. That includes:
- Setting up your new WooCommerce store
- Installing the must-have plugins
- Setting up 301 redirects for seamless transitions
- Clearing out any leftover sample data.
Need a sneak peek of how it all works? No problem! We can provide a free demo to ease your mind.
Step 3. Perform full eCommerce replatforming
The big moment arrives — the full migration! We'll take care of every detail and keep you informed throughout. Note that, unlike the Basic package, the All-in-One covers any additional options that pop up without any extra fees.
Once the migration is complete, we'll conduct thorough checks and resolve technical issues (if any) to ensure your new store is ready to roll. Even better, for six months afterward, we'll continue to safeguard your data by offering Re-migrations, Recent migrations, and Smart updates. These services are completely free of charge if the data is less than 10% of the total!
Seamlessly migrate your Magento store!
Bonus: How to Configure Magento 2 Export Order Profiles
Sometimes, your export requirements may vary depending on the situation. For instance, you might need specific settings for exporting women's products and a completely different set for men's items!
In such cases, the Amasty Export Orders extension (available for $199) is the perfect solution; you can create multiple Magento export orders profiles and customize each one to suit your needs. Let us walk you through the steps to make it happen:
Step 1. Enable the extension
First, go to “Stores” > “Configuration” in your Magento dashboard. Next, find the Amasty extension and click on “Efficient Order Export” > “General Settings.” After that, turn the “Enable Automatic Execution” setting to “Yes.”
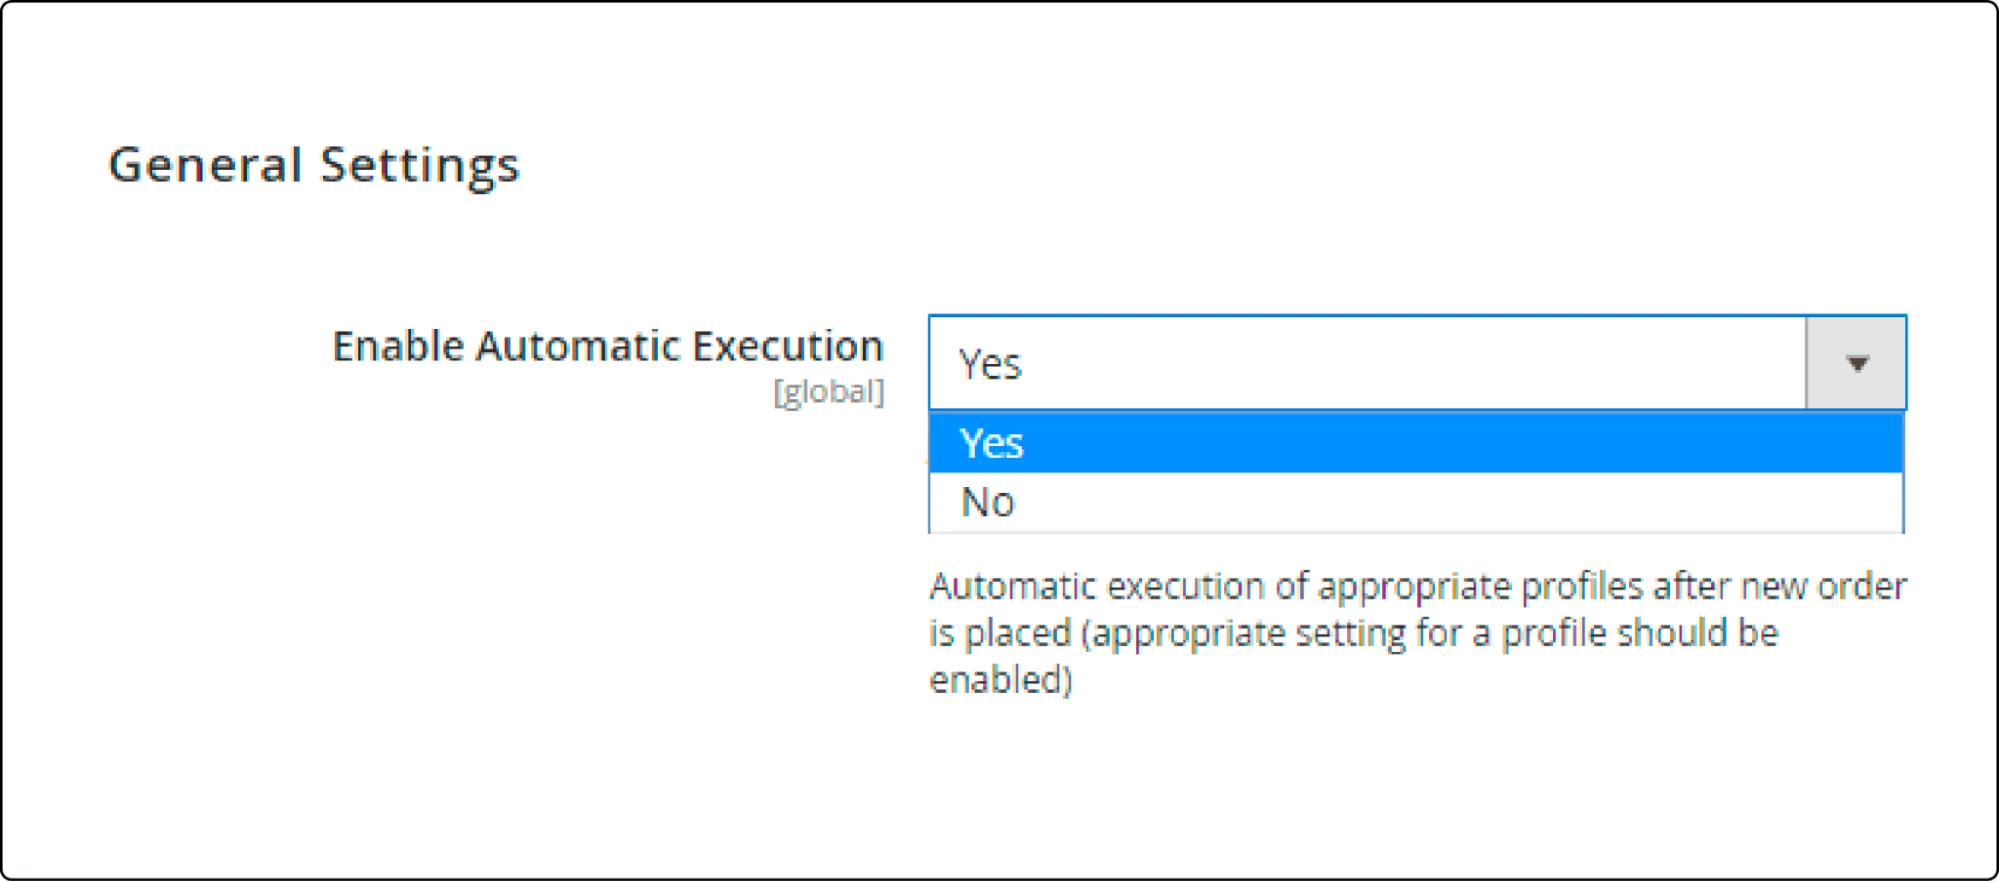
Step 1. Set the “Enable Automatic Execution” setting to “Yes.”
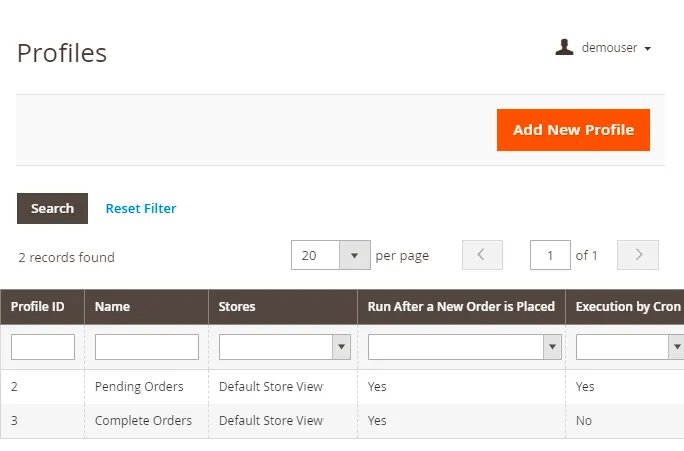
Step 2. View export profiles
Now, in the “Efficient Order Export” section, click on “Profiles.” You will see a list of available export profiles here; feel free to view, edit, or even create new ones.
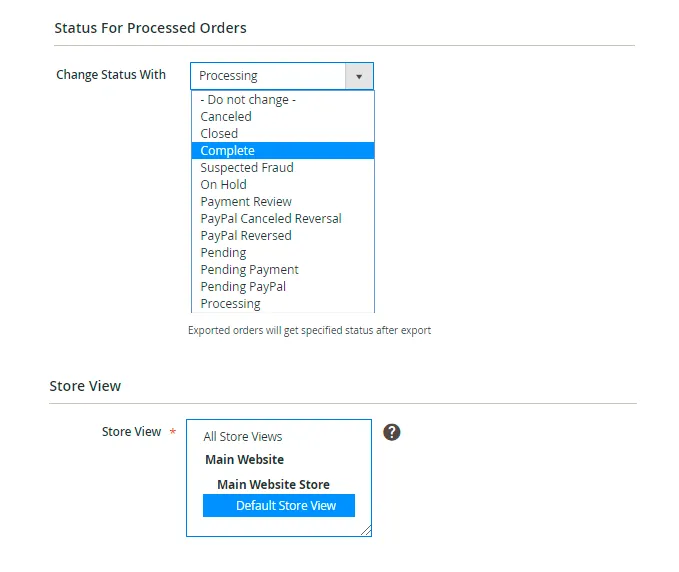
Step 3. Adjust settings for a profile
To adjust settings for a specific profile, click on the profile you want to configure. Some of the key options will show up:
- Skip Child Products: Enable this if you only want to export main products and exclude any child products (e.g., from configurable products).
- Skip Parent Products: If set to “Yes,” the export will exclude parent products like configurables or bundles.
- Change Status of Processed Orders: Specify the status that orders should have once they are exported.
- Select Store View: Choose which store view to export data from.
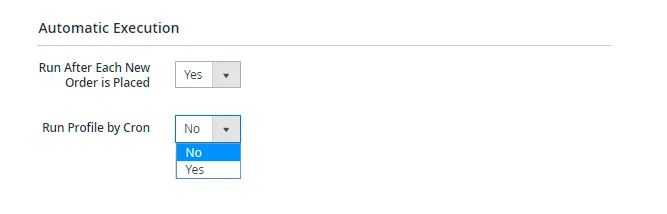
- Run After Each New Order is Placed: Turn this setting to “Yes” for automatic export after each new order.
Do not forget to save all these Magento export orders settings once you are done!
Magento Export Orders: FAQs
How do I export all orders from Magento?
For a quick and easy export in Magento, simply head to "Sales" > "Orders" > "Import" right from the backend.
On another note, third-party plugins (like Meetanshi) offer slightly more customization options to suit growing businesses. And if you're planning a complete store migration - including other types of data rather than just products - LitExtension is definitely the go-to solution.
How do I find export orders?
Since most devices have a default download folder, that's likely where your exported data will be waiting for you. Simply put, after the export, the Magento export sales data file will land in the same place as all your usual downloads.
How do I print orders from Magento?
The Amasty Mass Orders extension will come in handy here.
Once installed, simply navigate to "Sales" > "Orders" in your dashboard, then open the "Actions" dropdown and select "Print Packing Slips." The system will automatically generate a PDF, which you can download and print directly from your computer!
How to get order information in Magento 2?
To get order details, navigate to your OMS (Order Management System) Admin, then go to "Sales"> "Orders"> "Order ID for a specific order." You can check out this guide for more information.
Final Words
We have walked you through various methods for downloading Magento export orders. But let's be real: Magento's backend, while straightforward, only works well for smaller businesses. The Meetanshi plugin does have some strong points but is not quite there yet when it comes to handling larger operations.
That's why we recommend LitExtension Magento migration as the ultimate solution! With over 12 years of experience and 300,000 successful migrations, we've become the trusted choice for businesses looking for sustainable growth. We can't wait to bring you the same pleasant experience – just as we did for other 200,000+ happy customers!
For more information, check out our Magento guides and join our Facebook Community.

