A broken checkout can silently kill eCommerce sales, and most WooCommerce store owners only find out when it is too late. Therefore, knowing how to test WooCommerce checkout is one of the most important steps you can take before going live or after making any significant changes to your store.
In this guide, you will learn two main methods to test your WooCommerce checkout:
- WooPayments built-in test mode: Best for store owners and developers who are already using WooPayments as their primary payment gateway.
- Plugin-based testing: Best for stores running third-party payment gateways where a dedicated plugin is needed to simulate transactions safely.
From there, this guide also covers common errors to watch out for and best practices to keep your checkout running without a hitch. Let's get started!
Why You Need to Test WooCommerce Checkout?
Understanding why checkout testing matters helps you treat it as a priority rather than an afterthought. Here are the key reasons why you need to learn how to test WooCommerce checkout.
- Validate payment gateway integration: Whether you use Stripe, PayPal, Square, or WooPayments, each gateway has its own configuration that must be verified in test mode before going live.
- Prevent revenue loss: A checkout that silently fails means orders are dropped without you knowing, costing you sales and customer trust.
- Confirm order emails are triggered: Customers expect an instant order confirmation. Testing ensures your email notifications fire correctly for every order status.
- Check tax and shipping calculations: Errors in tax rules or shipping zones often only surface during an actual checkout simulation, not in the settings panel.
- Catch issues after updates: Every WooCommerce plugin update, theme change, or PHP upgrade is a potential point of failure. Learning how to test WooCommerce checkout after any site change is a habit that protects your store long-term.
The good news is that you don't need to spend real money or involve real customers to do this thoroughly. WooCommerce offers built-in test modes and third-party plugins that make the entire process straightforward–which we'll walk through in the sections below.
How to Test WooCommerce Checkout With WooPayments
If WooPayments is your payment gateway, you're already working with one of the most seamlessly integrated solutions in the WooCommerce ecosystem. It comes with a built-in test mode that lets you simulate the entire checkout flow, from entering card details to receiving an order confirmation.
Let's take a look at how to test WooCommerce checkout using WooPayments.
Step 1. Enable test mode
Before placing any test orders, the first thing you need to do is switch WooPayments into test mode. This is important because if you “test” your checkout by placing real orders in live mode and then refunding yourself, the transaction fees on those orders will not be returned under any circumstances.
To enable test mode, follow these steps:
- Go to Payments > Settings in your WordPress dashboard.
- Check the Enable test mode box.
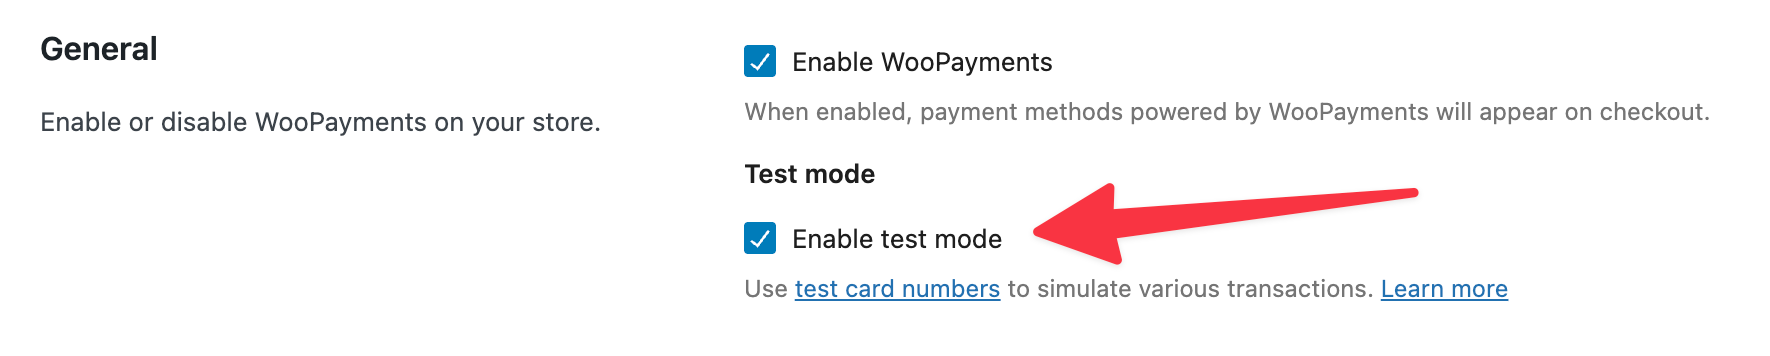
- Click the Enable button in the confirmation pop-up.
- Click Save changes at the bottom of the page.
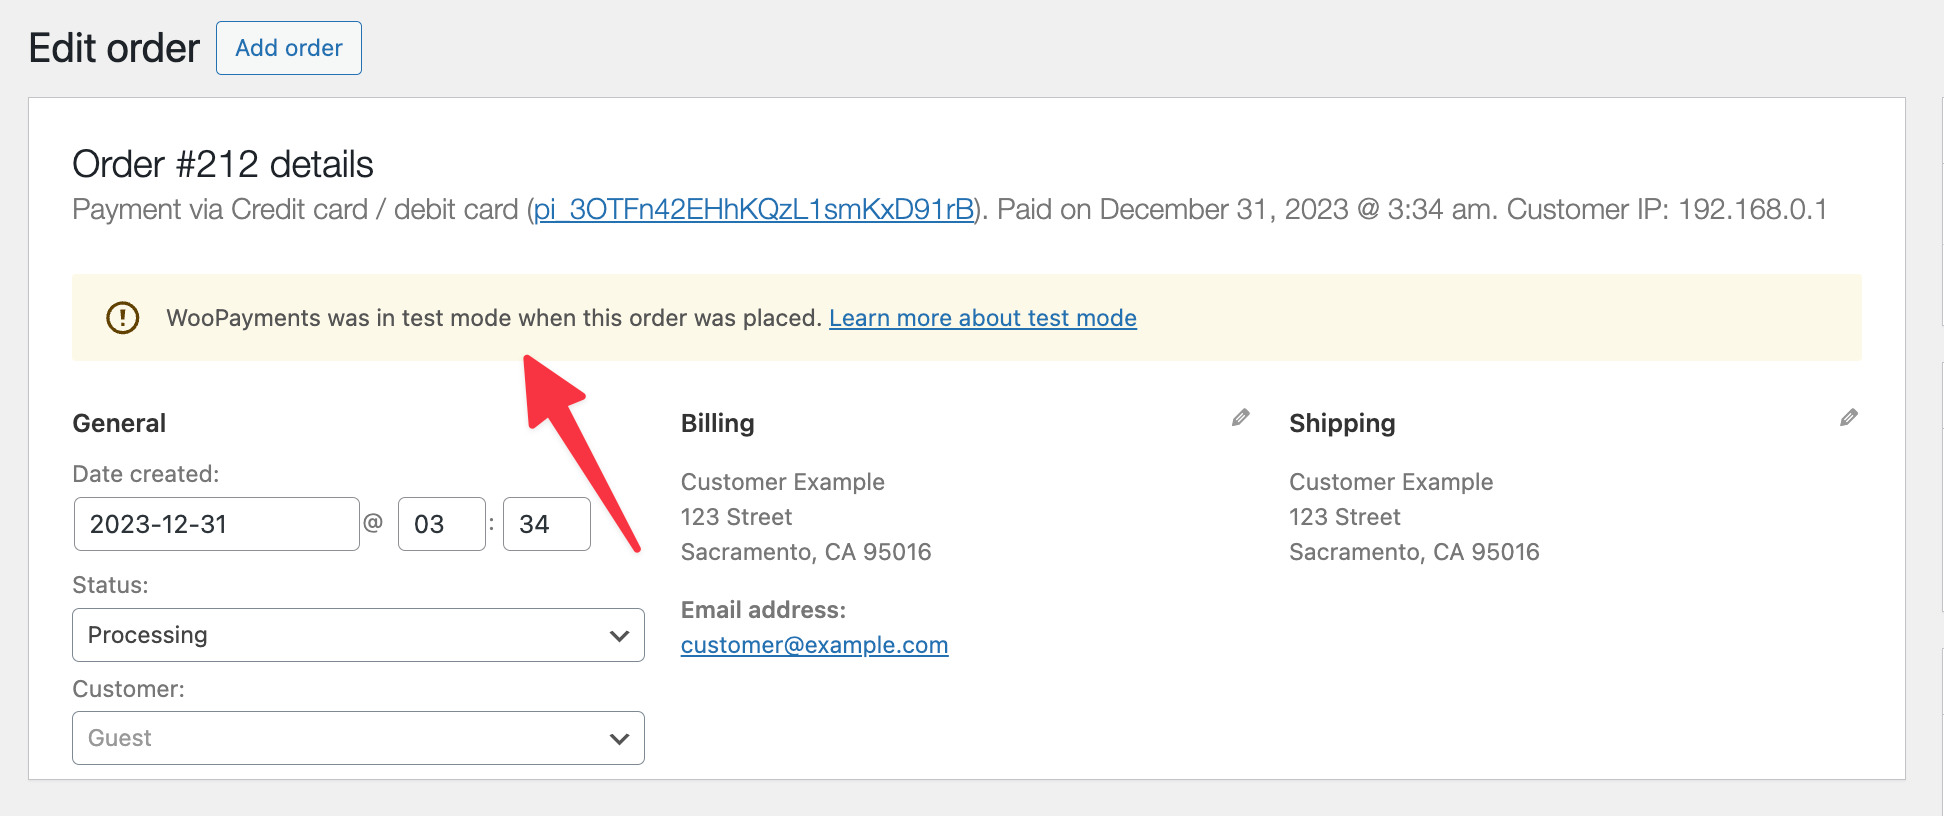
Once test mode is active, any orders placed through WooPayments will still be created as real orders inside WooCommerce, with a notice on the order edit page confirming it was placed in test mode. This notice will remain visible even after you turn test mode off, so you can always distinguish test orders from real ones.
Additionally, in test mode, the entire Payments section of your dashboard. including Payouts, Transactions, and Disputes, will only display test mode data. It will give you a clean, isolated view of your test activity without mixing it with real transaction history.
Step 2. Place a WooCommerce test order
With test mode enabled, you're ready to simulate a real customer purchase. The process mirrors exactly what a live customer would experience; the only difference is that no real money moves.
Step 2.1. Test card payments
To place a basic test order using card payments:
- Go to your store's shop page and add a product to your cart.
- Proceed to the checkout page and fill out the order form with any test details.
- Enter a test card number, expiry date, and CVC code. Here, you can use the provided test card
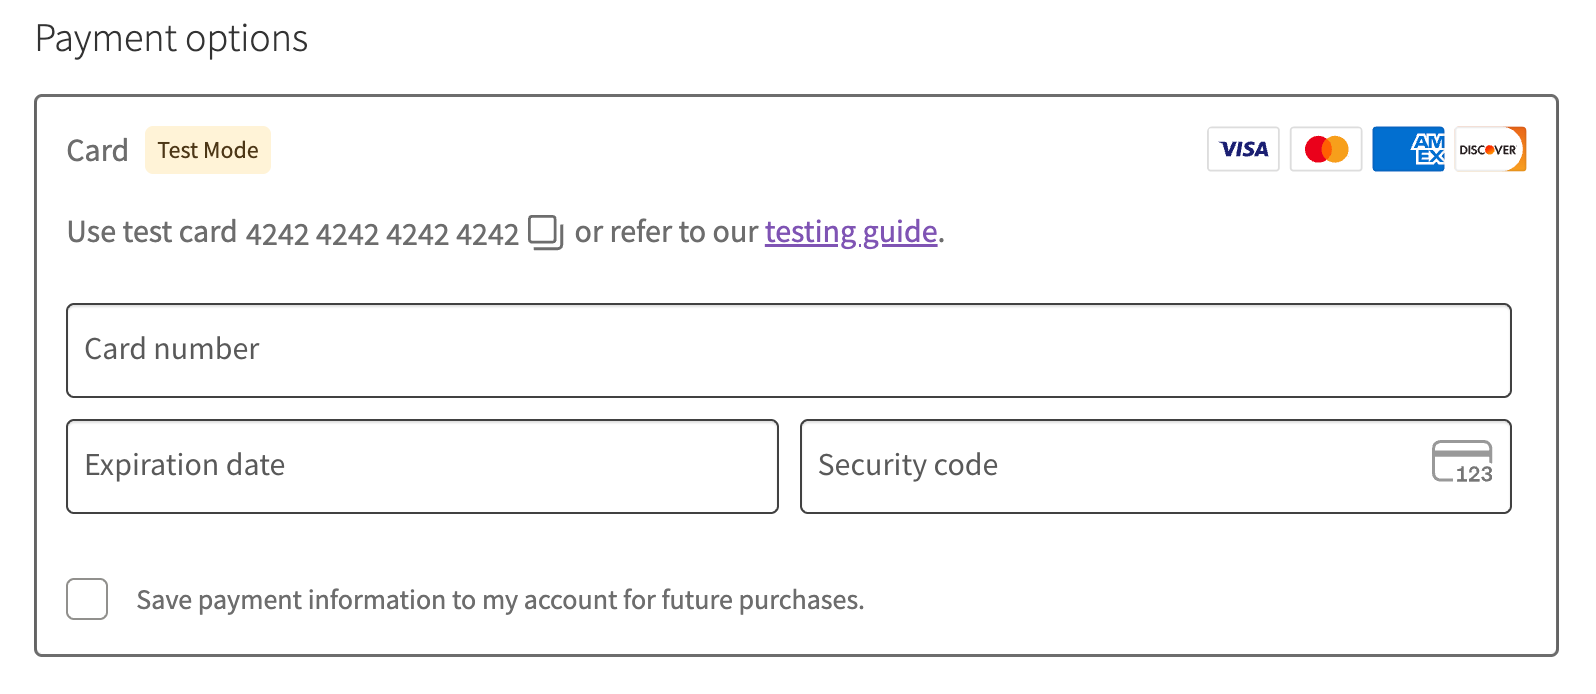
- Click Place Order.
The order will be processed just as if you had used a real card. Once you land on the Order received page, you can verify the transaction by going to WooCommerce > Orders and checking Payments > Transactions in your dashboard.
Step 2.2. Test manual capture payments
By default, WooPayments captures payment automatically at the moment an order is placed. However, if your store uses the authorize and capture feature, you need to test this flow separately.
For those learning how to test WooCommerce checkout via manual capture payments, please follow these steps:
- Go to “Payments” > “Settings” in your dashboard.
- Enable test mode (if not already active).
- Enable the “Authorize and Capture” option.
- Place a test order using the test card numbers provided.
- Go to “WooCommerce” > “Orders” and open the test order you just placed.
- Confirm the order note in the sidebar reads: “A payment of $XX.XX was authorized using WooPayments.”
- Manually capture the charge from the order page.
- Confirm the sidebar note now reads: “A payment of $XX.XX was successfully captured using WooPayments.”
- Go to “Payments” > “Transactions” and confirm that a corresponding transaction with the type “Charge” is listed.
This flow is especially important to test if you sell made-to-order products, pre-orders, or any product type where you don't want to charge customers until the order is confirmed and ready to fulfill.
Step 2.3. Test express checkouts
Express checkout methods, such as Apple Pay, Google Pay, and Link by Stripe, each have their own testing requirements and conditions. Hence, if you want to learn how to test WooCommerce checkout for express methods, there is no single universal method to test them all in one go.
WooCommerce provides dedicated testing documentation for each express payment method. To test a specific express checkout method, follow the instructions in the relevant guide for whichever method(s) you have enabled on your store.
Step 2.4. Test non-card payments
Testing non-card payment methods such as Bancontact, EPS, iDEAL, Sofort, and other local payment options is simpler than card testing. The process works as follows:
- Go to your checkout page and select the non-card payment method you want to test.
- Place the order. Then, you will be redirected to a Stripe-hosted page.
- On that page, choose whether to authorize or fail the test payment.
- After that, you will be automatically redirected to your store, and the relevant result will be displayed.
For Buy Now, Pay Later (BNPL) methods, WooCommerce has a separate dedicated testing section specific to each BNPL provider. You can refer to the Buy Now Pay Later documentation for full details.
Step 3. Test refunds
Testing the refund flow is a critical part of knowing how to test WooCommerce checkout end-to-end. It ensures your store responds predictably when things need to be reversed.
To test a refund with WooPayments:
- Place a test order as shown in Step 2 above, using any of the test card numbers.
- Go to WooCommerce > Orders in your dashboard.
- Click on the order ID of the test order you just placed.
- Follow the standard WooCommerce refund process on the order edit page.
Once the refund is processed, the order status will change to Refunded, and your test balance will be reduced accordingly. Also, try to test both a full refund and a partial refund on separate test orders, so you can confirm that WooCommerce and WooPayments stay in sync under both scenarios.
Step 4. Test disputes
Disputes, also known as chargebacks, happen when a customer contacts their bank to challenge a charge rather than requesting a refund directly through your store. Knowing how your store handles a dispute is an often-overlooked but essential layer of how to test WooCommerce checkout thoroughly, and WooPayments makes it possible to simulate the entire process safely in test mode.
WooPayments allows you to trigger a simulated dispute by placing a test order using one of the following dedicated dispute test cards:
Card Number | Dispute Type | Details |
Transaction not authorized | 4000 0000 0000 0259 | The charge will be disputed as unauthorized. This type of dispute is protected after 3D Secure authentication |
Product not received | 4000 0000 0000 2685 | With default account settings, charge succeeds, only to be disputed as product not received. This type of dispute isn’t protected after 3D Secure authentication. |
At this stage, you can also test the dispute response process, following the steps below:
- Go to “Payments” > “Disputes” in your site’s dashboard.
- Click the dispute in the list to open it up.
- Click “Challenge Dispute” or “Accept Dispute”.
- Click “Next” for each section (or click the Review tab in the top navigation) until you see the Cover Letter field.
- In the Cover Letter field, remove all text and do one of the following:
- Enter winning_evidence to win the dispute.
- Enter losing_evidence to lose the dispute.
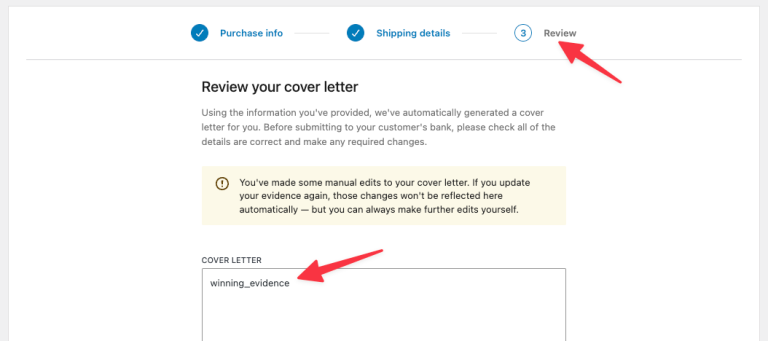
- At the bottom, click “Submit”.
Step 5. Test payouts
Once you've validated payments, refunds, and disputes, the last thing to verify is that your payout data is being recorded correctly. Payouts represent how WooPayments transfers your collected funds to your bank account, and checking this is the final step in a complete guide on how to test WooCommerce checkout from start to finish.
To verify your payout data after running test orders:
- Go to “Payments” > “Payouts” in your WordPress dashboard.
- Confirm that the test transactions from your test orders are reflected in the payout history.
- Check that the payout amounts align with your expected transaction totals, after deducting any simulated fees or refunds.
Once you finish testing, don't forget to disable test mode and switch back to live mode.
How to Test WooCommerce Checkout using a Plugin
If your store does not use WooPayments as its primary gateway, a dedicated plugin is the most practical way to test WooCommerce checkout safely. The Test Orders plugin, recommended by Woo, allows you to place test orders without processing any real payments, making it a reliable option for stores running third-party WooCommerce payment gateways.
If you want to learn how to test WooCommerce checkout, here's how to set up and use it.
Step 1. Install and activate the Test Order plugin
- Log in to your WooCommerce account and download the test-orders.zip file.
- In your WordPress dashboard, go to Plugins > Add New > Upload Plugin.
- Click Choose File, select the downloaded zip file, then click Install Now.
- Once installed, click Activate Plugin.
Step 2. Enable the Test Order payment gateway
After activation, the plugin adds a new payment gateway to your WooCommerce settings. You need to enable it before it will appear at checkout:
- Go to WooCommerce > Settings > Payments.
- Find Test Order in the list of payment gateways.
- Toggle it on and click Save changes.
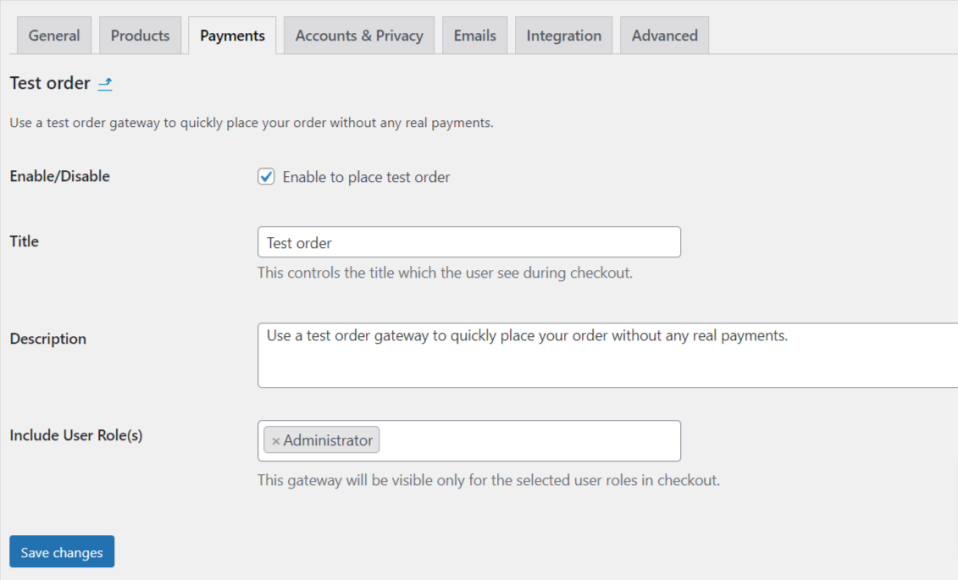
Step 3: Configure user role access (Optional)
One of the most useful features of the Test Orders plugin is its user roles filter. This lets you control which user roles on your site can see and use the Test Order payment gateway at checkout.
This is especially helpful if your store is already live–you can restrict the test gateway to admin or editor roles only, so real customers never see a “Test Order” option at checkout while you continue running tests in the background.
Step 4: Place a test order
With the gateway enabled, you are ready to simulate a complete checkout:
- Go to your store's shop page and add a product to your cart.
- Proceed to checkout and fill out the order form as a customer would.
- Under the payment section, select Test Order as the payment method.
- Click Place Order.
Troubleshoot Common Errors When Testing WooCommerce Checkout
Even with everything set up correctly, errors can still surface during testing when you learn how to test WooCommerce checkout. The table below covers the most common issues you might encounter, what causes them, and how to resolve each one.
Error | Cause | Solution |
Test payment is declined in test mode | The gateway is set to live mode with test credentials, or vice versa. | Switch your gateway to test mode and confirm sandbox API keys are correctly entered. Use the correct test card numbers provided by your gateway. |
Checkout page shows "Your cart is empty" | Caching plugins interfering with WooCommerce session handling. | Temporarily disable your caching plugin and retry. Exclude the checkout, cart, and account pages from caching to prevent session conflicts. |
Shipping or payment methods not appearing | Gateway or shipping zone is disabled or misconfigured. | Navigate to WooCommerce > Settings > Shipping and ensure shipping methods are enabled. Then go to WooCommerce > Settings > Payments and confirm your preferred gateways are active. |
Order confirmation email not sending | WordPress's native mail function is misconfigured at the server level. | Install a dedicated SMTP plugin such as WP Mail SMTP and configure it with a reliable mail provider to ensure deliverability. |
Checkout works in test mode but fails in live mode | Incorrect API credentials, misconfiguration of the SSL certificate, or external APIs restricting the live gateway. | Confirm that live credentials are correct and that your site runs under HTTPS before disabling test mode. |
JavaScript errors breaking the checkout form | Speed plugins that minify, combine, or delay JavaScript files can break payment forms or order buttons. | Disable JavaScript minification and deferral in your optimization plugin, then place another test order to confirm the fix. |
Plugin or theme conflict causing checkout failure | A third-party plugin or outdated theme template is interfering with WooCommerce's checkout process. | Deactivate all plugins except WooCommerce and your payment gateway, then reactivate them one by one to identify the conflict. |
Tax calculations incorrect or missing | Tax classes or rates are not properly assigned in WooCommerce settings. | Go to WooCommerce > Settings > Tax, ensure product tax classes are assigned correctly, and verify that tax rates are accurate. |
Orders showing "Failed" status after checkout | Gateway errors or server-side issues blocking transaction completion. | Navigate to WooCommerce > Status > Logs to review detailed gateway error messages that do not appear on the customer-facing checkout page. |
Best Practice When Performing WooCommerce Testing
Knowing how to test WooCommerce checkout is only half the battle; how you conduct that testing matters just as much. Following these best practices ensures your process is thorough, reliable, and repeatable.
- Always test on a staging environment first: Never run checkout tests directly on your live store. A staging environment that mirrors your production site lets you catch issues without exposing real customers to errors or disruptions.
- Disable test mode before going live: It sounds obvious, but forgetting to turn off test mode is one of the most common mistakes store owners make. Always double-check your payment gateway settings before launching or reopening your store after any changes.
- Test with both guest and logged-in accounts: Checkout behavior can differ depending on whether the customer has an account or is checking out as a guest. Testing both scenarios ensures a consistent experience for every type of customer.
- Test across multiple devices and browsers: A checkout that works perfectly on desktop Chrome may break on mobile Safari. Always verify your checkout on at least two browsers and both desktop and mobile layouts before signing off.
- Simulate every payment method you offer: Do not limit your testing to just the default payment gateway. If your store accepts credit cards, PayPal, BNPL options, or express checkouts like Apple Pay, each one deserves its own test run.
- Test edge cases, not just the happy path: Run tests with coupon codes, free shipping thresholds, out-of-stock items, and mixed carts. Real customers will try all of these, and your checkout needs to handle each scenario without breaking.
- Run tests after every significant update: Plugin updates, theme changes, and WooCommerce core upgrades can all introduce unexpected conflicts. Make checkout testing a standard part of your post-update workflow, not just a pre-launch task.
How to Test WooCommerce Checkout – FAQs
How to test checkout in WooCommerce?
To test WooCommerce checkout, follow these steps:
- Step 1. Enable test mode
- Step 2. Place a WooCommerce test order
- Step 3. Test refunds
- Step 4. Test disputes
- Step 5. Test payouts
Can I receive payment from a test order on WooCommerce?
No, you can't receive payment from a test order on WooCommerce. When test mode is active, no actual payment is processed and no funds are transferred to your account. This applies whether you are using WooPayments' built-in test mode or the Test Orders plugin.
Will I be charged a payment processing fee when testing WooCommerce checkout?
No, you will not be charged any processing fees for test orders. Since no real transaction takes place during testing, payment processors such as Stripe or PayPal do not apply any fees. However, it is important to ensure that test mode is properly enabled before placing test orders. If test mode is accidentally disabled and you place an order using a real card, a live transaction will be initiated and standard processing fees will apply.
Final Words
Testing your WooCommerce checkout is not a one-time task–it is an ongoing responsibility that every store owner should build into their regular workflow. From enabling test mode in WooPayments to using the Test Orders plugin for third-party gateways, knowing how to test WooCommerce checkout gives you the confidence that your store is ready to handle real customers without any hiccups.
If you found this guide helpful, LitExtension Blog covers a wide range of eCommerce topics to help you build, manage, and grow your online store with confidence. You can also explore the LitExtension Resources hub for in-depth guides, tools, and insights tailored to eCommerce store owners at every stage of their journey.