When many retailers want to sell customized products, the question of how to add personalization option on Shopify has grown in popularity. Indeed, personalization is essential because it helps businesses stand out from the competition and improves customer satisfaction, order value, and overall sales.
In this article, we – LitExtension, cover highlights on personalization on Shopify.
- Reasons why personalization is vital on Shopify
- How to add personalization option on Shopify product page
Keep reading because a ton of helpful information is coming your way.
Store Migration Made Easy With LitExtension!
LitExtension offers great migration solutions that help you transfer your data to your new Shopify store accurately, painlessly with utmost security.

Types of Customization Options on Shopify
Personalization is a fantastic way to differentiate your store from the competition and make it more distinctive.
There are countless customization options, from adding a personalization text box for custom orders, custom text, names, dates, and variants (size, color, style, material) to uploading outstanding graphics or images.
We recommend starting with the customization options you can complete promptly.
- Add customizable products in shopify by adding custom images or text or offering personalized customer service.
- Offer custom help and support to customers, or provide customized discounts and promotions.
- Or offer personalized shipping options, such as free shipping for orders over a certain amount.
Why Is Personalization Important on Shopify?
Shopify store owners can create a rewarding and enjoyable shopping experience that will increase sales and customer loyalty by understanding their customers' specific needs and preferences.
Therefore, the process of how to add personalization option on Shopify is crucial for some reasons:
#1 Increase advantage over rivals
Companies that don't use personalization risk falling behind their rivals in the eCommerce sector as it becomes increasingly crucial. Shopify stores can stand out and attract more customers by providing a personalized shopping experience.
For store owners looking to ensure their theme supports these features, using a Shopify theme detector can be very helpful.
#2 Enhance customer satisfaction
By applying Shopify product page customization to each customer's unique requirements and preferences, personalization improves the user's shopping experience. Thanks to this feature, customers feel valued and appreciated, which fosters customer satisfaction and repeat purchases.
If you're looking for unique ways to name these personalized products, exploring shop name ideas can provide inspiration.
#3 Conduct data gathering
Personalization enables Shopify stores to gather important customer information, such as their preferences, demographics, and browsing and purchasing histories. Making more informed business decisions and further enhancing the customer experience are all possible with the help of this data.
To manage these transactions smoothly, consider using a Shopify invoice generator.
#4 Boost conversion rates & potential sales
Customers are more likely to purchase when they feel catered to specifically. Customized promotions, targeted email marketing efforts, engraving options, and personalized product recommendations can all help boost conversion rates and sales.
Learn how to create a successful and attractive Shopify product page with comprehensive guides.
How to Add Personalization Option on Shopify Product Page
We will show you how to add personalization option on Shopify product pages, including:
- How to add various variants on Shopify
- Display product personalization options
- Modify product mockups
- And edit action buttons
to attract customers and encourage them to make purchases.
1. Product variant options
Follow our guidelines on adding Shopify custom product variants such as size, color, style, and material.
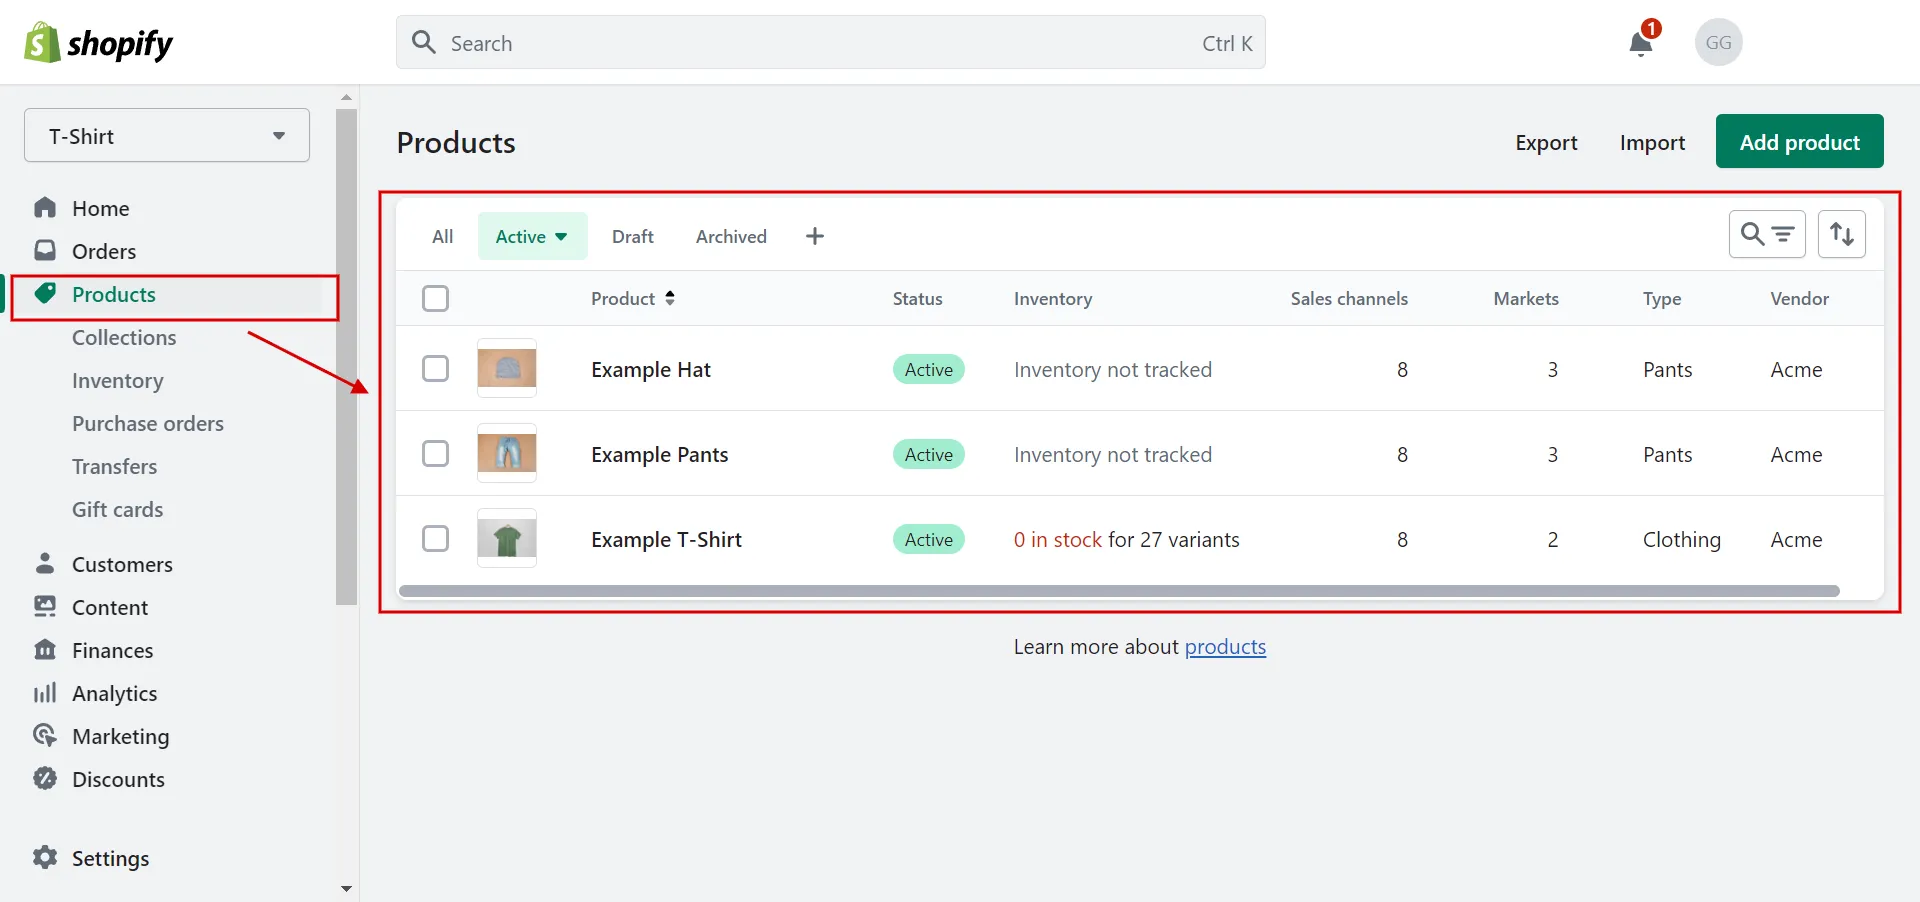
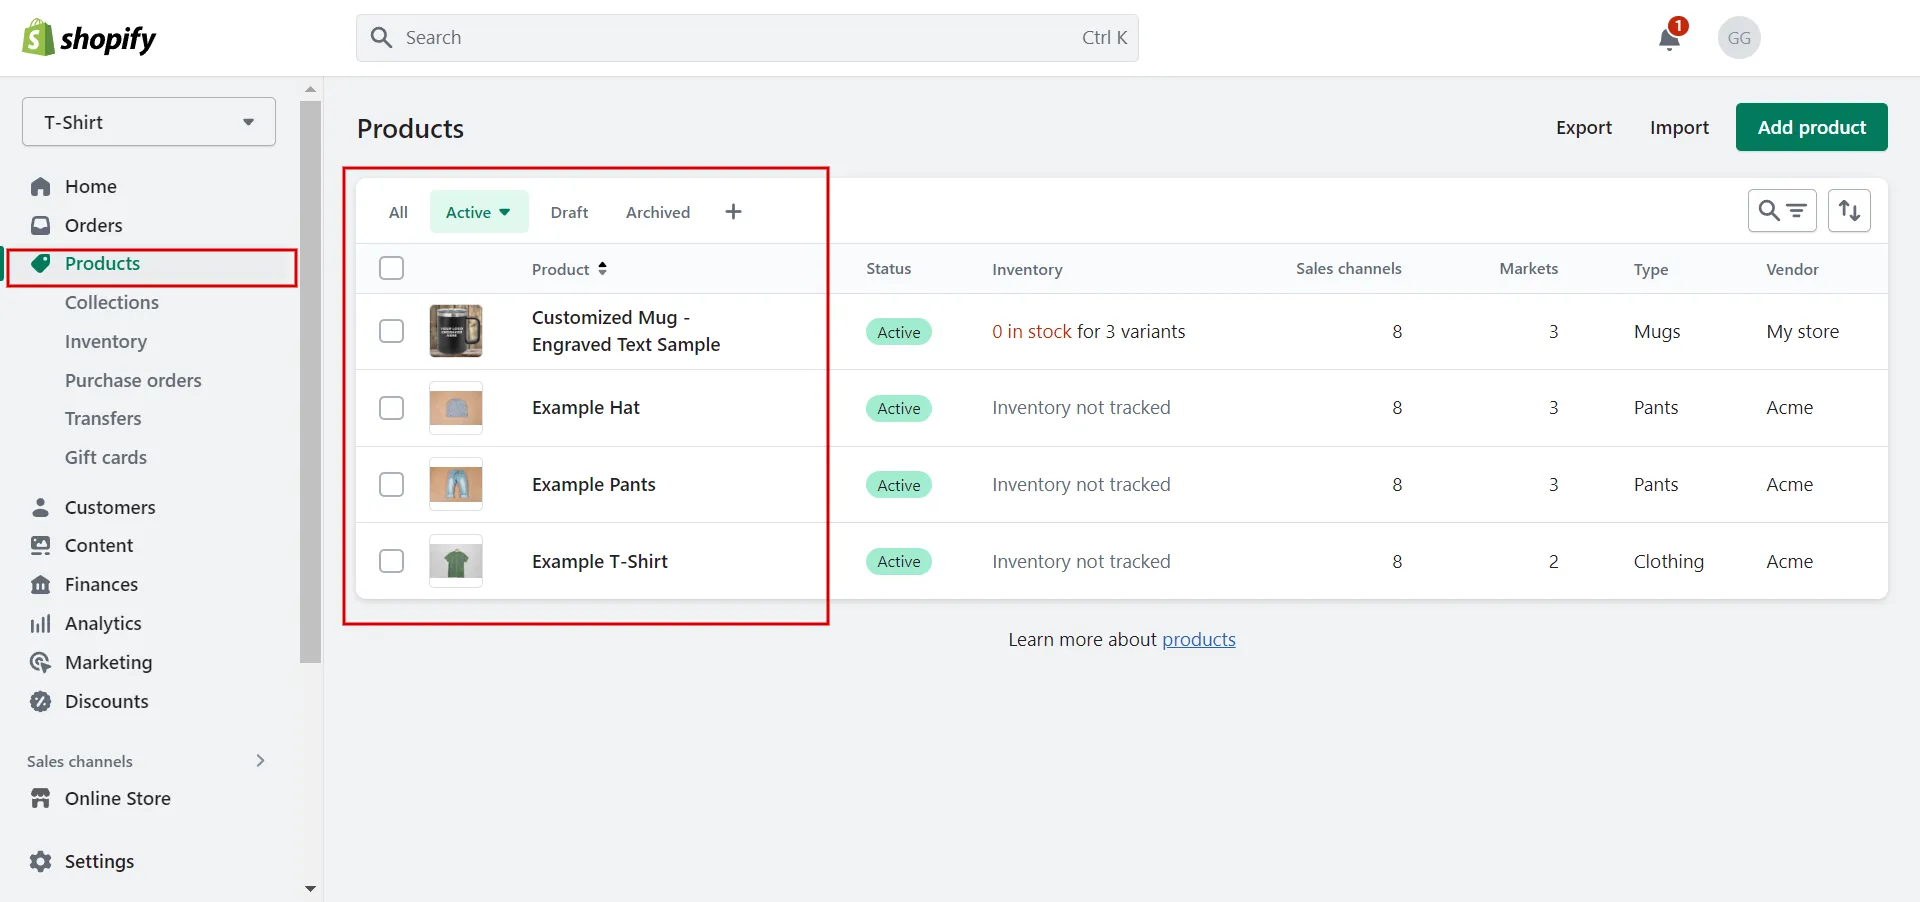
- Step 1: Go to Products.
Access the Products tab and choose a specific product you want to add variant options.
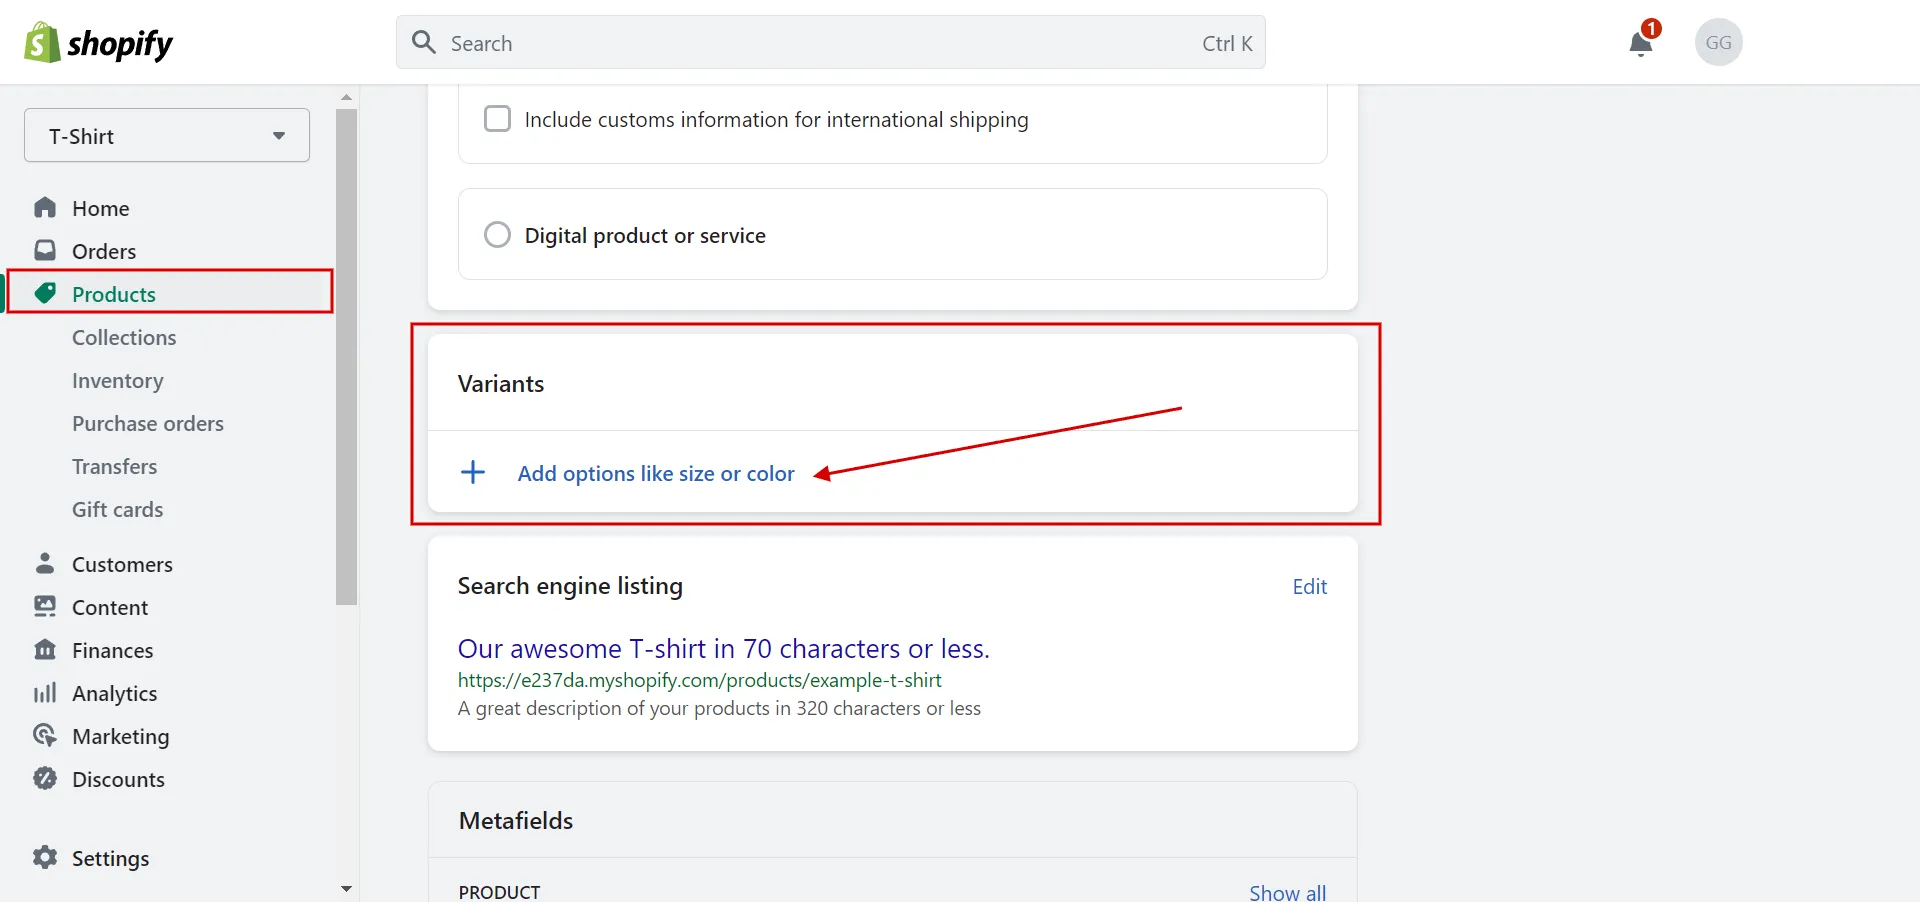
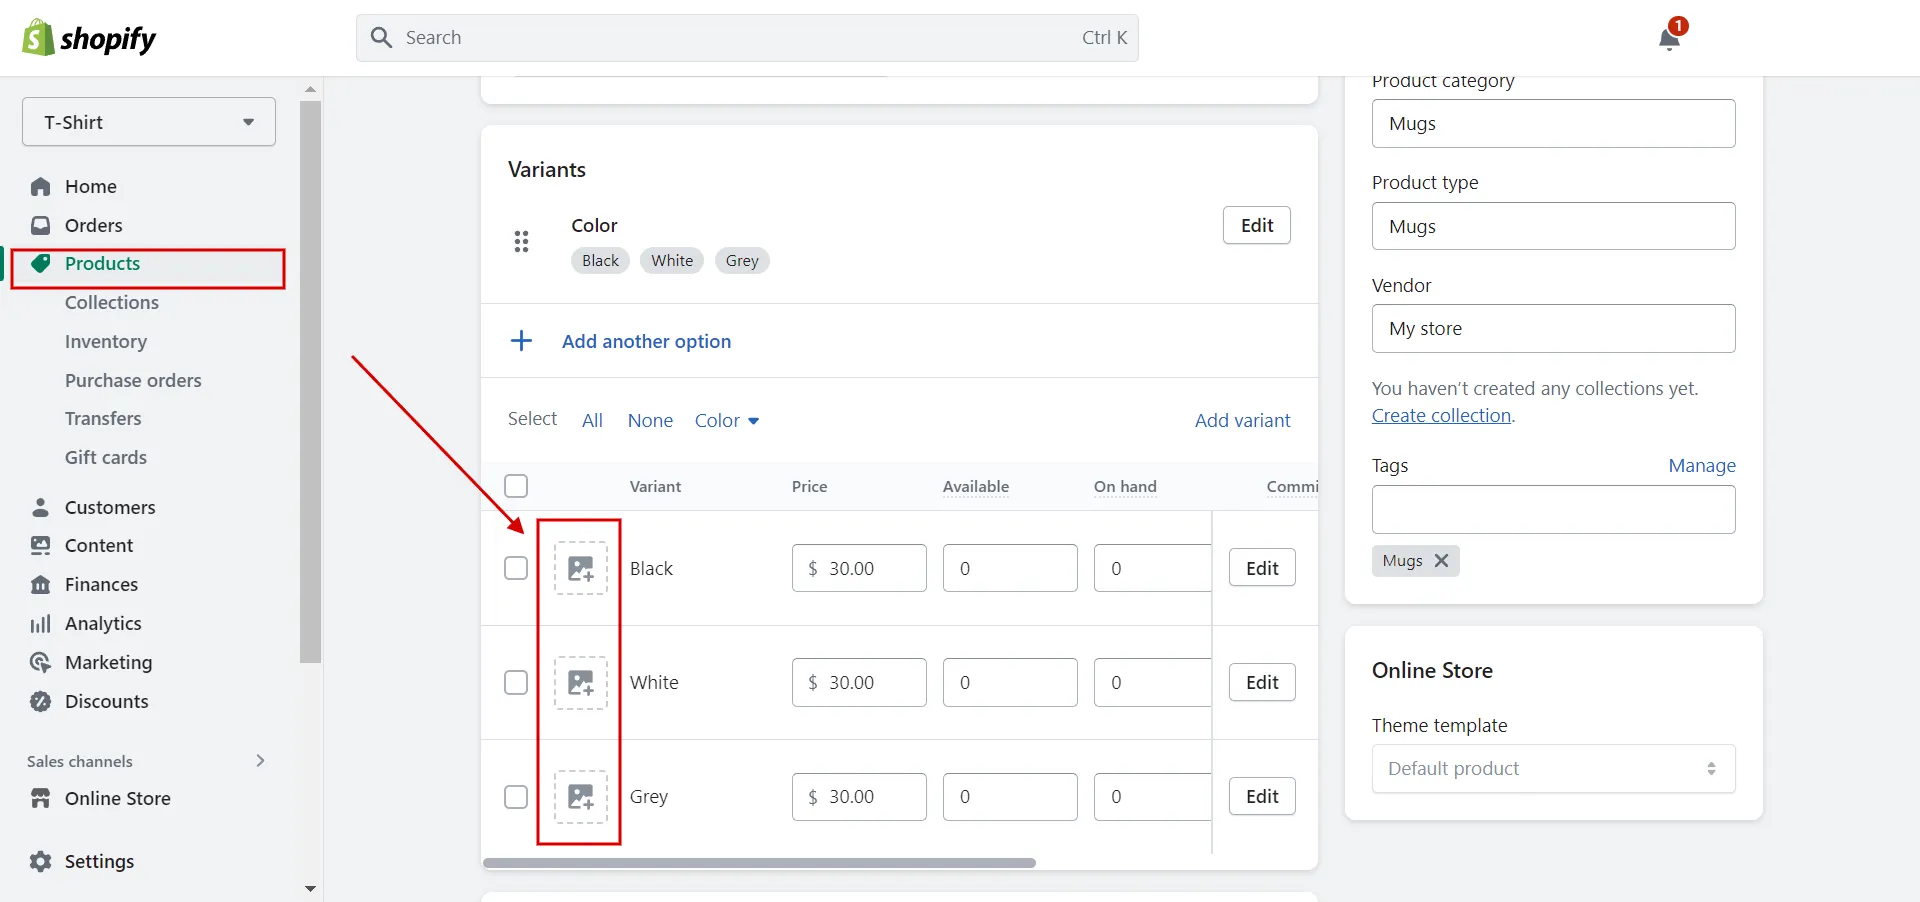
- Step 2: Click to Add Variant.
In the variants tab, click to Add options like size or color.
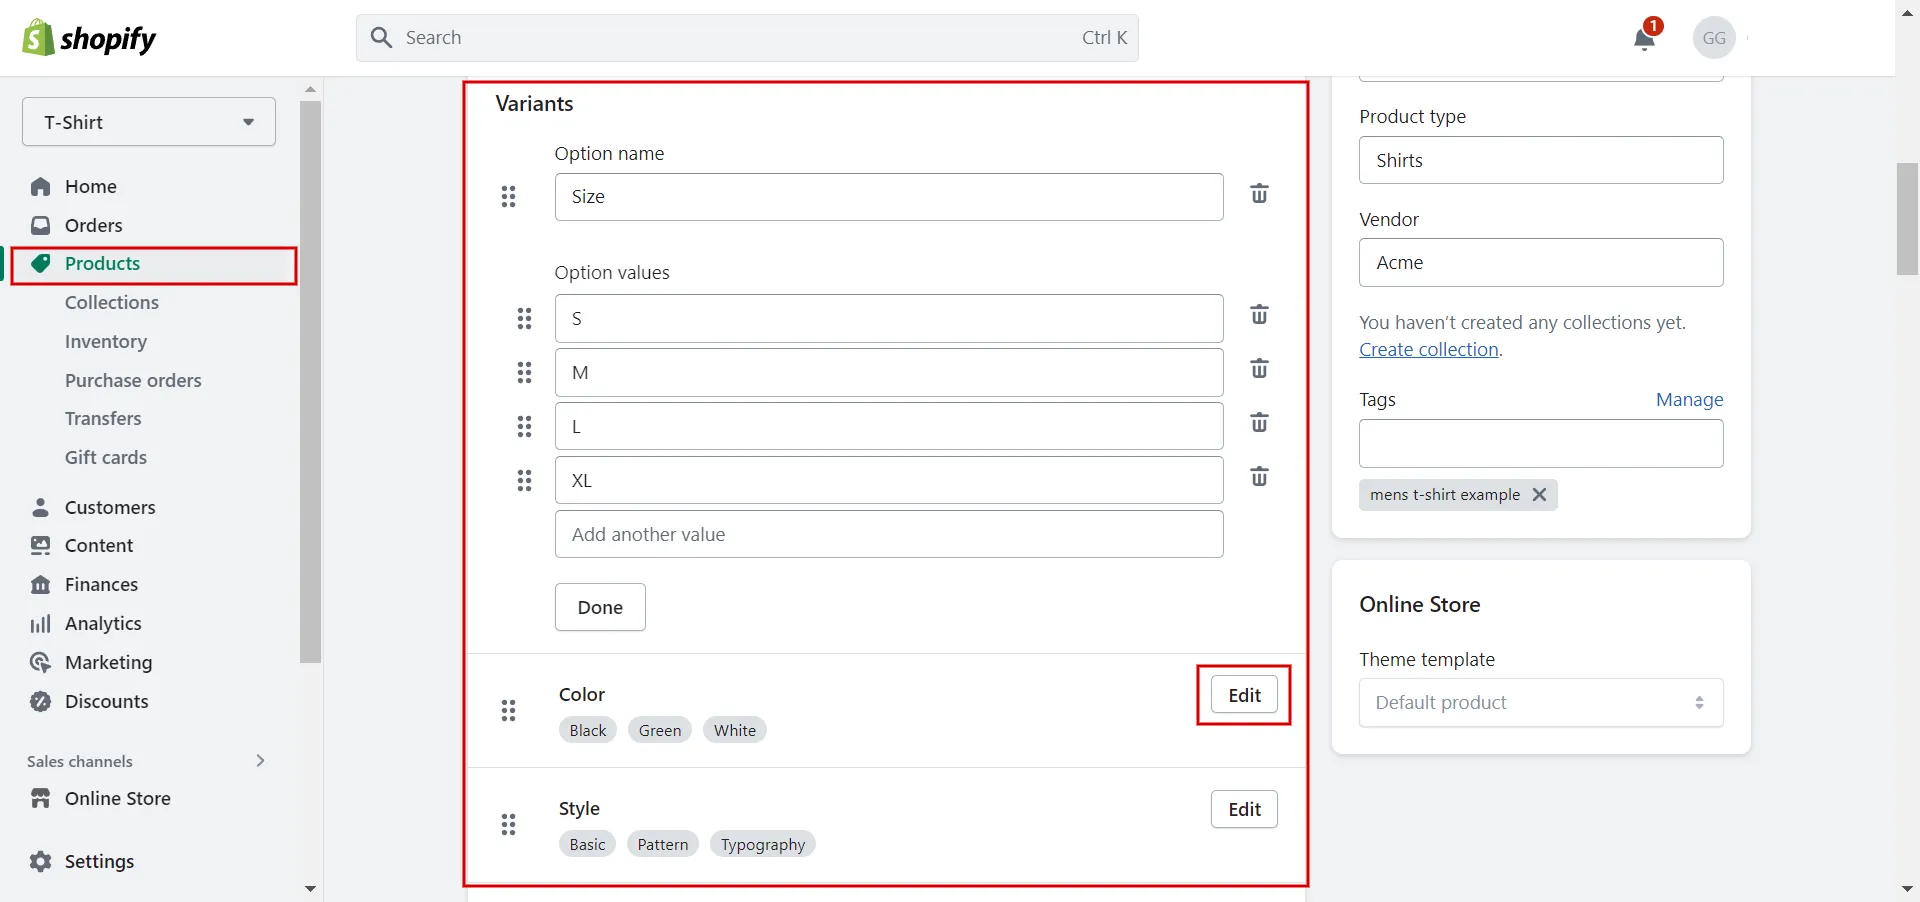
- Step 3: Add option name and value.
When you click to add options, you choose option names, including Size; Color; Material; Style, then add value for each option. Click the Edit button to change or add more values.
- Step 4: Save changes.
Note:
- There are 100 possible variations for one product.
- There are a maximum of 3 options for each product. For instance, one product might use style, color, and size, while another might use material, weight, and color.
Dive deep into how to add variants to existing product on Shopif now!
2. Personalization option display
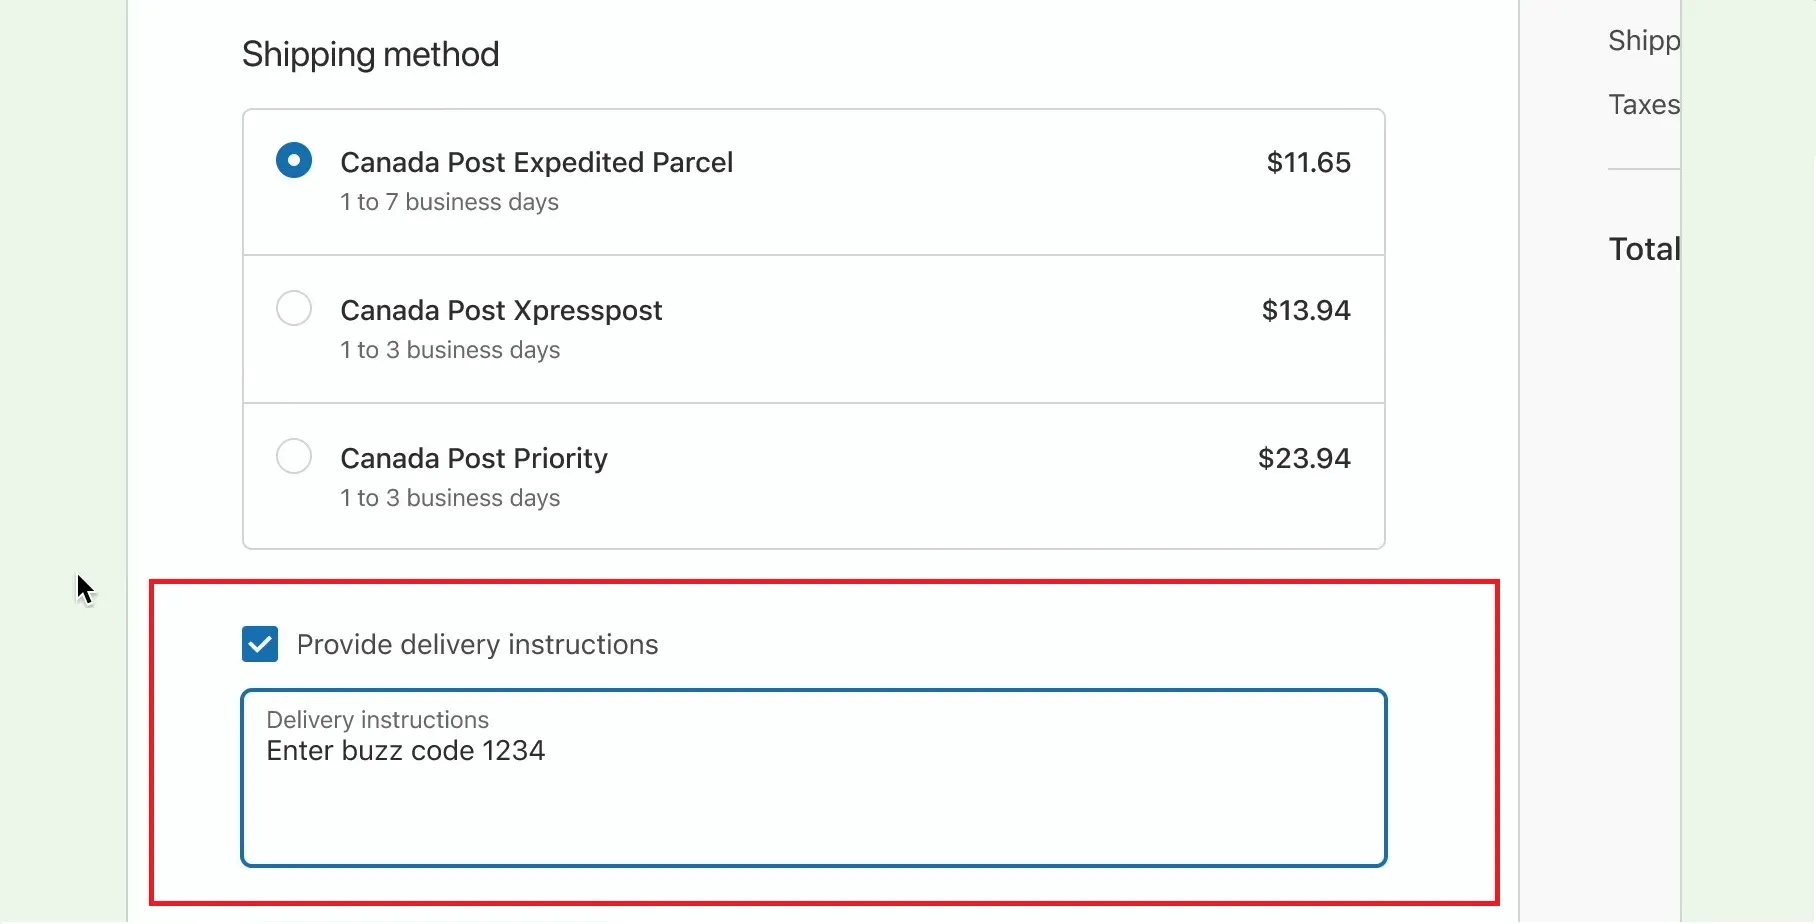
You can style the text that your customers enter in the personalization box shopify and create a personalization text box for custom orders.
For example, customers can enter their name in the personalization field if they purchase a mug with their name or their initials if they purchase a customized shirt. So the questions are:
- How to add a personalization box on Shopify using HTML
- How to add engraving option on Shopify
Let’s discuss the details.
2.1 How to add a personalization box on Shopify using HTML
Follow our step-by-step guides to add a personalization field to a product.
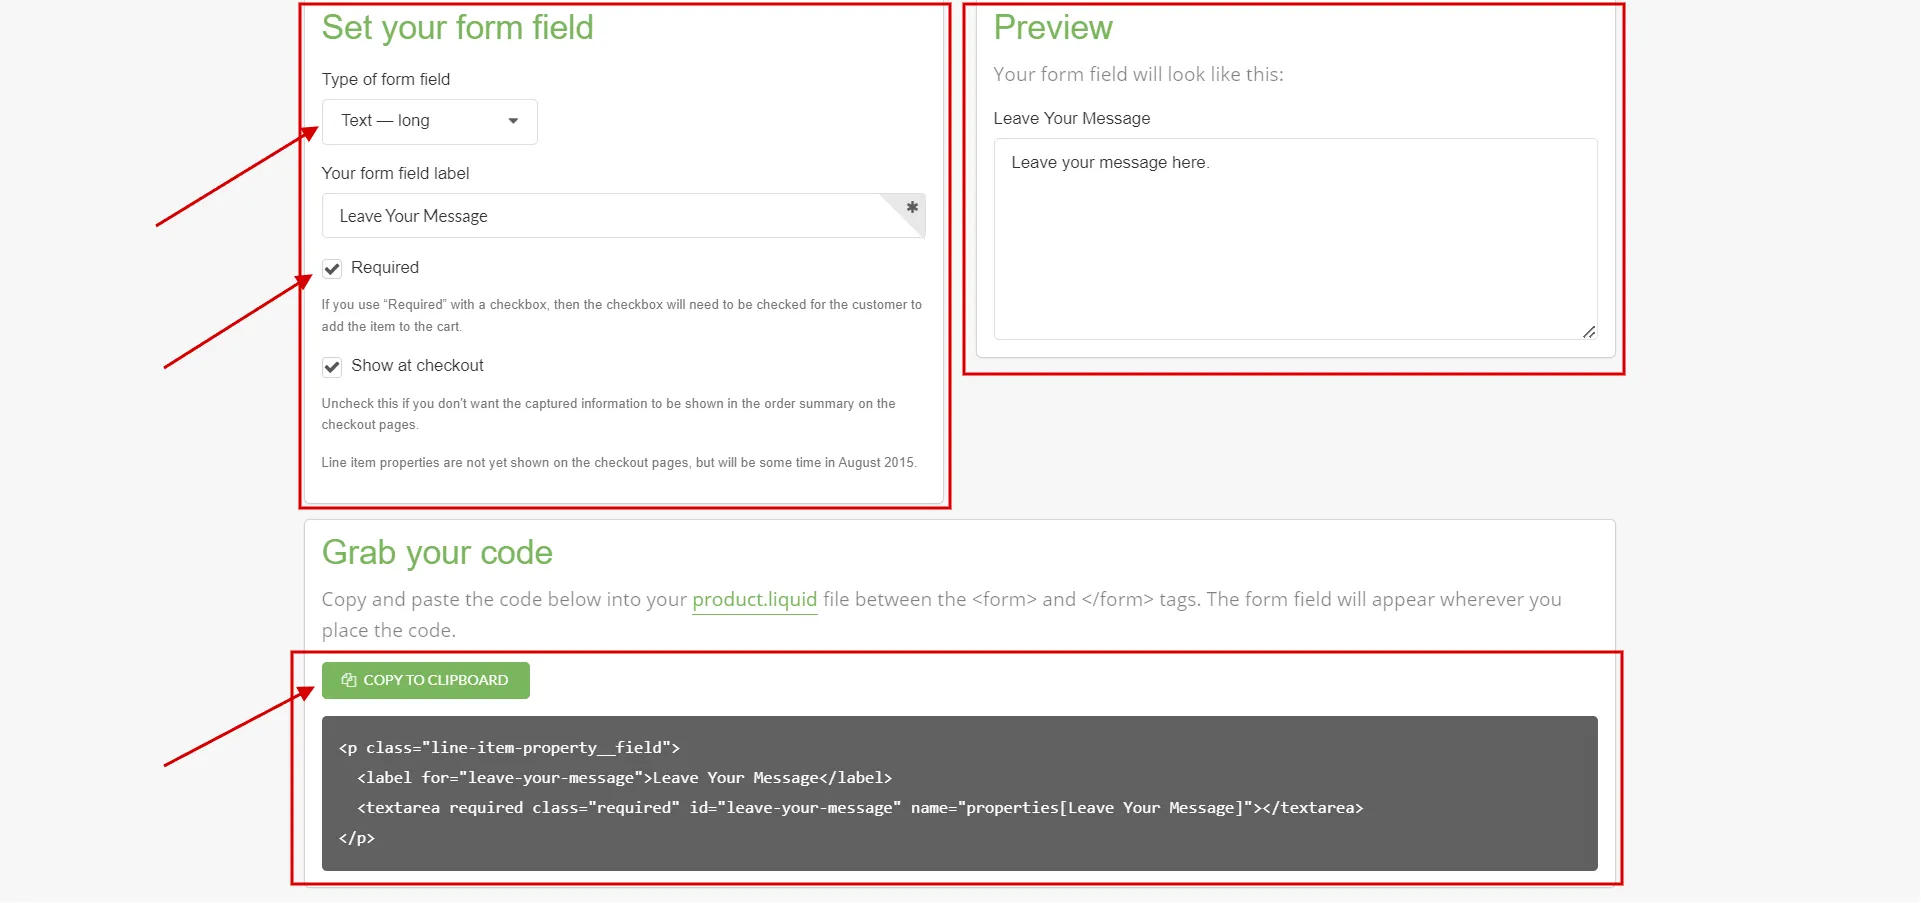
- Step 1: Create personalization box fields.
Go to the Shopify UI Elements Generator first. Choose the type of form element you want to use from the Type of form field drop-down menu in the Set your form field section.
Check Required if you want your theme to prevent users from adding items to shopping carts before filling out your form field.
The preview of your form field will then appear in the Preview section. From the box in the Grab your code section, copy the generated code.
- Step 2: Add personalization box Shopify.
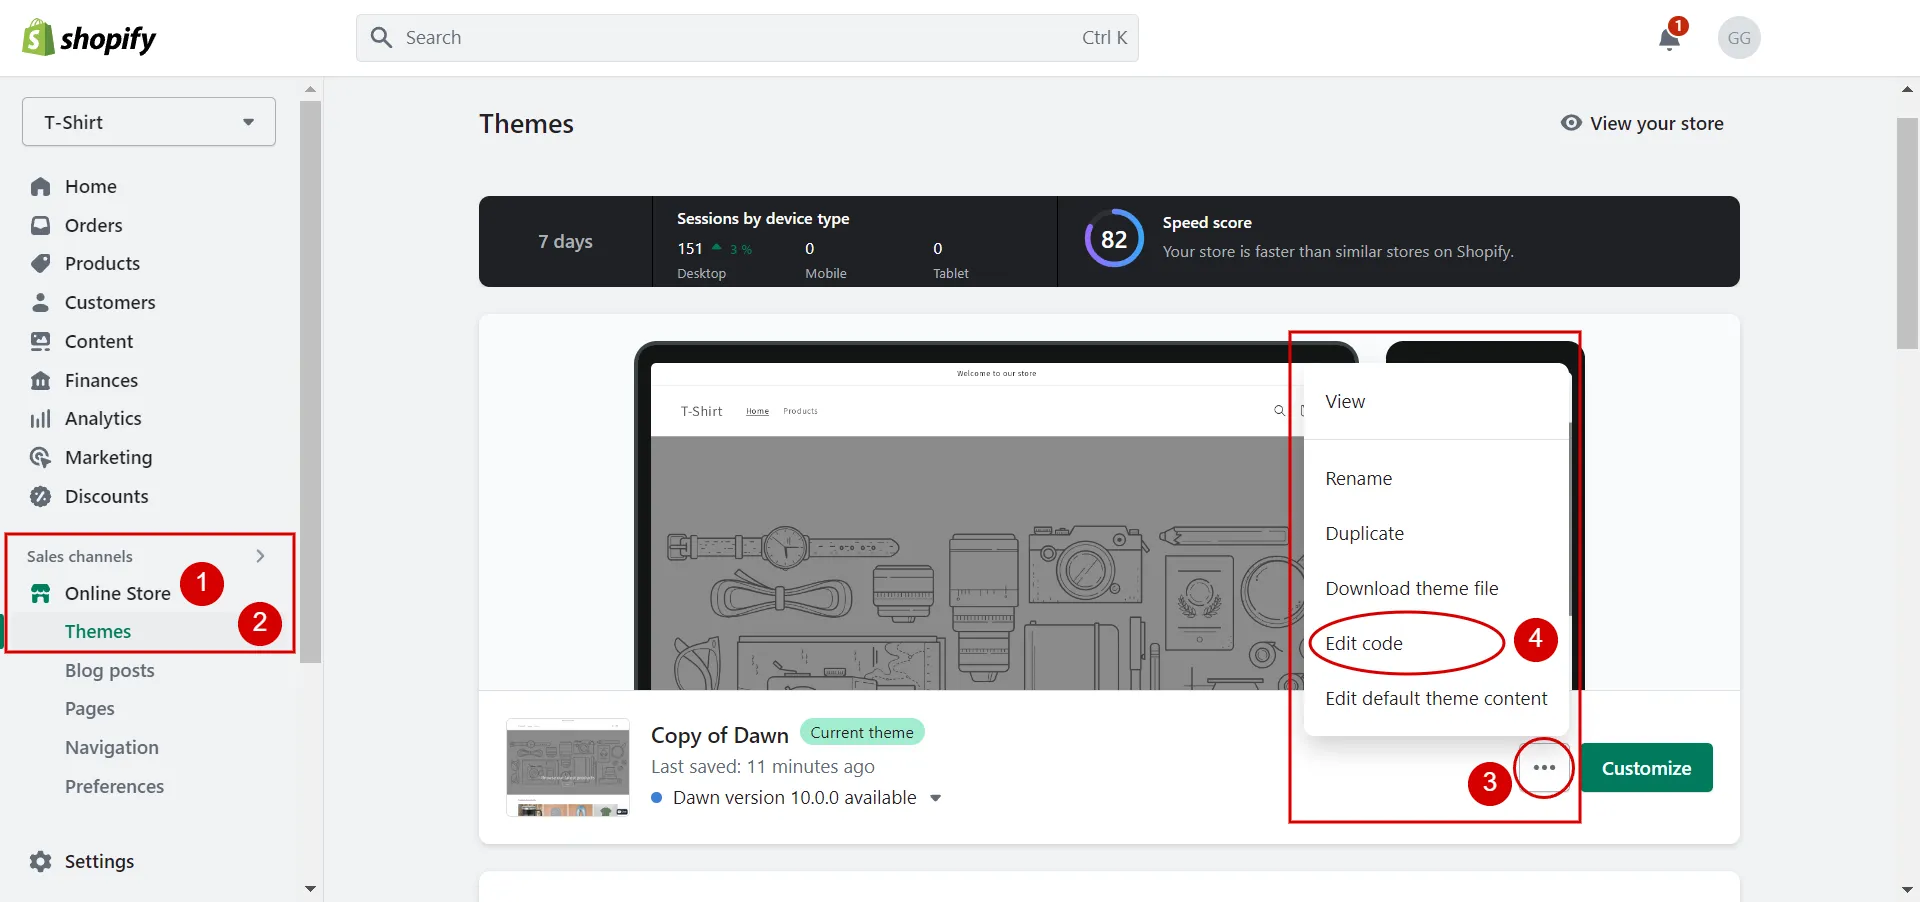
Next, you log in to your Shopify account, go to Online Store > Themes > click Actions > Edit code.
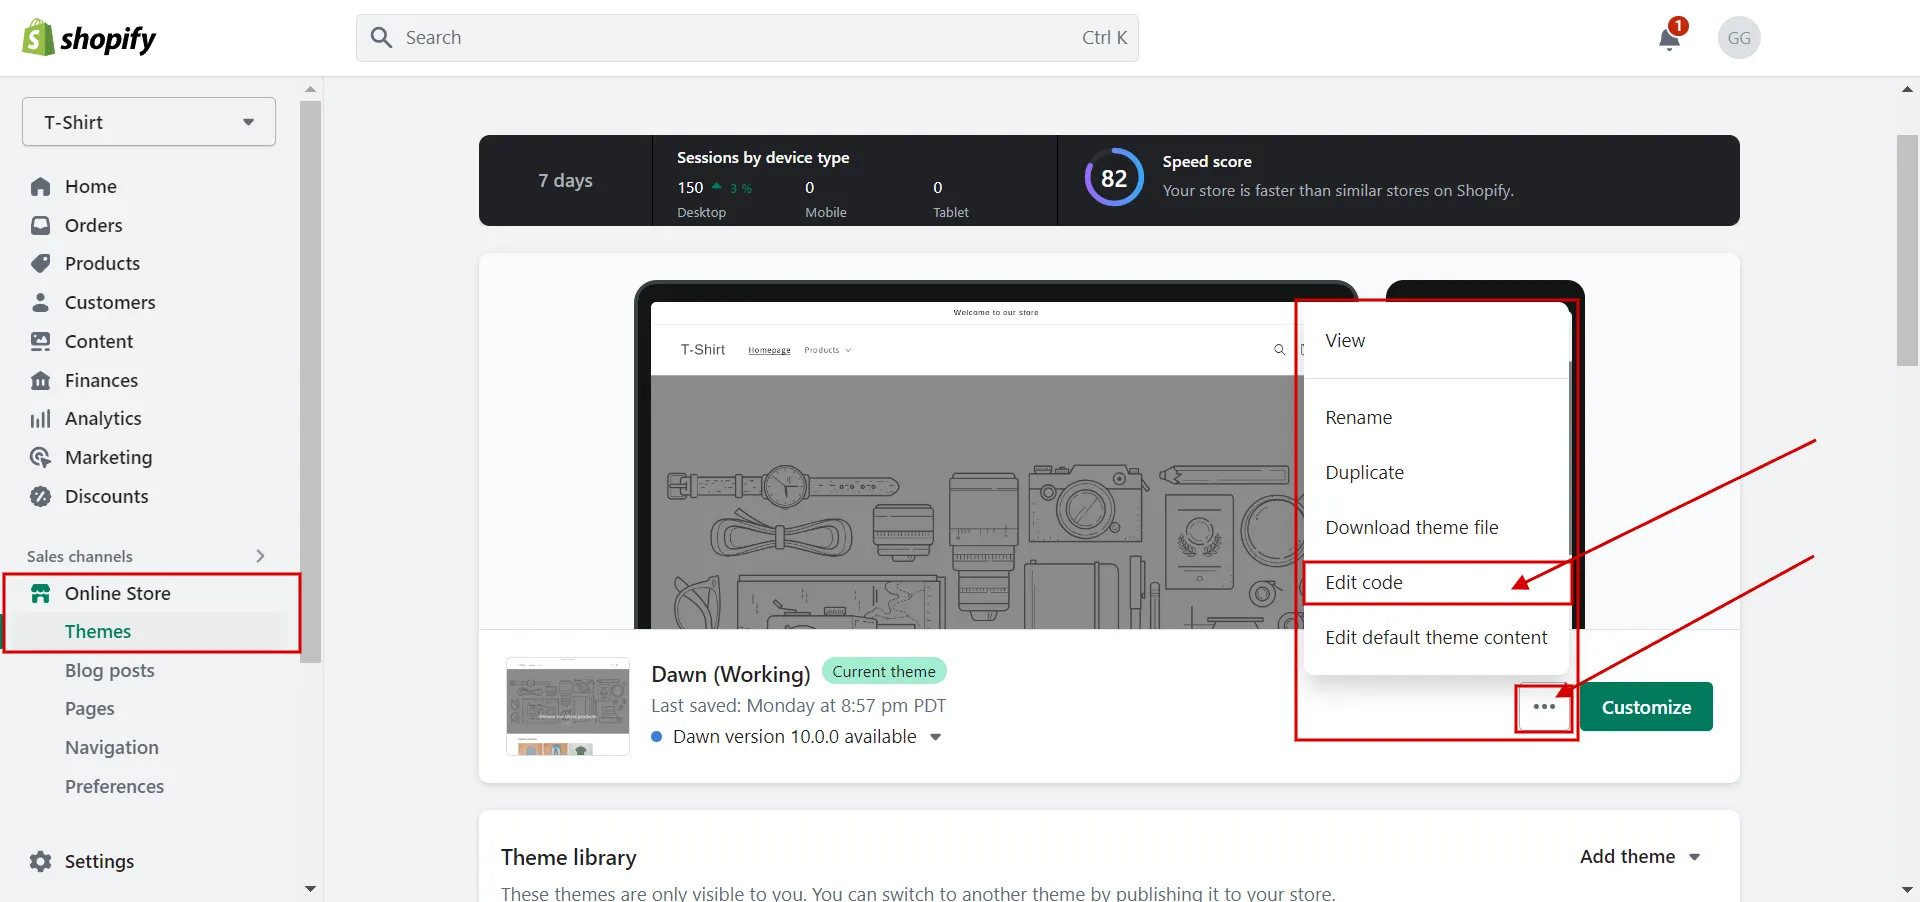
In the Theme Editor, choose product.liquid (1) from the Section folder, then paste the generated code in Step 1. Anywhere you put the code, the form field will show up (2).
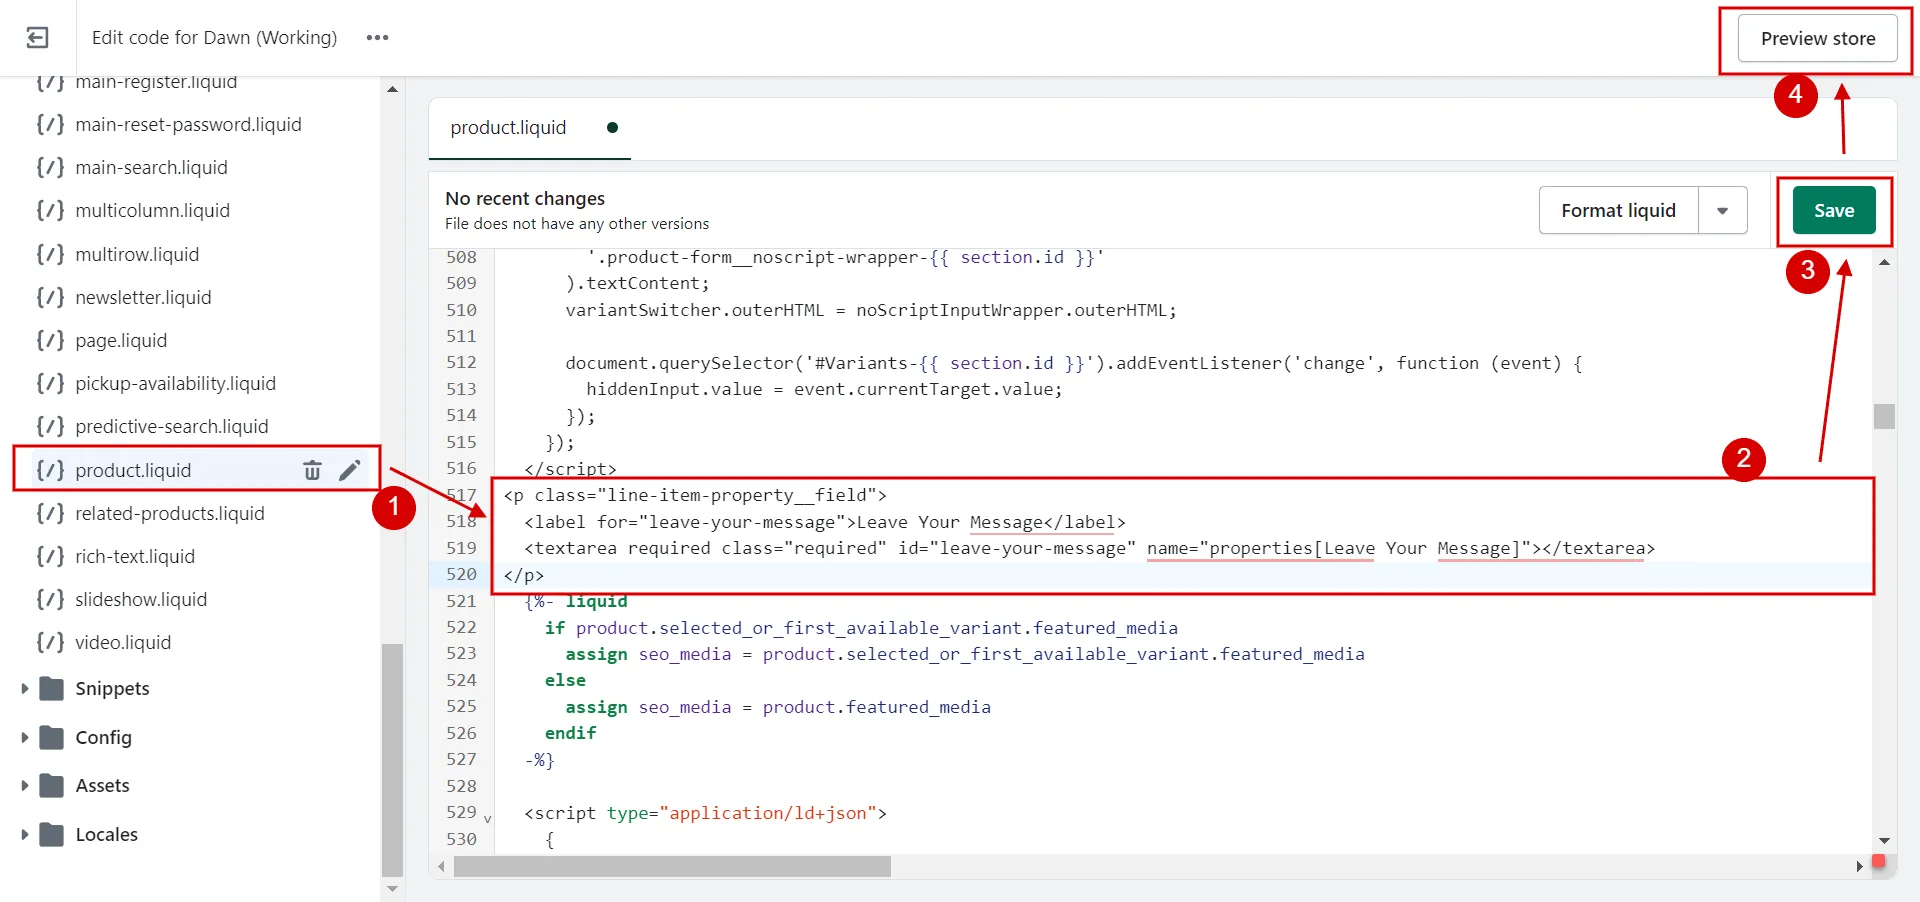
- Step 3: Save and Preview.
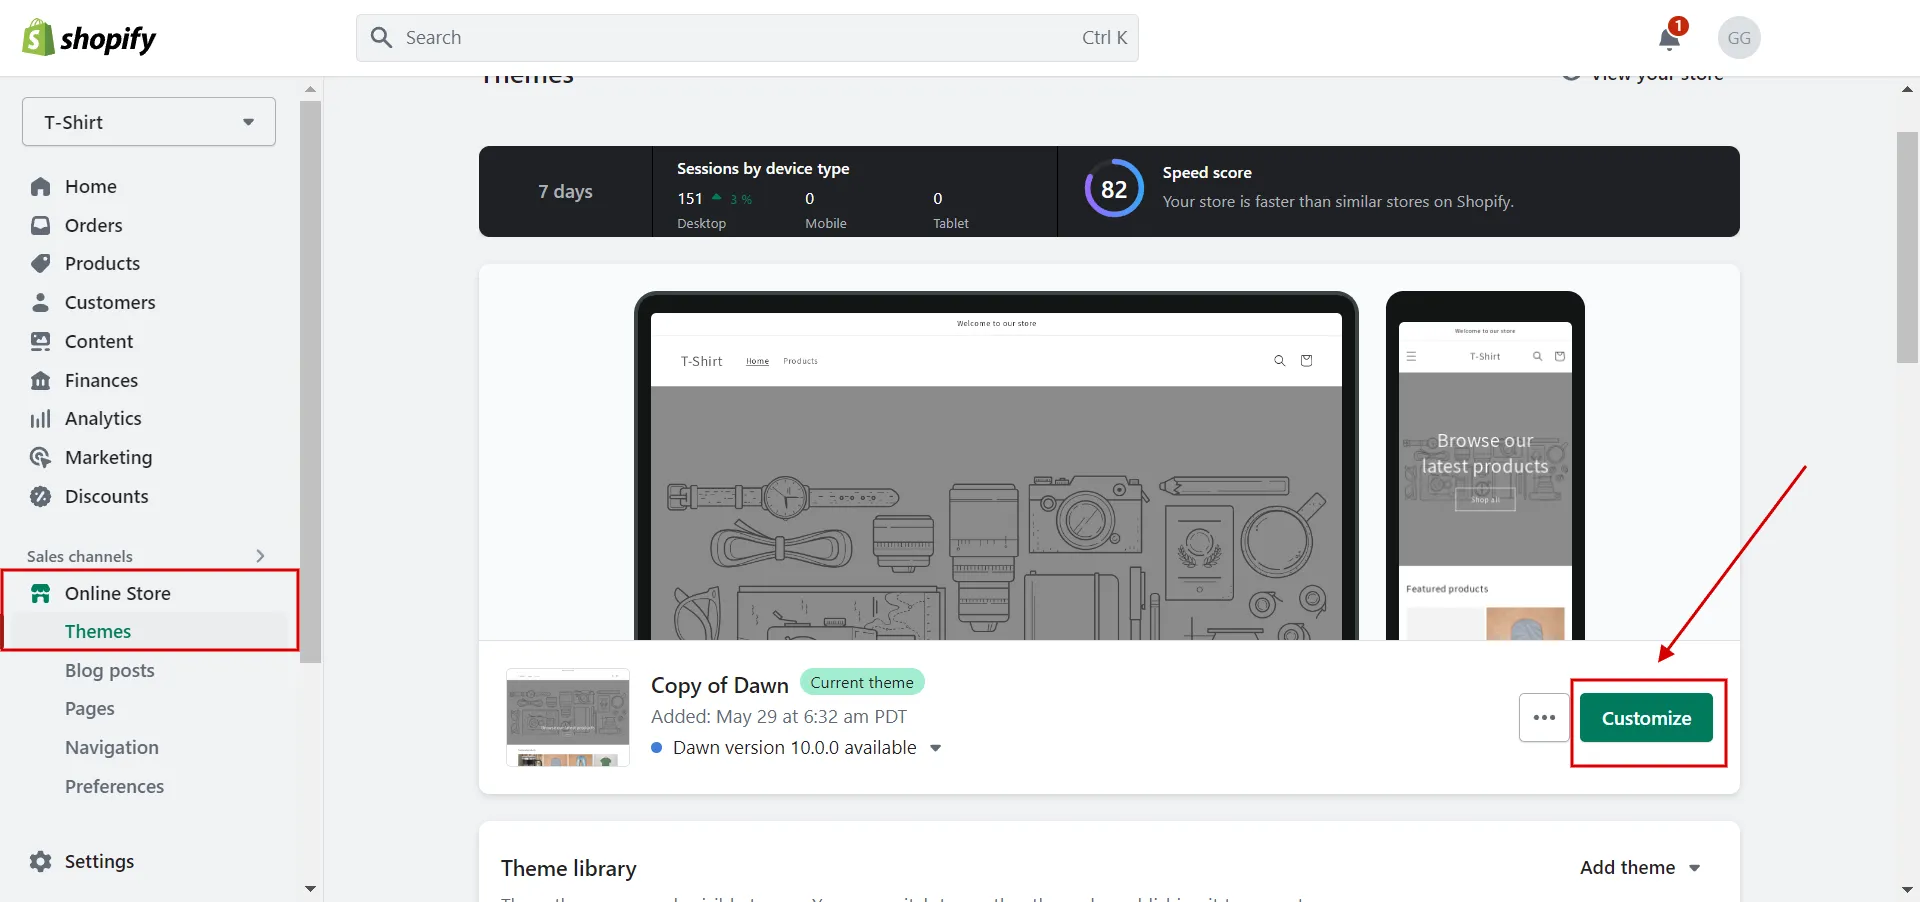
Finally, click Save (3) and Preview (4) to check the live page.
Where the form field appears on your product page depends on which line of code you use. Put the code in various locations throughout the file.

2.2 How to add engraving option on Shopify
Follow the steps to learn how to add personalization option on Shopify by engraving options.
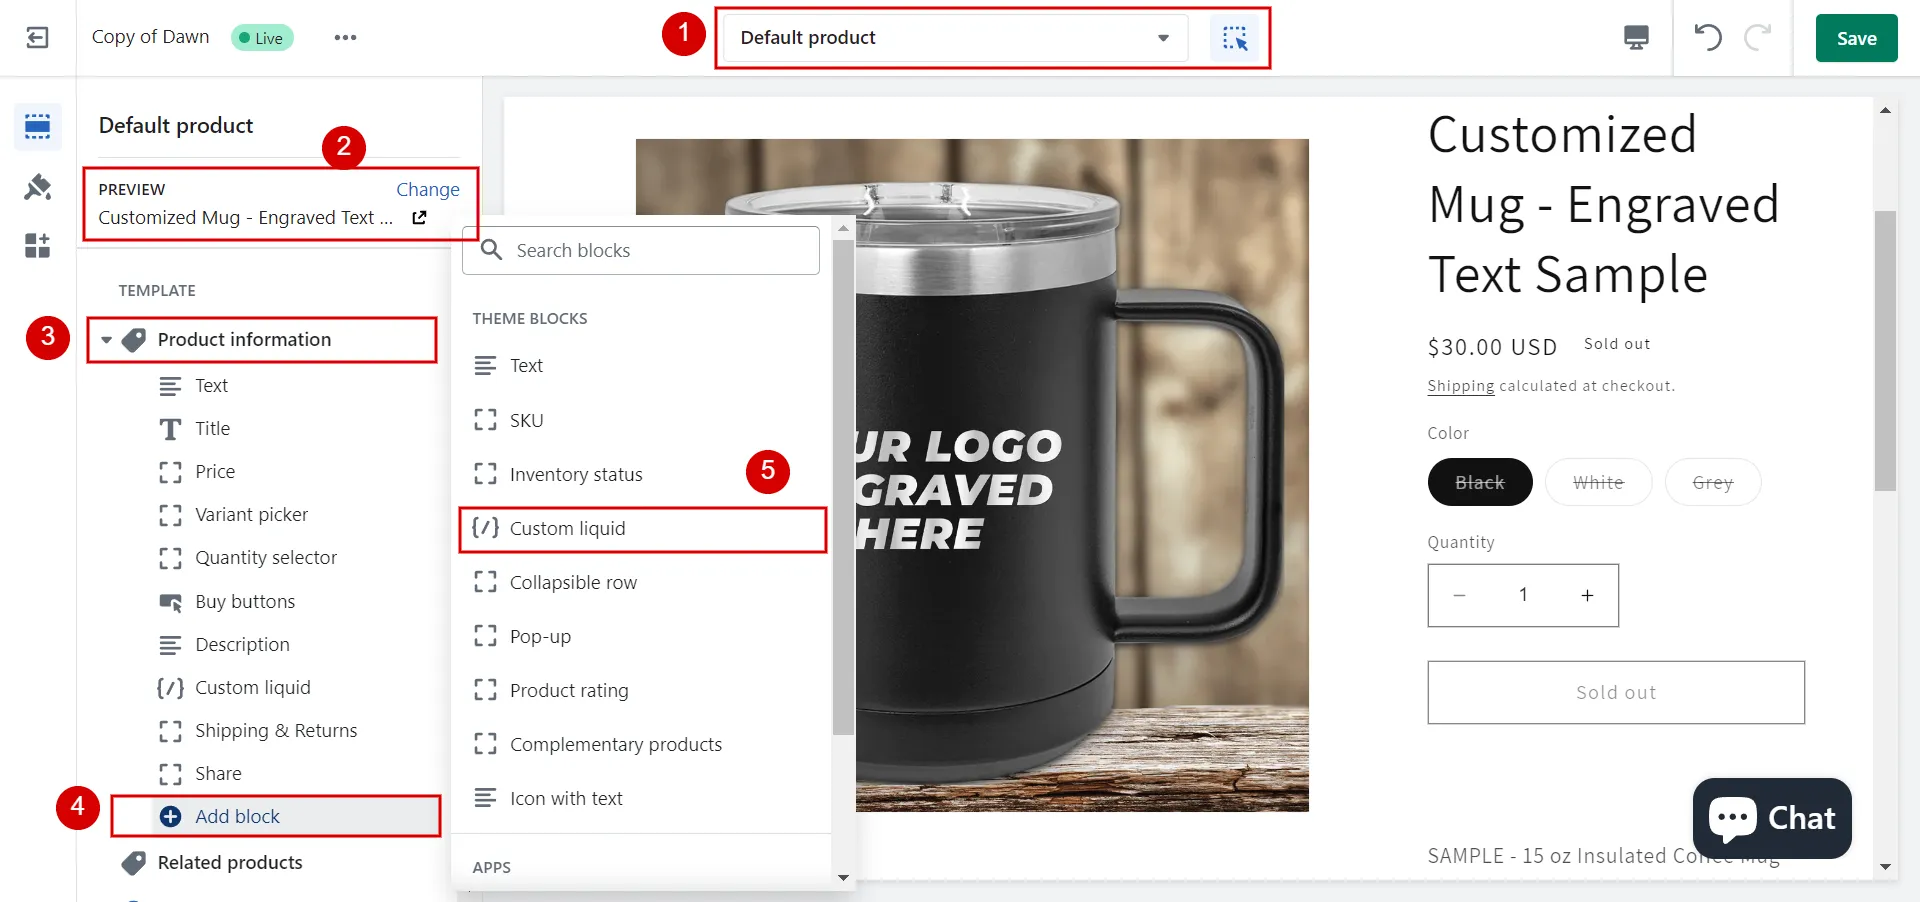
- Step 1: Add a custom liquid block.
First, navigate to Online Store > Themes > click Customize button.
In your theme editor, navigate to the default product page (1). Next, click Change in Preview tab to select the product page you want (2).
Then, in the Product Information tab (3), click Add block (4) > choose Custom liquid (5).
- Step 2: Add the code (for Dawn theme).
Once a custom liquid is created in the Dawn theme, you add the code below to it.
<label for=”engraving” class=”form__label”>Engraving :</label>
<div class=”field”>
<textarea id=”engraving” class=”text-area field__input” placeholder=”engraving ” name=”properties[engraving ]”form=”product-form-{{ section.id }}”></textarea>
</div>
Then, you can see the change in the preview screen.
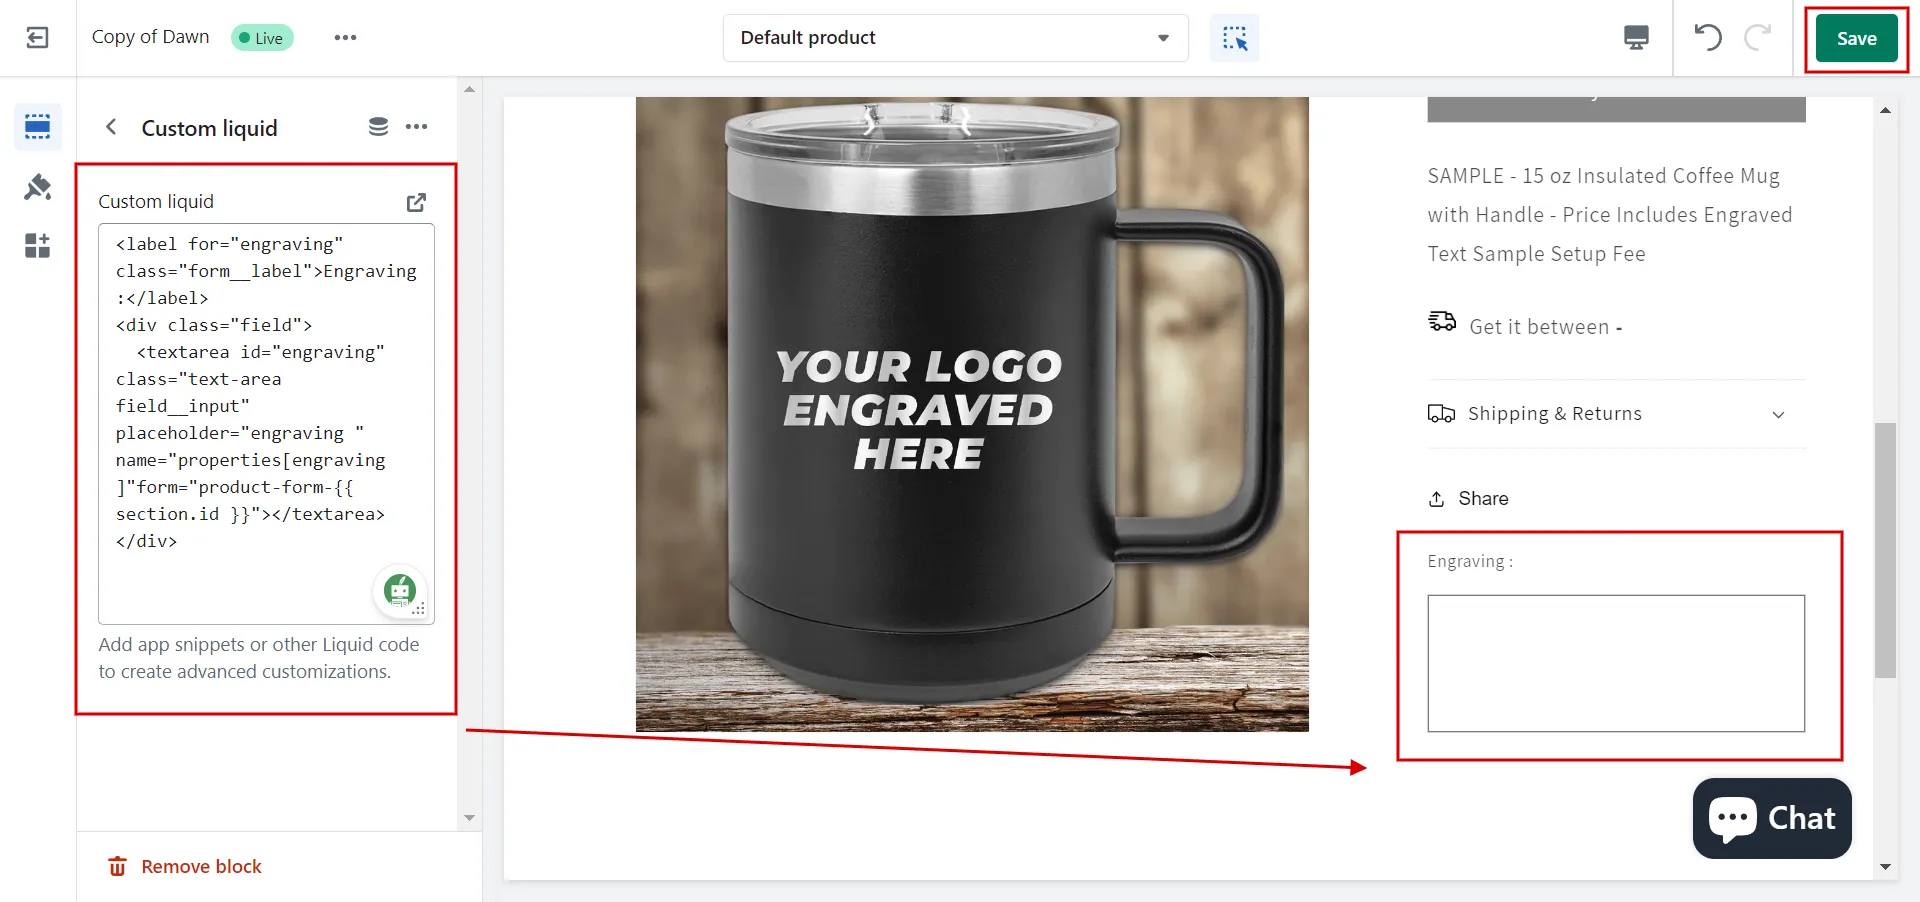
- Step 3: Save it.
Last, click Save when finished, and remember to recheck on the live page.
3. Product mockup
You can make your Shopify store unique by adding product mockups. Here is how to add personalization option on Shopify manually for new mockups:
- Step 1: Use design maker tools to generate mockups.
- Step 2: Go to Shopify, navigate to Products, and choose a specific product.
- Step 3: In the variants, select a variant image and click add image. Then upload your mockup design.
- Step 4: Save the changes.
4. Action buttons
Changing the appearance of the Add to Cart Button is one of the most typical personalization options on Shopify.
Follow our instructions to modify the Adding to Cart and Buy buttons using CSS code added to the theme.liquid file of the Dawn theme.
- Step 1: Open Code Editor.
Go to Online Store > Themes > Actions > Edit Code.
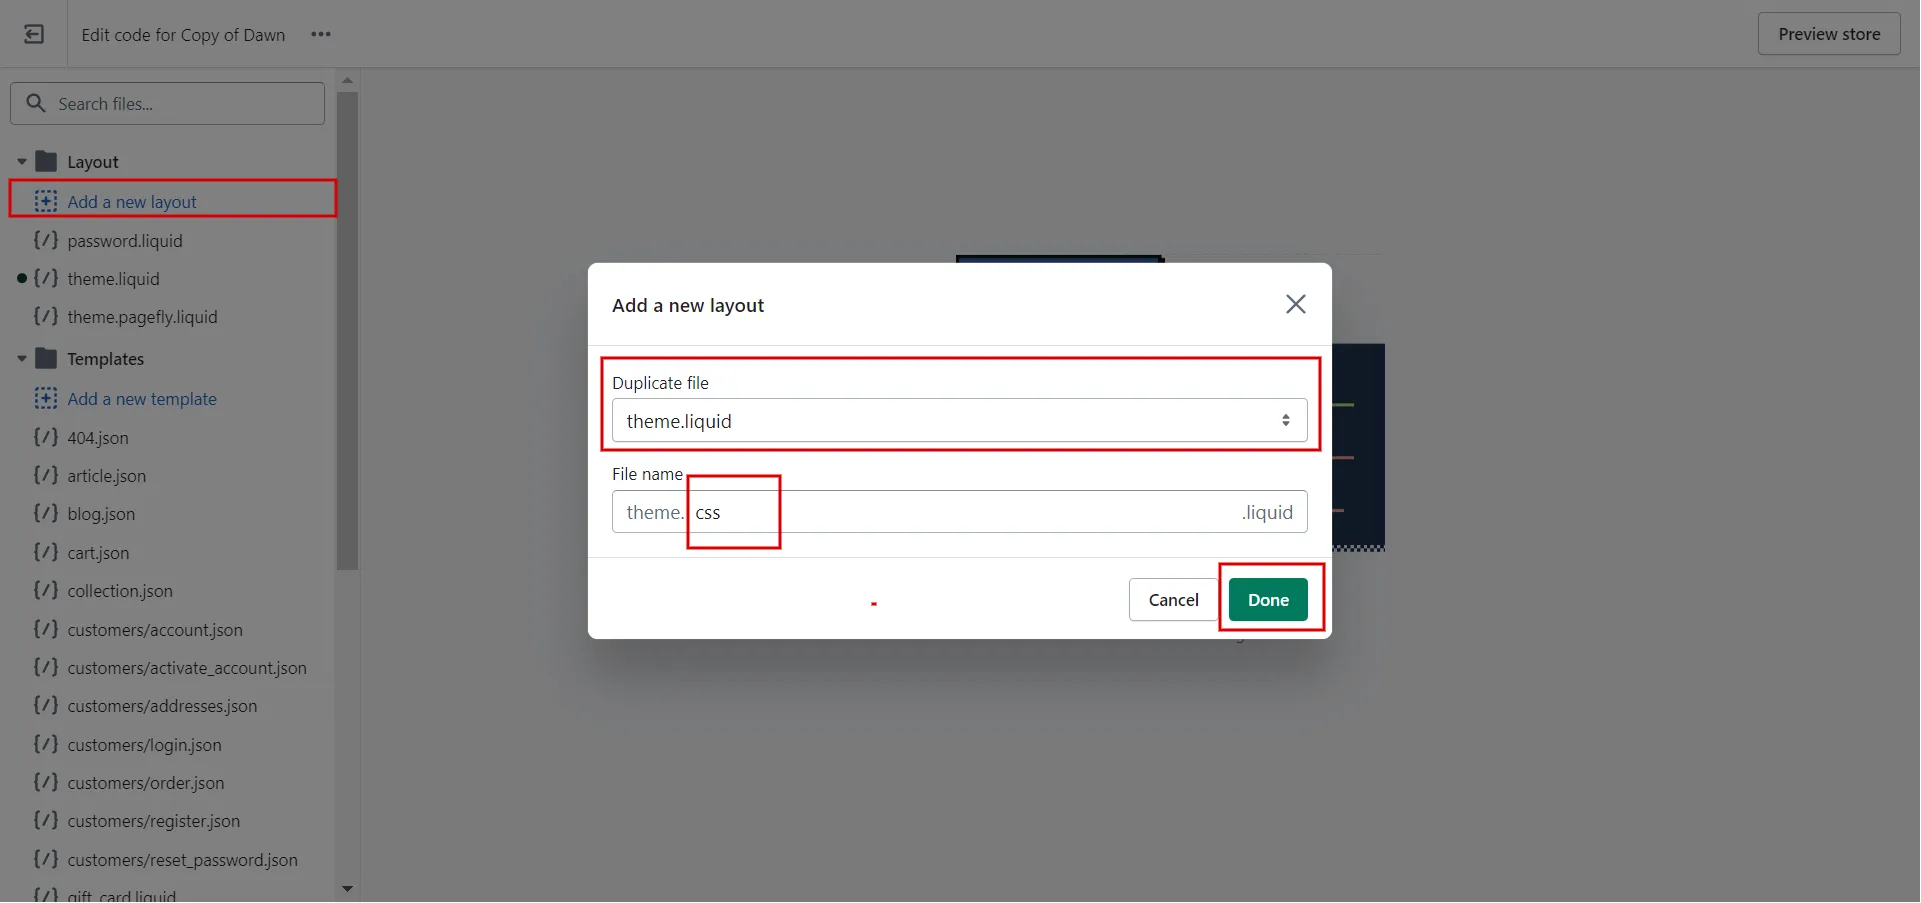
- Step 2: Create theme.css.liquid.
Click Add a new layout, then choose theme.liquid in duplicate file, then type css in file name. Click Done.
Once you created theme.css.liquid, you scroll down to the bottom, before </body> tag, add the code of Add to cart button and Buy it now button.
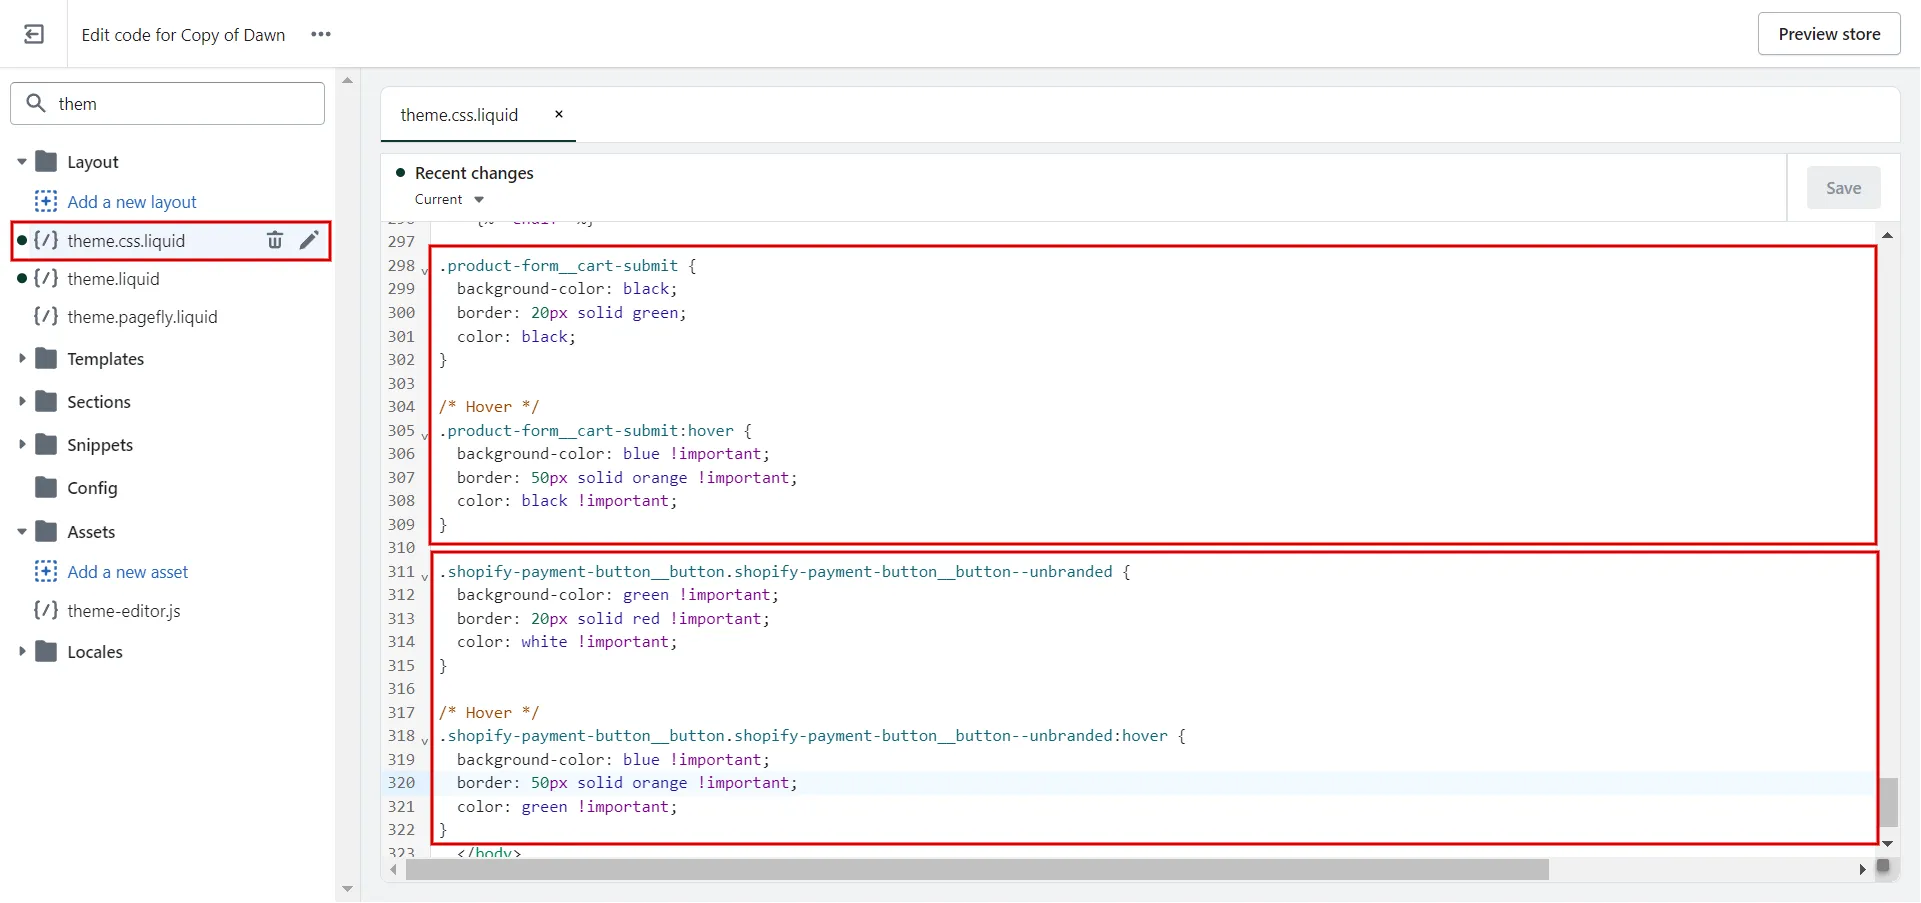
- Step 3: Edit the values.
You can change the code to modify the button's background color, border, and color.
- Step 4: Click Save.
From now, you know how to add personalization option on Shopify, from adding different variants and editing product mockups to changing action buttons…
Learn more about how to add custom text field on Shopify product pag immediately!
Best Apps for Adding Personalization Options on Shopify
You can install a free or paid Shopify personalization app from the Shopify App Store to easily Shopify custom products.
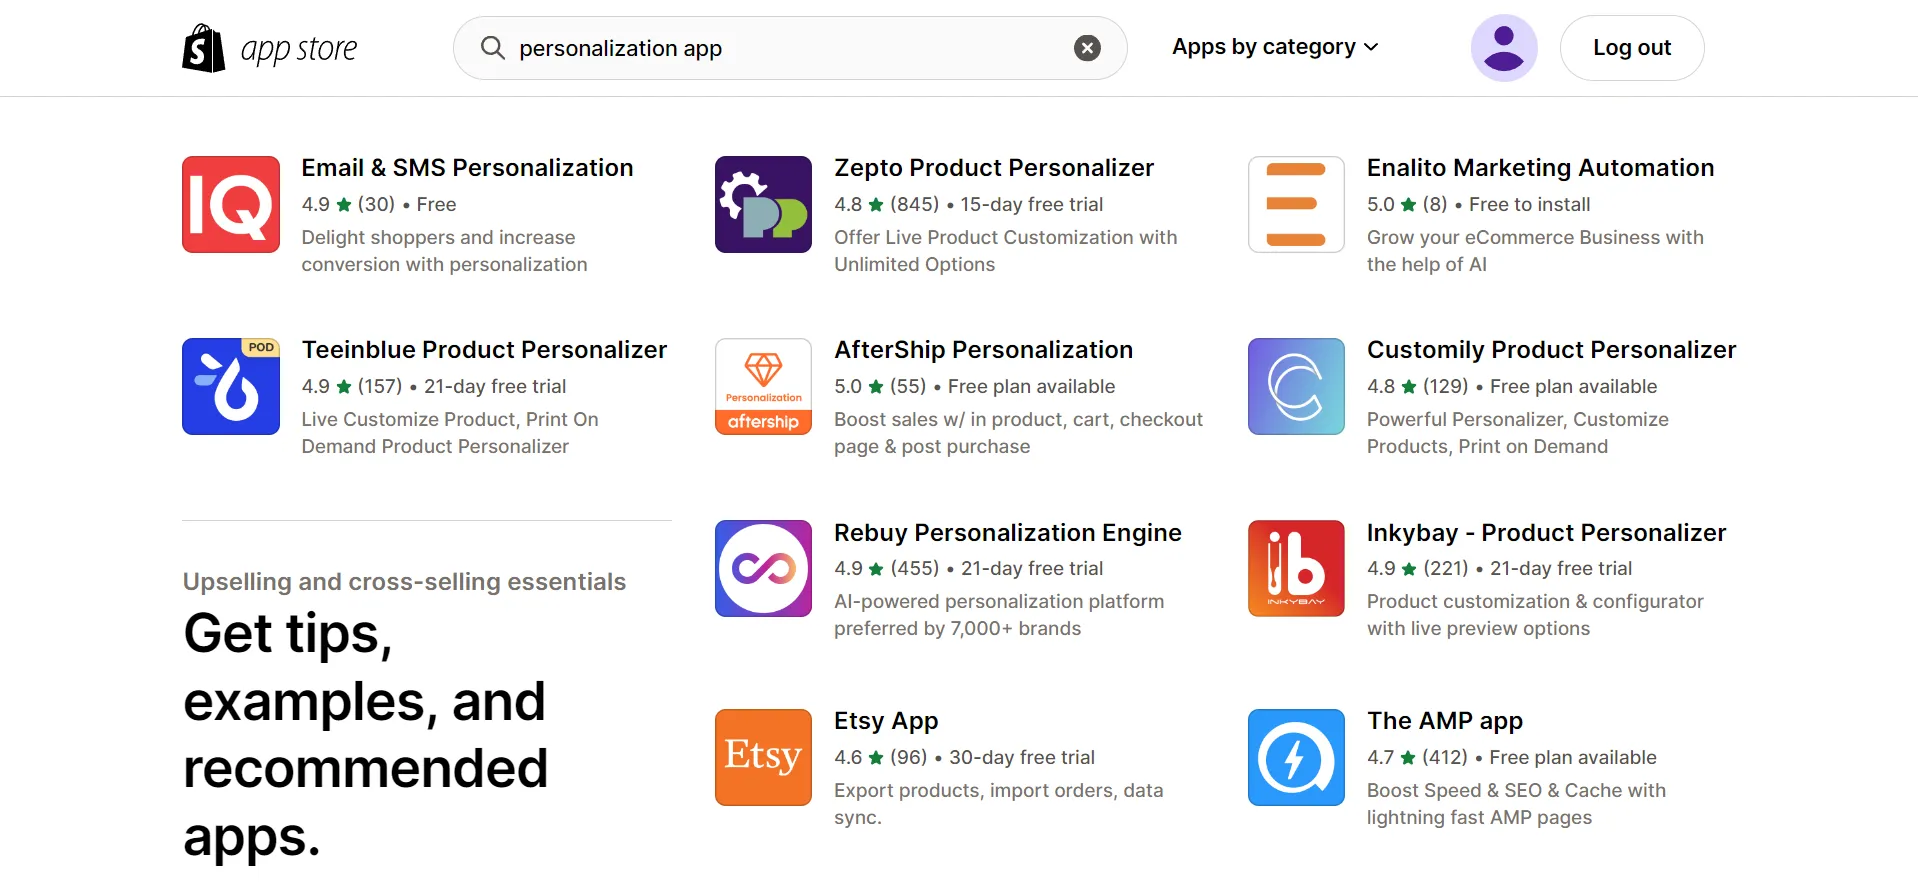
Here are some common Shopify personalization apps:
- Smart Customizer: customers can add color, text, vector shapes, or images, enhancing sales and reducing returns.
- Teeinblue Product Personalizer: customers can customize text, images, street maps, star maps, vectors, and top-trending personalization options with real-time previews.
- Custom Product Builder: customers can create unique products using 2D transparent images, similar to Photoshop layers, and add custom text and images to product views.
- Customily: customers can personalize products with unlimited customization options and live previews.
- Kickflip Customize Products: customers can add component options, color variants, and images to custom products, displaying live previews from multiple perspectives.
- Qstomizer ‑ Custom products: customers can personalize t-shirts, canvases, jewelry, mugs, and dog collars using over 200 pre-made or custom-created product templates.
Personalization on Shopify – FAQs
Does Shopify offer personalization?
Yes, you can personalize your online store to improve the user experience:
- Product recommendations are dynamically presented to your customers based on their actions, such as browsing history.
- Smart reviews include additional details about the reviewer, such as their height, location, and skin tone.
- Immersive experiences use augmented reality and 3D images to simulate in-person shopping.
- Easy returns close the circle on the personalized experience requiring having an accessible and welcoming return process.
- Smart sizing charts help shoppers buy confidently because they know the proper size.
How to add custom text field on Shopify product page?
Follow our instructions on using Shopify's built-in customization tool to add a personalization field to a product.
- Step 1: Go to Online Store > Themes.
- Step 2: Click to Customize the current theme.
- Step 3: Go to the product page template.
- Step 4: From there, you can add fields for text, images, or other information that you want customers to be able to add to their orders.
- Step 5: Save changes.
How do I customize my Shopify look?
There are 4 ways to customize your Shopify store’s appearance.
- Find the ideal theme in the Shopify theme store
- Change your theme settings to adjust the appearance of your store
- Establish templates.
- Utilize Shopify apps to personalize your store and add more sections.
Can I personalize items on Shopify?
Yes, you can add Shopify custom products for your customers. Any product in your shop can add a personalization box Shopify, allowing customers to add their custom text when they purchase.
How to customize themes on Shopify
Here are the details to customize themes to suit your brand:
- Step 1: Go to Online Store > Themes.
- Step 2: Click Customize next to the theme you want to personalize.
- Step 3: In the theme editor, customize settings, checkout, store design, templates, sections, blocks, and more.
- Step 4: Save it.
Summing-Up
In conclusion, it is possible to manually customize products in your Shopify store or use Shopify personalization apps. We hope that in our article “How to Add Personalization Option on Shopify,” you can successfully edit the personalization option for your products.
LitExtension, the #1 Shopping Cart Migration Expert, offers the most simple solution for your Shopify store. Visit our LitExtension blog and eCommerce community for additional advice on managing your online store.

