WooCommerce export orders can be done in many ways, depending on the format you need and how detailed the export should be. Currently, WooCommerce offers both built-in tools and plugin-based options, giving you plenty of flexibility.
In this guide, we’ll show you how to export orders from WooCommerce store with and without plugins, including the following methods:
- Method 1: Using WooCommerce reports
- Method 2: Using WooCommerce analytics
- Method 3: Using the WordPress order export tool
- Method 4: Using plugins
Let’s get started!
Method 1: Using WooCommerce Reports
The WooCommerce reports section gives you a quick way to export basic order data. It's ideal when you want a sales summary without diving into too many details. From your WordPress dashboard, go to WooCommerce > Reports.
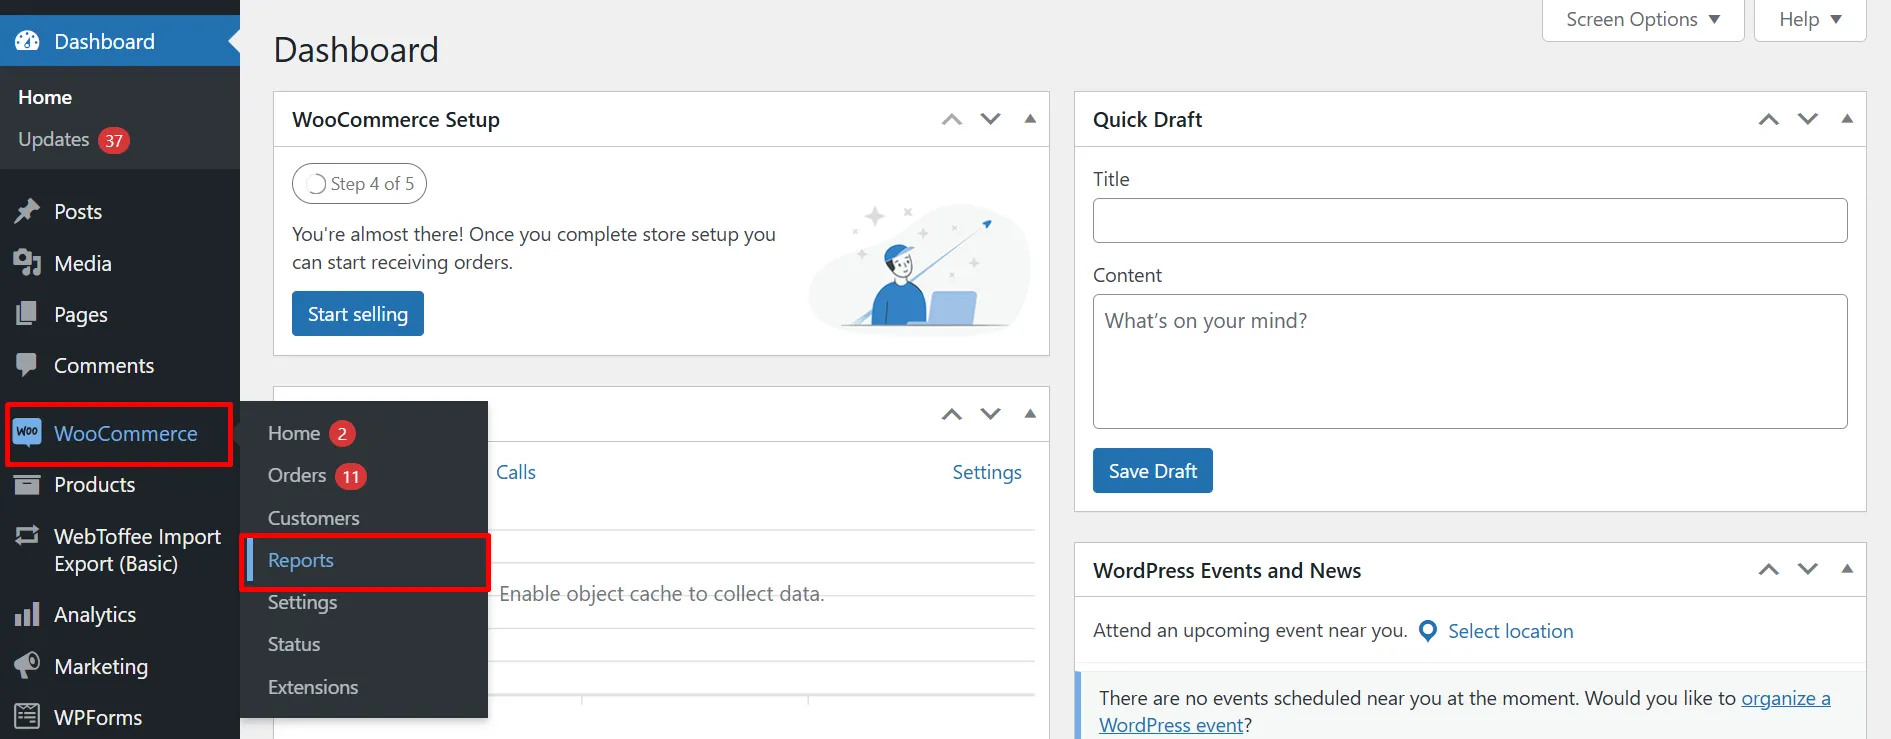
Here, WooCommerce organizes data into three categories: Orders, Customers, and Stock. Under the Orders tab, you’ll find multiple report types like:
- Sales by date;
- Sales by product;
- Sales by category;
- Coupon by date;
- Customer downloads.
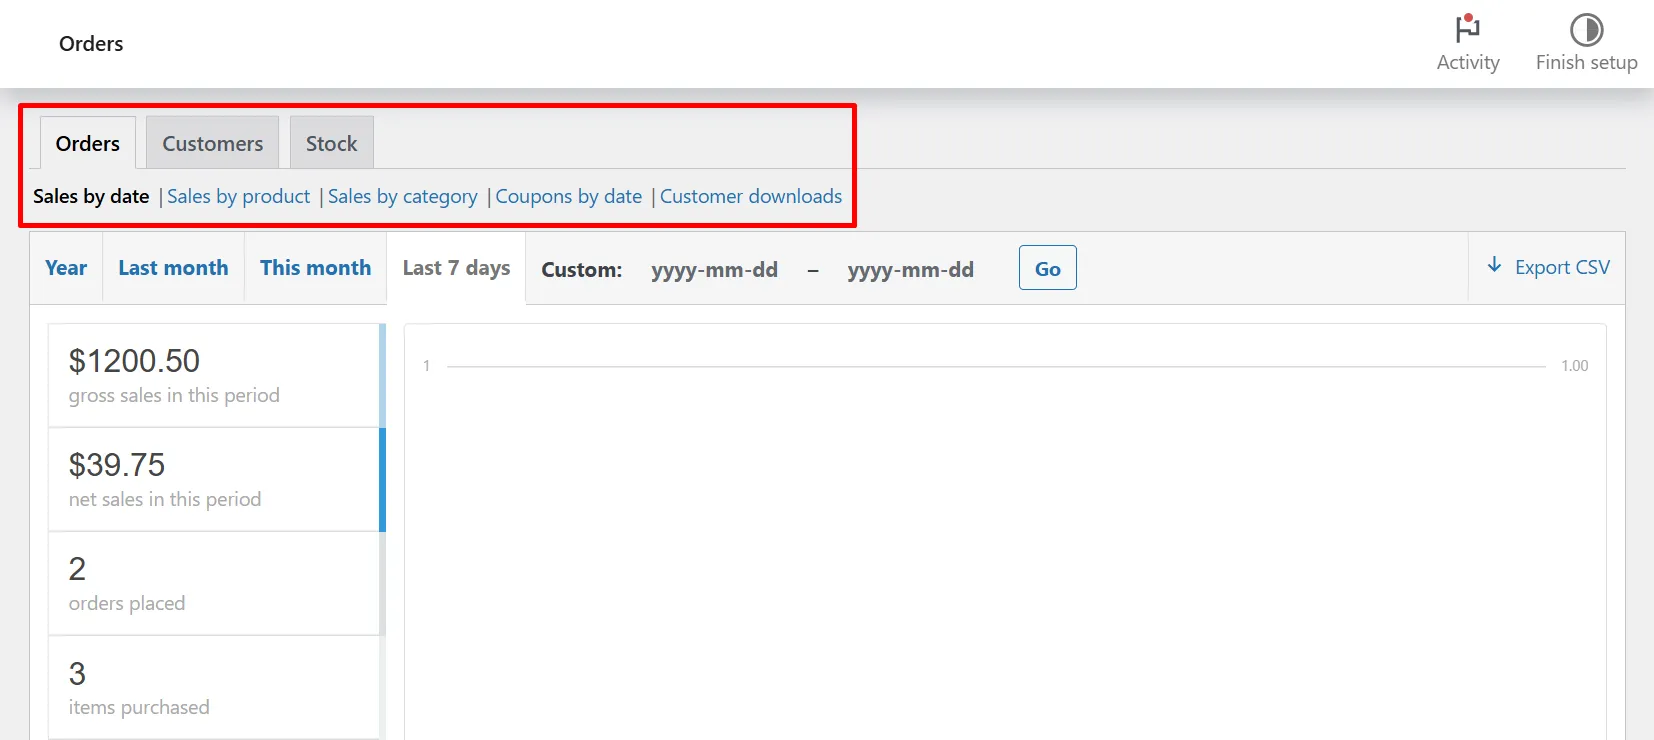
Select the type of data you want, then set the desired time period. You can choose from default options like “Last 7 days” or enter a custom range.

Once the data is loaded, click the Export CSV button. WooCommerce will generate and download a spreadsheet file containing your selected report.
After downloading, you’ll see the data organized into columns – such as product names, order totals, and dates. From there, you can edit, filter, or restructure the spreadsheet as needed.
Who should use this method?
This method is best for store owners who only need a quick overview of their sales performance rather than a full order export. If you’re preparing simple reports for accounting, tracking revenue trends, or analyzing product performance over a specific period, the WooCommerce reports tool is enough.
Method 2: Using WooCommerce Analytics
Another method for WooCommerce export orders that you can consider is the WooCommerce Analytics. In fact, WooCommerce is gradually directing users toward WooCommerce Analytics as the go-to reporting tool. It provides a quick, visual overview of your store’s orders, with more detailed filtering and configuration options. This makes it ideal for high-level reporting or spotting sales trends over time.
However, keep in mind that WooCommerce Analytics does not include full order details. You won’t get complete product line items, customer addresses, or shipping information. For deeper exports or bulk editing, you'll want to use Method 1 or Method 3 instead.
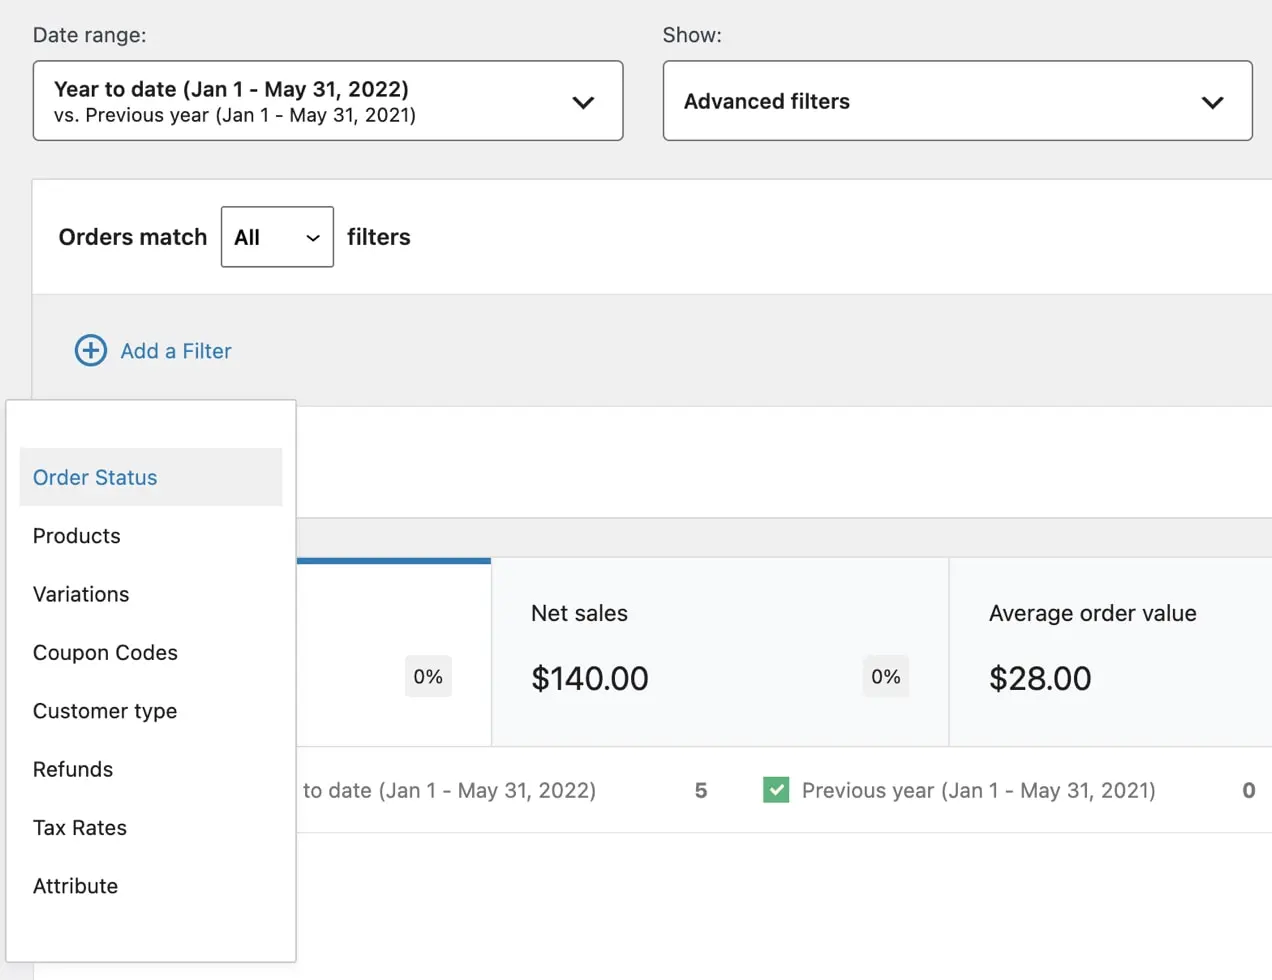
To get started on WooCommerce export orders, go to WooCommerce > Analytics > Orders. Choose a date or custom range, and then apply filters like:
- Order status;
- Products or variations;
- Coupon codes;
- Customer type;
- Refunds;
- Tax rate;
- Attributes.
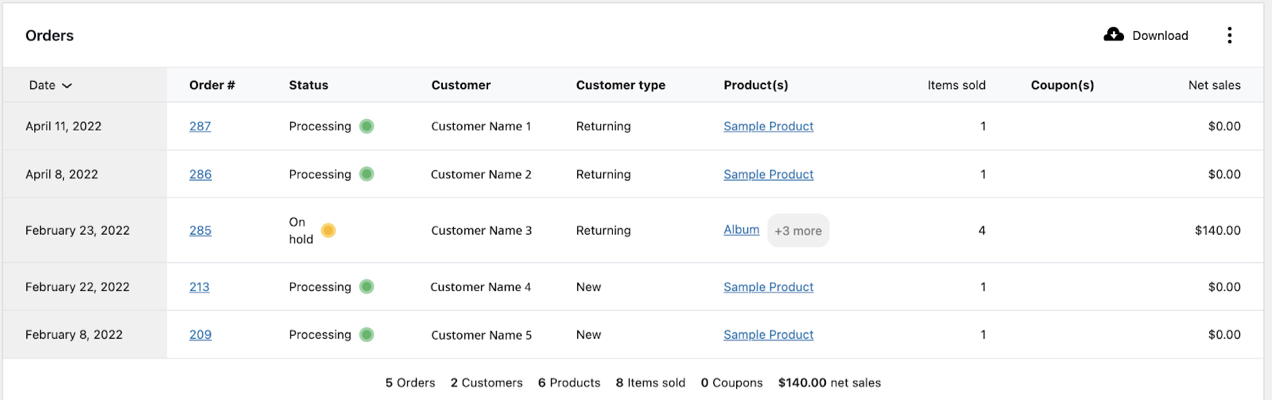
Once your results load, you’ll see columns like:
- Order date and number;
- Status;
- Customer name and type;
- Products purchased;
- Items sold;
- Coupons applied;
- Net sales.
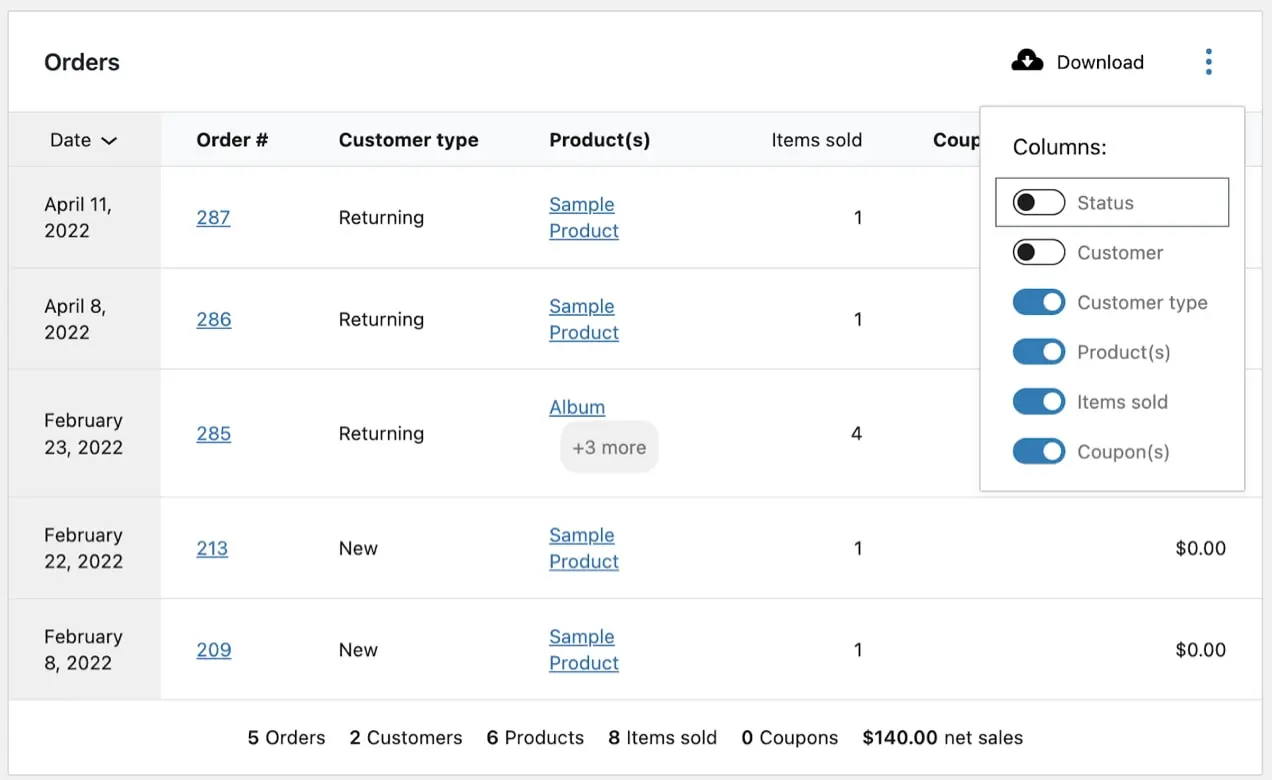
You can customize the report view by clicking the (⋮) in the top right corner and toggling columns on or off. When you’re happy with the data shown, click “Download” to export the file as a CSV.
Who should use this method?
WooCommerce Analytics is ideal for merchants who want a more visual, high-level view of their order performance without needing every detail. It’s especially useful for spotting sales trends, filtering data by specific conditions, or generating reports for management and marketing.
Method 3: Using the WordPress Order Export Tool
Another way to export orders is through WordPress’s built-in export feature. You’ll find it under Tools > Export in your WordPress dashboard.
On the export screen, select “Orders” from the list of available post types (be careful not to choose “Order”).
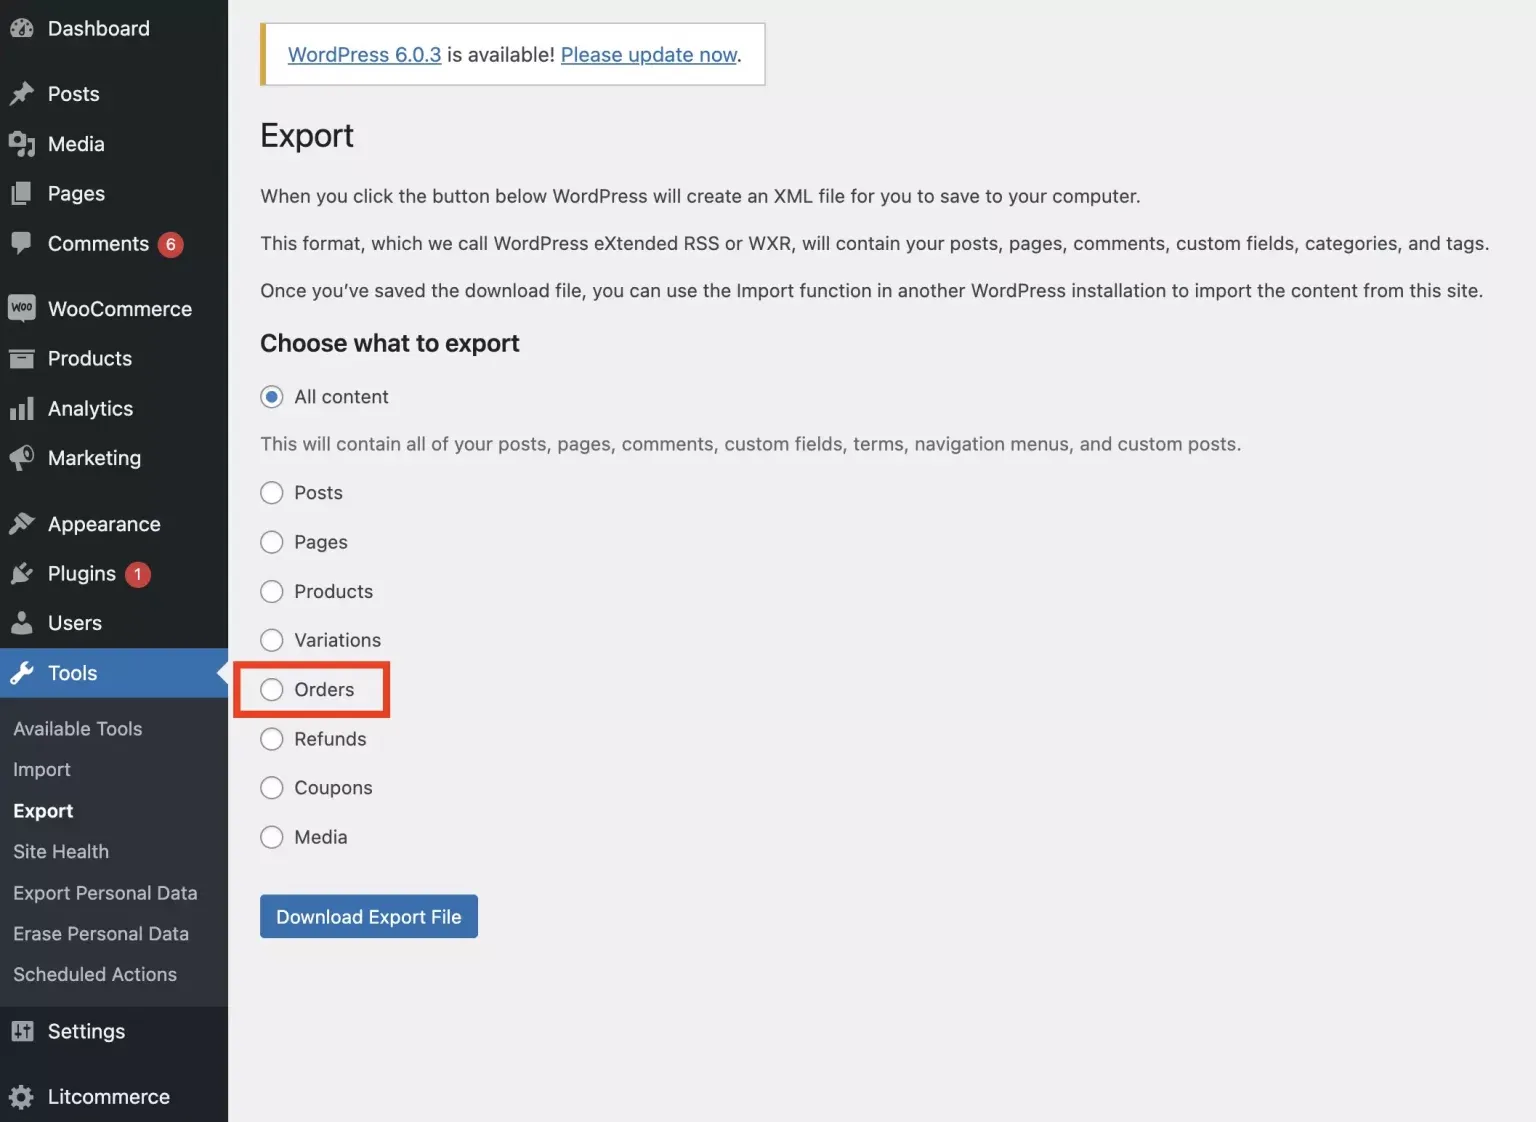
Then, click the “Download Export File” button to generate an XML file containing your WooCommerce orders.
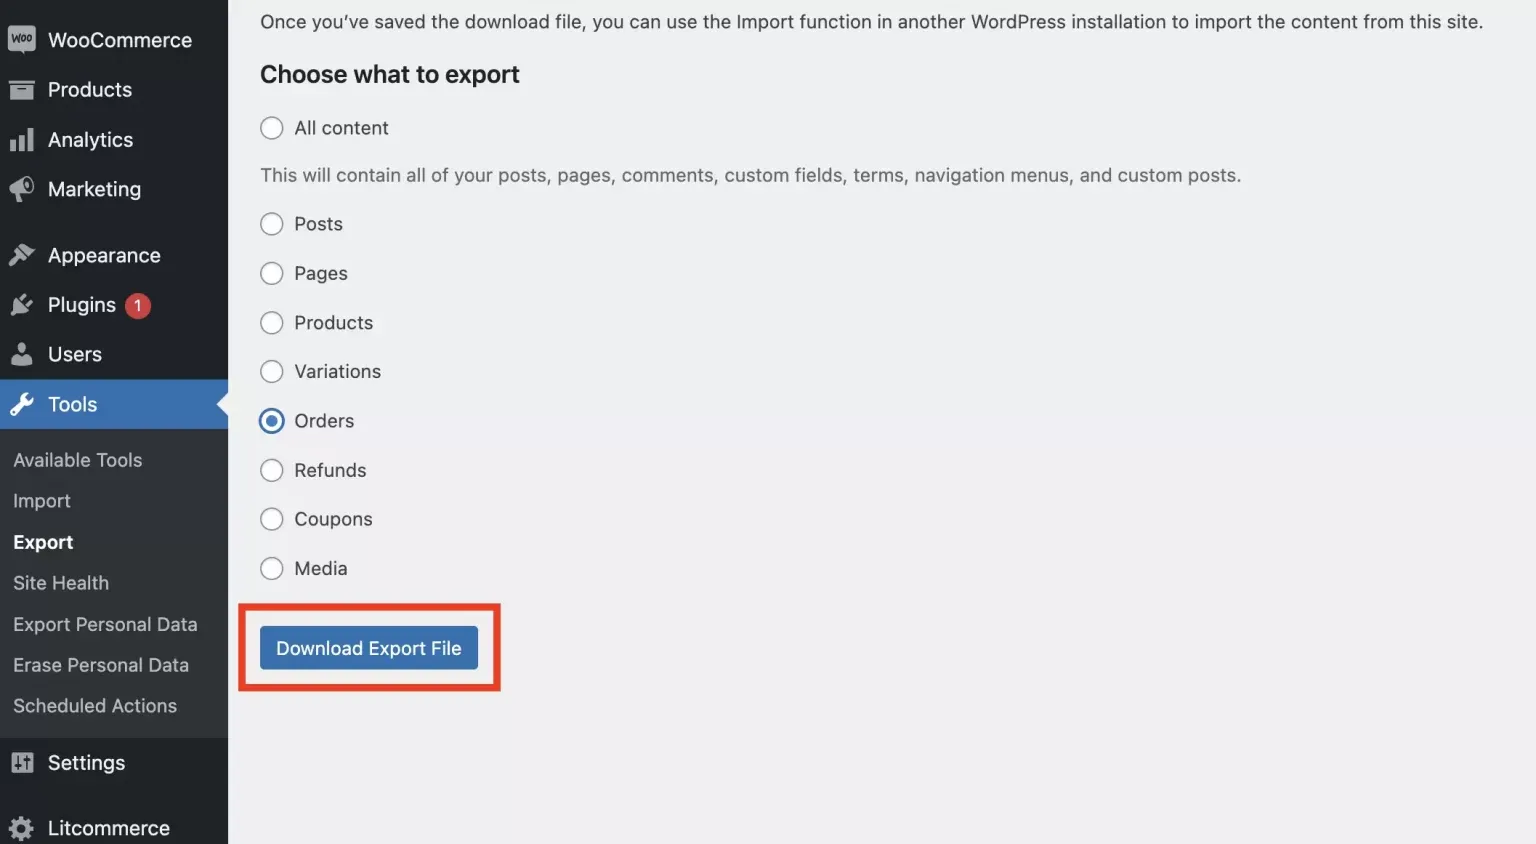
This method is simple and works well if you're importing data into another WooCommerce site. However, it has limitations. The export won’t include product names or quantities, and the XML format isn't ideal for analysis. You may need to convert it into a CSV file for easier viewing or editing.
Who should use this method?
This method for WooCommerce export orders works best for store owners who only need a basic order export for site-to-site migration or backup purposes. If you’re moving orders between WooCommerce installs or handing data to a developer who prefers working with XML, this option is simple and reliable.
As you can see, WooCommerce offers a few different ways to export orders manually. These methods work well for simple needs or occasional exports.
Method 4: Perform WooCommerce Export Orders Using Plugins
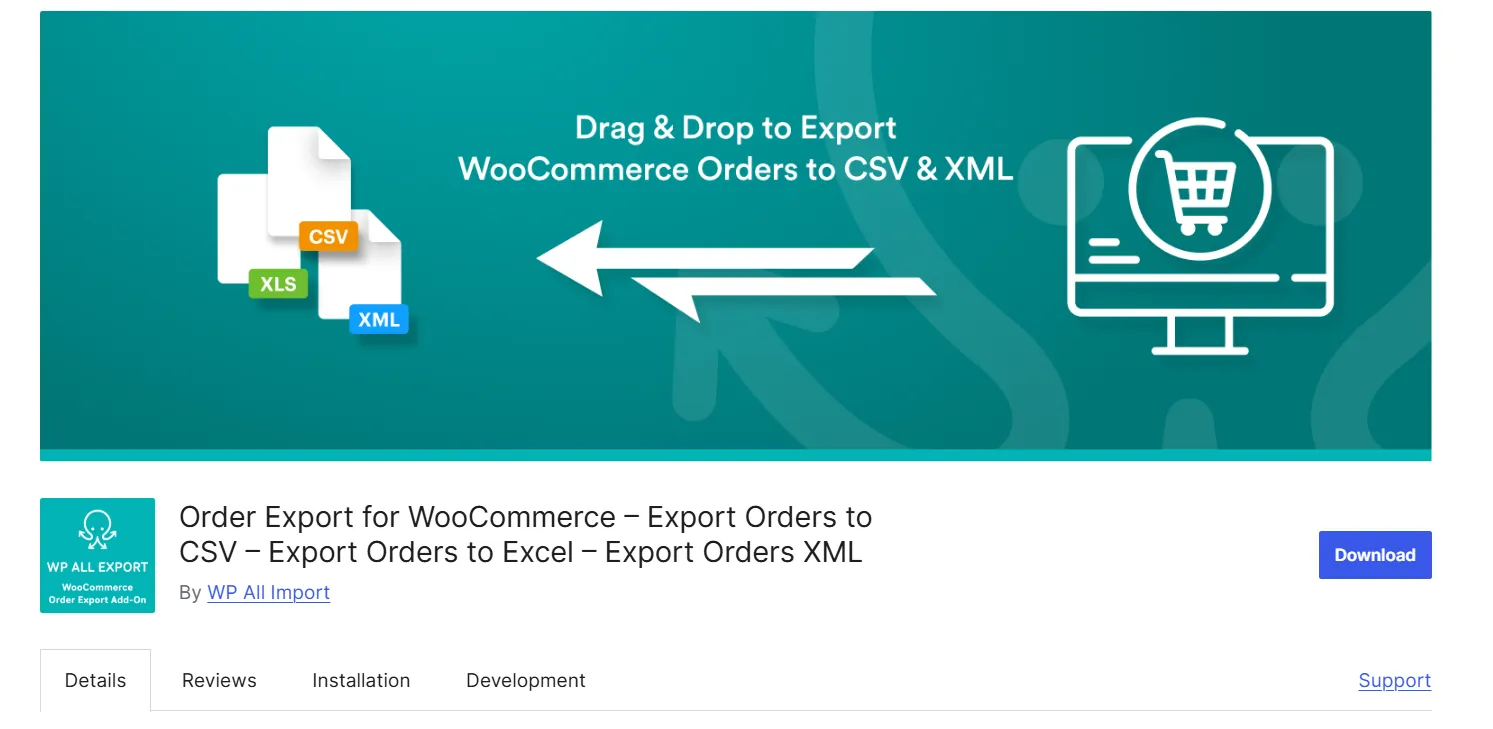
If you need more flexibility when exporting orders, using a plugin is the best approach. While there are several popular options available (which we’ll cover in the next section), in this guide, we’ll show you how to use one of the most trusted tools: WP All Export.
Instead of being limited to preset report layouts, you can choose specific fields, reorganize them, and export your orders in multiple file types such as CSV, Excel, or XML. The plugin also handles large order volumes smoothly, making it a great choice for growing stores or merchants who need detailed, analysis-ready files.
Step 1: Install the plugin
Download the plugin, then go to Plugins > Add new > Upload and search for the plugin. Click “Install Now” and then “Activate“.
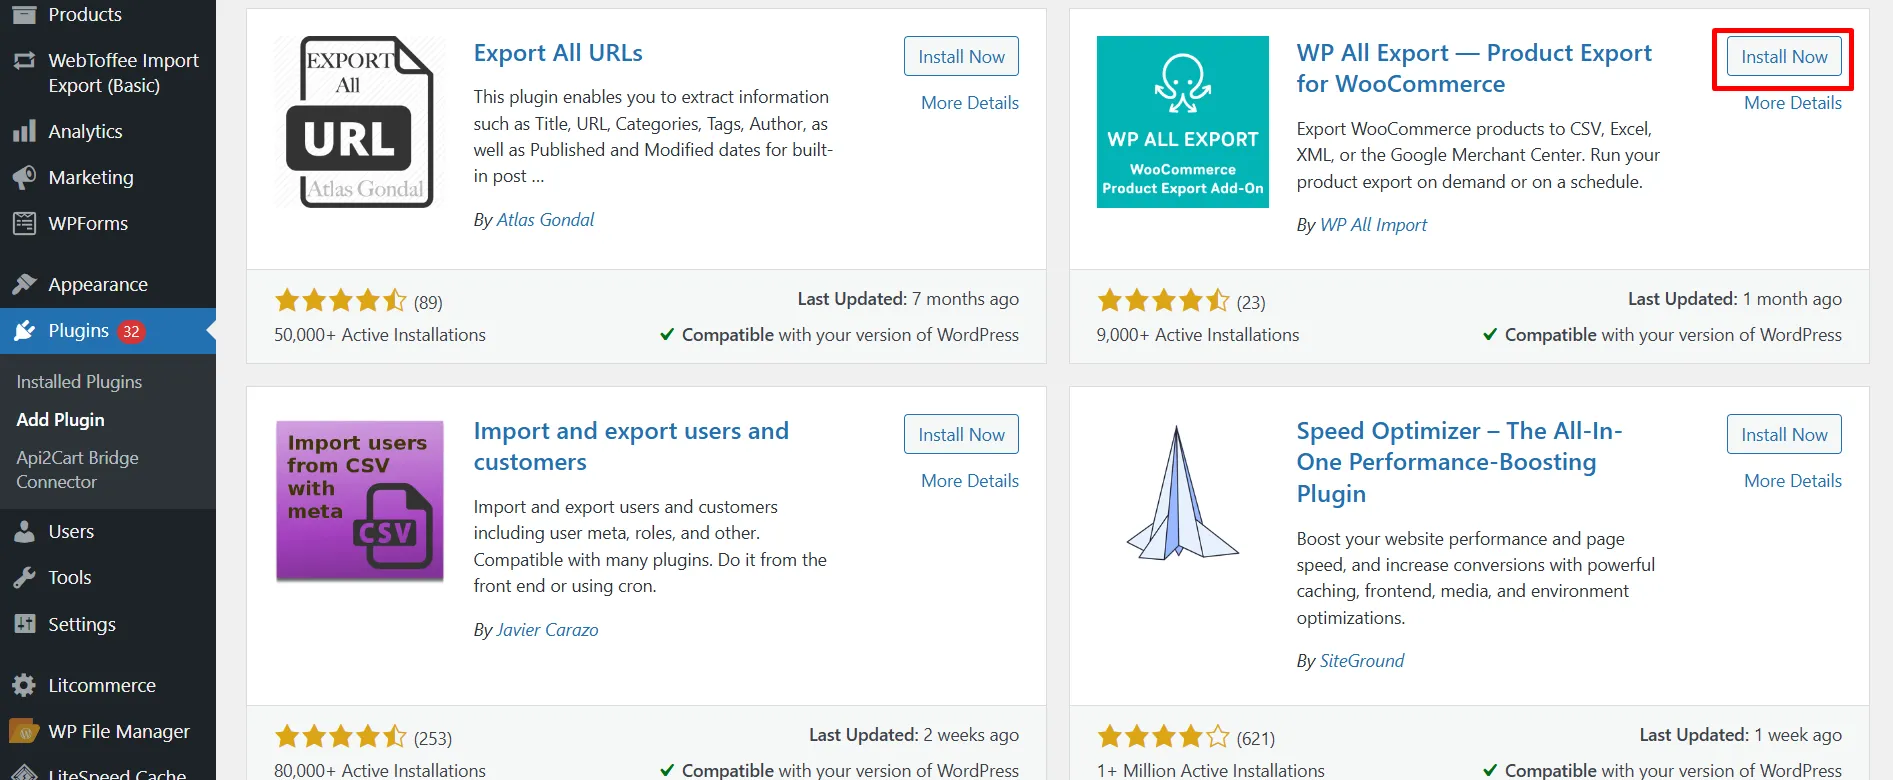
After activation, the plugin will add a new All Export menu to your left sidebar.
Step 2: Create a new export
From your WordPress dashboard, go to All Export > New Export and choose WooCommerce Orders as the export type. WP All Export will automatically scan your store’s database and show you how many orders are available for export.
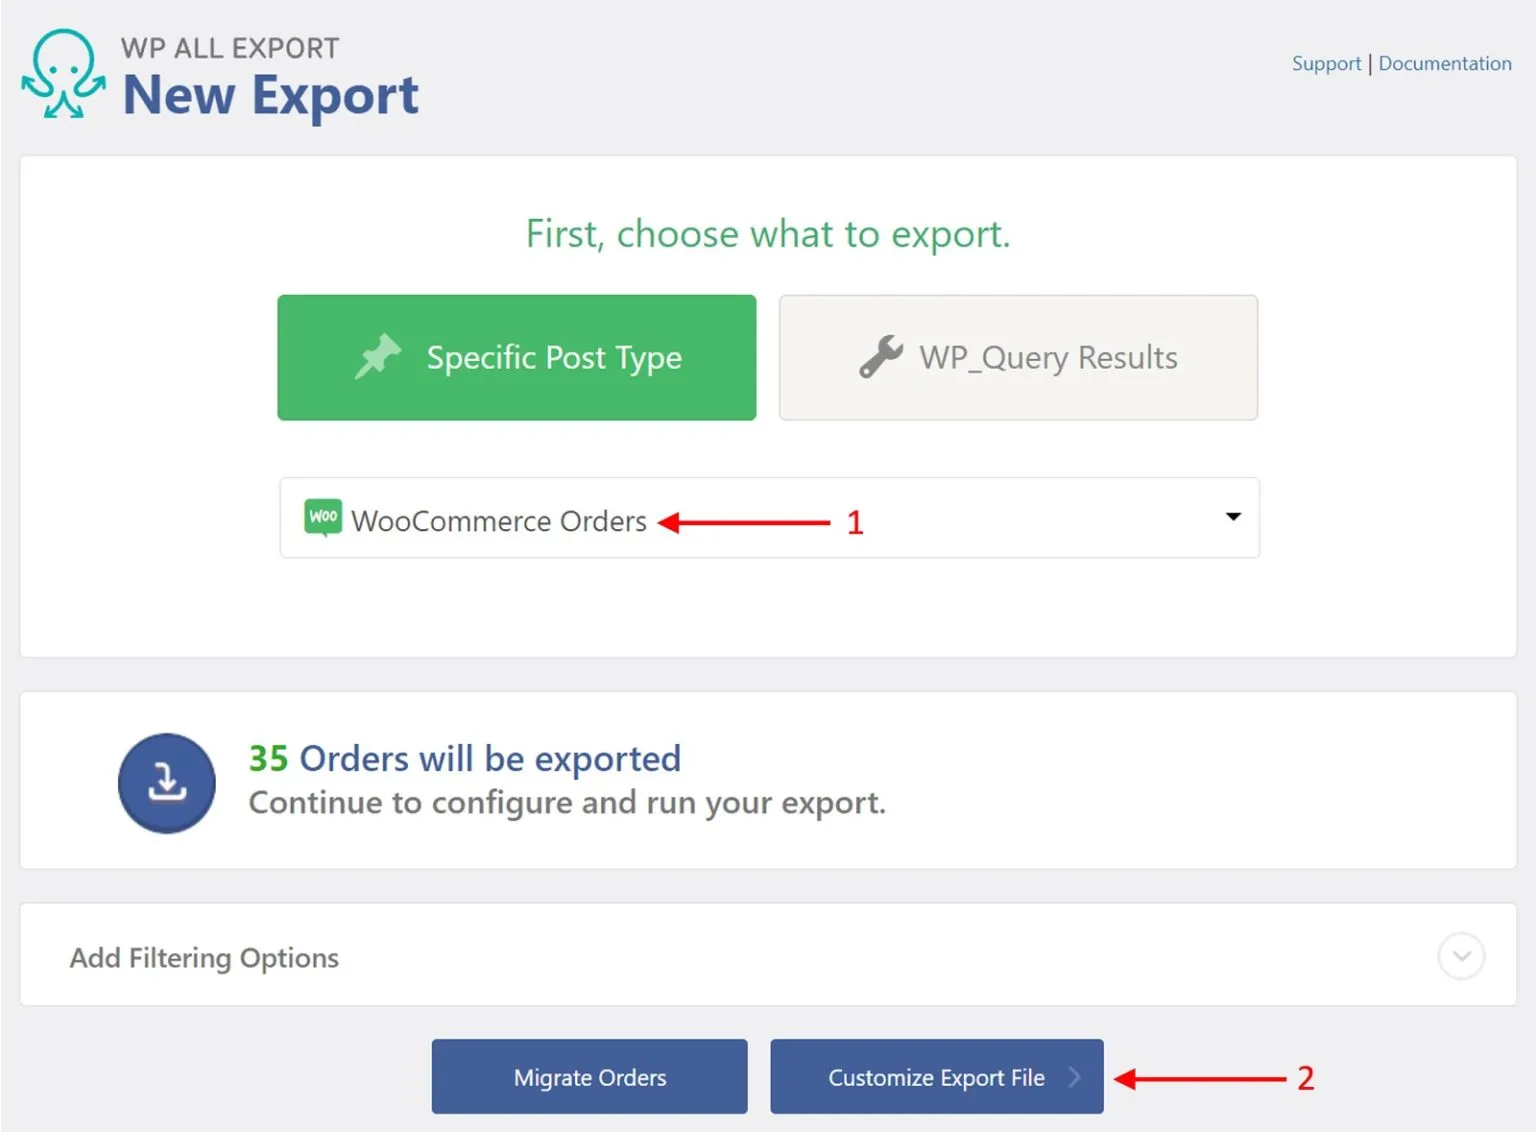
Step 3: Configure the export filters
If you only want to export a specific group of orders, you can refine the dataset using the built-in filtering tools. Then, open the Add Filtering Options panel and begin adding your filter conditions. Each rule consists of three parts: the element you want to filter (such as order status or order total), the logic (equals, contains, greater than, etc.), and the value you want to match.
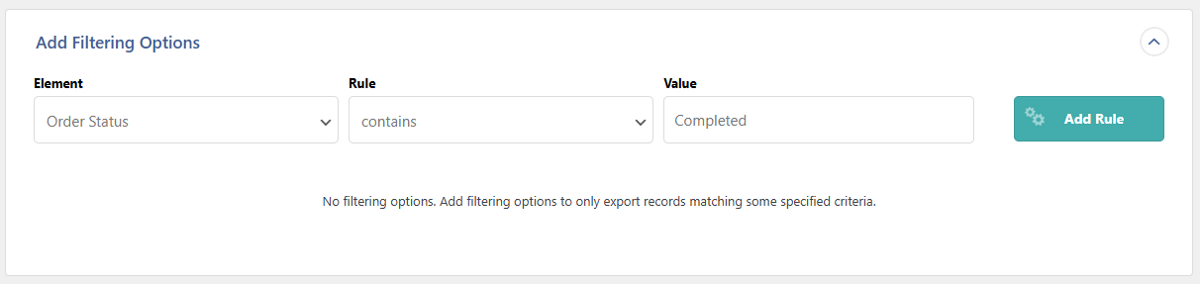
After you configure all three components, click Add Rule to apply the filter. You can add multiple rules and combine them with AND or OR to create more complex conditions.
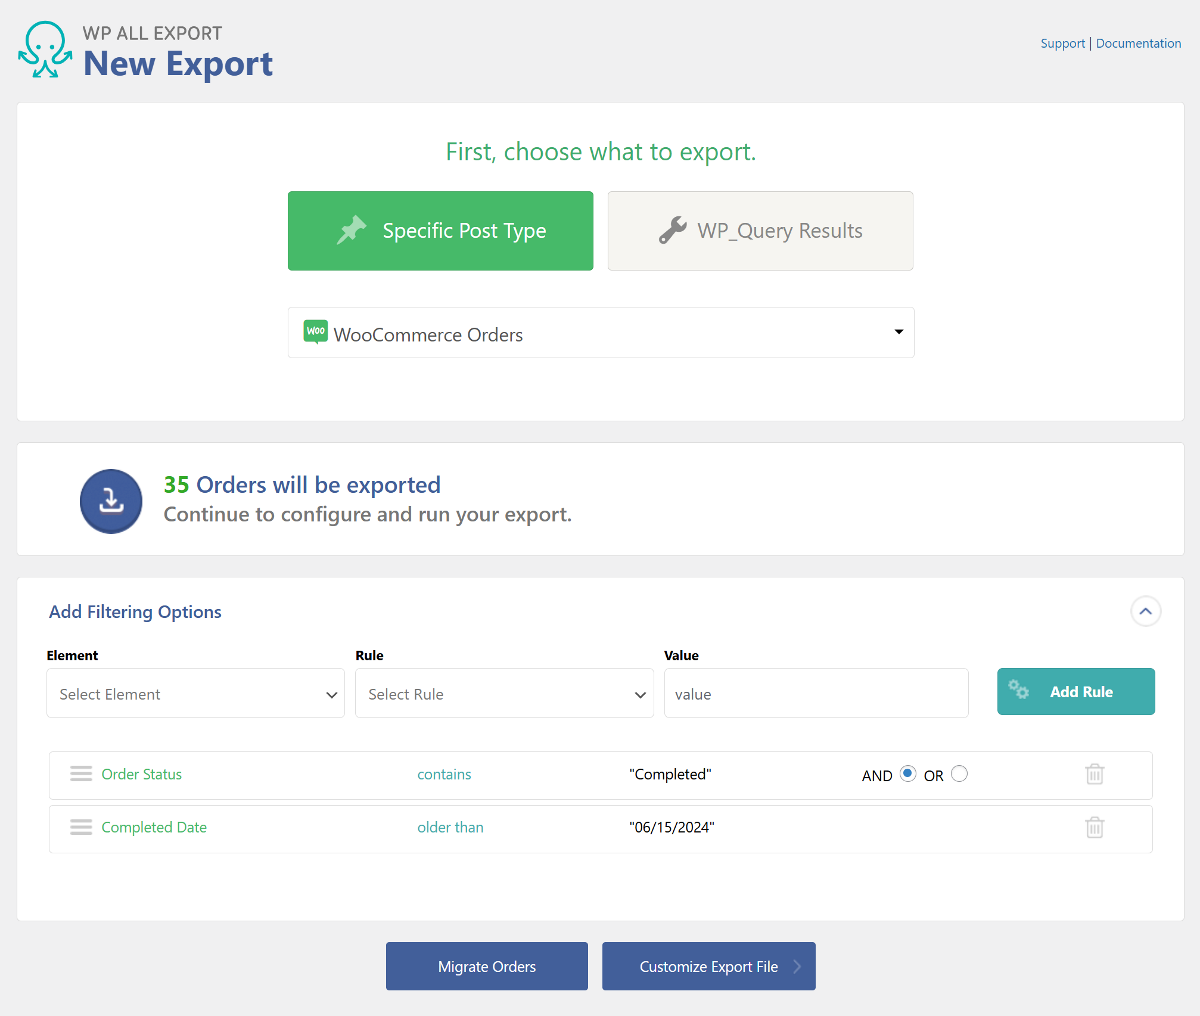
Once your filters are set and the results look correct, scroll down and click Customize Export File to proceed to the next step.
Step 4: Select and add custom fields
Every WooCommerce order contains a large amount of data, but sometimes you only need specific details or certain custom fields for your report. Fortunately, WP All Export makes the export WooCommerce orders with custom fields process very simple.
In the Available Data panel, you can expand each section to explore all standard and custom fields available in your store. Under Available Data › Order, you will find all the basic WooCommerce order information, including:
- Order ID: The unique ID assigned by WordPress.
- Order Key: A code WooCommerce uses to distinguish orders.
- Order Date: The date the order was placed, shown in Y-m-d H:i:s format.
- Completed Date: The date the order was marked as completed, in Y-m-d H:i:s format.
- Title: The order title.
- Order Status: The current status such as wc-completed, wc-pending, wc-processing, wc-on-hold or wc-cancelled.
- Order Currency: The currency used for the order, for example USD.
- Payment Method Title: The payment option selected by the customer, for example PayPal.
- Order Total: The total amount the customer must pay.
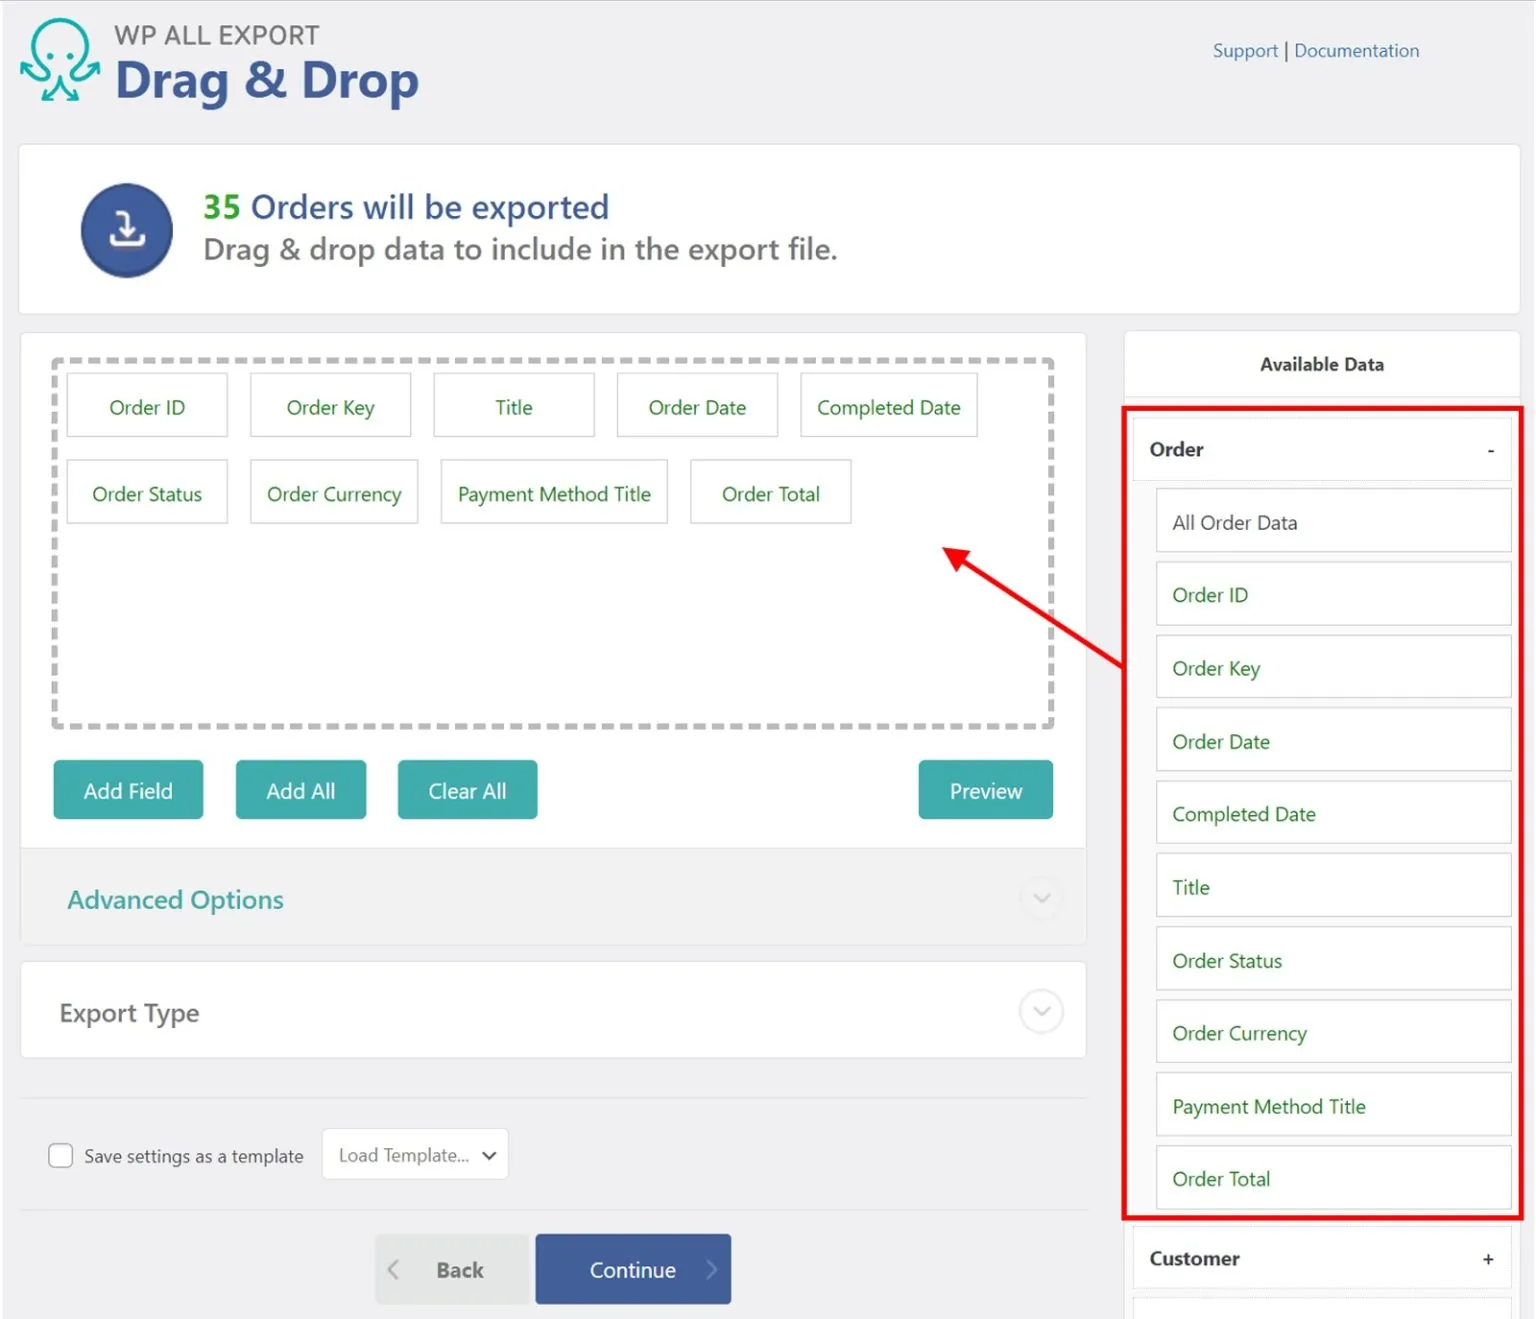
To include any of these fields in your export, simply drag them into the column layout area on the left. You can add as many fields as you want and rearrange them in any order to match your preferred structure.
If your store uses additional or plugin-created custom fields, open the Other tab to locate them.
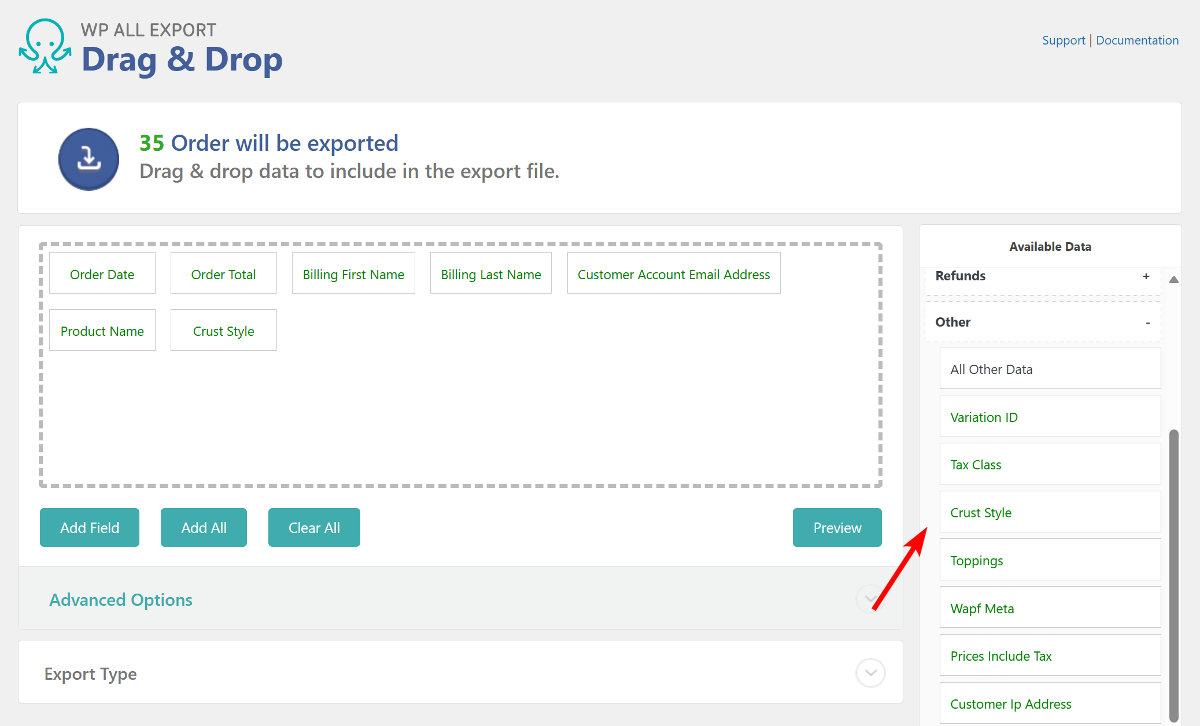
When a field does not appear automatically, click Add Field and search for it in the pop-up window.
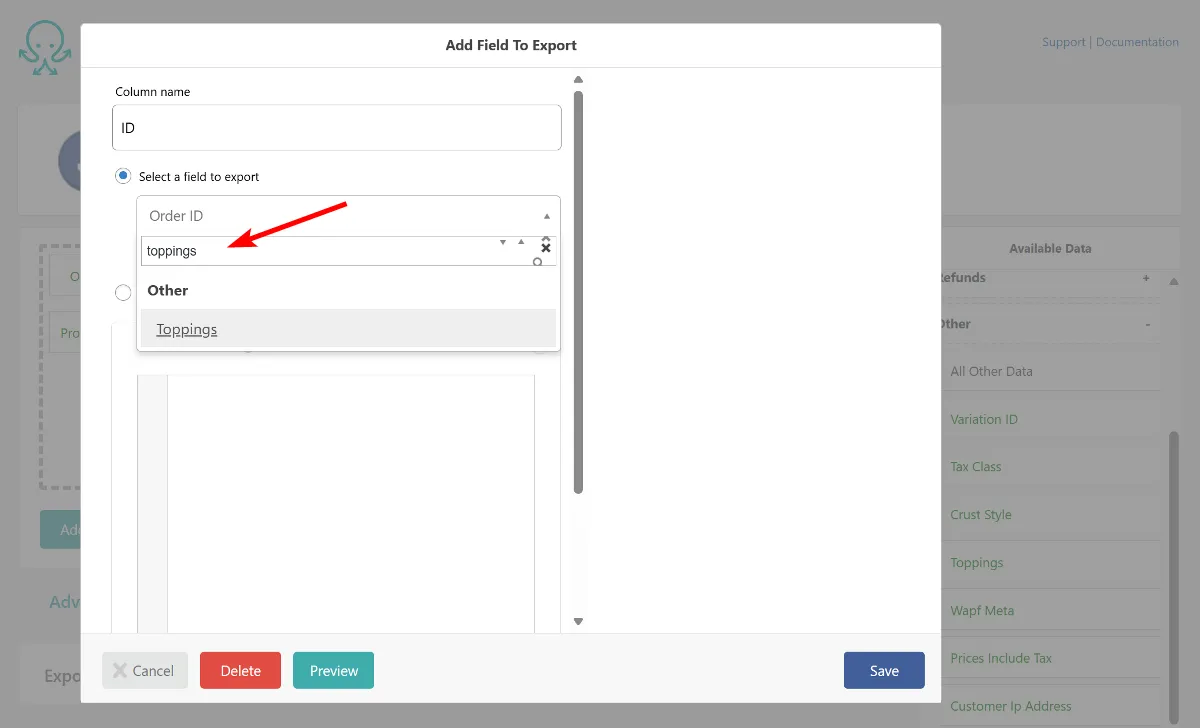
After selecting all the WooCommerce custom fields you want to include, click Preview to see how they look in the final export. You can remove any unwanted column simply by dragging it out of the layout area, which gives you full control over the contents of your export file.
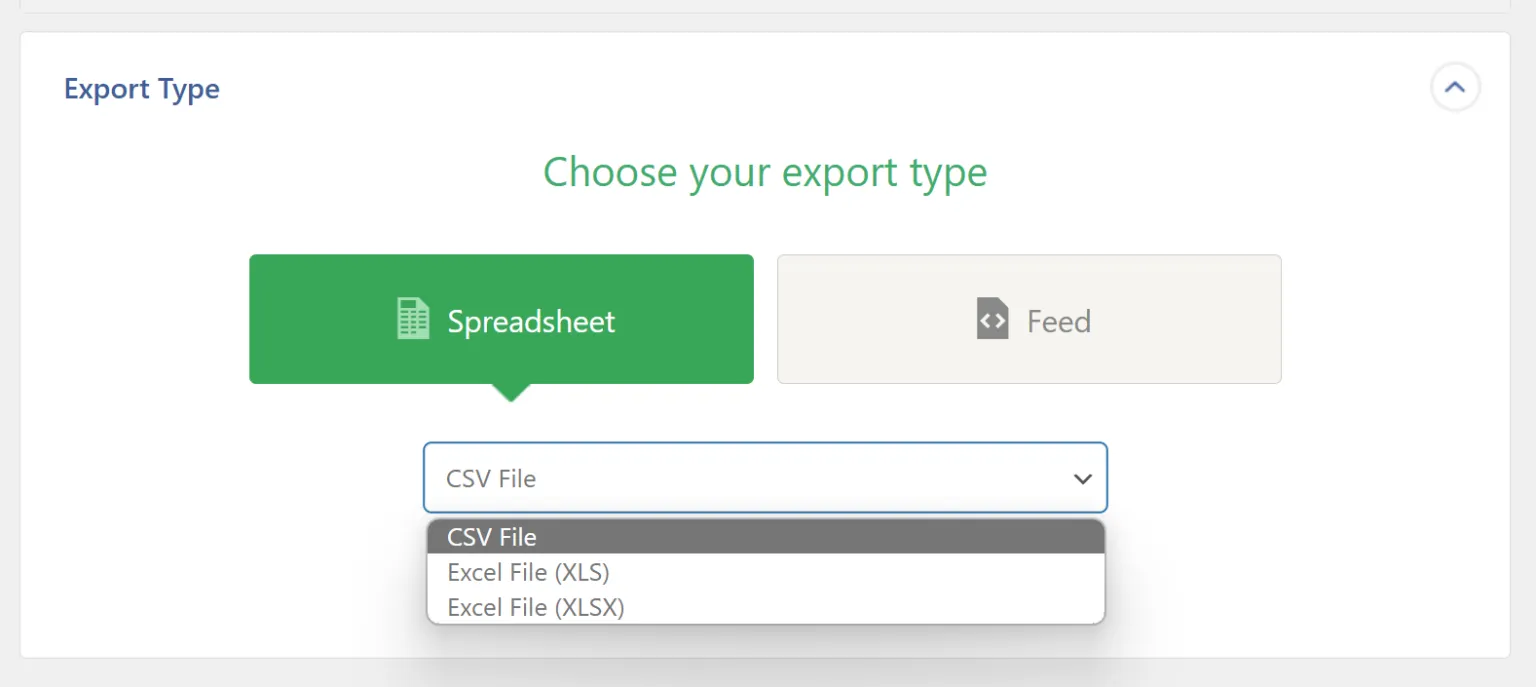
WP All Export also lets you choose the output format. In the Export Type panel, select CSV, Excel, or XML depending on your needs. For this tutorial, we will continue with CSV.
When everything is ready, click Continue at the bottom to move to the next step for WooCommerce export orders.
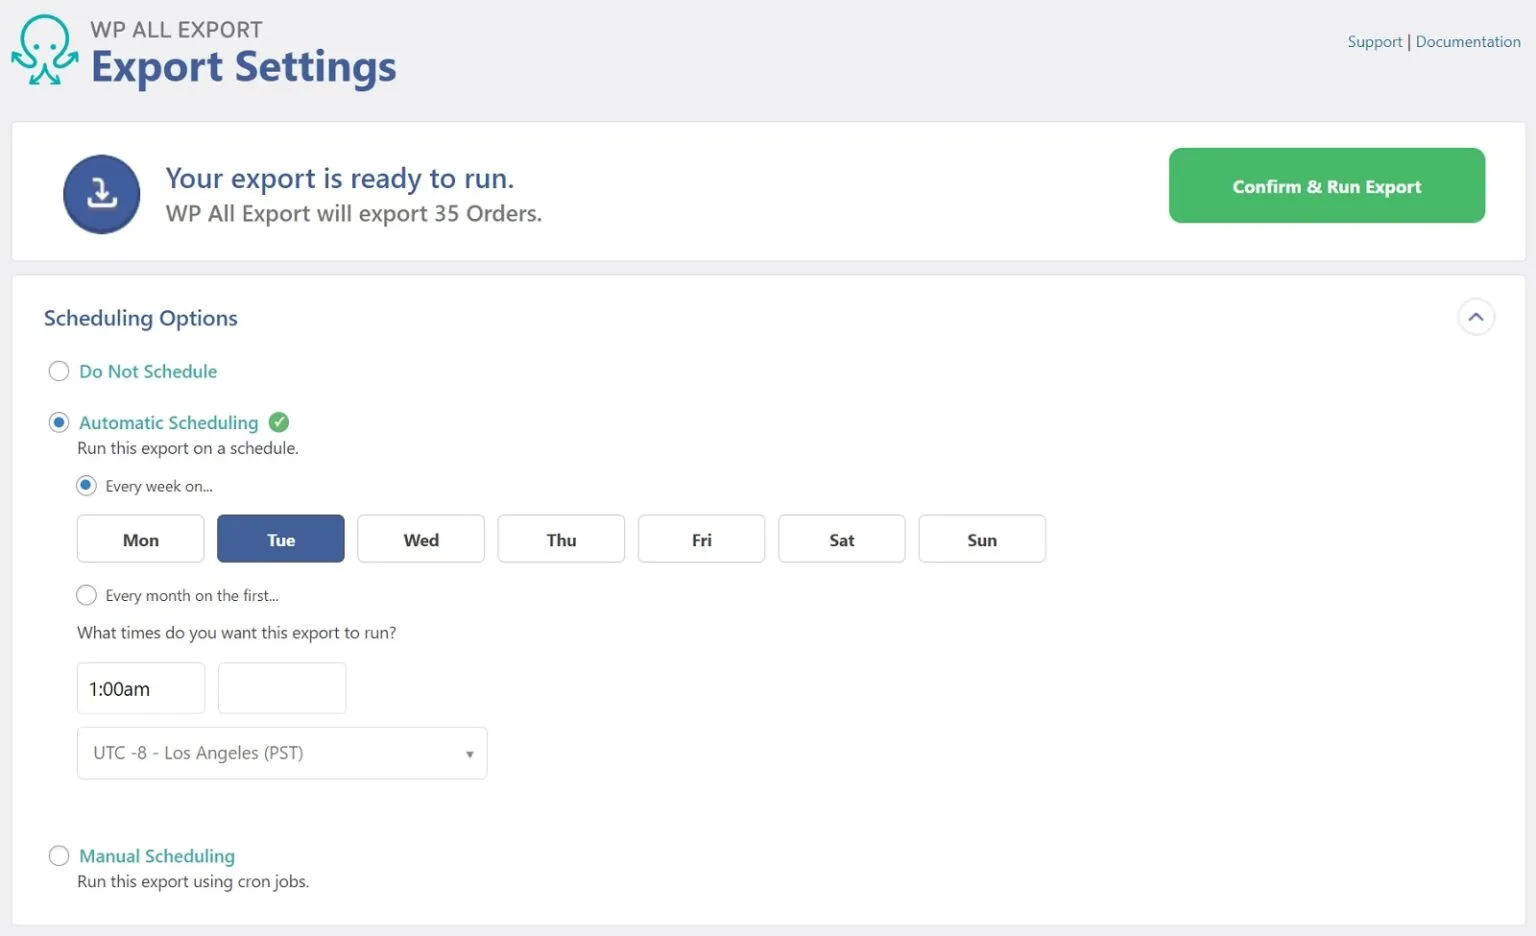
Step 5: Schedule your export (optional)
WP All Export also supports automated WooCommerce order exports, which is helpful when your store needs to sync data regularly with external tools. On the Export Settings screen, the Scheduling Options panel provides two automation methods:
- Automatic Scheduling service
- Manual cron job setup
Most users prefer the automatic option because it allows weekly or monthly exports with specific days and times. A common setup is a weekly export at 2:00 a.m., which keeps reporting consistently during low-traffic hours.
The Advanced Options panel adds real-time exporting that sends order data immediately after a purchase. This feature integrates smoothly with tools like Zapier and ensures external systems always receive the latest information.
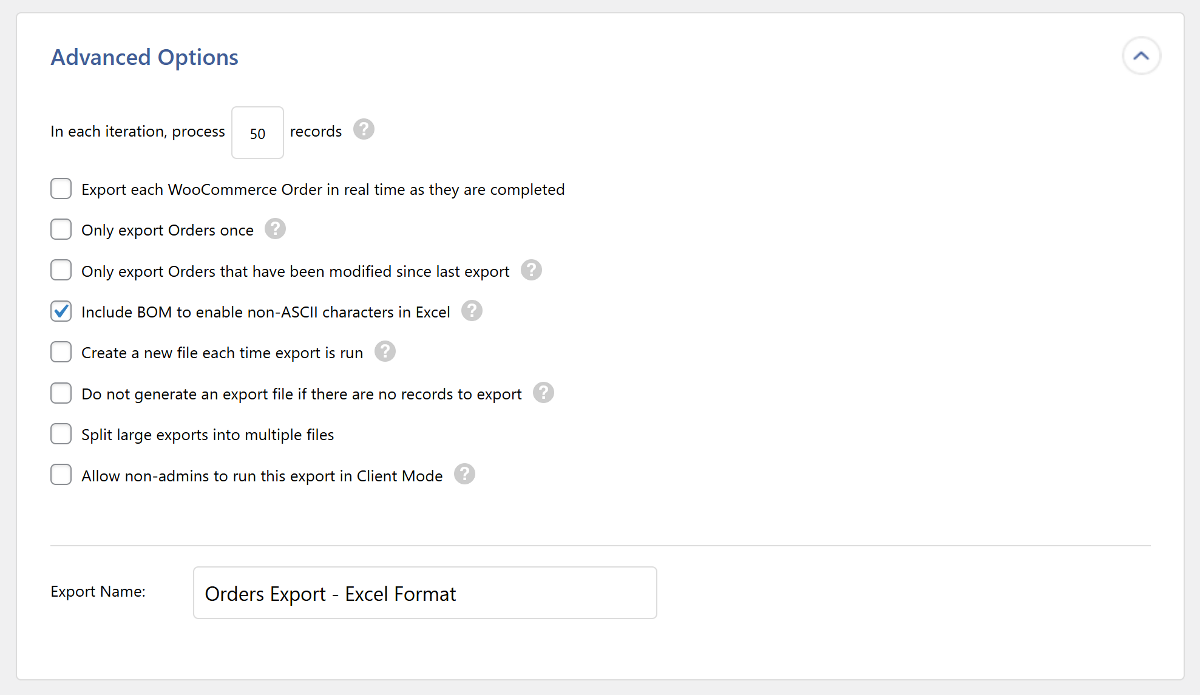
Additional settings appear further down the page as simple checkboxes that you can enable based on your workflow. These options offer more control without requiring technical changes.
After finalizing all preferences, the last step is to enter a custom file name and click Save & Run Export. This confirms your schedule and activates the automated export process.
Step 6: Download your file
The WooCommerce export orders may take a few minutes to process, depending on how many orders your store contains. WP All Export will notify you as soon as the file is ready to download.
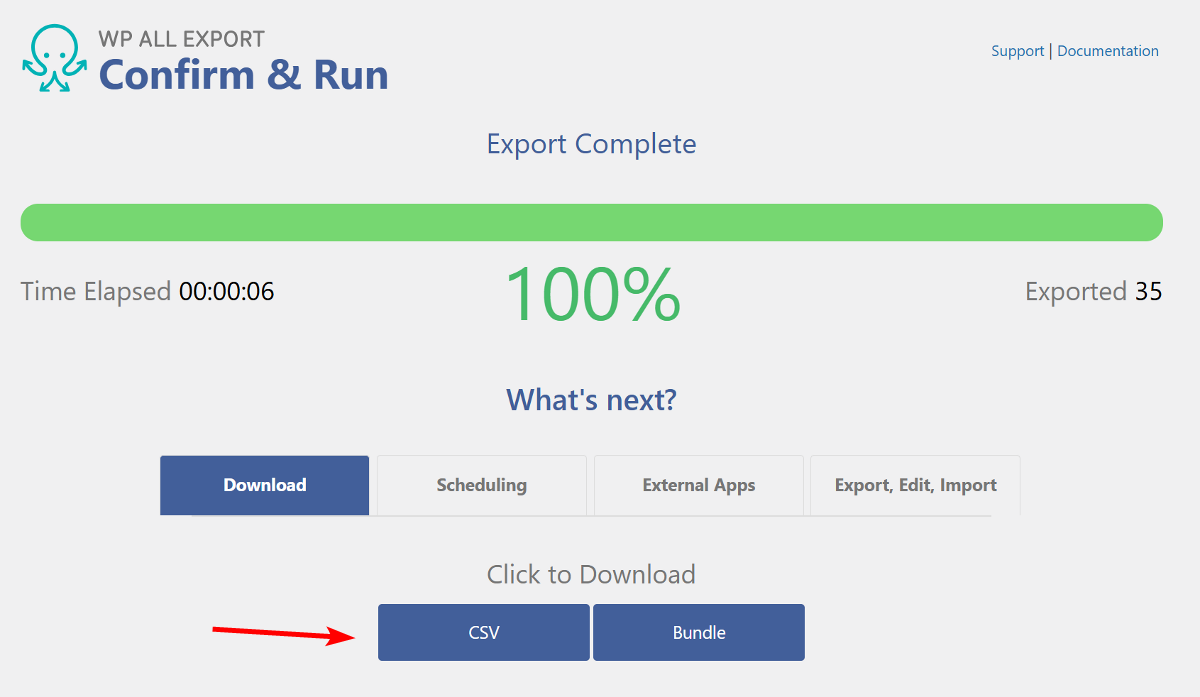
The Click to Download section gives you two ways to get your exported WooCommerce order file:
- Download the file directly: Click the file format name to download the export instantly. This option is ideal when you simply need the data for reporting or analysis.
- Download the bundle: Choose the Bundle option to receive a ZIP file containing both the export file and an import template. This is helpful when the file will be used on another site or platform.
The bundle option is especially helpful when you plan to migrate order data to another website. If you need a smooth and secure way to move your entire store, you can rely on our LitExtension migration service, which ensures accurate, risk-free data transfer without disrupting store operations.
Let Our Experts Handle Your Store Migration!
With the All-in-One Migration Service, our experts take care of everything, ensuring a seamless and stress-free migration.
BOOK FREE CONSULTATION
That’s it. In just a few steps, you have successfully exported your WooCommerce order data, including all relevant custom fields.
If you also need to export other WooCommerce data, check out our detailed guide on how to import & export WooCommerce products.
When Do You Need to Perform WooCommerce Export Orders
There are many moments in your store’s workflow where exporting WooCommerce orders becomes necessary. In most cases, you will need an export whenever your order data has to be analyzed, shared, backed up, or used in another system outside of WordPress.
Below are the most common situations where exporting your WooCommerce orders becomes necessary.
1. Data analysis and reporting
There are times when insights about revenue, customer behavior, or product performance are easier to uncover in tools like Excel or Google Sheets. When you pull your order data into these platforms, you can spot trends more clearly, evaluate campaigns with better context, and make informed business decisions.
2. Business expansion and migration
Any move to a new platform or the launch of a second store requires order data to be transferred. With a clean export, you keep your sales history intact and avoid the risk of manually re-entering hundreds or thousands of records.
3. Integration with third-party tools
Some accounting systems, fulfillment centers, CRMs, or marketing tools do not fetch WooCommerce data automatically. In these cases, an exported order file keeps all third-party services aligned with accurate and updated information.
4. Backup and record keeping
A downloadable export serves as a reliable offline copy of your sales history. This is helpful for tax preparation, audits, and resolving issues caused by plugin conflicts or hosting errors.
5. Bulk data management
Large datasets can be difficult to manage directly inside WooCommerce. When you send your orders to Excel, Google Sheets, or other data tools, you gain more flexibility to reorganize, clean, or analyze information in bulk.
Understanding the core reasons for what you are doing will definitely improve your order management system. In other words, you can estimate the time and resources needed as well as conduct suitable steps for the process.
Alternatives Apps for WooCommerce Order Export
WP All Export is already a solid choice if you need flexibility and control. Still, depending on your workflow, it might not be the only option worth considering.
Hence, to give you a clearer picture, here are a few other popular WooCommerce export plugins, each coming with its own strength:
1. Import Export Suite for WooCommerce
Price: From $129/year for a single site license.
This is a comprehensive solution by WebToffee that brings import and export features into one powerful tool. It helps streamline data management tasks across your WooCommerce store – from handling orders and customers to managing products and coupons at scale.
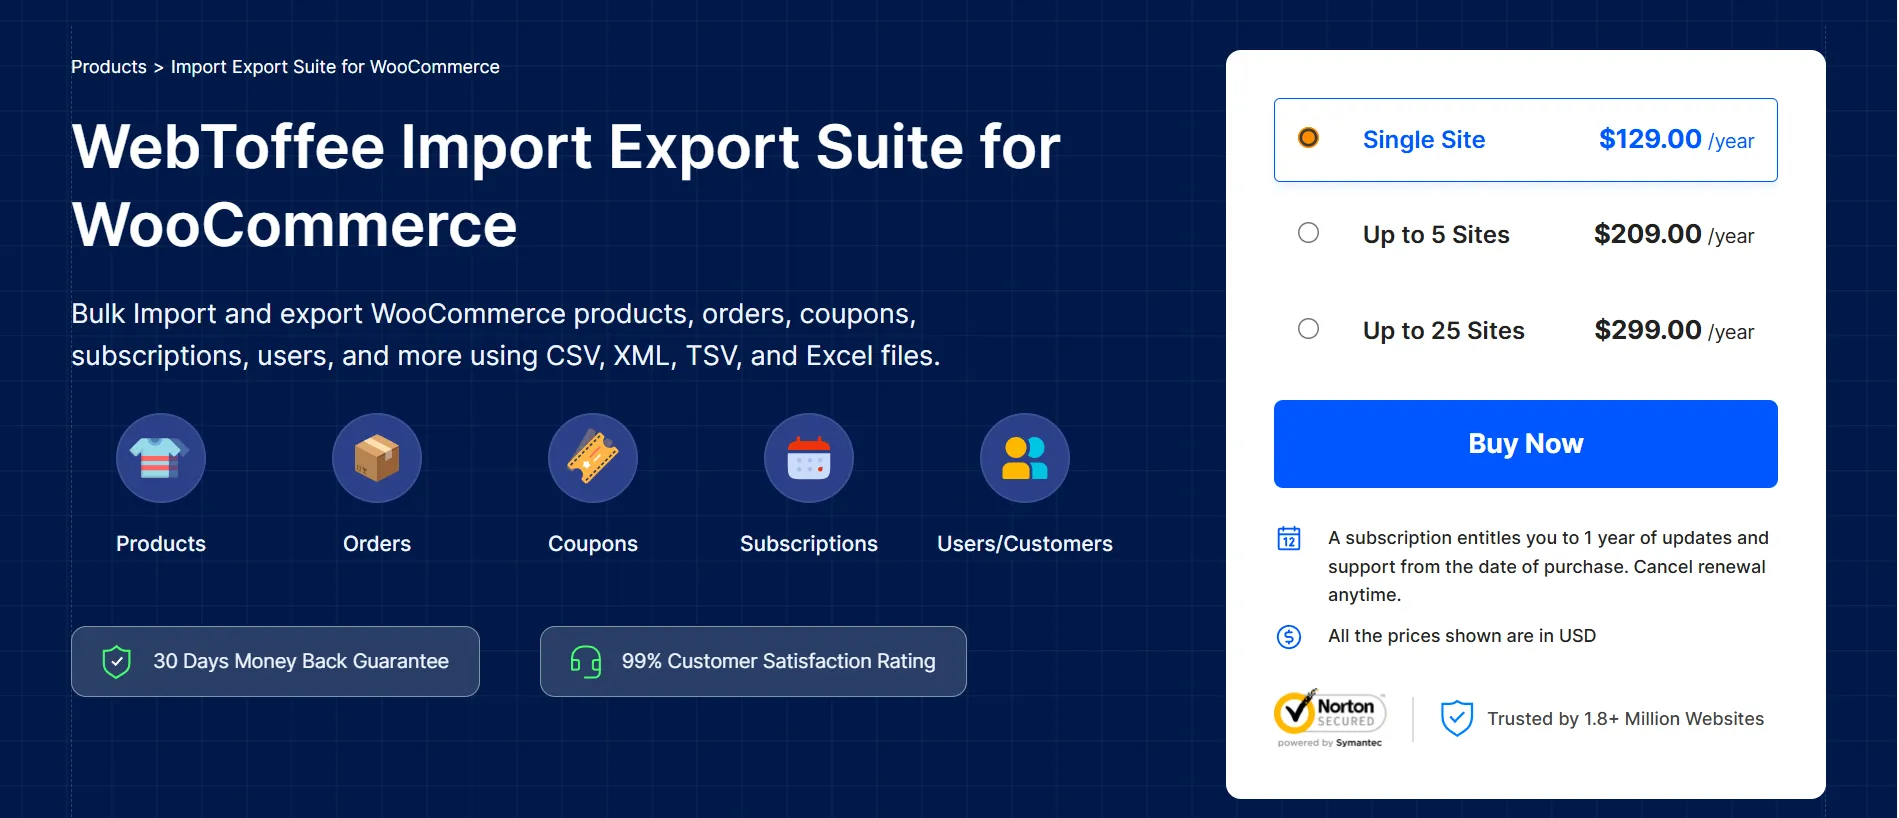
Key features:
- Import/export images, metadata, and custom fields;
- Schedule import/export actions using FTP or SFTP;
- Bulk update WooCommerce data during import;
- Support for all major product types (simple, variable, grouped, subscription, etc.);
- Integration with ChatGPT API to auto-generate product descriptions.
Recommended for: Medium to large WooCommerce stores that require a robust, customizable, and secure solution for managing store data.
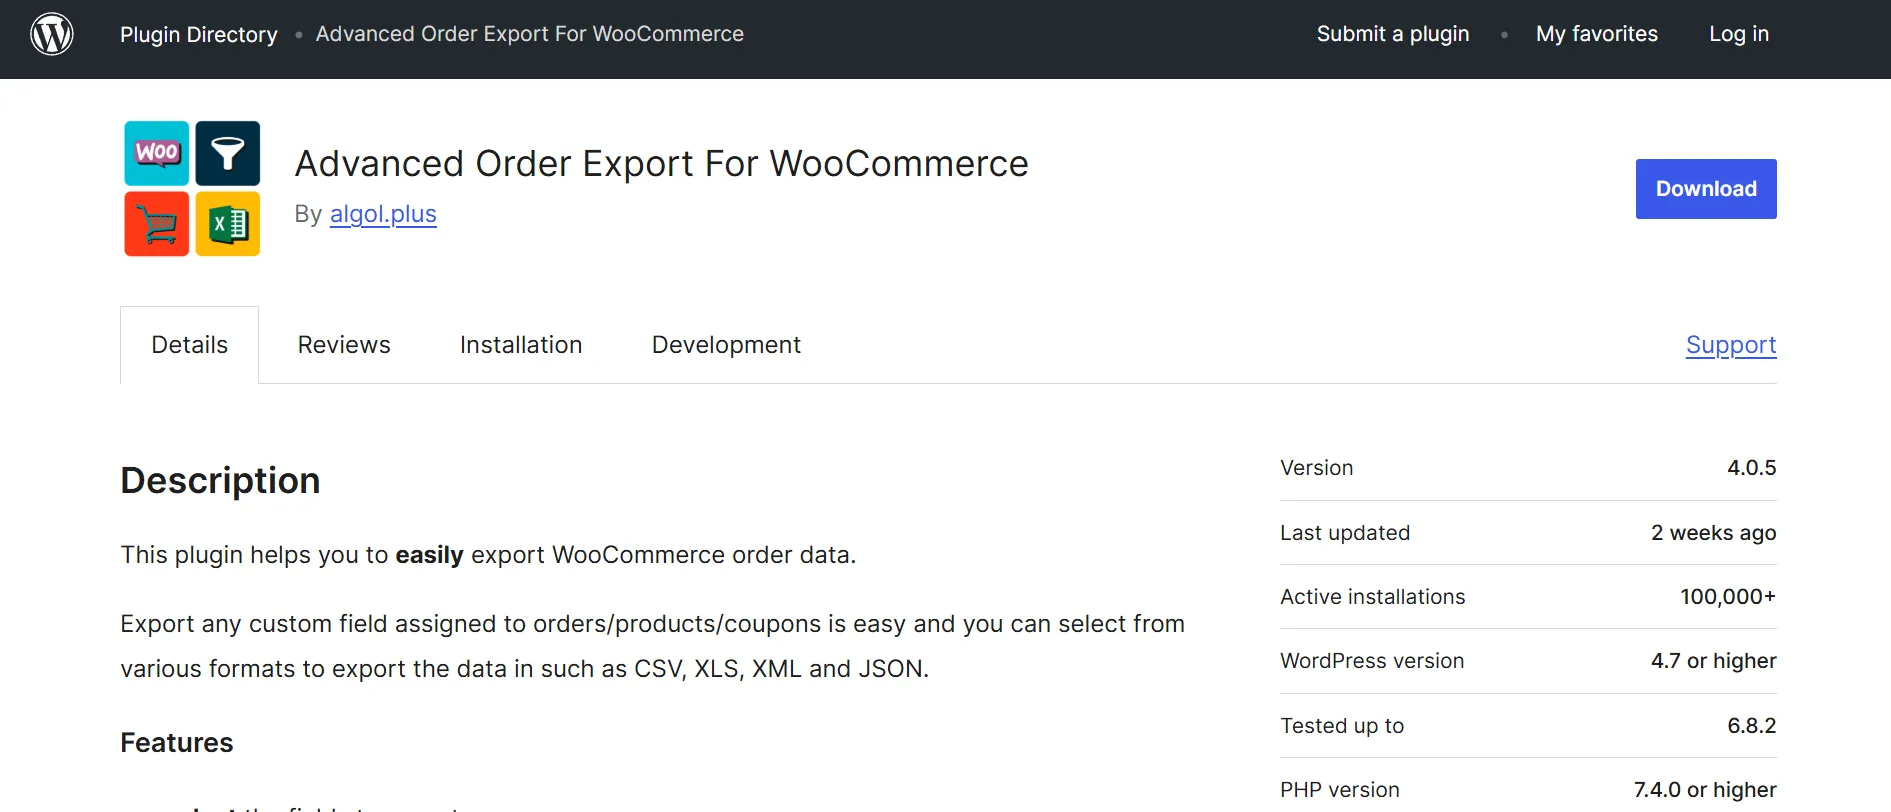
2. Advanced Order Export for WooCommerce
Price:
- Free version available (sufficient for basic order export tasks).
- Pro version starts at $30/year for a single site.
Advanced Order Export for WooCommerce focuses on usability, making it easy to generate clean, well-structured exports for accounting, shipping teams, or internal reporting workflows. Many store owners choose it because the interface feels lightweight while still supporting complex export requirements such as detailed line-item structures and multi-format output.
Key features:
- Support for multiple export formats, including CSV, XLSX, XML, JSON, and TSV;
- Custom export presets that can be saved and reused for recurring tasks;
- Line-item formatting options to include product variations, attributes, and fees as separate columns;
- Delivery options for automated exports, such as email, FTP/SFTP, Google Drive, and Dropbox;
- Built-in export logs with detailed timestamps to track export history;
- Conditional formatting tools to clean or transform values before generating the file;
- Ability to merge multiple fields into one column for easier accounting workflows;
- One-click preview mode to verify data before exporting.
Recommended for: Merchants who need a simple but reliable exporting tool that can handle recurring exports, multi-format output, and detailed order structures. This plugin works especially well for users who rely on multiple delivery destinations or need quick access to reusable export presets.
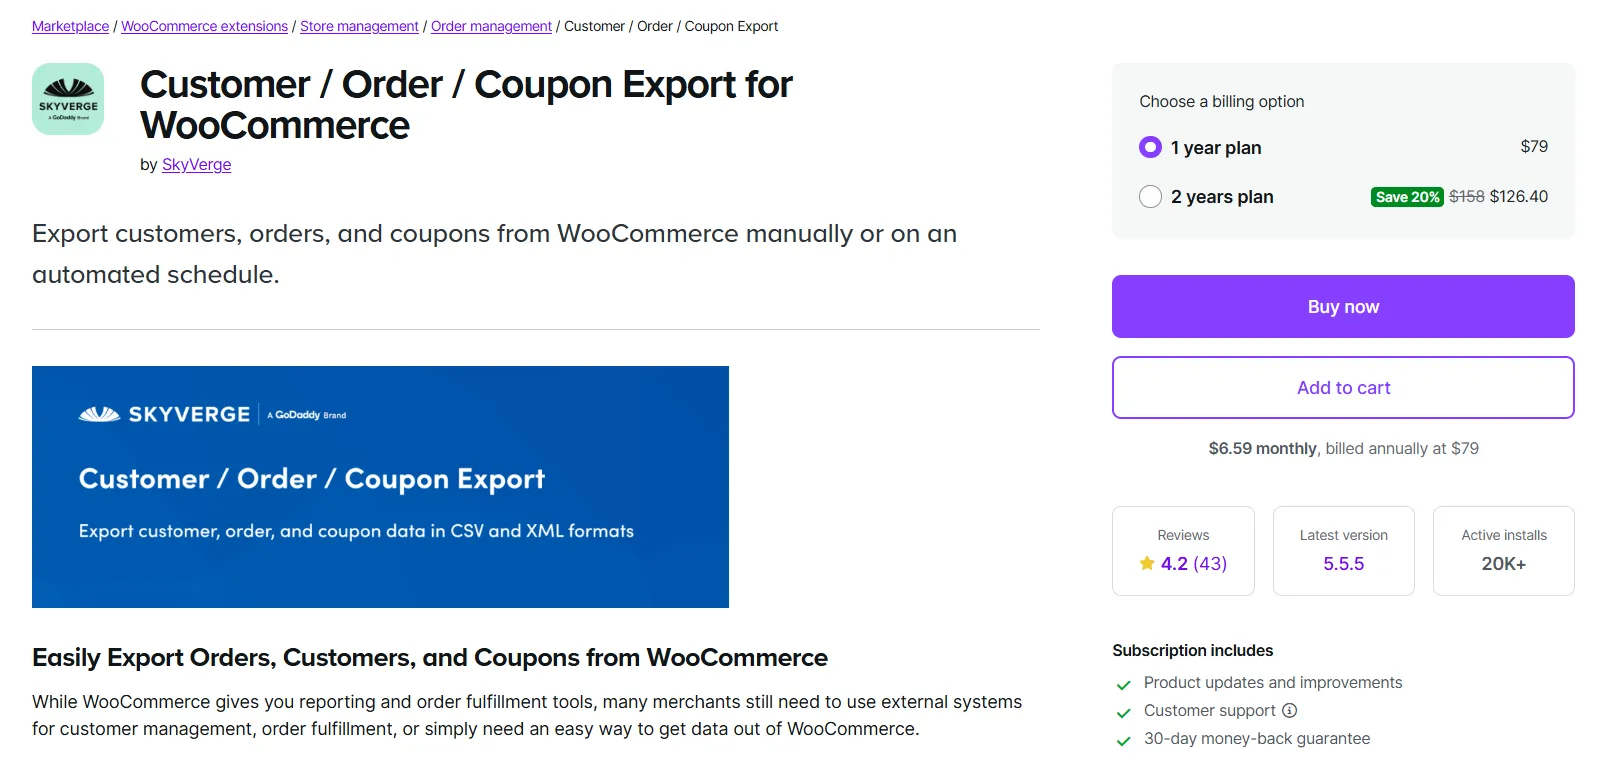
3. Customer / Order / Coupon Export for WooCommerce
Price: Starts from $79/year for a single site license.
Created by SkyVerge and sold through the official WooCommerce marketplace, this plugin focuses specifically on exporting customer, order, and coupon data. It’s built with automation in mind, allowing you to set up scheduled exports and deliver files via email or FTP without manual effort.
Key features:
- Automatically export orders on a set schedule;
- Send export files via email, FTP, or HTTP POST;
- Export in CSV or XML format, compatible with most systems;
- Customize export formats to match third-party requirements;
- Seamless integration with tools like accounting software and CRMs;
- Supports both manual and recurring exports from the WooCommerce admin.
Recommended for: Store owners who need automated, reliable data exports for operations like accounting, logistics, or CRM syncing.
Troubleshooting Common WooCommerce Export Orders Issues
Though WooCommerce export orders are quite a straightforward task (given the right method), complications are not uncommon. Below, we’ll explore some of the most widespread issues and practical solutions to resolve them:
1. Resolving plugin conflicts during export
Under normal circumstances, WooCommerce relies on various plugins to add functionality, which sometimes clash with the platform's export features and lead to errors. To address this issue, you can:
- Temporarily deactivate any plugins you've recently installed or updated to identify the cause of the conflict.
- Verify that all active plugins are compatible with your current WooCommerce version.
- Use troubleshooting tools like the Health Check plugin to safely identify plugin conflicts in a staging environment without disrupting your live store.
2. Fixing slow WooCommerce export performance
For medium- to large-size WooCommerce order exports, you must prepare yourself for unexpected delays, timeouts, or even out-of-memory errors.
In this case, we suggest editing your wp-config.php file to increase the PHP memory limit:
- Locate the file within your WordPress installation folder (commonly in public_html).
- Open the file and check for the line that specifies WP_MEMORY_LIMIT. If it doesn't exist, add this line: define(‘WP_MEMORY_LIMIT', ‘256M');
If that doesn't work, consider breaking down large exports into smaller batches to avoid overwhelming your server resources.
3. Handling exports that get stuck in queue
From our observation, queued exports are often the result of issues with background processing, server settings, or conflicting plugins (discussed earlier).
Hence, you should check your wp-config.php file for the following line: define(‘DISABLE_WP_CRON', true). If this line is present, remove it or change its value to false to enable WordPress cron jobs.
How to Export Woocommerce Orders: FAQs
How do I export all orders from WooCommerce?
The simplest way to export all WooCommerce orders is by using a plugin. Here's how:
- Install and activate the plugin from the WordPress plugin directory.
- Go to WooCommerce → Export Orders.
- Leave the filters blank to include all orders.
- Choose your desired file format (CSV, XLS, XML, etc.).
- Click Export to download the full order list to your computer.
How do I export orders from WooCommerce to PDF?
WooCommerce doesn’t offer PDF export by default, but you can use plugins that support this format. For example:
- Download and install plugin
- Navigate to the plugin’s export settings (under WooCommerce).
- Select PDF as the export format.
- Apply filters or select the orders you want.
- Click Export, and your PDF file will be ready for download.
How do I export all products from WooCommerce to excel?
You can use WooCommerce’s built-in exporter or a plugin. Here’s the built-in method:
- In your WordPress dashboard, go to Products > All Products.
- Click the Export button at the top.
- Choose which product data fields to include (or leave everything checked to export all).
- Click Generate CSV.
- Open the downloaded CSV file in Excel.
How do I export WooCommerce orders to Google Sheets?
There’s no direct export to Google Sheets, but you can do it manually:
- Use a plugin (e.g. Advanced Order Export) to export orders as a CSV.
- Open your Google Drive and create a new Google Sheet.
- Click File > Import and upload the CSV file.
- Choose to insert new rows or replace the current sheet.
Final Words
Woocommerce export orders is necessary for store owners in many cases, such as WooCommerce upgrades. So to help its users, WooCommerce has been developing to incorporate export tools right within the system. You can consider WooCommerce export plugins available in the market for more capabilities than the default system.
Last but not least, you can check out our WooCommerce blogs collection or join our community to get more eCommerce knowledge.

