
Due to the platform’s lack of built-in importers, uploading WooCommerce import variable products has always been an uphill battle – even for the experienced.
The good news? Third-party plugins and apps can simplify the task for you! While there’s no shortage of plugin options available, our extensive research reveals the three most effective methods below:
- Import variable products with Product CSV Import Suite
- Transfer products into WooCommerce with WP All Import
- Perform advanced WooCommerce import with LitExtension
Ready to learn more? Let’s get started!
What is WooCommerce Variable Products
If you sell anything with options, such as sizes, colors, or materials, you’re already dealing with WooCommerce import variable products, whether you realize it or not. Still, before diving into the import methods, it’s worth taking a moment to understand what this product type actually is and why it behaves so differently from a regular listing.
In short, a variable product is a single WooCommerce listing that holds multiple variations under one parent. Think of a hoodie that comes in three sizes and four colors: instead of creating twelve separate product pages, WooCommerce lets you bundle all twelve combinations into one parent product, with each combination (Small/Black, Large/Red, etc.) existing as its own child variation. Customers then simply pick their preferred options from dropdown menus right on that single page.
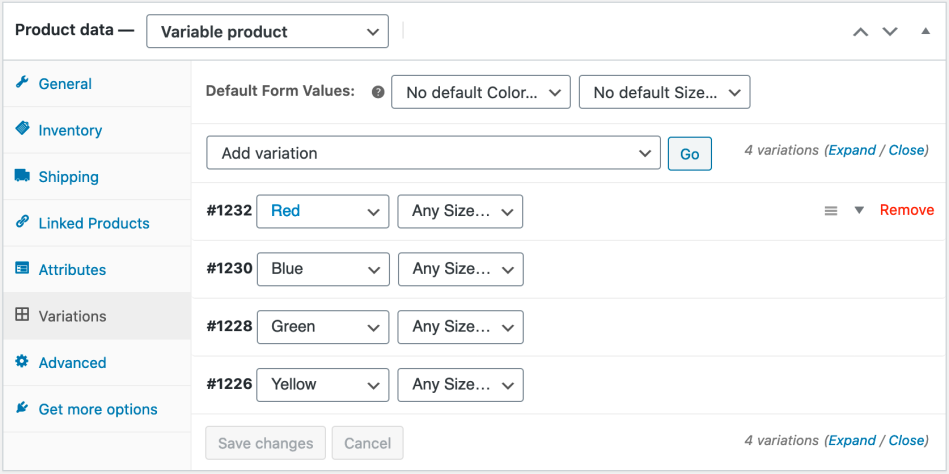
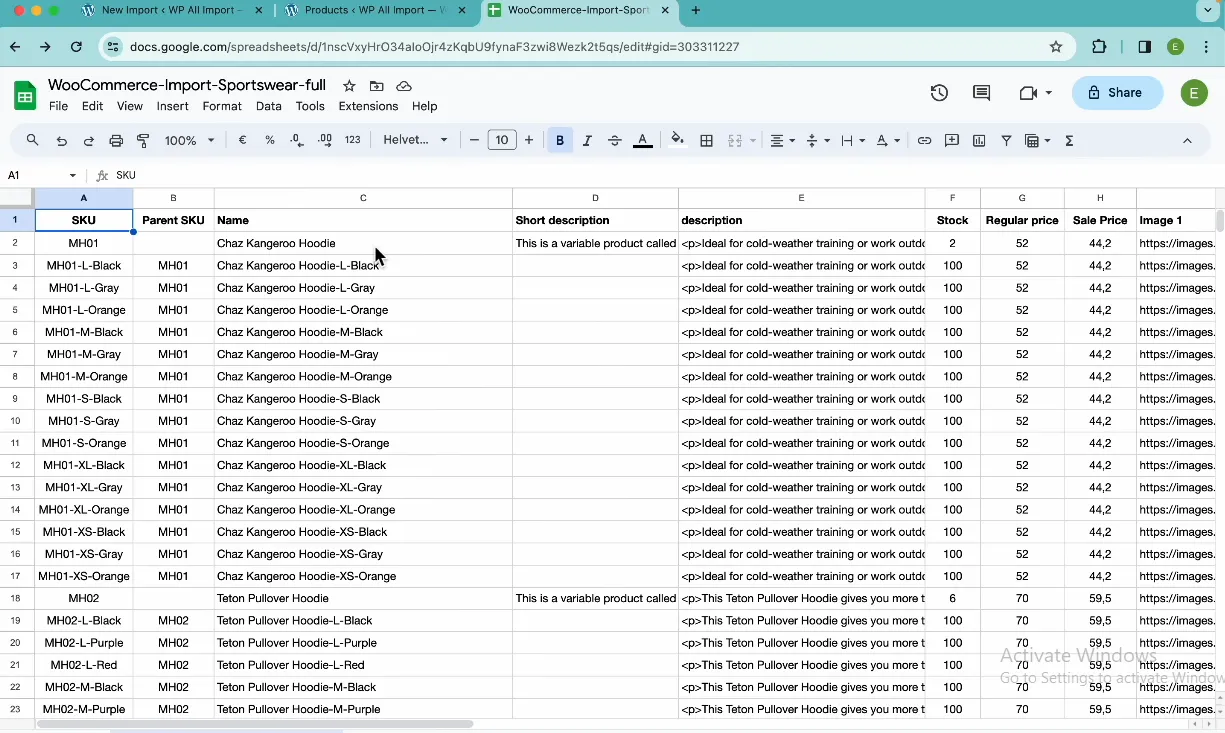
Since WooCommerce relies on this parent-child relationship to build variations correctly, your import file must clearly communicate which rows or entries are parents and which are children, and how they connect (usually via a shared SKU, Parent SKU, or Group ID). Skip this step, and the WooCommerce import variable products process will likely throw out a pile of disconnected, parent-less variations, or worse, simple products with no options at all.
Now that the foundation is clear, let’s move on to the first method of getting these products into your store.
Method 1: Import WooCommerce Variable Products with Product CSV Import Suite
One of the most popular WooCommerce import variable products plugins to consider is the Product CSV Import Suite, developed by none other than WooCommerce itself! Overall, the process is user-friendly and very straightforward. Once the required import files are ready, all you need to do is click a few buttons to upload them and let the plugin handle the rest.
Still, given the considerably low price (roughly $52 a year), it would be best to manage your expectations when it comes to customization options. Not to mention, the file preparation process is still entirely manual and can be time-consuming. If that does not sound like a deal-breaker to you, keep reading for our detailed guidelines.
Long story short, to perform WooCommerce import variable products with the Product CSV Import Suite plugin, follow these steps:
- Step 1. Install the plugin
- Step 2. Prepare a CSV for parent products
- Step 3. Create a CSV for the child variations
- Step 4. Upload the Parent Products CSV
- Step 5. Upload the variations CSV
Step 1. Install the plugin
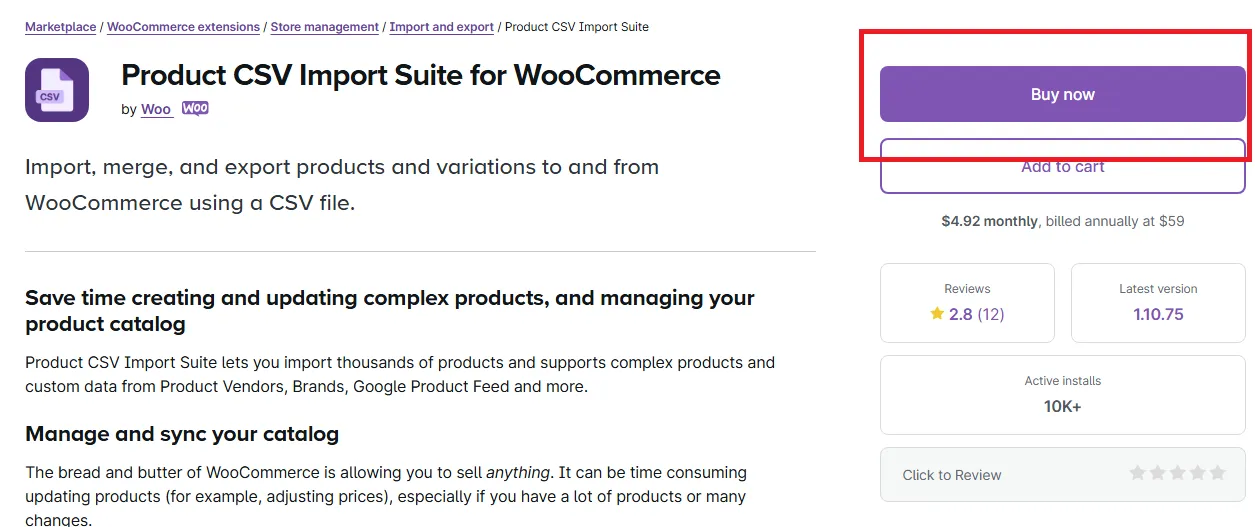
First, go to the plugin’s homepage and click the “Buy now” button. Follow the simple follow-up prompts displayed on the screen to complete your payment, and you are all set!
Step 2. Prepare a CSV for parent products
Once the plugin is installed, you need to create a CSV file for all the parent products (see Woo’s documentation for more detailed instructions).
Make sure you include columns like price, name, colors, group ID, or any other product attributes the store requires. Most importantly, do NOT forget the SKU column since it links each parent product to its child variations – which we will discuss in the next step.
Step 3. Create a CSV for the child variations
Now, it’s time to create another CSV file specifically for the child (product variation) items. The file’s format is relatively similar to that of the parent’s products, except for two things that you must keep in mind:
- Ensure the SKUs in this file correspond to the parent SKUs for proper linking.
- Include columns for variation-specific details such as size, color, or price.

Step 4. Upload the Parent Products CSV
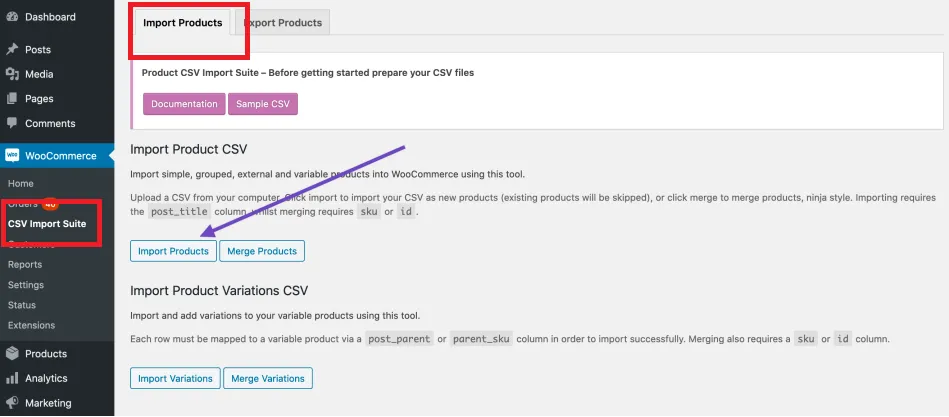
Next, navigate to the “WooCommerce” > “CSV Import Suite” > “Import Products.” Then, in the “Import Product CSV” section, click “Import products” to upload your parent products CSV File.
Remember that:
- If you use default column headers, WooCommerce will automatically map them for you.
- For custom headers, however, you must manually match them to the default fields using dropdown menus.
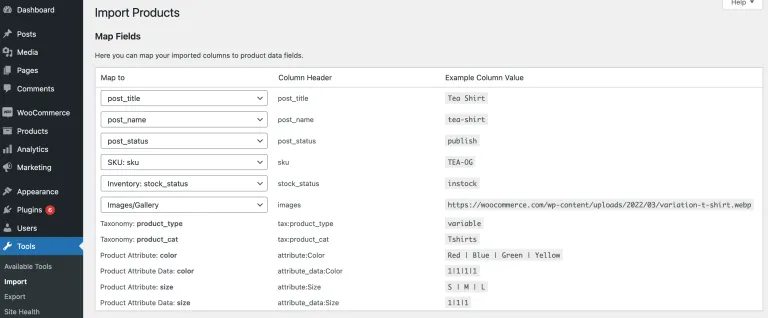
After that, click “Submit” and check the upload result at “Products” > “All Products.” At this stage, the WooCommerce import variable products display will appear, but doesn’t display any variations yet.
Step 5. Upload the variations CSV
Finally, return to “WooCommerce” > “CSV Import Suite” > “Import Products” > “Import Variations.” Then, browse to select your variations CSV file, and click “Upload file and import” to upload it.
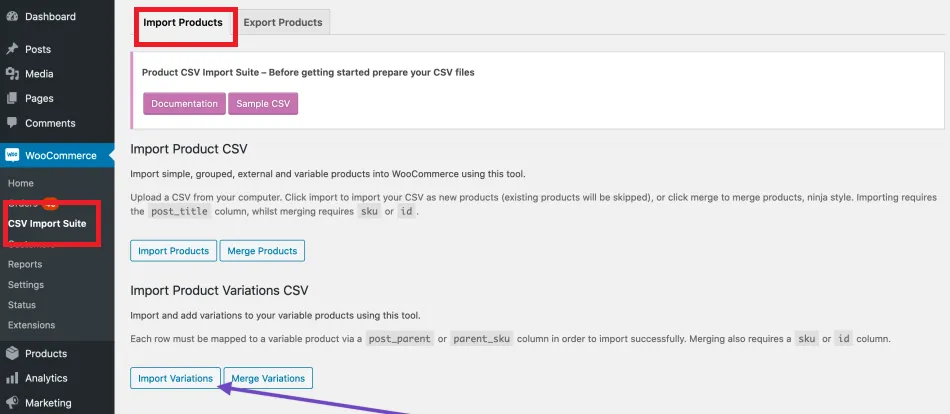
Once you confirm the fields are correctly mapped (just like the parent CSV process), click “Submit” to complete the upload. Your WooCommerce import variable products should now display their variations in the inventory. And that’s it!
Method 2: Import WooCommerce Variable Products with WP All Import
Another trusted plugin for WooCommerce import variable products is WP All Import. Starting at $99 per year (almost twice the price of Import Suite), this plugin offers far more customization and grouping options. Better yet, unlike Import Suite and its exclusive CSV support, WP All Import is also compatible with other formats, such as XML, XLSX, and more.
Unfortunately, even WP All Import cannot eliminate the tedious file preparation process; you’ll still need to handle it manually. The same goes for most field-mapping tasks, which can be equally time-consuming. Without prior experience or a dedicated staff team, this step alone could take months for medium- to large-scale businesses.
In short, let us give you a step-by-step instruction on how to upload WooCommerce import variable products using WP All Import:
- Step 1. Purchase the plugin
- Step 2. Create and upload your import file
- Step 3. Review your import file
- Step 4. Map the data to product fields
- Step 5. Configure import settings
- Step 6. Run the import
Step 1. Purchase the plugin
Before we start the import, it’s quite obvious that you need to install the plugin first!
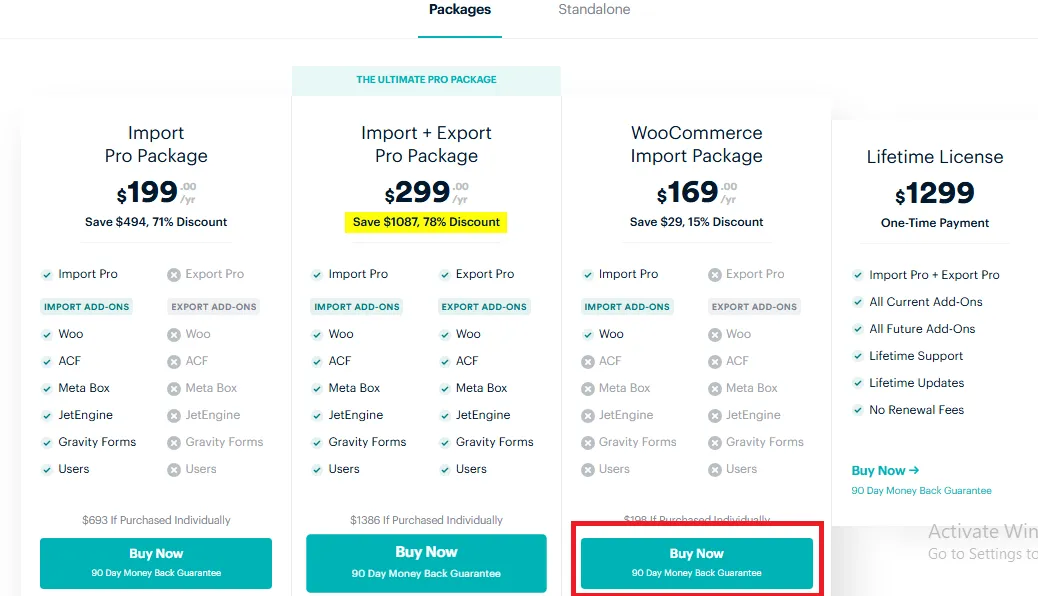
Go to WP All Import’s homepage, navigate to your chosen subscription plan, and click “Buy now.” Then, provide all your payment details in the pop-up box; the rest of the payment process should be a breeze after that.
Step 2. Create and upload your import file
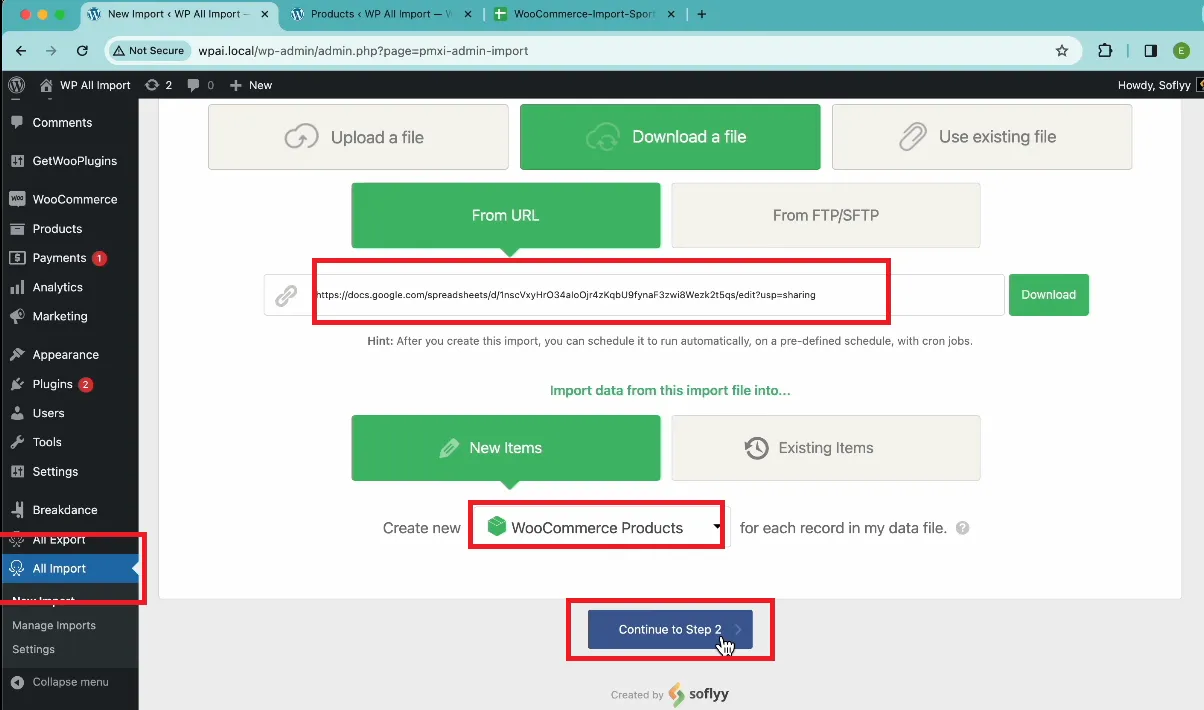
Next, you need to create a proper import file first. Check the featured image below for further reference:
Then, go to “All Import”> “New Import” to upload your import file. Then, choose “WooCommerce products” in the dropdown list right below and click “Continue to step 2.”
Step 3. Review your import file
Now, check the “Review Import File” screen to ensure all your import data is accurate and make adjustments where applicable. Some extra reminders to keep in mind:
- For CSV files, adjust the delimiter if needed.
- If you use XML files, feel free to select the parent node for the import.
- You can also use the “Manage filtering options” on the screen to filter which products to import (e.g., based on conditions.)
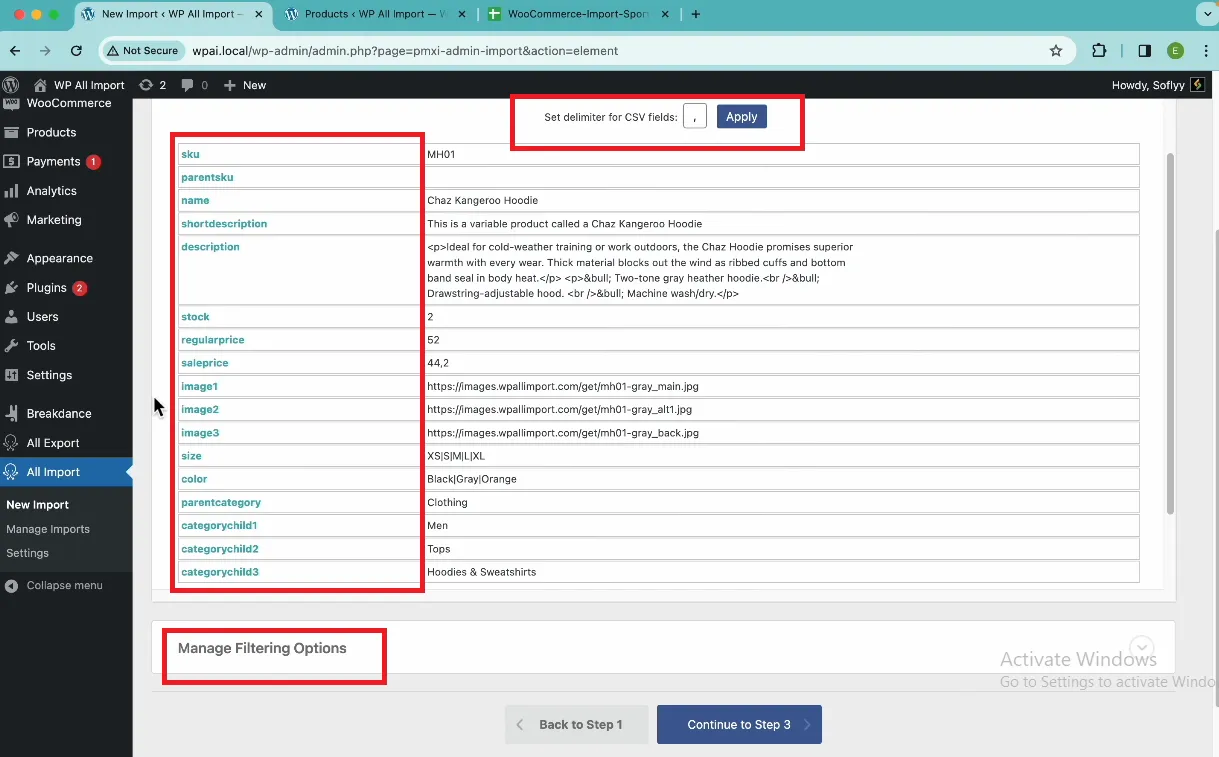
Are you satisfied with the WooCommerce CSV import variable products file? Great! Click “Continue to Step 3” to move on.
Step 4. Map the data to product fields
Next, use the “Drag & drop” interface to map your import file fields (e.g., product title, description, etc.) to WooCommerce product fields.
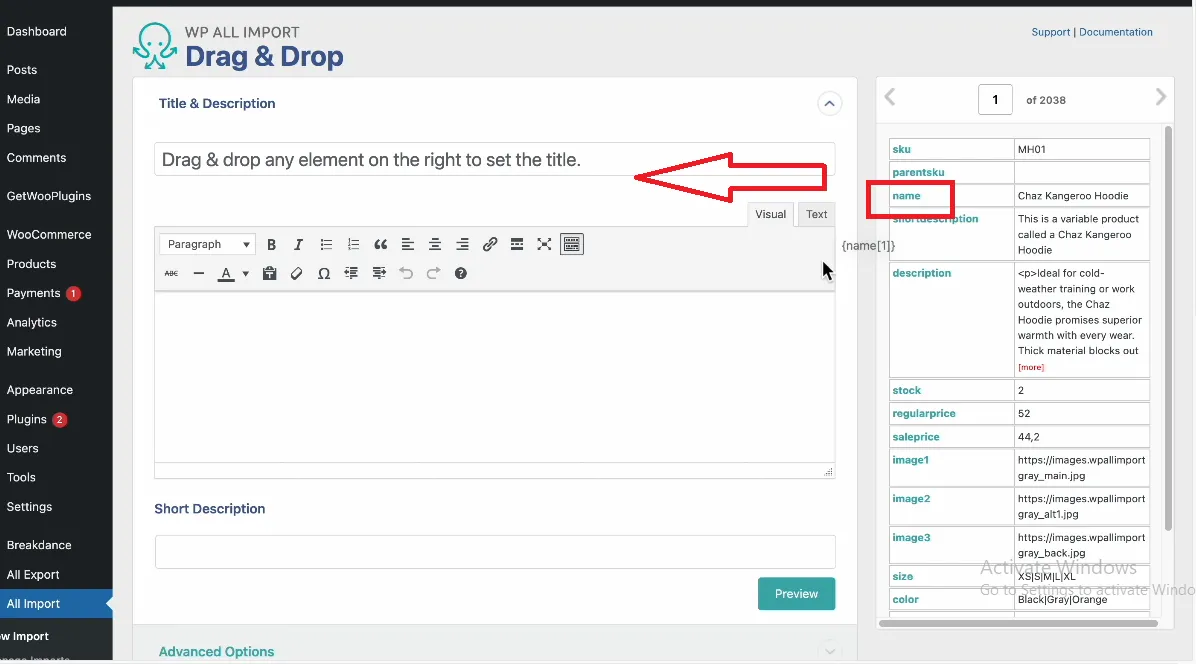
Once done, scroll down to the menu right below to toggle the settings.
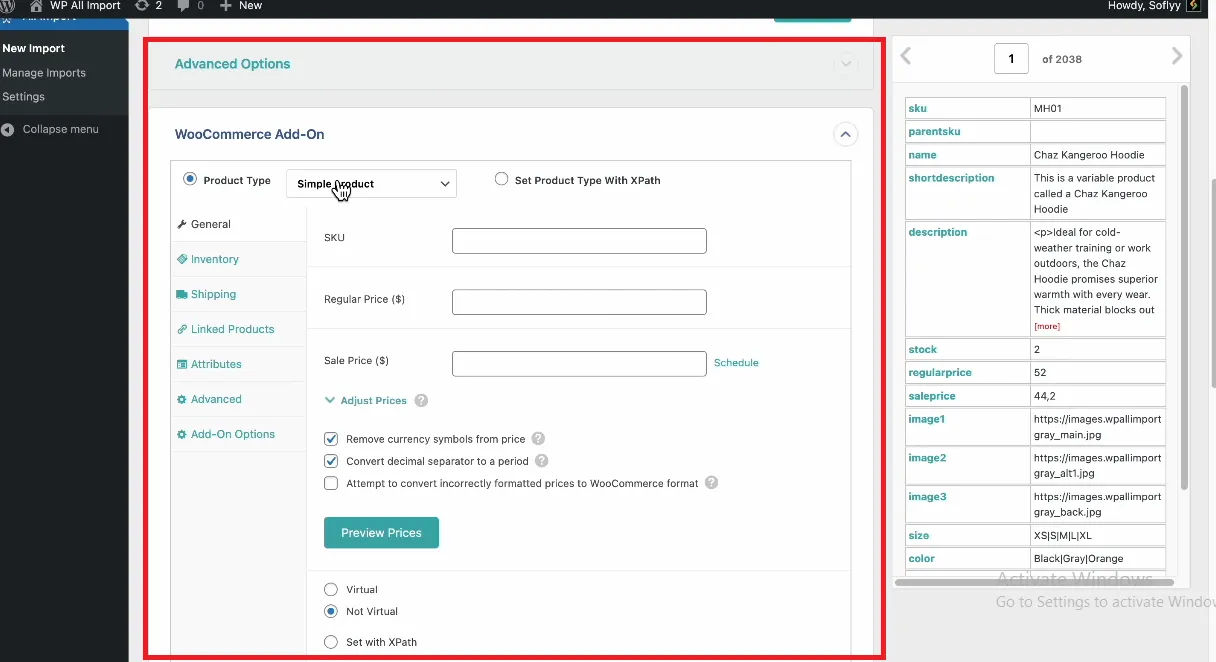
Below are a few suggestions on what you can do:
Section | What You Can Do |
Add-on Section | Set product type: Choose Variable product. Configure these tabs: + General Tab: Specify prices (mandatory for variations to show up). + Attributes Tab: Set variation attributes like Size, Color, etc. + Variations Tab: Link variations to parent products (using SKU, Group ID, or Title). |
Attributes | Use slugs to match attributes (e.g., Size, Color) with existing ones in WooCommerce. |
Variations setup | + By Parent SKU: Use a "P" rent SKU" column to group variations under a parent product. + By Group ID: Use a "Group ID" column to link variations and let the plugin auto-create parent products. + By title: Group variations under a parent product by matching titles. + For XML files: Use XML paths to set up variations when they are child elements. |
After modifying all the necessary settings, click “Continue to Step 4.”
Step 5. Configure import settings
Now, on the “Import settings” screen, you can use the preset options to:
- Auto-detect or set a unique identifier for the import.
- Decide how the import handles updates (e.g., update, delete, or create products).
- Configure scheduling and advanced settings (optional).
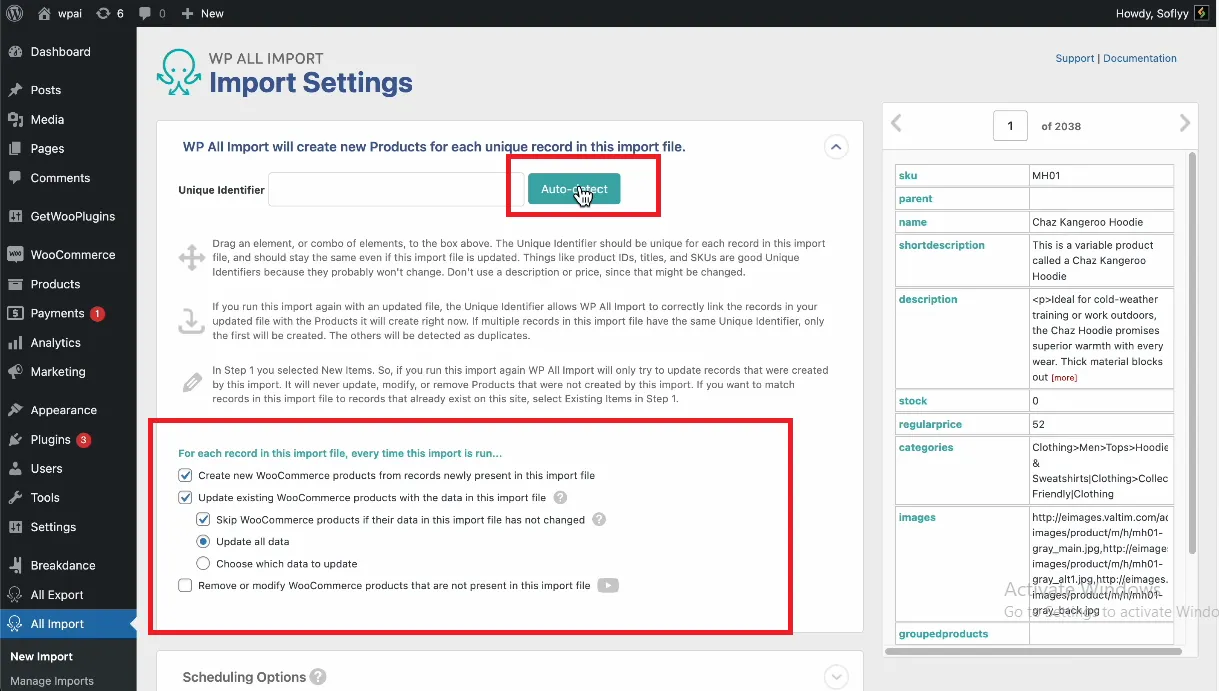
When you are happy with the results, hit “Continue.”
Step 6. Run the import
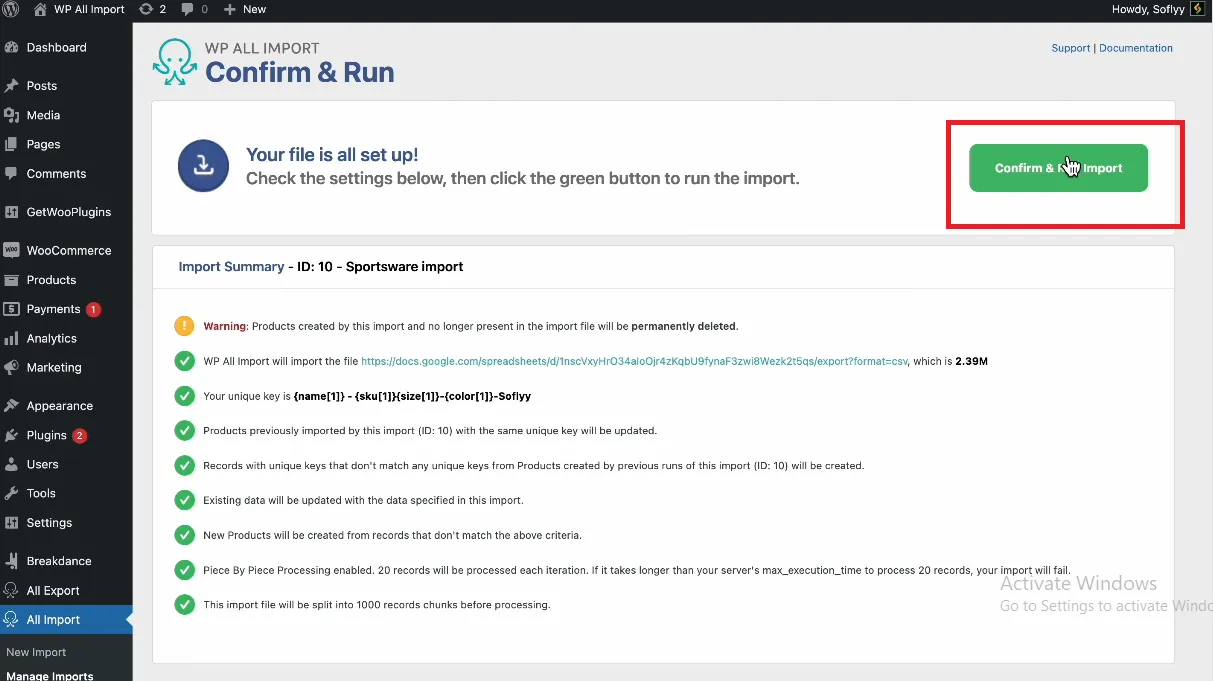
Finally, on the “Confirm & run” screen, review the WooCommerce import variable products summary again before clicking “Confirm & run import.” Once the import process is complete, go to “Products” > “All Products” in WordPress to verify the data.
Method 3: Import WooCommerce Variable products with LitExtension (Advanced)
Overall, though the two plugins for WooCommerce import variable products mentioned above offer some standout features, the excessive time and manual effort they require remain a major limitation. Worse, the import files mostly handle basic product attributes, meaning most of your customized product variations and features are severely unsupported.
And that’s where LitExtension comes in, a smarter, more efficient solution to your migration challenges!
As the #1 eCommerce Migration Expert, we deliver tailored solutions to ensure your data transfer is effortless and lightning-fast. Better yet, beyond WooCommerce import variable products, our team also facilitates smooth migrations of other data types, such as customer information, tax settings, shipping methods, credit card data, passwords, etc.,all with precision and ease!
As of this writing, LitExtension offers two specialized migration packages to cater to diversed needs of your WooCommerce import variable products project. Keep scrolling to see which is a better fit for you:
All-in-One Package
Overall, the All-in-One package offers a 100% worry-free approach to handling WooCommerce import variable products!
Specifically, our team of migration specialists will take care of every technical detail from beginning to end, while you just need to sit back and stay alert for our updates. The whole process is as follows:
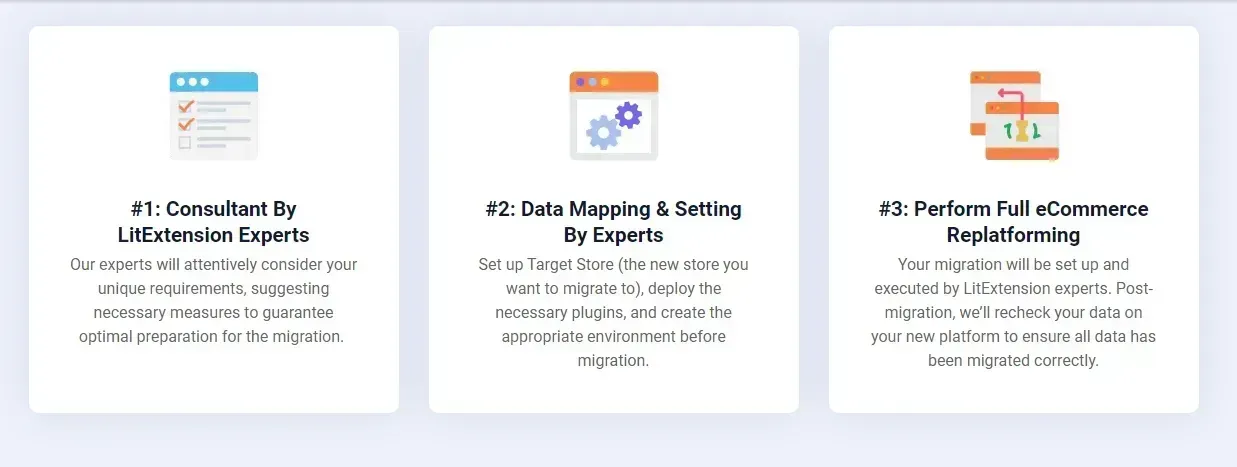
Step 1. Consultant by LitExtension experts
Your migration journey begins with a tailored consultation. Once you reach out to our team, we will schedule a meeting accordingly so you can discuss all your migration requirements with us in great detail.
As soon as the roadmap is clear, we will formalize the plan through a Service Level Agreement (SLA) and begin the project immediately after you complete your payment. From that moment onwards, you can trust us to oversee every part of the WooCommerce migration.
Step 2. Data mapping and setting by experts
Next, to ensure a smooth transition, our team will meticulously prepare your new store by:
- Setting up critical redirects for SEO continuity (if requested)
- Cleaning and organizing your data for optimal functionality
- Customizing settings to match your requirements.
Throughout this stage, you will have the opportunity to have a closer look at our preparation process with unlimited demo migrations. Simply require us to perform as many demos as you would like (at no extra cost), and leave us suggestions for improvement until you are ready for the next step.
Step 3. Perform full eCommerce replatforming
Once all preparations are complete, our team will execute the full migration and run the WooCommerce import variable products for you. Better yet, unlike the Automated package, all additional options are fully covered here – no extra fees required!
And that’s not all; our commitment extends far beyond the migration itself. Indeed, after reviewing and validating your new store (to ensure all criteria from Step 1 are met), we also provide ongoing, dedicated post-migration support as below:
- 02 free Re-migration
- Free and unlimited Smart Update
- Free and unlimted Recent Data Migration, given that the newly incurred entities are less than 5% of the original ones.
Let Our Experts Handle Your Store Migration!
With the All-in-One Migration Service, our experts take care of everything, ensuring a seamless and stress-free migration.
Automated Package
Unlike the All-in-One package, the Automated package puts you in full control of the migration process.
This approach is quite similar to Import Suite and WP All Import, though there’s still a significant advantage: you won’t need to spend days or weeks preparing the CSV import file manually. All it takes is to configure a few basic settings – a process that should take no more than ten minutes. After that, the LitExtension tool will automatically run the WooCommerce import variable products for you!
To transition your store with ease (given that the data requirements are not overly complex), you just need to follow three easy steps:
Step 1. Set up Source Cart and WooCommerce Cart
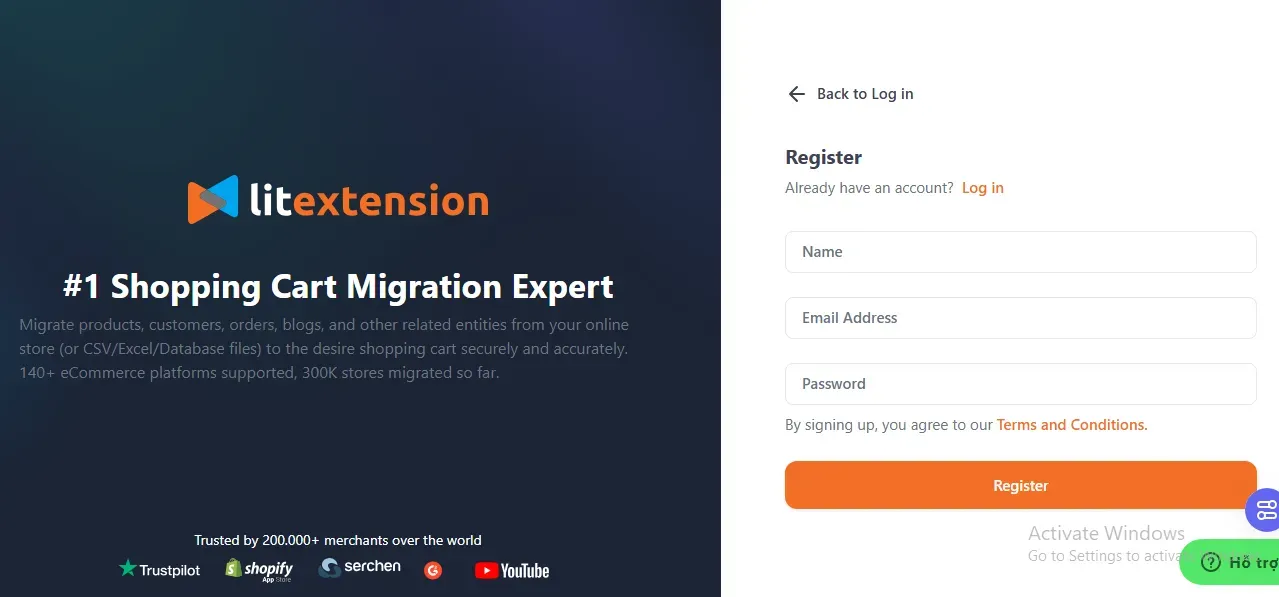
First, remember to register on our platform: visit the registration page, then fill out your details (including your name, email, and password). Or, if you already have an account, another alternative is to log in via the “Sign in with Google” option.
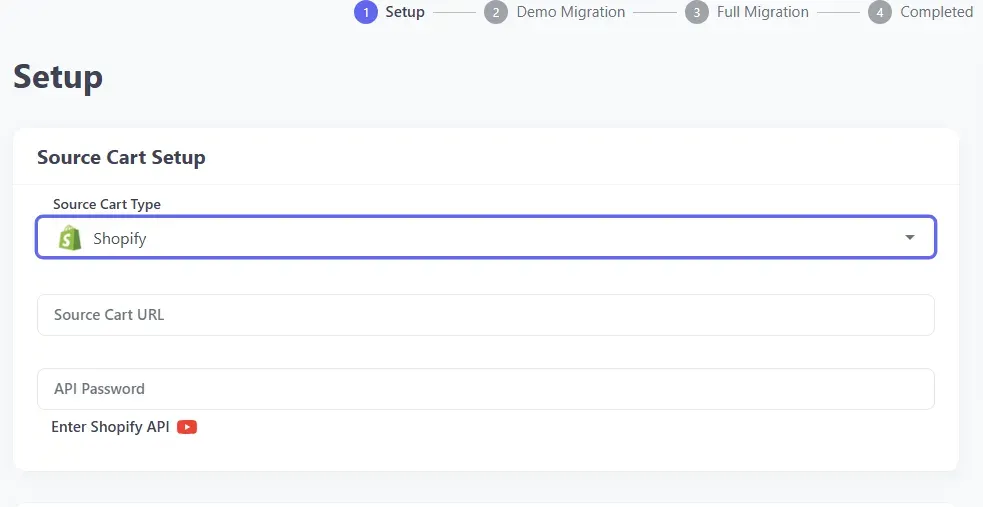
Next, navigate to the Migration” section and click on “Create New Migration.” Here, you select your store’s current platform (e.g., Shopify) as the Source Cart and enter its URL. Once done, follow the straightforward instructions on the screen to connect your store to the LitExtension system securely.
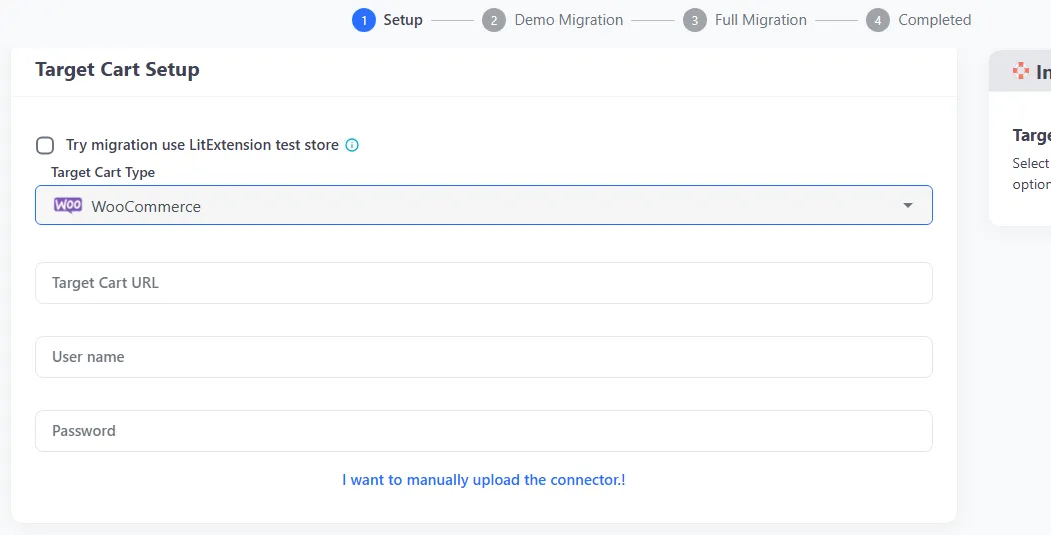
Now, choose the platform you need to migrate to (in this case, WooCommerce) from the dropdown menu and input the URL of your new store. After that, follow the prompts on-screen to set up the connector with LitExtension, which ensures a smoother migration process for you down the line.
Step 2. Select data to migrate
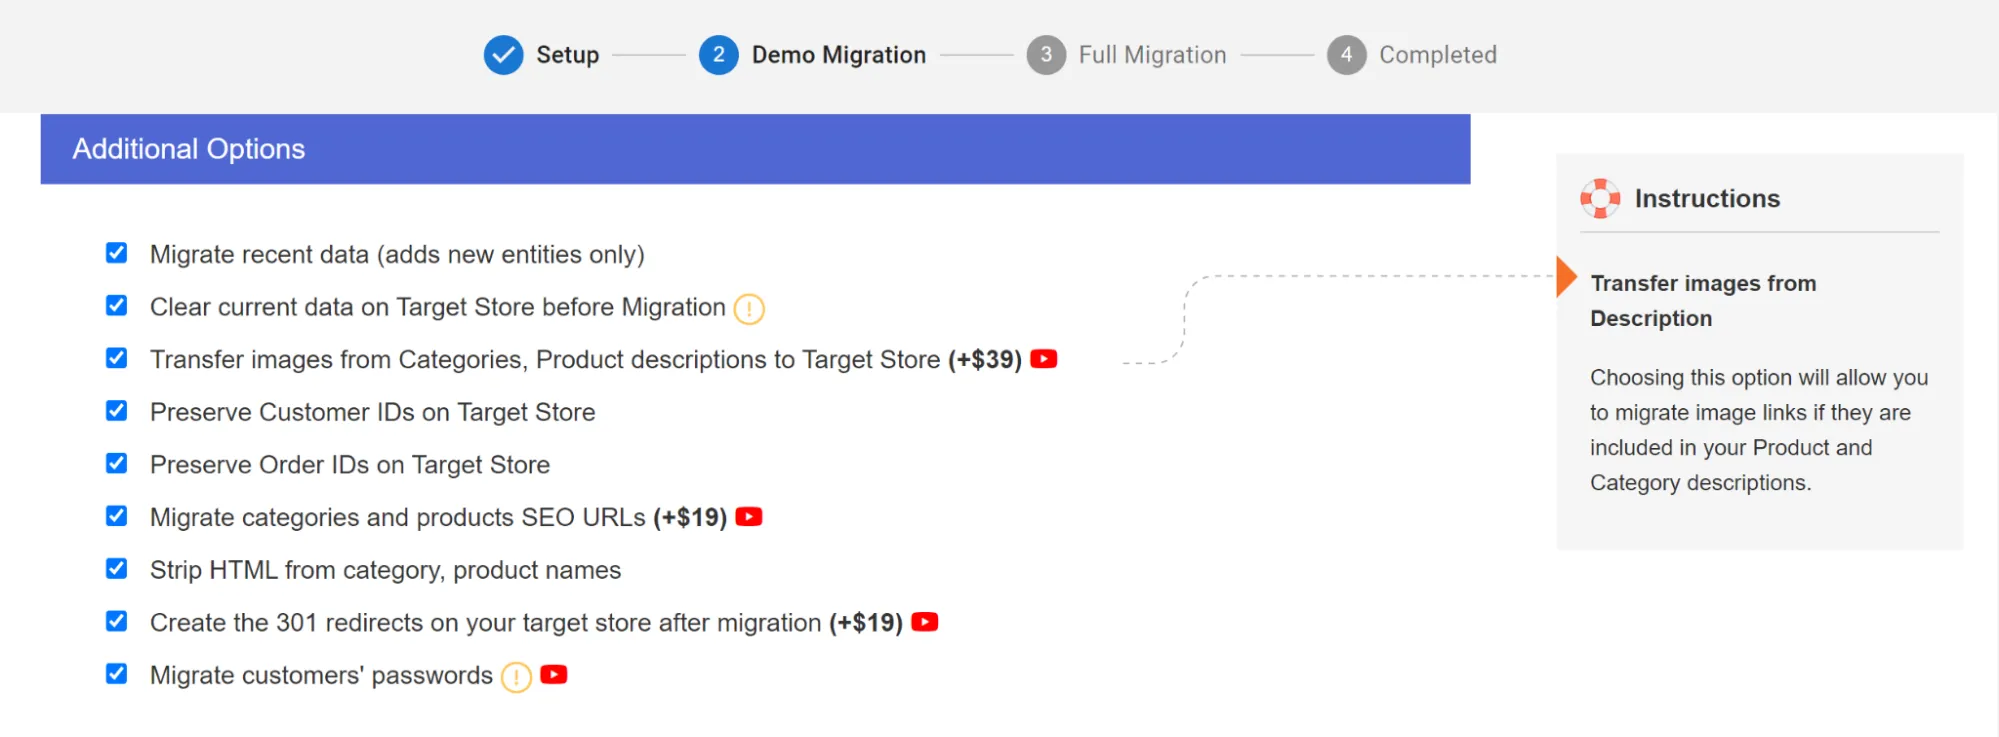
At this stage, you will see a comprehensive list of data types available for migration. These include categories, products, orders, customers, store settings, and more. Tick the box next to each specific entity (or simply click “Select All” for a complete migration). It’s your call!
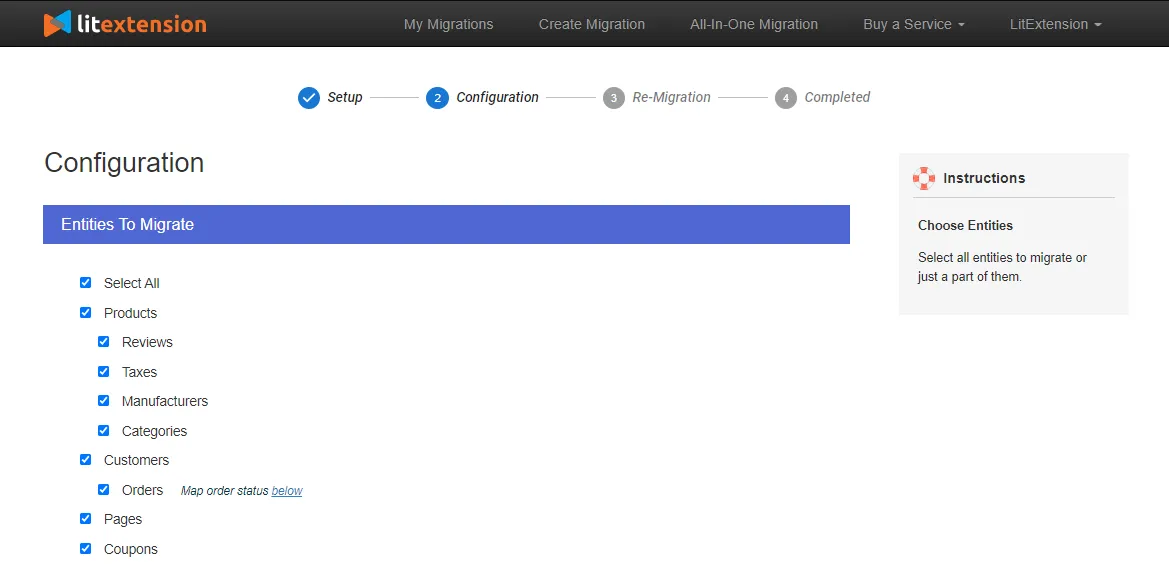
And if you still seek extra customization, no worries; there’s a list of additional options (e.g., advanced mapping, extended data transfers, etc). Note that some of them might involve a nominal fee, so weigh your options and budget wisely.
Step 3. Perform the full migration
Once your setup is complete, it’s time to initiate a free demo migration. This step allows you to transfer up to 20 items per data type (e.g., 20 products, 20 customers) at no cost – a wonderful opportunity to test the water.
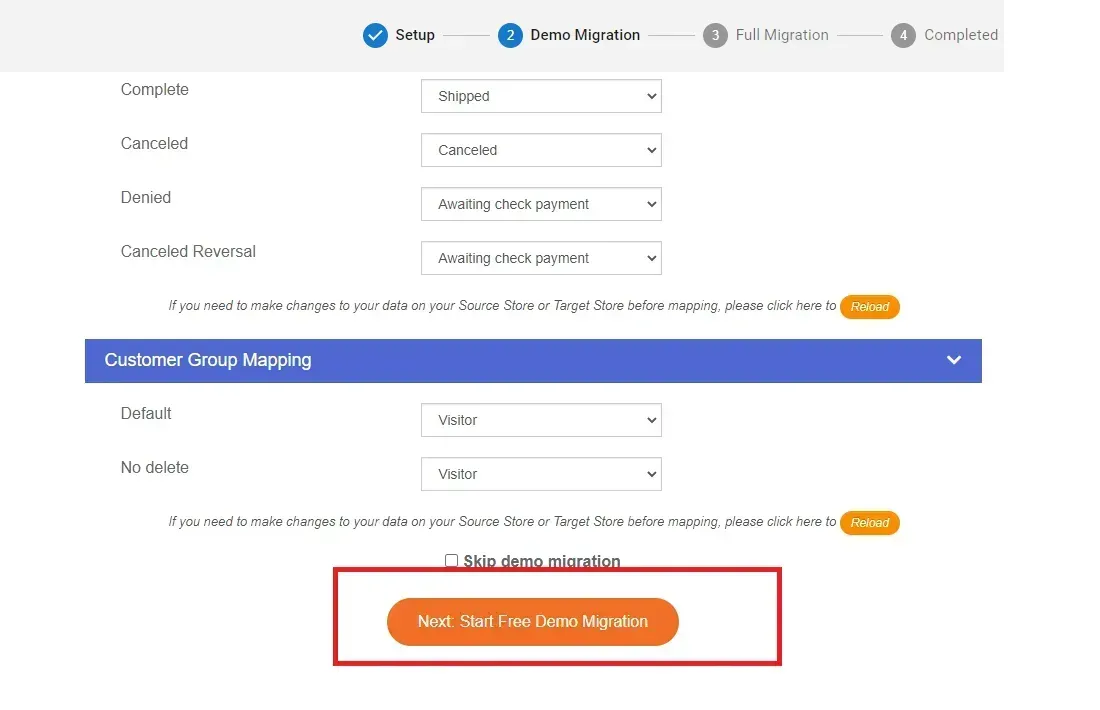
Once you confirm the accuracy of our demo migration, feel free to proceed to the full migration with confidence. A confirmation email will arrive in your mailbox as soon as the migration is complete.
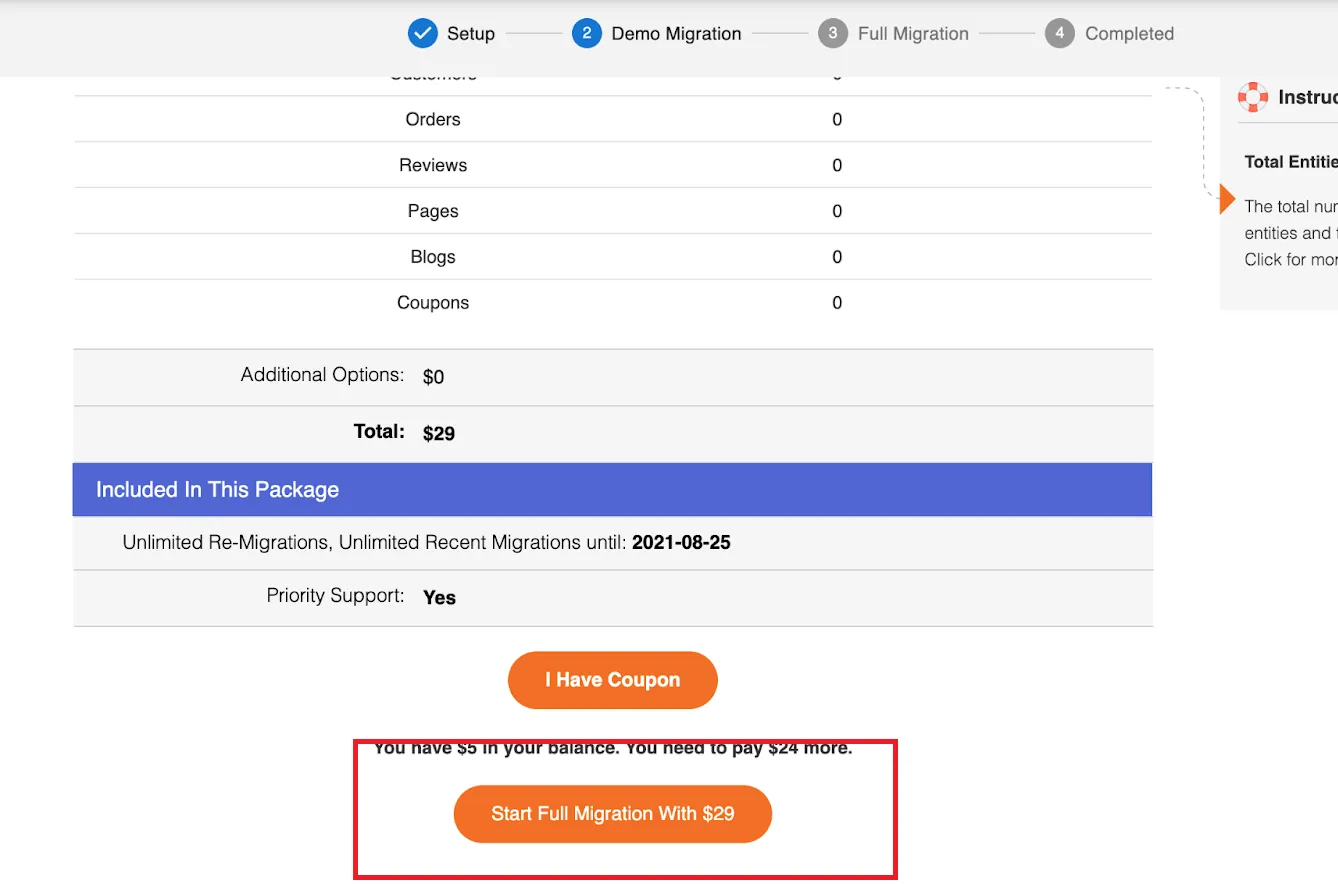
For more insights on the pricing, benefits, and features included, check out our guide on LitExtension Automated Migration here.
Need Help to Migrate Your Store to WooCommerce?
LitExtension Automated Migration Tool transfers products, customers, and orders
from old store to WooCommerce – fast, accurate, and hassle-free.
What To Do After The WooCommerce Import Variable Products
A successful WooCommerce import variable products process doesn’t end the moment the upload bar hits 100%; there are still a few crucial checks to run to make sure everything displays and functions the way it should. Skipping this stage is one of the most common reasons store owners later discover broken variations, missing images, or products that simply won’t sell. To save yourself that headache, here’s what you should do right after the import:
- Verify all variations appear correctly under the “Variations” tab of each product.
- Double-check pricing on every variation, since WooCommerce hides variations with no price set.
- Review stock status and quantities to confirm they match your source data.
- Inspect product images and galleries, including any variation-specific images.
- Test attribute consistency (e.g., “Red” vs. “red”) to avoid duplicate or broken attributes.
- Preview the product page as a customer would and click through the variation dropdowns.
- Clear your cache and refresh permalinks under “Settings” > “Permalinks.”
- Run a backup once everything checks out, giving yourself a clean restore point.
Taking the time to walk through this checklist might feel tedious, but it’s a small price to pay compared to fixing a storefront full of broken variations after customers have already started complaining. Once everything is verified, you can move on to the more advanced part: troubleshooting any lingering issues, which we’ll cover next.
Troubleshooting Common WooCommerce Import Variables Problems
Even with the best preparation, things can still go sideways during a WooCommerce import variable products process. The good news? Most of these hiccups come down to a handful of recurring culprits, and once you know what to look for, they’re refreshingly easy to fix. Below is a quick-reference table to help you diagnose and resolve the most common issues.
Problem | Reasons | Solution |
Variations don't show up | Attribute values don't match exactly between the parent and child rows, slugs are inconsistent, or the parent product is missing some of the listed values. | - Make sure attribute names and values match across every entry. - Confirm the parent lists all possible values. - Double-check that global attributes already exist. |
Images don't import | Broken image URLs, mismatched filenames, blocked external hosting, or incorrectly structured image columns/tags | - Use full, valid image URLs and confirm they load in a browser first. - For multiple images, separate them with commas in CSV files or use proper <image> tags in XML files. |
Duplicate products appear | SKUs were reused, changed, or left blank, or the import was set to create new products instead of updating existing ones | - Assign a unique SKU to every product and variation. - Enable the "update existing products" option when applicable. - Run a small test batch first to confirm everything maps correctly. |
SKUs aren't recognized | The SKU contains invalid characters, duplicates the parent's SKU, or has hidden leading/trailing spaces | - Keep SKUs clean and alphanumeric - Give every variation its own unique SKU. - Trim any extra spaces before importing. |
Attribute slug or prefix mismatch | Global attributes always use the pa_ prefix, while custom attributes use the attribute: format. Mixing these up, or swapping underscores for hyphens, can break the whole variation structure. | - Verify that attribute slugs match exactly. - Stick to global attributes whenever possible. - Avoid any reserved attribute names. |
Variations exist but won't display on the storefront | The variation is missing a price. WooCommerce simply won't show a variation on the front end unless the price field is filled in | Go through your imported products and confirm that every variation has a regular price (and sale price, if applicable) set. |
Import times out on large files | The server runs into memory or execution time limits, often on shared hosting, especially when importing thousands of variations at once | - Increase your PHP memory and timeout settings. - Split large files into smaller batches. - Use a plugin that supports scheduled or background processing. |
As you can see, most WooCommerce import variable products errors trace back to the same root cause: small inconsistencies in how the file was prepared.
Bonus Reading: How to Export WooCommerce Variable Products
Now that your WooCommerce import variable products project is wrapped up, here’s a question worth keeping in your back pocket: what happens when you need to go the other way? Whether you’re backing up your catalog, migrating to a new host, or simply want a clean file to edit in bulk before re-importing, exporting your variable products is just as important a skill as importing them.
Unfortunately, since WooCommerce’s native tools weren’t built with variable products in mind, so you’ll need a plugin to handle this process. Whichever solution you choose, the general workflow looks like this:
- Install an export-capable plugin, such as the CSV Import Suite developed by WooCommerce itself, or a more advanced tool like WP All Import’s companion export add-on.
- Navigate to the export section of your chosen plugin (for example, “Products” > “Export”).
- Select the product types you want to include, making sure variable products and their variations are part of the export, not just the parent listings.
- Adjust any additional settings, such as which columns or attributes to include.
- Download the file, which will contain both your parent products and their child variations, properly linked by SKU.
This export file becomes incredibly useful down the line. You can use it as a backup before running a major update, a template for preparing future import files, or even a way to bulk-edit existing products (just export, edit the data in a spreadsheet, then re-import the corrected file).
WooCommerce Import Variable Products: FAQs
How to import variable products in WooCommerce?
To import variable products in WooCommerce, you can either use third-party plugins (like Product CSV Import Suite or WP All Import) or opt for leading migration services like LitExtension.
How to import product attributes in WooCommerce?
The process requires a third-party plugin or extension. Simply go to “Products”> “Import” (or similar sections in your chosen plugin), upload the CSV file containing the attributes, and then map them to the corresponding fields during the import process.
How do I import multiple products in WooCommerce?
Again, you’ll need a plugin here since this feature has never been built into WooCommerce’s system. Once the plugin is installed, go to “Products” > “Import” (or other sections with similar names), upload a CSV file with all your product data, map the fields correctly, and run the importer to add the products to your store.
How to export variable products in WooCommerce?
You must set up a plugin (like the CSV Import Suite developed by Woo). Then, head to “Products” > “Export” to select the product types and adjust any additional settings if needed. Finally, download the CSV file containing your product data.
Final Words
We hope you now have a clear understanding of all the available methods for WooCommerce import variable products.
Overall, while both the plugins discussed above have their respective merits, all the painstaking manual preparation and customization remain quite a huge deal breaker. Not to mention, if you’re planning a complete and thorough store migration, these plugins alone won’t suffice.
In that case, why not let LitExtension WooCommerce Migration experts handle the process for you instead? Backed by 15+ years of experience and a proven track record, we will ensure your WooCommerce store is up and running in no time. Join the 200,000+ customers worldwide who have trusted us to make their migrations a success, and you won’t regret a single penny invested in our service.


