For many store owners, handling WooCommerce import orders can feel overwhelming—especially when you're working with large datasets, old transaction records, or platform migrations. CSV errors, mismatched details, and missing order data often turn the process into a headache.
The good news is WooCommerce gives you flexible options. You can manually create orders one by one or use third-party plugins to import hundreds of orders in bulk with just a few clicks. With the right tools and methods, managing WooCommerce import orders becomes much faster, easier, and less error-prone.
In this guide, you'll learn how to:
- Manually import WooCommerce orders
- Advanced import orders with LitExtension
- Import WooCommerce orders via a third-party app
- Best practices for WooCommerce import orders
Let’s break it down step-by-step.
How to Manually Import WooCommerce Orders
If you have a small number of orders and prefer to input them manually into WooCommerce (e.g., from phone calls, offline sales, or a short list), WooCommerce’s built-in interface allows you to do this without any plugin.
Important note: WooCommerce does not support order import via CSV by default. You must use a plugin for bulk order import. Manual creation is only suitable for low-volume or occasional orders.
Step 1. Open the Order panel
From your WordPress dashboard, go to WooCommerce > Orders. Then click the “Add order” button at the top of the page.
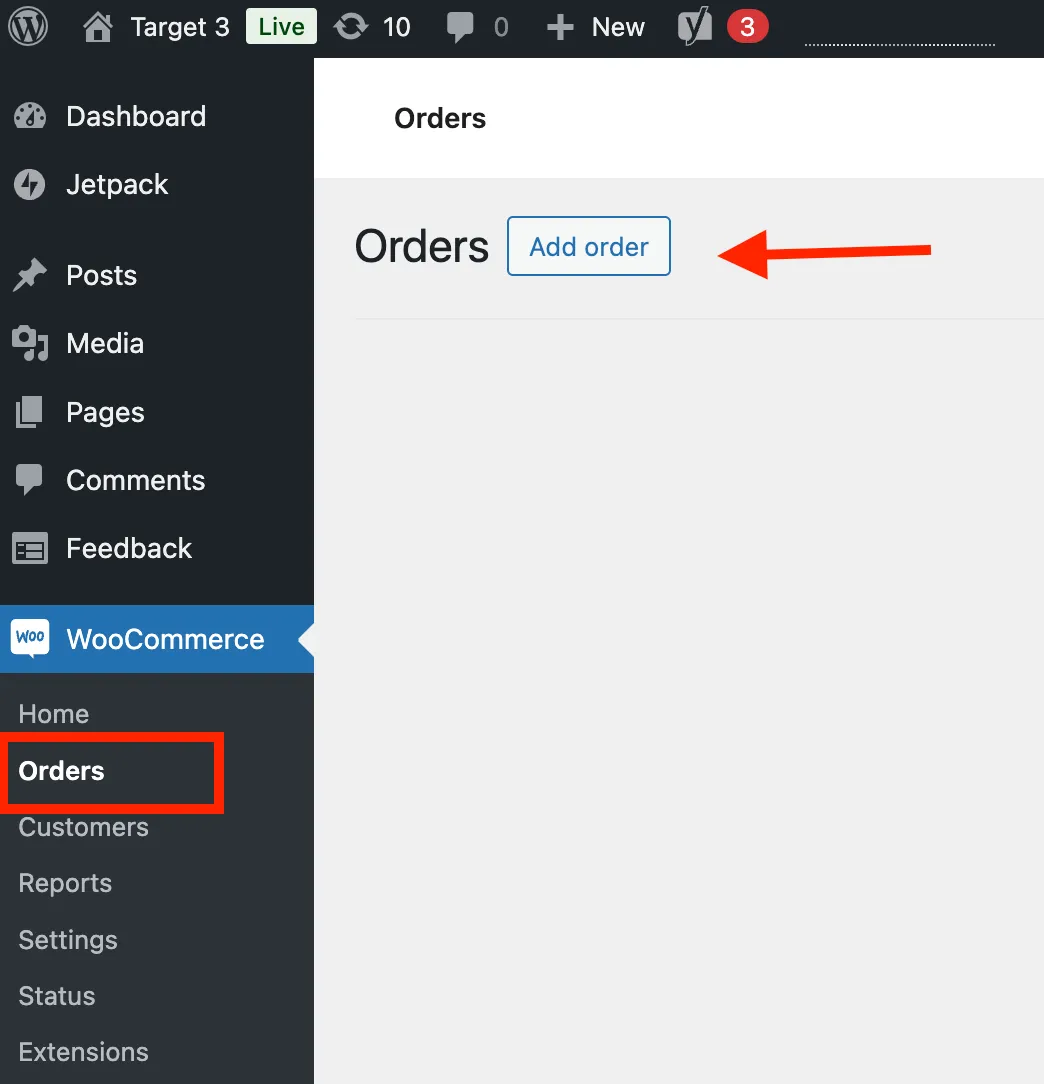
This will open a blank order form where you can manually enter all order details.
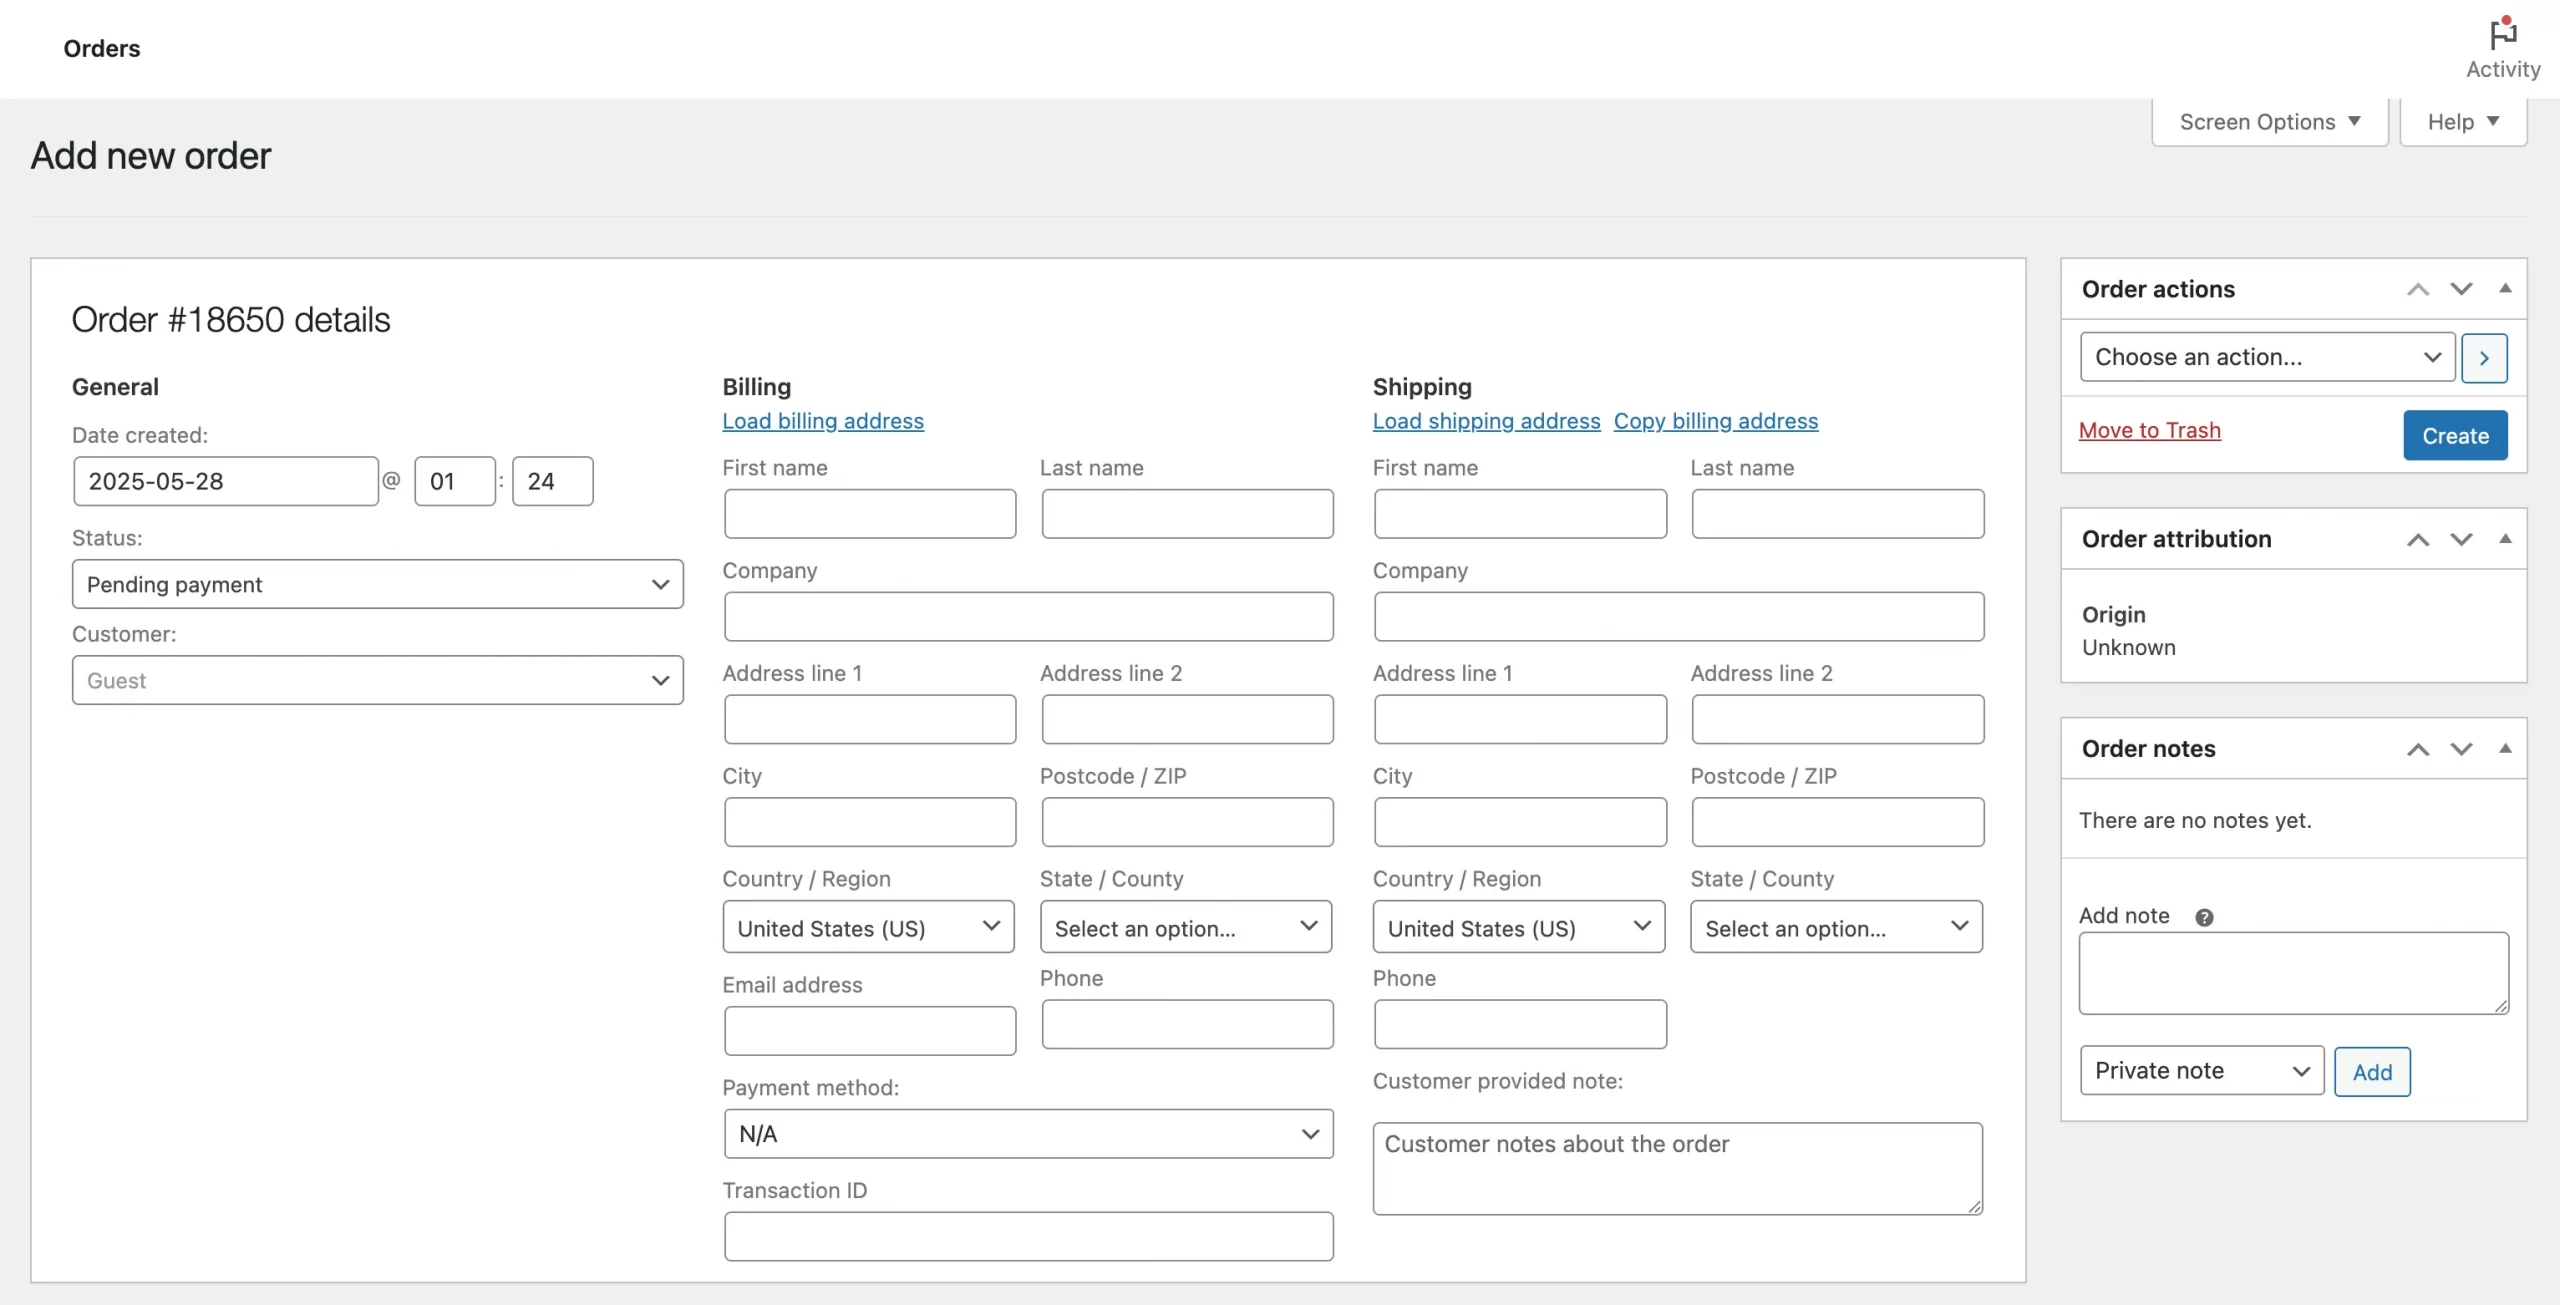
Step 2. Set general Order information
In the General section (top left):
- Date created: Adjust to match the order date (helpful for backdated entries).
- Status: Choose one from the dropdown:
- Pending payment
- Processing
- On hold
- Completed
- Cancelled
- Refunded,…
- Customer: Select an existing user or leave it as “Guest”.
If you’re creating the order for a past customer, start typing their name or email in the Customer dropdown to link the order to their account.
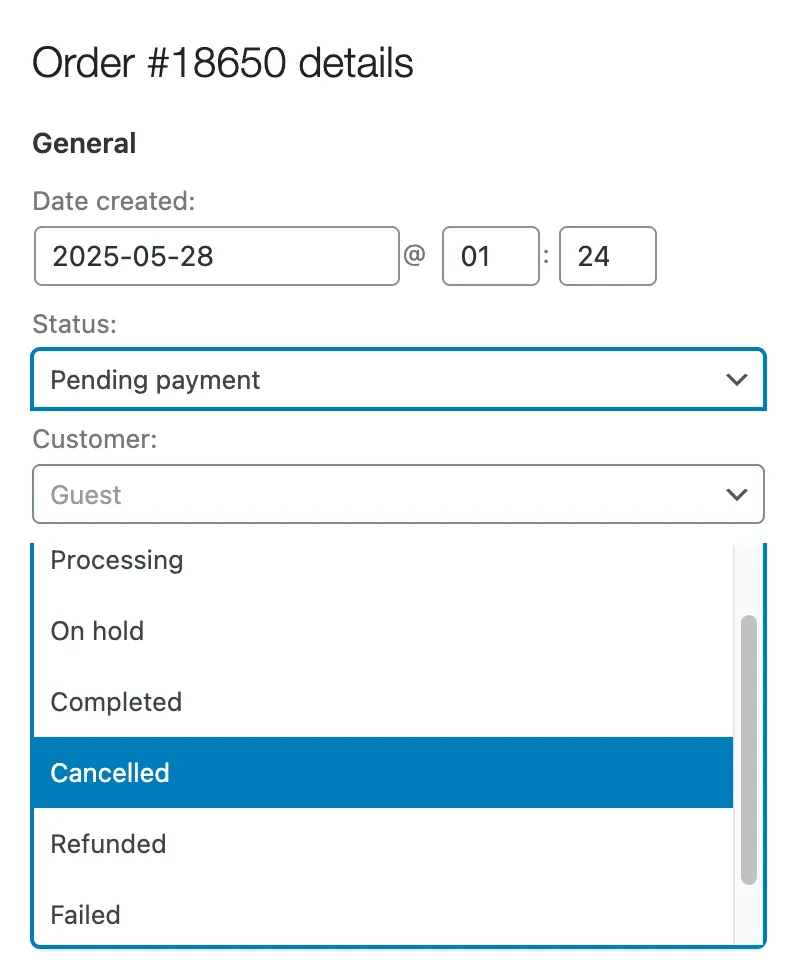
Step 3. Enter billing and shipping information
Fill out both sections or copy one to the other:
3.1. Billing details
- First name, Last name
- Company (optional)
- Address, City, State, Zip
- Country
- Email address (for order confirmation emails)
- Phone number
3.2. Shipping details
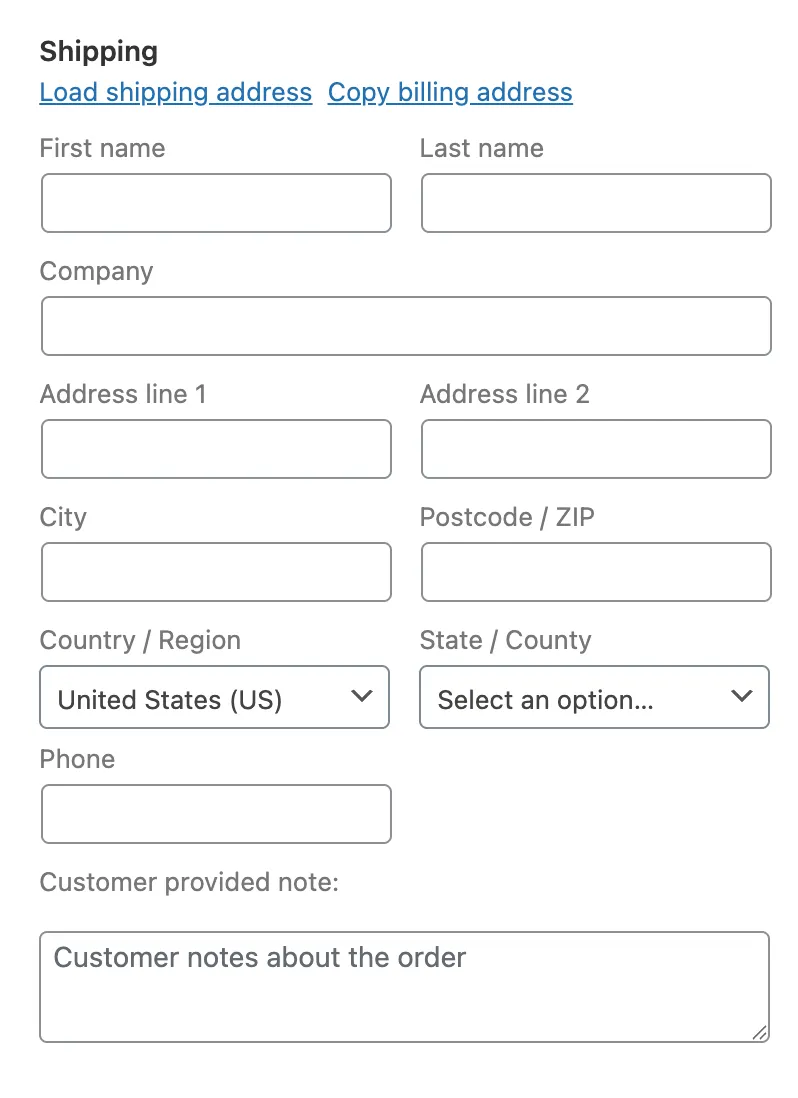
- Same fields as billing.
- You can click “Copy billing address” to speed things up.
Even if shipping isn’t needed (e.g., for digital products), WooCommerce still shows these fields by default.
Step 4. Add products to the Order
Scroll to the items section:
- Click “Add item(s)” > “Add product(s)”
- Use the product search field to locate items.
- Adjust quantity, cost, or taxes as needed.
- Optional: Click “Apply coupon” to apply any available discount codes.
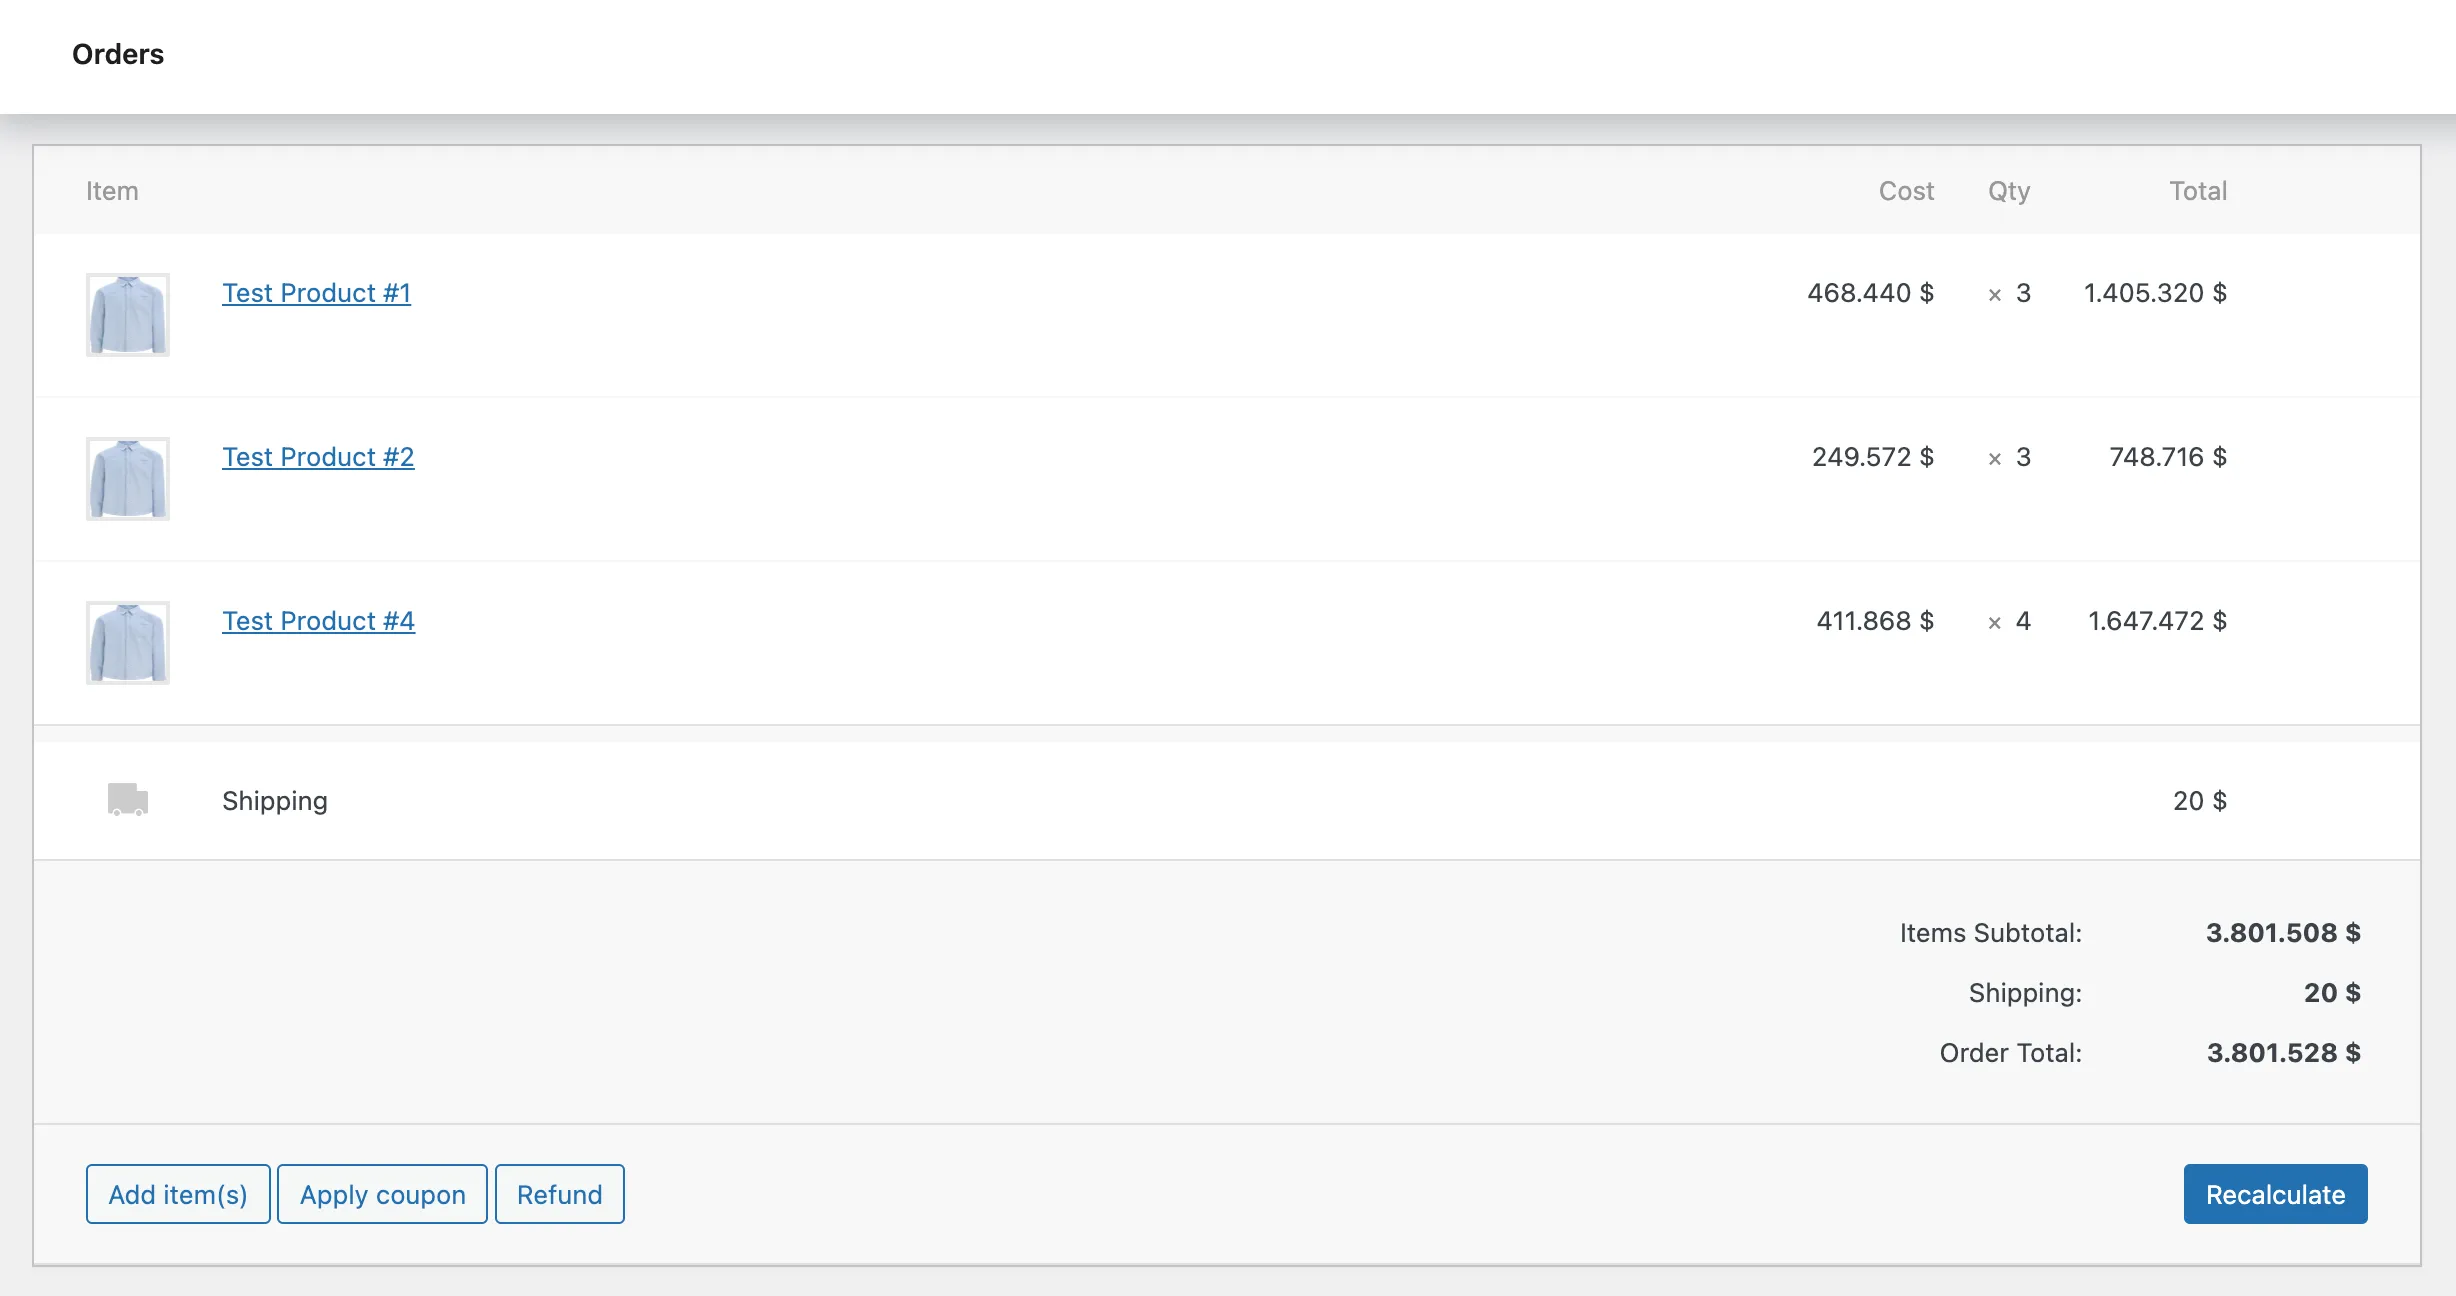
Once products are added, click “Recalculate” to ensure totals are correct:
- Items Subtotal
- Order Total
You can also manually edit pricing if needed ,which is useful for custom orders or special cases.
Step 5. Manage additional details (optional)
You may optionally configure:
5.1. Downloadable product permissions
Grant download access for digital products (if applicable).
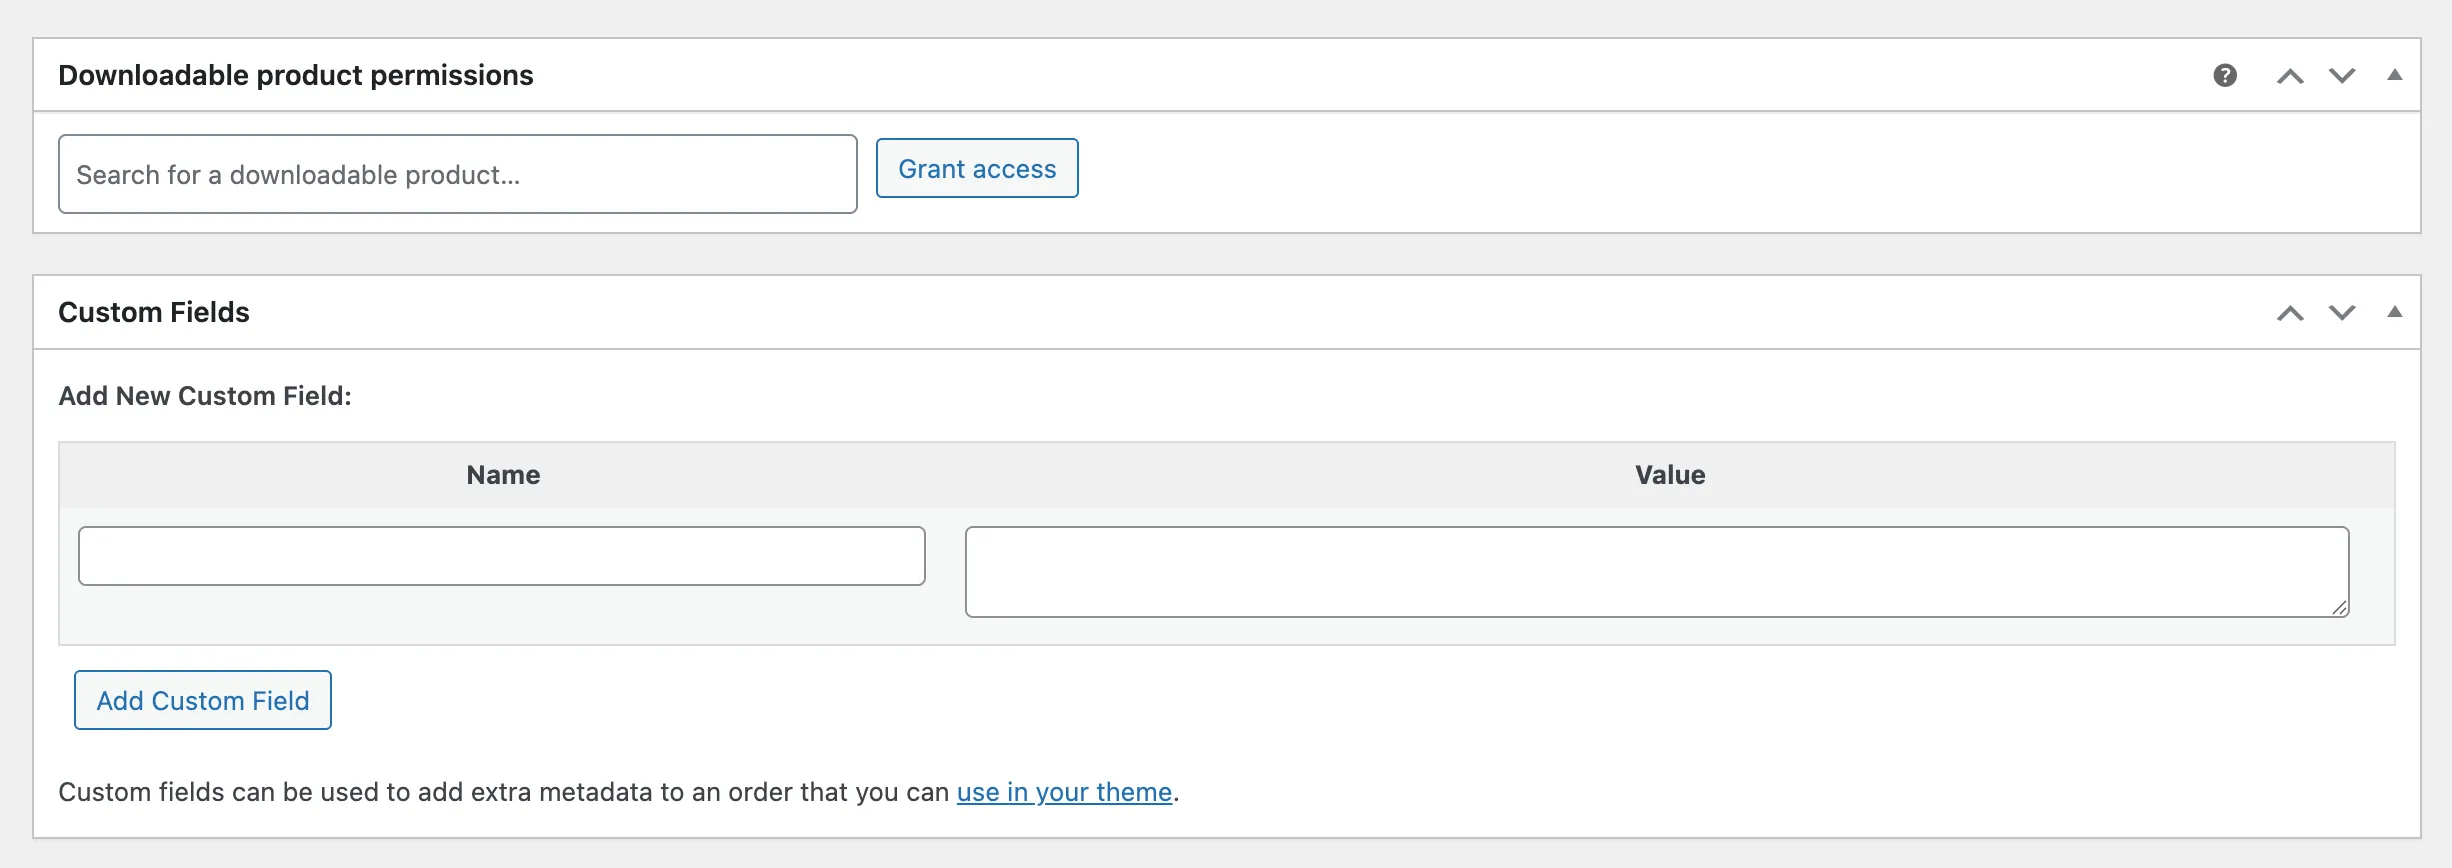
5.2. Custom fields
Add metadata (if your store uses custom fields for integrations or reporting).
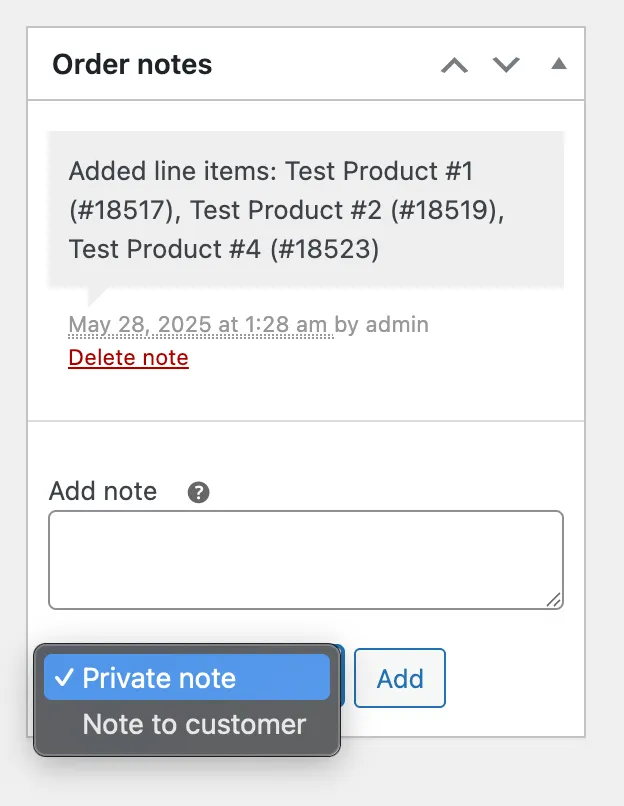
5.3. Order Notes
- Add private notes for internal staff (e.g., “Phone order – verify before shipping”).
- Add customer notes that will be visible in order emails.
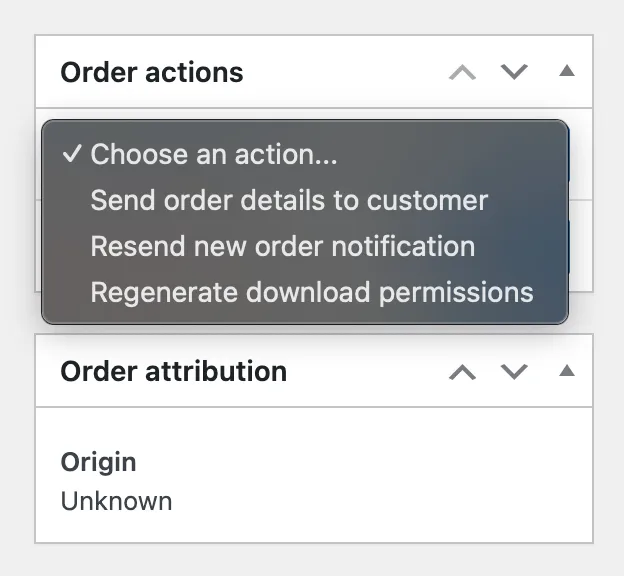
Step 6. Finalize the order
On the right sidebar:
- Use the Order Actions dropdown to:
- Send order confirmation email
- Trigger invoice or download permissions
- Click the blue “Create” button to save the order.
Once saved, the order will appear in your WooCommerce Orders list just like any normal online order.
As said, you should only use manual methods when:
- Creating one-off or manual orders (e.g., from customer phone/email)
- Adding orders that were paid for offline
- Back-entering small volumes of historical orders
- Making admin-only test orders
If you need to import multiple orders at once, you’ll need a plugin. WooCommerce’s built-in interface does not support CSV-based order import, and manually adding dozens of orders one by one can quickly become inefficient. And we'll talk about it right in the section below!
Advanced WooCommerce Store Migration with LitExtension
The Import Export Suite plugin above is a significant step over WooCommerce's built-in tools for importing orders and product-related data. But what about all the other complex data types like passwords, blog posts, taxes, CMS pages, and more? Unfortunately, this plugin cannot yet handle those.
Plus, since it's still just a small plugin at the end of the day, the number of entries and entities you can import is quite limited. And if you run into any technical issues with WooCommerce import orders, you're left to troubleshoot them on your own!
Here's where LitExtension steps in as a much better alternative for store migration. With LitExtension, you get two competitive package options: the Basic Migration (where you perform the migration yourself) and the All-in-One Migration (where our team of experts handles everything for you). Below are the detailed step-by-step guides for each package:
Automated Migration
Before exploring the Basic Migration package, remember to create your account first! Go to this link to enter your name, email, and password, then click “Register.” (Or, if you already have an existing Google Account, go to this link and click “Sign in with Google.”)
Once you're all set, you can move on to the next three steps described as follows:
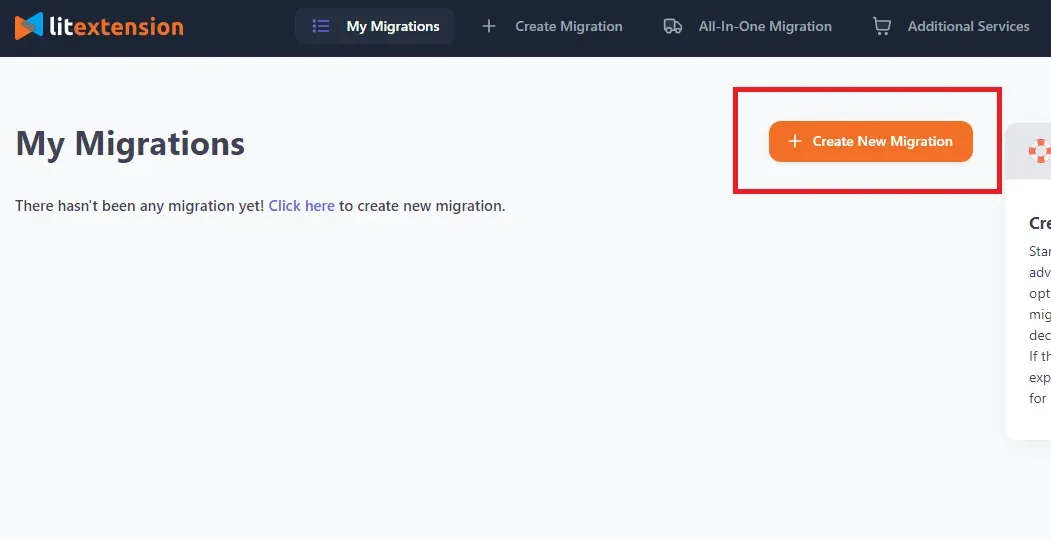
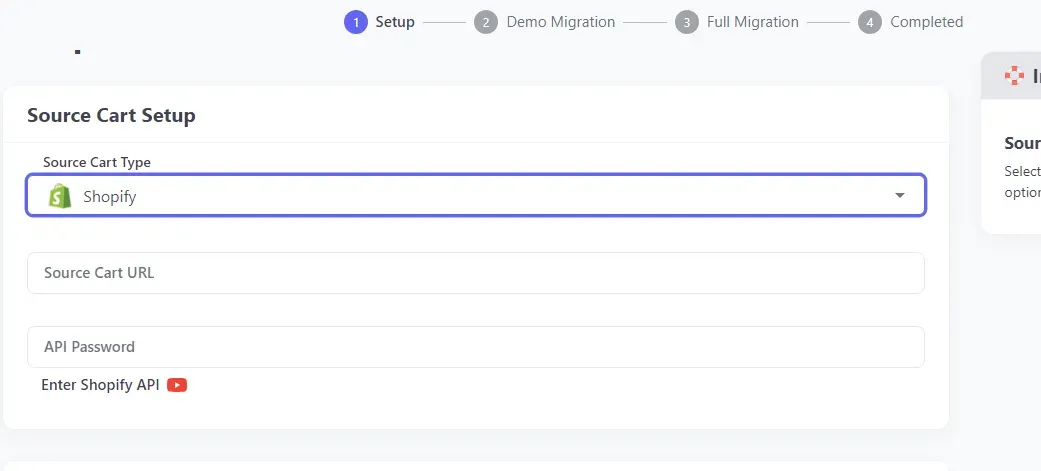
Step 1. Set up your Source Cart
To kickstart the migration, head to the Migration page and select “Create new migration.” You'll then choose the type of your Source Cart (the store you want to migrate from) and enter its URL.
Next, you need to connect LitExtension to your store using one of the following methods, depending on your store type:
- Install LitExtension connector (for open-source stores)
- Provide API keys (for hosted carts)
Whichever method you choose, you'll find easy-to-follow instructions on the right side of the screen to guide you through the process. Just follow along, and you'll be set up in no time!
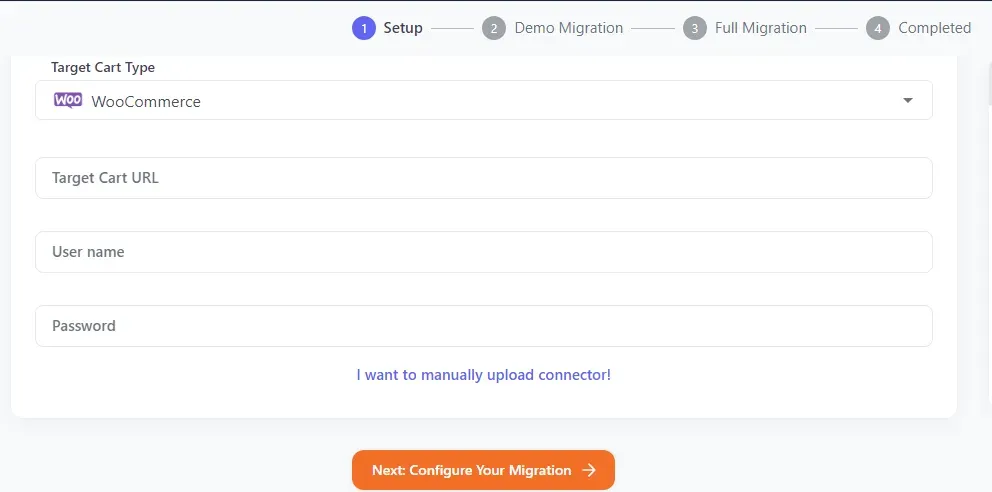
Step 2. Set up your Target Cart
Once your Source Cart is properly connected, it's time to set up your Target Cart (in this case, WooCommerce). Simply select “WooCommerce” from the dropdown, enter the URL, and install the LitExtension connector to link LitExtension to your store. Again, detailed step-by-step guidance will be on the right side of the screen to ensure everything goes smoothly for you.
When you're done, click “Next: Configure your migration” to move on to Step 3.
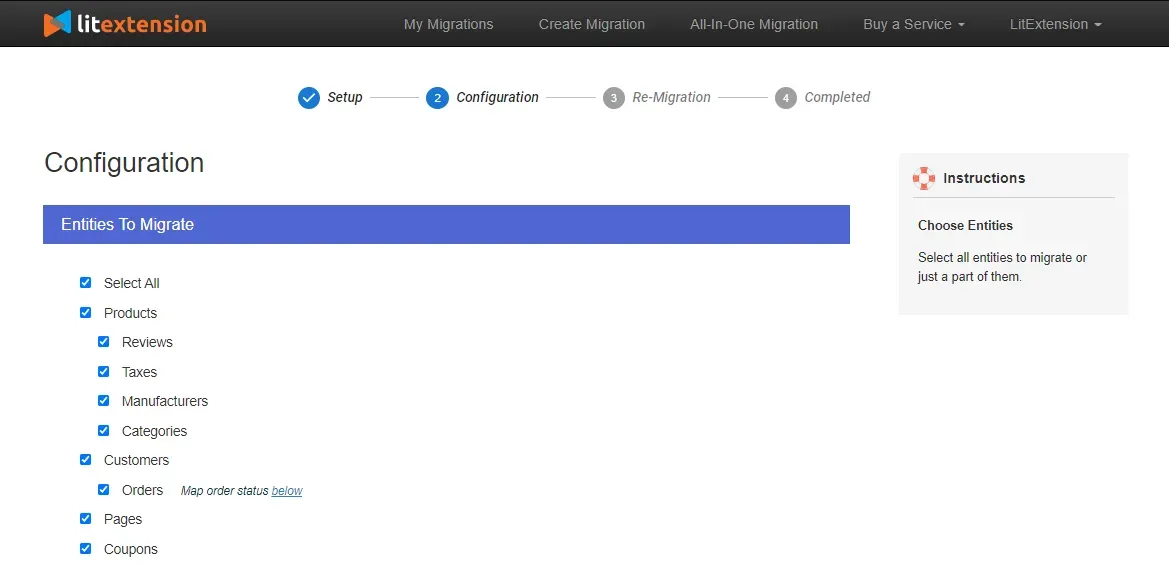
Step 3. Configure your WooCommerce migration
Now, it's time to decide what you want to migrate to WooCommerce!
You can choose from a list of available entities we provided, such as “Customers,” “Products,” “Orders,” etc. If you want to transfer everything, simply hit “Select All” to include all data types. There are also mapping options (store, language, order status, and customer group) you may consider.
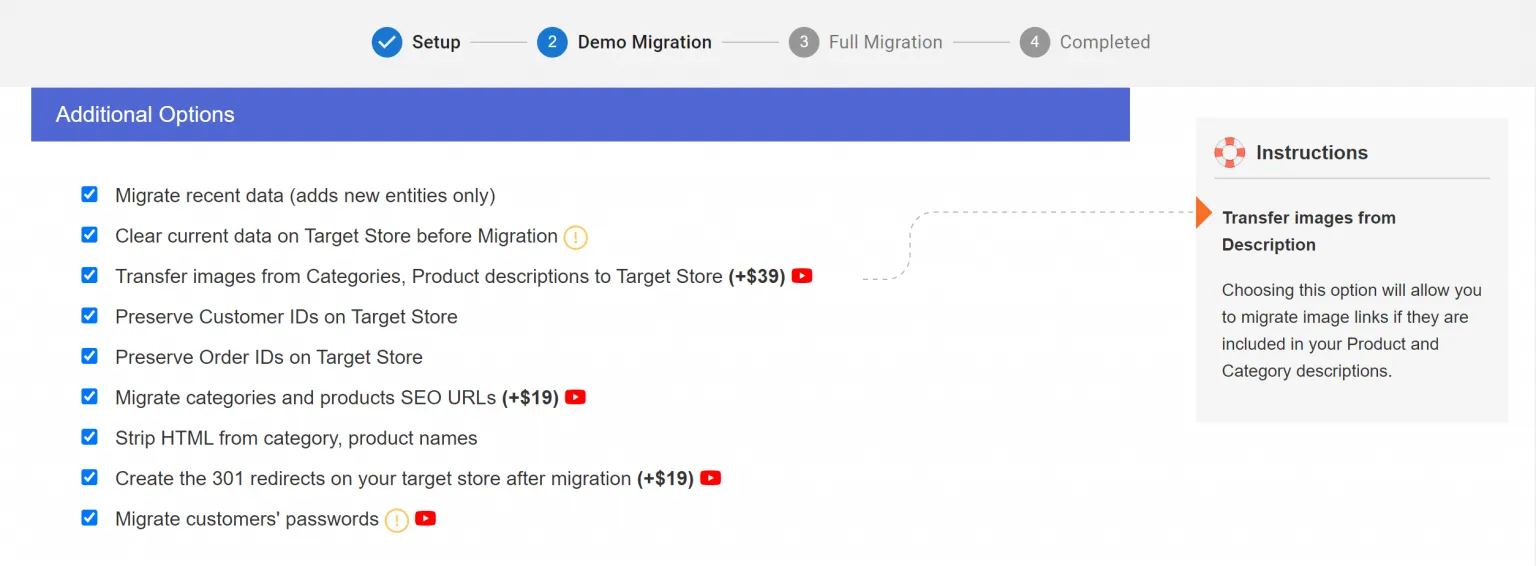
Still have more requirements? No problems! Aside from the basics, LitExtension also offers additional data migration options, such as migrating recent data, creating 301 redirects on the Target Cart, and more (as shown in the image below):
Step 4. Run your demo and full migration
At the bottom of the Configuration page, you'll see the option to start a free demo migration; this allows you to transfer up to 20 entities at no cost!
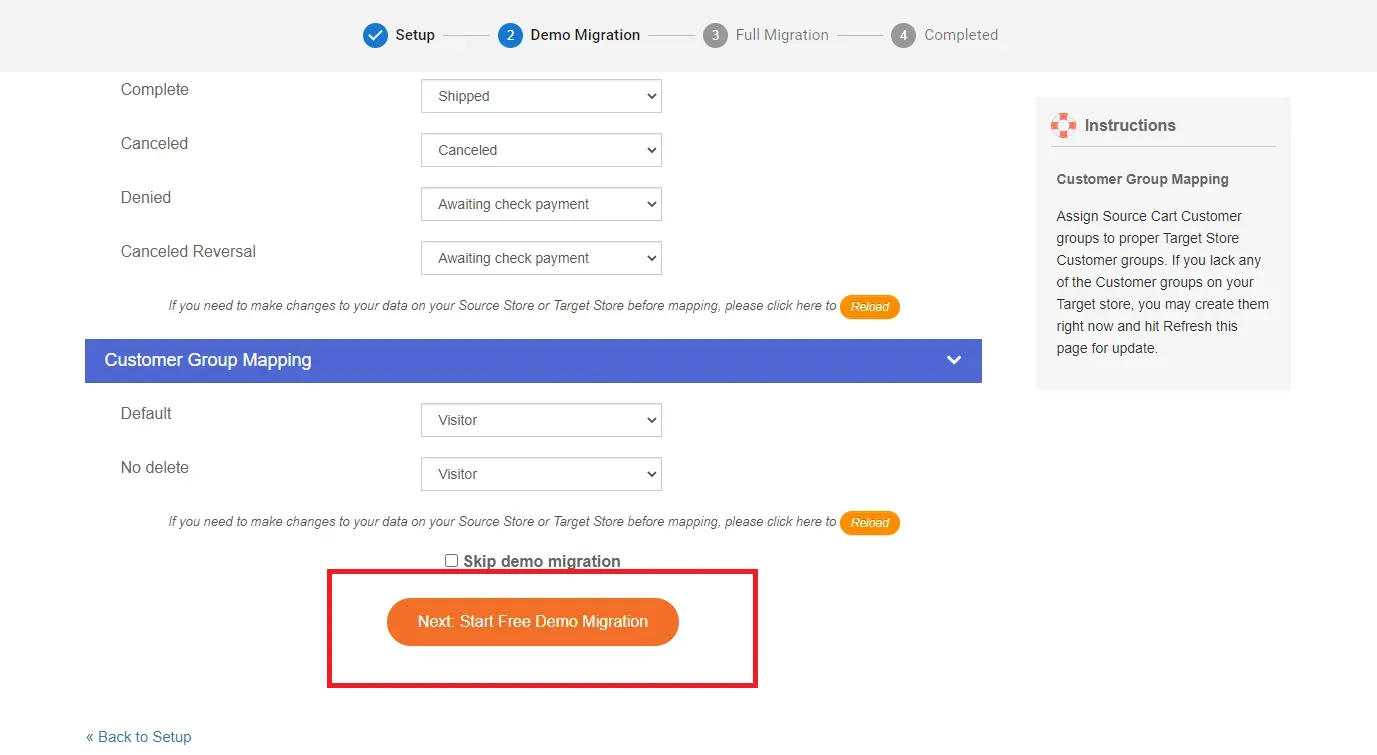
After the demo, you'll receive an email confirming the successful import of entities. If everything looks good to you, return to the Configuration page and settle your payment, then click “Start Full Migration” to complete the process.
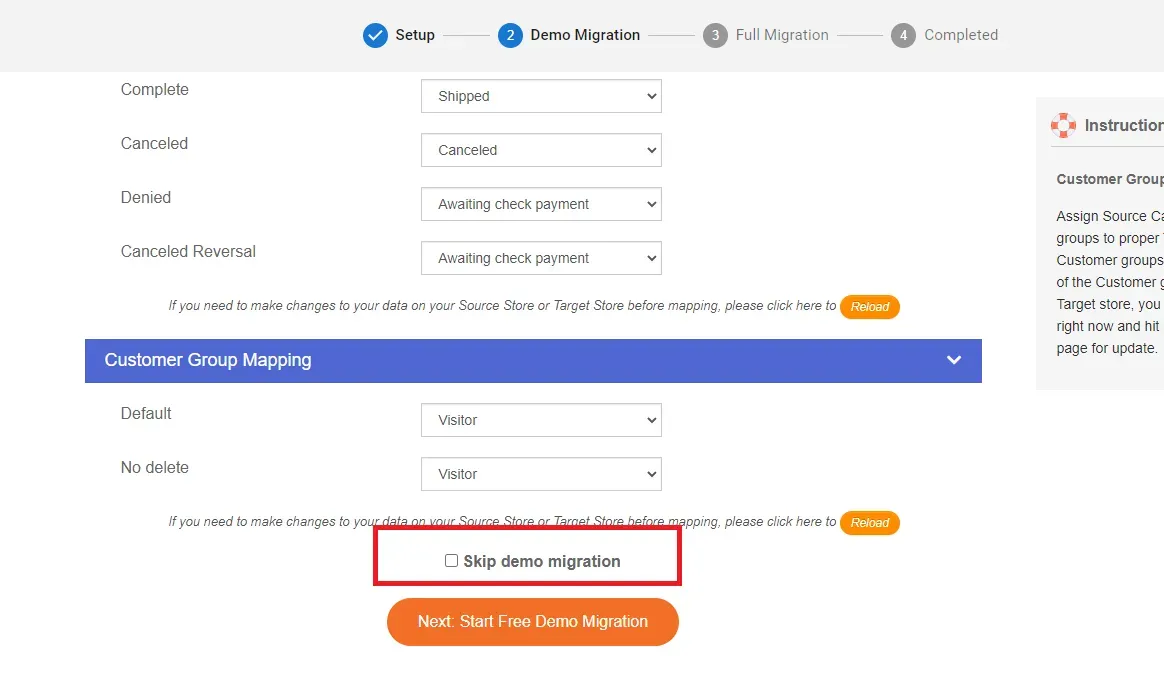
(Would you prefer to skip the demo and jump right into the full migration? No problem; just check the box for “Skip demo migration” and click “Start Full Migration.”)
That's it! Now, all you have to do is sit back and wait until the migration is completed.
All-in-One Migration (Recommended)
As you can see, although the Basic Migration package is easy to use and quickly gets the job done, you'll still have to manage every step yourself. Plus, for more complex needs, settling for the basics might not be enough! That's why we suggest the All-in-One package, a complete solution that offers personalized service every step of the way. Here's how it works:
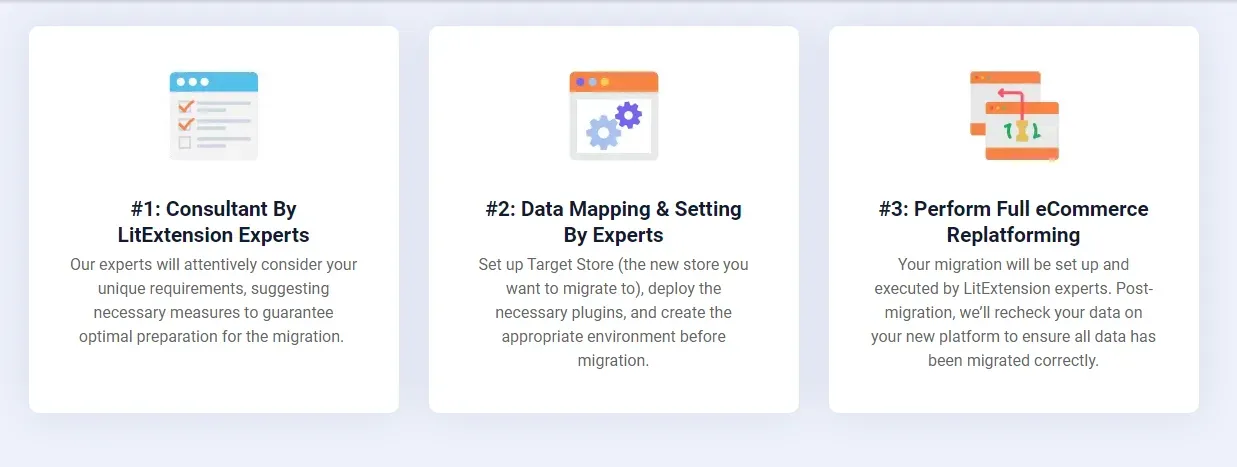
Step 1. Consultant by LitExtension experts
First, let's get things started by contacting our team. We'll look into exactly what you need to transfer, whether it's WooCommerce import orders, products, blog posts, or custom requests.
Throughout the discussion, we will walk you through our services and break down the pricing clearly. Once you're on board, you can sit back and relax while we handle the rest.
Step 2. Data mapping and setting by experts
Now, our team will get everything ready for the migration. This step includes:
- Setting up your WooCommerce store
- Installing essential plugins
- Creating 301 redirects
- Clearing out sample data.
Curious about how things will work? We can even provide a free demo if that's what you need!
Step 3. Perform full eCommerce replatforming
Here comes the big moment: the full migration! Our team will take care of it all while keeping you updated every step of the way. And unlike the Basic Migration package, all additional options that arise during- and post-migration will be covered at no extra cost!
Once it's done, we'll run final checks, address technical issues (if any), and make sure your store is ready to launch on WooCommerce. During the next 6 months, we will ensure none of your important data is missing by providing Re-migrations, Free/Unlimited recent migrations, and Smart update services. Better yet, if that data makes up less than 10% of the total, you'll receive these services completely free of charge!
WooCommerce Orders Import, Done Right!
With LitExtension’s experts by your side, you can migrate safely and keep your business running flawlessly.

How to Import WooCommerce Orders Using Plugins
As mentioned earlier, the built-in tools will likely serve you well if you're running a small store with straightforward needs. However, if you want to bulk upload orders into your WooCommerce store, using a third-party plugin is recommended. Fortunately, there are several WooCommerce apps that can support you in this matter.
In this article, we will walk you through how to perform WooCommerce import orders with the Import Export Suite for WooCommerce plugin, recommended by the platform itself. Let's get started!
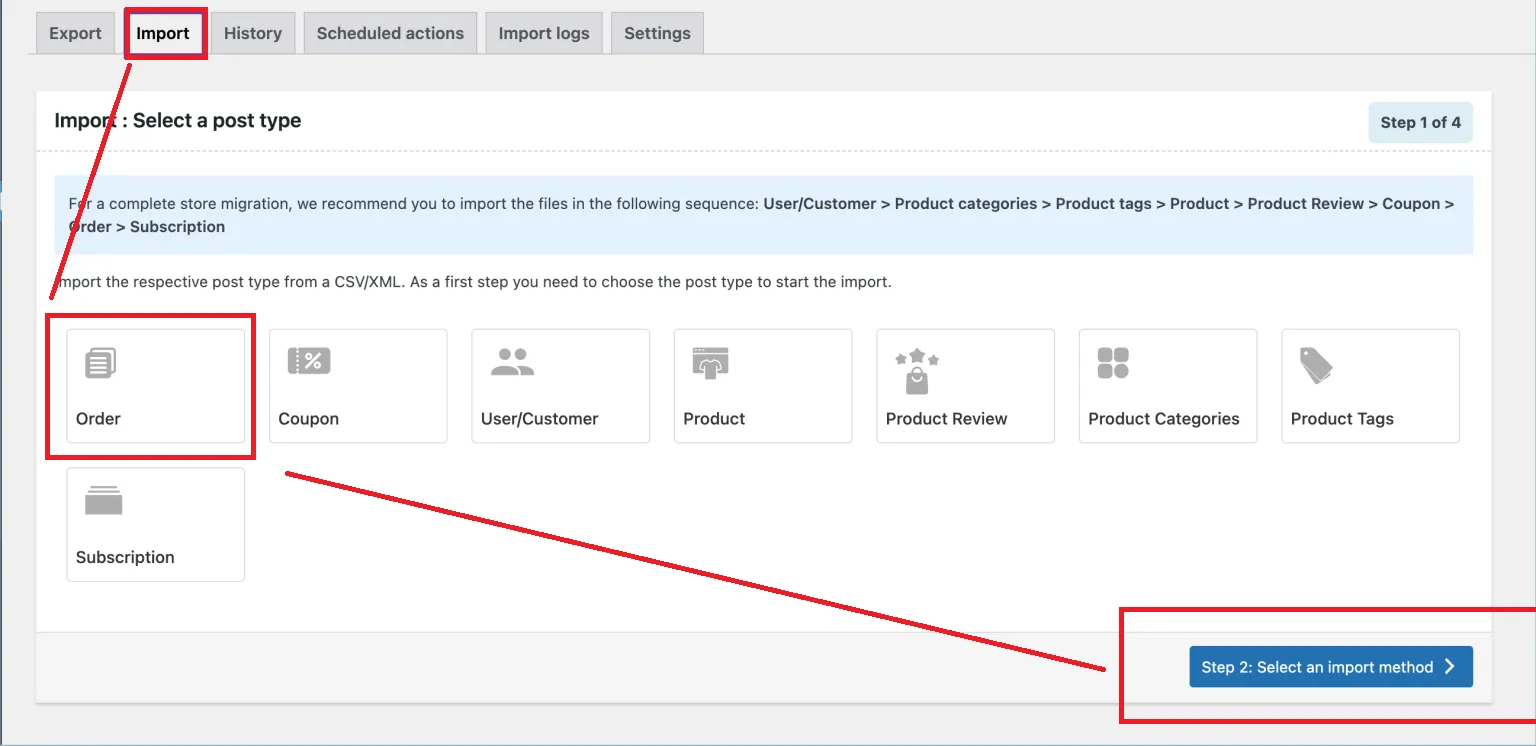
Step 1. Choose the post type
First, go to “WooCommerce > “Import Export Suite” and click on the “Import” tab. After that, choose “Order” as the post type for your import, then click “Step 2” to continue.
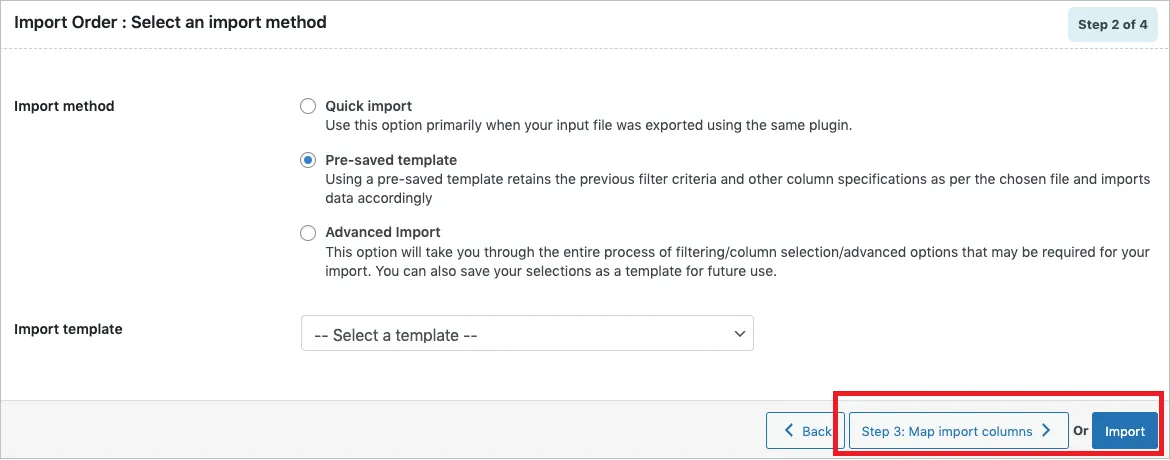
Step 2. Choose your import method
From here, you can select from one of the following import methods:
- Quick import: Imports basic fields. You can import files from Local, URL, or FTP.
- Pre-saved templates: Imports data using a previously saved template (meaning you need to have used this plugin at least once before). There will be a list of templates for you to choose from.
- Advanced method: Allows for mapping specific columns and advanced customizations before importing.
For the first two methods, just click “Import,” and you're done! But if you pick the “Advanced Method,” move on to Step 3 to adjust more advanced settings.
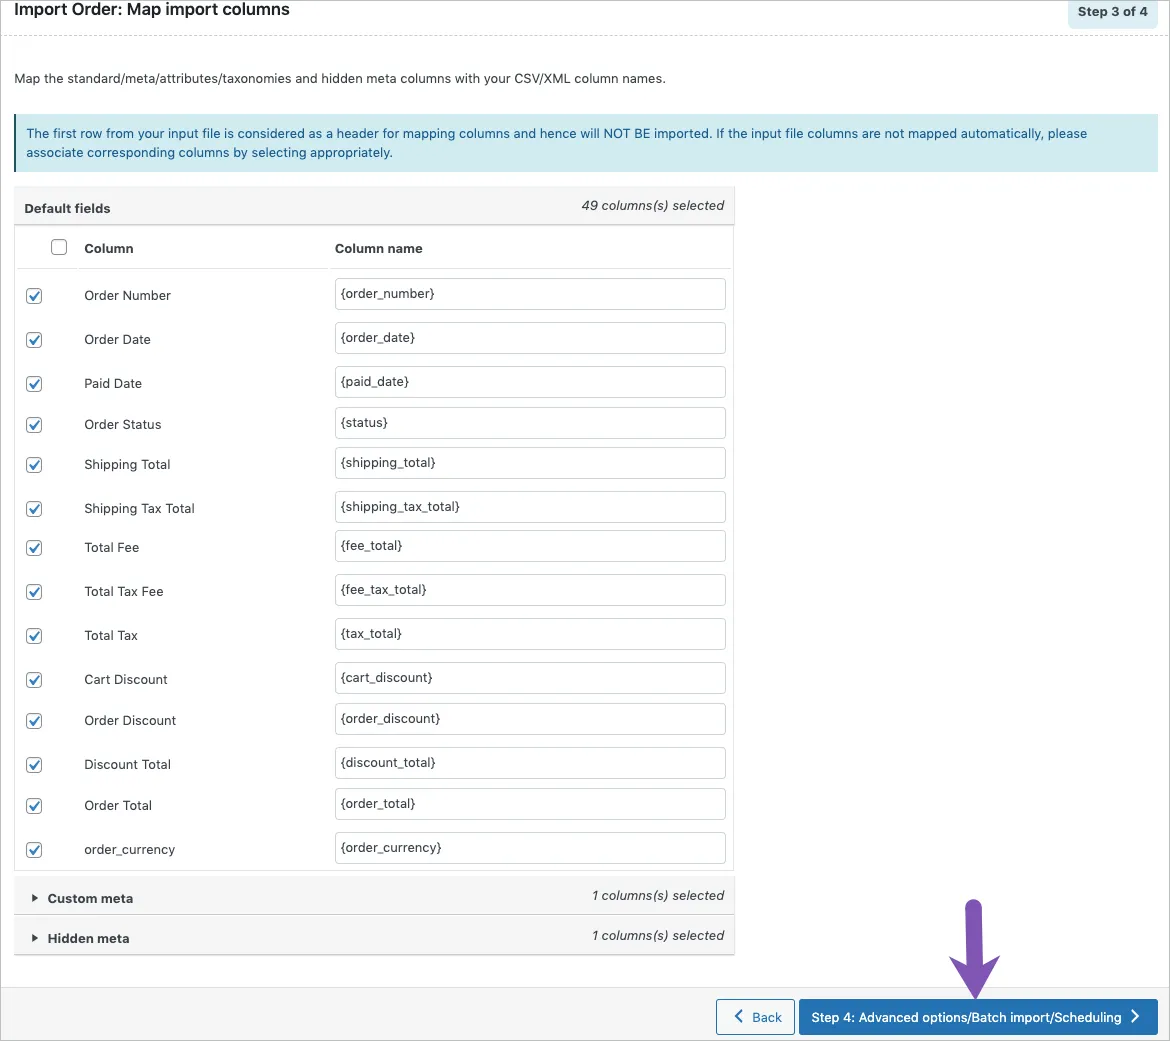
Step 3. Map import columns
In step 3, you will be able to map the following import columns manually:
- Default fields: Edit the column names if needed.
- Meta (custom fields) and Hidden Meta: Specify additional fields if necessary.
- Evaluate Field: Add or modify values using operators like +, *, and -.
Once mapped, click “Step 4” to proceed.
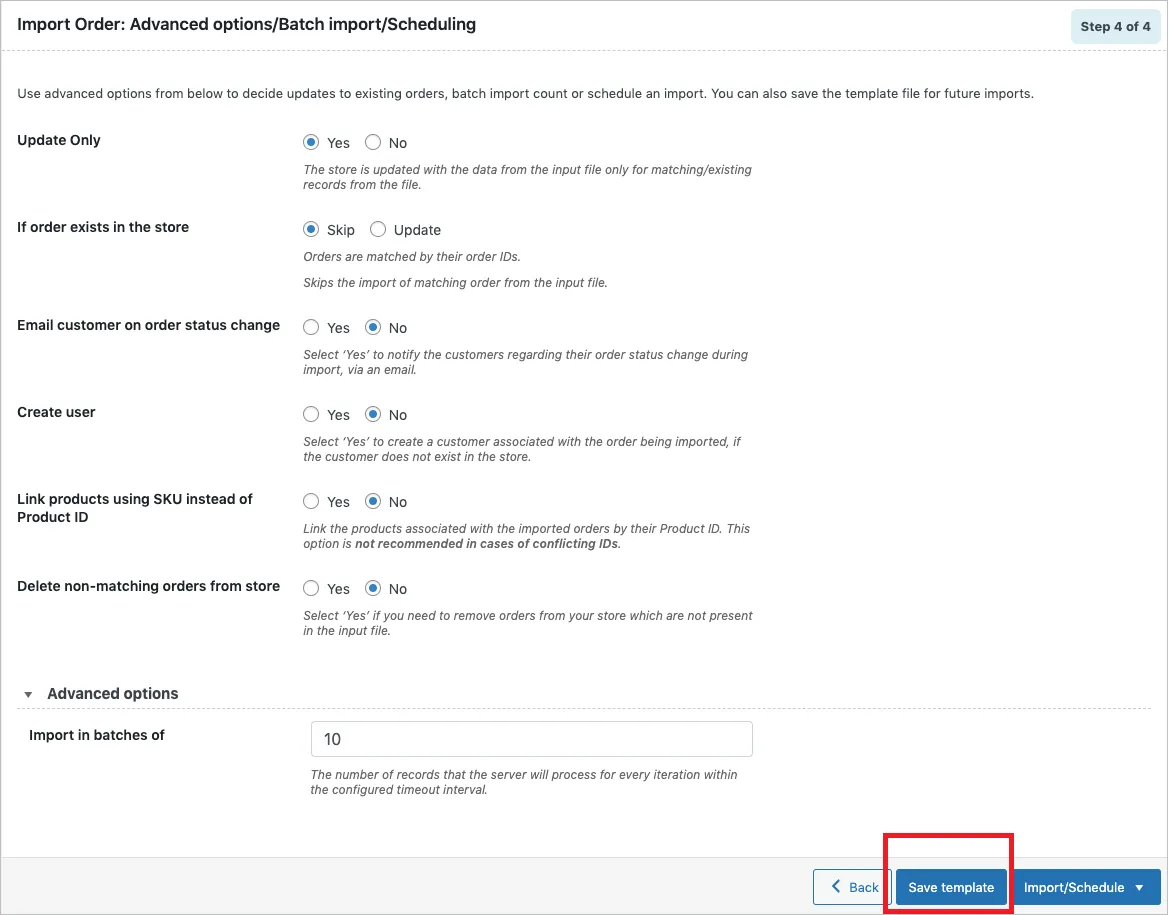
Step 4. Choose advanced options
Aside from column mapping, you can experiment with even more advanced options for your WooCommerce import orders here. Some examples:
- Update only: Update matching records only.
- If order exists: Skip or update existing orders.
- If conflict with post ID: Skip or import as new.
- Email customer: Notify customers about order status changes.
- Link products by SKU: Choose this option to link orders by SKU(though it's not recommended in case of conflicting IDs)
- Delete non-matching orders: Remove orders not in the input file if desired.
Even better, you can adjust the number of records processed per batch or schedule the import if needed. Save the template for future use if desired.
Step 5. Finish uploading WooCommerce import orders
Finally, click “Import/Schedule” to finish:
- If scheduling, configure the import time and click “Schedule now” to set it
- If directly importing, click “Import.”
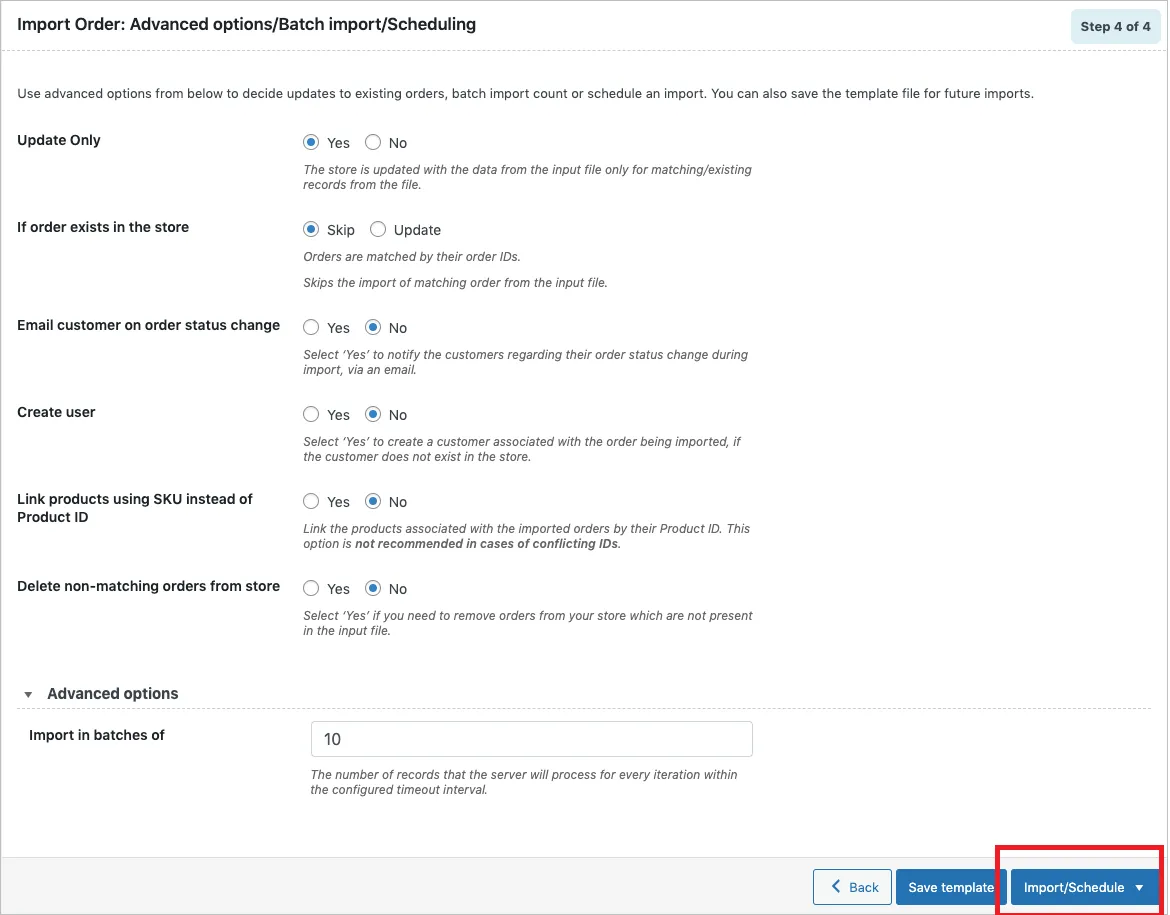
Either way, after completion, a pop-up will display the process status and show you both successful and failed imports. That's it!
Best Practices for Successful WooCommerce Import Orders
Whichever path you choose, to get the most out of WooCommerce import orders, it's best to follow a few best practices. These steps reduce errors, avoid duplicates, and keep your store data clean and reliable.
1. Prepare clean import data
- Use a spreadsheet or CSV with properly formatted columns.
- Avoid merged cells, extra spaces, or mixed data types in the same column.
- Confirm that product SKUs or IDs in your import file exactly match those in WooCommerce.
- If importing from another platform, verify that order statuses map correctly.
2. Test with a small batch first
- Select a small batch of orders and import them to a staging or test environment first.
- Check that all entities are linked correctly.
- Fix any mapping issues or formatting problems before importing the full dataset.
3. Use a staging or backup environment
- Work on a staging site whenever possible, then push changes to production after testing.
- If you must import directly on the live site, take a full database backup before the WooCommerce import orders process.
- Keep a copy of the CSV or export file you used, so you can repeat or revert the import if needed.
4. Double-check results after WooCommerce import orders
- Spot‑check a random sample to confirm everything is import correctly.
- Watch for “Item not found” or placeholder products that may indicate SKU mismatches or mapping issues.
- Confirm that statuses are set correctly and match your business logic.
5. Document your import process
- Record what data was imported, which tool or plugin you used, and any custom field mappings or rules you applied.
- Store this info in a shared document or internal wiki so your team can repeat the process safely.
By following these best practices, your WooCommerce import orders will be faster, cleaner, and far less risky.
WooCommerce Import Orders: FAQs
How to add bulk orders in WooCommerce?
You can’t do this manually without a plugin. To add multiple orders at once, use a plugin that supports CSV import. Or, to simplify the entire process, you can also use LitExtension — the most reliable automated migration tool to transfer bulk WooCommerce orders with zero downtime.
How to migrate WooCommerce orders?
The easiest way is with a migration tool like LitExtension, which transfers orders, customers, and products automatically. Alternatively, you can manually export orders via CSV and import them into the new site using an order import plugin.
How do I import order history in WooCommerce?
You’ll need to export your order history as a CSV file from your previous system or site, then use a plugin to map the fields and import them into WooCommerce. This is a common step during store migrations or rebuilds.
Can I import orders with downloadable products or custom fields?
Yes, advanced import plugins support downloadable files, order metadata, and custom fields—as long as your CSV is formatted correctly and the fields are mapped during import.
Will customers be notified after importing orders?
That depends on the plugin settings. Most tools let you choose whether or not to trigger emails like order confirmations or status updates during the import process. It’s best to turn off emails during bulk imports to avoid confusing customers.
How does WooCommerce handle order IDs when importing orders, and how can I preserve the original order numbers?
When importing WooCommerce orders, if the CSV file contains order_id and order_number, WooCommerce attempts to import these values. However, if the order_id conflicts with an existing order ID in the store, the imported order will be treated as a new item, causing the order_id and order_number to change accordingly. To preserve the original order numbers during import, it is recommended to install and activate a sequential order number plugin or a third-party plugin designed for this purpose. These plugins help import order numbers as-is, maintaining consistency in your order records.
What import options are available when importing WooCommerce orders using the Import Export Suite plugin?
The Import Export Suite plugin for WooCommerce offers three main import options when importing orders:
- Quick Import: Imports basic or standard fields and is best used when the input file was exported using the same plugin. It supports importing files from local storage, URL, or FTP.
- Pre-saved Template: Allows importing data using templates saved from previous advanced imports, retaining filter criteria and column mappings.
- Advanced Import: Provides a detailed import process with options for filtering, column selection, and advanced settings. You can also save these settings as a template for future use.
Users select the post type as "Order" and then choose one of these import options to proceed with the import process.
Final Words
Our article has broken down several methods for WooCommerce import orders, each with its own merits. However, if you're looking for the most comprehensive and budget-friendly solution, LitExtension clearly stands out from the rest!
Not only can our team simplify your order imports, but we also handle multiple other data types for a thorough, all-in-one WooCommerce migration. Plus, with 12 years of experience and 300,000+ successful migrations under our belt, we can handle all kinds of custom requests that go far beyond what standard WooCommerce plugins offer.
For more information, check out our WooCommerce guides and join our Facebook Community.

