WooCommerce doesn’t offer a built-in way to export subscription data, so store owners who use recurring billing plugins often look for a reliable method to handle WooCommerce export subscriptions orders. When your store grows, exporting your subscription records becomes essential for backups, reporting, migrations, and bulk updates.
With the right export method, you can download all subscription details into a CSV file and manage them easily in a spreadsheet.
In this article, we’ll walk you through the essentials, including:
- Reasons why WooCommerce export subscriptions matters;
- How to export your subscriptions from WooCommerce;
- Steps to import subscription data into your WooCommerce store.
Keep scrolling to learn more!
Why WooCommerce Export Subscriptions Orders Matters?
As your subscription store grows, your data becomes more valuable and more complex. Thus, WooCommerce export subscriptions gives you the clarity and control to keep scaling without headaches. Its importance becomes even more apparent when you consider the benefits below:
- Reliable data backup: Exporting creates a secure copy of all subscription details, helping you prevent data loss and maintain a smooth experience for customers.
- Smooth store migration: When moving to another platform, an export ensures every subscription record transfers accurately and remains fully intact.
- Easier bulk updates: Editing data in a spreadsheet lets you apply large-scale changes quickly, then re-import everything without manual adjustments.
- Better reporting and analysis: Exported data gives you the flexibility to filter, sort, and build custom reports, from forecasting renewal revenue to spotting at-risk subscriptions.
- Simplified subscription management: Exports help you add new subscriptions or sync data with other tools, keeping information consistent across all systems.
Together, these benefits make subscription exports a simple but powerful way to protect your data, streamline operations, and stay ready for whatever your store needs next. Now, let’s look at how to perform a WooCommerce subscription export to CSV step by step.
How to Perform WooCommerce Export Subscriptions Orders?
To export WooCommerce subscriptions, you need a tool that supports recurring billing data, handles subscription fields correctly, and generates a clean CSV file that can be re-imported without issues. After testing multiple options, Import Export Suite for WooCommerce stands out for offering the most complete export control and ease of use.
It lets you choose every subscription field you want to export, apply filters, customize the CSV format, and export both active and past subscription data in a structured file.
Below is how to export WooCommerce subscriptions to CSV using this plugin.
Step 1: Choose post type
First, install the Import Export Suite for WooCommerce plugin from Plugins > Add New and activate it.
With the plugin enabled, the export panel becomes available under WooCommerce > Import Export Suite. Inside the Export section, click on Subscriptions among other data types.
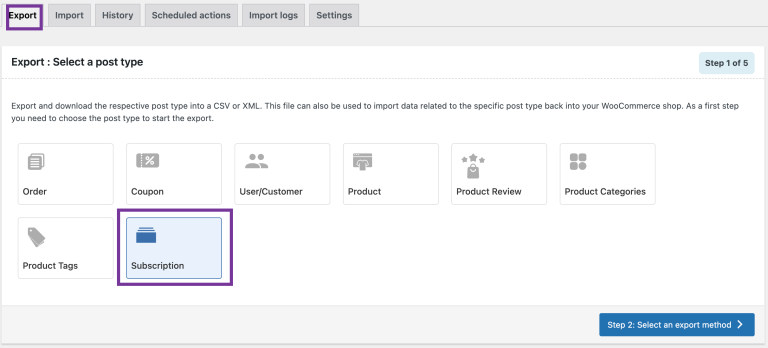
This tells the plugin that you want to work specifically with subscription data instead of products, orders, or customers.
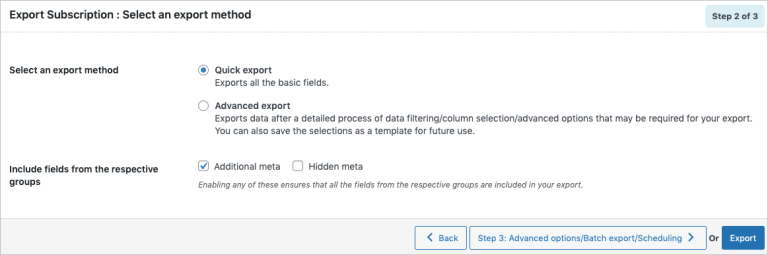
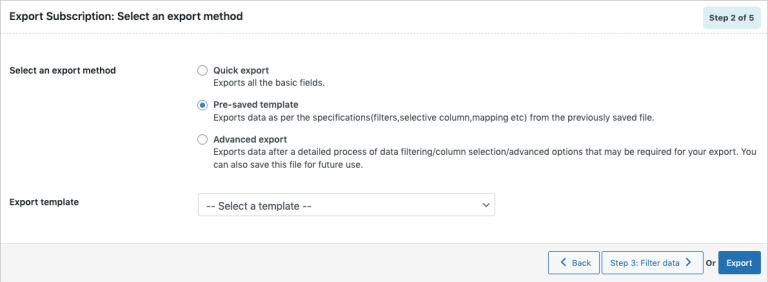
Step 2: Decide export method
With the post type selected, the plugin presents 3 WooCommerce export subscriptions methods. Each one offers a different level of control depending on how simple or detailed your export needs to be.
Option 1: Quick export
For users who want a fast, no-frills file, Quick export pulls the standard subscription fields instantly. There’s also room for extra data – such as additional or hidden meta – by enabling the corresponding checkboxes. You can download the file right away or move to Step 3 to refine it further.
Option 2: Pre-saved template
This method works best when you want to reuse settings from a previous export. Any saved template will appear in the Export template dropdown, allowing you to repeat the same configuration – filters, selected columns, mappings – without starting over.
Option 3: Advanced export
When your export WooCommerce subscriptions requires more control, Advanced export provides the step-by-step tools to fine-tune filters, restructure columns, and set advanced options. It also includes an option to save the configuration as a reusable template, making future exports much more efficient.
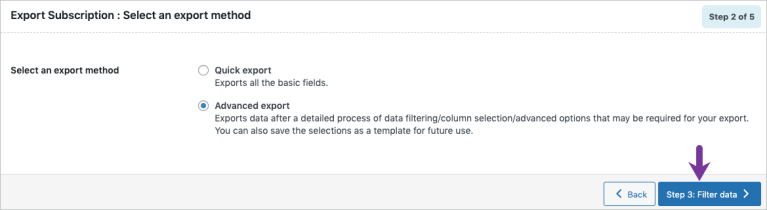
After deciding which approach fits your needs, continue to Step 3 to start filtering your subscription data.
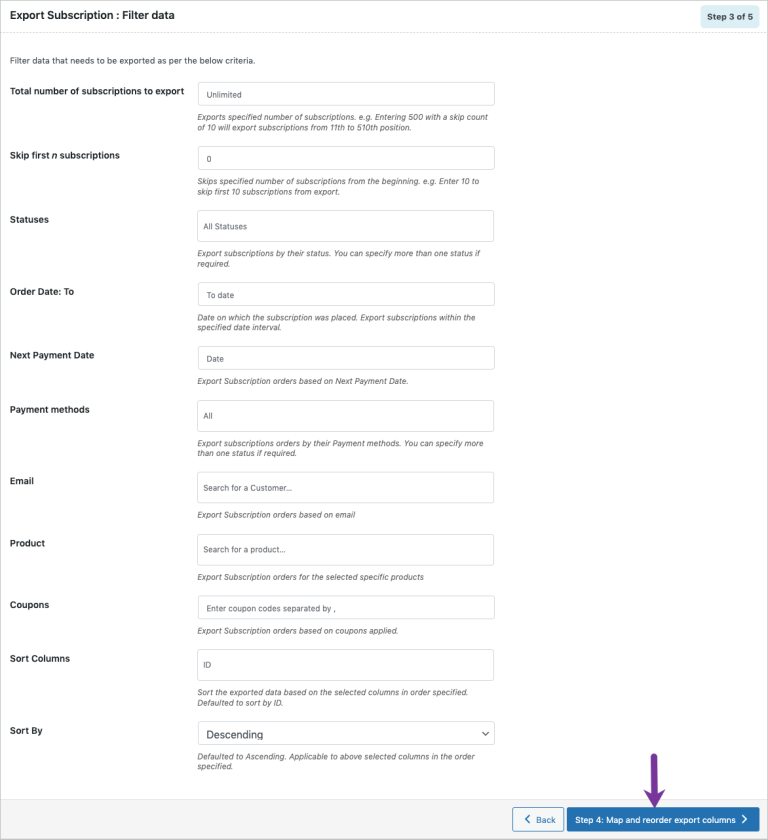
Step 3: Filter data
The next step is to filter the subscription records you want to include in your export. The plugin offers a range of criteria you can apply, depending on how specific or broad your data needs to be:
- Total number of subscriptions to export: Specifies how many records to include. For example, entering 500 with a skip count of 10 exports subscriptions from positions 11 to 510.
- Skip first n subscriptions: Excludes a set number of entries from the start of the list. Entering 10 skips the first ten subscriptions.
- Statuses: Filters subscriptions by status – pending, on-hold, active, cancelled, etc. Multiple statuses can be selected at once.
- Order Date: From: Sets the earliest order date allowed in the export.
- Order Date: To: Defines the latest order date to include.
- Next Payment Date: Filters subscriptions based on their next scheduled renewal date.
- Payment methods: Limits the export to subscriptions using specific payment methods, such as bank transfer, COD, or check payments.
- Email: Exports subscriptions tied to a specific customer email.
- Product: Includes only subscriptions linked to selected products.
- Coupons: Filters subscriptions where certain coupons were applied.
- Sort Columns: Determines how the data should be ordered based on the selected fields.
- Sort By: Applies the sorting order – defaulted to ascending – to the selected columns.
Step 4: Map columns
This stage focuses on arranging how your subscription data will appear in the CSV file. Column labels in this section can be renamed for clarity, and any preferences saved in a previous template will appear automatically when a pre-saved template is selected. Reordering is also straightforward – columns can be moved up or down to create the exact layout you want.
The available fields are grouped into three categories:
- Default fields: Core subscription data provided by WooCommerce.
- Additional meta: Extra fields added by third-party extensions or custom setups.
- Hidden meta: Background data usually not shown on the front end but sometimes useful for advanced exports.
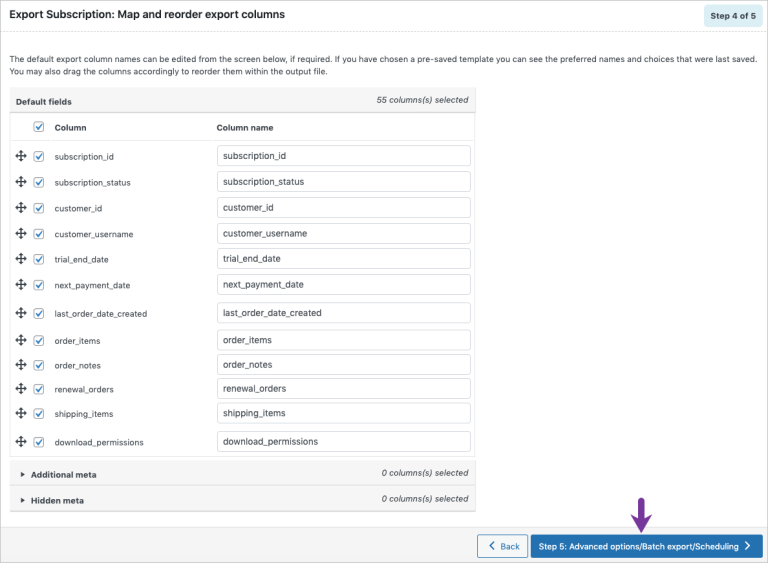
Once the columns look right, continue to Step 5 to configure advanced options or finalize the export.
Step 5: Set advanced or scheduled options
The final step gives you control over how the WooCommerce export subscriptions file is generated and delivered. Several settings are available here to help you customize the output:
- Export file name: Lets you set a custom name for the exported file. If left empty, the plugin assigns a default name automatically.
- Export file format: Offers a choice between CSV and XML, depending on what your workflow requires.
- Delimiter: Defines the character used to separate columns in the CSV file, with “,” selected by default.
- Enable FTP export: When enabled, you can choose an FTP profile and specify the destination path to send the exported file directly to your server.
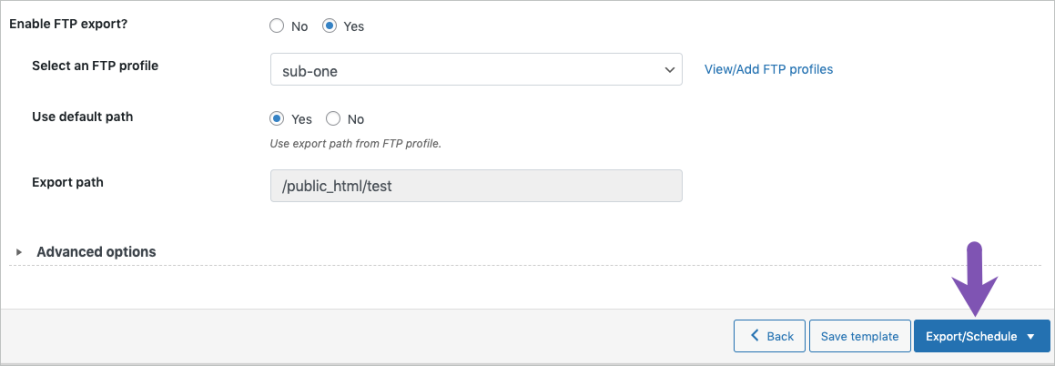
Expanding the Advanced options section reveals additional performance settings. Here, you can adjust how many records the server processes per iteration. Lowering this value may help if the export fails due to timeout issues.
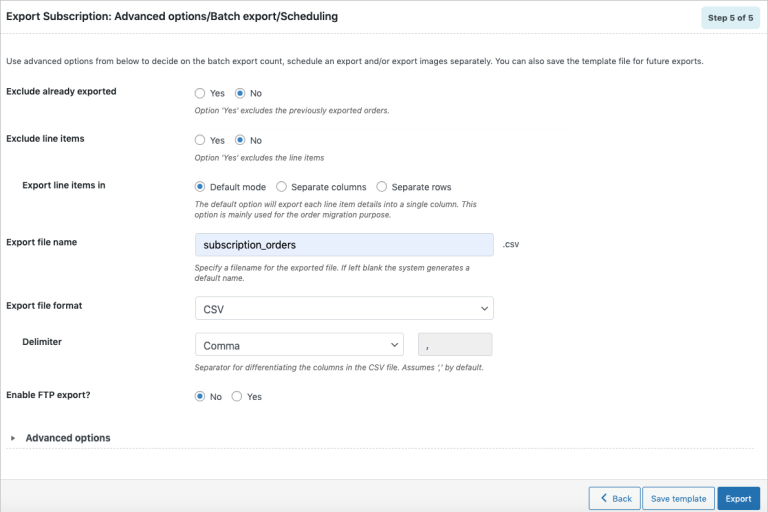
There is also an option to save this configuration as a template, making future exports much faster and more consistent.
Once everything looks right, click Export to generate the file immediately or set up a schedule if you prefer the export to run automatically.
How to Import WooCommerce Subscriptions Orders?
Handling WooCommerce export subscriptions is just one side of the workflow. When you’re restoring data, migrating stores, or updating large subscription lists, you’ll also need to import that information back into WooCommerce.
Here’s how to import subscription data with a CSV file using the same plugin.
Step 1: Create your mapped file
To import WooCommerce subscriptions data successfully, your CSV file needs to match the column names and formats recognized by the Import Export Suite plugin. This mapping ensures the plugin can read each field and assign it to the right subscription property. You can use the table below as your reference.
Column heading | Explanation | Accepted value |
subscription_id | Unique identifier assigned to the subscription. | Numerical |
subscription_status | Indicates the current state of the subscription. | Text. eg: Pending, On-hold |
customer_id | Unique ID that identifies the customer. | Numerical |
customer_username | Username linked to the customer account. | Alpha-numeric characters. |
customer_email | Customer’s contact email address. | Alpha-numeric characters. |
date_created | The date and time when the subscription was first created. | MM/DD/YYYY H:i:s eg: 9/6/2016 6:29:00 |
trial_end_date | The date when the subscription’s trial period finishes. | MM/DD/YYYY H:i:s eg: 9/6/2016 6:29:00 |
next_payment_date | When the next recurring payment is scheduled. | MM/DD/YYYY H:i:s eg: 9/6/2016 6:29:00 |
last_order_date_created | The creation date of the most recent order linked to the subscription. | MM/DD/YYYY H:i:s eg: 9/6/2016 6:29:00 |
end_date | The date on which the subscription officially ends. | MM/DD/YYYY H:i:s eg: 9/6/2016 6:29:00 |
post_parent | The order ID associated with the subscription. | Numerical |
Note: The table above includes only the key fields you’ll use in most imports. The plugin supports many additional columns as well, you can view the full list in the documentation here.
Step 2: Choose the post type
To begin the WooCommerce import subscriptions process, head to WooCommerce > Import Export Suite and switch to the Import tab. From here, the plugin will ask you to select the type of data you want to bring into your store.
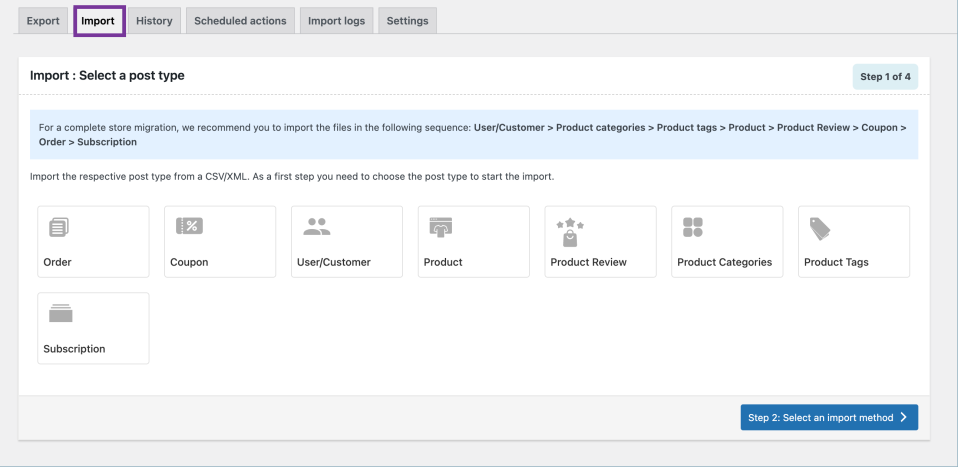
Simply choose Subscriptions as the post type so the plugin knows you’re uploading subscription records rather than products, orders, or customers.

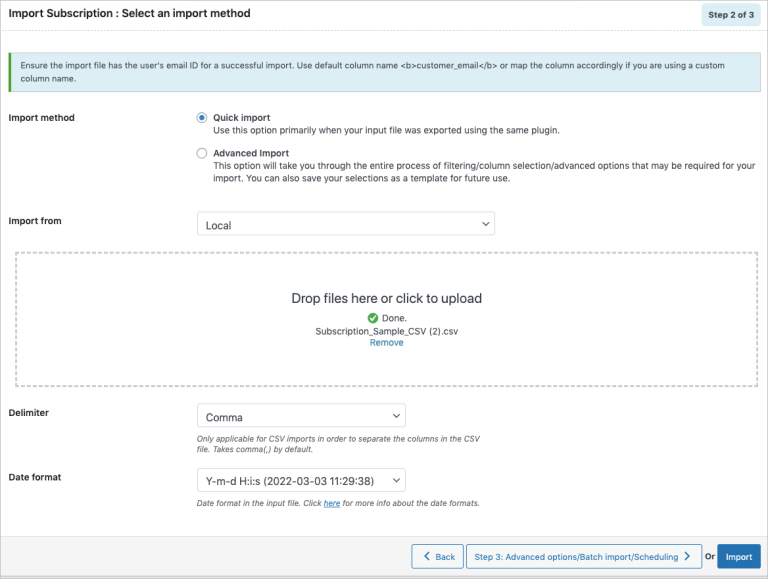
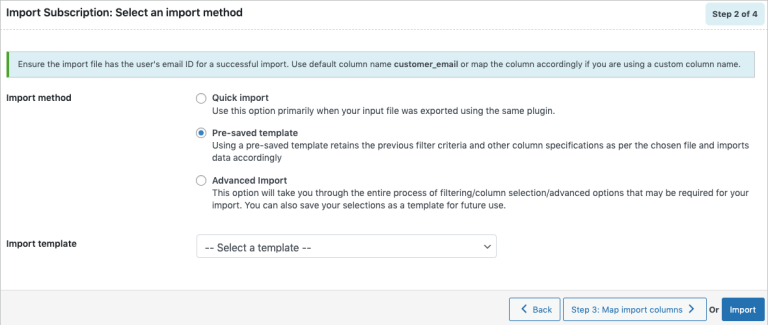
Step 3: Select an import method
At this stage, the plugin gives you three ways to bring your subscription data into WooCommerce. Each method suits a different scenario:
Quick import is the fastest route, ideal when your CSV was exported using the same plugin. It automatically recognizes standard fields and lets you upload the file from your computer, a URL, or FTP.
Pre-saved template works best for repeating imports. If you’ve saved an import setup before, the plugin will load your previous filters and column selections, removing the need to configure everything again.
Advanced import is for more complex files. It opens up the full mapping and filtering interface so you can fine-tune how each column in your CSV matches WooCommerce’s subscription fields.
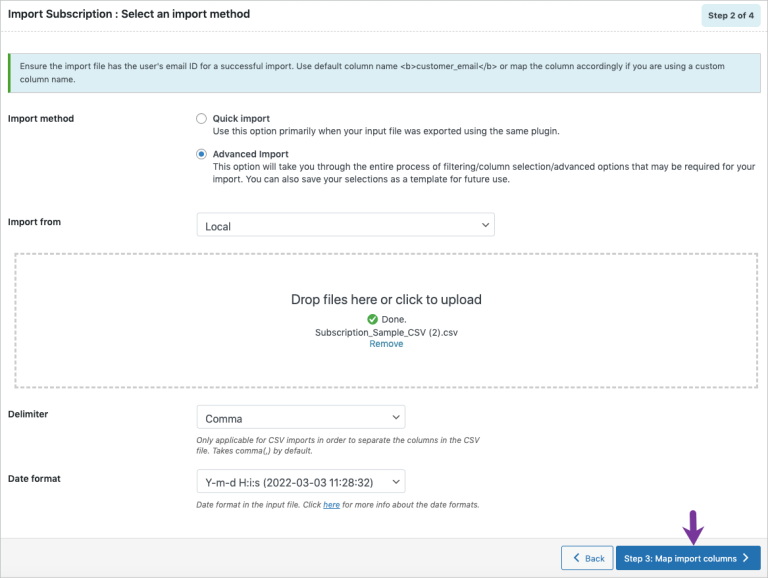
Once you know which method matches the CSV you prepared, you can move on to Step 4: Map your columns.
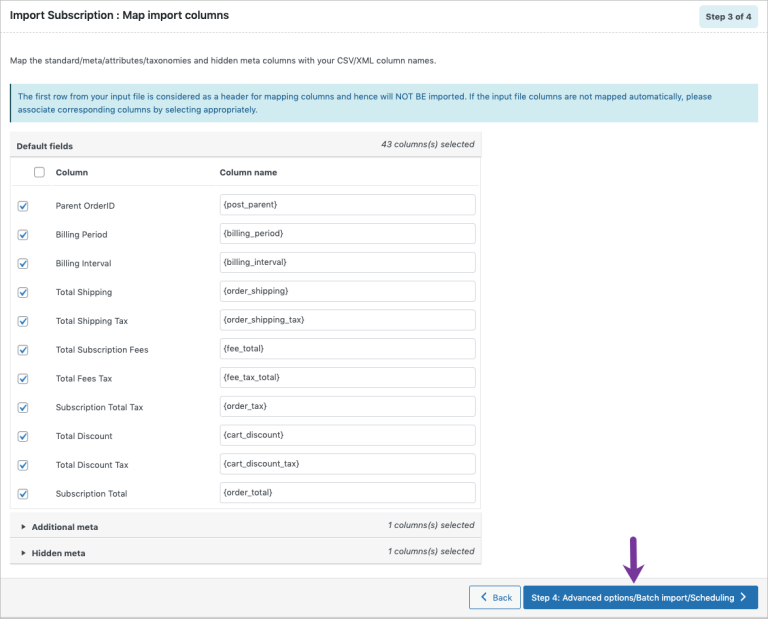
Step 4: Map your import columns
After selecting your import method, the next step is matching the columns in your CSV file to the subscription fields used inside WooCommerce. The plugin divides these fields into 3 groups, making it easier to understand where each part of your data belongs:
- Default fields: Core subscription fields supported by WooCommerce. These column names can be edited, and if you loaded a pre-saved template, any previously saved labels or preferences will appear automatically.
- Additional meta: Extra metadata created by extensions or custom functionality on your store.
- Hidden meta: Background fields that WooCommerce or other plugins store behind the scenes, sometimes useful for advanced imports.
Along with basic field mapping, the plugin also provides an Evaluate Field option for transforming values during the import. This tool lets you append text, combine fields, or run simple calculations on your data without editing the CSV beforehand.
The evaluation panel includes 3 parts:
- Expression: Supports operators like +, *, /, -, (), &, @ and allows string constants to generate modified values.
- Input: Lets you choose the column from your CSV that should be processed.
- Output: Shows a preview based on the first row of your file so you can verify the result.
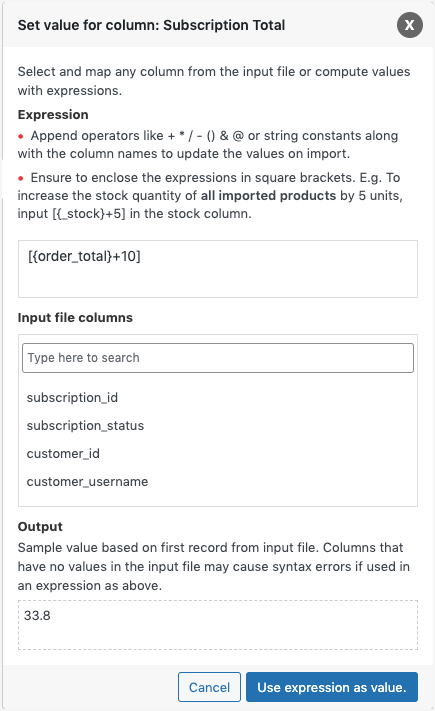
A quick note: expressions may fail if the input column contains blank values, so it’s best to apply them to fields with consistent data.
Once all columns look correct, you can move on to Step 5 to finalize the import.
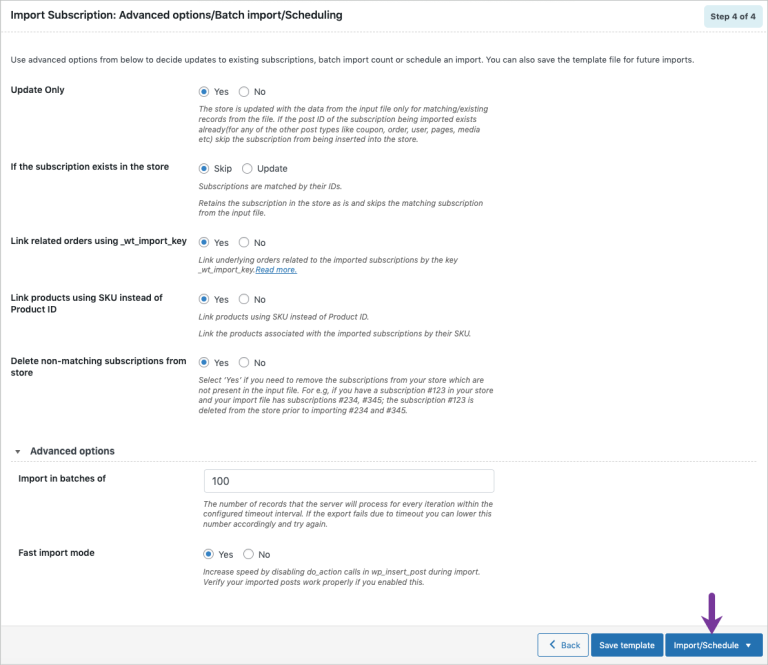
Step 5: Configure advanced, batch, or scheduled options
The last stage lets you control how the plugin handles existing data in your store and how the imported subscriptions should interact with related orders and products. These options determine whether records are updated, skipped, or created as new entries.
- Update Only: When set to Yes, the plugin updates subscription records only if they already exist in your store. Choosing No processes every row in the CSV, updating existing entries or inserting new ones whenever needed.
- If the subscription exists in the store: You can decide whether to skip the existing entry or update it with the data from your file.
- If a post ID conflict occurs: If the imported file contains a post ID that already exists, you can skip that item or import it as a completely new subscription.
- Link orders using _wt_import_key: This option associates the imported subscriptions with their related orders using the _wt_import_key value.
- Link products using SKU instead of Product ID: When set to Yes, the plugin links products by SKU, which is useful if your product IDs differ between systems or environments.
- Delete non-matching subscriptions: Selecting this option removes any subscriptions from your store that are not present in the CSV file, helping keep data fully aligned.
Expanding the Advanced options section gives you access to performance controls. Here, you can adjust how many records the server processes per iteration. If the import times out, lowering this value often resolves the issue.
After reviewing these settings, click Import to complete the process. Your subscription data will now be added or updated in WooCommerce based on the rules you’ve configured.
If you're preparing for a platform switch or planning to rebuild your store, LitExtension can help you move from or to WooCommerce smoothly and securely. Our team handles every stage of the migration with precision, ensuring your data and store structure transfer seamlessly.
Let Our Experts Handle Your WooCommerce Migration!
With the All-in-One Migration Service, our experts take care of everything, ensuring a seamless and stress-free migration.

WooCommerce Export Subscriptions Orders: FAQs
How do I export WooCommerce subscriptions from my store?
WooCommerce doesn’t include a built-in export tool for subscriptions, so you’ll need a plugin to handle this task. With the Import Export Suite for WooCommerce plugin, you can export all essential subscription fields and generate a CSV or XML file in just a few clicks.
What file formats can I export subscriptions to?
The Import Export Suite plugin lets you export subscription data in CSV or XML format. CSV is the most common choice for reporting, spreadsheet editing, and data migration.
Can I export subscription product details separately from subscription orders?
Yes. The WooCommerce subscription plugin allows you to export only the fields you want. You can pick the columns to include, such as products, billing details, schedules, or order data, so your CSV file contains only the information you need.
How do I import exported subscriptions back into WooCommerce if needed?
You can re-import subscription data using the same Import Export Suite for WooCommerce plugin. Switch to the Import tab, choose Subscriptions as your post type, select an import method, map your columns, adjust the final settings, and upload your CSV. The plugin will create or update subscription records based on your configuration.
Conclusion
WooCommerce export subscription data can feel overwhelming at first, but breaking it down into clear steps makes the entire workflow much easier to manage. Hopefully, these steps give you everything you need to complete your tasks smoothly and keep your store running without disruption.
And if you ever expand or migrate your WooCommerce setup, LitExtension is here to support your next move. With over 14 years of experience, we are confident in delivering a smooth, secure, and reliable migration that helps your business grow without interruption.
For more WooCommerce tutorials, please head to our blog posts or join our community group to learn from other folks.

