
WooCommerce CSV import is a convenient way to add or update products without entering each item manually. However, even small formatting errors can result in missing images, incorrect variations, or duplicate products.
The good news is that the process is straightforward once you understand the CSV format WooCommerce requires! In this guide, we’ll explain how to structure your product CSV and walk you through importing products, variations, images, and custom metadata.
WooCommerce CSV Import Format: What You Need to Know
WooCommerce’s built-in product importer expects your CSV file to follow a specific structure. Correct encoding, column names, value formats, and identifiers help reduce import errors, but you should still review the column mapping and import settings before proceeding.
WooCommerce CSV import file requirements
Before importing, make sure your CSV follows these basic formatting rules:
- Use UTF-8 encoding. WooCommerce recommends saving or exporting the file as a UTF-8 CSV to avoid character and encoding issues.
- Use 1 and 0 for Boolean fields. For example, Is featured? uses 1 for true and 0 for false. Published controls product status: 1 = published, 0 = private, -1 = draft, and 2 = pending review.
- Separate multiple values with commas. For example, multiple categories or tags can be entered as comma-separated values. If a single value itself contains a comma, enclose it appropriately or escape the comma according to WooCommerce’s CSV rules.
- Use > for taxonomy hierarchies. For example, Clothing > T-Shirts represents a child category under Clothing.
- Distinguish product IDs from product references. In the ID column, enter the numeric ID, such as 100. In reference columns such as Parent, use id:100 for an existing product ID or SKU101 for a SKU.
- Keep the column headers consistent with WooCommerce’s schema. WooCommerce automatically maps recognized column names during import; unrecognized columns are not imported by default unless they are mapped appropriately.
Important WooCommerce CSV fields
You don’t need every available column for every import. The fields you need depend on the product data you’re bringing into WooCommerce. Below are some of the most important ones:
| CSV field | What it controls | Example |
|---|---|---|
ID |
Identifies an existing product for updates | 100 |
Type |
Defines the product type | simple, variable, variation |
SKU |
Product’s unique identifier | TSHIRT-001 |
Name |
Product name | Blue Cotton T-Shirt |
Published |
Product status | 1 |
Regular price |
Regular selling price | 24.99 |
Sale price |
Discounted price | 19.99 |
Categories |
Product categories | Clothing, Clothing > T-Shirts |
Tags |
Product tags | cotton, summer |
Images |
Product images | https://example.com/tshirt.jpg |
Parent |
Links a variation to its parent product | TSHIRT-001 |
Attribute 1 name |
Attribute name | Size |
Attribute 1 value(s) |
Available attribute values | S, M, L |
Attribute 1 visible |
Whether the attribute is displayed | 1 |
Attribute 1 global |
Whether the attribute is a global attribute | 1 |
These fields come from WooCommerce’s current built-in Product CSV Import Schema. The schema also includes fields for descriptions, inventory, shipping, downloads, upsells, cross-sells, external products, and other product properties.
For variable products, the Parent and Attribute fields are particularly important because WooCommerce uses them to establish the relationship between the parent product and its variations. We’ll cover this structure in more detail later in the guide.
Custom fields and metadata
In addition, WooCommerce also supports importing product metadata through CSV. To import a custom metadata field, add the meta: prefix to the column header. For example:
meta:product_depth
This tells WooCommerce to treat the column as product metadata rather than a standard product field. Unrecognized columns without the appropriate mapping are not imported by default. The built-in importer supports plain-text custom metadata; serialized data and JSON are not supported by the standard CSV schema.
WooCommerce CSV Import: How to Import Important Fields & Data Using CSV
Once your CSV follows WooCommerce’s required format, you can use the built-in importer to add or update product data in bulk. The overall workflow is similar for different types of data, but products, variations, images, and custom metadata require different CSV structures.
Follow the relevant steps below based on what you want to import.
1. Importing products
For standard products, you can import fields such as product names, SKUs, prices, categories, stock, and descriptions through WooCommerce’s built-in CSV importer.
Step 1: Prepare your product CSV
First, create your CSV with the product data you want to import and use WooCommerce’s supported column headers, such as Name, SKU, Regular price, Sale price, Categories, Tags, and Images. Save the file as a UTF-8 CSV. If you are updating existing products, include their product IDs or SKUs so WooCommerce can match the rows to the products in your store.
Step 2: Upload the CSV and map your columns
In your WordPress dashboard, go to Products > All Products and click Import at the top of the page.
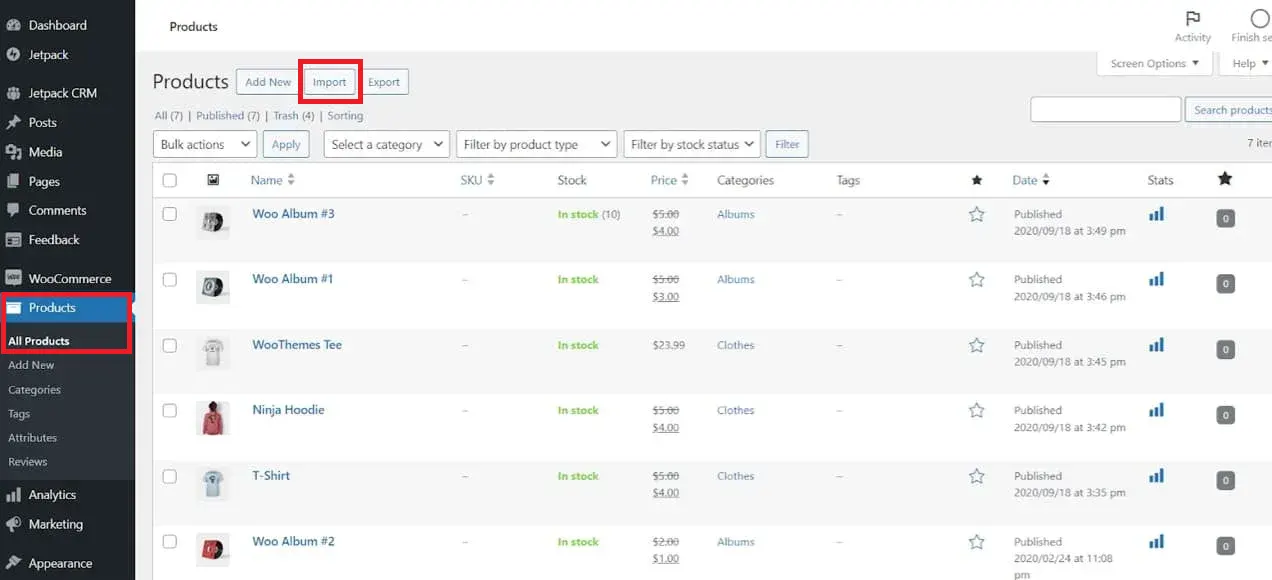
On the Upload CSV file screen, click Choose File, select your CSV, and click Continue. WooCommerce will take you to the Column mapping screen and automatically match recognized CSV headers to product fields. Review the mappings and use the dropdown beside any column to select the correct field or Do not import if you want to skip it.
Step 3: Run the import and check your products
Once the mappings are correct, click Run the importer. Wait for WooCommerce to finish processing the CSV without refreshing or leaving the page. When the import is complete, open several products and check important fields such as SKUs, prices, categories, stock, and descriptions.
Updating existing products
If you want to update rather than create products, select Update existing products on the upload screen before clicking Continue. WooCommerce uses the ID or SKU in your CSV to match existing products. Rows that do not match an existing product are skipped.
2. Importing variable products and variations
Unlike simple products, variable products need a different CSV structure because the file must define the parent product and its individual variations.
Step 1: Set up the parent and variation rows in your CSV
First, create one row for the parent product and one row for each variation.
Then, set the parent product’s Type to variable and each variation’s Type to variation. Give the parent and each variation a SKU and make sure every variation has a unique SKU. In each variation row, use the Parent column to connect it to the parent product using the parent SKU or ID.
Step 2: Add the attributes and variation values
Now, use columns such as Attribute 1 name, Attribute 1 value(s), Attribute 1 visible, and Attribute 1 global to define the attributes. The parent row should contain all available values, while each variation row should contain the value assigned to that variation.
For example, a T-shirt with Small and Medium variations can use this structure:
| Type | SKU | Parent | Attribute 1 name | Attribute 1 value(s) | Attribute 1 visible | Attribute 1 global |
| variable | tshirt | — | Size | S, M | 1 | 0 |
| variation | tshirt-s | tshirt | Size | S | 1 | 0 |
| variation | tshirt-m | tshirt | Size | M | 1 | 0 |
For a local product attribute, set Attribute 1 global to 0. Use 1 when the attribute is a global attribute already configured in the store.
Step 3: Import the CSV through the product importer
Go to Products > All Products > Import, click Choose File, select the CSV, and click Continue. On the Column mapping screen, check that the Type, SKU, Parent, and attribute columns are mapped correctly. Then click Run the importer and wait for the process to finish.
Step 4: Verify the variable product
Last but not least, open the imported product and check that WooCommerce has created the parent as a variable product and attached the expected variations to it. Check the variation attributes, SKUs, prices, and stock individually.
If you are converting an existing simple product: WooCommerce 11.1 introduced a single-import workflow for this case when the parent product row appears before its variation rows. You select Update existing products during the import, and WooCommerce can update the existing parent and create the new variations in the same import when the required conditions are met.
If you cannot guarantee the row order, or you are using a version earlier than 11.1, WooCommerce recommends using two imports instead.
3. Importing product images
Here’s the great news: You can add product images through the Images column in the same product CSV! WooCommerce supports images that are already in the Media Library as well as directly accessible external image URLs.
Step 1: Add your image references to the CSV
In the Images column, enter the direct URL of an online image or the filename of an image that is already available in your Media Library.
You can list multiple images for one product using the format supported by WooCommerce’s core product CSV schema. The first image is used as the featured image; meanwhile, additional images are added to the product gallery.
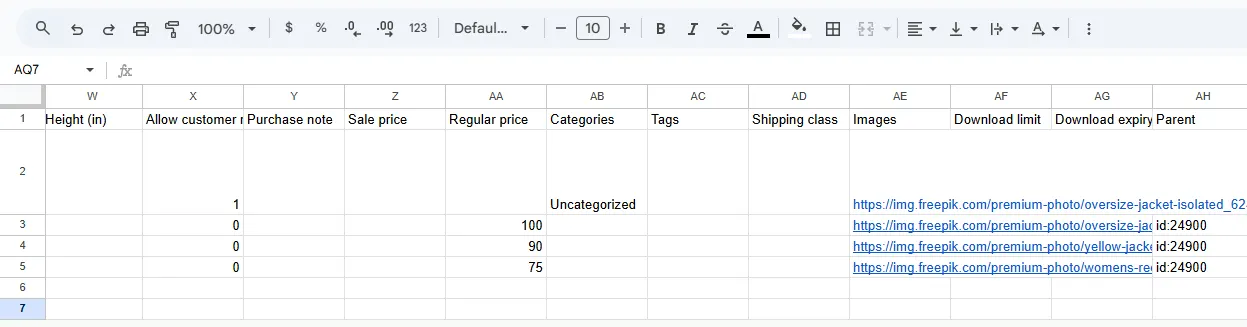
Step 2: Check the image URLs before importing
For external images, make sure the URL points directly to an accessible image. WooCommerce downloads accessible external images into the Media Library during the import. URLs that work through redirect scripts, including some cloud-storage links, are not supported by the core importer.
Step 3: Upload and import the CSV
Go to Products > All Products > Import, then click Choose File and select your CSV. On the Column mapping screen, make sure the Images column is mapped to the image field. Then, just like with other import processes, click Run the importer and wait for the import to finish.
Once done, open several imported products and confirm that the featured image and gallery images appear correctly. Note that WooCommerce’s core CSV importer cannot add, edit, or update product image alt text through the CSV.
4. Importing custom product data
What if your products contain custom metadata that is not covered by WooCommerce’s standard product fields? In that case, you can import it using the meta: prefix.
Step 1: Add the custom metadata to your CSV.
First, identify the metadata key used by your custom product field and add it to the CSV header with meta: in front of it.
For example, if the metadata key is product_depth, use meta:product_depth as the column header. Enter the corresponding value for each product in that column.
Step 2: Upload the CSV and map the metadata column
Go to Products > All Products > Import, click Choose File and upload your CSV. On the Column mapping screen, WooCommerce can recognize meta: columns as product metadata. If the column is not mapped automatically, open its dropdown and select Import as meta.
After checking the mapping, click Run the importer and wait for the process to finish. Then check the affected products to confirm that the custom metadata was imported correctly.
Keep in mind that WooCommerce’s core importer only handles fields supported by its product CSV schema and recognized product metadata. If the data comes from a third-party extension and requires extension-specific fields, check that extension’s import documentation before proceeding.
Need Help With Your WooCommerce CSV Import?
WooCommerce’s built-in importer works well for product CSVs that follow its required format. But files exported from another platform may use different column names, product relationships, or data structures that need adjusting before import.
LitExtension’s CSV File Migration Service provides expert help with preparing files, mapping fields, and transferring supported data to WooCommerce. Our team reviews your files and requirements, handles the agreed migration, and checks the results before delivery. If you also need to transfer customers, orders, or custom data, we assess what your files contain and confirm the scope and any customization required.
If your source store is still accessible on a supported platform, LitExtension’s Automated Migration Tool may let you transfer data directly without preparing CSV files. Share your source platform and migration requirements so our team can recommend a suitable approach.
Need Help With WooCommerce Import?
LitExtension provides a well-optimized CSV file migration service for your data transfer.

Troubleshooting WooCommerce CSV Import Issues
Even a properly formatted file can hit snags once it reaches WooCommerce. Here are the errors that come up most often, and what actually fixes them.
1. WooCommerce cannot upload or process the CSV
A CSV may fail before the import starts because of an invalid file format, server restrictions, or a file that is too large for the server to process. WooCommerce recommends using a UTF-8 CSV and splitting large files into smaller batches when necessary.
How to fix it:
- Make sure the file is saved as UTF-8 CSV.
- If WordPress displays “Sorry, this file type is not permitted for security reasons,” upload the CSV to the site’s uploads directory through SFTP or the hosting file manager. Then use Show advanced options in the importer to enter the server file path.
For large files, split the CSV into smaller batches and import them separately. If the problem continues, ask your hosting provider to check upload, memory, and processing limits.
2. CSV data is imported into the wrong field or not imported
WooCommerce automatically maps recognized CSV headers, but columns that do not match the product CSV schema are not imported by default. Formatting also affects how values are interpreted: use numeric values in the ID column, and add the id: prefix when referencing a product ID in columns such as Parent.
How to fix it:
- On the Column mapping screen, review the mapping for every column before clicking Run the importer Select Do not import for columns you do not need.
- Check that your headers match WooCommerce’s supported schema.
- Use the correct format for special values, such as 1/0 for Boolean fields and id:100 when referencing an existing product ID.
For custom metadata, use the meta: prefix, such as meta:product_depth, and map it to Import as meta if necessary.
3. Variations or their Attributes are not imported correctly
Variation data depends on several CSV fields working together. If the Type, Parent, SKU, or attribute values are inconsistent, WooCommerce may skip the variation or fail to associate it with the correct parent product.
How to fix it:
- Set the parent product’s Type to variable and each variation’s Type to variation. Give every variation a unique SKU.
- Check that Parent contains the correct parent SKU or ID.
- Make sure the attribute name and values in the variation rows match those defined for the parent.
When converting an existing simple product using WooCommerce 11.1’s single-import workflow, make sure the parent row appears before its variation rows.
4. Images are missing or duplicated after import
As mentioned earlier, WooCommerce can import images from direct external URLs or reference images already available in the Media Library. Still, problems can occur when an image URL is inaccessible, relies on redirects, or the same external image is repeatedly downloaded during imports.
How to fix it:
- Open external image URLs directly in a browser to confirm that they point to the actual image.
- Check that the Images values are correctly formatted.
- If an image already exists in the Media Library, use its filename where supported instead of repeatedly downloading it from an external URL.
- Test a small number of images before importing a large catalog.
Again, please keep in mind that the core WooCommerce importer does not add or update image alt text through CSV.
5. Products are skipped during import
Check the import log to identify the affected rows and their reported errors.
- If a SKU already exists, select Update existing products when you intend to update that product.
- For standard product updates, confirm that each row’s ID or SKU matches an existing product.
- If products were imported but seem missing, check their Published values and product status.
Correct the affected rows and test a small batch before retrying the full file.
Best Practices for WooCommerce CSV Import
Most of the issues above are avoidable, not just fixable after the fact. A few habits go a long way toward making a WooCommerce CSV import predictable instead of a gamble:
- Back up your store before importing. Keep a current backup of your database and site files so you can restore the store if needed. A product CSV export is useful for reference, but it does not replace a full backup.
- Test with a small batch first. Import 5–10 rows before running the full file. This surfaces mapping or formatting issues while they’re still easy to fix, rather than after thousands of rows have already gone through.
- Save your file as UTF-8 before every import. Recheck the saved CSV after editing, as spreadsheet applications can change its encoding or formatting.
- Use consistent IDs or SKUs for update imports. Confirm that these identifiers match the existing products and are mapped correctly, then select Update existing products before running the importer.
- Review the mapping screen manually, even when the auto-match looks right. A silently wrong mapping produces no error – just incorrect data sitting in the right-looking place.
- Spot-check after every import, not just the first one. Open a handful of products – ideally including at least one variable product – and confirm images, pricing, stock, and variations all look correct.
- Keep source files organized by import date and entity type. If you ever need to re-run or partially undo an import, having the exact file you used on hand saves significant time.
- For recurring imports, standardize your export template once. A consistent column structure in your source system means less remapping each time you run the process.
None of these steps takes long individually, but skipping them is exactly how a “successful” import ends up needing a second pass or a manual cleanup a few days later.
WooCommerce CSV Import – FAQs
Can I import a CSV file directly into WooCommerce?
Yes. The built-in Product CSV Importer lets you add or update products through Products > All Products > Import. It does not import customers or orders.
What format should a WooCommerce CSV file be?
Save your file as UTF-8 CSV using WooCommerce’s supported column headers. Export an existing product to get a compatible starting template. Use numeric IDs in the ID column and the id: prefix for ID references in columns such as Parent.
Can I import product images with a WooCommerce CSV?
Yes. Use the Images column with directly accessible image URLs or filenames from your Media Library. Separate multiple images with commas; the first becomes the featured image.
How do I update existing WooCommerce products with a CSV?
Include matching product IDs or SKUs, select Update existing products when uploading your CSV, review the column mapping, and run the importer.
Can I import variable products with a CSV?
Yes. Use a variable parent row and separate variation rows, linked through Parent. Give each variation a unique SKU and matching attribute values. If variations are missing, check the import log and parent references before retrying.
Final Words
A successful WooCommerce CSV import starts with a file that matches your products and the changes you want to make. Use the correct column structure, check IDs or SKUs when updating existing products, and test a small batch before importing your full catalog.
After the import, review your product details, variations, and images, and check the import log for any failed or skipped rows. These checks help you catch problems early and build a reliable CSV workflow for future product updates.


