Running a Shopify store certainly involves a lot of moving parts — and yet, there's one crucial piece that often flies under the radar: Shopify redirects. In fact, many beginners (and even some experienced store owners) find themselves at a loss when creating and managing these links.
But don't worry; we've got you covered! In this guide, we'll walk you through everything you need to know, including:
- A quick overview of Shopify redirects
- How to create these redirects
- How to manage them
- Steps to export and import Shopify redirects
- Advanced solution with LitExtension
Without further ado, let's get started!
About Shopify Directs: A Quick Overview
Before we explore further how to create and manage Shopify redirects, let's have a quick look at their importance to your store and some different types of redirects available:
When to use Shopify redirects?
As their name suggests, Shopify redirects help keep your customers on the right path, especially when major changes happen to your site. You will likely want to have them in place when:
- Updating product or page URLs: Ensure anyone heading to the old URL gets smoothly sent to the updated one.
- Managing out-of-stock or discontinued products: Set the redirects to guide customers to similar products or even to a broader category page.
- Rebranding or changing your domain: When shifting to a new domain or finishing Shopify migration, redirects are non-negotiable if you don't want to lose out on valuable traffic or SEO rankings.
301 vs 302 redirects
There are two types of redirects, 301 and 302, each with a unique role to play:
- 301 redirect (Permanent): This one signals to search engines that the old URL is gone for good. You will transfer all SEO value (rankings or backlinks) from the original link to the new one.
- 302 redirect (Temporary): On the other hand, the 302 redirect is meant for temporary changes. Hence, you can't pass SEO value to this type since it suggests the original URL will eventually be back in action.
Since most URL changes in eCommerce are meant to last, Shopify allows 301 redirects only. That way, merchants can maintain their SEO strength and avoid the confusion that temporary redirects might cause.
How to Create Shopify Redirects
We have some good news: setting up Shopify URL redirects in your store is quite a breeze. In fact, you can handle it all right from your Shopify admin! Let us give you a quick guide to get you started:
- First, open the Shopify Admin, then head to the main menu (on the left-hand side) and click “Navigation” > “View URL redirects.”

- Next, find and click on “Create URL redirect.”

- Then, in the “Redirect from” field, input the old link from which you want visitors redirected.
- Once done, scroll to the “Redirect to” field and type the new link you want to guide them to. (If it's your store's homepage, simply enter a /.)
- Finally, click “Save” to save these Shopify redirects, and you're all set!

How to Manage Shopify Redirects
With all your Shopify 301 redirects properly set up and ready, let’s explore some simple ways to filter, edit, and keep them organized:
Filter URL redirects by date
If your Shopify store is packed with months or even years of data, scrolling through an endless list of Shopify redirects just to find the right ones would be a nightmare! Luckily, Shopify makes it easy to narrow things down by date; all you need is to:
- Head to “Navigation.”
- Next, select “Date added,” then pick the time frame you want from the drop-down menu.

Edit URL redirects individually
Just like the rest of your store settings, Shopify redirects are totally flexible and can be modified anytime you need! If you'd like to edit a redirect individually, here's how:
- First, head over to “Navigation” and click on a URL redirect you want to update.
- After that, take your changes in the fields provided. And when you're done, hit “Save redirect” to lock it in.
- Edit the fields provided and click “Save redirect.”

Edit multiple URL redirects simultaneously
We have just discussed steps to edit redirects one by one; how about tackling them all at once?
Fortunately, bulk editing from Shopify Admin is much more straightforward than we expected. You also head over to “Navigation,” but this time, select multiple redirects in Shopify instead of a single one. Make your edits in the same fields we went over earlier, and hit “Save” when you're done!

How to Export and Import Shopify Redirects
Creating and managing redirects aside, a question we hear all the time is, “Can I export or import Shopify redirects?” The answer is absolutely a yes! Just keep these steps in mind, and you'll have it down in no time:
Export Shopify redirects
To export these redirects, head to “Navigation” and select “View URL redirects”:

- Once on the URL Redirects page, find the “Export” button in the top right corner.

- In the popup window, choose “All redirects” under the options.
- For “Export as,” select CSV if you'll be using Numbers, Excel, or a similar spreadsheet program.
- Finally, click “Export redirects.” Shopify will send you an email with a link to download your CSV file!

Import Shopify redirects
To import, you'll need a CSV file that's formatted appropriately according to Shopify's requirements. Unsure how to prepare for this? One quick trick is to follow our export guide above to download a CSV export file, then use its template to set up your import CSV.
Now that your CSV is ready:
- Go back to “Navigation,” click on “Import,” then choose “Select file.”

- Next, upload your CSV, and hit “Upload file.”

- Shopify will show the total number of imported redirects on the screen. Double-check the numbers and make any modifications (if needed), then click “Import redirects.”
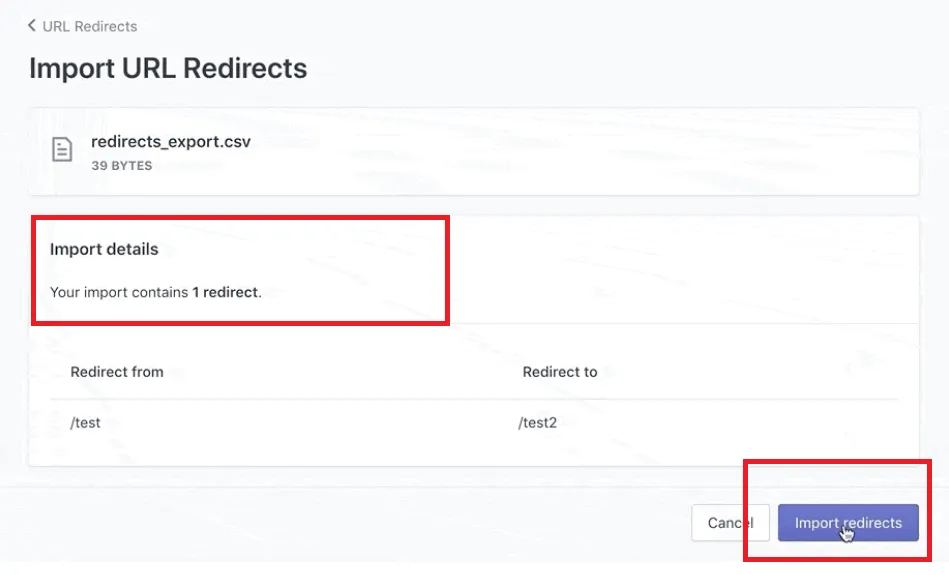
It's that simple! Your Shopify redirects are good to go.
Advanced Solution with LitExtension
We have just discussed how to create redirects in Shopify (as well as filter and edit them).
As you can see, these built-in tools are fairly straightforward, but they won't cut it at all if you're hoping for more advanced customization. Worse, transferring huge batches might get quite overwhelming since Shopify settings aren't exactly designed for large-scale import and export.
But don't sweat it; LitExtension has you covered! As the #1 eCommerce Migration Service, we make it extremely easy for you to migrate your entire store to and from Shopify, with extra options to set up and manage 301 redirects. You can either go the do-it-yourself route with the Automated package (plus additional fees for 301 redirects) or let the experts handle everything with the All-in-One package (where Shopify redirects are included completely free).
Need Help To Migrate to Shopify?
LitExtension provides a well-optimized All-in-One migration service that will help you transfer all your data accurately.
FREE DEMO NOW

Ready to see which option suits you best? Here's a quick rundown to help you navigate each package:
Litextension automated migration
As mentioned above, this Automated package is for you if you prefer to handle each step of the process yourself.
To get started, all it takes is a quick registration: just enter your name, email, and password on the sign-up page (or select “Sign in with Google” to speed things up). Once registered, you can now proceed to our comprehensive guides below:
Step 1. Set up your Source Cart (Your current store)
First, navigate to the Migration page and click “Create new migration.” Select your current platform (for example, BigCommerce) as the Source Cart from the drop-down menu, and enter the store's URL. Then, follow the easy prompts on the screen to connect LitExtenstion to your store; no guesswork here!
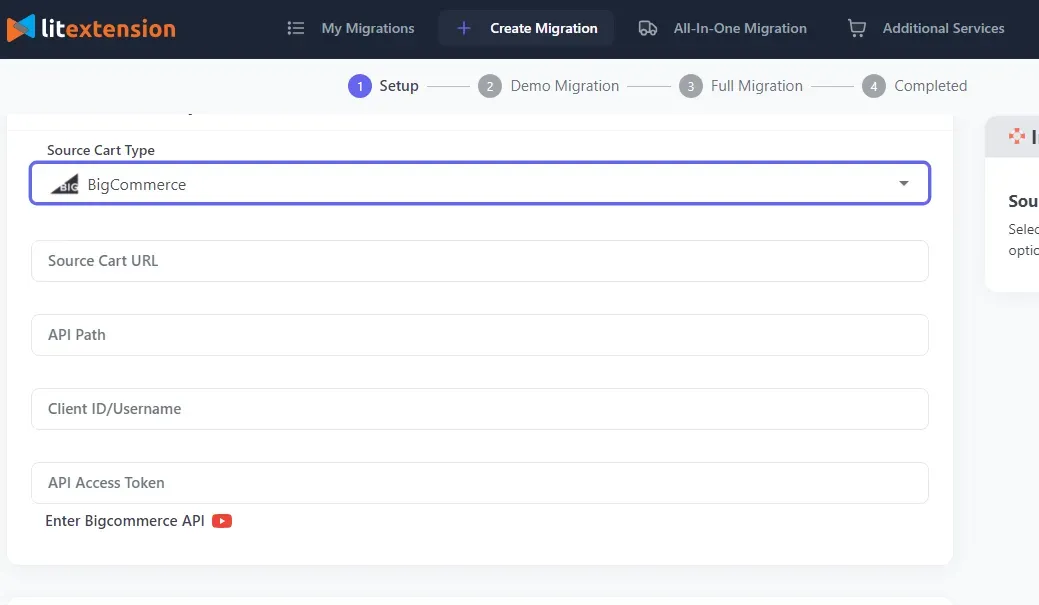
Step 2. Set up your Target Cart (Your new store)
Now, it's time to set up your Target Cart. Choose the platform (e.g., Shopify), enter your new store's URL, and connect it to LitExtension. Again, this step should be quick and straightforward, all thanks to the easy step-by-step instructions shown on the screen!

Step 3. Customize your migration
Here, you can decide precisely which data to bring over — customers, orders, store settings, and more! For a one-and-done approach, simply select “All” to move everything in one seamless go.
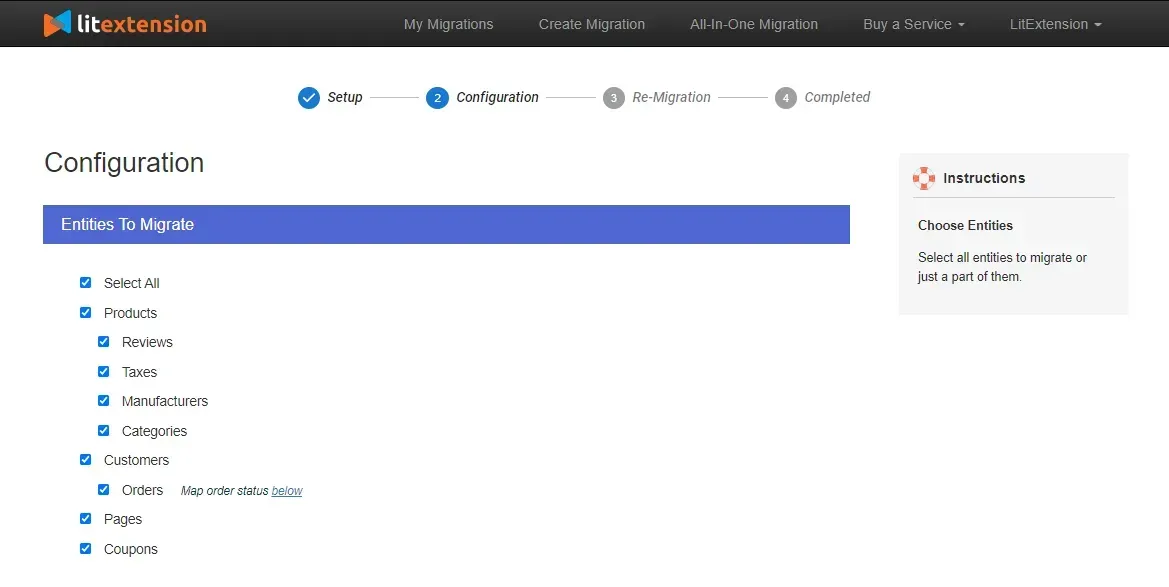
And if you're looking to go beyond the basic migration, you'll find additional options below (301 redirects included), some available for a small extra fee to help you further personalize the process. Pick the ones that best fit your needs!
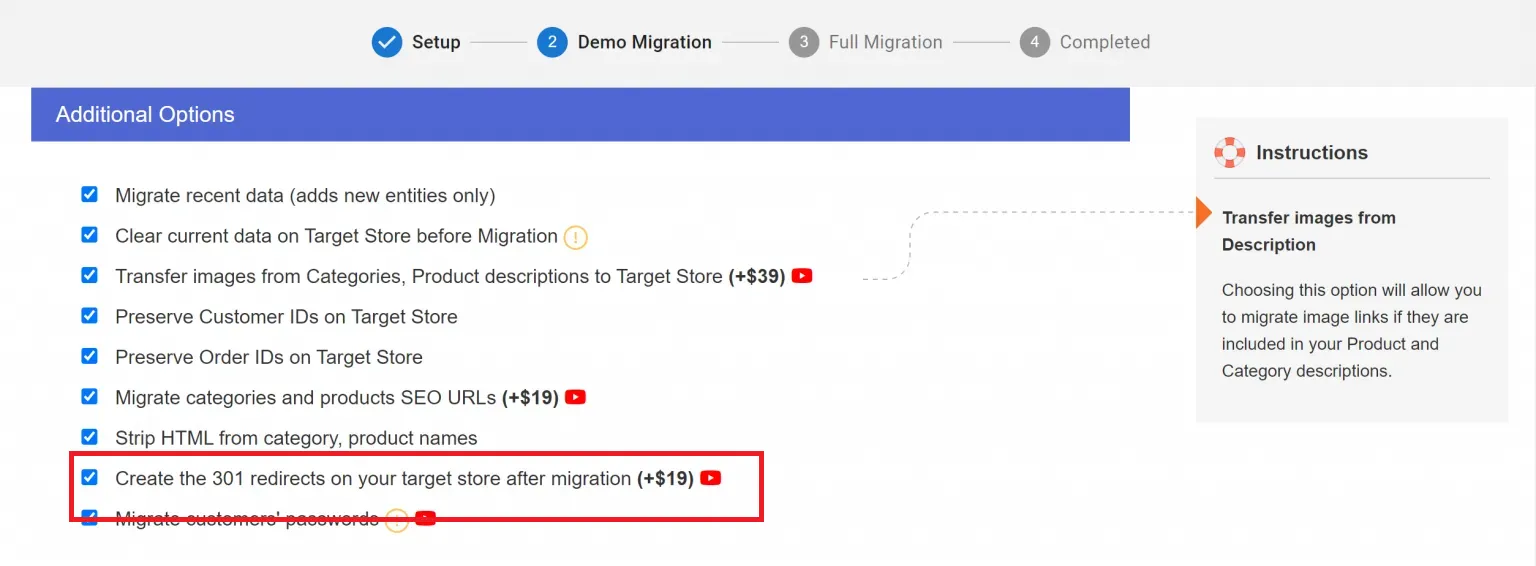
Step 4. Launch your migration
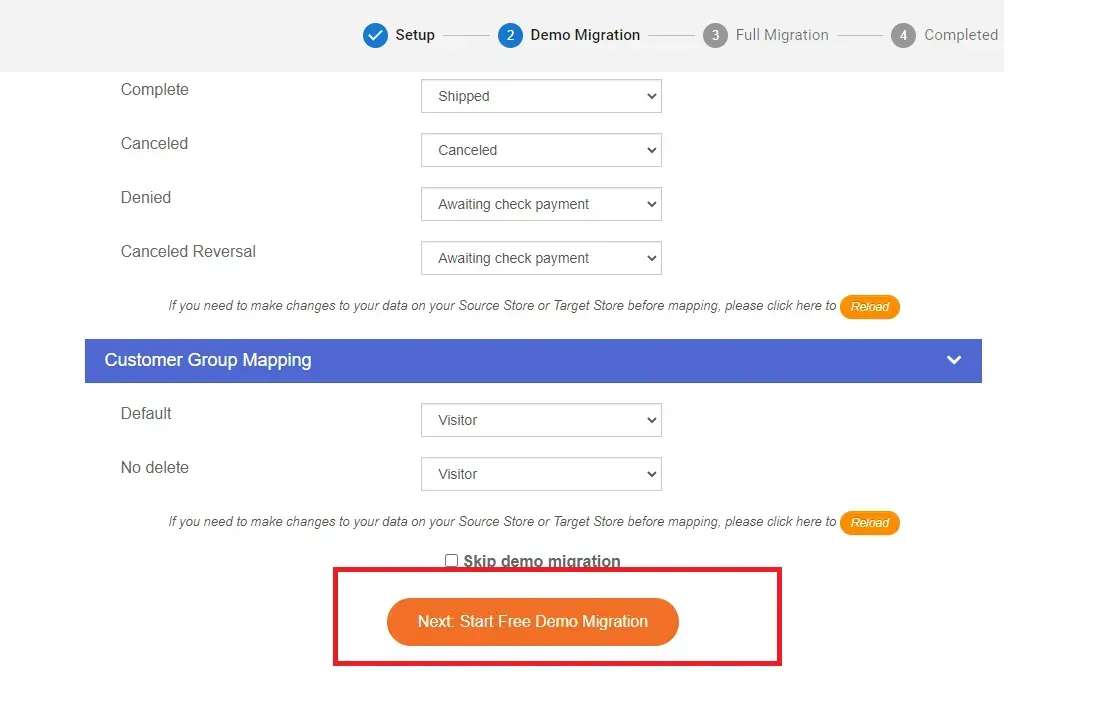
Are you ready? Click “Start free demo migration” at the bottom of the setup page! You will be able to transfer up to 20 items per data type (customers/orders/products). This transfer is completely free of charge, of course, since this is a demo. When it is completed, make sure to double-check the results before committing to the full migration.
Once your actual migration begins, there's no need to keep your browser open all the time since the whole process takes place in the cloud. All you need to do is sit back and wait for our confirmation email!
Better yet, our ongoing support doesn't just end there. Post-migration, you will receive dedicated technical help, one free re-migration, and unlimited recent data migrations for 60 days (starting the moment you complete your payment). Plus, any smart updates to existing data are free for 90 days — no limits or restrictions.
All-in-One migration
Although the Automated package covers all the essentials, you must still be doing all the work yourself! Sure, you can manage fine on your own if your Source and Target carts are relatively similar. But if complex setups or major incompatibility get in the way, you will likely hit major snags down the road!
To help you bypass all these technical frustrations, we suggest choosing the All-in-One package. Our expert team will handle basically every part of the process to give you a worry-free experience! Let us show you how we can make your transition smooth and simple:

Step 1. Consultant by LitExtension experts
The first step to take is to sign up for a quick chat with our team. We'll listen closely to your requests to understand exactly what you want to migrate – customer records, products, orders, 301 redirects, or any other features unique to your current store.
Once we all reach a mutual agreement and payment is handled, you can step back now. We've got the rest covered from here!
Step 2. Data mapping and setting by experts
Next, our team will get to work and make sure everything is ready on your new platform by:
- Setting up essential Shopify redirects
- Installing necessary add-ons and plugins
- Cleaning and preparing backups
- Configuring extra settings for your new store
Want to learn more about the progress? No problem! We can give you as many demo migrations as you'd like so you can observe all the changes firsthand.
Step 3. Perform full eCommerce replatforming
Finally, it's time for the big migration! As mentioned above, our team will manage the entire process while providing you with real-time updates and quick responses (in 12 hours or less, unlike the 24-hour window of the Automated package). Better yet, all the additional options (such as 301 redirects) are included at no extra cost!
Once your migration is complete, we'll conduct a thorough check to ensure your new store is fully operational.
Plus, we're here to support you with ongoing assistance for re-migrations and recent data transfers during the next 30 days (after the migration is completed). Not to mention, there are UNLIMITED smart updates for 90 days as well! All these services are free of charge if the extra data accounts for less than 5% of your total.
Shopify Redirects: FAQs
How do I stop Shopify from redirecting?
Head to your Shopify dashboard and click on "Domains." Right there, in the "Primary domain" section, you'll spot your current main domain. If the option "Redirect all traffic to this domain" is turned on, just uncheck it to disable the redirect.
Are Shopify redirects 301 or 302?
Shopify exclusively uses 301 redirects as of this writing.
Does Shopify automatically create redirects?
Yes, but only in certain cases (for instance, Shopify will automatically create a redirect when you change your product's link). In other situations, it's always wise to double-check your URLs after making major adjustments.
What are the maximum redirects on Shopify?
Shopify sets a cap of 100,000 redirects for regular plans like Basic, Shopify, and Advanced. If you're a Shopify Plus subscriber and need a higher number, feel free to discuss expanding your limit with the Shopify team.
Final Words
That's a wrap on our guide to creating, filtering, and editing Shopify redirects!
Overall, Shopify's built-in tools are relatively easy to use and cover most basic needs for small to medium stores. But we get it: you will likely need much more than that when handling a large volume of redirects or planning a complete store migration to a new platform.
And that's where LitExtension comes in. With over 12 years of experience and 300,000+ successful store migrations, we're here to make sure your Shopify transition is smooth and completely worry-free. Let us be your trusted partner on this exciting journey!
For more information, check out our Shopify guides and join our Facebook Community.

