Want to back up your Shopify store database, import data to third-party apps, or migrate to a new platform? Lucky for you, it’s not difficult to export data out of your Shopify store– you can do it either manually or automatically using an app. And LitExtension – #1 Shopping Cart Migration Expert is here to guide you through every step of performing Shopify data export.
Here’s a quick glance at what we’ll cover in this guide:
- An overview of Shopify data export
- How to do Shopify data export manually?
- How to export Shopify data automatically?
Let’s dive right in!
Shopify Data Export Overview: What You Need To Know About
Before we show you a detailed guide on how to perform Shopify data export, let’s spend a few minutes to better understand:
- What kinds of data types you can export
- How many methods to export your data
- Whether you can import all the exported files into another Shopify store
💡 Interested in launching a profitable eCommerce store with Shopify? Check out our honest Shopify review to better understand Shopify’s features, pricings, pros & cons!
What kind of data can you export out of your Shopify store?
Shopify data export is a Shopify’s built-in functionality that allows you to download various types of data from your Shopify store into a readable file format, typically in CSV or Excel, including:
Data type | Description |
Products | You can do Shopify export product descriptions, titles, prices, and inventory levels. |
Customers | Information such as customer contact details, order history, and account status can be extracted. |
Orders | You can do Shopify export orders with order history, including customer information, payment, and fulfillment status. |
Gift card codes | Active gift card codes and their respective balances can be exported. |
Discount codes | Get a list of discount codes along with their status and usage counts. |
Financial data | Extract transaction details and financial summaries for bookkeeping and financial analysis. |
Blog posts and pages | Though Shopify doesn’t support exporting blogs and pages natively, you can perform Shopify export pages using a Shopify exporter app. |
Data generated with third-party apps | Depending on the app’s features, you may be able to export data generated within these applications. |
Why do you need to export Shopify data?
Shopify exporting functionality will come in handy when you want to sync your Shopify data to another tool, migrate to a new platform, or simply do a store back-up periodically.
- Back up Shopify database: Regularly exporting data helps you create backups, preventing loss from unintended deletions or store issues.
- Import to your third-party apps or tools: To run more effective email campaigns, better-targeted ads, or integrate with accounting software, you might want to export your Shopify data and push them to your desired tools.
- Migrate to a new platform: If you’re moving your store to another platform, you might want to export your Shopify product database and other crucial data under CSV files– which you can use to import to your new eCommerce platform.
How many methods are available to export Shopify data?
If your purpose of exporting data is to migrate to another Shopify store, read carefully our notes below first:
⚠️ Important notes
Shopify allows you to export several data types under CSV files. However, unlike exporting features, you should be well-noted that Shopify’s importing functionality only allows you to transfer some certain types of information.
Below is a list of data types you cannot import into your new Shopify store either manually or automatically:
- You cannot import traffic data to another Shopify store.
- Orders cannot be transferred manually. Instead, you must use Shopify data export API. Or you can also hire an expert or migration agency to perform Shopify export orders automatically.
- You cannot import discount codes.
- The gift cards which have been issued cannot be transferred
- Your custom reports cannot be imported into a new store
👉 If you want to migrate your store to another Shopify store, the optimal solution would be to use a reliable migration service like LitExtension.
Our certified migration experts will go the extra mile to ensure a fast, risk-free & error-free Shopify to Shopify migration. A few bucks and a few hours are all it takes!
If you only want to back up your store for safety reasons of importing your CSV files to other third-party tools, you can do it manually or via a Shopify exporter app.
Method #1: Manual method
The manual exporting process in Shopify is straightforward– it is built into Shopify and does not require additional tools or applications. All you have to do is log in to your Shopify store, navigate to the data type you want to export, and choose to export your data. (we’ll discuss it in greater length later).
Pros | Cons |
+ No additional cost as it is a built-in feature. | - Limited customization and filtering options for data exports. |
Method #2: Using an app
If you are looking for more advanced features like automated exports and detailed customization options, doing data export Shopify automatically using a Shopify exporter app would better suit you.
Pros | Cons |
+ Automation of exports at scheduled intervals. | - Additional cost for the app subscription or purchase. |
Need Help to Migrate Your Store from Shopify?
LitExtension Automated Migration Tool transfers products, customers, and orders
from Shopify—fast, accurate, and hassle-free.

How To Export Shopify Store Database Manually?
Just to be clear, as of writing this article, the native Shopify data export feature allows you to export these data types under CSV files:
- Products
- Customers
- Orders
- Gift card codes
- Discount codes
- Financial data
Because the process of exporting Shopify data is similar across all the six data types above, we will show you how to export the most important one, Shopify products. If you want to export other information within your Shopify admin dashboard, just follow the same steps, and you’ll be doing perfectly fine!
Here’s how easy-peasy it is to do Shopify data export:
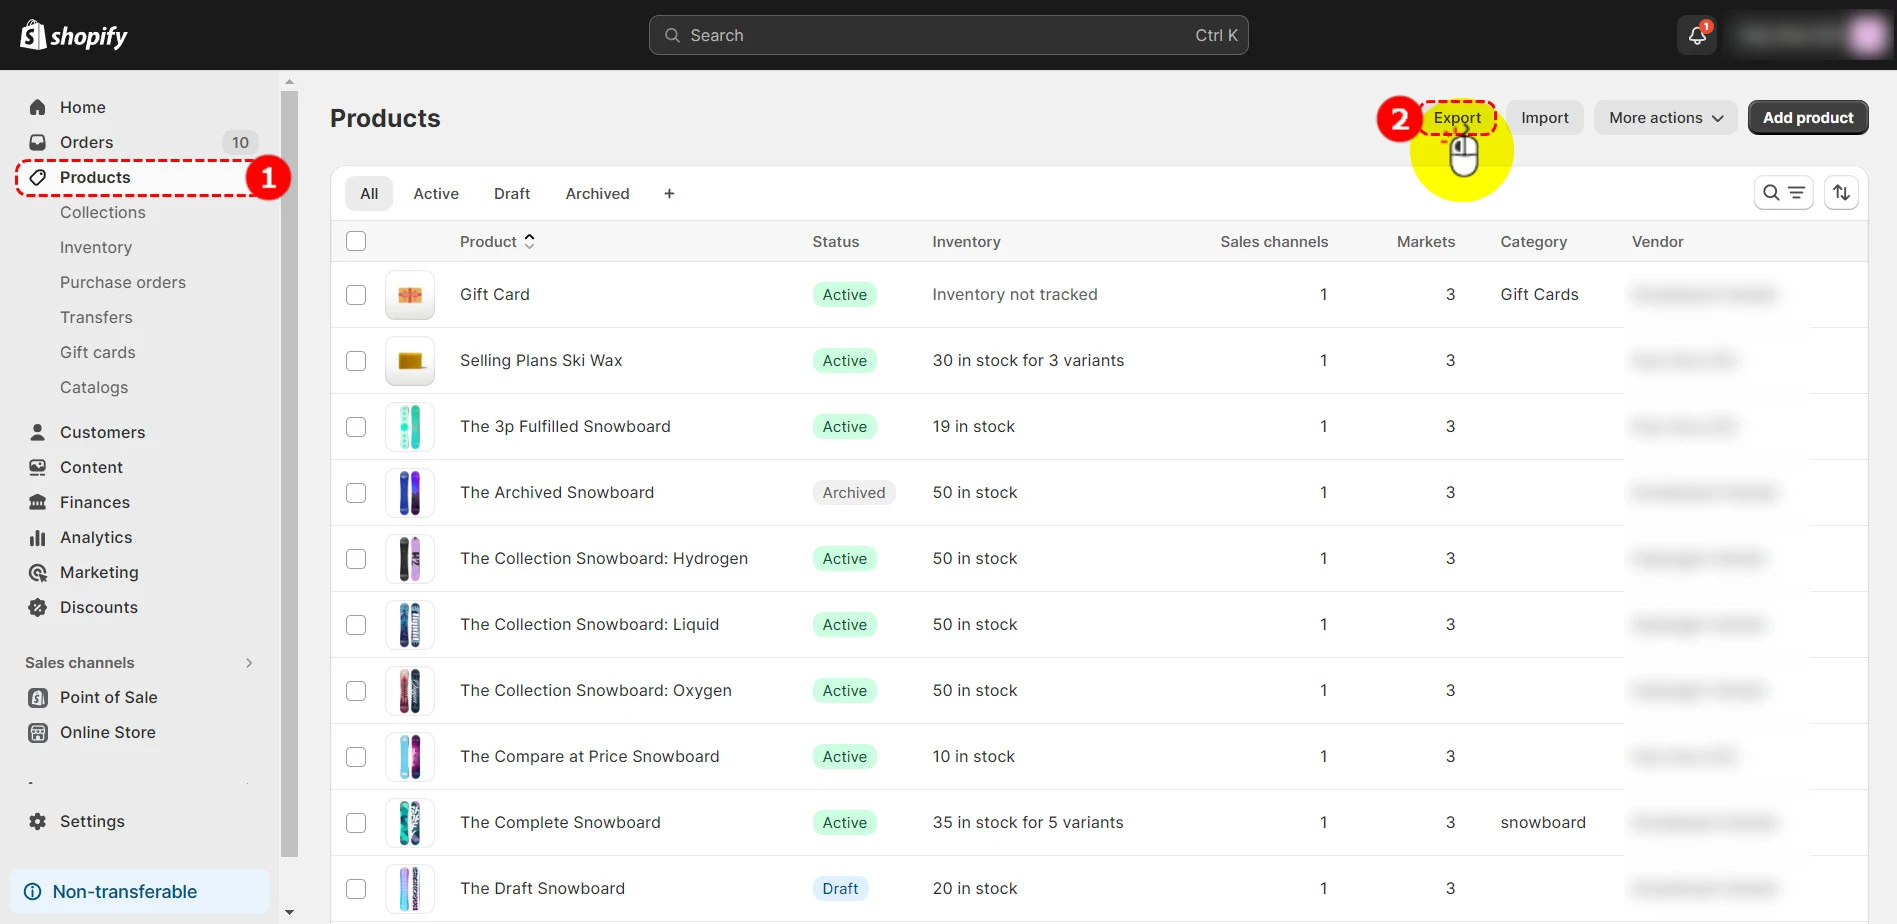
Step 1: Choose the data you want to export
On your Shopify admin dashboard, click the Products tab > Click the Export button.
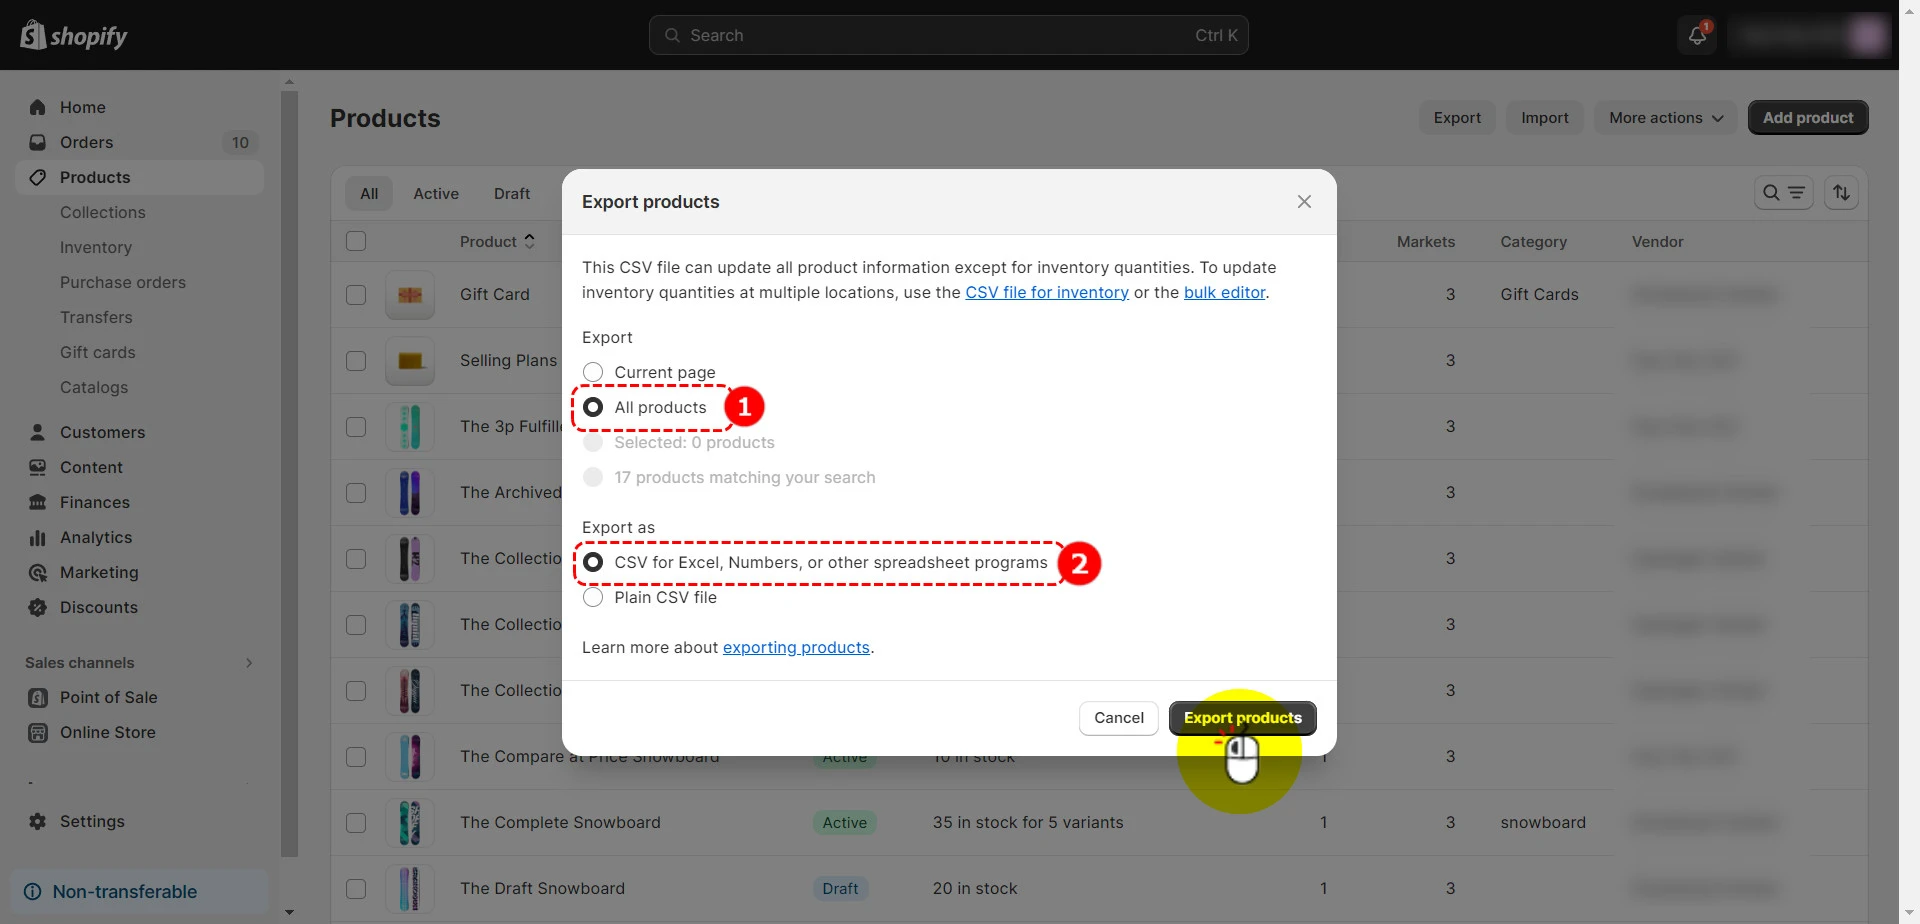
Step 2: Configure your export settings
In the Export section, tick the All products option. In the Export as section, tick the CSV for Excel, Numbers, or other spreadsheet programs option. Then, hit the Export products button.
💡Pro tip:
If you want to export some specific products out of your Shopify product database instead of your entire catalog, you should leverage Shopify’s sort and filter features.
For instance, if you want to export only the products listed in your primary market, then choose Add filter > Market > Primary market.
Afterward, follow the same steps above. But instead of ticking All products, choose to export products matching your search.
If nothing goes wrong, a notification pop-up should appear as shown:

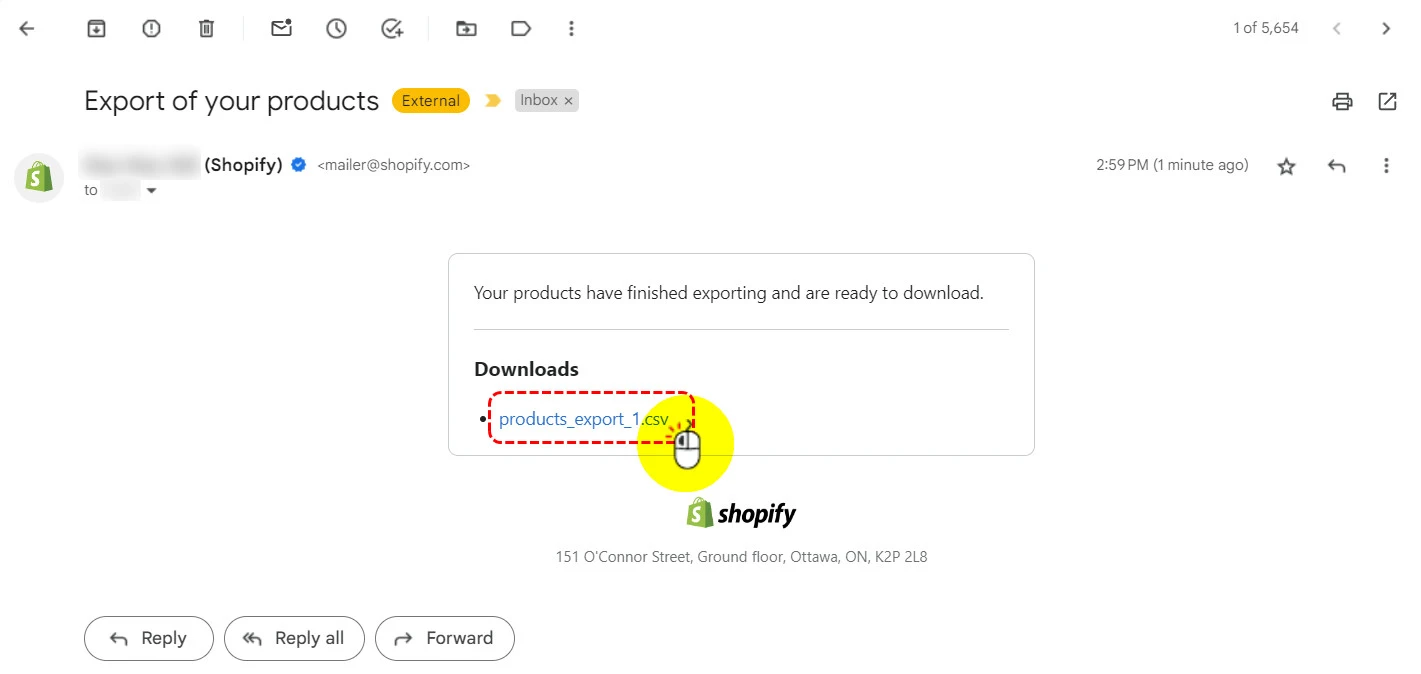
Step 3: Download your CSV file
Finally, check your mailbox and click on the CSV file to download it.
And that’s how simple it is to perform Shopify data export manually.
How To Perform Shopify Data Export Using A Shopify Exporter App?
If you want to export other types of data that Shopify doesn’t support natively, let’s learn next how to do Shopify data export using a Shopify exporter app.
And the app we’ll use for this guide is Data Export IO Shopify as this tool excellently passes our app testing team’s quality standards.
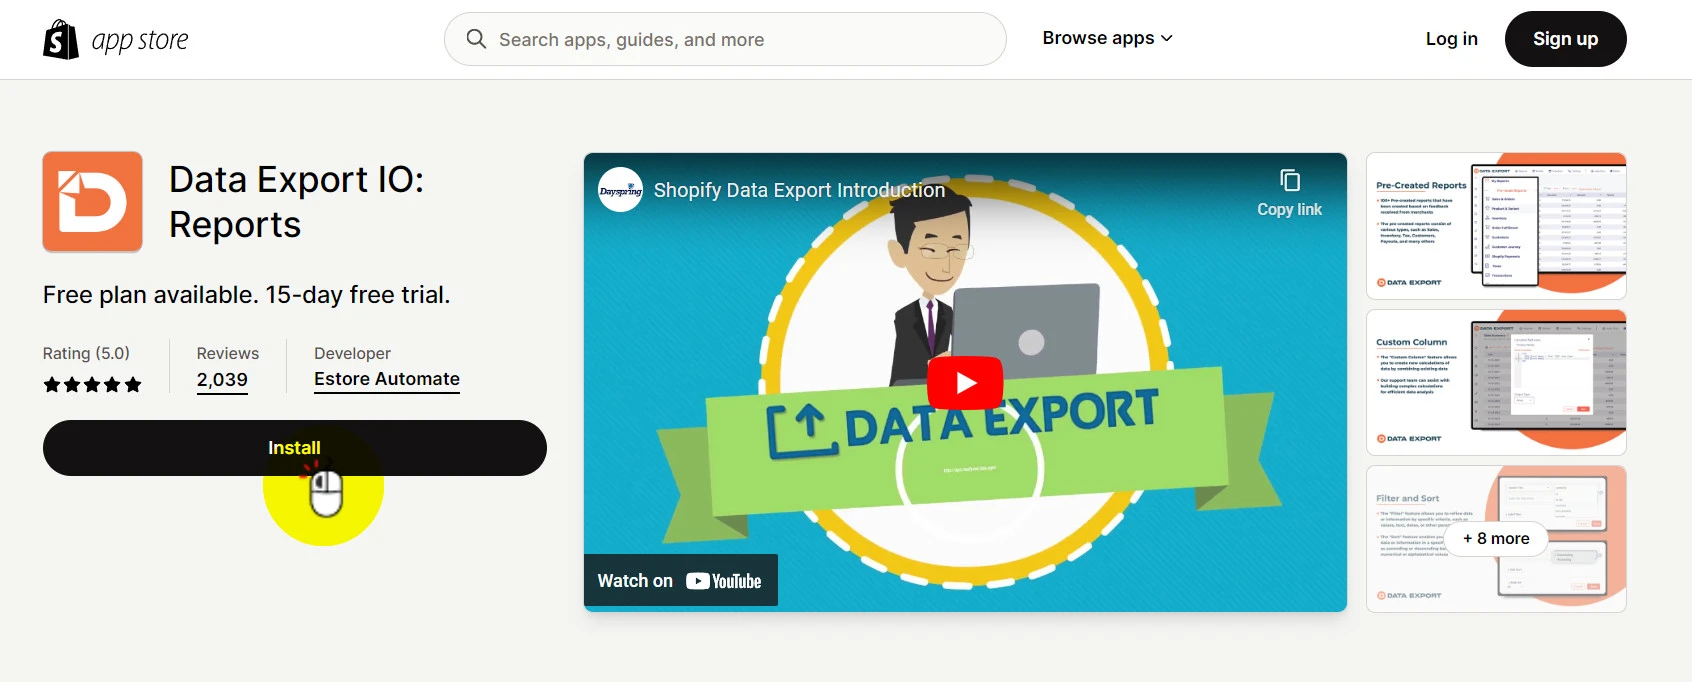
Step 1: Install the Data Export IO app to your Shopify store
First, install Data Export IO to your Shopify store by clicking Install on the app’s listing page.
Click Install app to confirm your installation.
You will then be asked a few prompts. Answer them all so the app developer can better understand your demands or simply Skip if you want.
Step 2: Choose the data or report you want to export
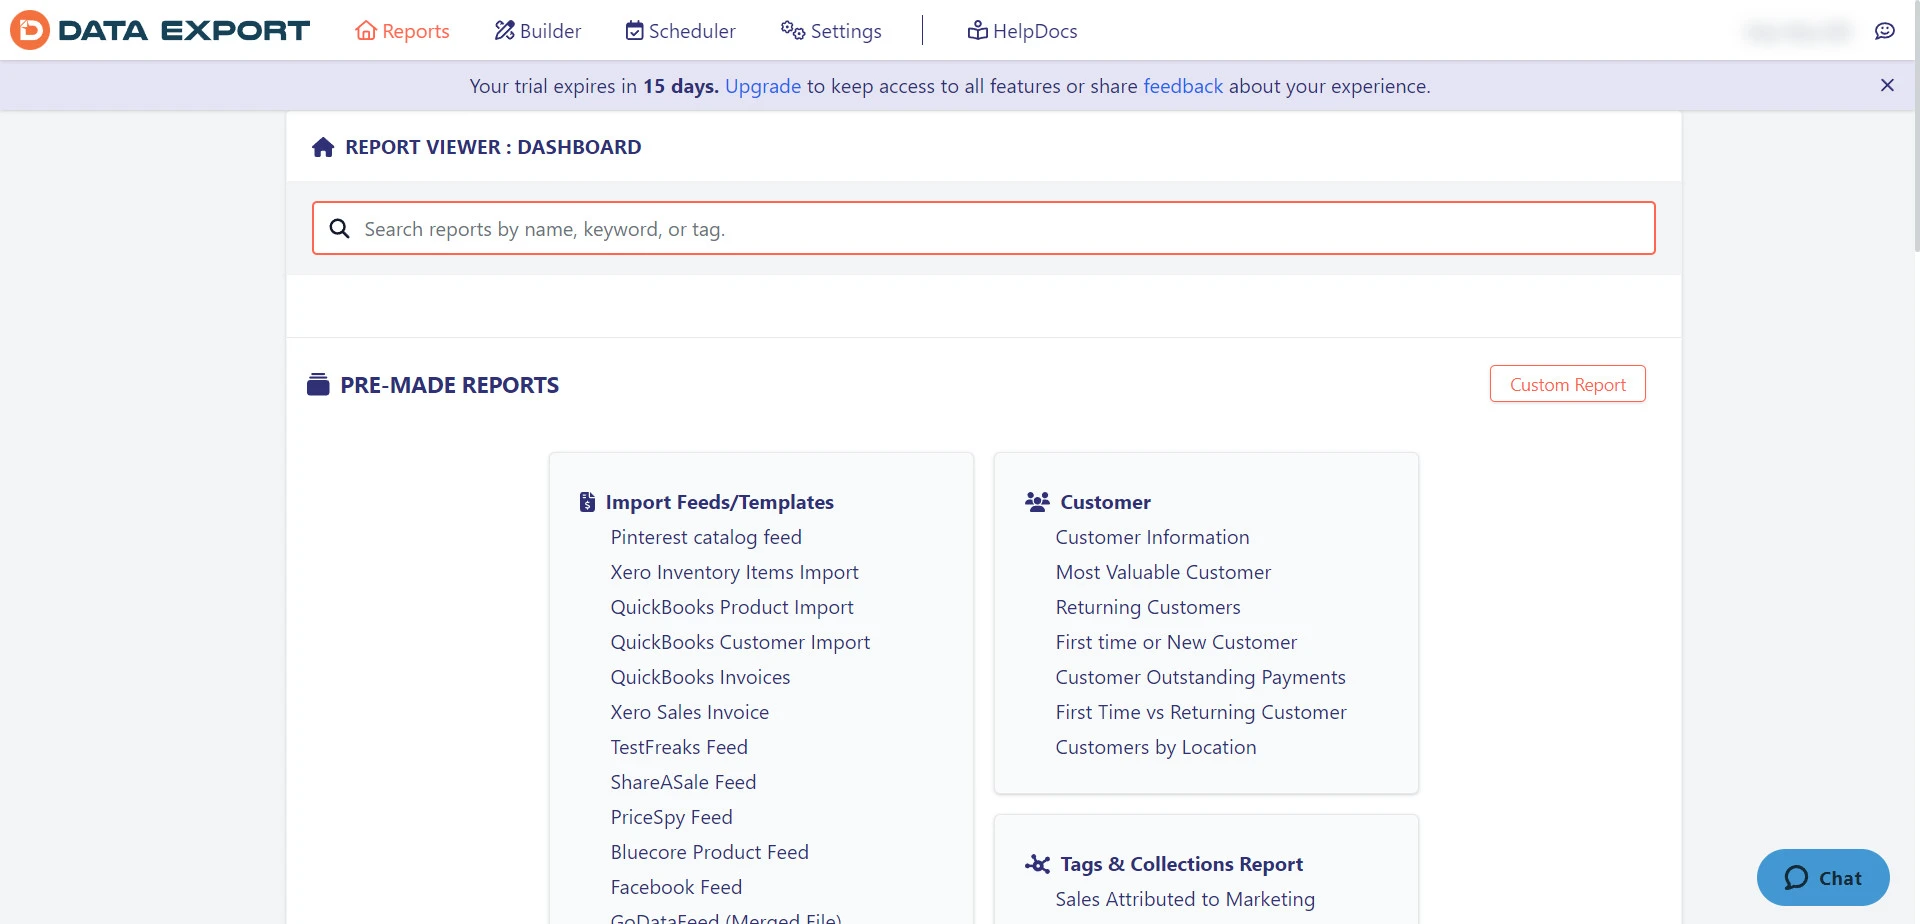
Afterward, you’ll be directected to Data Export IO’s admin dashboard as shown:
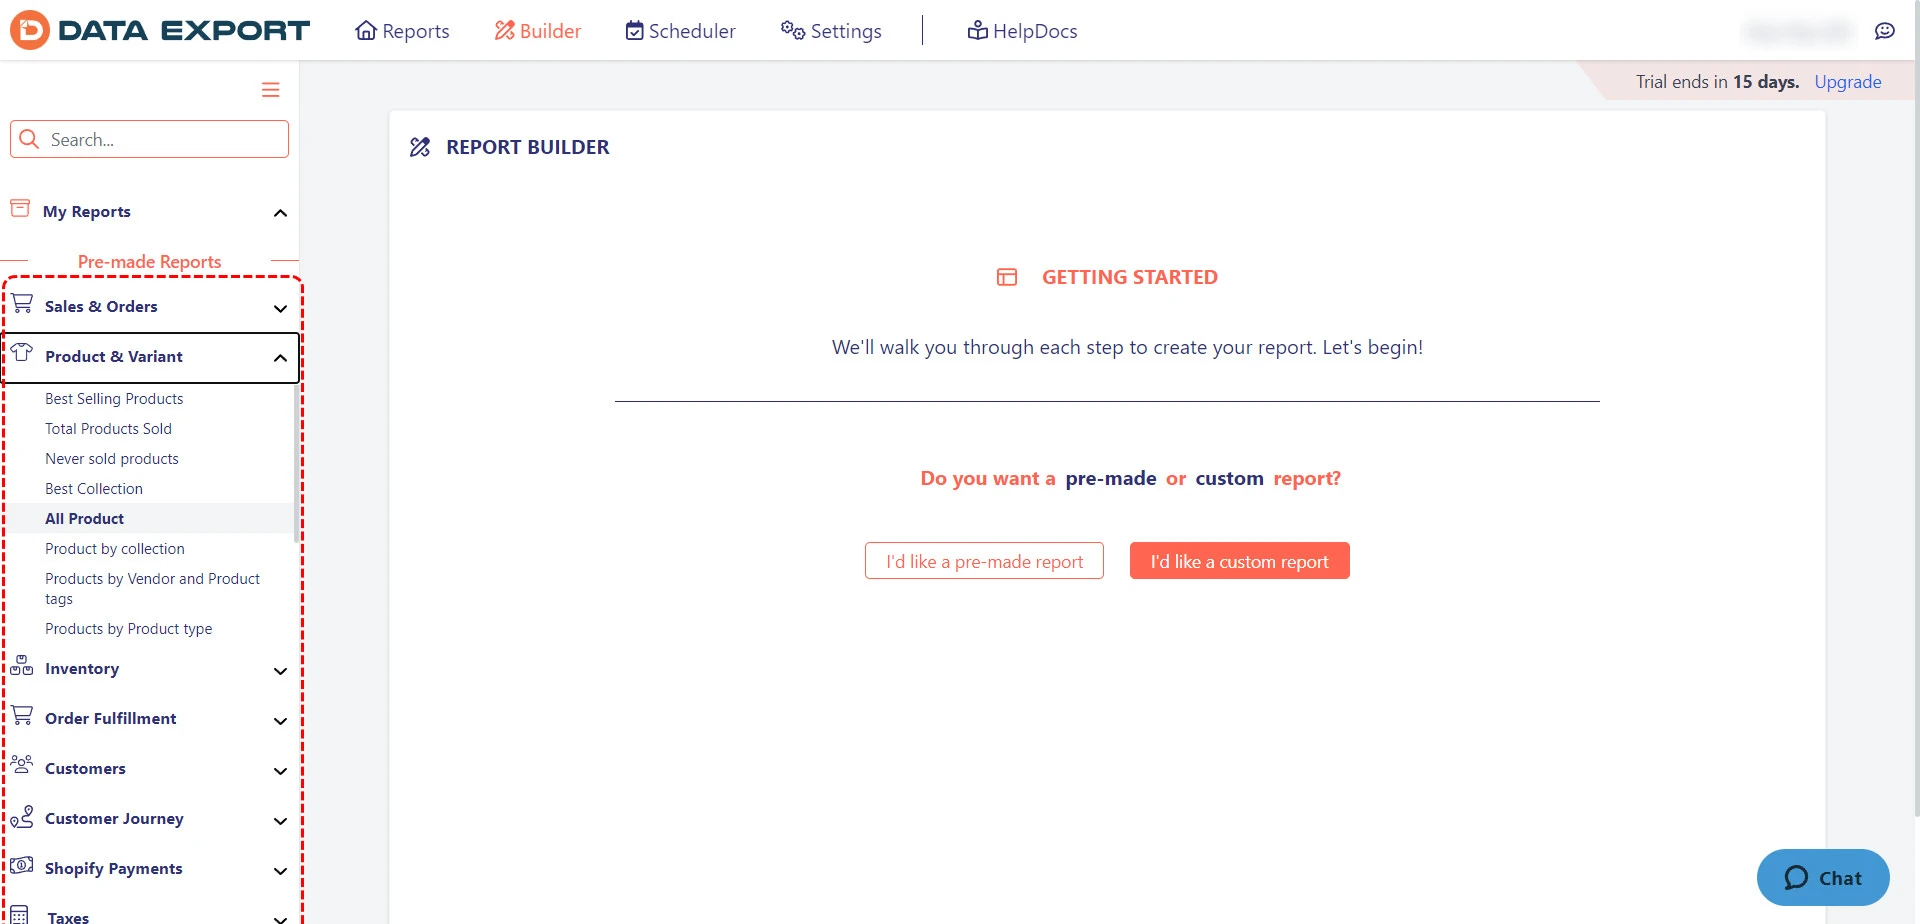
Click Builder option on the top control panel. Look to the left, and you’ll see tons of pre-made reports that you can export with Data Export IO.
For instance, we choose to export all products.
Step 3: Apply filter to refine your data
After you have selected the report you want, click Export button to export the data you want right away.
However, we suggest using Data Export IO’s filter to fine-tune the information you’ll export.
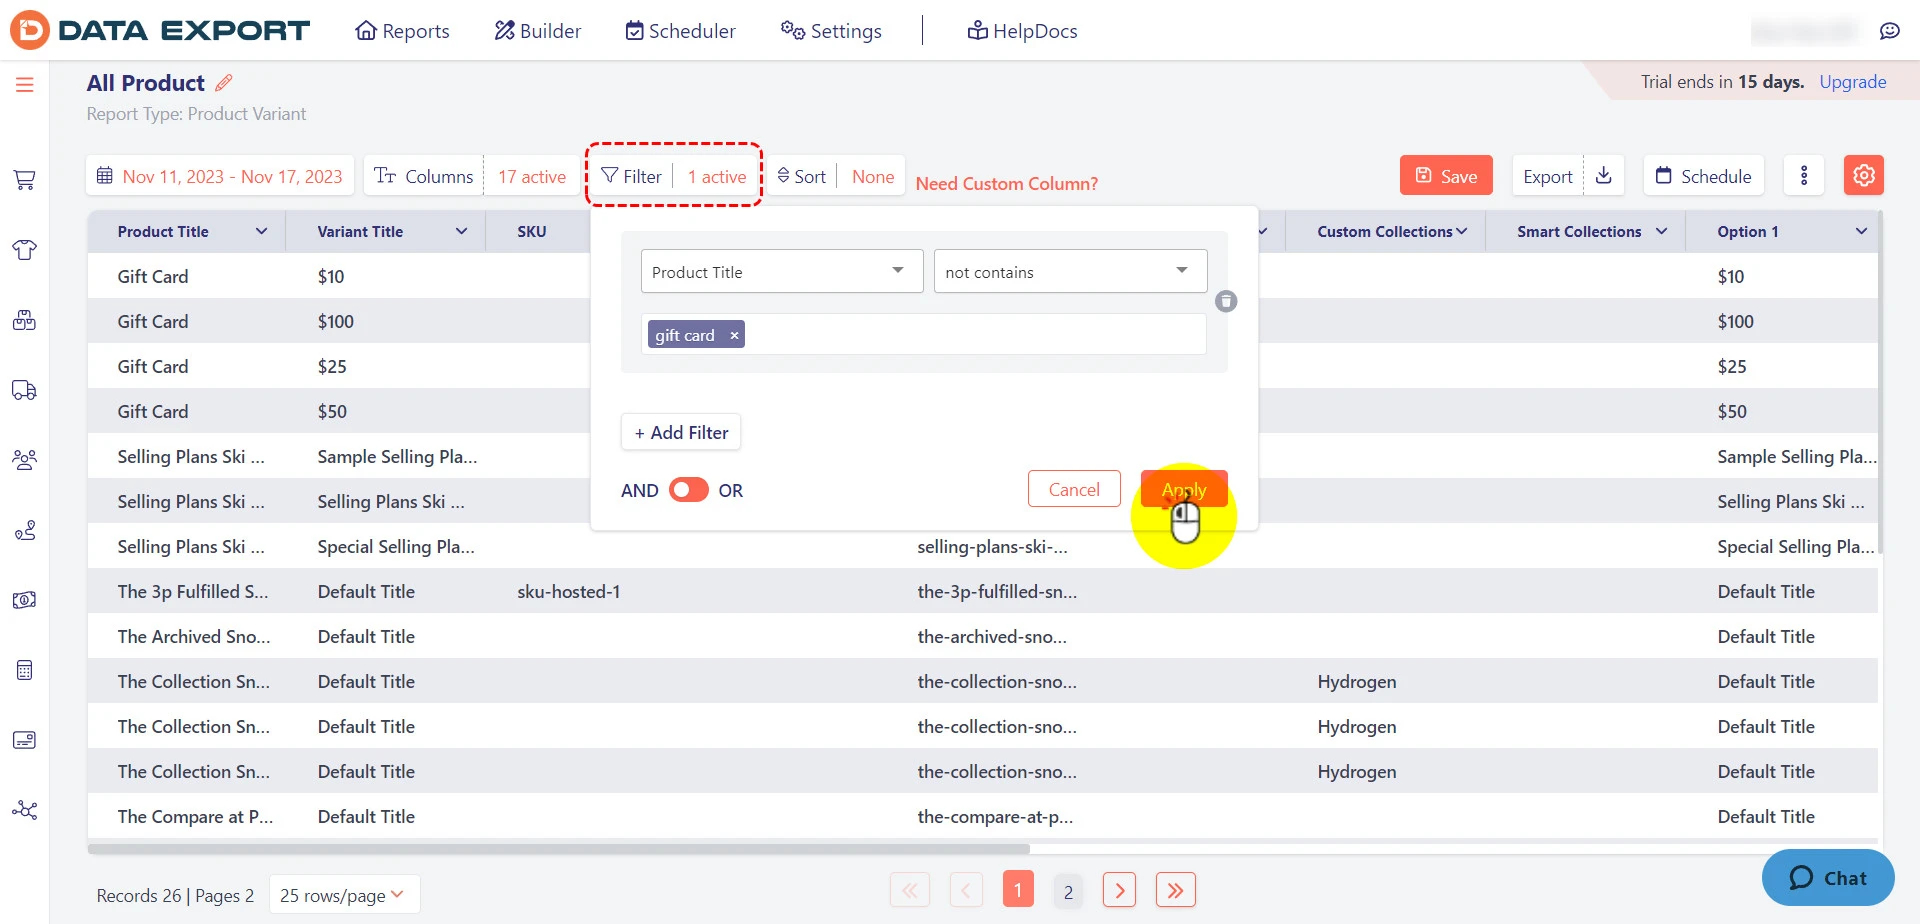
Click Filter and define your logic. For instance, we use the filter to exclude the gift card items from our exported file.
Next, click Apply to activate the filter.
Step 4: Export the data you want
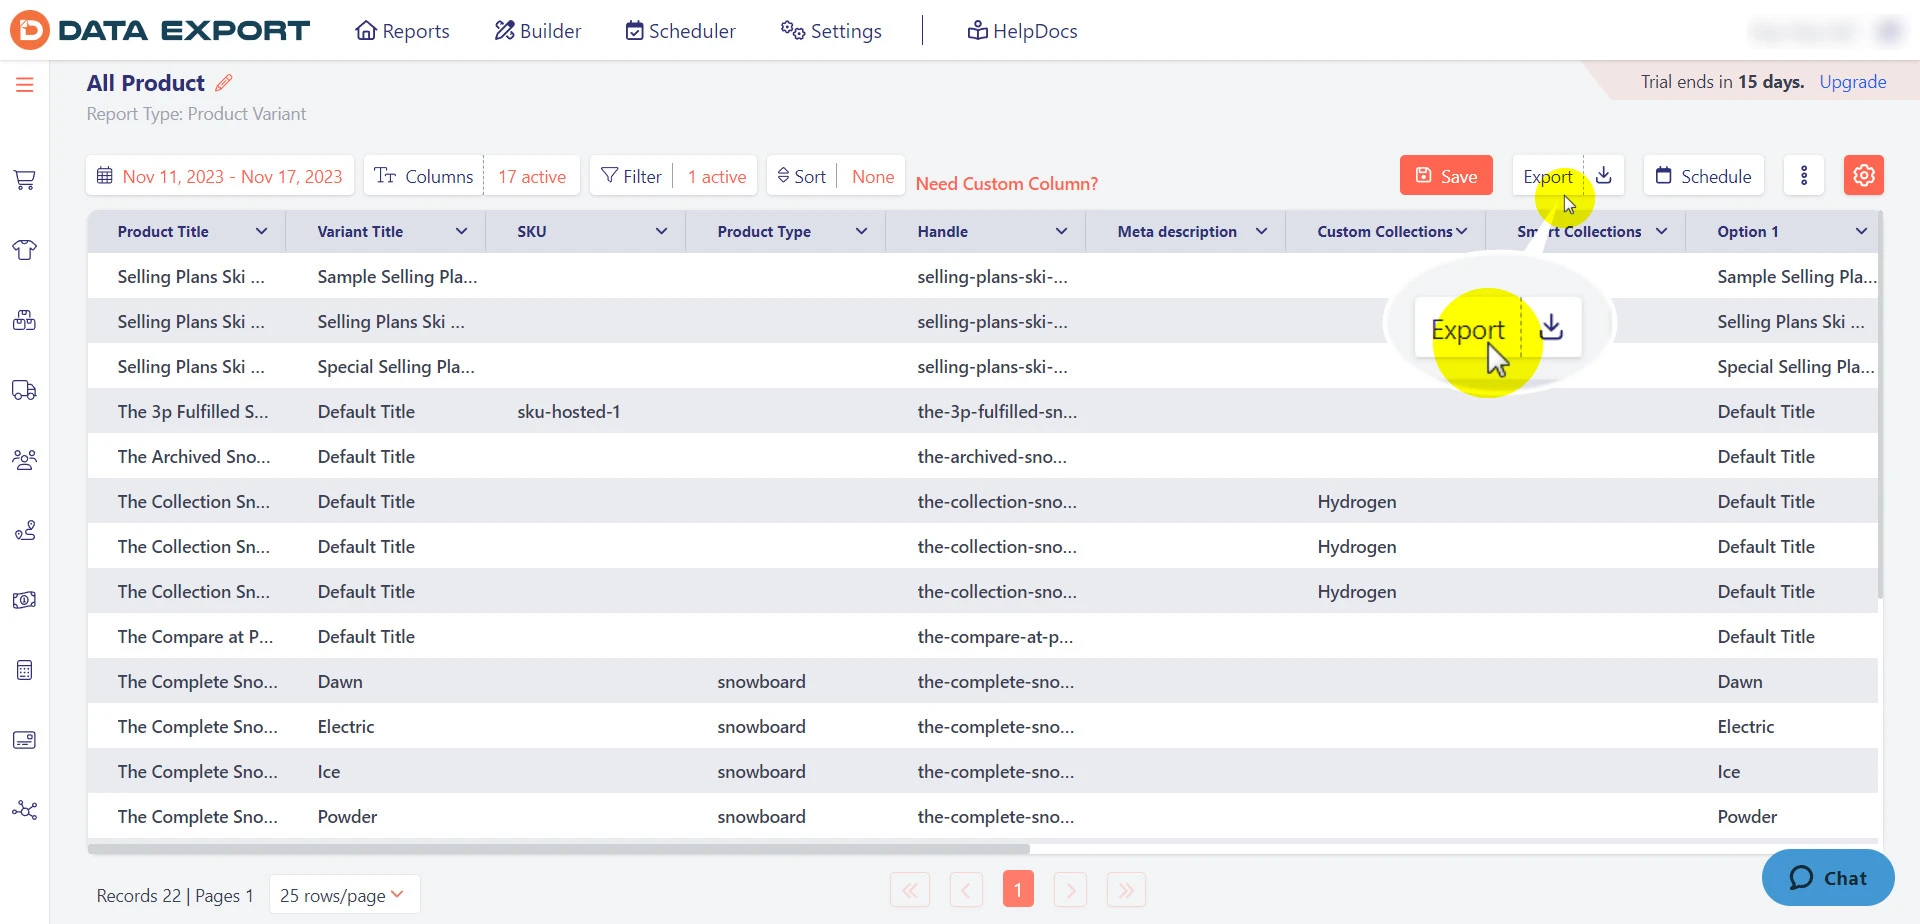
After you have activated the exporting filter, click Export on the top right corner, and you're all set.
FAQs
How do I export data from Shopify?
To export data from Shopify, go to your admin dashboard, navigate to the area containing the data you want (Orders, Products, Customers, etc.), click the 'Export' button, select the data range, and the file format, then click 'Export' again.
Can I export data from Shopify to Excel?
Yes, you can export data from Shopify to Excel. Choose the 'Export' option as explained above and select 'Excel CSV file' as your export format.
Can I export customer data from Shopify?
Yes, you can export customer data from Shopify. In your admin dashboard, go to 'Customers,' click 'Export,' select the customer data you want to download, choose your preferred file format, and then click 'Export customers.'
How do I transfer data from Shopify?
To transfer data from Shopify, use the export feature to download your data to a CSV or Excel file, then import it into the new platform using their data import tools.
Conclusion
Whether you want to migrate to a new eCommerce platform or import your existing Shopify data to another third-party tool, exporting your data under CSV files is the prerequisite step. Thus, we hope after reading this article, you can perform proper Shopify data export! Trust LitExtension Shopify Migration service to handle it all for you if you want to migrate your store to a new platform.
Don’t forget to jump into LitExtension’s insightful blog site and join our active eCommerce Facebook Community crowded with 16,000+ worldwide entrepreneurs.

