Despite thousands of eCommerce platforms available, Shopify stands tall as the biggest and most popular. That's why most merchants assume that advanced features like automatic Shopify backup naturally come standard. Surprise! They don't.
But no worries; our team is here to help you take control of your own backups! In this article, we're going to discuss:
- How to duplicate Shopify store via Shopify admin
- Steps to clone the Shopify store using a backup app
- Advanced store migration with LitExtension
- Extra tips when creating your backup
Without further ado, let's get started!
How to Create A Shopify Backup via Shopify Admin
Do you prefer to handle everything without the need for third-party apps or services? In that case, Shopify lets you back up your store right from the dashboard!
Nevertheless, remember that since it doesn't allow you to export everything (for example, images, passwords, and credit card details are off-limits), you'll need to copy those manually later on. That could take days if your store is on the larger side — or even just medium-sized, for that matter.
Still up for it? Then here's our complete guide to help you backup Shopify data:
Step 1. Export the Shopify backup file
The first step is to export the essential data from your Shopify store:
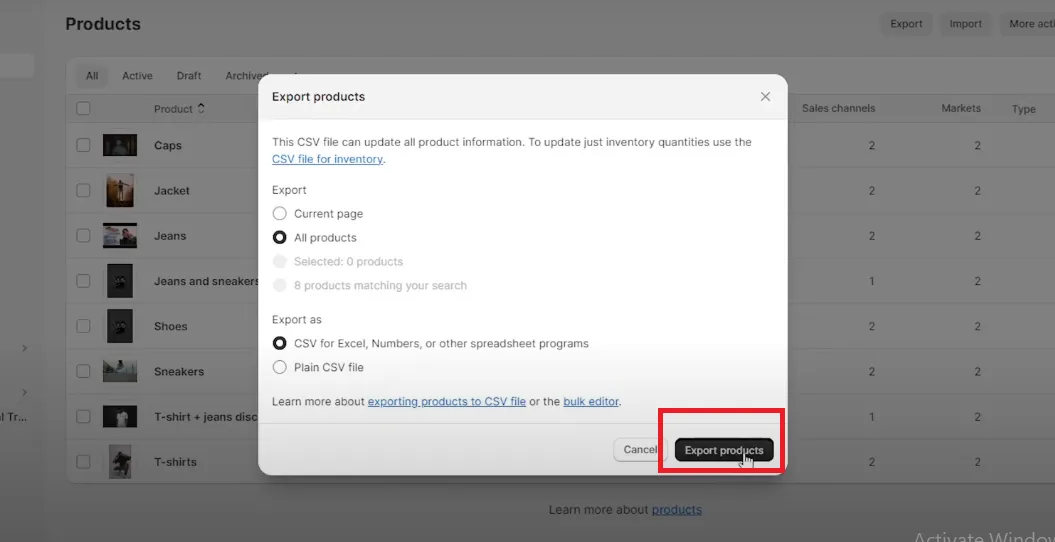
- Go to “Products,” then click on “Export” and choose the type of data you'd like to export. You may also select “All products” to export all data types listed on the pop-up screen.
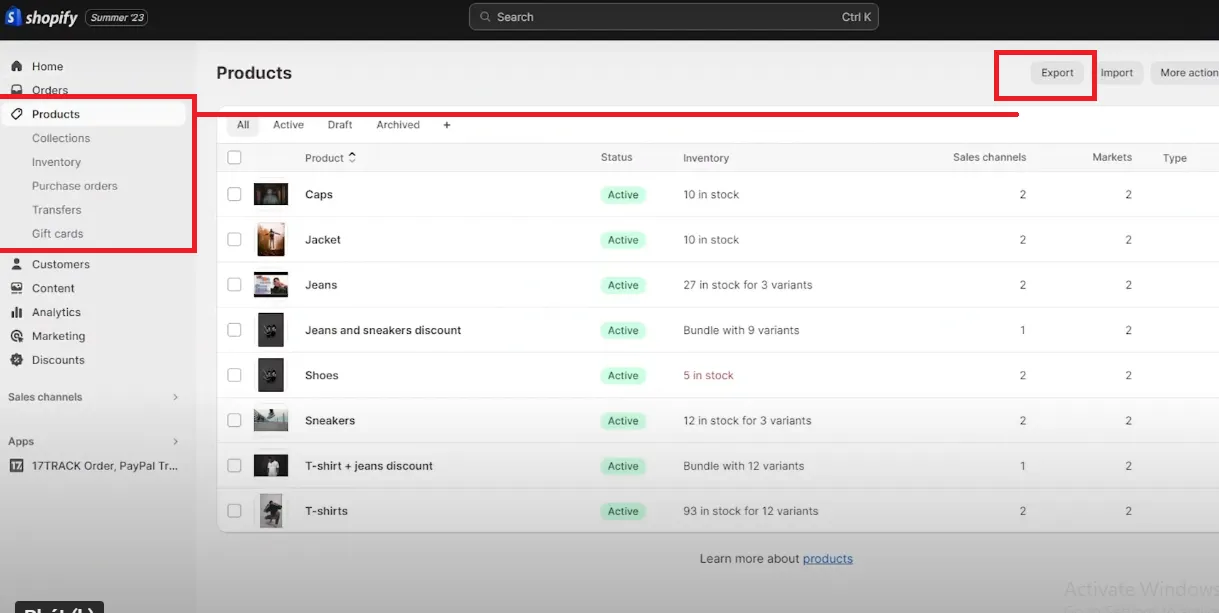
- Now, pick a specific format for your CSV. Do you want to export in Google Sheets, Numbers, or Microsoft Excel?
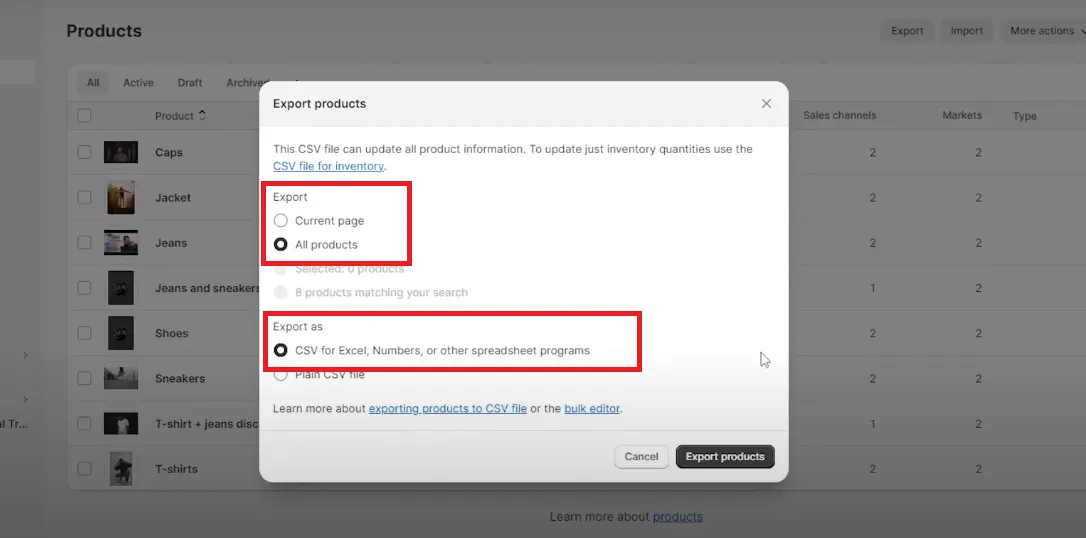
- Once you've decided on the CSV format, press “Export” to download this Shopify store backup file. You can repeat these steps to other data types aside from Products, such as Collections, Inventory, Purchase Orders, Transfer, and Gift Cards.
Step 2. Copy additional data manually
As of this writing, Shopify only allows you to export customer information, product/order information, and financial orders. That means some other data won't be included in the CSV, and you'll need to copy these manually! For example:
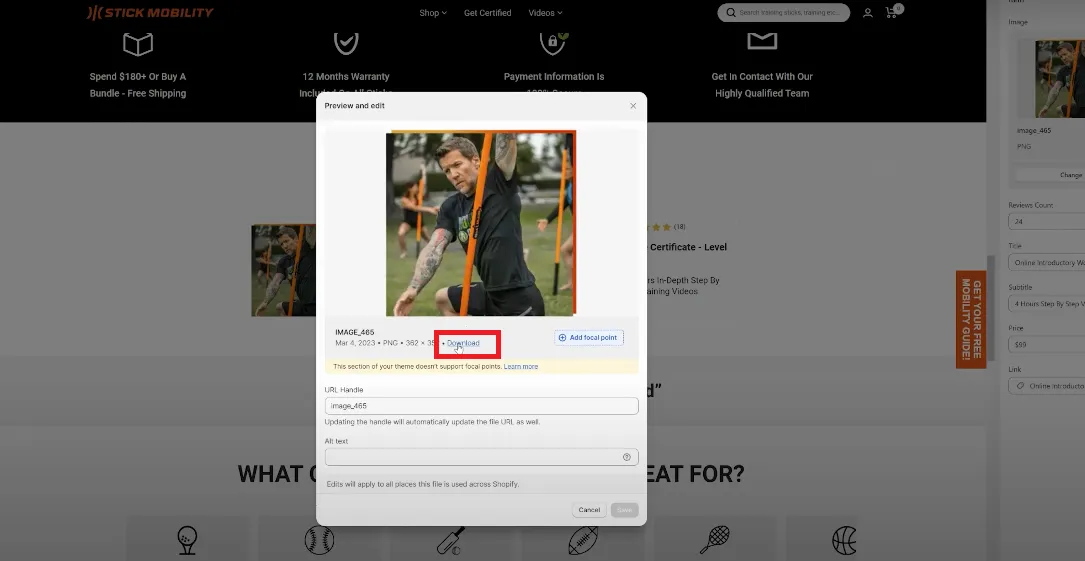
- For product images: Go to the “Products” page, select a product, click the image, and choose “Download.”
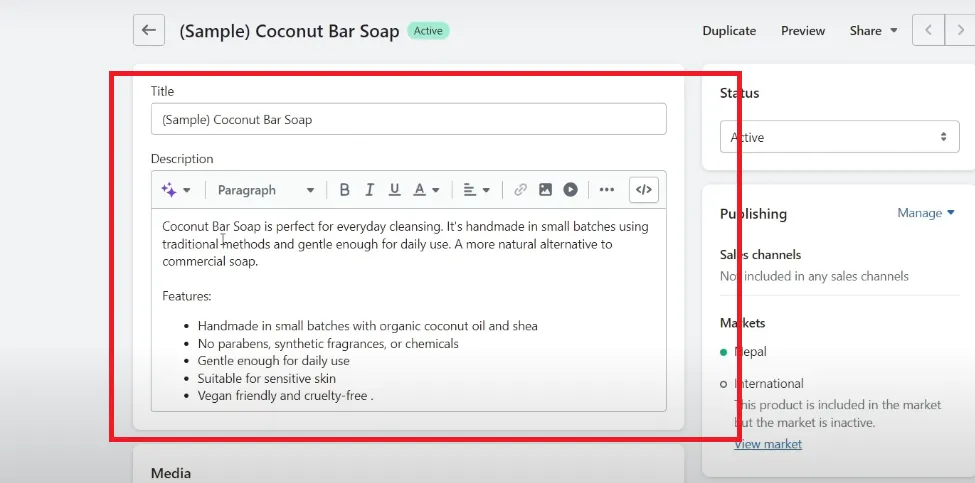
- For product descriptions: Again, go to the “Products” page and click on a product. After that, open the “Description” tab and copy the text to paste it into a document or spreadsheet.
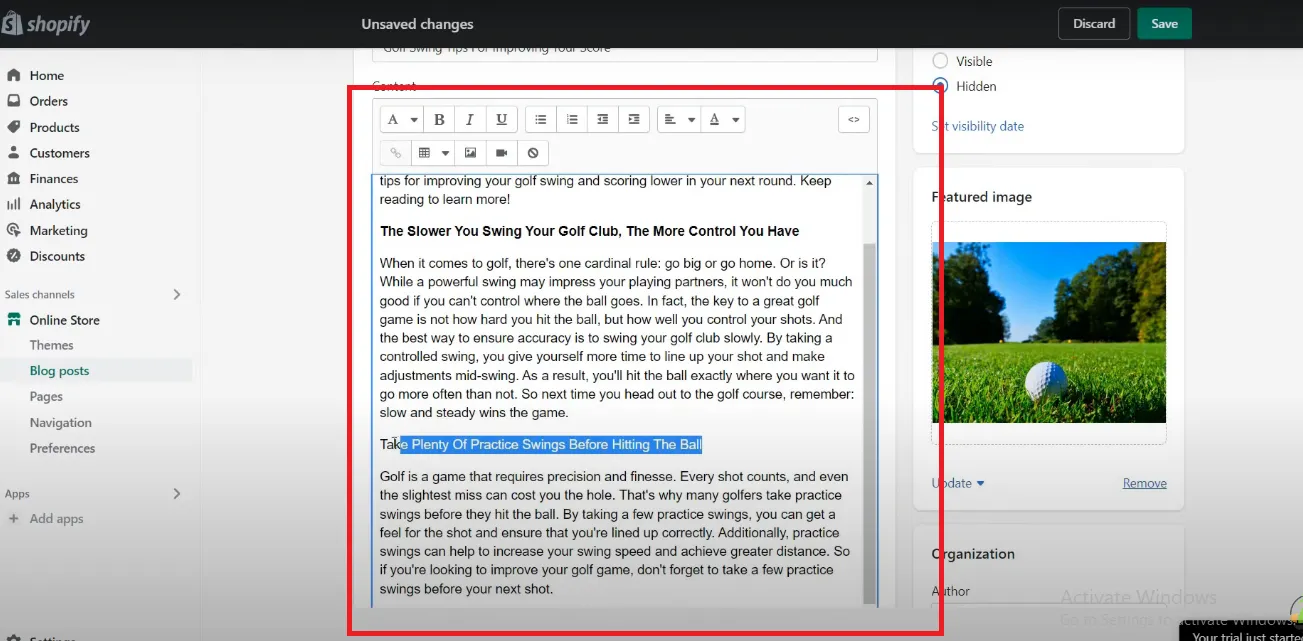
- For blog posts: Head to the “Online store” section on the dashboard and choose “Blog posts”. Next, copy and paste the blog content into a document or spreadsheet.
Step 3. Download your Shopify theme files
Last but not least, you need to preserve your store's look and feel as well! To do so, complete the following checklist to duplicate Shopify store themes:
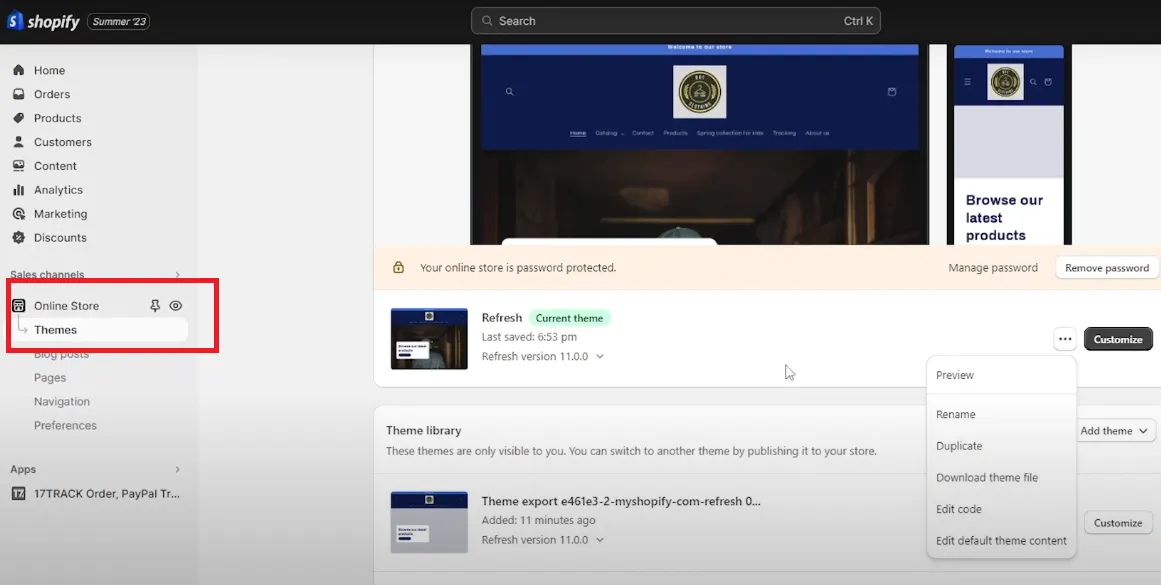
- In the Shopify Admin, click on “Online Store.”
- Then, under “Themes,” find the theme you wish to export and click the three dots next to it.
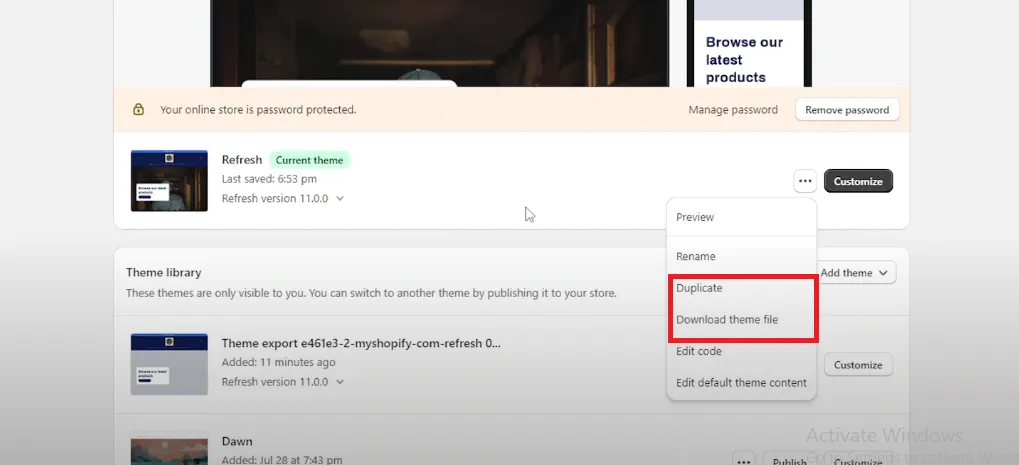
- Choose “Download theme file”; you can pick either “.tar.gz” or “.zip” as the file type for your export.
- Finally, click “Export theme” to download the theme to your computer. You can also click “Duplicate” to create a direct Shopify backup of your theme. And that's it!
How to Create A Shopify Backup Using A Shopify App
Given the clear limitations of Shopify's manual backup method, our team decided to try some of the most popular backup apps out there, such as Automatic Backups, Storelapse, Goshu, Matrixify, and more.
Overall, while these apps generally do their job, they still come with a few major drawbacks. Corrupted files or errors are still a possibility, for example. And worse, some of them don't have the strict security measures you'd expect from a Shopify backup app!
That's why, after months of testing, we eventually settled on Rewind Backups (starting at $9/month). Of course, Rewind is not 100% perfect: handling large product collections can still be a challenge, and yes, your backups might lag at times. But for most small stores with straightforward needs, this app still gets the job done.
To make things easier for you, we've put together a quick guide on how to copy a Shopify store smoothly with Rewind:
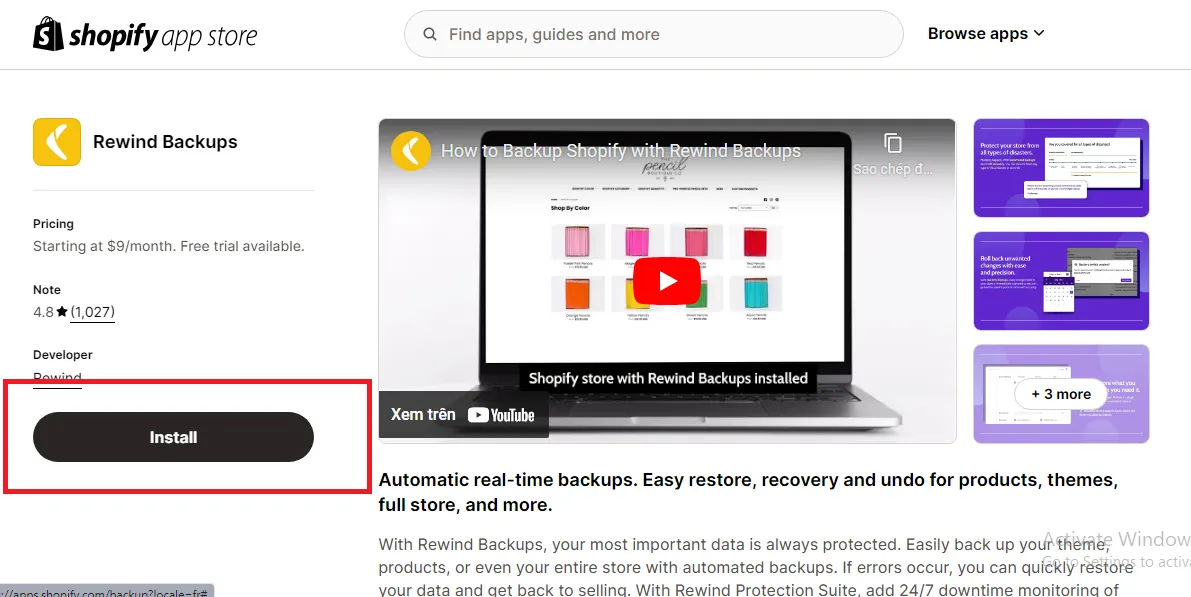
First, go to the Shopify App Store, search for “Rewind Backups.” and click “Install.”
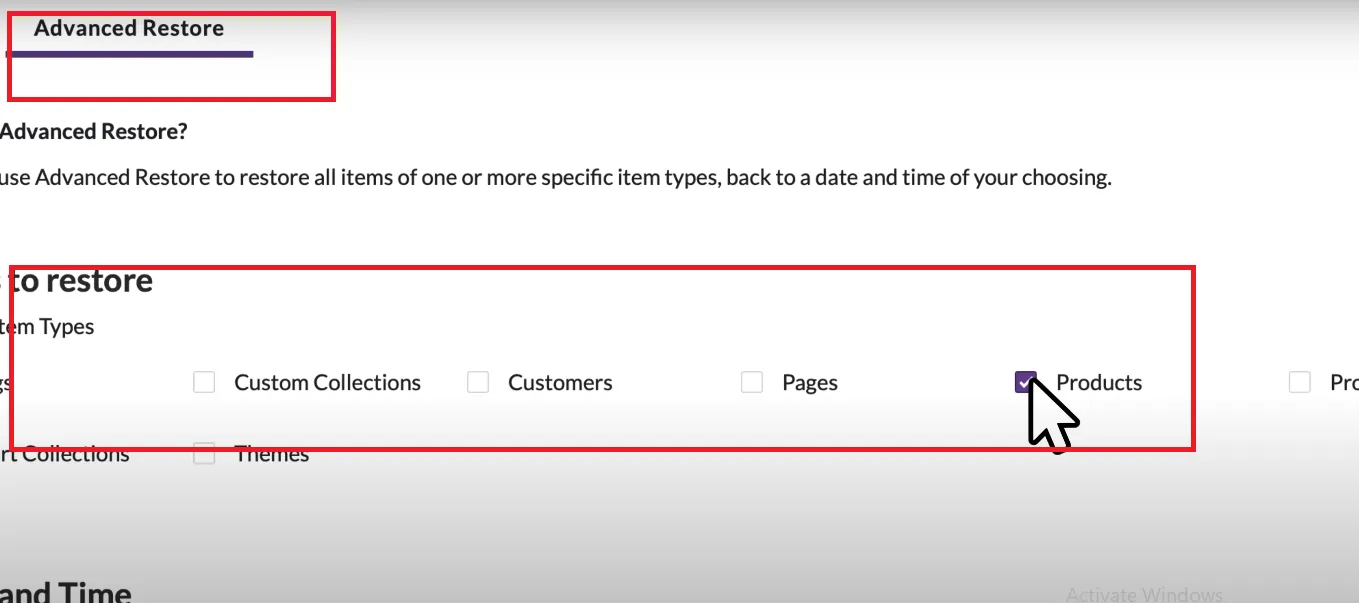
Now, open the “Advanced Restore” section from your admin dashboard to select all the items (e.g., products, themes, collections) you want to restore.
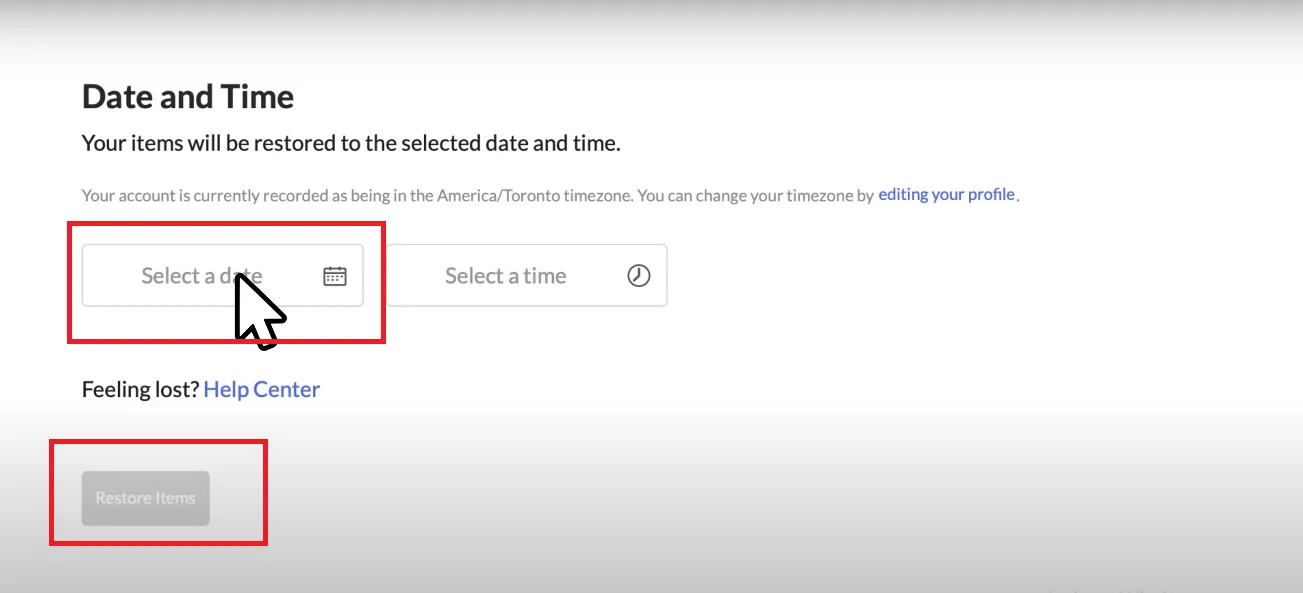
You can also choose the date you want to revert to, then click “Restore items.”
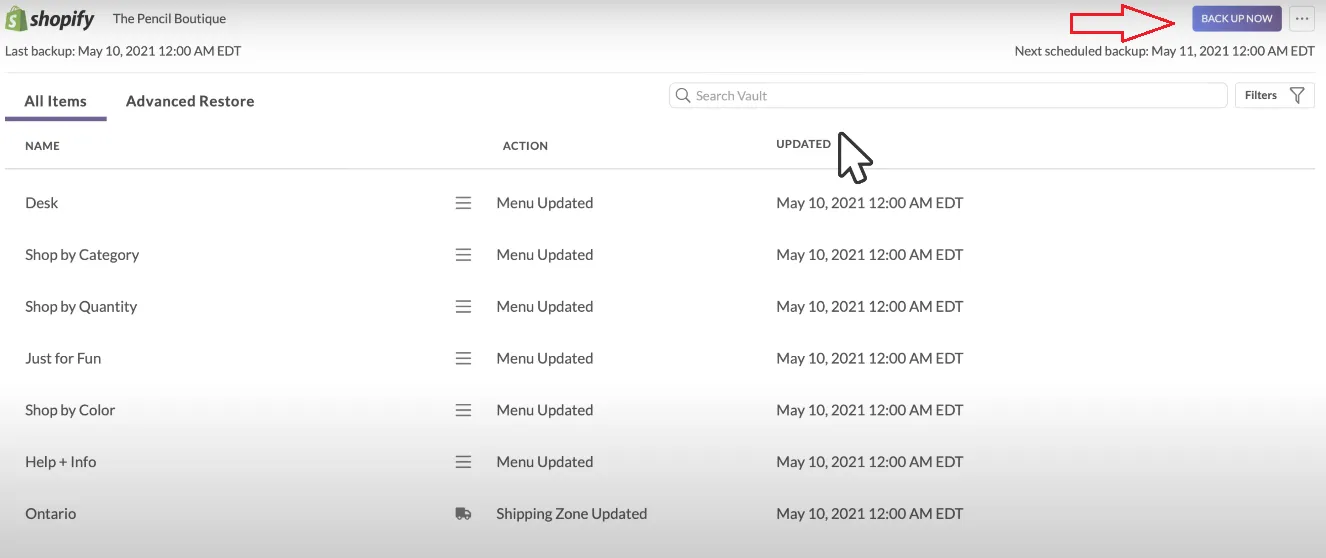
Finally, click “Backup now” to create a Shopify backup for all this restored data. Feel free to use the “Support” button inside the app if you encounter any trouble with your Shopify duplicate store!
Advanced Migration from Shopify with LitExtension
Our guides have just shown you two common ways to copy Shopify store. However, as you can see, both approaches are mostly designed for smaller setups or stores with extremely straightforward needs. If you’ve got a larger-scaled store or complex requirements, these methods simply won’t cut it.
Worst of all, when importing these Shopify backup files to another platform (say, Magento), you must spend extra time modifying them to match the new system. Needless to say, all these additional steps will seriously slow you down.
That’s why LitExtension is the ultimate solution you need! You can easily migrate your Shopify clone store to over 140 other platforms in record time, 100% hassle-free. And the best part? With 12+ years of experience and over 300,000 successful migrations under our belt, we’re more than equipped to handle any custom requests you may have!
As of this writing, you've got two great migration options to choose from: the Basic Migration package (where you call the shots and handle everything yourself) and the All-in-One Migration (where our team of experts steps in and takes care of every little detail). Both are designed to be easy and tailored specifically to your needs, so let's break them down!
Seamlessly migrate your store to the new platform!
LitExtension can safely transfer your products, customers, and orders to unlock more growth on the new platform.
FREE DEMO NOW

Basic Migration
If you like to be in control, the Basic Migration package is the way to go! But first things first — you must set up your account. All you have to do is fill in your name, email, and password on the registration page and hit “Register.” (Prefer a faster way? Just click “Sign in with Google” to speed up the login process).
Once you're in, you can now begin your migration journey:
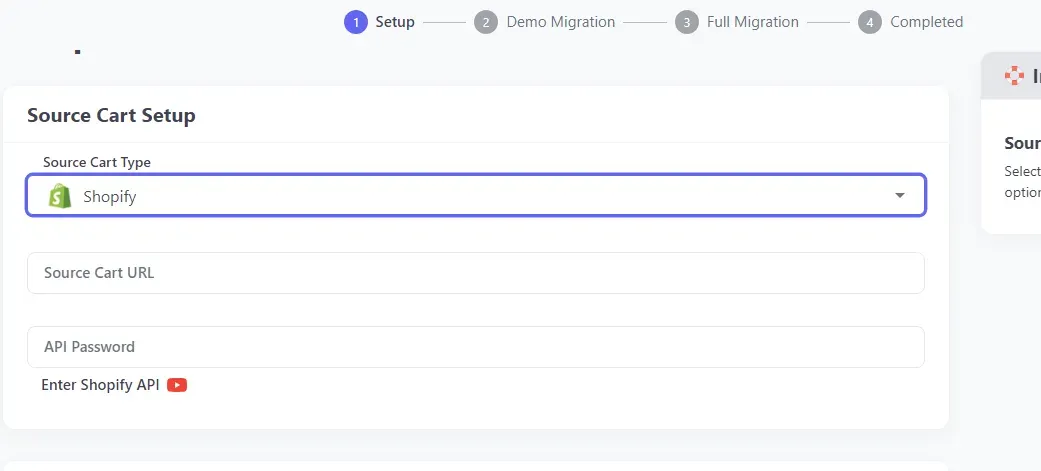
Step 1. Set up your Source Cart
On the “Migration” page, hit “Create new migration.” Now, it's time to pick your Source Cart (the platform you're migrating from – or Shopify) and type in its URL.
After that, you'll need to connect to LitExtension by providing the API keys for your current store. But no worries; the step-by-step instructions on the screen will make this part super clear and easy to follow!
Step 2. Set up your Target Cart
Next, it's time to configure your Target Cart (the platform you're migrating to). Select a platform from the dropdown menu, type in your store URL, and then proceed to connect it to LitExtension. Again, there's absolutely nothing to stress about this part; detailed guidance will be displayed as you go through the steps.
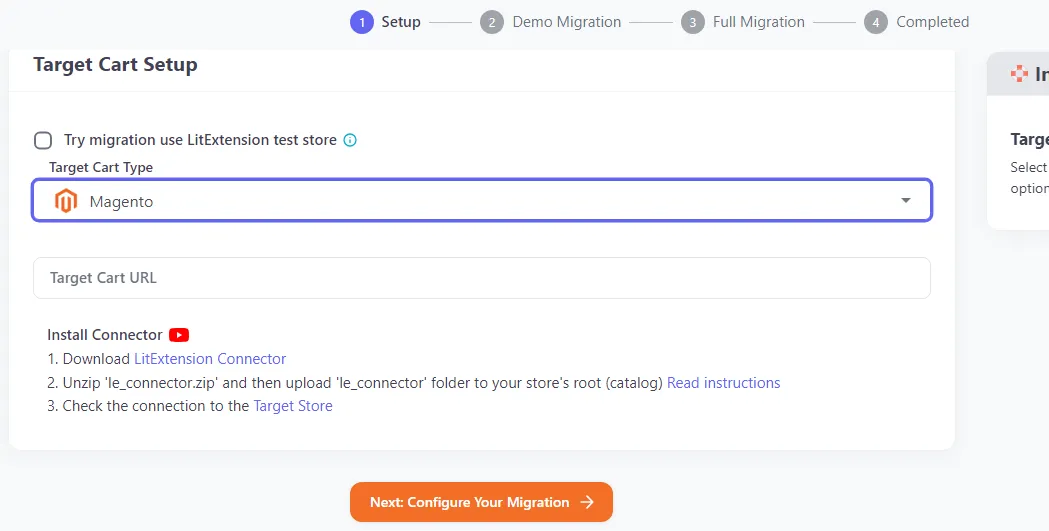
Once that's done, just click “Next: Configure your migration” to move forward.
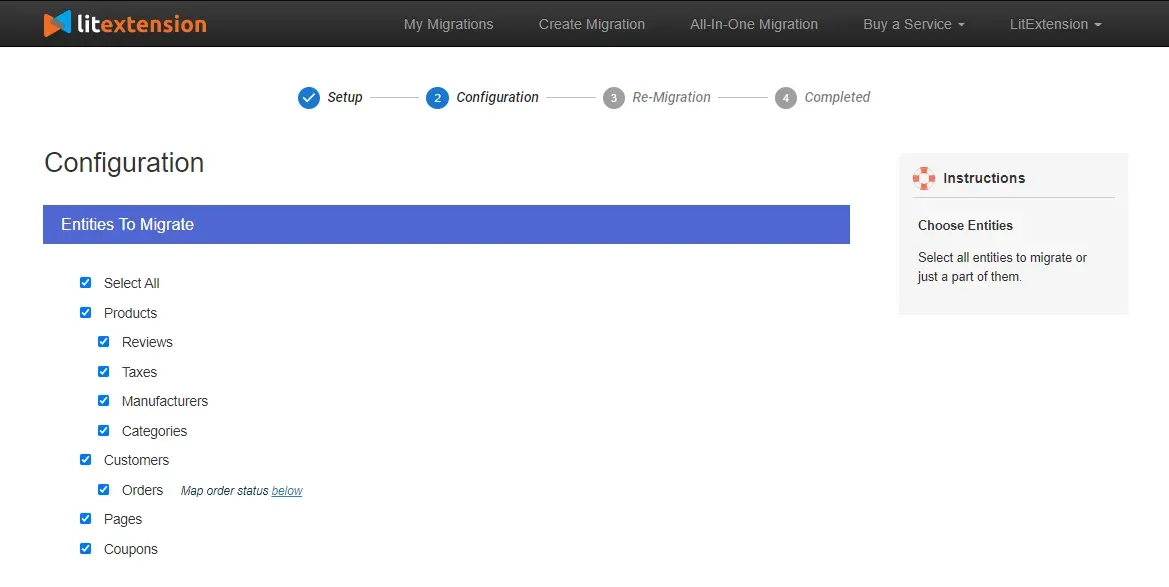
Step 3. Configure your migration
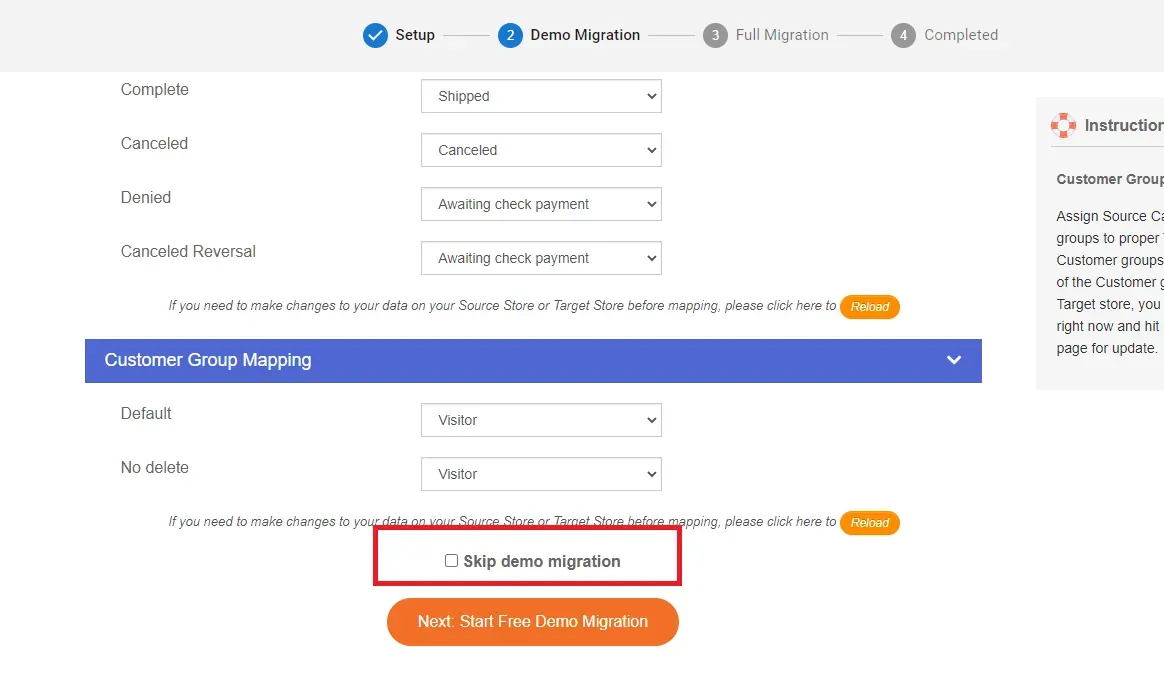
Here's where things get serious! Now, you get to choose what exactly you want to migrate. You can pick specific data like Orders, Customers, or Products — or go all in and click “Select All” to transfer everything. And feel free to map other important details like customer groups, store settings, order statuses, and languages.
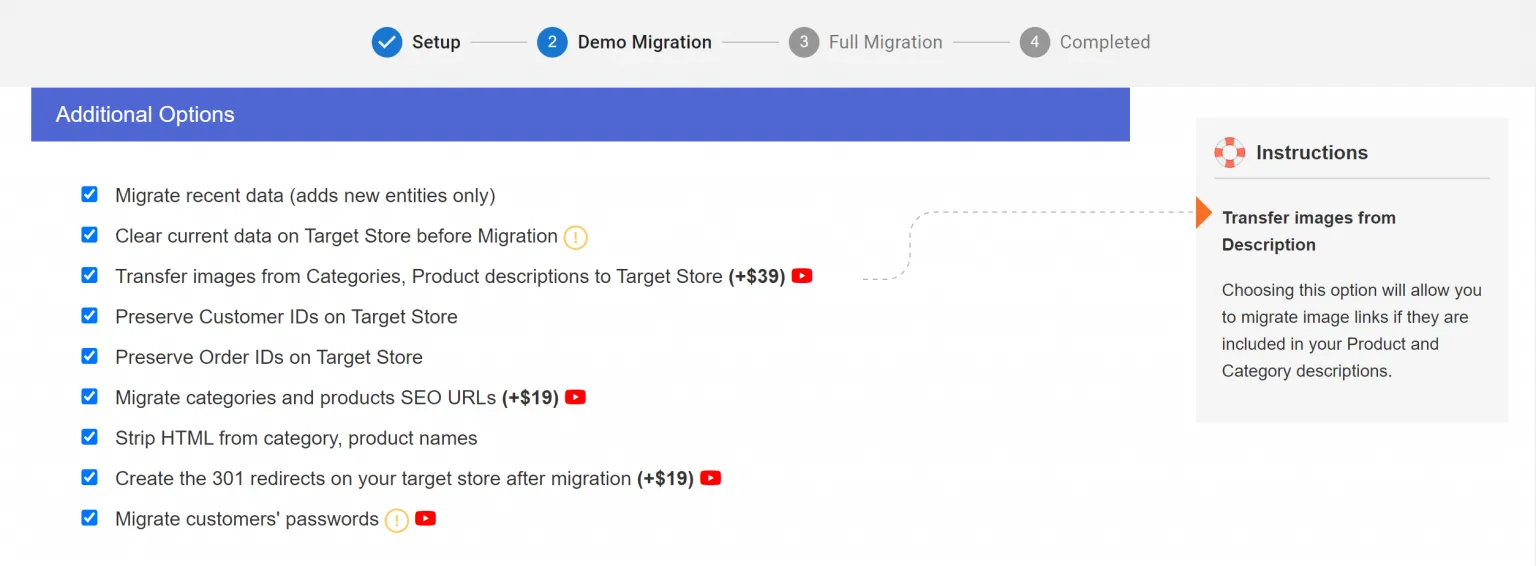
Need more flexibility? No problem! LitExtension also gives you extra migration options, such as transferring recent data or setting up 301 redirects on your target cart at additional charges. Check the image below:
Step 4. Run the migration (Demo and Full)
Next, at the bottom of the Configuration page, you'll find the button for “Start free demo migration.” This is where you can try out the migration process by transferring up to 20 entities for free. It's an excellent way to test things out and get a feel for how the system works!
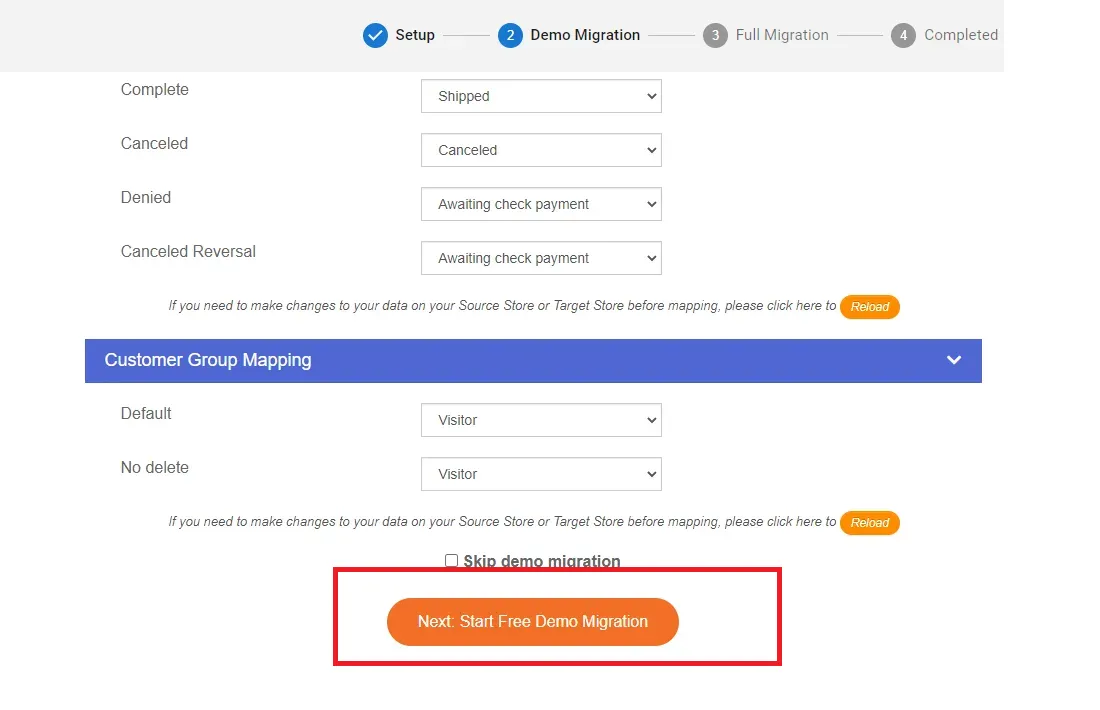
After the demo, you'll receive an email confirming which data was successfully transferred. If everything looks good to you, go back to the Configuration page, make your payment, and start the full migration to wrap things up.
(Note: Rather skip the demo and get straight to the actual process? In that case, just hit “Skip demo migration” and proceed directly to “Start full migration”!)
All-in-One Migration (Recommended)
The Basic Migration package above is very straightforward; nevertheless, it does require you to handle everything by yourself! Of course, that might not be a big deal if the new platform is easy to navigate. But if it has tricky migration requirements or is structured far too differently from Shopify, you'll likely hit many bumps along the way.
So, if that sounds like a headache you’d rather avoid, the All-in-One Migration package is totally your best bet. Here's how you can leave all the technical details to our experts:
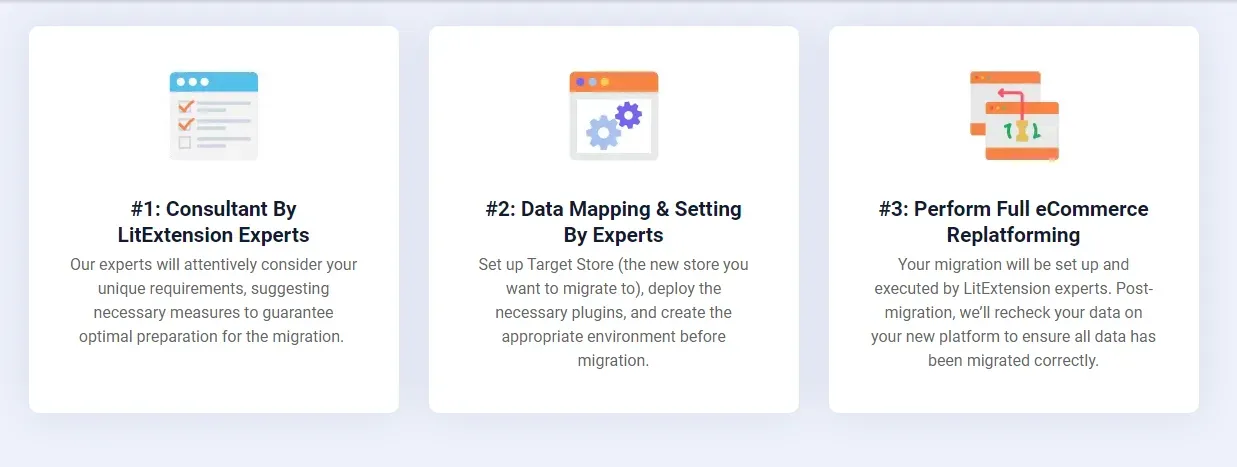
Step 1. Consultant by LitExtension experts
First things first, get in touch with our LitExtension team. We'll discuss thoroughly with you to understand exactly what you need to migrate. Also, the services and pricing options will be clearly detailed so you can choose the best one for your business!
Once we're on the same page and payment is handled, you can relax now; we'll take care of the rest.
Step 2. Data mapping and setting by experts
In this step, our team will prepare your full migration by:
- Setting up your store
- Cleaning up the Shopify backup
- Installing necessary plugins (if any)
- Creating 301 redirects.
Want to see a preview of how things will look? That is no problem; we can totally arrange unlimited demo migration for you.
Step 3. Perform full eCommerce replatforming
Finally, the moment you've been waiting for: the full migration! As mentioned, our experts will take care of everything and keep you updated throughout the process.
Plus, there's access to priority support, meaning you'll get responses to any issues within 12 hours (twice faster than the Basic Migration's 24-hour support window). Furthermore, any additional migration options like 301 redirects or recent data transfers are fully included at no extra cost!
Once your migration is complete, our team will do thorough checks to ensure your new store is ready for action. And that's not all! Afterward, we will continue to support your business for the next 30 days with our Re-migrations, Unlimited recent data transfers, and Smart updates. All these services are entirely free if your additional data is under 10% of the total.
Extra Tips When Creating A Shopify Backup
Our guide has detailed instructions on how to duplicate a Shopify store, either as a backup or as part of a complete store migration. Now, let's make sure you REALLY do it like a pro! Here are three additional tips to smooth out the entire process even further for you:
The 3-2-1 backup strategy
Want to create multiple layers of protection for your data? The first step toward this goal is always to remember the 3-2-1 backup strategy:
- Keep 3 copies of your data. If one backup fails, the other two are there to save the day.
- Store them in 2 different formats. Why? Because you don't want all your eggs in one basket! A solid fallback plan is a must in case your cloud service goes down or the external hard drive fails at ill-timing.
- Keep 1 copy off-site. Imagine a fire or flood hitting your office, for instance. This off-site copy is your guarantee that the data will survive even when disaster strikes.
Keep your data locked down with encryption
Needless to say, you obviously don't want your precious data (or your customers' sensitive info) to fall into the wrong hands. That's why encryption is a must; you're basically putting your data in a locked box that only you have the key to!
To be more specific, always remember to turn on encryption in your cloud storage. Plus, for local backups (e.g., the ones you store on external hard drives), we highly recommend BitLocker on Windows and VeraCrypt. These tools let you encrypt the entire drive so that even if someone gets their hands on it, they won't be able to access anything at all without the decryption key!
Test your Shopify backup regularly
Suppose an emergency happens out of nowhere, and you need to restore your store's data ASAP. But when you go to recover it, you find out your backups don't work. Nightmare, right?
To avoid such disasters, you should try restoring a small portion of your Shopify store once a month (or any other time frame you prefer) to a separate test system. That way, you can catch any issues, like corrupted files or incomplete backups, before they turn into real problems. Plus, this little tip also gives you some practice so you'll know exactly what to do with your Shopify copy store when the stakes are high.
Shopify Backup: FAQs
How do I export a complete Shopify store?
The most common option is to export a CSV file directly from your Shopify admin (though certain data types still need to be handled manually). Another great alternative is to rely on exporter/backup apps like Rewind Backups.
But what if you're planning to migrate the entire store? In that case, specialized migration services like LitExtension will be your best bet.
Can I restore a Shopify store?
Absolutely, but only when you have a backup in place. Otherwise, things will get a lot trickier if you haven't saved your data or the files are permanently deleted from the Recycle Bin. You might need to hire recovery experts at that point, and such services usually don't come cheap!
Where is my Shopify data stored?
As of this writing, Shopify has spread your data across multiple regions on the Google Cloud Platform. That way, your store can handle every request and visit, even during high-traffic surges, while staying fast yet reliable.
Conclusion
And that's a wrap on three different ways to create a Shopify backup! If you're just looking to keep things simple and have a backup in place for peace of mind, the manual method or plugin installation will get the job done. But for those eyeing a smooth, hassle-free store migration without lifting a finger, that's where LitExtension steps in.
With 12+ years of experience and over 300,000 successful migrations (not to mention in-depth expertise across 140+ platforms), our team has got every custom requirement covered. You can trust us to deliver the same pleasant and hassle-free experience during your Shopify migration, all while keeping costs optimized!
For more information, check out our Shopify guides and join our Facebook Community.

