Years after its release, Magento still dominates the open-source field for its unmatched flexibility and customization. Still, that freedom admittedly comes with a cost since the troubleshooting process can be far more technical than on hosted platforms. And that’s why knowing how to create a reliable Magento backup and restore is extremely essential here!
In this article, we’ll walk you through three proven methods to create a Magento 2 backup, including:
Keep scrolling to find the method that best fits your needs!
Magento Backup and Restore via the Admin Panel
Are you looking for a simple yet effective way to create a Magento backup and restore, including your media files, system configuration, and database? In that case, using the Admin Panel is your best bet!
Since this method is built directly into the Magento interface, it has unsurprisingly become a go-to choice for store owners who want peace of mind without diving into technical commands. Let us show you how to backup Magento 2 the right way:
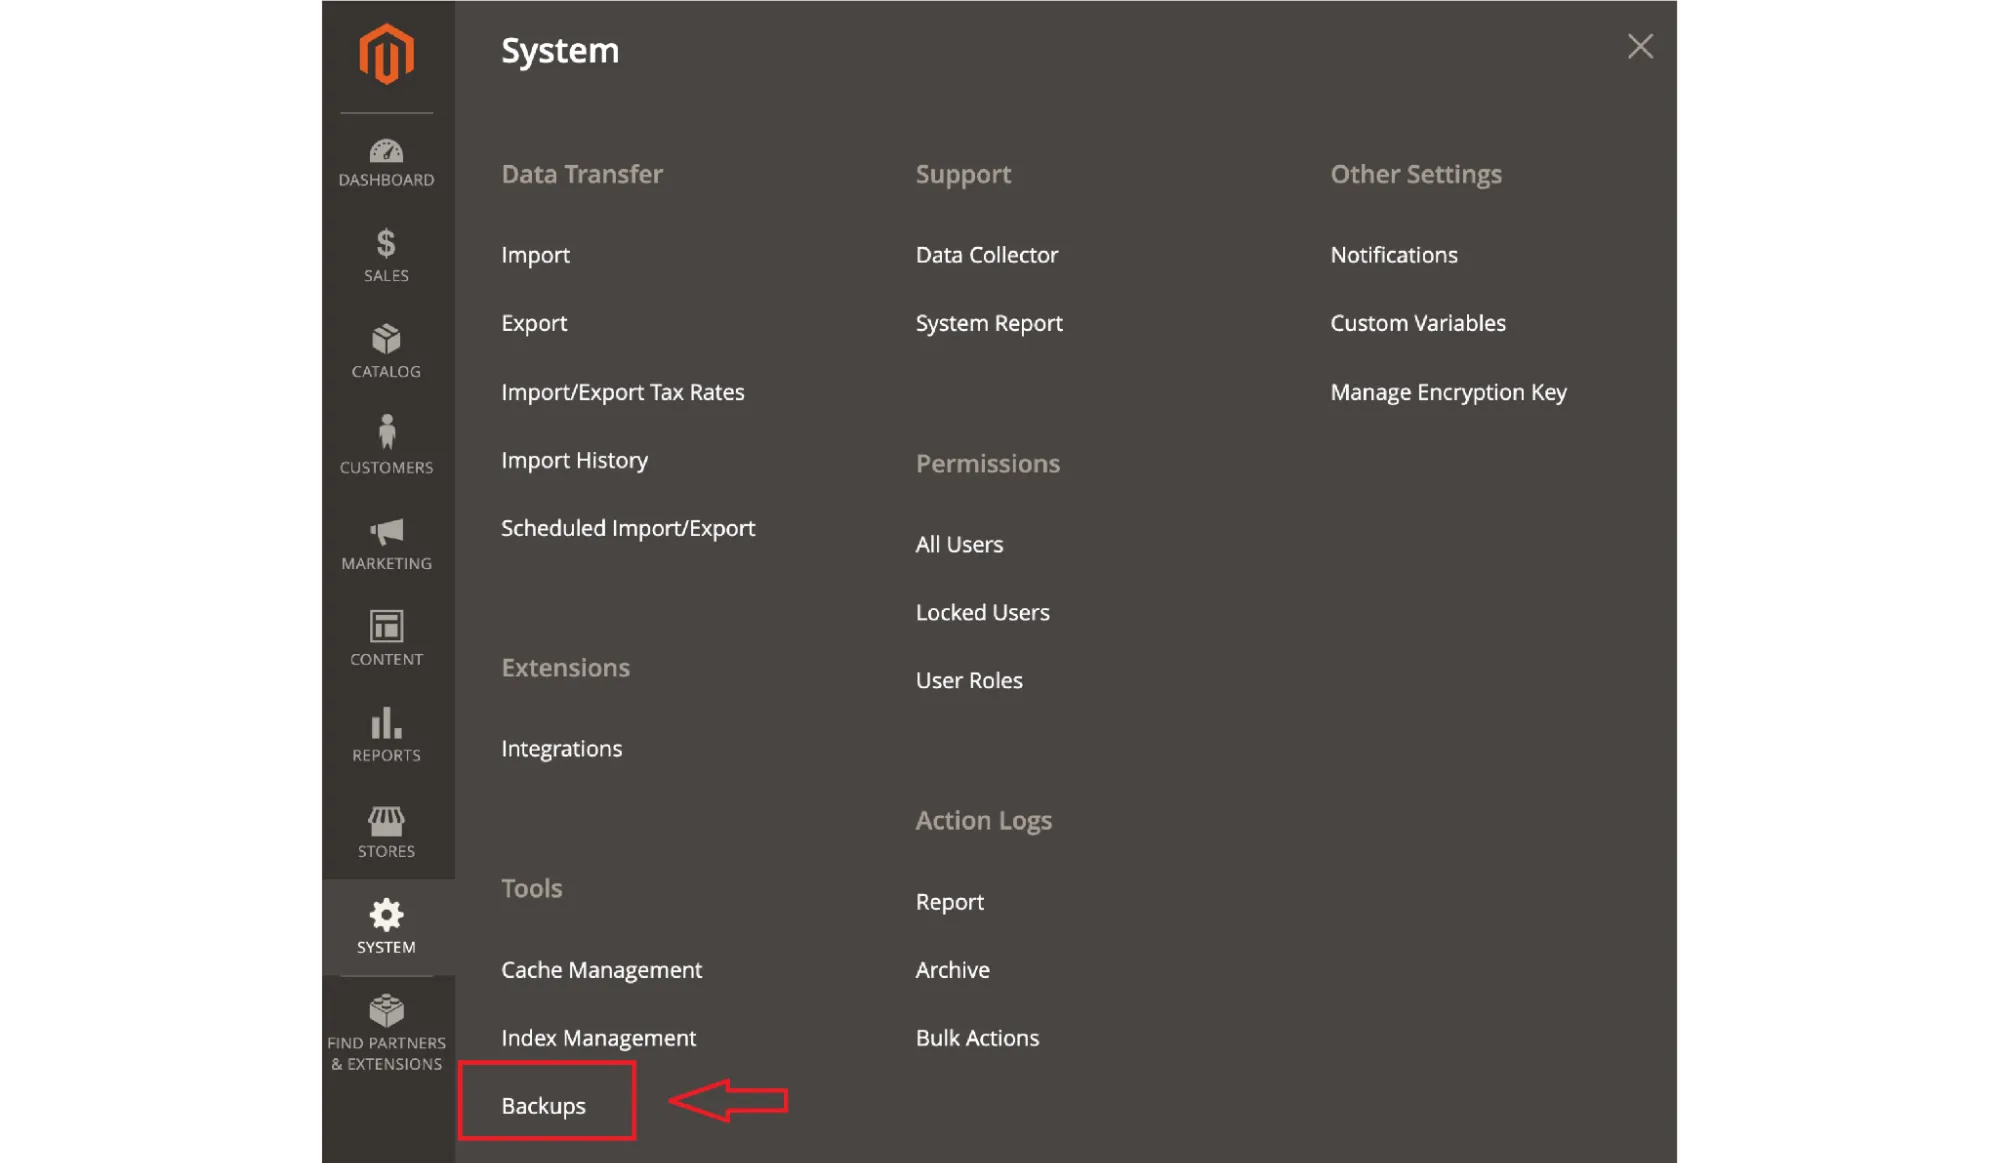
Step 1. Navigate to the backup tools
First, you should sign in to your Magento backend using your admin credentials. Once you're in, you'll be greeted by the dashboard!
Now, on the left-hand sidebar, click on “System.” A dropdown menu will appear; look for “Tools,” then select “Backups.” This step will take you to the backup management screen.
Step 2. Choose your Magento backup and restore type
Now, you'll see three backup options:
- System Backup: Includes the file system and database.
- Database and Media Backup: Captures your media folder and database only.
- Database Backup: Just the database, without files or media.
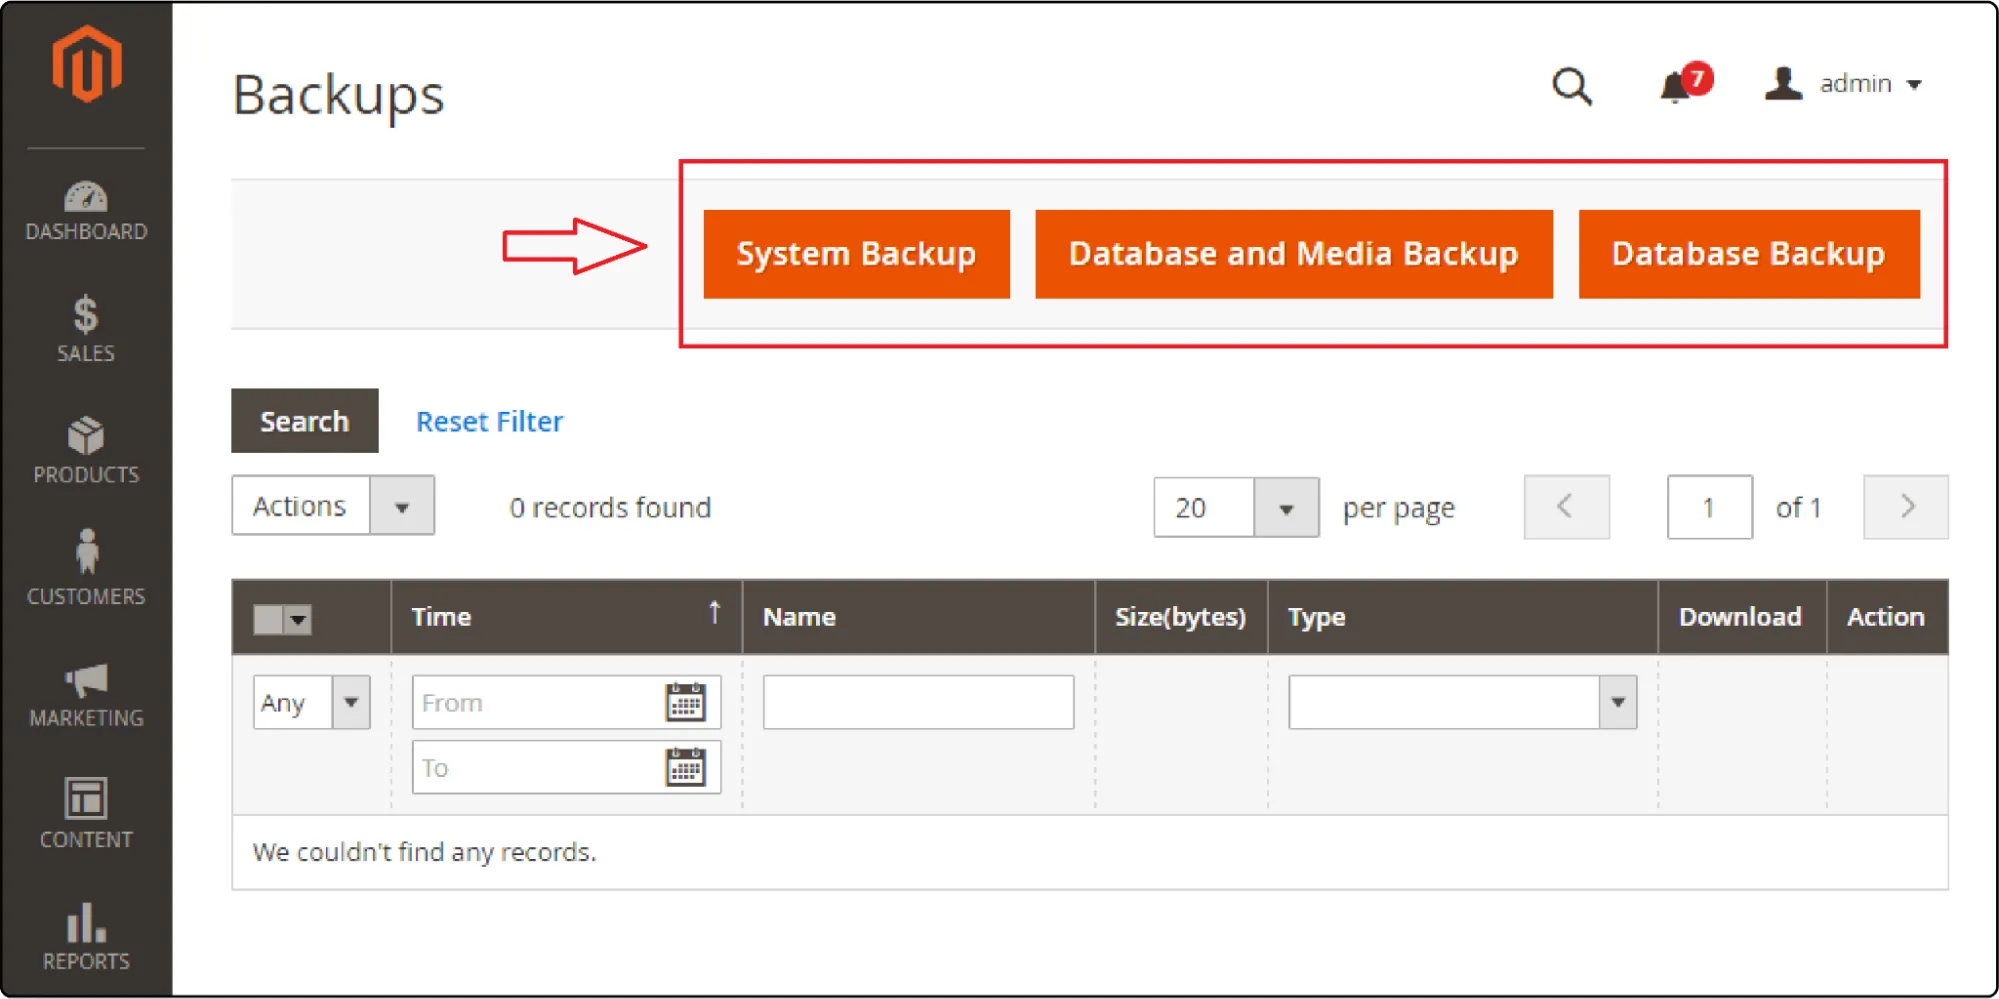
Simply select whatever type that fits your current needs. For example, if you're about to update your store, a full system backup is usually recommended.
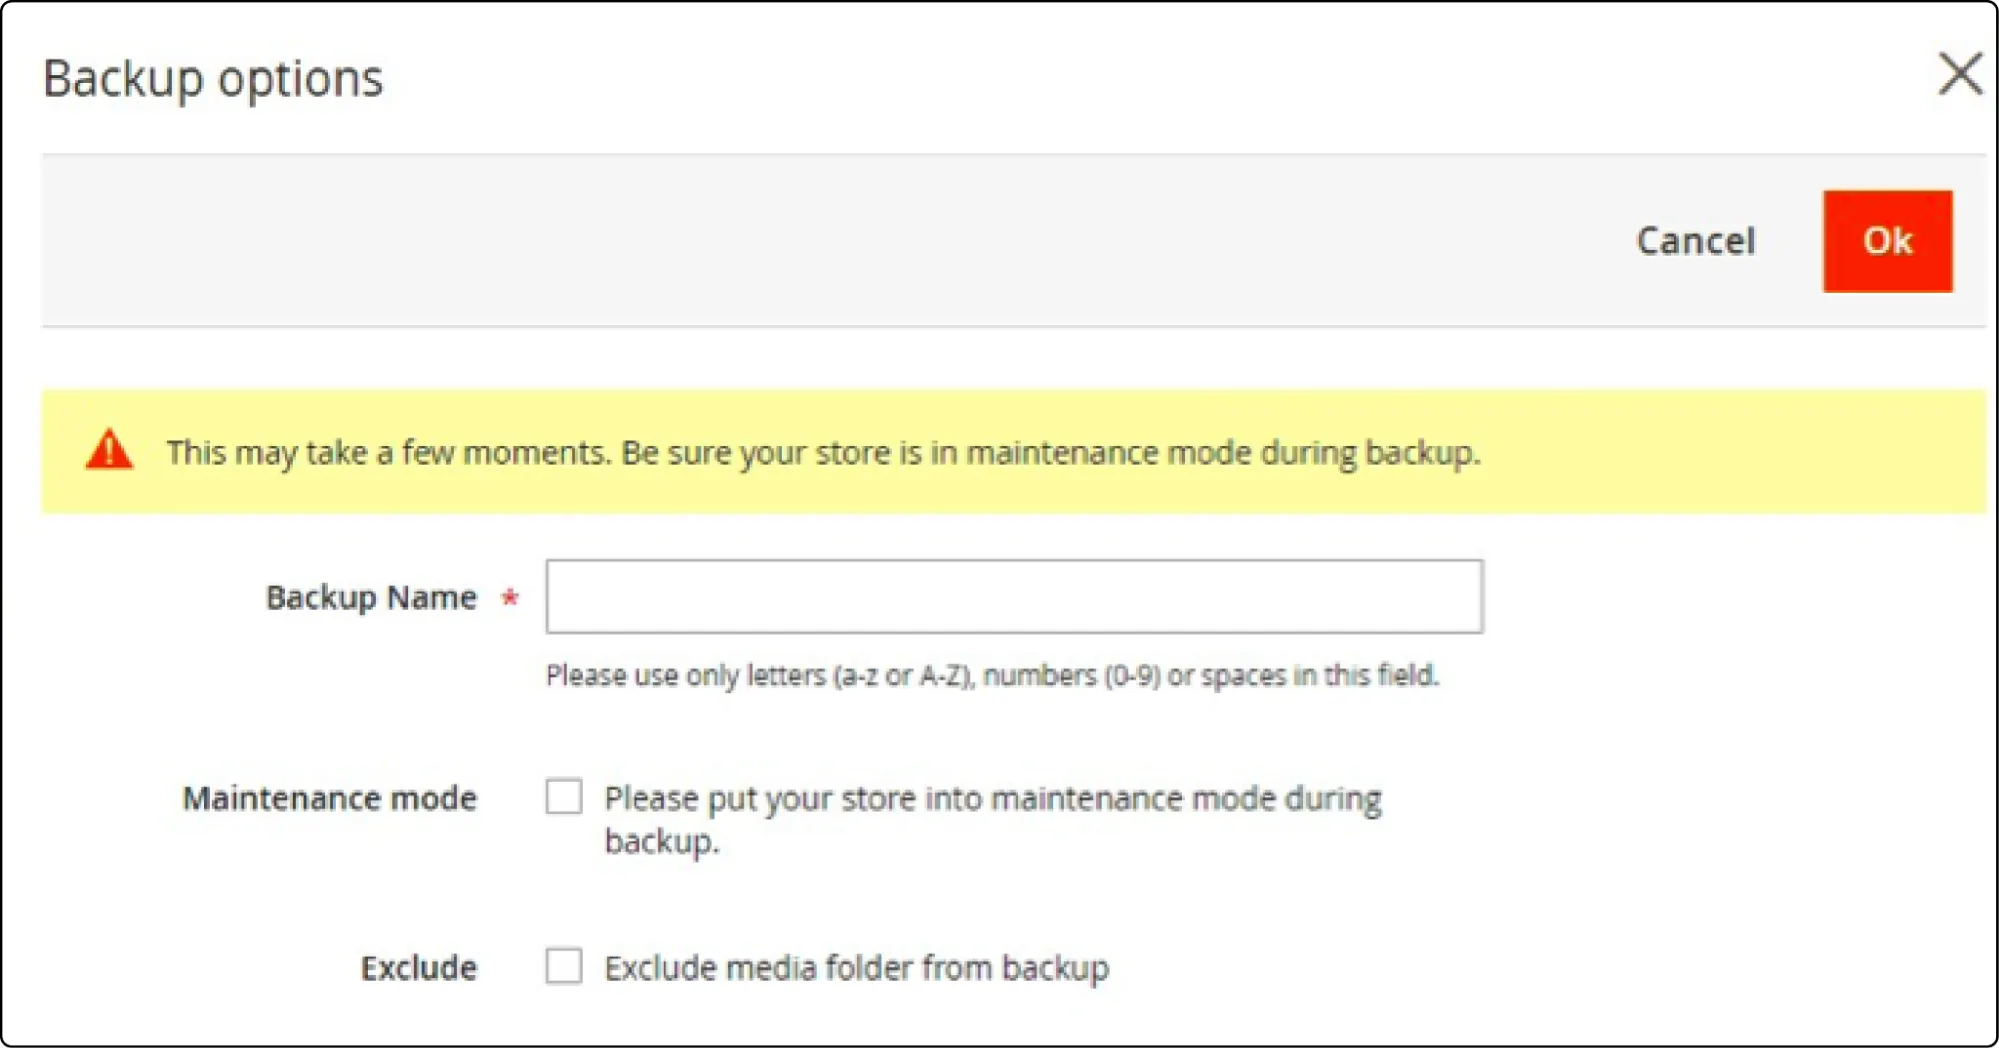
Step 3. Run the backup
After choosing the backup type, click the “Create Backup” button. A pop-up may show up to ask for confirmation; in that case, just press “OK” to proceed. The platform will then begin the Magento backup and restore process!
Once done, the new backup will appear in your list of available backups. If needed, you can download any backup file to your local machine for safekeeping.
Magento Backup via the setup:backup Command
In rare cases where the Magento Admin Panel becomes inaccessible or unreliable, turning to command-line tools is a smart alternative, especially if you're comfortable with terminal operations!
The setup:backup and setup:rollback commands, in particular, offer a robust way to create a Magento 2 backup and restore. With this method, you can preserve three major components: the file system (excluding var/ and pub/static), the pub/media directory, and the entire database. Everything is saved in the var/backups folder and is ready to be restored when needed.
Let's walk through the full process from setup to rollback:
Step 1. Enable the backup feature
By default, the Magento backup and restore functionality is disabled. To activate it, run the following command in your terminal:
bin/magento config:set system/backup/functionality_enabled 1
This step tells Magento that you intend to use its built-in CLI backup tools.
Step 2. Configure file system limits (Optional but recommended)
To avoid silent failures during a rollback (especially with large datasets), it’s wise to increase the open file limits. Switch to your Magento file system owner and enter:
ulimit -s 65536
For a permanent solution, edit the user's .bashrc file and add the same line, then save and exit. Be aware that the exact syntax can vary by system, so check your OS documentation if needed.
Note: Avoid tweaking pcre.recursion_limit in your php.ini, as it may cause rollback errors without any warnings.
Step 3. Run the backup command
Now, it’s time to create the Magento backup and restore. The general command syntax is:
bin/magento setup:backup [–code] [–media] [–db]
Here’s what each flag does:
–code: Saves the file system, minus var and pub/static
–media: Backs up your pub/media directory
–db: Dumps your full database
For example, to back up both the file system and the database, run:
bin/magento setup:backup –code –db
During this process, Magento will automatically enter maintenance mode, execute the backup, and then disable maintenance once it’s done. Backup files will be stored under var/backups/, and the filenames will include a timestamp for easy reference.
Step 4. Verify backup success
After the command runs, Magento will confirm the Magento backup and restore were successful with success messages like the following:
[SUCCESS]: Code backup completed successfully.
[SUCCESS]: DB backup completed successfully.
Step 5. Restore with the setup:rollback command
If you ever need to roll back to a previous state, you’ll first need to identify your backup filenames. Run:
bin/magento info:backups:list
Then, execute the rollback command with the appropriate flags:
bin/magento setup:rollback –code-file=”your_code_backup.tgz” –db-file=”your_db_backup.sql” –media-file=”your_media_backup.tgz”
You can use any combination of these flags depending on what you wish to restore. For instance, to restore just a media backup:
bin/magento setup:rollback -m 1440611839_filesystem_media.tgz
Magento will then re-enter maintenance mode, perform the rollback, and exit maintenance mode once completed. You’ll see confirmation messages similar to:
[SUCCESS]: Media rollback completed successfully.
And that's it!
Magento Backup via the Magento-cloud snapshot:create Command
Lastly, for those running their Magento stores on Adobe Commerce Cloud, there's one more reliable way to back up your environment: using the magento-cloud snapshot:create command.
We especially recommend this method if you want to create a manual Magento backup and restore for any active Starter or Integration Pro environments, either directly from the Cloud Console or through the Cloud CLI. It captures everything from your environment's persistent data, such as MySQL databases and mounted directories, to configuration files (but not your codebase, which is already stored in Git).
Simply open your terminal and go to your local Magento project directory, then check out the environment branch you want to back up. Once you're ready, run the following command:
magento-cloud snapshot:create –live
Adding –live ensures the environment stays online during the process with no downtime. You can also use the shorthand:
magento-cloud backup
The pop-up message afterwards should be something like this:
Creating a snapshot of develop-branch
Created backup my-snapshot
[============================] 45 secs (complete)
Snapshot name: my-snapshot
Extra Tips for Magento Backup and Restore
We've already covered the three main backup methods. To ensure your Magento backup and restore process runs as smoothly and reliably as possible, consider these extra tips:
- Always test your backups before you need them: Obviously, a backup is only useful if it can actually be restored. Hence, it's a good practice to occasionally restore a backup in a staging or test environment to make sure the files aren't corrupted and the data is complete. This way, you'll know you can count on it when disaster strikes.
- Schedule regular backups (not just before major changes): Many store owners only create a Magento backup and restore right before installing a new extension or running updates. They clearly forget that unexpected problems like server crashes or malware attacks can happen anytime! So, set up a recurring schedule (daily or weekly, depending on how often your store changes) to ensure you always have a recent recovery point.
- Store your backups offsite or on external storage: Don't keep all your backup files on the same server as your live Magento site. If the server goes down, you might lose both the site and its backups! Instead, use cloud storage, external drives, or a separate server to safely store backup files away from the main environment.
- Name your backups clearly with timestamps: Lastly, a messy Magento backup and restore folder can cause confusion when you're in a rush. We suggest using consistent naming formats that include dates and backup type (e.g., 2025-06-04_db_backup.sql) so you can quickly find the right file when needed.
Magento Backup and Restore: FAQs
How do I take a Magento backup?
You can create a Magento backup using three main methods:
1. Through the Admin Panel, which lets you back up the system, database, and media with just a few clicks.
2. Using the setup:backup command via CLI, which is ideal if you prefer more control or if the admin panel isn’t accessible.
3. On Adobe Commerce Cloud, by running the magento-cloud snapshot:create command, allowing you to back up data from Starter or Integration Pro environments.
What is the process of Magento backup and restore?
The general process involves creating a backup of your store’s files and database, storing it securely, and restoring it when needed.
1. For backup, you either use the Admin Panel or CLI to export your site’s critical data.
2. For restore, you can either download and manually re-upload the files (Admin Panel), or use rollback commands (setup:rollback or magento-cloud snapshot:restore) to revert your site to a previous state.
What is the backup and restore functionality in Magento?
Magento’s backup and restore functionality allows store owners to protect their store data against unexpected issues like failed updates, code conflicts, or server crashes. Depending on the method used, backups can include your entire file system, media folders, and database.
Conclusion
Overall, creating a reliable Magento backup and restore serves as the safety net on which your business depends. We hope each method discussed above gives you control over your store's data and peace of mind when things go wrong!
And on a side note, if you're backing up your Magento store to prepare for a migration, LitExtension Magento Migration is here to help with the rest. With over 12 years of experience and more than 300,000 successful migrations, we specialize in ensuring a seamless transition with data intact and downtime minimized. Let us handle the technical side so you can focus on growing your business!
For more information, check out our Magento guide and join our Facebook Community.

