As one of the leading eCommerce platforms, Shopify has made small-scale data exports and imports relatively smooth with its native features. Yet, there's one surprising gap that's still causing headaches: how to export and import Shopify discounts. For store owners, this missing element is certainly a huge roadblock impossible to ignore, especially with a big sale or holiday shopping spree on the horizon.
But don't worry! We're here to make sure you're not left scrambling when it's crunch time. In this guide, we are going to discuss:
- Whether you can import discounts Shopify from the Admin
- How to import Shopify discounts with Matrixify
- Advanced store migration with LitExtension
- How to export Shopify discounts
Without further ado, let's import discounts Shopify!
Can You Import Shopify Discounts from The Dashboard?
No, you can't bulk import discounts Shopify directly through Shopify Admin. As of this writing, Shopify currently only lets you import basic data like customers, products, orders, store credits, and gift cards. Discount codes and coupons, unfortunately, don't make the cut!
Now, you might be wondering, “Can I export discounts from my Shopify store and then import them back to that same site?” The answer is still no. Sure, you might export your discount data (by going to “Discounts”> “Export”), but importing it back into Shopify is not possible. In simpler terms, you can pull the data out, but there's no way to put it back in.
How to Import Shopify Discounts with Matrixify
Since Shopify doesn’t have a built-in feature for discount imports, we decided to venture into popular third-party apps like EzShopifyDiscounts, StoreRobo, Bulk Discount Code Bot, and a few others.
For the most part, we must say these apps delivered what they promised and managed to import discounts Shopify, especially considering their pretty low price points. Nevertheless, our testers ran into more errors and bugs than we were comfortable with. It got to the point where we had to go back and double-check every single detail, sometimes even manually copying over discount codes that got left out during the import!
Fortunately, after several more attempts, we finally found an app that lived up to our expectations (to a certain extent): Matrixify.
Sure, if you’re eyeing its higher-tier plans (like the Big plan at $50/month or the Enterprise plan at $200/month), there are still too many technical hiccups you have to deal with. But the Basic Plan ($20/month for 300 discounts) runs far more smoothly in comparison, a solid option for smaller-scale imports! Even better, for those not yet ready to commit, there’s a Free/Demo plan that lets you import 10 discounts to Shopify to see how it performs.
Want to give this app a shot now? Here’s our easy step-by-step guide on how to add discount on Shopify:
Step 1. Export your discounts
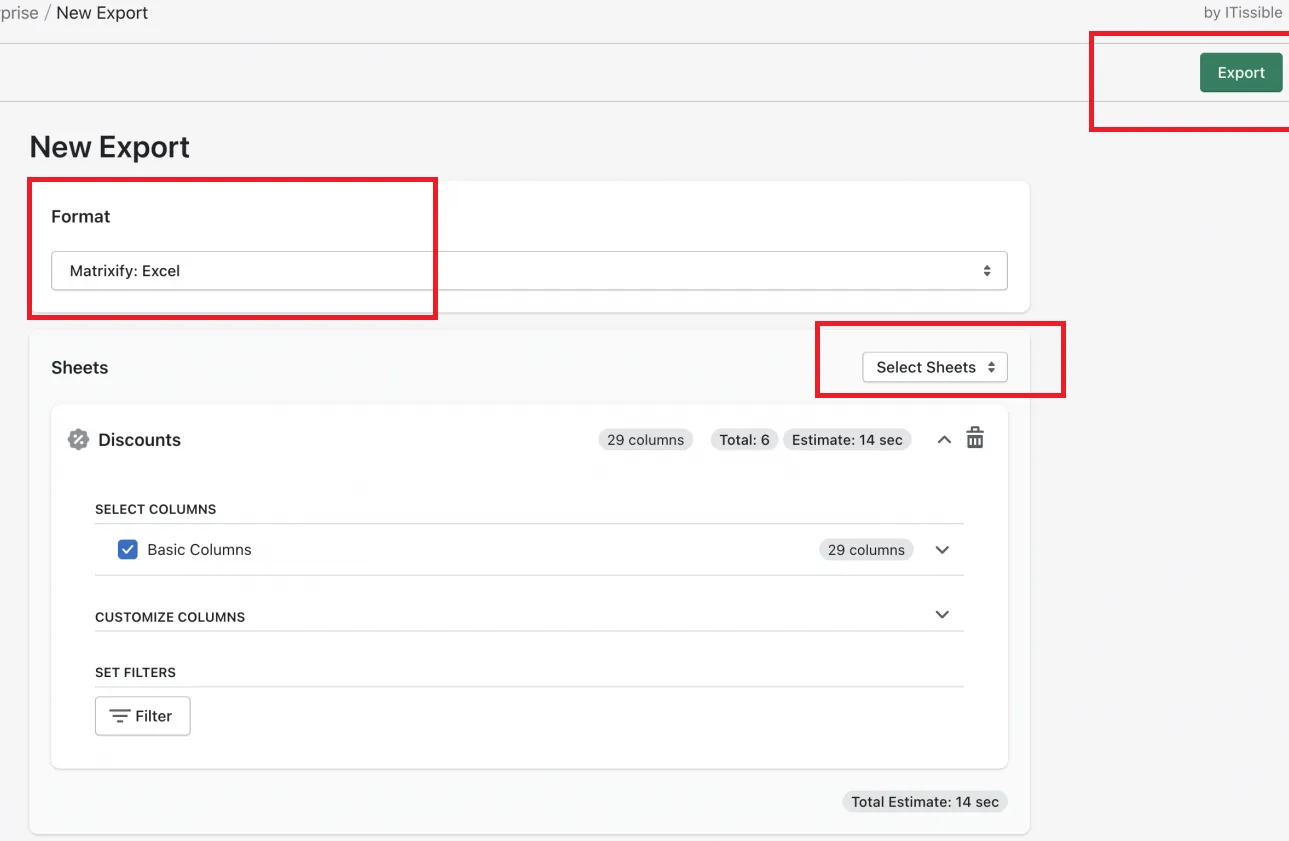
First of all, you need to install Matrixify from the Shopify App Store. Once done, open the app and go to the “New Export” page:
- Select the file format: Matrixify: Excel.
- In the “Select Sheets” dropdown, check the box for “Discounts.”
- Press the “Export” button to start your export process.
Step 2. Duplicate the discount codes in Excel
Now, open the Excel file you just downloaded and copy the entire discount code row as many times as needed. For example, if you want 10 discount codes, copy it 9 more times (check out our image example below):
Before:

After:

Step 3. Format the Excel file
The next part is to format the file properly before you import discounts Shopify later on. Our table below will summarize several key tasks you need to complete during this critical step:
Column | What to do |
Title and Code | Each discount row must have a unique Title and Code for Shopify to recognize them as different discounts. For multiple codes under a single discount, you can keep their titles the same. Still, ensure each row has a different code. |
Command | Set this to NEW for new discounts. |
Discount value | Enter the percentage or fixed amount for each discount. |
Minimum purchase amount | Define different purchase minimums if needed. |
Applies to: Collection | Enter the collection handle the discount applies to. |
ID | The ID column should be deleted. It links the discounts by ID, meaning keeping the same ID will cause them to be treated as one discount. |

Step 4. Save and upload the file
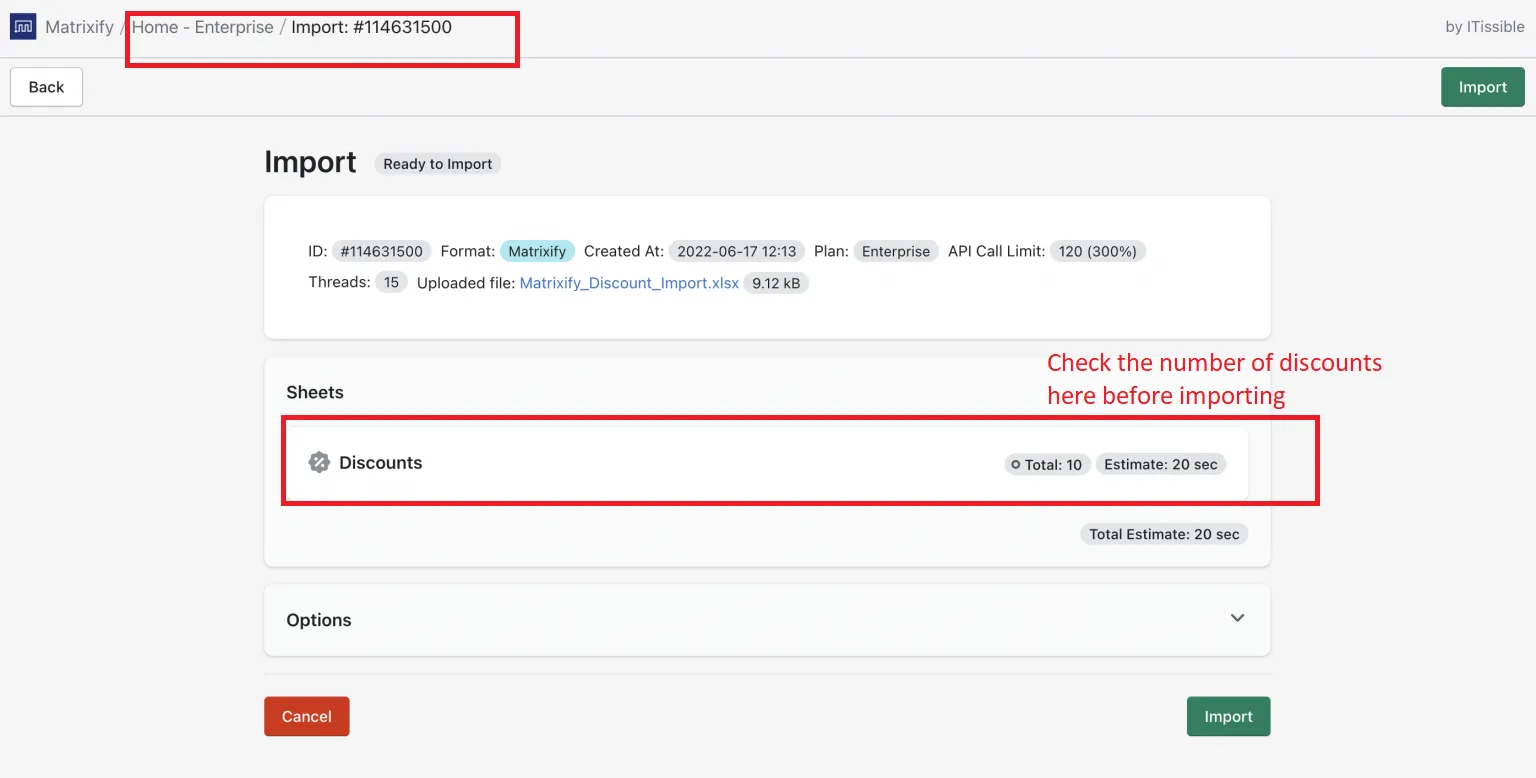
Make sure you save the Excel file from Step 3 after editing. After that, in the Matrixify app, go to the “Import” section and drop the file in the upload area:
- If using a CSV file, ensure the filename includes the word Discounts (e.g., “my-shopify-discounts.csv”).
- If using an XLSX file, the sheet/tab name must be Discounts.
Matrixify will analyze the file and display the number of discounts to be imported. If the total shown doesn't match the number of rows in your file, double-check that the ID column is deleted and that each row has unique Title and Code values, just as we instructed earlier.
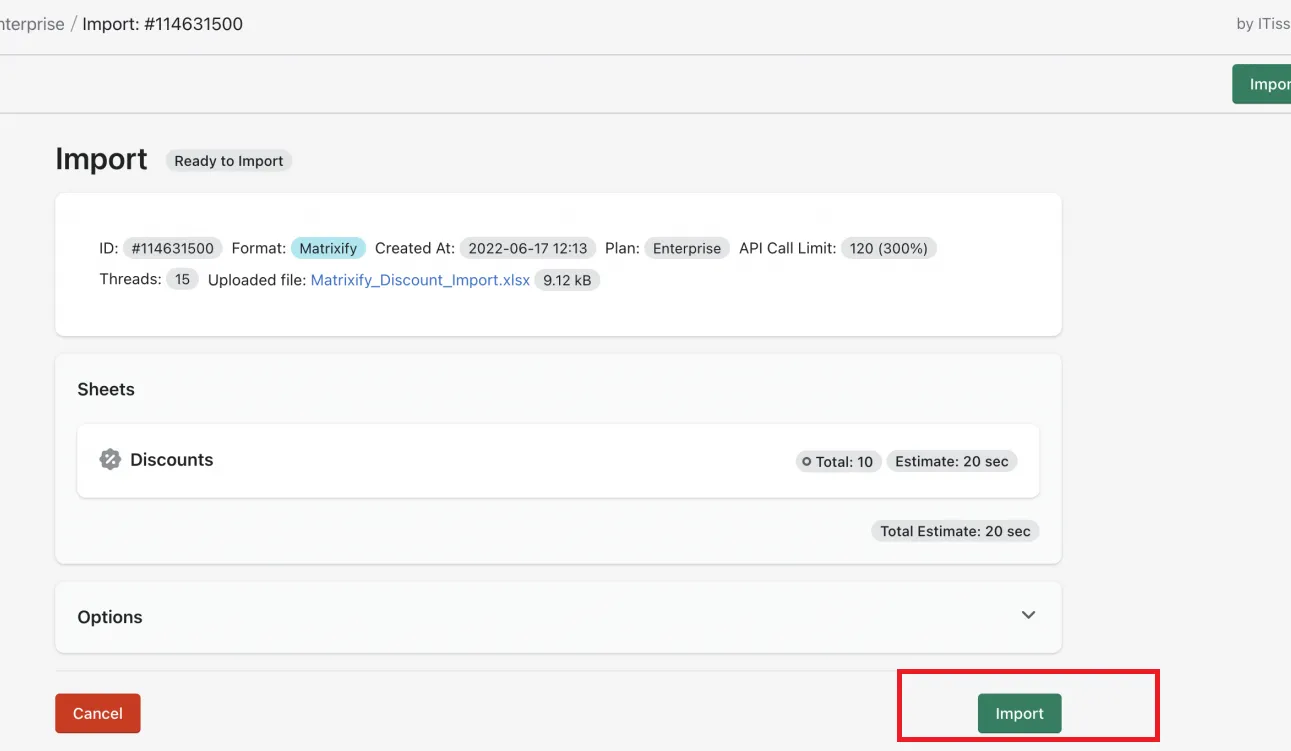
Step 5. Import Shopify discounts
Does everything finally look good now? Great! You can press the “Import” button to import discounts Shopify.
And if any item fails during the process, you should download the “Import Results” file and check the “Import Comment” column for specific causes. Fix all these existing issues before re-importing the failed rows, and you're golden!
Advanced Discounts Import with LitExtension
The Matrixify app above may help you import discounts Shopify successfully, but let's be honest: it still involves way too many manual steps! (in Step 3, for instance, you have to update unique titles and codes for every single row). Not to mention, it's not exactly bug-free, especially when working with a larger batch of discounts. There's just no time for such types of slowdowns if you want to prep your store well for major events like Black Friday or Christmas.
And that's where LitExtension comes in to save the day! Indeed, you can import as many discount codes as you need (whether they're percentage or flat-rate) without breaking a sweat.
And the best part? It's not just the Shopify import discount codes. LitExtension is a full-blown migration service, meaning it's a breeze to bring over your blog posts, customer data, orders, shipping info, taxes, and even passwords in one sweep. No more juggling different apps or services for each type of data!
As of this writing, LitExtension offers two main migration packages: the Basic Migration and the All-in-One Migration. Let's break down each one and see how you can easily transfer your Shopify store to a new account!
All-in-One Migration
Overall, the Basic Migration package is easy to follow, but keep in mind that you'll still be doing all the heavy lifting yourself! Of course, it would be no problem if Shopify were relatively similar to your current store. But if they were wildly different (or require complicated migration tasks), you might find yourself hitting huge roadblocks.
Rather skip all those technical headaches instead? In that case, the All-in-One Migration package is exactly what you need since our experts will handle all the trickiest parts for you. Let us show you how we can make your migration smooth and stress-free:
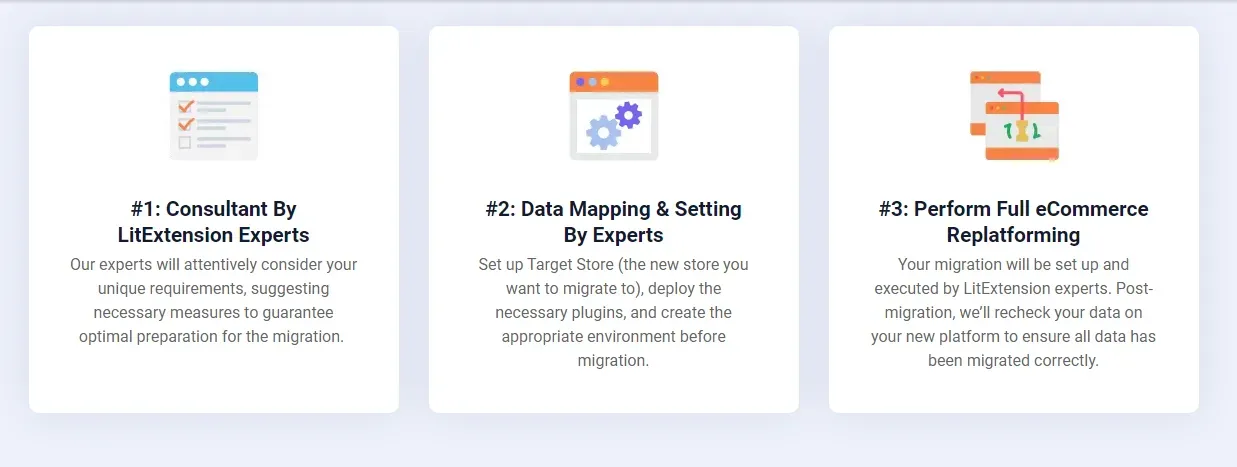
Step 1. Consultant by LitExtension experts
First, you need to reach out to our team. We will proceed to understand what exactly you want to migrate (whether you just import Shopify discounts or anything else) and make sure all the details are crystal clear. Our experts will also break down the services and pricing options so you can pick what fits your needs best!
Once you're good to go and payments are sorted, it's time for you to sit back. We can take it from here now.
Step 2. Data mapping and setting by experts
In this stage, our team will get everything in order by:
- Setting up your new store
- Cleaning up your Shopify backup
- Installing any plugins you need
- Creating important 301 redirects.
Curious to see how things will look before we finish? No worries! We can run unlimited demo migrations so you can preview all the changes yourself.
Step 3. Perform full eCommerce replatforming
Now for the big moment — your full migration! Our team will handle the entire process while keeping you updated throughout. Plus, you get our priority support with detailed responses to all questions within 12 hours (way faster than the Basic plan's 24-hour window).
The best part? You won't need to pay extra for additional options like 301 redirects or recent data transfers. Unlike with the Basic package, they're all included!
As soon as the migration is complete, we'll double-check everything to make sure your new store is good to go. And even for the next 30 days post-migration, we'll still support your business throughout with unlimited re-migrations, recent data transfers, and smart updates — all free as long as any extra data is less than 5% of your total.
Migrate to Shopify with LitExtension
LitExtension provides a well-optimized All-in-One migration service for your data transfer!

Automated Migration
Do you prefer to stay in control and handle every step yourself? In that case, this Migration package is perfect for you!
Of course, first things first, you'll need to sign up. Simply enter your name, email, and password on the registration page (or click “Sign in with Google”), and you're good to go! Once that's done, you can now proceed to our detailed guides to import Shopify discounts and other migration data:
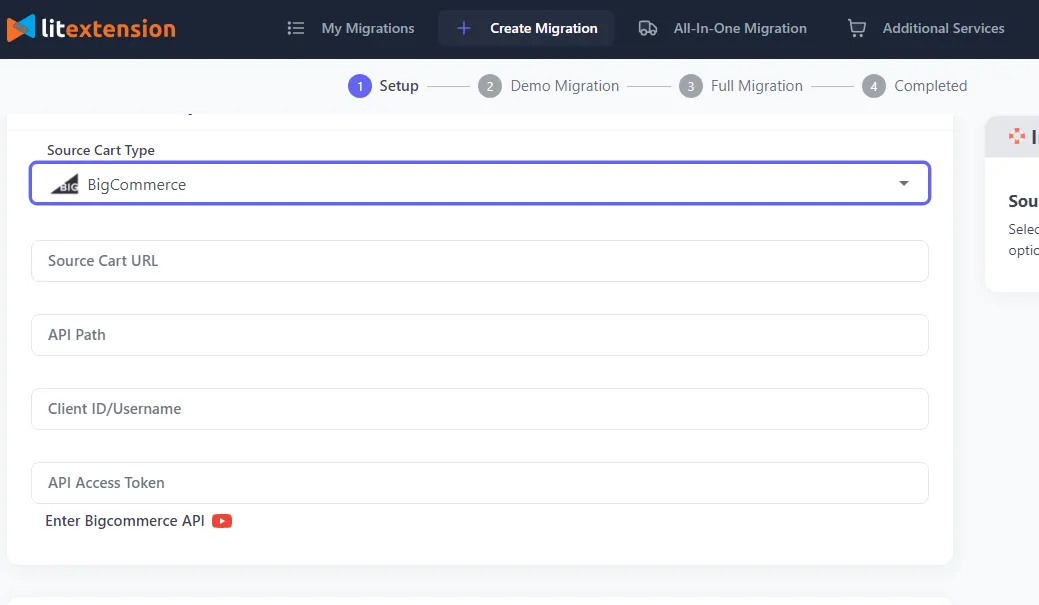
Step 1. Set up your Source Cart (your current store)
First, head over to the Migration page and click “Create new migration.” Then, pick a platform as your Source Cart (e.g., BigCommerce) from the dropdown menu. Don't forget to enter the store's URL, either!
After that, you'll need to perform a few more tasks to connect LitExtension to your store. But don't worry; the entire process will be a breeze with our step-by-step instructions shown on your screen!
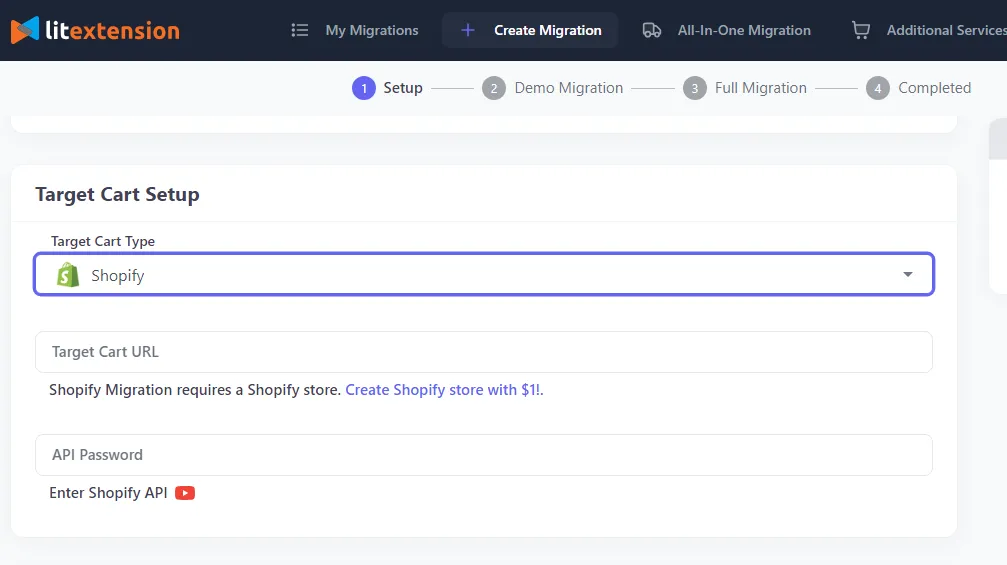
Step 2. Set up your Target Cart (your new Shopify store)
Next, you'll need to configure your Target Cart. Select Shopify, enter the URL of your new store, and connect it to LitExtension. Just like with Step 1, the on-screen guides will help you sail through this step in just a few minutes.
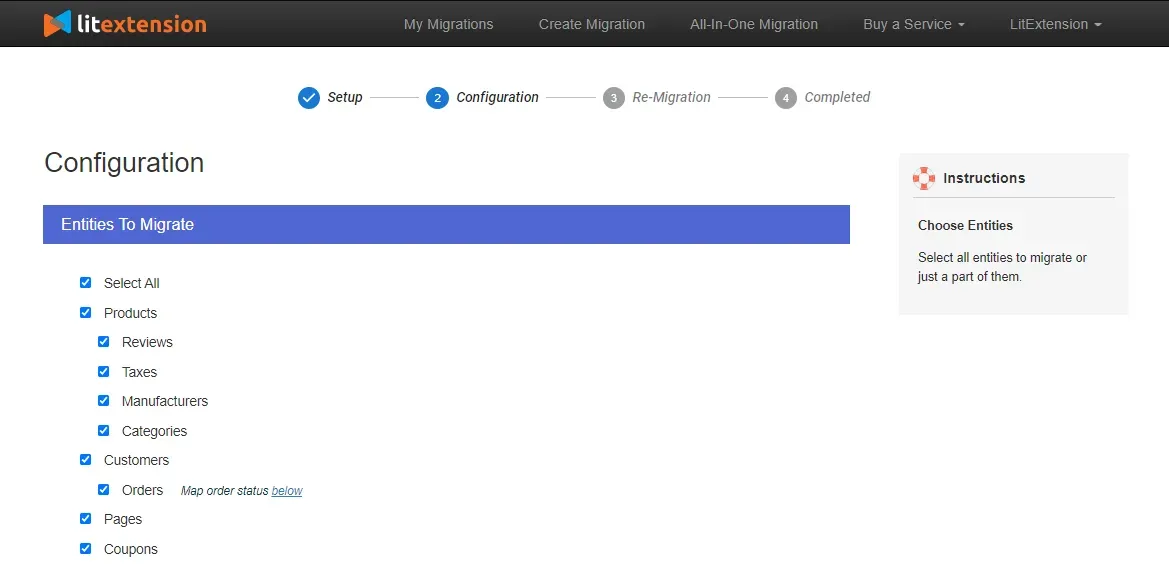
Step 3. Configure your migration
Here, you can choose exactly what you want to migrate, whether it's just the discount codes or the full package (Customers, Orders, Settings —you name it!). You can even select “All” to transfer everything in one go.
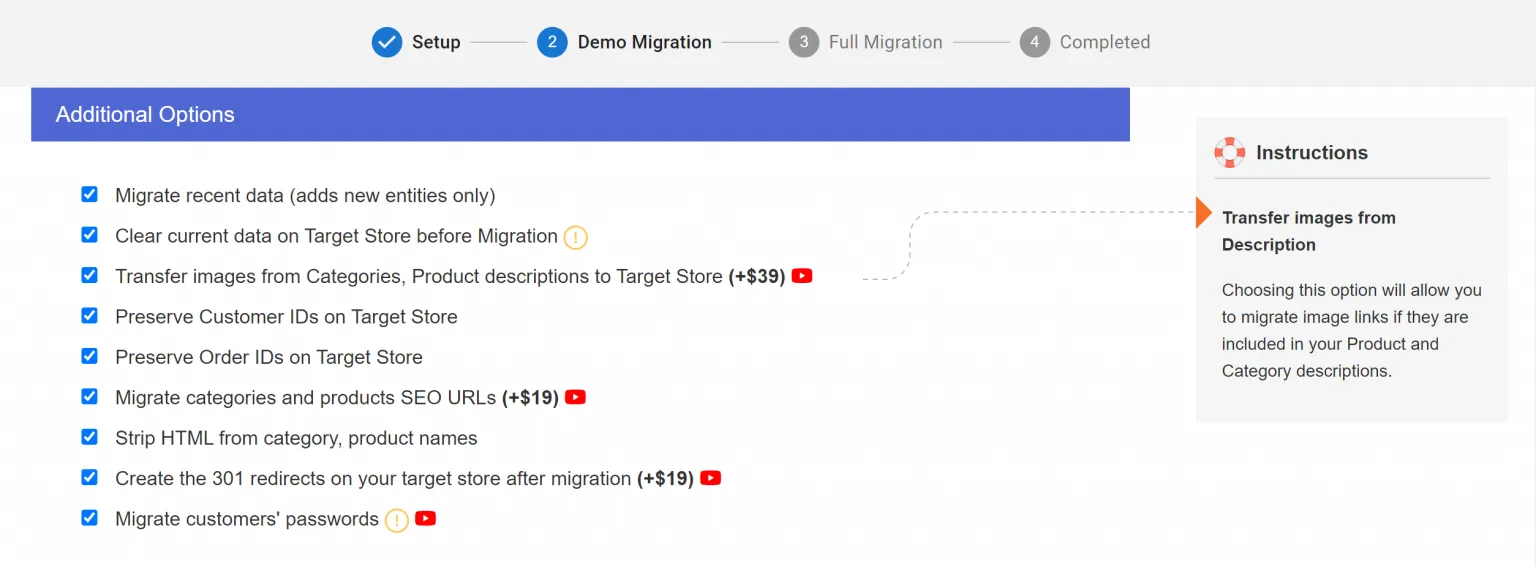
Still looking for additional options besides the main list? In that case, you can tick some extra boxes in the image below, too (for a small added fee, of course). Check them out:
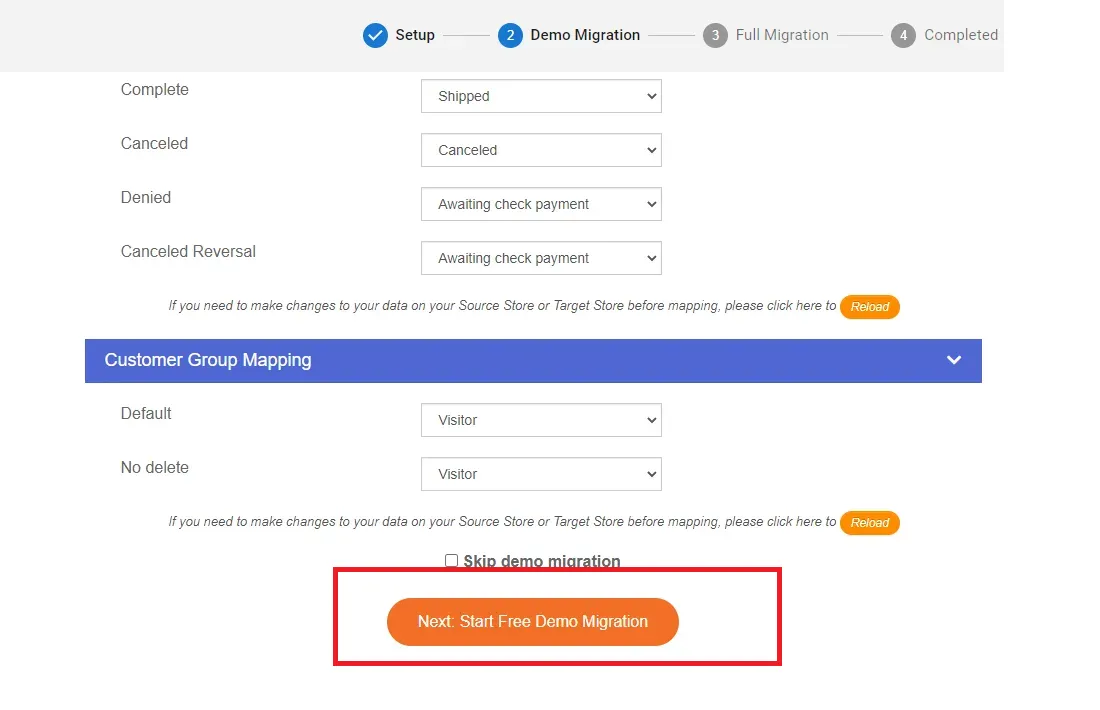
Step 4. Run your migration
Now, at the bottom of the configuration page, click “Start free demo migration” to transfer up to 20 items for free. It's an excellent way to ensure everything is working smoothly before you make your payment and start the full migration! (But, of course, if you already feel prepped, just click “Skip the demo” instead).
When it's time for the actual migration, you can sit back and relax during the entire process since everything is cloud-based; there's no need to keep your browser connected all the time! And once the migration concludes, you'll receive an email confirming that all your chosen store data has been successfully transferred.
And that's not all; our support keeps going long after the migration is done. You’ll enjoy dedicated tech support, 3 free re-migrations, and unlimited recent migrations for a full 60 days (starting the moment you complete your payment). Plus, smart updates for existing data are yours for a LIFETIME – no limits attached!
Bonus: How to Export Shopify Discounts
We have discussed how to import discounts Shopify; now, let's see how to export them!
Fortunately, compared to the import process, the export is much simpler. Since Shopify already provides built-in export tools, you simply need to choose what you want to export and let the platform generate a clean CSV file for you:
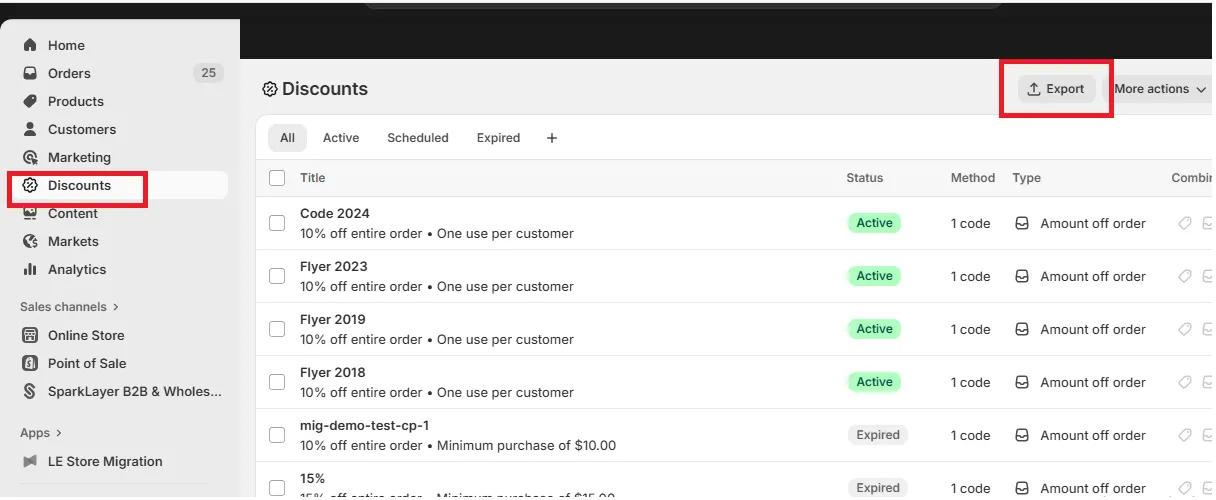
Step 1. Access the Discounts section
First, log in to your Shopify admin and open the Discounts tab, then click the “Export” button.
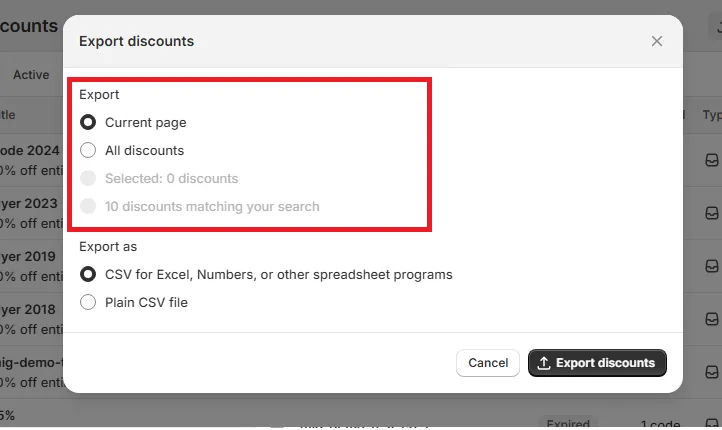
It will open a panel where Shopify asks what portion of your discount list you want to download. At this point, think about what you actually need:
- If you’ve just filtered the list or run a search, you can click “Current Page” or “Current Search” to export only the results currently displayed.
- If you want a complete backup of everything, click “All Discounts” to export all discounts at once.
- For those who have already manually selected a few specific codes beforehand, choose “Selected Discounts” to export only those.
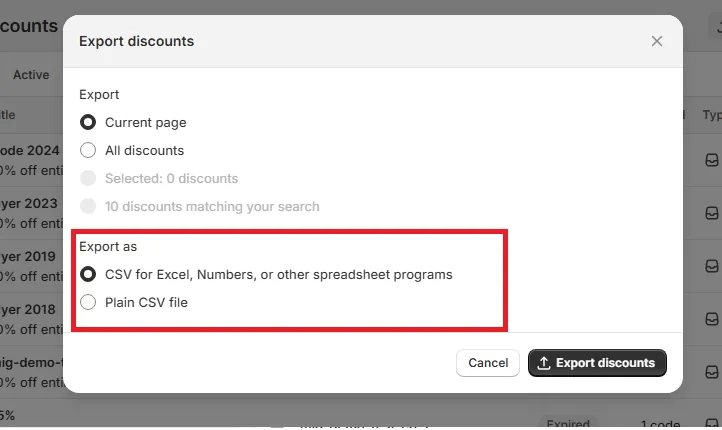
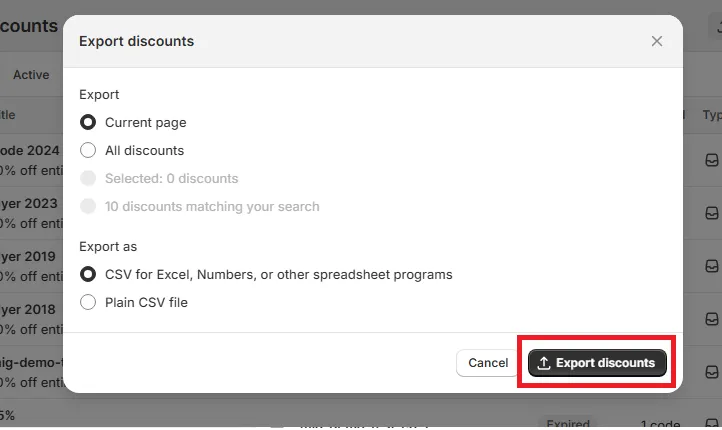
Step 2: Choose the format
After selecting the range of discounts to export, Shopify will ask which file format you prefer. The best choice naturally depends on how you plan to use the file afterward:
- For those who expect to open the file in Excel, Google Sheets, or Numbers, choosing the spreadsheet-friendly CSV option is the simplest route.
- If you’d rather work with the file in a plain-text editor or handle it through scripts or code, the plain CSV format is more appropriate.
Both types of Shopify export discounts CSV files contain the same information; the difference just lies in how easily they interact with your chosen tools.
Step 3: Generate and download your discount CSV file
Finally, once you’ve set both the scope and the format, click “Export discounts” to generate the file. Shopify will prepare the CSV and automatically download it to your device. And that's it!
Import Shopify Discounts: FAQs
How do I import discounts to Shopify?
One of the most common ways is to install the Matrixify app. Use it to export your discount data into an Excel file, make the necessary updates to the columns, and then upload it into Shopify.
But what if you're migrating your entire store to Shopify (including discount codes, products, and everything else)? That's when calling in expert migration services like LitExtension makes all the difference!
How do I add a discount on Shopify?
Just go to your Shopify Admin, head to the "Discounts" section, and click on "Create a Discount." From there, you can customize additional settings until they fit the exact type of deal you want to offer.
How do I bulk a discount code on Shopify?
You can either duplicate rows in a CSV file as many times as you need before importing (refer back to Step 2 in our Matrixify guide) or use third-party apps like My Bulk or Bulk Discount Code Bot.
Final Words
We hope you're now in the loop regarding different methods to import Shopify discounts!
Overall, the Matrixify app is a solid, straightforward pick when handling smaller to medium imports. But if you're looking to go all-in with a full store migration (and steer clear of any tech headaches), then LitExtension is hands-down the way to go! With 12+ years of experience and a track record of 300,000 successful migrations, we've got more than enough expertise to make your Shopify migration absolutely seamless and stress-free.
For more information, check out our Shopify guides and join our Facebook Community.

