Since its release, Drupal has rightfully earned its place as one of the most popular content management systems (CMSs) thanks to its unmatched flexibility and control. Nevertheless, for many beginners, learning how to use Drupal to build and manage a website can feel extremely intimidating.
But here’s the great news: once you understand the fundamentals, Drupal becomes incredibly efficient, reliable, and rewarding to use!
In this tutorial, we’ll walk you through how to use Drupal to build and manage your own site from scratch in five simple steps:
- Step 1. Install Drupal
- Step 2. Configure themes
- Step 3. Create pages
- Step 4. Start posting
- Step 5. Manage components
Let’s get started!
How to Use Drupal: 5 Steps
To use Drupal to create and manage a website, you need to follow these five essential steps:
- Step 1. Install Drupal
- Step 2. Configure themes
- Step 3. Create pages
- Step 4. Start posting
- Step 5. Manage components
Let’s see how each step works in more detail:
Step 1. Install Drupal
First, to start learning how to use Drupal to build a website, you need web hosting and a domain name.
We recommend choosing a provider with 99.9% uptime, fast load speed (<850ms), reliable support, and reasonable price. Providers like Bluehost, for instance, even offer one-click Drupal installs, which saves you the trouble of manual setup!
Let's say you decide to go with Bluehost. In that case:
Log in and go to “Advanced”> “Portals/CMS.”
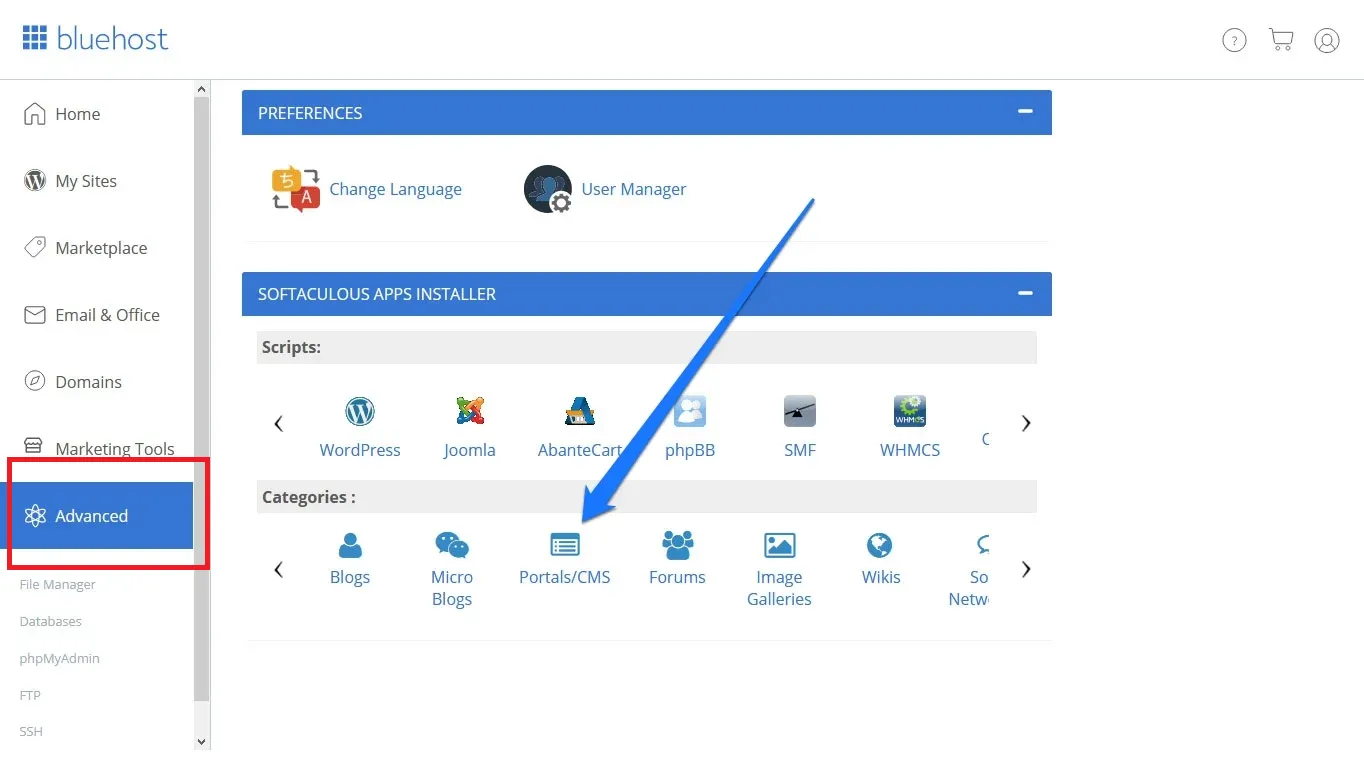
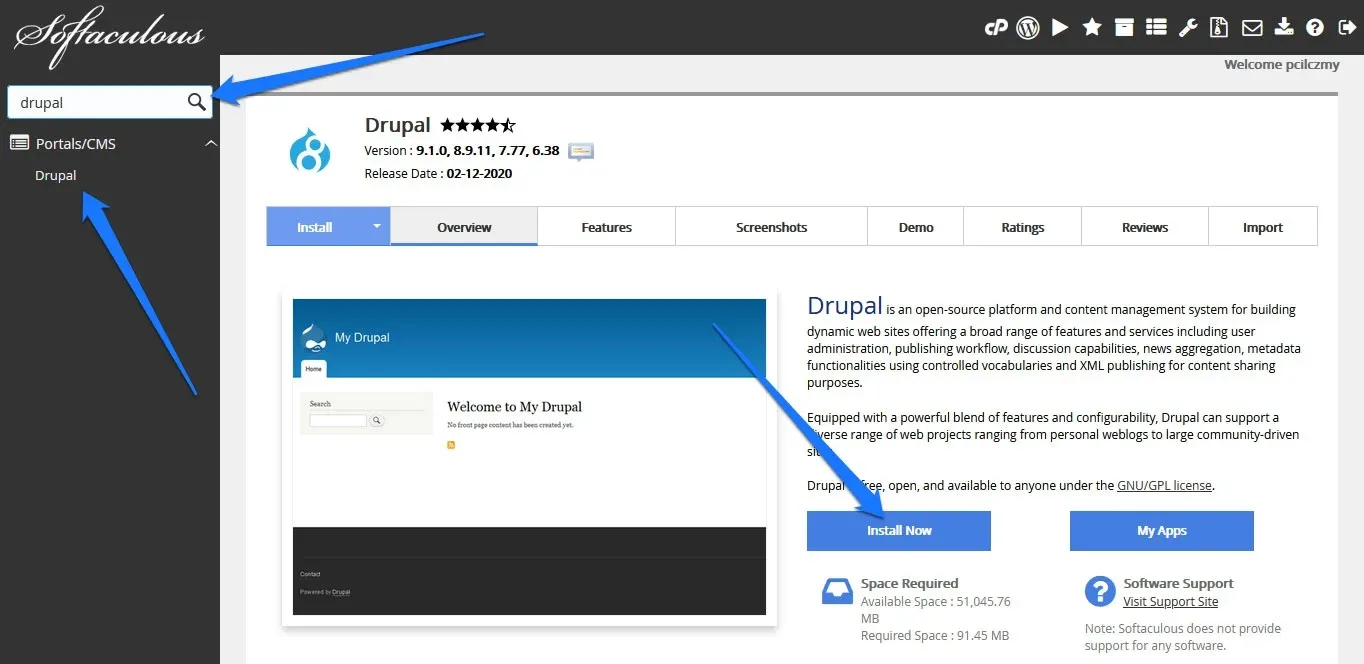
Next, select “Drupal,” and click “Install Now.”
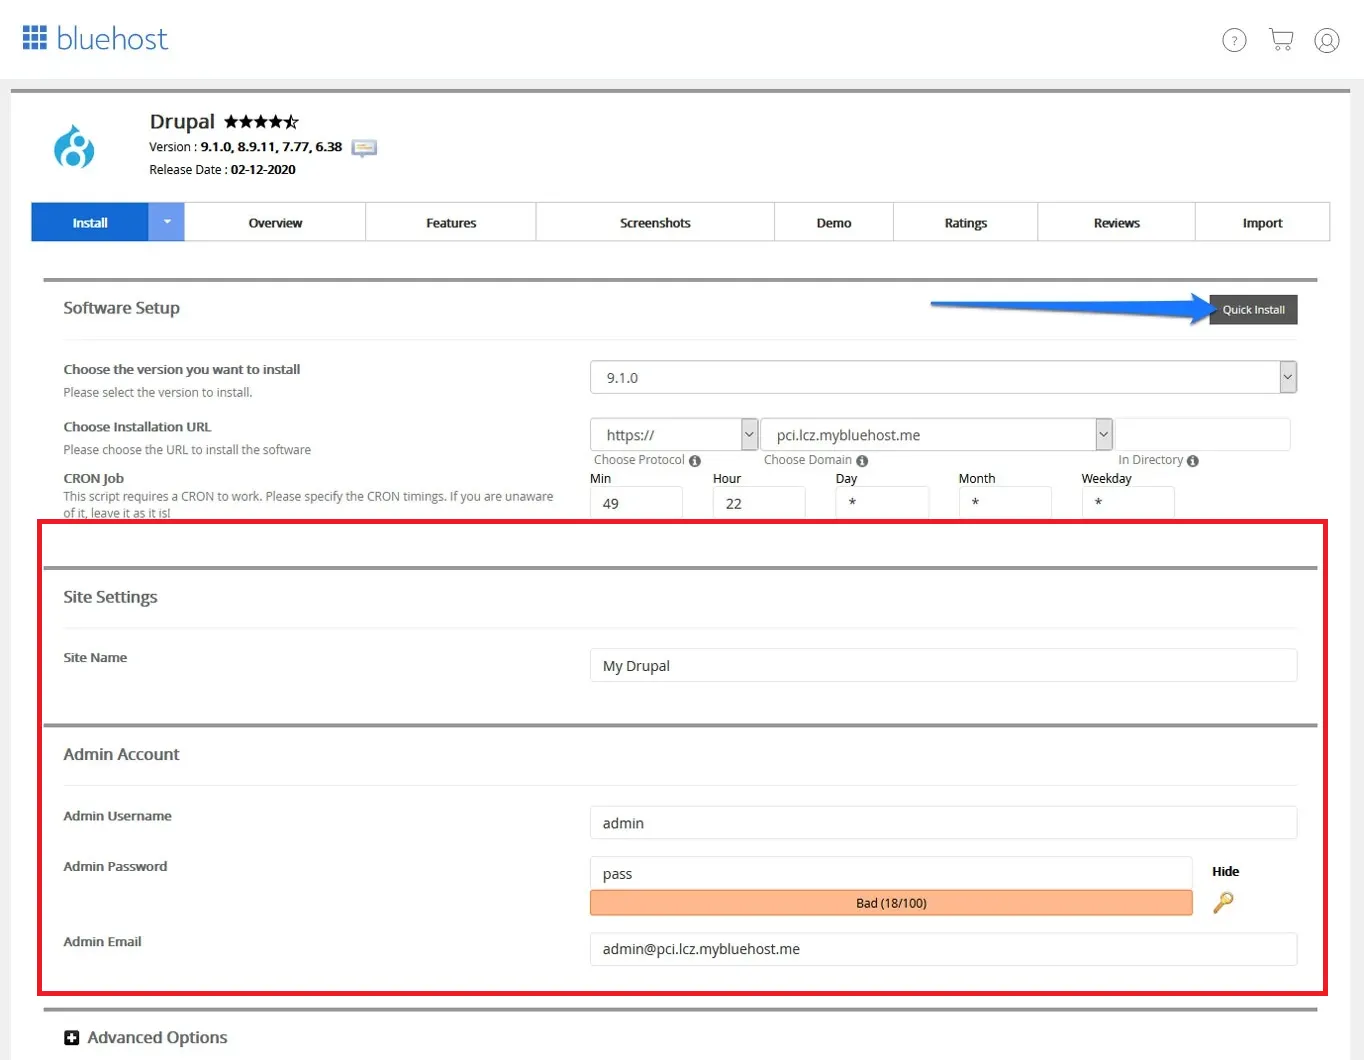
Then, use “Quick Install,” fill in your admin credentials, and confirm any overwrite prompts. After that, wait for the installation to finish and access your new site via the provided login URL.
For manual installation on other hosts:
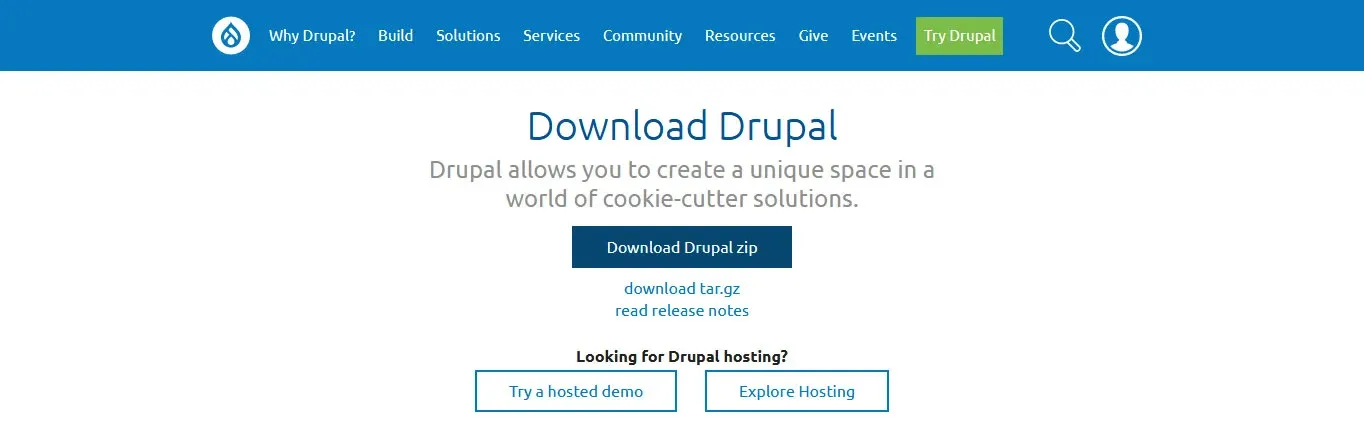
You should download Drupal from the official site and then upload files to your web host via FTP.
Next, create a MySQL database and note down:
- Database name
- User and password
- Host address
After that, visit your domain to launch the setup wizard:
- Choose language
- Pick installation profile (Standard or Minimal)
- Enter database credentials
- Configure site name, admin account, timezone, and update preferences
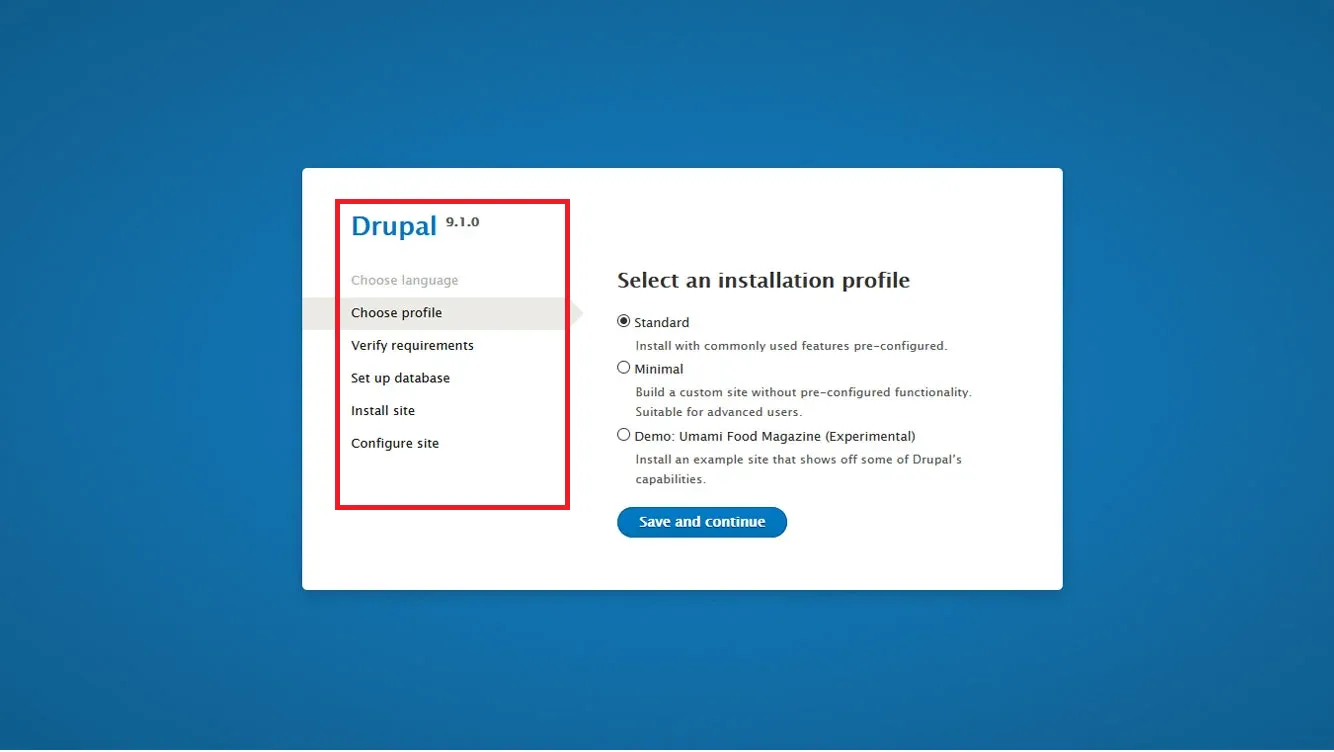
Once you click save, the installation process will officially begin!
Step 2. Configure the themes
After the installation, the next step in learning how to use Drupal is to customize your site's appearance:
Go to “Appearance” > “Install new theme,” then browse the Drupal Theme Directory (there are over 3,200 themes at the moment).
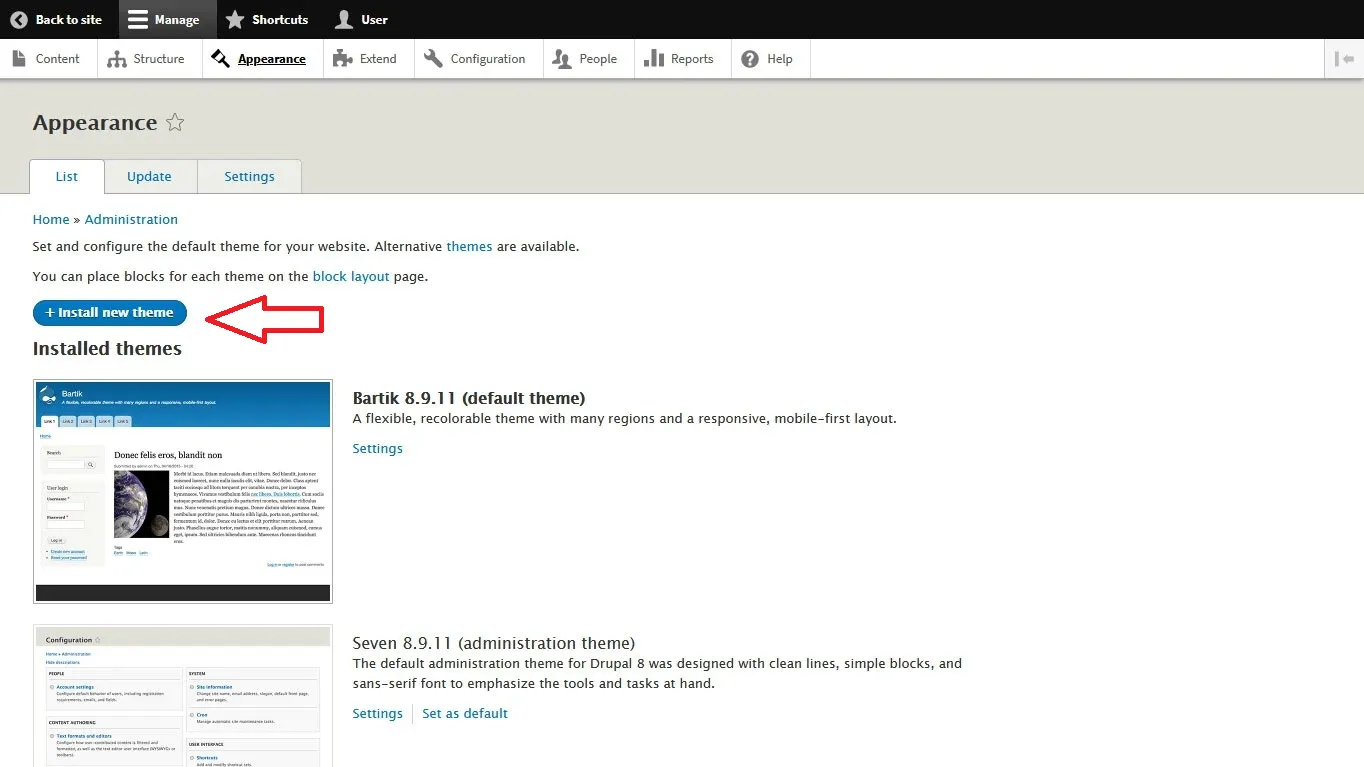
Next, download or copy the theme URL, upload it, and click “Set as default.” You can now adjust theme options under “Appearance” > “Settings,” including logo, color scheme, fonts, and layout elements.

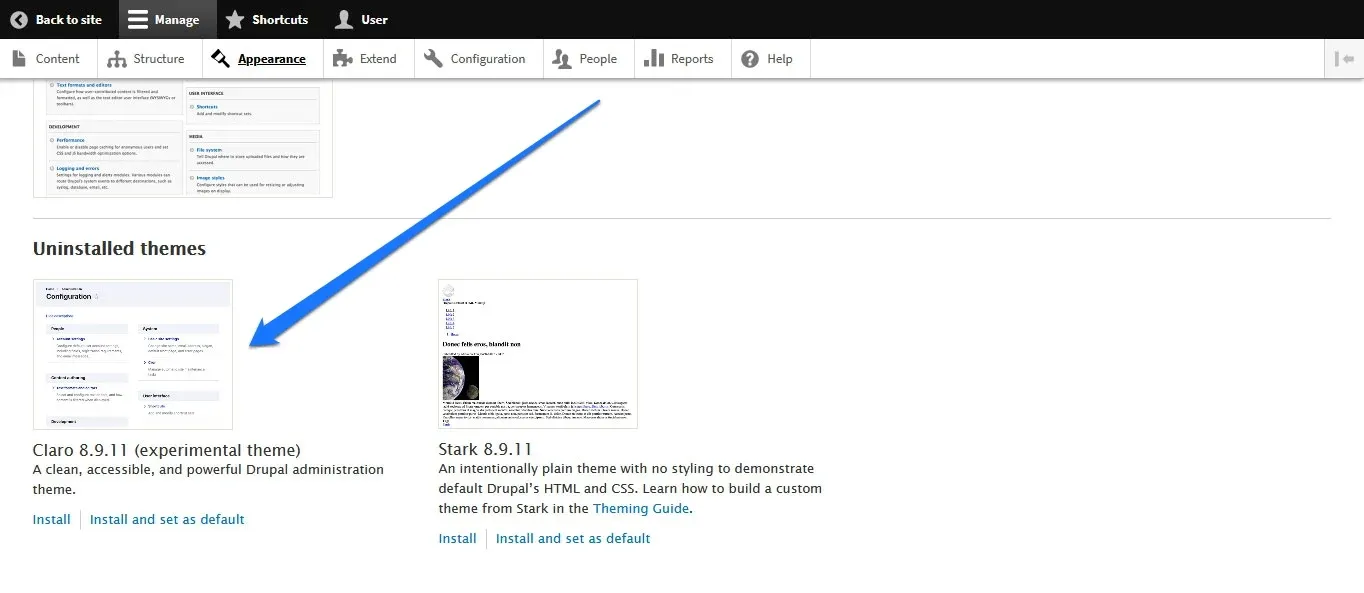
Better yet, you can also update the admin back-end theme. Simply look for “Claro” under Uninstalled themes, click “Install,” then choose it as your “Administration theme” for a modern UI.
Step 3. Create pages
Now, it's time to build out your site.
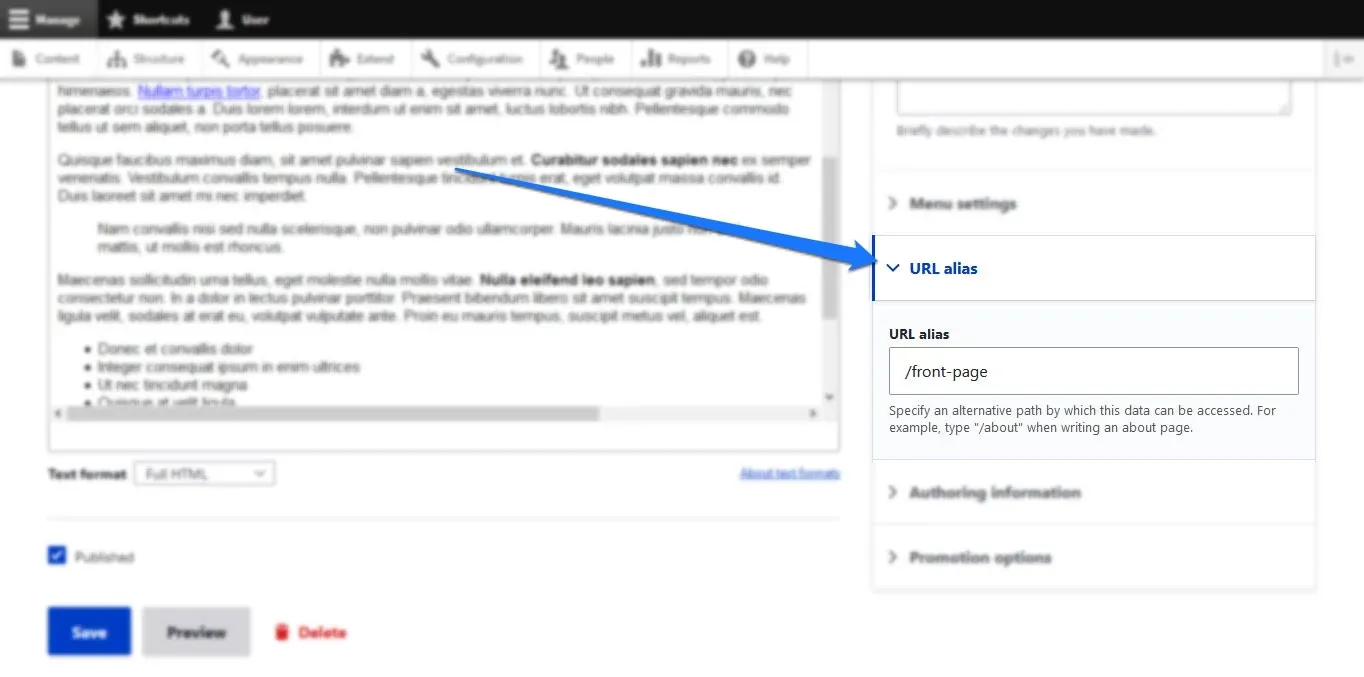
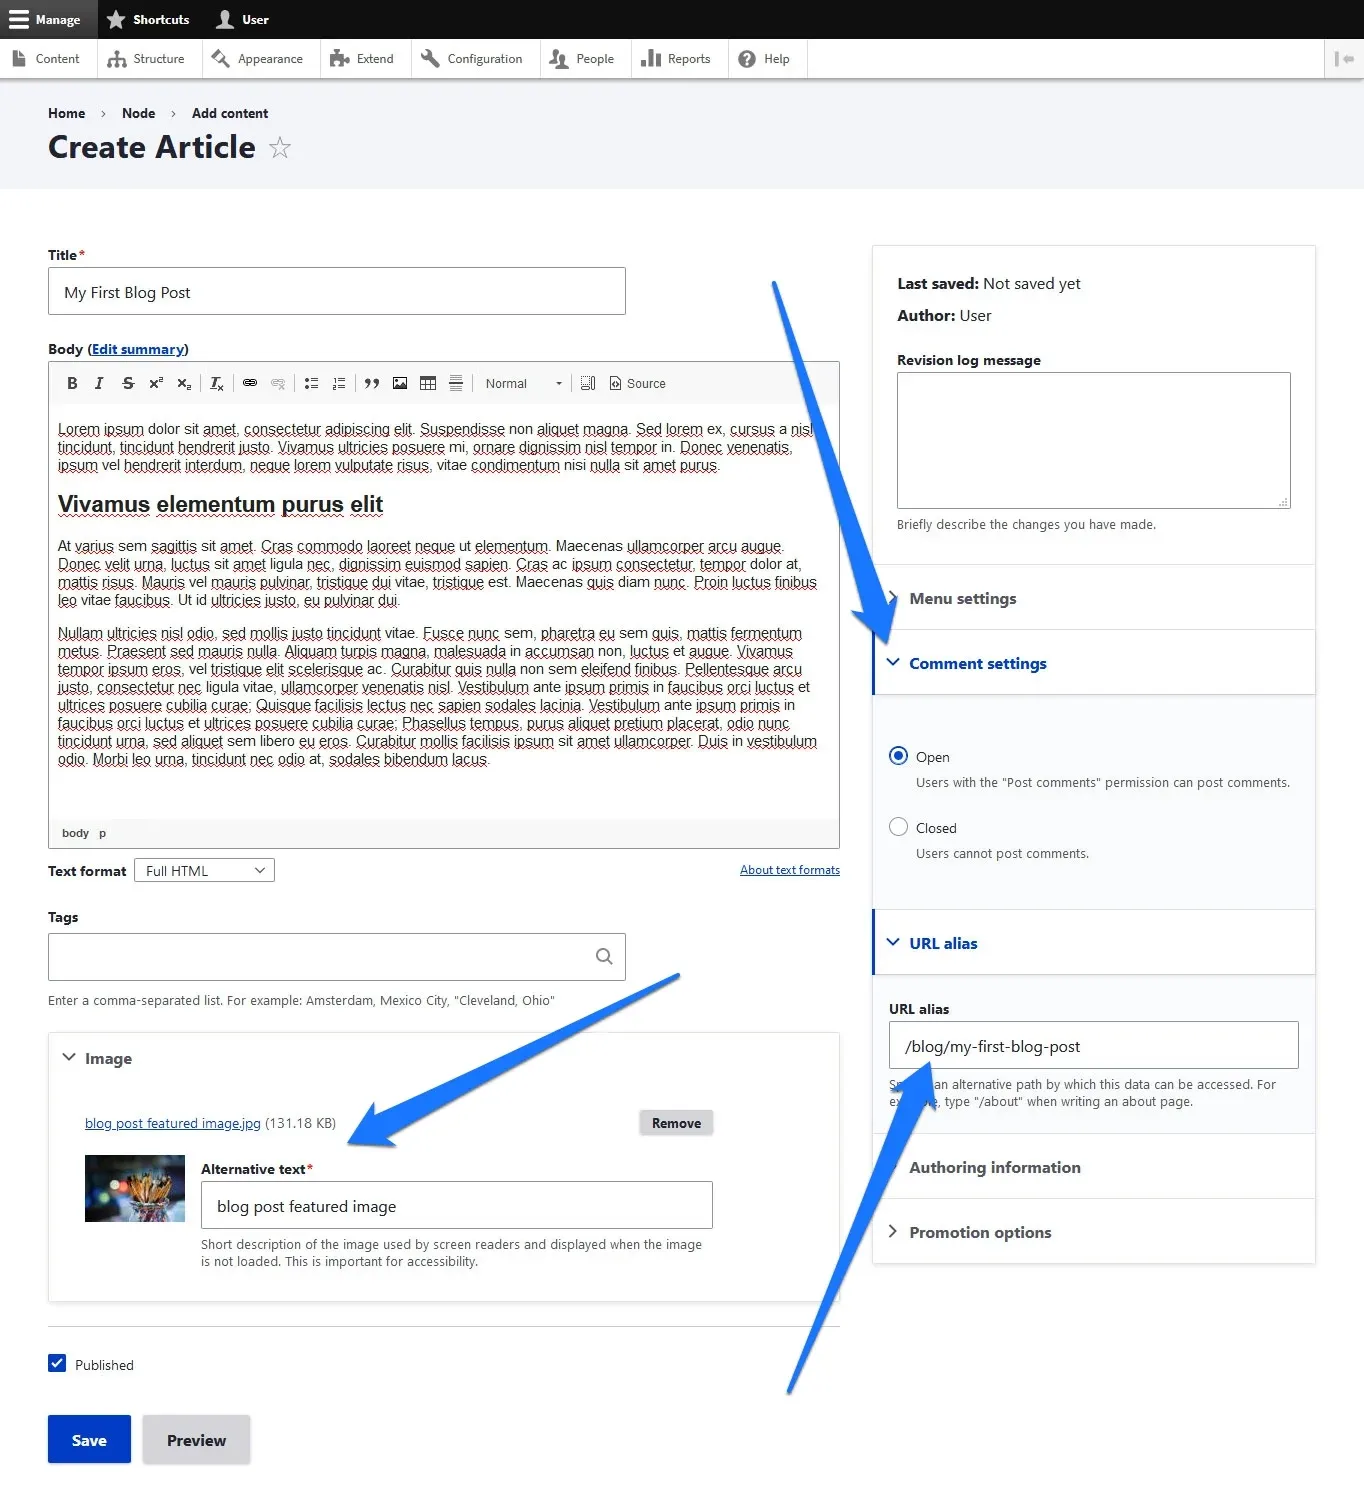
Navigate to “Content” > “Add content” > “Basic page.” Then, add a title, summary (optional), and body text with formatting (bold, lists, images, etc.)
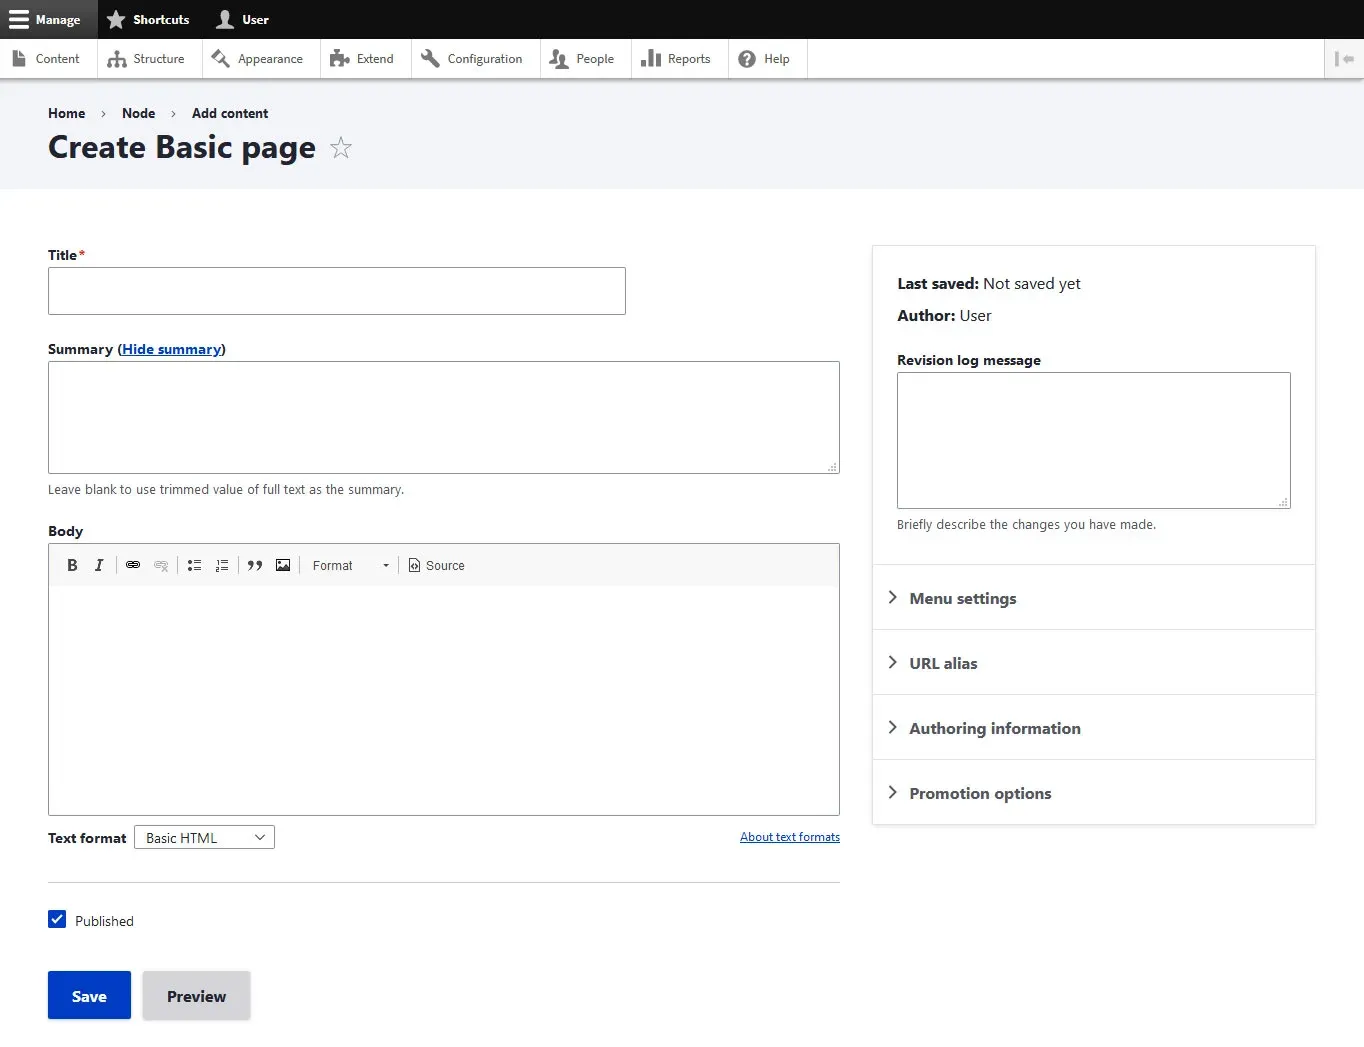
After that, set a URL alias (e.g., /front-page)
Once done, tick the “Published” box and save.
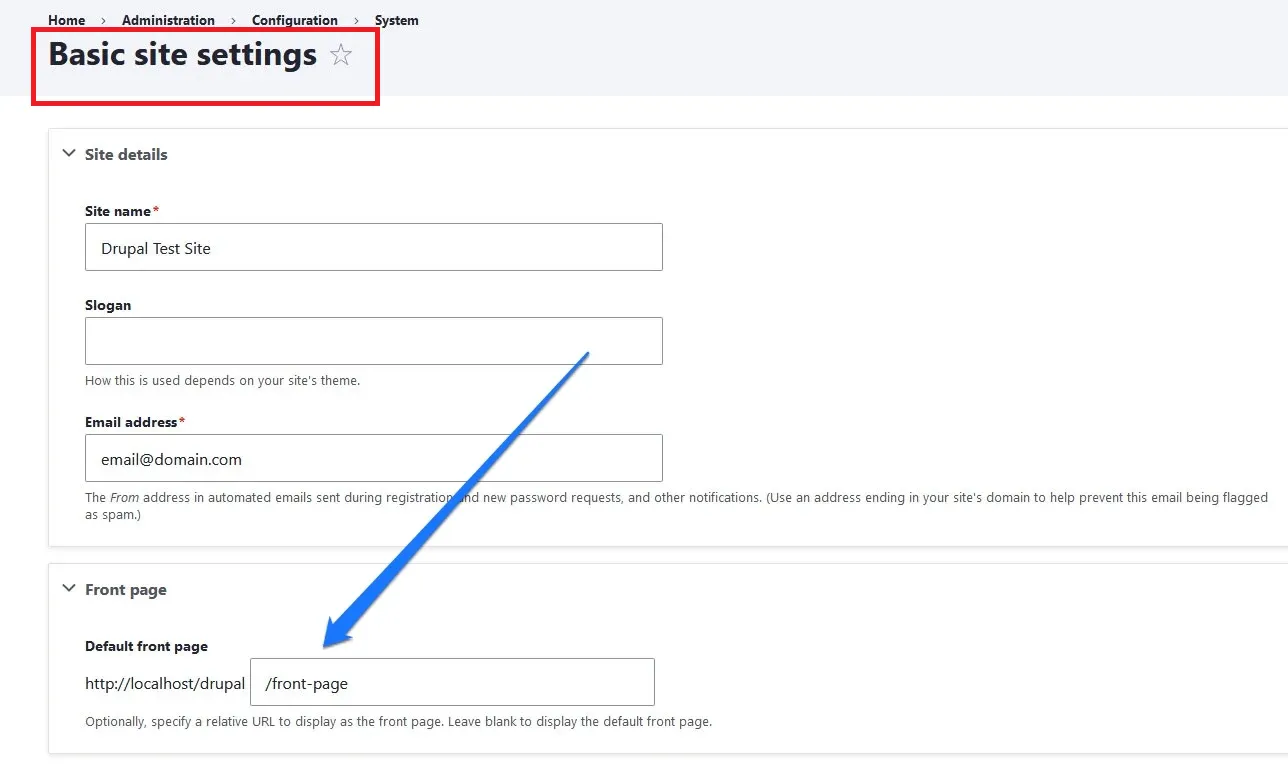
To use a page as your front page, go to “Configuration” > “System” > “Basic site settings.” Next, under “Default front page,” enter your page alias (e.g., /front-page) and save.
Furthermore, you can also add a navigation menu link when creating a page! To do so, enable “Menu settings” and fill out:
- Menu link title (e.g., “About Me”)
- Description (hover text)
- Weight (position in menu)
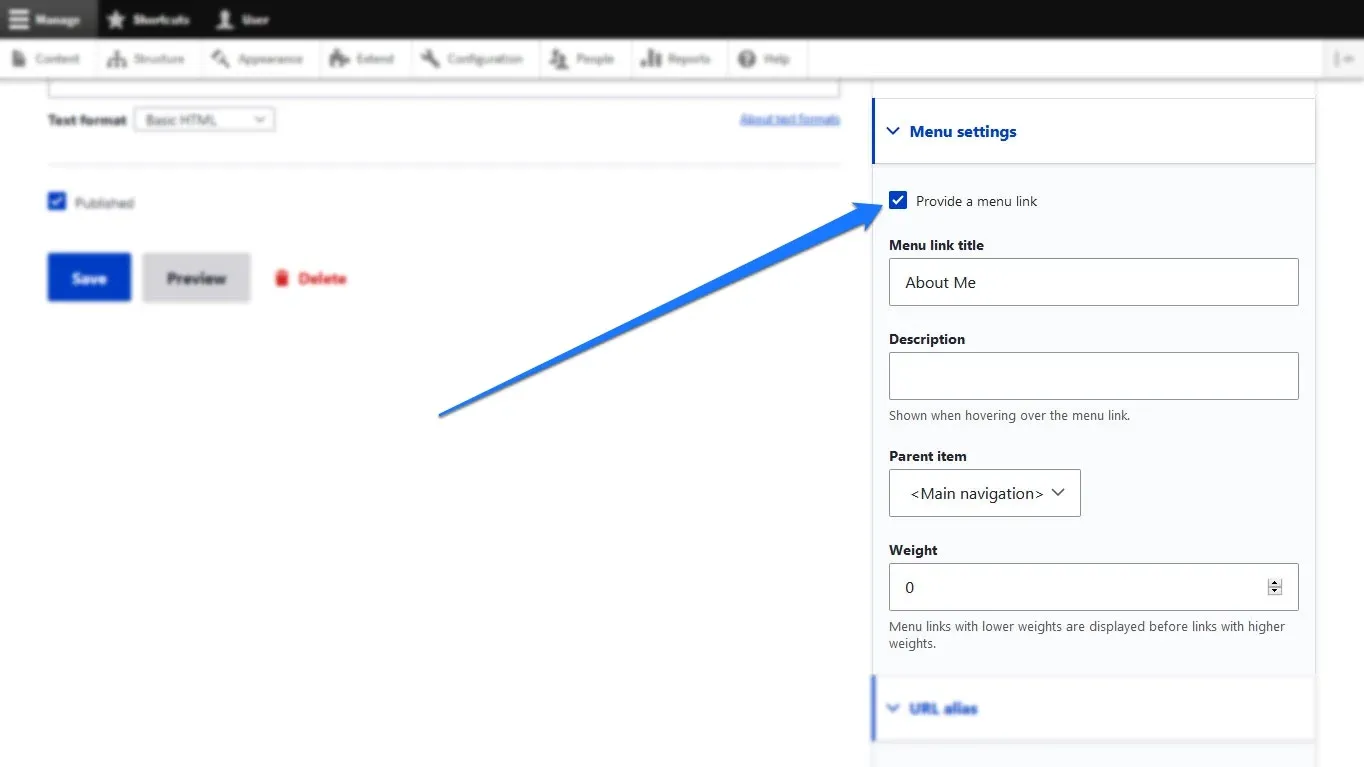
You can either reorder menu items via “Structure” > “Menus” or directly from the front end. How to use Drupal for this part is entirely up to you.
Step 4. Start posting
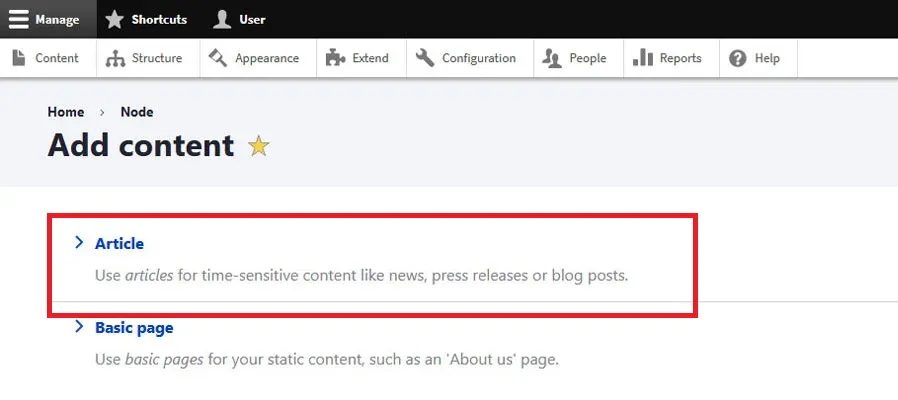
At this stage, we can now move on to discuss how to use Drupal to upload your content. Drupal does include a built-in “Article” content type for blogging, so here's what you need to do:
Go to “Content” > “Add content” > “Article.”
Then, fill in the title, summary, body, and URL alias. Remember to add tags, images, and control comment settings as well. Once done, publish it!
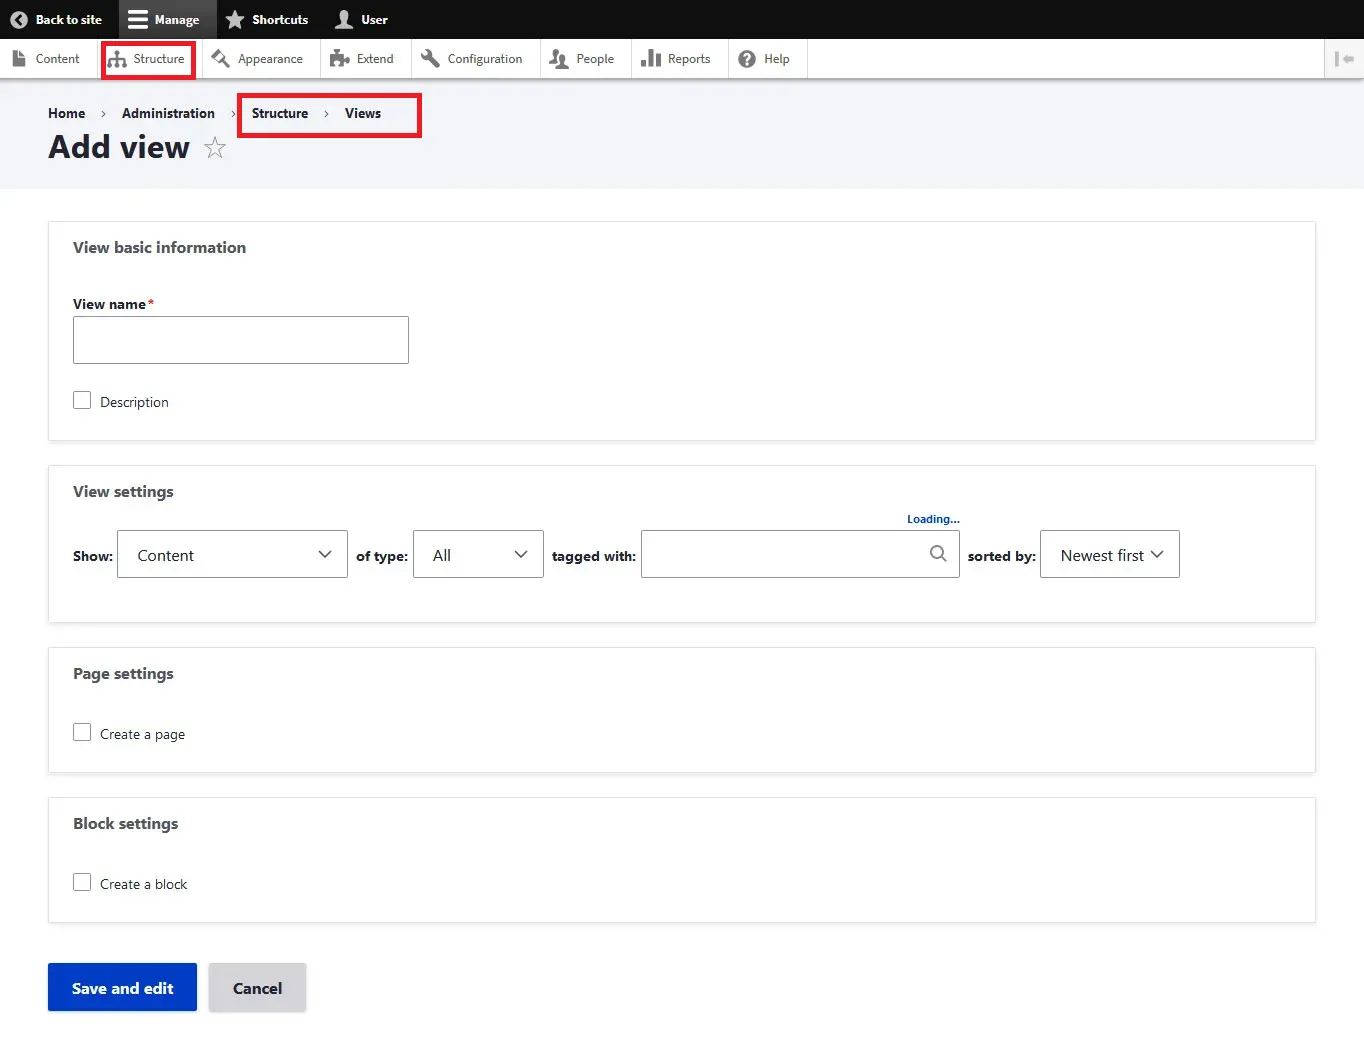
To show all blog posts on a dedicated page, go to “Structure” > “Views” > “Add view,” then choose:
- Show: Content > Article
- Sort: Newest first
- Create a page: ✓
- Path: /blog
- Format: Unformatted list and Teasers
- Add menu link: ✓ (e.g., “Blog”)
Once done, save and check your blog page.
Step 5. Manage components
Now that your site is live, it's time to learn how to use Drupal to manage and expand it!
For content
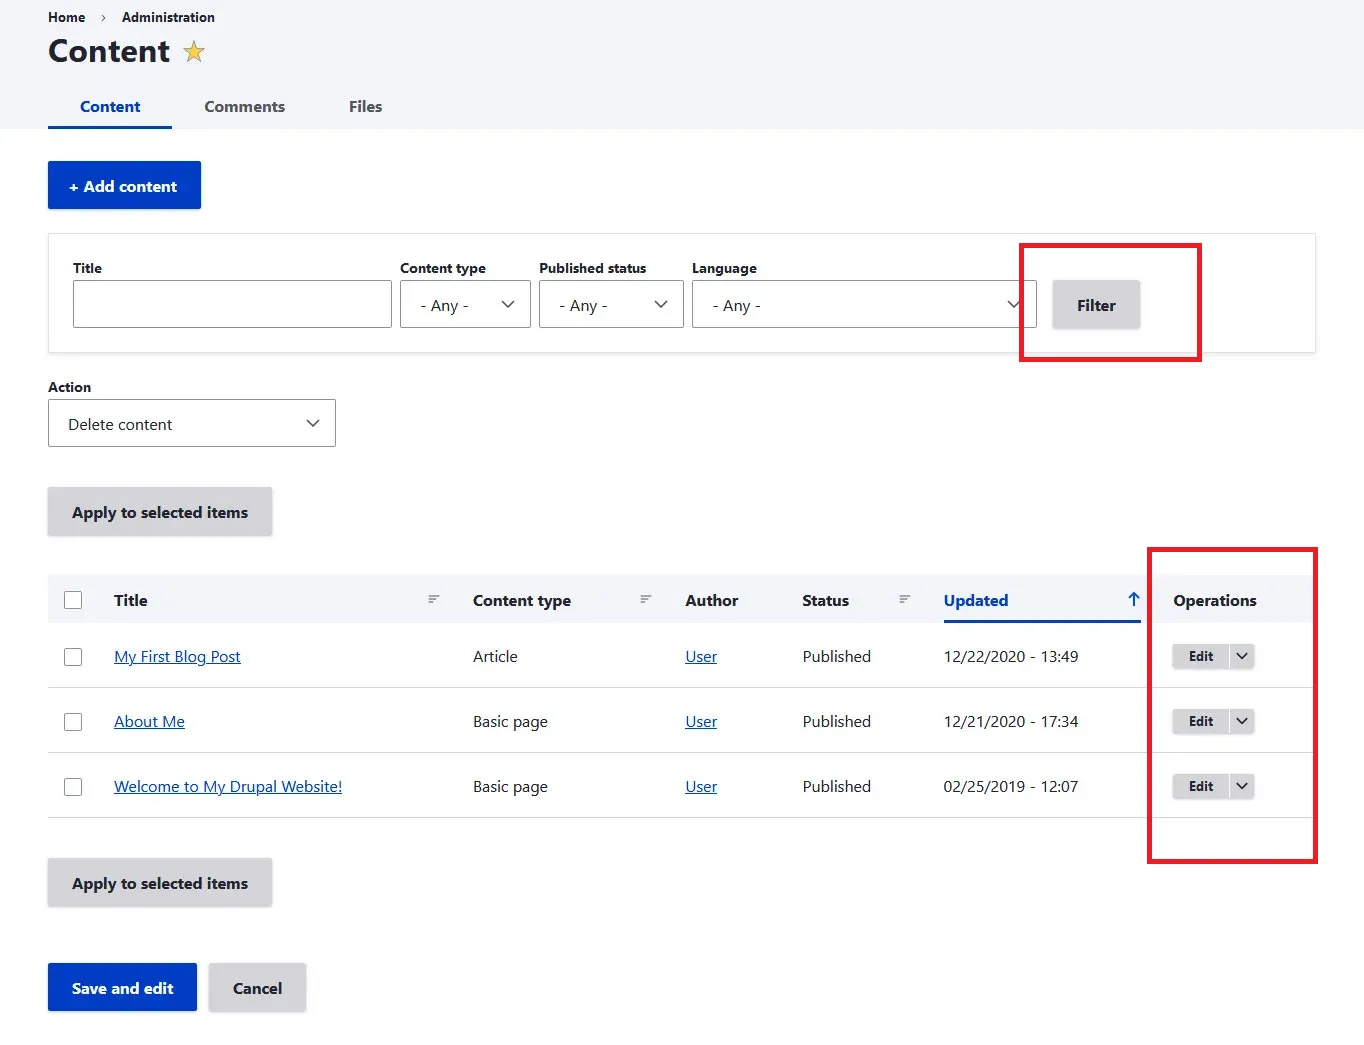
You can view all content under “Content” and use filters (title, type, status) to find posts. Then, either click “Edit” or “Delete” or use batch operations.
For modules
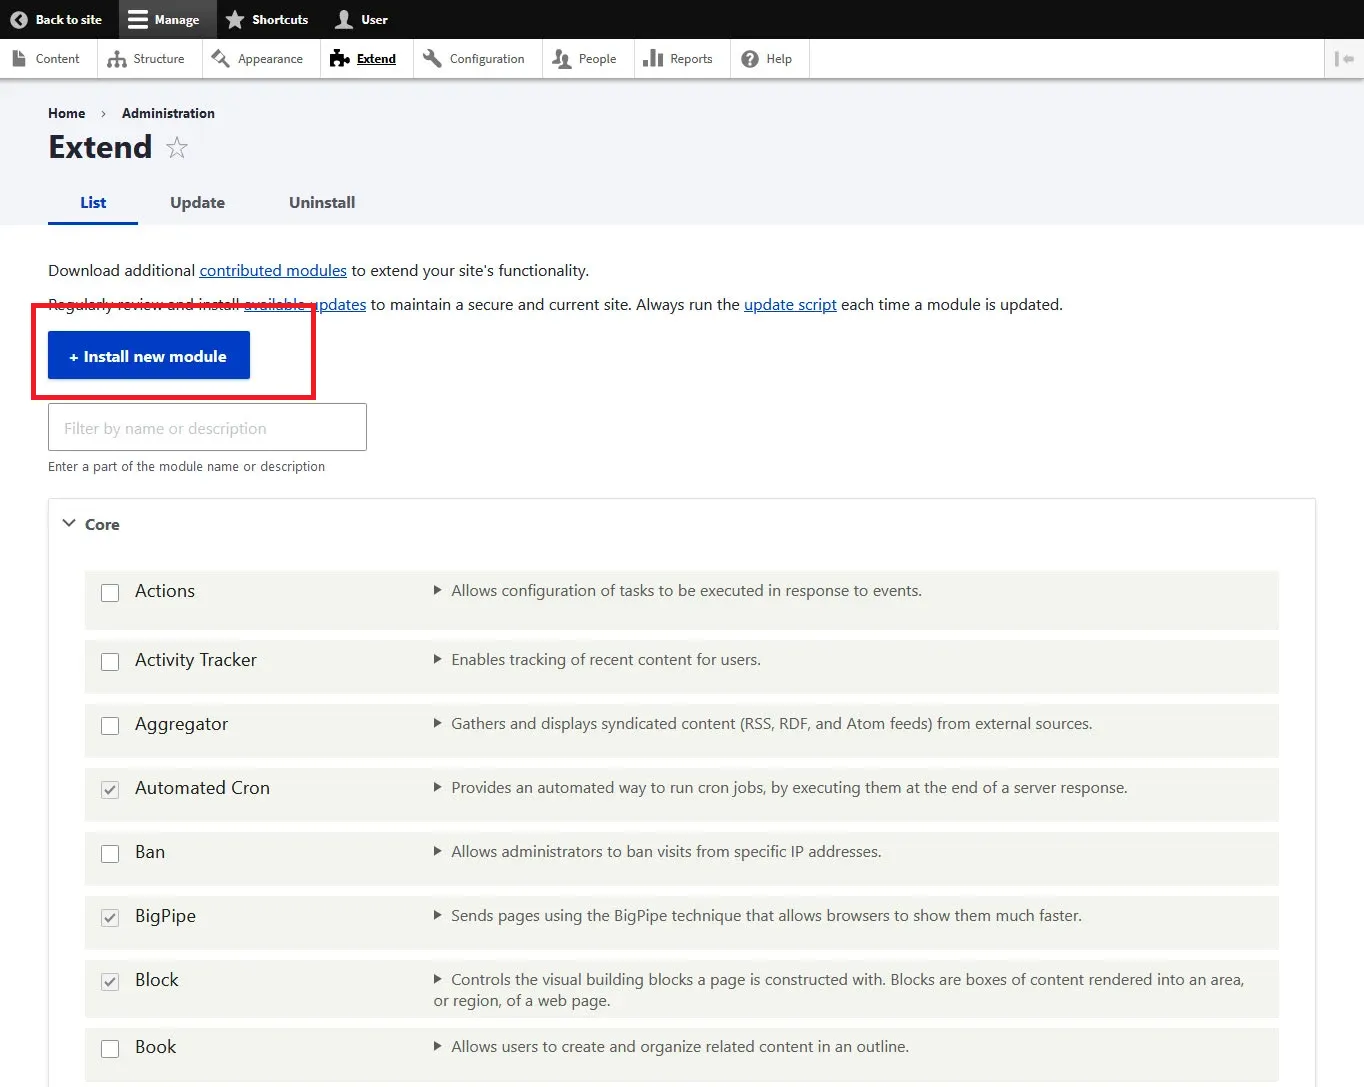
Go to “Extend,” then enable core modules by checking boxes and clicking “Install.” You can also use a completely new module (not available in the directory) by uploading a file or URL.
Likewise, to uninstall unused modules, simply do so from the “Uninstall” tab.
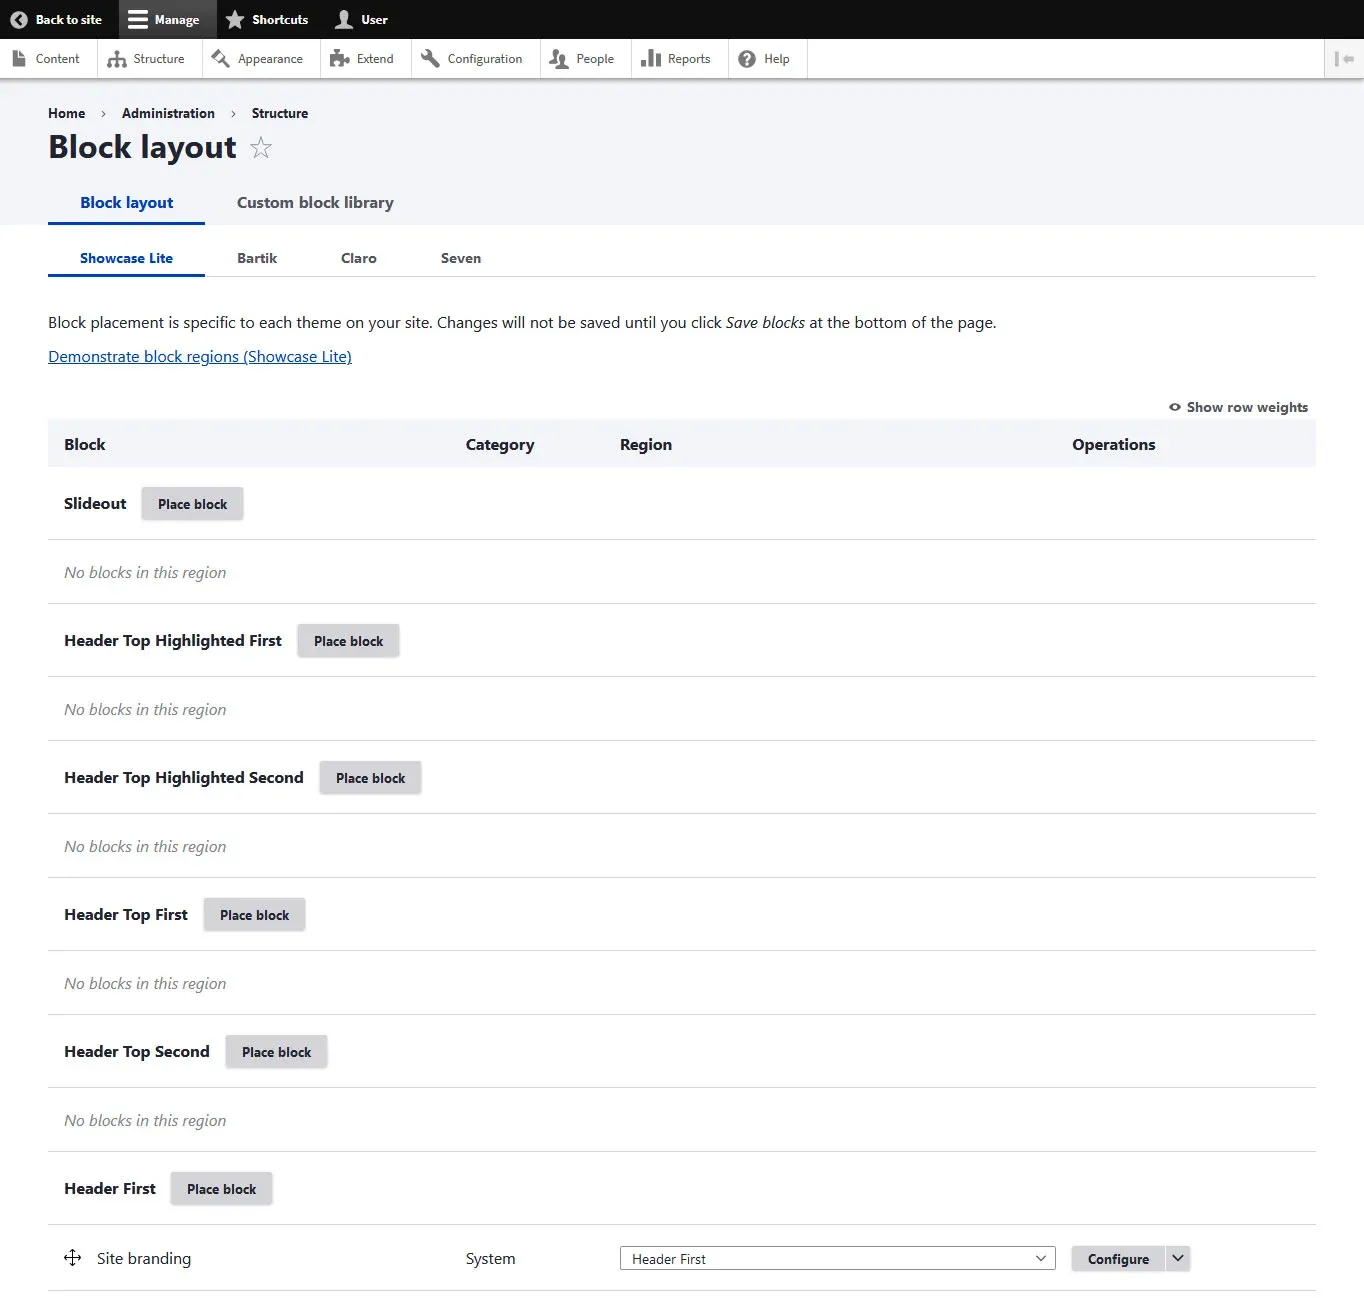
For blocks
Go to “Structure” > “Block Layout,” then click “Demonstrate block regions” to see block positions. From here, you can either add a block (via “Place block” in a region) and configure its visibility, title, and placement.
You can also:
- Rearrange blocks via drag-and-drop
- Disable or delete blocks via drop-down
- Create custom blocks via “Structure” > “Block layout” > “Custom block library” and assign them to regions like any other block.
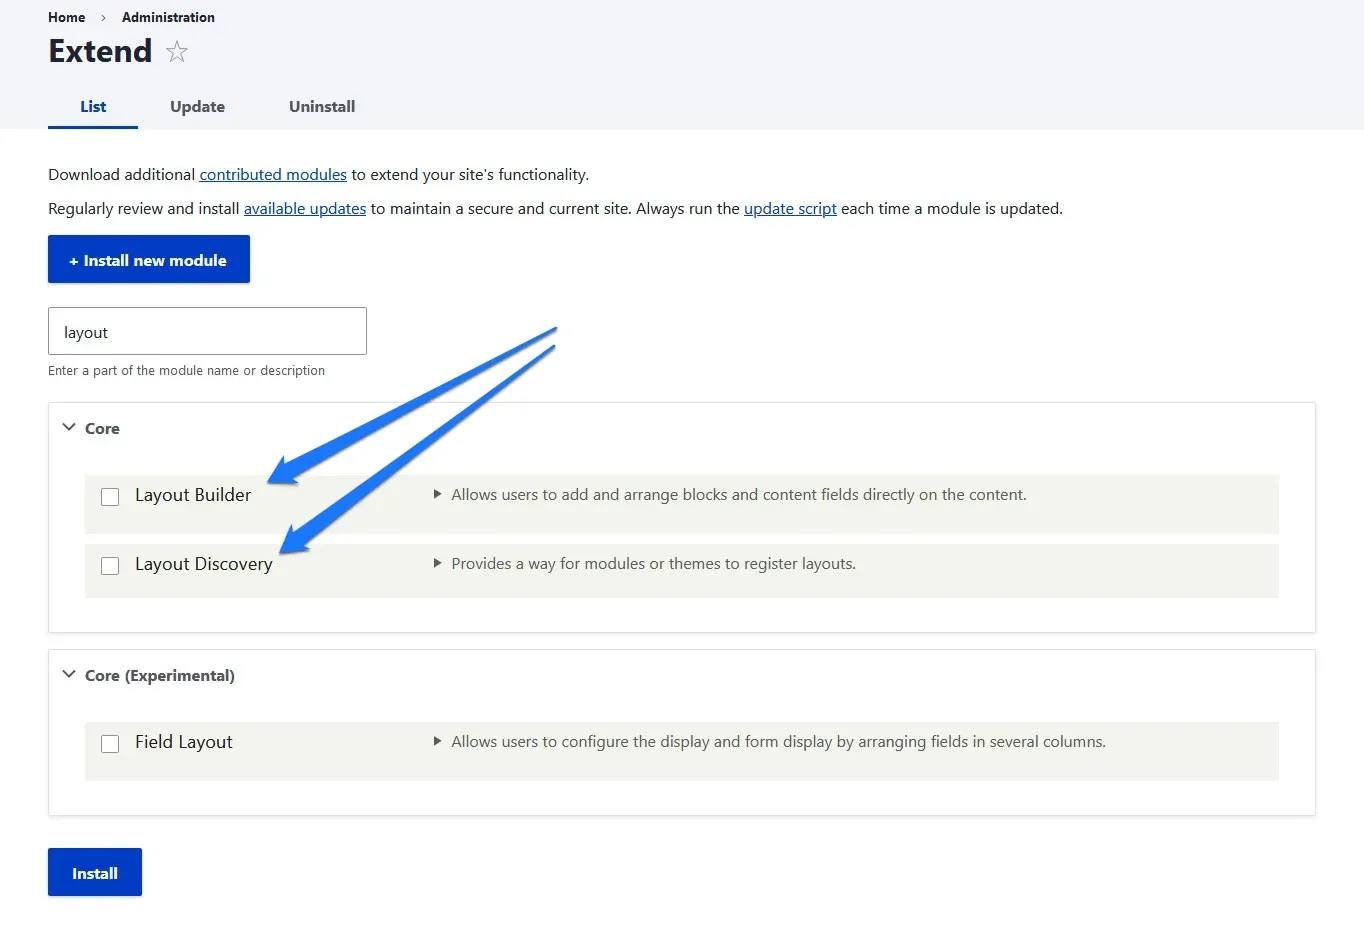
For layout builders
First, you need to enable the “Layout Builder” and “Layout Discovery” modules.
Then, go to “Structure” > “Content Types” > “Manage display. Check “Use Layout Builder” and (optional) “Allow content-specific layout.”
After that, click “Manage layout” to:
- Add sections (1, 2, or 3 columns)
- Insert blocks into the layout
- Customize per content type or individual content.
And that's how to use Drupal for basic site building and management!
Where to Learn More About Drupal
Want to explore how to use Drupal beyond these basics? In that case, there are two excellent learning resources you can rely on to learn Drupal:
Drupalize.Me
Specifically, Drupalize.Me is a well-known training platform created by Lullabot, one of the most respected Drupal development companies. This site offers multiple Drupal tutorials, from beginner fundamentals to advanced development and theming, organized into tracks (site building, theming, module development, etc.).
Better yet, many of these tracks are accompanied by videos, code examples, hands-on exercises, and more. Sure, there is premium content behind a paywall, but it also includes a fair number of free resources that are perfect for those just getting started.
Drupal User Guide
The Drupal User Guide (available at Drupal.org) is a completely free, official manual maintained by the Drupal community. It's structured as a step-by-step walkthrough for setting up and managing a Drupal site, covering everything from installation to content types, menus, and security best practices. All in all, we highly recommend it for users who prefer a structured, text-based manual and want to understand Drupal using real-world examples.
Aside from the two abovementioned sources, you can also check out helpful discussions from the Drupal subreddit, where developers and beginners alike share advice, tutorials, and troubleshooting tips. If you're ever stuck, chances are someone has already posted a solution or helpful insight!
Best Tips to Run a Drupal Store Successfully
Running a Drupal-based website is one thing, but keeping it performing well and user-friendly in the long run is a different challenge altogether. No worries; let us give you some simple but powerful tips for how to use Drupal effectively in the long run.
1. Check for core and module updates weekly and apply them after full backups
Every few weeks, you should log into the Drupal admin dashboard and go to “Reports”> “Available Updates.” Then, click “Check manually” to refresh the status of Drupal core and all contributed modules.
However, if updates are available, do not apply them immediately!
First, back up your entire website (including both files and database) using a reliable backup method (check out how to perform Drupal backup here).
After confirming that the backup is stored safely, return to the update list and apply the updates in a staging environment first, if possible. Only when it is confirmed that nothing breaks should you apply the same updates on the live site.
2. Configure full-page caching, aggregate CSS/JS, and optimize media files
Another important tip: you should go to “Configuration” > “Development” > “Performance” and enable both page caching and CSS/JavaScript aggregation. Then, install performance-enhancing modules like AdvAgg or BigPipe and configure them according to your hosting capacity. If your host supports it, implement Redis or Memcached to reduce database load.
Also, before uploading product images or banners, resize them to the exact display dimensions using image editing software and compress the file size with tools like TinyPNG or ImageOptim. It would be best to avoid uploading high-resolution or oversized media files; also, remember to periodically audit the /sites/default/files/ directory and remove any unused or orphaned media.
3. Build content types and fields with reusability and simplicity in mind
Before creating a new content type, check whether an existing one can serve the same purpose. Make sure to reuse existing fields whenever possible instead of creating duplicates; for example, you can use a single “Product Description” field across multiple product types.
We also recommend using taxonomy terms to categorize content, such as product types, collections, or tags. Avoid hardcoding content into themes or blocks, and do not create content types that serve only a single page.
4. Create role-based user permissions and audit access regularly
Lastly, don't forget to go to “People” > “Roles” and create distinct roles such as “Store Manager,” “Product Editor,” and “Content Writer.”
Assign each role only the permissions necessary for their tasks. For example, do not allow content editors to administer modules or site configuration. Every 3 to 6 months, make sure to review all user accounts and permissions and remove users who are no longer active.
Seamlessly migrate to Drupal!
LitExtension can safely transfer your data to unlock more growth on Drupal.

How to Use Drupal: FAQs
What is Drupal, and how do you use it?
Drupal is a free and open-source content management system (CMS) that allows individuals and organizations to build websites, blogs, and even complex web applications. You can use Drupal to build and manage your site by installing it on a web server, selecting and customizing a theme, creating pages and content types, and installing additional modules for extended functionality.
Is Drupal good for beginners?
Yes and no. Drupal is highly flexible and capable, but it comes with a steeper learning curve compared to simpler CMS platforms like WordPress (check out Drupal vs WordPress comparison here). However, if you're willing to invest time into learning its concepts, then Drupal can be a very rewarding tool even for beginners.
How to work with Drupal for beginners?
Beginners should start with the basics: learn how to install Drupal, create content (pages and articles), manage menus, and install themes. From there, it's useful to explore how blocks work, how to use modules to extend features, and how to use Views to display content in custom ways.
Make use of the Drupal User Guide and video tutorials to practice each concept step by step. Don't rush into custom coding until you're comfortable with the interface.
How to start with Drupal?
To start using Drupal, you'll first need a domain name and hosting provider that supports PHP and MySQL (or a local development setup). Install Drupal either manually or through a one-click installer (like with Bluehost), then log into your admin panel. From there, install a theme, start adding pages and blog posts, and experiment with layout tools and modules to extend your site. Focus on one feature at a time until you gradually build confidence in using Drupal.
Final Words
We’ve just walked you through the key steps of how to use Drupal, along with practical tips to keep your site running smoothly. Hopefully, this Drupal tutorial will give you the clarity and confidence to make the most of this platform!
For more information, check out our Drupal review and join our Facebook Community.

